Ubuntu Precise’s package for ImageMagick is currently at version 6.6.9.7. In my PHP application, I take a transparent PNG, scale it down, then write it back out. I found that this version had a bug that caused the transparent edges of the PNG to get a dirty black background applied to them, and this problem was fixed by the time Ubuntu Raring’s version 6.7.7.10 of ImageMagick was released. So this post is about how to install Raring’s ImageMagick package into Precise.
Start by installing build pre-requisites:
sudo apt-get update
sudo apt-get install build-essential fftw3-dev liblcms2-dev liblzma-dev fakeroot perlmagick
sudo apt-get build-dep imagemagick
Download the sourcecode for ImageMagick from Raring by using the download links on this page
wget https://launchpad.net/ubuntu/raring/+source/imagemagick/8:6.7.7.10-5ubuntu2.1/+files/imagemagick_6.7.7.10.orig.tar.bz2
wget https://launchpad.net/ubuntu/raring/+source/imagemagick/8:6.7.7.10-5ubuntu2.1/+files/imagemagick_6.7.7.10-5ubuntu2.1.debian.tar.bz2
wget https://launchpad.net/ubuntu/raring/+source/imagemagick/8:6.7.7.10-5ubuntu2.1/+files/imagemagick_6.7.7.10-5ubuntu2.1.dsc
Now use dpkg-source to unpack that sourcecode for you and apply the patches:
dpkg-source -x imagemagick*.dsc
Enter that unpacked directory:
cd imagemagick-6.7.*
Edit debian/rules in your favourite text editor, find the build-stamp section and add parameters to the command-line for “./configure” that change the quantum to Q8 (meaning that ImageMagick will use the faster 8-bit pipeline internally instead of the slow Q16 one) and disable TIFF support. TIFF support requires libtiff5 which I couldn’t be bothered porting to Precise:
MagickDocumentPath="/usr/share/doc/imagemagick" ./configure --with-quantum-depth=8 --without-tiff \
Edit the install scripts to replace references to Q16 modules to Q8:
sed -i 's/Q16/Q8/' debian/libmagickcore5.install
sed -i 's/Q16/Q8/' debian/libmagickcore5-extra.install
Remove the dependency upon libtiff5-dev:
sed -i 's/libtiff5-dev//' debian/control
Disable running the test-suite (which takes forever):
export DEB_BUILD_OPTIONS=nocheck
Now, from the imagemagick-6.7.7.10 folder, build the package. The options mean don’t clean the source before build, the source is unsigned, changes are unsigned, and don’t build source packages (just binary packages):
dpkg-buildpackage -rfakeroot -nc -us -uc -b
Now you should have a full set of .deb files for ImageMagick in the parent directory! Change into the parent directory and install those:
cd ..
sudo dpkg -i *.deb
Since I wanted to be able to use ImageMagick from PHP, I also needed to install the newer version of php5-imagick to go along with it. Similar process:
sudo apt-get install cdbs
sudo apt-get build-dep php5-imagick

wget http://archive.ubuntu.com/ubuntu/pool/universe/p/php-imagick/php-imagick_3.1.0~rc1-1build2.dsc
wget http://archive.ubuntu.com/ubuntu/pool/universe/p/php-imagick/php-imagick_3.1.0~rc1.orig.tar.gz
wget http://archive.ubuntu.com/ubuntu/pool/universe/p/php-imagick/php-imagick_3.1.0~rc1-1build2.debian.tar.gz

dpkg-source -x php-imagick_3.1.*.dsc
cd php-imagick-3.1.*

dpkg-buildpackage -rfakeroot -nc -uc -b
cd ../
sudo dpkg -i php5-imagick*.deb
Then I restarted Apache so PHP could reload and pick up the new extension:
sudo service apache2 restart
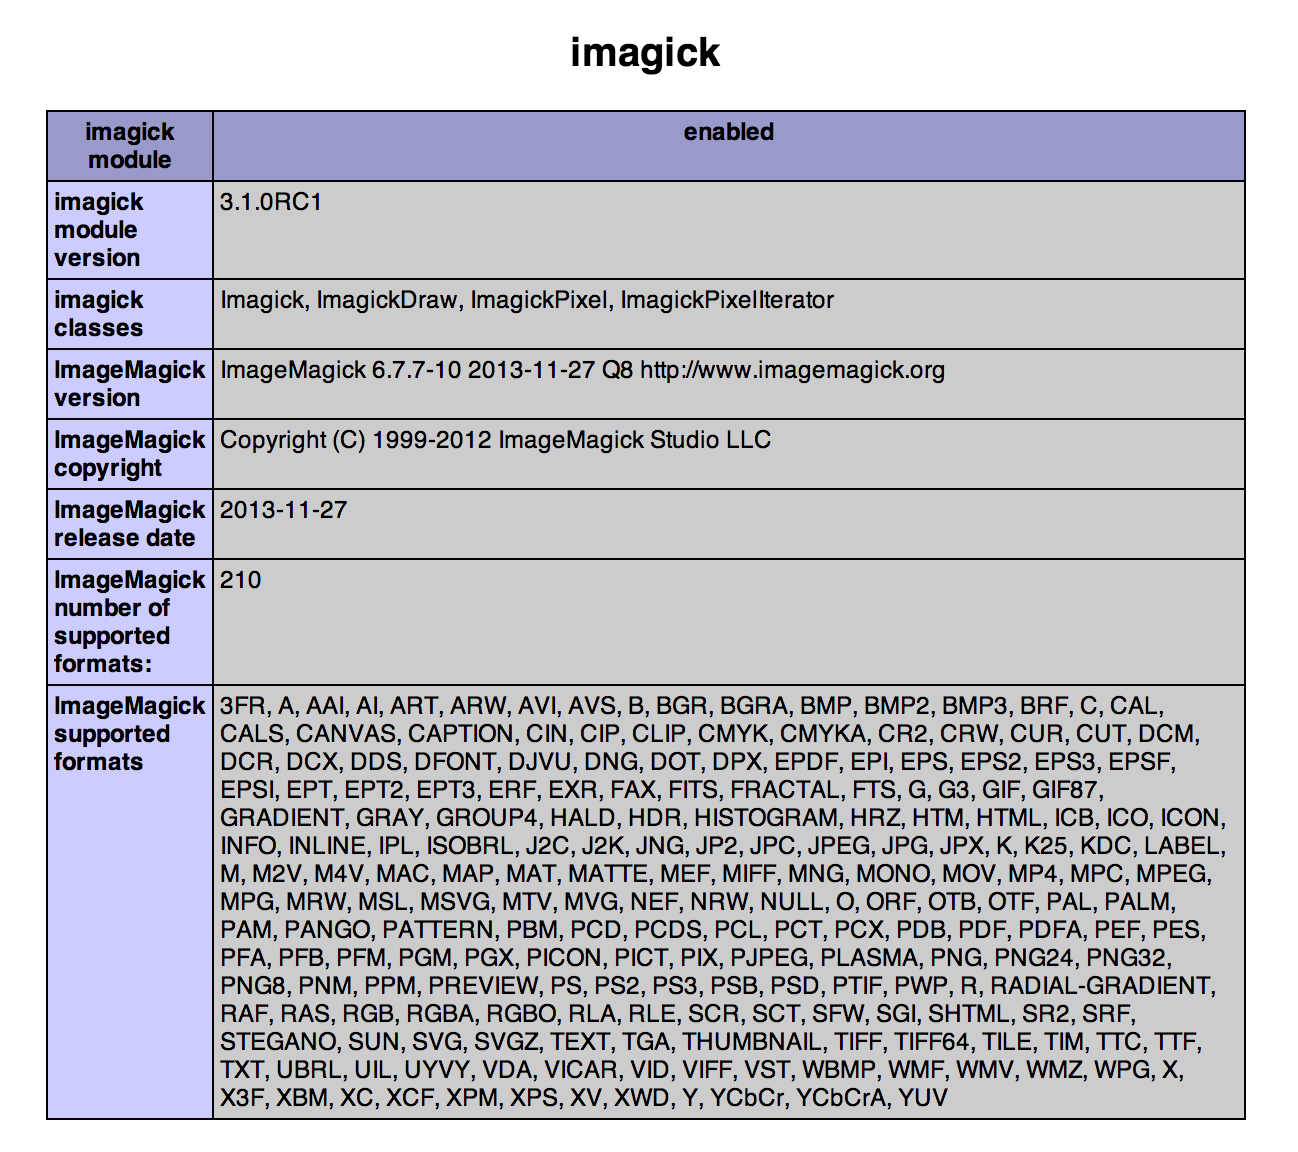
And finally, according to PHP’s phpinfo(), I had the newer version of ImageMagick running!