I wanted to emulate MIPS guests on my Proxmox hypervisor so that I could do some security research on router firmware. Unfortunately, Proxmox has customised some of the QEMU packages and their dependencies, which makes it impossible to install the standard Debian qemu-system-mips package.
To solve this, we need to build a modified version of Proxmox’s QEMU package from source.
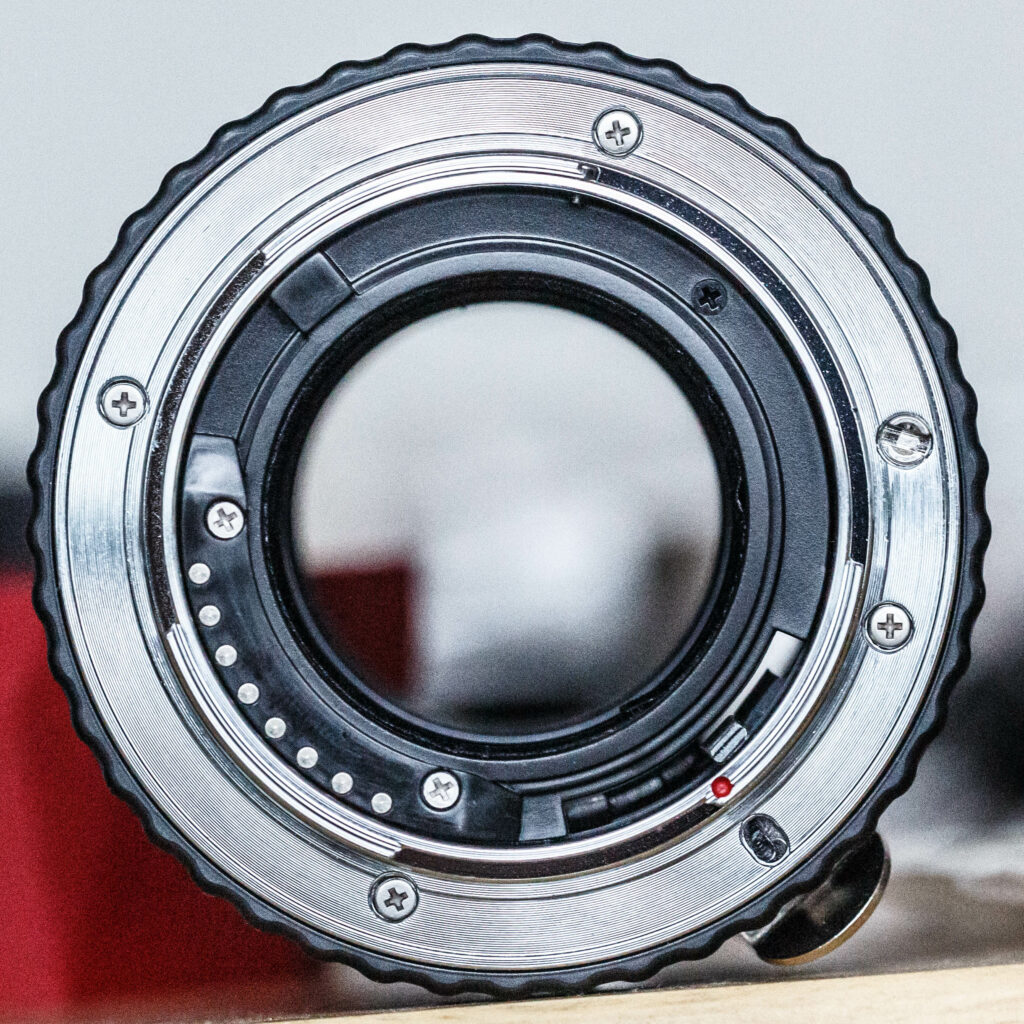
So you want to 3D-print a camera accessory like a lens adapter, extension tube, or a custom lens? You’ll need a lens mount design to go along with that!
We’ll clone the required dimensions from the mount found on a lens (for ‘male’ mounts) or camera (for ‘female’ mounts). One way to get an example of both the male and female mount at the same time is to buy an extension tube for your desired mount, e.g. I’ve found the ones from Meike to be good. Avoid tubes with plastic mounts as these are less accurate and may have draft angles that make them difficult to measure. Get a tube that has electronic contacts (for autofocus) so that you can use the dimensions of those as a reference as well.
You’ll need a pair of calipers for measuring the lens dimensions.
For this example I’ll show the process of modelling a Sony A lens’s ‘male’ mount using Fusion 360.
Start by taking a reference photo of your lens mount. Be sure to align your photo straight-on with the mount so that the image isn’t skewed. If you can stand far away from the mount and zoom in when you take the photo this gets you closer to an “orthographic perspective”, which means that features won’t appear to erroneously grow larger when they’re closer to your camera.
If you’re using OCLP (OpenCore Legacy Patcher) on an old Mac in order to upgrade beyond the officially-supported macOS version to macOS Monterey instead, Xcode 13.2.1 will crash on launch with the error “The application “Xcode” can’t be opened, 6″. The crash report gives this cause:
I’ll assume you already have Proxmox 7.2 installed. You also need a real Mac available in order to fetch the OSK key.
Ventura now requires that your CPU has support for AVX2, so for Intel your CPU would have to be at least as new as Haswell. However, I have added the CryptexFixup kext to work around this restriction and allow Ventura to be used even on CPUs that don’t have AVX2 support (and merely support SSE 4.2 and AVX1). Note that the AMD graphics card drivers won’t work in this situation, and other apps that assume AVX2 is present could break too! Please see the CryptexFixup readme for details.
Modern AMD CPUs also support AVX2 and should work with this guide.
Since Ventura is still in closed Developer Beta, you need to be an Apple Developer and have access to a Mac (or Mac VM) to download it.
I’ll assume you already have Proxmox 7.2 installed. You also need a real Mac available in order to build the installer and fetch the OSK key.
Your Proxmox host computer’s CPU must support AVX2 (a new restriction in Ventura), so for Intel your CPU must be at least as new as Haswell. Older CPUs will panic and reboot while trying to boot the installer.
Modern AMD CPUs also support AVX2 and should work with this guide.
Since Ventura is still in Beta and support for it is preliminary in OpenCore, don’t expect full functionality (Beta software makes for a poor daily-driver).
Regular fans for 3D printers have just two wires, power and ground, and we vary the average supply voltage to the fan using PWM to change its speed.
However 4-wire computer fans like Noctuas are different, these fans expect a steady 12V power supply and a separate 5V PWM signal to set their speed. Check the pinout of your fan’s connector here:
Have you run out of room on your macOS VM’s disk? Here’s how you can expand it.
In the Hardware tab for your VM, select your disk and click the “resize disk” button at the top of the page. Enter the size increment in gigabytes (note, this is not the final size you want to achieve, it is the amount the disk will grow by).
I’ll assume you already have Proxmox 7 installed. You also need a real Mac available in order to fetch the OSK key.
Your Proxmox host computer’s CPU must support SSE 4.2, so for Intel your CPU must be at least as new as Nehalem, which was the first CPU generation to bear the “Core” i5/i7 branding. Older CPUs will cause Illegal Instruction crashes when apps/extensions attempt to use these missing instructions.
Modern AMD CPUs also support SSE 4.2 and will work with this guide.
Have you ever generated GPG keys, loaded them into your YubiKey, and then thrown away/erased your computer? You’ll discover that when you take your YubiKey to a new computer, GPG refuses to automatically import your key when running --card-status.
The common wisdom on the Internet is that this is because YubiKeys (and Smart Cards in general) don’t store your public keys at all, they only store your private keys, so you must import your public keys from a backup or a public keyserver instead. If you don’t have such a backup, you’re screwed.
However, I investigated this and found that this common wisdom wasn’t true. I was able to recover my public keys from my YubiKey 4 even on a brand new, erased computer. Here’s how you can, too.
Since Monterey is still in closed Developer Beta, you need to be an Apple Developer and have access to a Mac (or Mac VM) to download it.
Your Proxmox host computer’s CPU must support SSE 4.2, so for Intel your CPU must be at least as new as Nehalem, which was the first CPU generation to bear the “Core” i5/i7 branding. Older CPUs will cause Illegal Instruction crashes when apps/extensions attempt to use these missing instructions.
Modern AMD CPUs also support SSE 4.2 and will work with this guide.