
In this guide I’ll explain how you can run Tails as a VM in Proxmox while retaining the persistence feature, and keeping support for Proxmox backups and snapshots.
Firstly, note that running Tails as a VM defeats a lot of the security features it offers, since you now need to trust the hypervisor to be secure. The VM’s memory could be swapped to disk in the host’s swapfile or persisted in a guest snapshot (if the “include RAM” option is ticked), which will leak the contents of the guest onto the host’s persistent storage, including secret encryption key material.
Consider your threat model carefully. If you don’t mind if the guest’s secrets are leaked to the host, and you just want to use Tails for its secure Tor browser environment, running it as a VM may be a reasonable choice. For me I consider this setup to be useful for e.g. submitting anonymous bug reports to companies that may not be thankful for them.
Create the VM
Create a new VM. During creation, set the CD to “do not use any media”. On the System tab, set the BIOS to OVMF (UEFI) and the Machine to Q35 (this is just my preference), add an EFI disk, and set SCSI Controller to “VirtIO SCSI single”. On the Disks tab, use the trashcan icon to remove the root disk (we’ll be replacing it with a Tails USB image later).
From the Tails website, download a USB stick image (e.g. using wget):
https://tails.boum.org/install/download/index.en.html
Expand the size of that image to suit your needs for persistent storage space, but it should be at least 8GB:
truncate -s 16G tails-amd64-4.14.img
Now import it as a disk to your VM:
# Like so:
qm importdisk <vmid> tails-amd64-*.img <storage name>

# e.g.:
qm importdisk 108 tails-amd64-4.14.img local-lvm
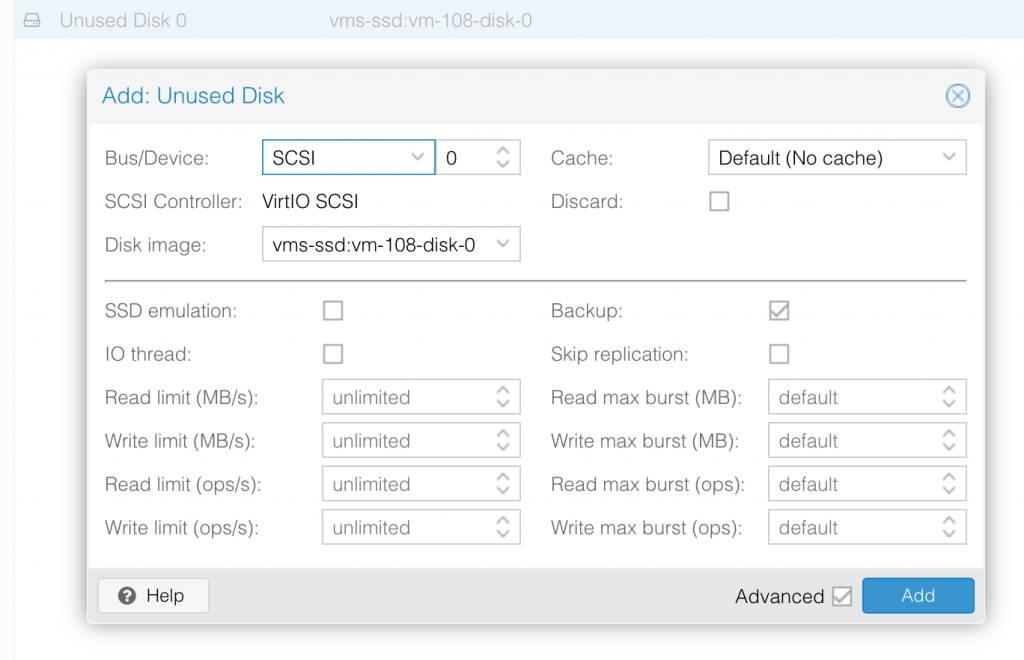
This will add it to your VM’s “hardware” tab as an “unused disk”. Click that unused disk and then click the “Edit” button at the top of the page. Set it to be attached to SCSI 0:
Tails only wants to boot from a USB flash drive, so we need to replace this SCSI drive with a USB flash drive. Since Proxmox doesn’t support this natively, we need to do it using the VM “args” instead.
Run qm showcmd 1xx --pretty (replace 1xx with your VM ID) to see the command Proxmox will use to launch the VM. In that output, find the definition Proxmox created for the SCSI drive, specifically these two -drive and -device lines:
qm showcmd 108 --pretty
...
   -drive 'file=/dev/zvol/rpool/vms/vm-108-disk-0,if=none,id=drive-scsi0,format=raw,cache=none,aio=native,detect-zeroes=on' \
   -device 'scsi-hd,bus=scsihw0.0,channel=0,scsi-id=0,lun=0,drive=drive-scsi0,id=scsi0' \
Now edit your VM’s config file (in /etc/pve/qemu-server/1xx.conf), and add a new “args:” line to it.
Firstly we’ll mark the original SCSI disk as read-only so the guest doesn’t accidentally try to modify it simultaneously with the USB version of the same backing file:
-set drive.drive-scsi0.readonly=on
Now we’ll add a -drive argument that mimics the original -drive argument we got from showcmd. We just need to change the “id” argument of the original to “drive-usb0”:
-drive 'file=/dev/zvol/rpool/vms/vm-108-disk-0,if=none,id=drive-usb0,format=raw,cache=none,aio=native,detect-zeroes=on'
Finally, we attach this drive as a new “usb-storage” removable flash drive. This has “bootindex” set to 1 so it’ll become the new default boot drive:
-device 'usb-storage,drive=drive-usb0,bootindex=1,removable=on'
Put those all together on one line like so:
args: -set drive.drive-scsi0.readonly=on -drive 'file=/dev/zvol/rpool/vms/vm-108-disk-0,if=none,id=drive-usb0,format=raw,cache=none,aio=native,detect-zeroes=on' -device 'usb-storage,drive=drive-usb0,bootindex=1,removable=on'
Tails should now boot successfully!
Enabling persistence
Tails is now capable of automatically resizing the partition table to fill the root disk we expanded, so to set up persistence you only need to click this button on the boot screen as normal.

Thank you very much, i can use Batocera on Proxmox with your tips 😉
Hello,
First, thanks !
Doesn’t works here, when i import with qm importdisk :
importing disk ‘tails-amd64-4.14.img’ to VM 107 …
Rounding up size to full physical extent 4.00 MiB
4.00 MiB… why ? 😐
Ok find it sorry
truncate -s 16384 tails-amd64-4.14.img
Forgot M for -s 16384M 😉
Thank you!!1
It works but can’t setup the persistence into Tails
“Error creatig partition on /dev/sdb: Failed add parition to device /dev/sdb (Unable to satisfy all constraints on the partition)”
Sorry about that, I must have been testing with a disk image that was already partitioned. I’ve added a new section to the end of the blog now that should fix that issue up.
Yep it works !
Thanks 🙂
Tested and get the same error:
“Error creatig partition on /dev/sdb: Failed add parition to device /dev/sdb (Unable to satisfy all constraints on the partition)”
I wish this guide was a little more simple to understand. im having a hard time following it. Can you make a youtube video please?
Sorry, it takes too much time to keep a video tutorial up to date as the software gets updated, so I avoid producing those.
Hi Nicholas,
thanks a lot – great work, it works nicely in my Proxmox 7.1-6 environment.
Persistence for language settings, browser bookmarks, installed software and many more works smoothly, only the display-size / screen-resolution becomes lost each after a reboot or shutdown.
There is probably no way to get this fixed?
Keep on tooooooring 😀
so everything worked through the persistent storage, gives an error that says “Tails is running from non-USB / non-SDIO device”. config and everything modified etc… at a loss for why. What should I check to see if this is done as USB?
I ran through the instructions again using the latest version of Tails and it worked fine, so most likely your “args” line in your VM config is incorrect. Please share it.
Hello , many thanks for your tutorial.
Following the instructions will bring me to boot Tails , but it will hung up immediately as soon as it switches graphically with those 3 horizontal dots.
It light up the first of this 3 dots and dies there. sending an ESC key with the console , will return a blinking cursor on the top left corner of the console frame. Any ideas in what’s wrong? ..many thanks
That’s strange, it boots fine for me from this stage (although it does take a minute or two at the three-dots stage).
I’ve updated the instructions to reflect that Tails now automatically resizes the root partition, so that we don’t need to use “gdisk” to edit that (so if you were doing that, this might fix it).
I’ve noticed that TAILS can often be quite twitchy about booting on this setup, I’ve had installs that once in a while would stall for up to several minutes at loading initramfs. And others (including some of the same ones) that just wouldn’t boot right once in a while for some reason.
It’s often worth it to wait for a while when a TAILS VM running this way is acting strange. If it doesn’t eventually come unglued, try poking at it different ways. It may eventually work.
Case in point, while trying to upgrade to Tails 5.14 just now, the USB stick froze upon hitting the start screen, unless I booted it in “external hard disk” mode.
Twiddling with the options has kept me going sooo many times and I’ve been using this setup frequently for months at this point.
Thank you for this wonderful tutorial. Quick question on how to upgrade to the new version while retaining all persistence data
Hi I followed the instructions and eventually got it to work with my Proxmox 8 setup. However, I noticed the persistent method loads very slow compared to the ISO way (non-persistent). Is this happening to you as well? If so, is there any way to speed things up?
Hi, i noticed the same. The system is realy slow and i tested some vm configurations but nothing helped.
How to handle persistence storage while upgrading tails with new .img file?
If you keep updating tails, there would be no problem but if you miss few updates you need to reinstall tails with new img file.
How to move persistence storage to a new instillation?
May be mounting new “id=drive-usb0,format=raw ” and use tails install to usb option?
The only way I’ve been able to do a manual upgrade is to export the VM to an image, put it on a USB. Then use another USB with the newer version of Tails to upgrade the ‘old’ USB and persistent storage. Then you have to again create an image of the now upgraded USB and then do another import and configure as the article above explains.
It’s a pain and I assume there must be a better way within Proxmox, but I’ve been unsuccessful.
Would it be easier to put it on a real USB Stick and attach it to the VM?
I did everything accoirding to the tutorial, after a long time it boots up but with the following Error:
Partitioning Errors
Error were detected in the partitioning of your Tails USB stick.
Try reinstalling Tails. If the error persists, reinstall on a new USB Stick.
In Proxmox 9.1.1 I need to configure the args in the following way, because there is any -drive on my VM CMD
root@home:~# cat /etc/pve/qemu-server/100.conf
args: -blockdev ‘{“driver”:”raw”,”file”:{“driver”:”host_device”,”filename”:”/dev/pve/vm-100-disk-1″},”node-name”:”drive-usb0″}’ -device ‘usb-storage,drive=drive-usb0,bootindex=1,removable=on’
bios: ovmf
boot: order=ide2;net0
cores: 6
cpu: x86-64-v2-AES
efidisk0: local-lvm:vm-100-disk-0,efitype=4m,ms-cert=2023,pre-enrolled-keys=1,size=4M
ide2: none,media=cdrom
memory: 4096
meta: creation-qemu=10.1.2,ctime=1774811303
name: batocera
net0: virtio=BC:24:11:CD:B5:50,bridge=vmbr0,firewall=1
numa: 0
onboot: 1
ostype: l26
scsihw: virtio-scsi-single
smbios1: uuid=72082f4e-d35d-49ff-a362-cbe1e551f890
sockets: 1
unused0: local-lvm:vm-100-disk-1
vmgenid: 6157fbd8-1643-4473-b6c6-f699620b327f