
Recently I migrated my MacBook Pro into a Proxmox virtual machine to use as my daily-driver. This made for a rather large stepdown in IO performance, since my MacBook used an SSD, and Proxmox was using a RAIDZ1 array of spinning disks. On top of the IOPS penalty for spinning disks, there are currently no macOS drivers for the virtio SCSI paravirtual device, so we have to use IDE/SATA emulation instead, which is very slow (although this may change in the near future).
One way to improve things would be to use PCIe passthrough to pass through a whole physical SATA controller to the guest. This would eliminate almost all of the performance penalty of the virtualised SATA controller. But there’s a new option for drive passthrough: NVMe SSDs.
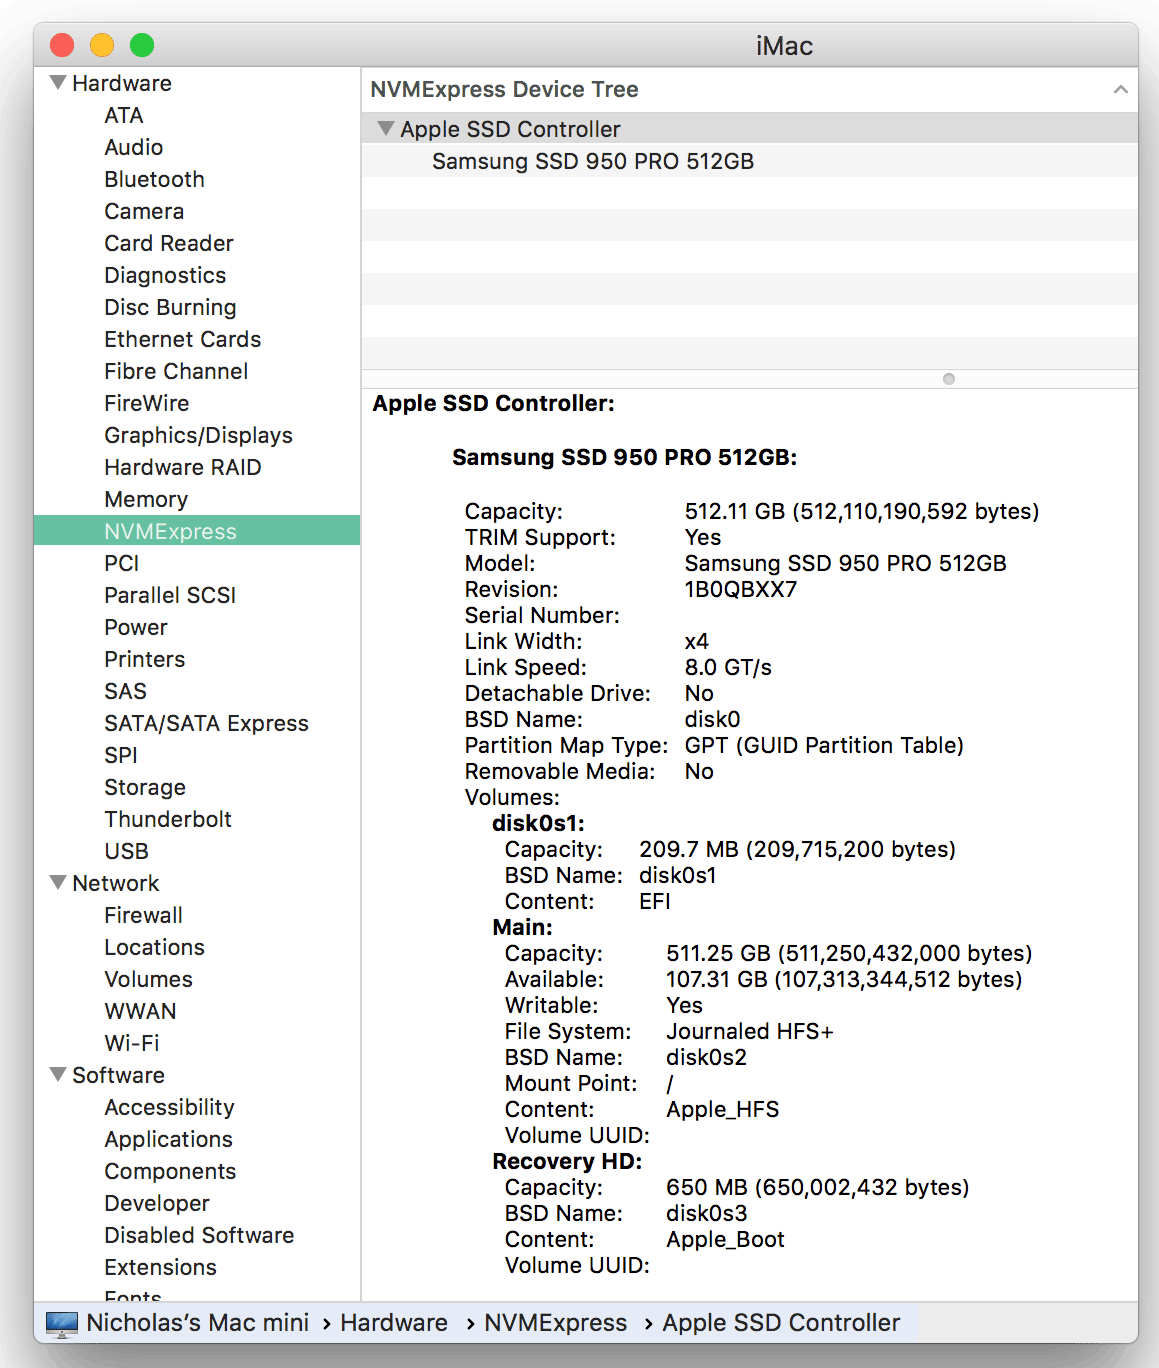
NVMe is a new standard for operating systems to communicate with a disk controller, which has been specifically designed to extract the most speed possible from SSDs. NVMe SSDs are PCIe devices (typically x4), so we can pass them straight through to macOS. I’m using the Samsung 950 Pro. You might also consider the faster 960 Pro.
The only missing piece of the puzzle is NVMe support in macOS Sierra. Thankfully, modern macs have begun shipping with NVMe SSDs inside, so we have an official Apple driver we can use. It just needs to be patched to accept our SSDs.
Note that in High Sierra, the built-in NVMe driver already supports most SSDs, and we don’t have to mess with it any more!
Using an NVMe SSD with no Mac support
Just a note that you can actually use an NVMe SSD without macOS seeing it as an NVMe drive, and so needing no special support for it, if you pass it through as a virtual SATA device in your VM’s configuration file, like so:
sata0: file=/dev/nvme0n1
This is a good option when you’re running the initial installer for macOS. However, by using this approach you’ll miss out on nearly all the performance benefits, so after installation, let’s patch a kext to add support for direct access instead.
Patching IONVMeFamily.kext
Note: With the release of High Sierra, this patch is no longer required! This is because High Sierra added native support for third party SSDs with 4k sector sizes
We can use a tool called “NVMeP” by Micky1979 (GitHub) to patch the vanilla IONVMeFamily.kext for us. You can download a binary version of that tool from InsanelyMac:
http://www.insanelymac.com/forum/files/file/604-nvmep/
Just run it with no arguments, it’ll find your vanilla kext and create a new patched version called “IONVMEFamilyBorg.kext” for you in the same directory.
To install it, we can just:
sudo mv IONVMEFamilyBorg.kext /System/Library/Extensions
sudo chown -R root:wheel /System/Library/Extensions/IONVMEFamilyBorg.kext
sudo chmod 755 /System/Library/Extensions/IONVMEFamilyBorg.kext
sudo touch /System/Library/Extensions
Now follow the Proxmox PCIe passthrough instructions to prepare Proxmox for passthrough support, and add your NVMe SSD to your /etc/pve/qemuserver/VM-ID-HERE.conf. I ended up adding this line to my config:
hostpci0: 03:00.0,pcie=1
Shut down your VM and start it up again. If successful, macOS should prompt you to initialise (erase/format) your new SSD (if it was empty), and it’ll appear in the System Information tool:
Replacing your main macOS drive with the SSD
I wanted to use this SSD disk as my new boot drive. I believe that booting from NVMe requires Clover/UEFI boot (SeaBIOS doesn’t support NVMe), so set that up first. For some reason macOS would freeze during boot if I booted from Clover when Clover was stored on the SSD, so I attached a little 1GB emulated SATA disk to the VM and installed Clover onto that instead. You can get the image of the Clover disk I used at the end of this article. This now works fine without using a separate drive
At this point I shut down the guest, and restarted Proxmox to make the SSD available to the host again. I then used “dd” on Proxmox to copy the contents of the guest’s hard drive onto the SSD. For my drives, that was: (don’t get this command wrong and overwrite the wrong device!)
dd if=/dev/zvol/tank/vm-100-disk-1 of=/dev/nvme0n1 bs=4M
Then I removed the old SATA drive from the guest’s configuration, and booted from the NVMe drive successfully!
Performance
While virtualised SSD performance certainly blows away spinning disks, there seems to be a significant performance hit in the guest when compared to benchmarking from the host. I don’t know if this is macOS’s fault, QEMU’s fault, or if this is my CPU’s fault (E5-2670, I’ve heard that newer CPUs have better virtualised IO performance).
Host random read performance using the “iops” benchmarking tool (though keeping in mind that thermal throttling is likely to have an impact and wasn’t controlled for):
# iops --num-threads 256 --time 4 /dev/nvme0n1
/dev/nvme0n1, 512.11 G, sectorsize=512B, #threads=256, pattern=random:
 512  B blocks: 107912.3 IO/s,  55.3 MB/s (442.0 Mbit/s)
   1 kB blocks: 105699.6 IO/s, 108.2 MB/s (865.9 Mbit/s)
   2 kB blocks: 102079.9 IO/s, 209.1 MB/s (  1.7 Gbit/s)
   4 kB blocks: 94101.5 IO/s, 385.4 MB/s (  3.1 Gbit/s)
   8 kB blocks: 91506.9 IO/s, 749.6 MB/s (  6.0 Gbit/s)
  16 kB blocks: 74230.0 IO/s,   1.2 GB/s (  9.7 Gbit/s)
  32 kB blocks: 28224.2 IO/s, 924.9 MB/s (  7.4 Gbit/s)
  65 kB blocks: 18445.9 IO/s,   1.2 GB/s (  9.7 Gbit/s)
 131 kB blocks: 9876.1 IO/s,   1.3 GB/s ( 10.4 Gbit/s)
 262 kB blocks: 6271.6 IO/s,   1.6 GB/s ( 13.2 Gbit/s)
 524 kB blocks: 3788.1 IO/s,   2.0 GB/s ( 15.9 Gbit/s)
   1 MB blocks: 2114.4 IO/s,   2.2 GB/s ( 17.7 Gbit/s)
   2 MB blocks: 1134.2 IO/s,   2.4 GB/s ( 19.0 Gbit/s)
Guest performance:
/dev/rdisk0, 512.11 G, sectorsize=512B, #threads=256, pattern=random:
 512  B blocks: 33601.3 IO/s,  17.2 MB/s (137.6 Mbit/s)
   1 kB blocks: 32527.2 IO/s,  33.3 MB/s (266.5 Mbit/s)
   2 kB blocks: 32214.6 IO/s,  66.0 MB/s (527.8 Mbit/s)
   4 kB blocks: 32708.1 IO/s, 134.0 MB/s (  1.1 Gbit/s)
   8 kB blocks: 32016.3 IO/s, 262.3 MB/s (  2.1 Gbit/s)
  16 kB blocks: 33145.8 IO/s, 543.1 MB/s (  4.3 Gbit/s)
  32 kB blocks: 32420.3 IO/s,   1.1 GB/s (  8.5 Gbit/s)
  65 kB blocks: 27379.1 IO/s,   1.8 GB/s ( 14.4 Gbit/s)
 131 kB blocks: 22739.9 IO/s,   3.0 GB/s ( 23.8 Gbit/s)
 262 kB blocks: 10347.5 IO/s,   2.7 GB/s ( 21.7 Gbit/s)
 524 kB blocks: 2588.7 IO/s,   1.4 GB/s ( 10.9 Gbit/s)
   1 MB blocks: 1326.3 IO/s,   1.4 GB/s ( 11.1 Gbit/s)
   2 MB blocks:  606.0 IO/s,   1.3 GB/s ( 10.2 Gbit/s)
I found that increasing the guest thread count by a factor of 4 allowed it to keep pace with host performance, but that’s a ton of threads (I don’t have any workloads that are that heavily parallel!)
If your old disk was larger than your new SSD
My old boot disk was 550GB, but my new SSD was 512GB. Obviously this would cause me to run out of space during the “dd” copy onto the SSD. To fix it, I took a backup of the disk (critical!), then used macOS’s Disk Utility to resize my drive’s main partition to end well within the 512GB limit. This causes macOS to add an empty partition at the end of the drive to use up that free space. This partition will end up being cut in half later, which we’ll need to repair. Then I shut down the guest and copied the contents of the disk onto the SSD using “dd” from the host. dd will complain that it ran out of space on the destination device, which is fine.
GPT format disks have a backup copy of some partition information at the end of the disk, which will now be missing. The blank partition that Disk Utility added will lie partially outside the disk. And the disk’s header will say that the disk is longer than it actually is. We can fix these problems using the repair tools in GPT fdisk (gdisk) against the SSD.
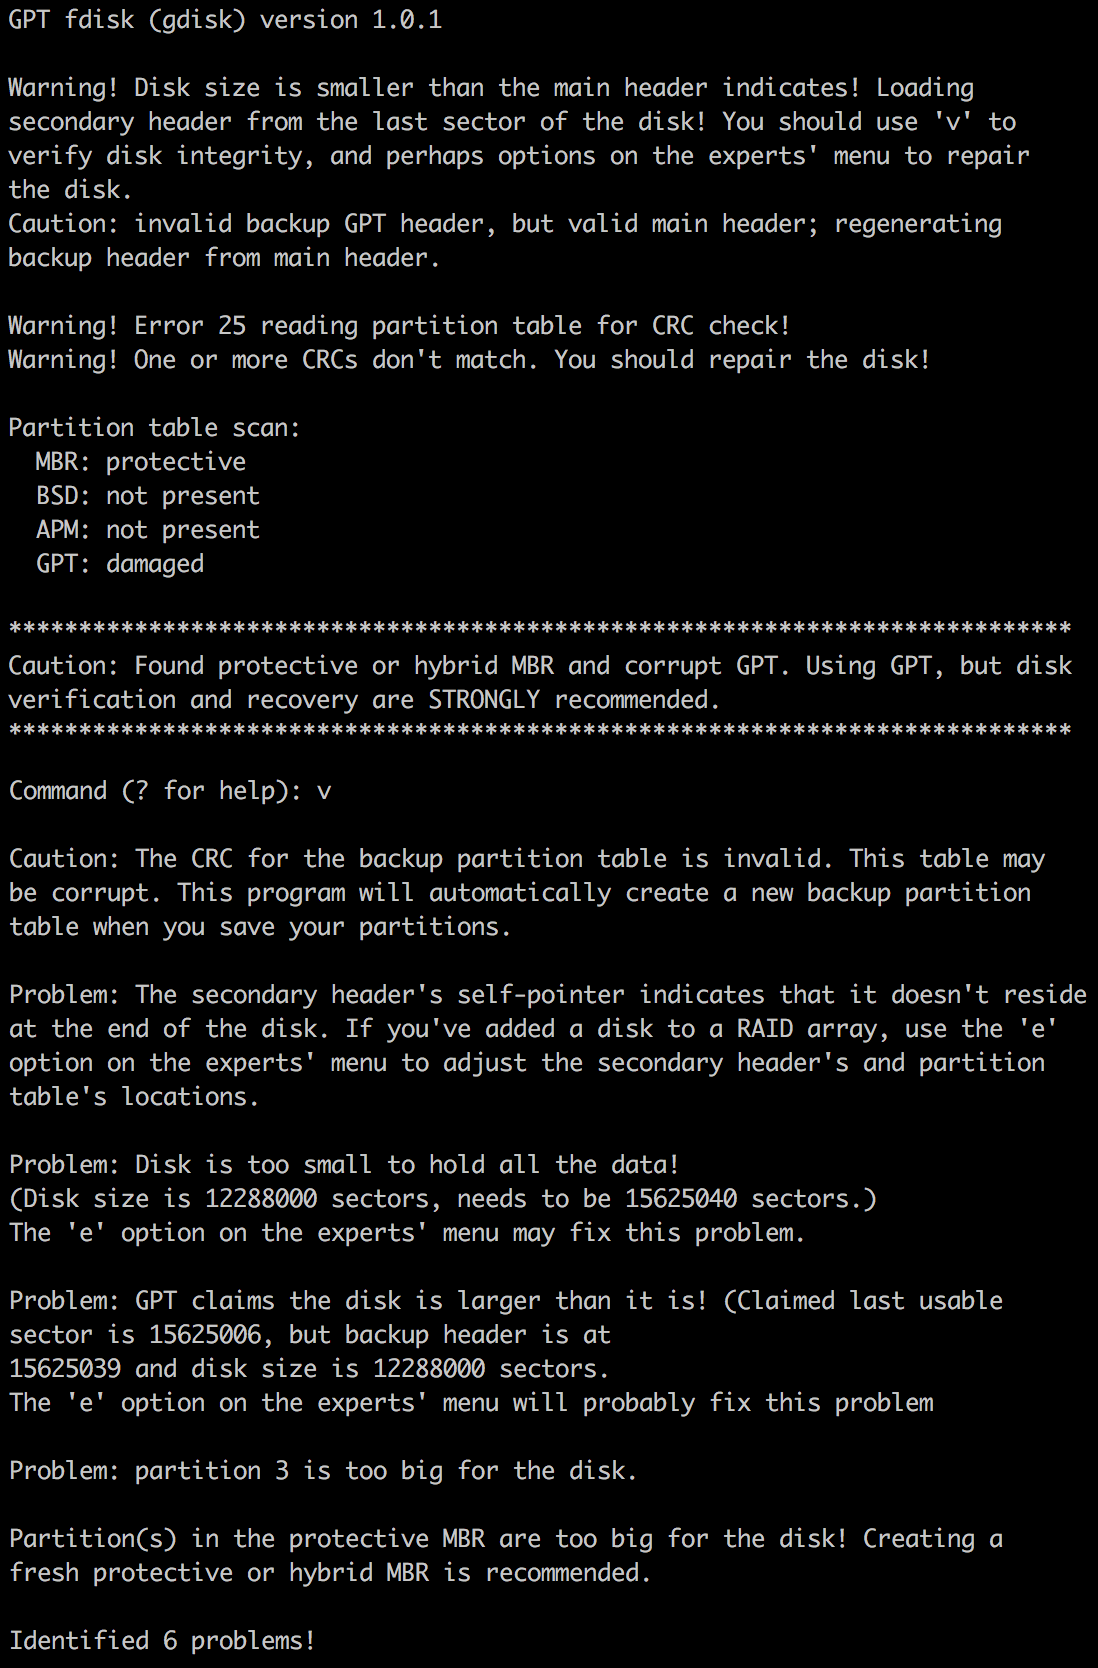
I used “p” to print the partition table, and identified that partition 3 was the empty partition at the end of the disk that I wanted to remove. I removed it with the “d” command. Then I used “x” to enter the expert menu and “e” to relocate the backup structures to the end of the disk properly. Finally I used “w” to write my changes to the disk. A quick check with “v” showed that everything was now hunky-dory.
Is it possible to install the kext into the boot image on your other article?
I’d like to just straight up install OSX on to a SSD.