
With the final release of Mojave, this tutorial is now out of date, see the new tutorial for installing Mojave instead!
This tutorial for installing macOS Sierra has been adapted for Proxmox 5 from Kholia’s GitHub project for installing into vanilla KVM. There is more documentation there which will help out with enabling extra features and diagnosing problems!
Requirements
I’ll assume you already have Proxmox 5.1 installed. You also need a real Mac available in order to download High Sierra from the App Store and build the installation ISO. Your Proxmox host computer must have an Intel CPU at least as new as Penryn (I believe you would need a a custom Mac kernel in order to use an AMD CPU).
First step: Create an installation ISO
On a Mac machine, download the macOS High Sierra installer from the App Store (this will download it into your Applications folder).
Check the size of the completed download. Some people will end up with a 16MB installer, and some will receive the full 5GB installer (nobody knows why yet). If you received the 16MB version, follow the instructions here to get the full 5GB version instead.
Now run this script in order to create HighSierra.iso from the installer. The ISO should get saved to your desktop. Upload the ISO to your Proxmox server’s ISO store (typically /var/lib/vz/template/iso).
Prepare a Clover image
We’ll be using Clover as a bootloader for High Sierra.
Download this Clover disk image (that I built using kholia’s build script from Clover r4428), unpack it, and upload it to Proxmox’s ISO store at /var/lib/vz/template/iso. Although it has a .iso file extension, this is actually a hard disk image. (I do it this way because Proxmox has nicer tools for storing and picking .iso files for us)
Fetch the OSK authentication key
macOS checks that it is running on real Mac hardware, and refuses to boot on third-party hardware. You can get around this by reading an authentication key out of your real Mac hardware (the OSK key). Run the first bit of C code from this page (you’ll need XCode installed) and it’ll print out the 64 character OSK for you. Make a note of it.
Every Mac uses the same OSK, so don’t be surprised if it doesn’t look like a random string!
Create the VM
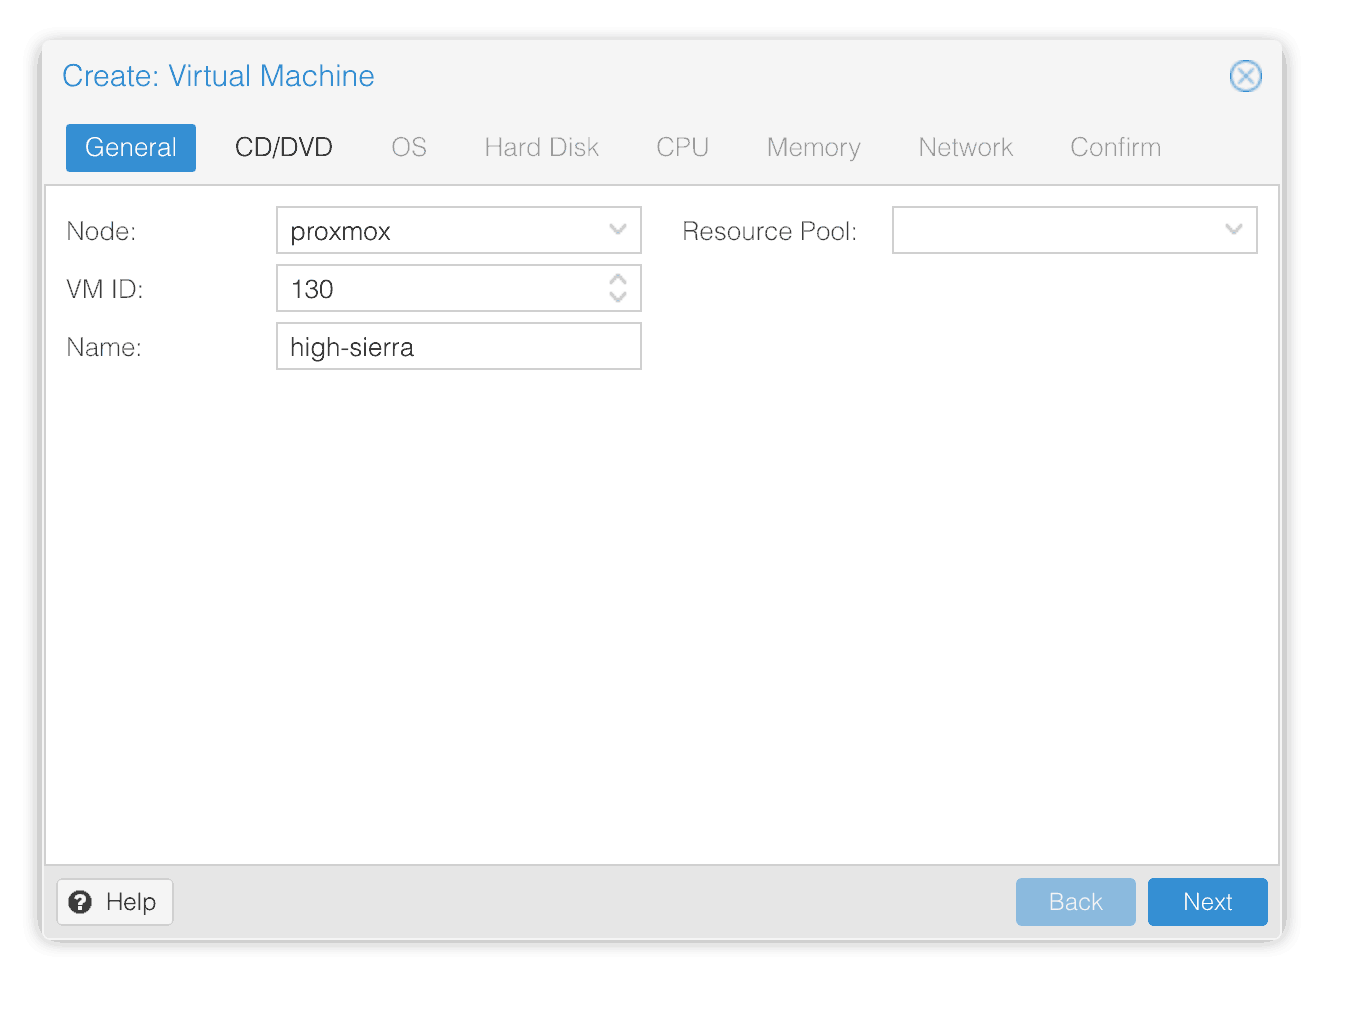
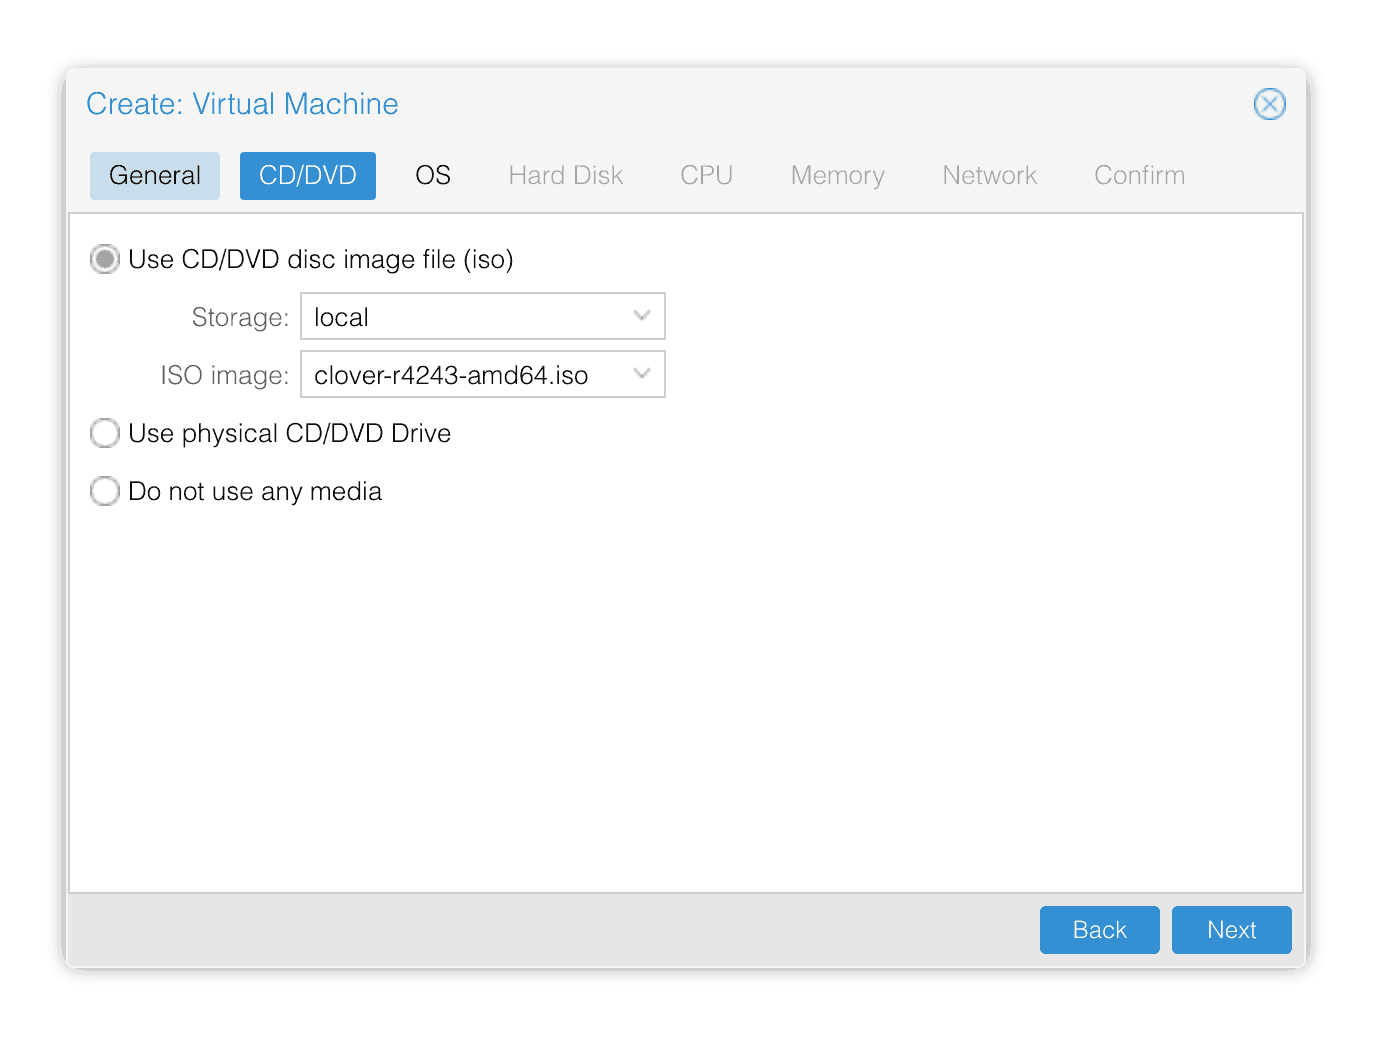
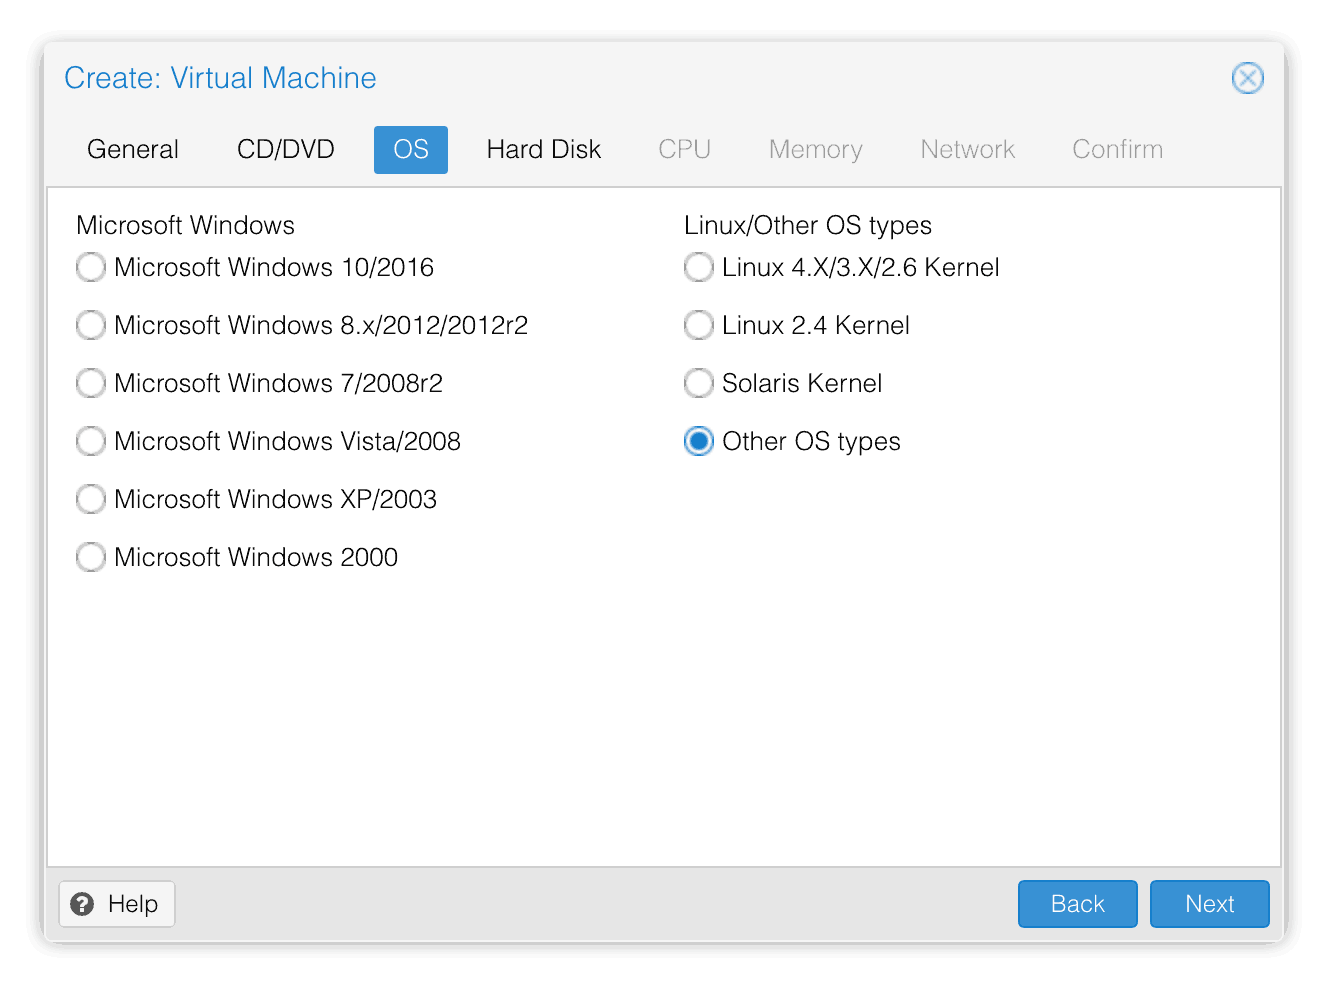
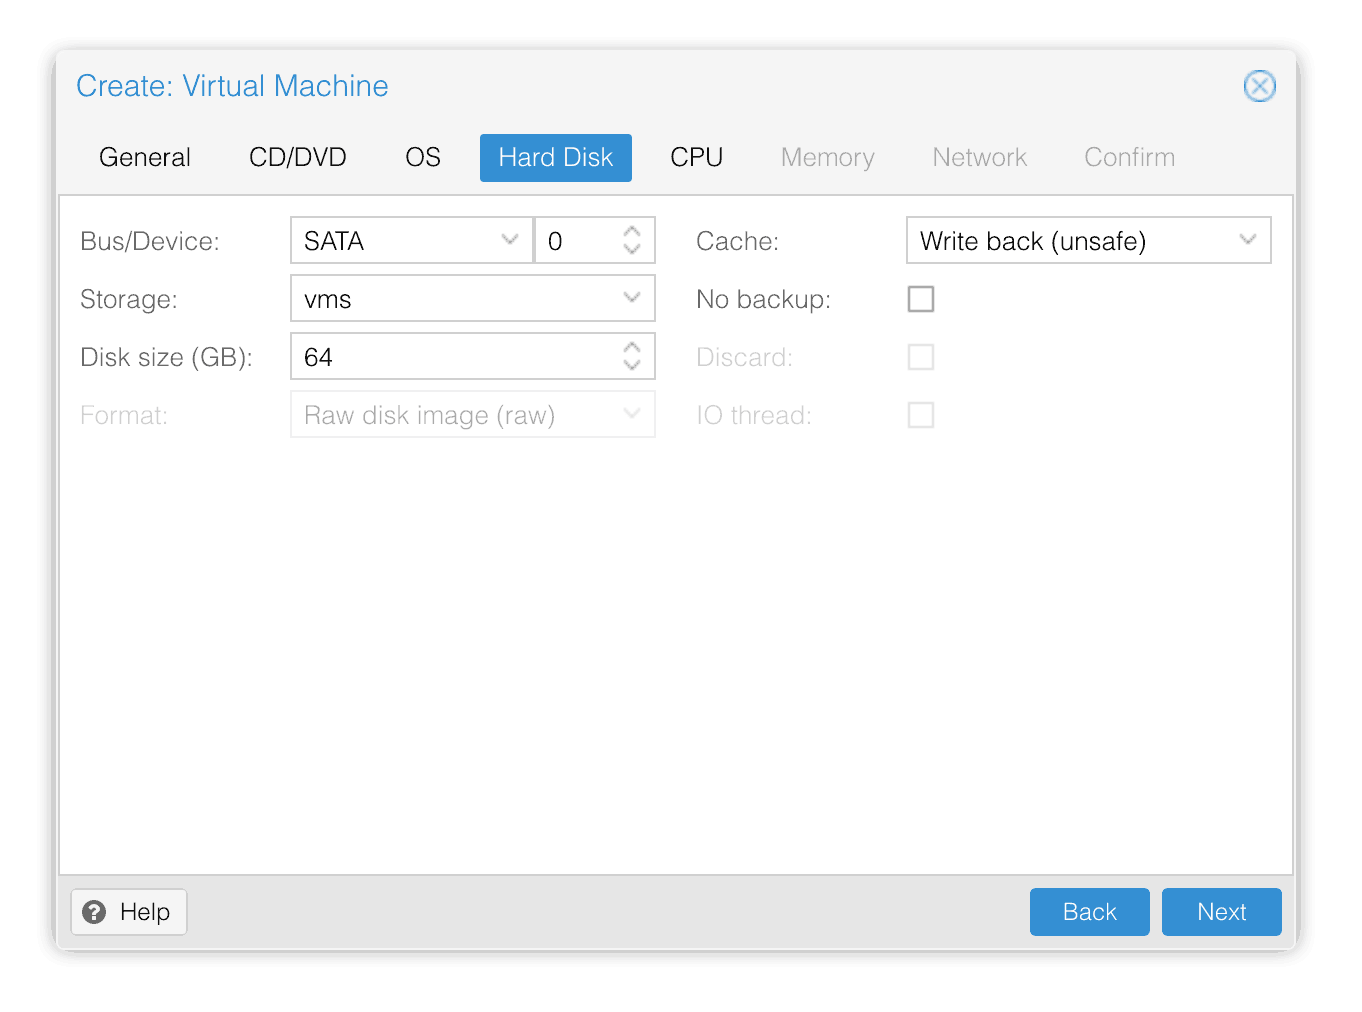
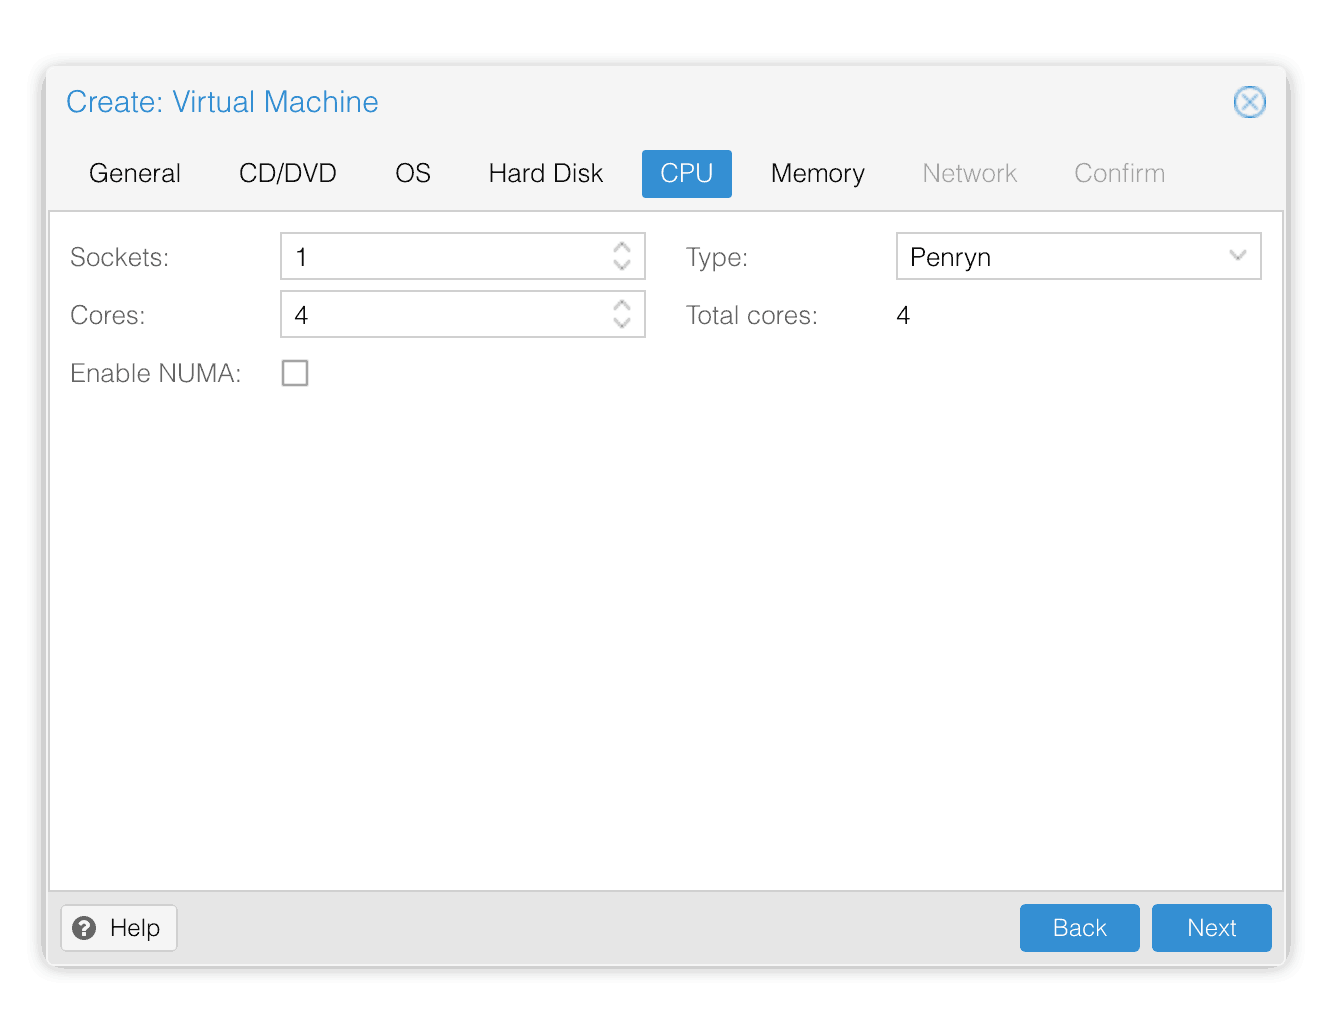
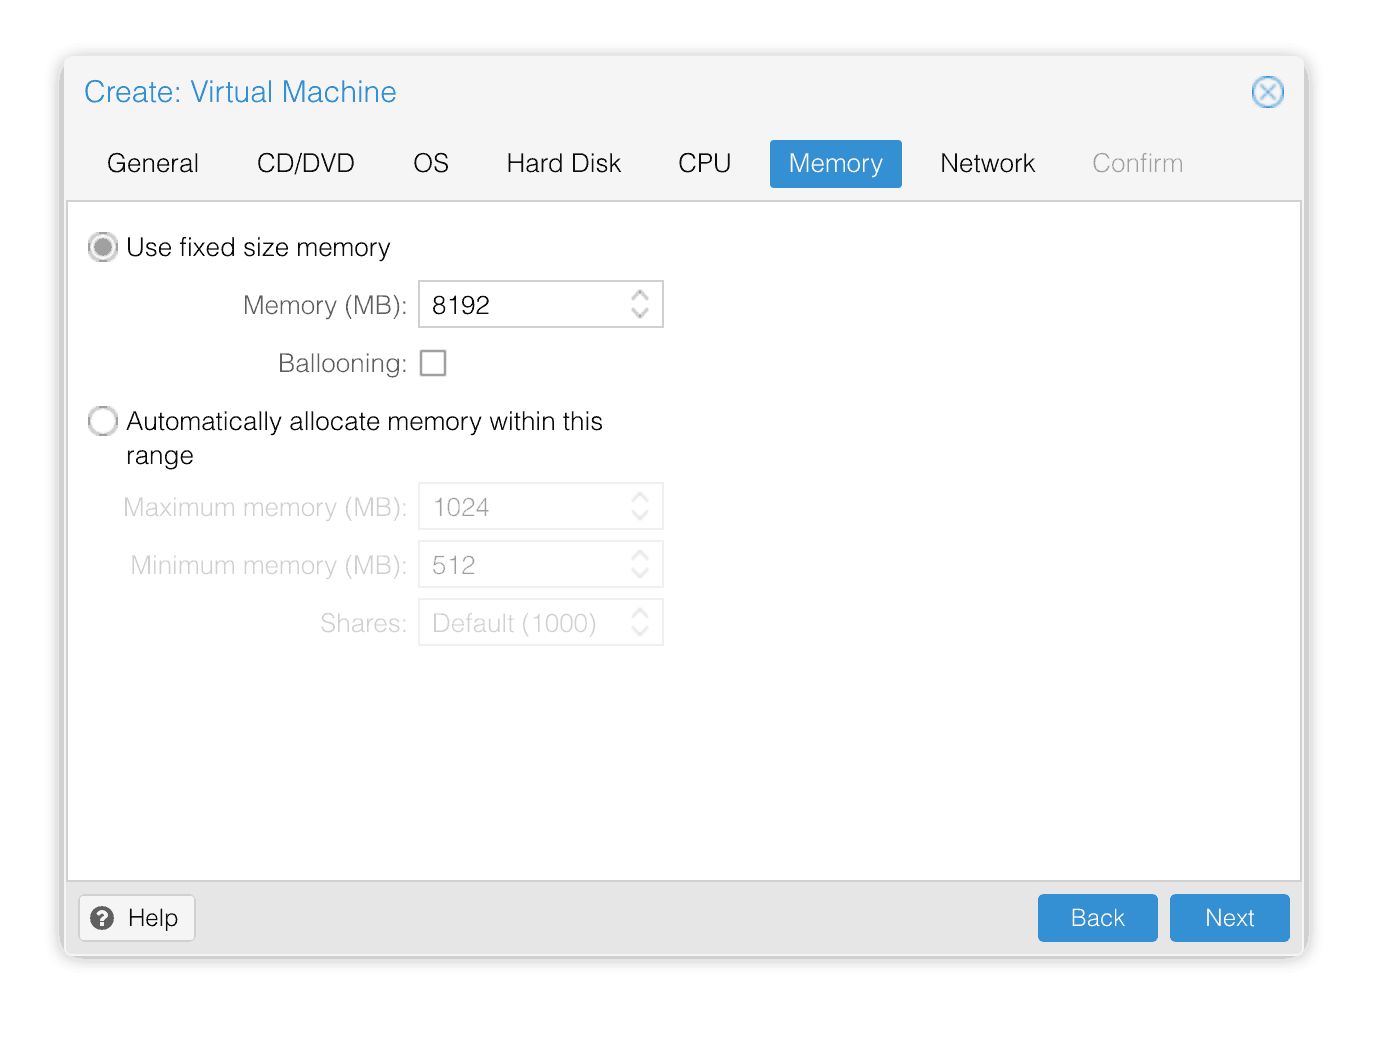
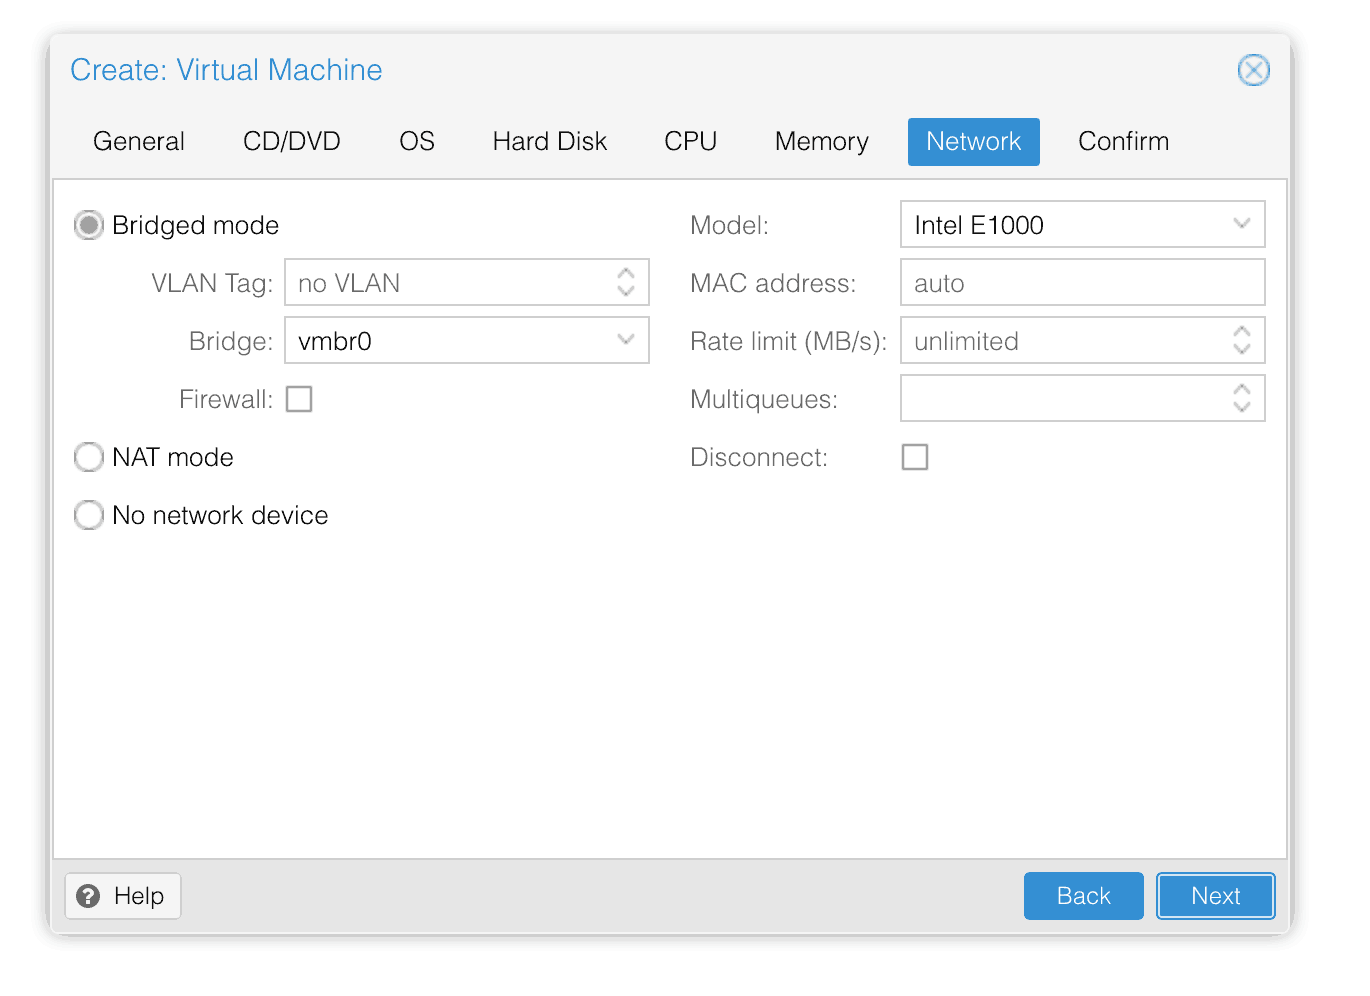
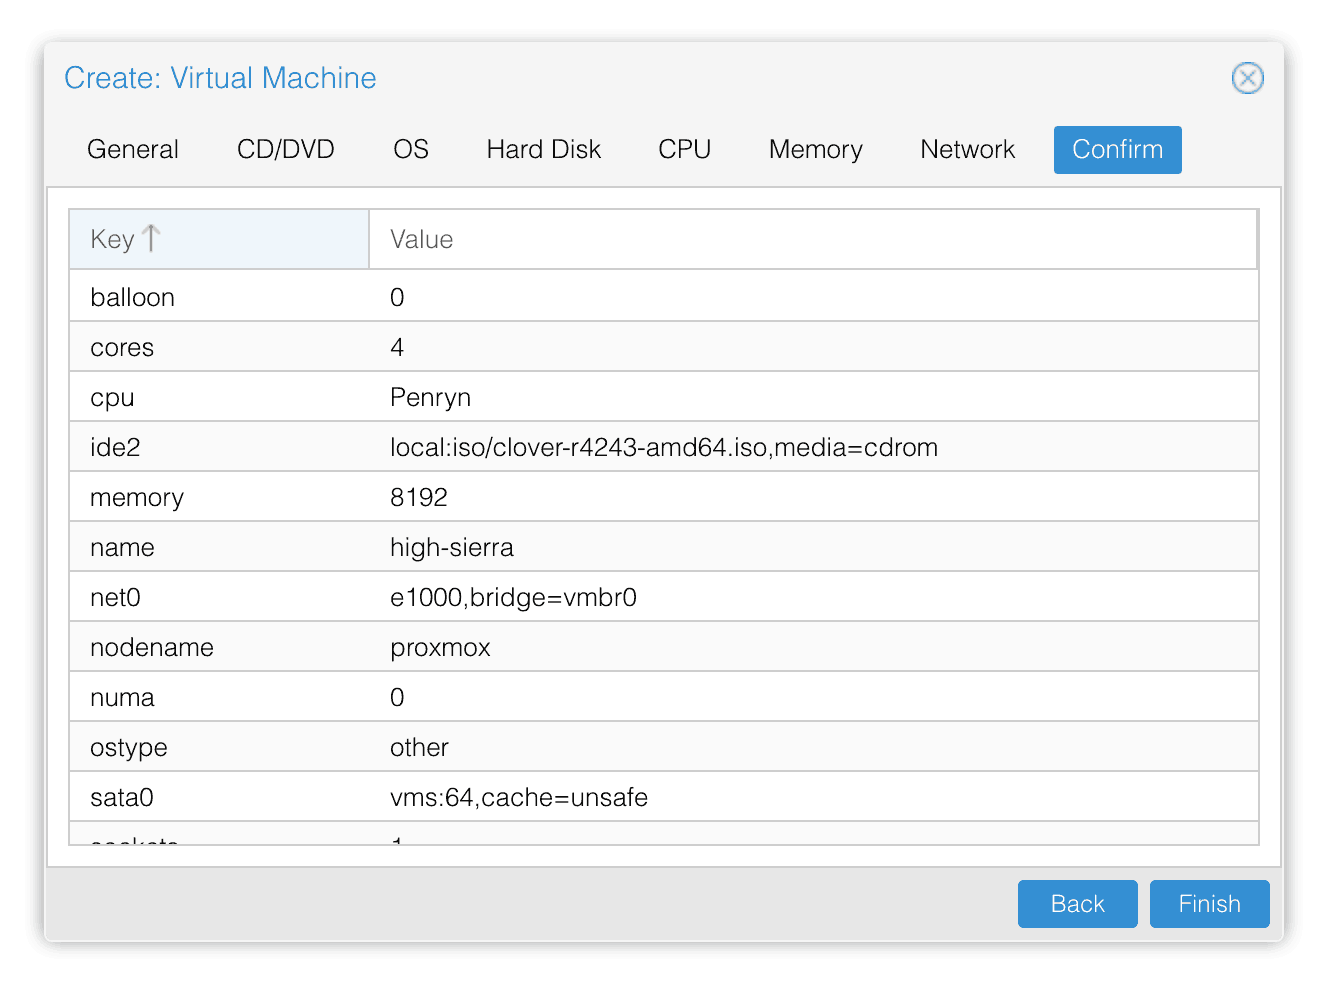
From the Proxmox web UI, create a new virtual machine as shown below.
In the Options page for the VM, make sure “use tablet for pointer” is set to “Yes”. Change “BIOS” to “OVMF (UEFI)”.
In the Hardware page for the VM, change the the Display to Standard VGA (std). Add a second DVD drive at IDE0, set it to use your HighSierra.iso. Add an “EFI Disk” too.
Don’t try to start the VM just yet. First, SSH into your Proxmox server so we can make some edits to the configuration files.
Edit /etc/pve/qemu-server/YOUR-VM-ID-HERE.conf (with nano or vim). Add these two lines, being sure to subtitute the OSK you extracted earlier into the right place:
machine: pc-q35-2.11
args: -device isa-applesmc,osk="THE-OSK-YOU-EXTRACTED-GOES-HERE" -smbios type=2 -cpu Penryn,kvm=on,vendor=GenuineIntel,+invtsc,vmware-cpuid-freq=on
Find the two lines that define the CDROM drives (ide0 and ide2), and remove the “,media=cdrom” part from both lines. Add “,cache=unsafe” in its place. If the Sierra boot option doesn’t appear in Clover later, try adding “,media=cdrom” back to the line for the Sierra ISO.
On the net0 line, change “e1000” to “e1000-82545em”. This variant is supported by OS X.
Return to the Options tab and change the boot order to put IDE2 (the Clover image) first.
Configure Proxmox
On Proxmox, run “echo 1 > /sys/module/kvm/parameters/ignore_msrs” to avoid a bootloop during macOS boot. To make this change persist across Proxmox reboots, run:
echo "options kvm ignore_msrs=Y" >>/etc/modprobe.d/kvm.conf && update-initramfs -k all -u
You must now install a patched version of Proxmox’s OVMF library in order to be able to boot High Sierra.
Install High Sierra
Now start up your VM.
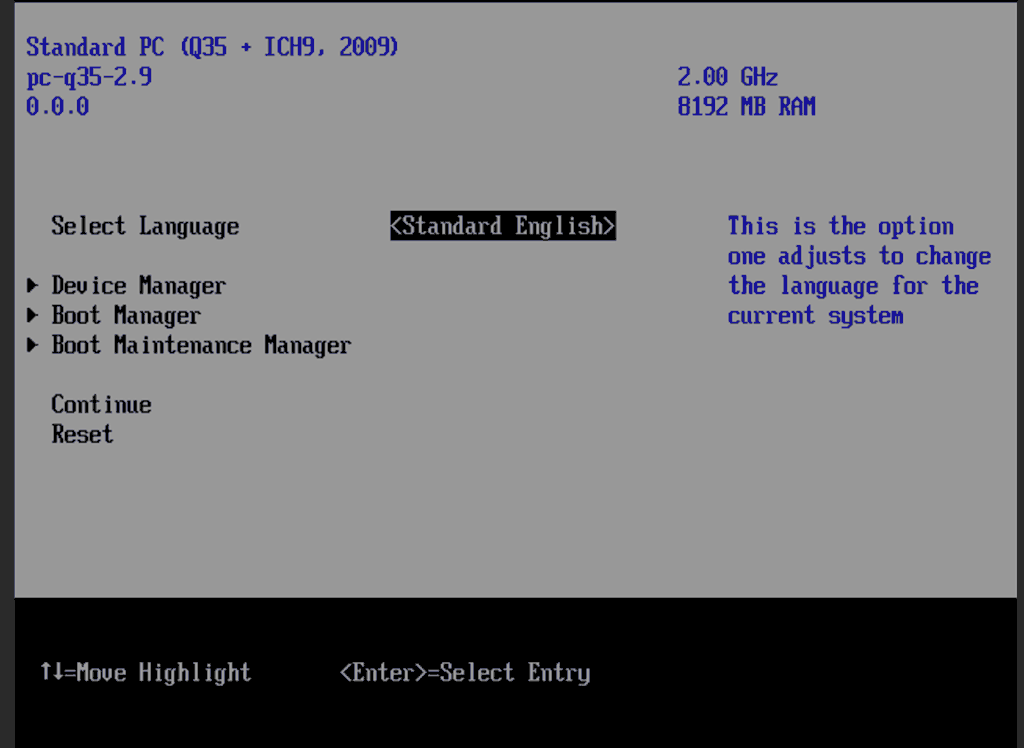
Go to the Console tab, quickly hit Escape at the Proxmox logo to enter the OVMF configuration. If your keyboard doesn’t work, leave the Console tab, stop the VM, start the VM, then re-enter the console tab. If pressing escape still doesn’t enter the menu, make sure you are using “machine: pc-q35-2.11” in your VM config and you do not have a USB keyboard defined in pve-q35.cfg (it seems that the OVMF menu only supports the default PS/2 keyboard).
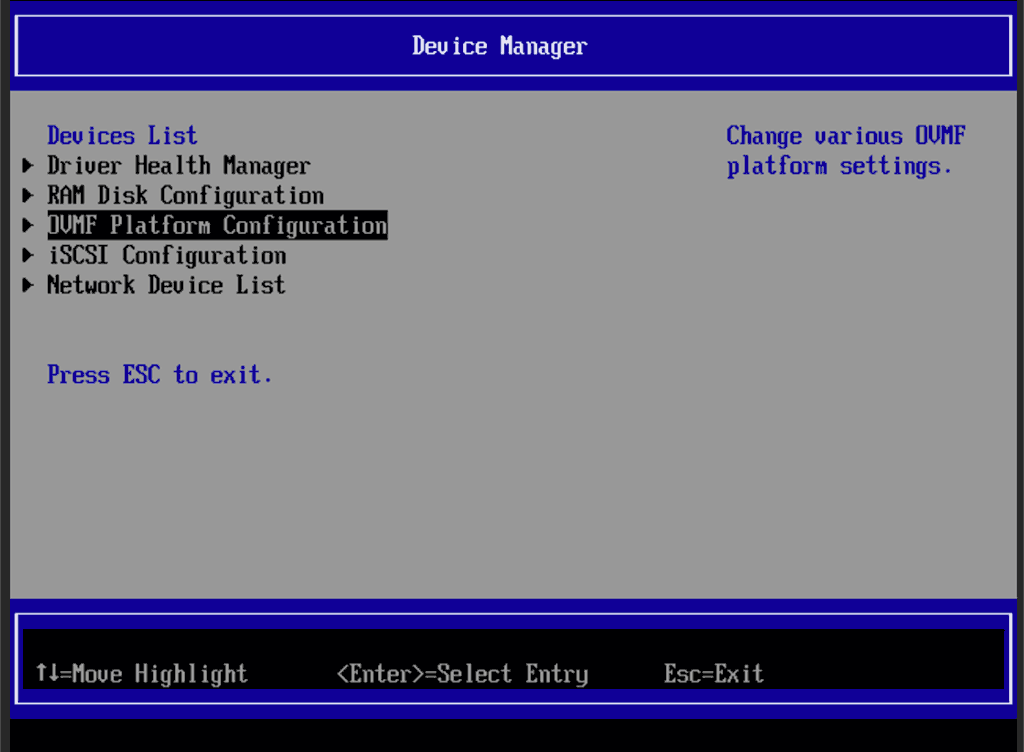
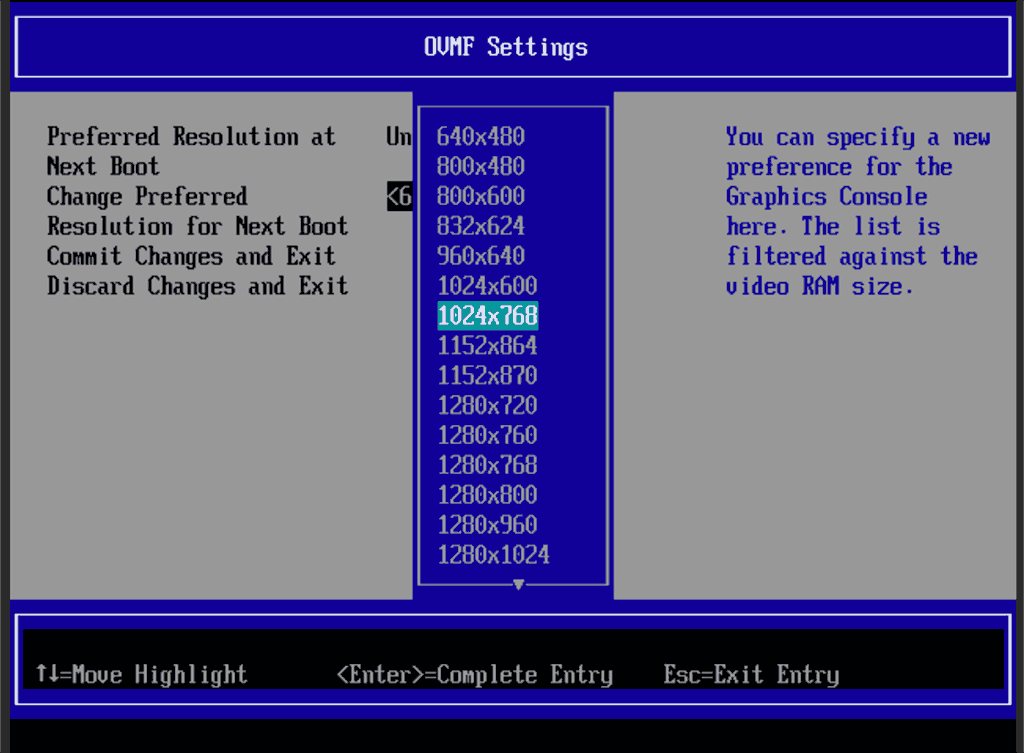
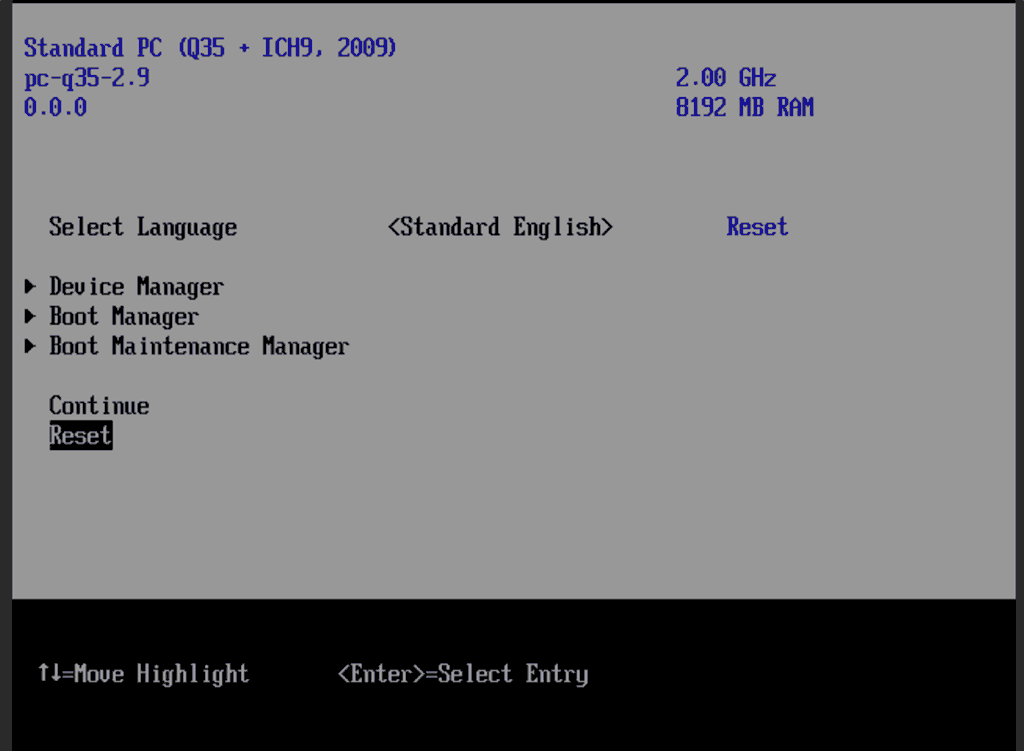
Follow the steps above to set the screen resolution to 1024×768 and “reset” to apply the new settings (not “continue”). This step is required to avoid scrambled graphics (Clover resolution must match OVMF resolution).
High Sierra doesn’t support QEMU’s PS2 keyboard and mouse, but it does support the USB tablet we’ve selected on the Options page (thanks to Jack H for the tip about the tablet!) Edit /usr/share/qemu-server/pve-q35.cfg and add a USB keyboard to the bottom of the file to replace the PS/2 one it would provide by default:
[device "keyboard1"]
 driver = "usb-kbd"
 bus = "ehci.0"
 port = "2"
(Port 1 is occupied by the USB tablet that Proxmox will provide for us)
We’ve added this to the config file instead of to the VM’s args directly. If we were to add it to the VM’s args, then when Proxmox constructs its call to KVM to launch the VM, the device definition would appear before the pve-q35.cfg file is included, which defines the USB busses. However, the device definition must appear after the definition of the USB bus that it refers to.
Note that this file is whitespace-sensitive, make you you don’t add any blank lines that have extraneous spaces on them.
Stop the VM and start it again to pick up this new keyboard config. It should now boot into Clover.
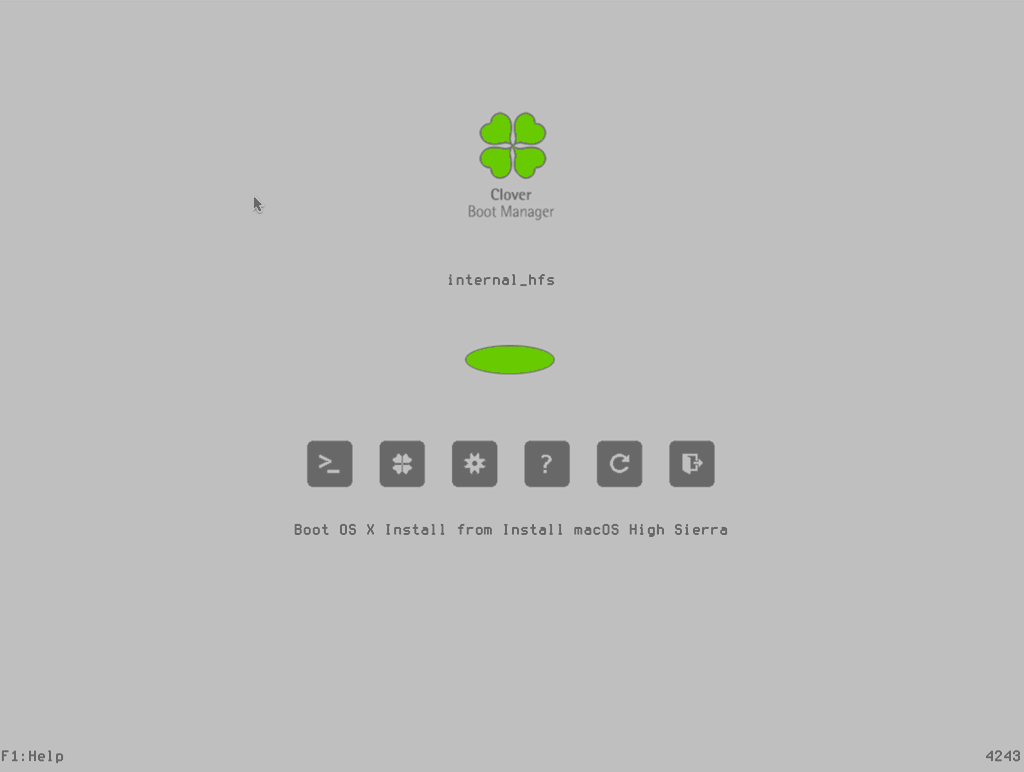
On Proxmox 5.2, there’s currently a problem where the resolution you chose in the UEFI menu doesn’t actually get applied when you initially boot to Clover, which will cause booting macOS to fail (scrambled progress bar followed by a hang). You can fix this by hitting Reset on your VM when you reach the Clover screen (not shutdown/start), and come back to Clover. After the reset, the resolution will be applied correctly. You’ll have to do this each time you Start the VM.
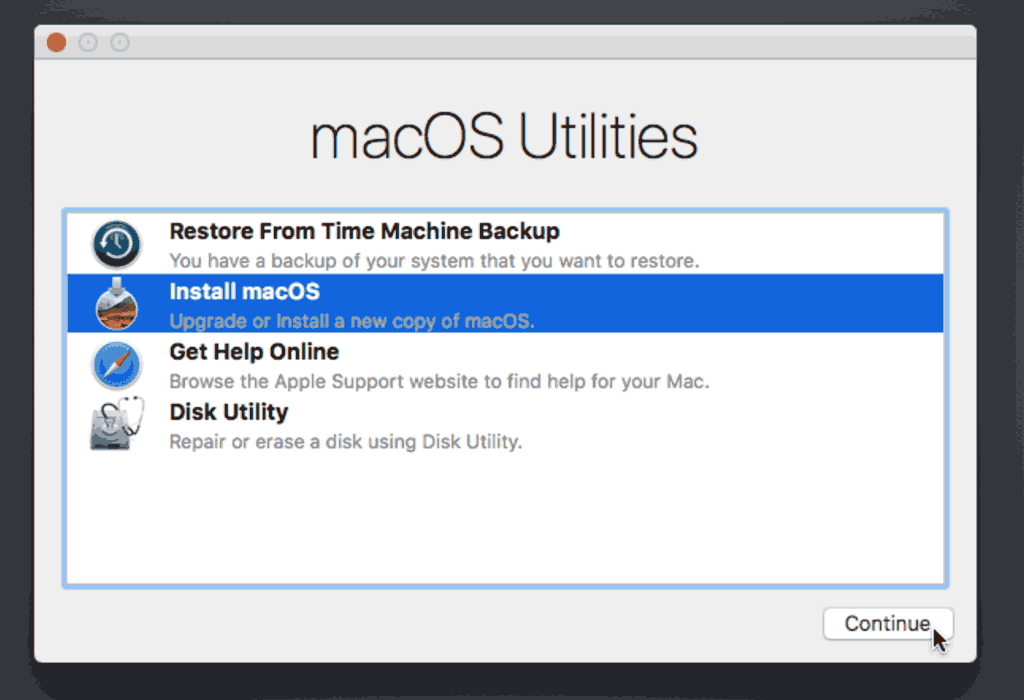
Press enter to boot the “Boot OS X Install from Install macOS High Sierra” entry and the installer should appear. Choose your language.
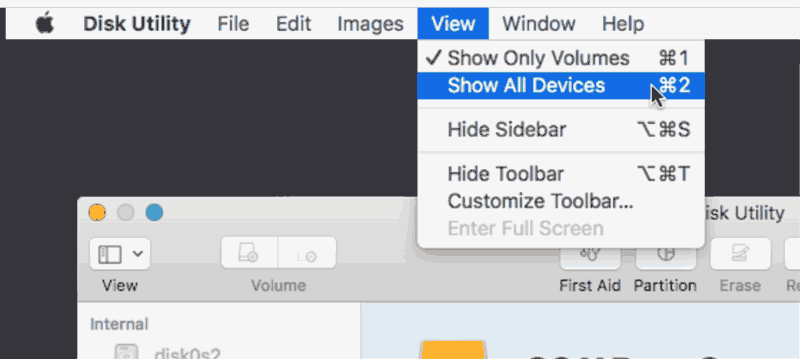
Our virtual hard drive needs to be erased/formatted before we can install to it, so select the Disk Utility option. Follow the steps below to format the disk:


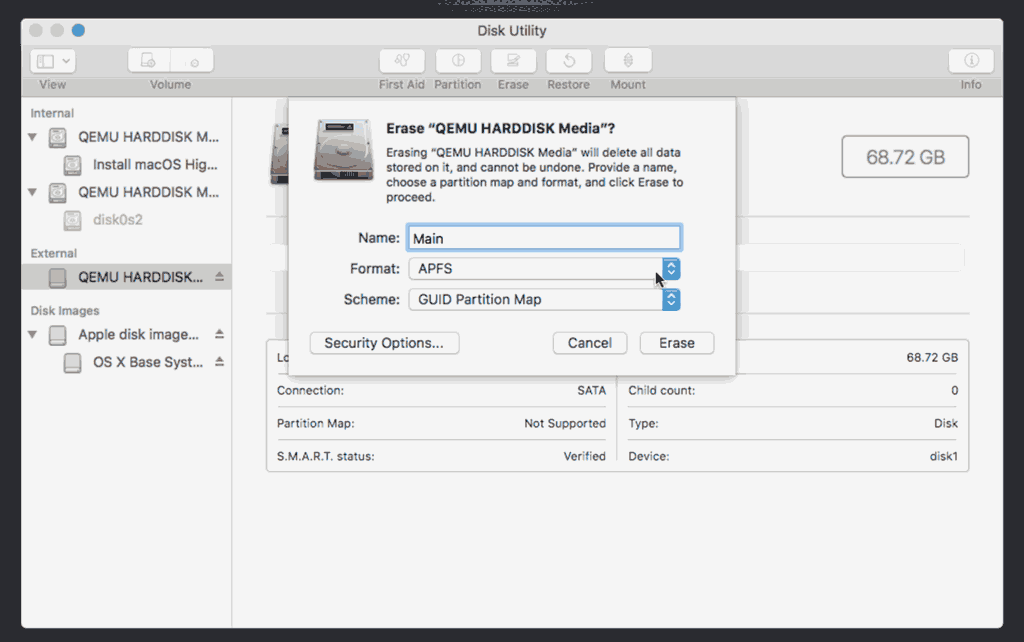
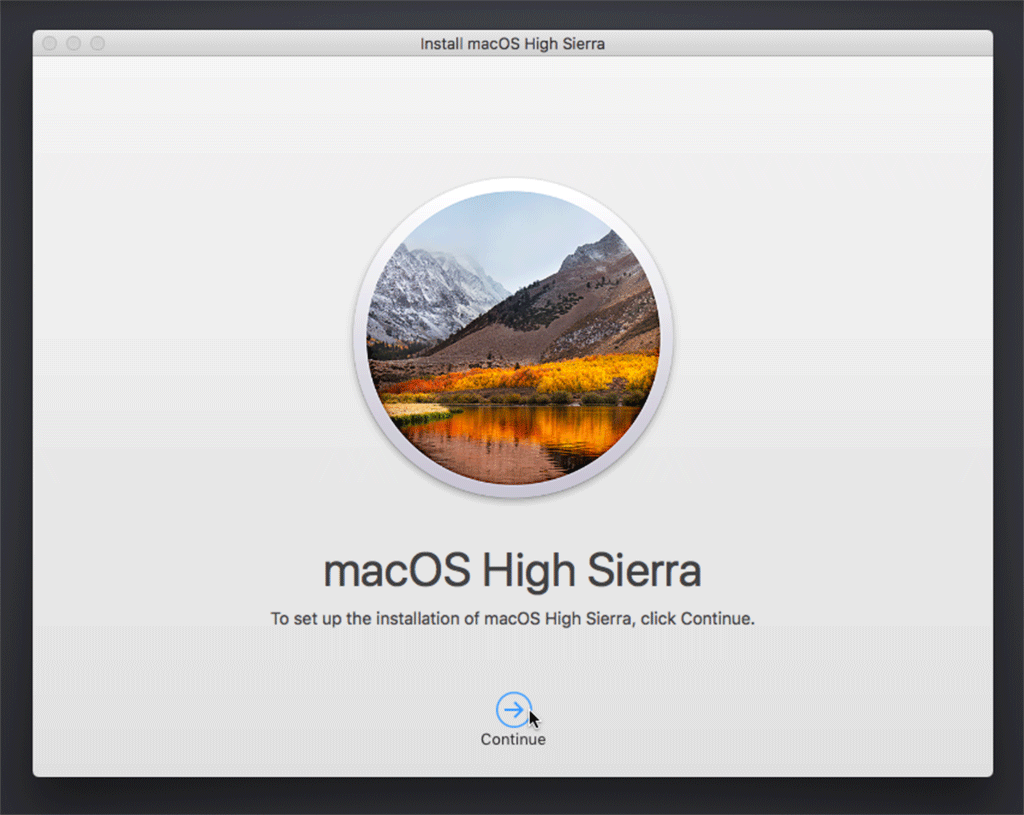
Now we’re ready to begin installation!
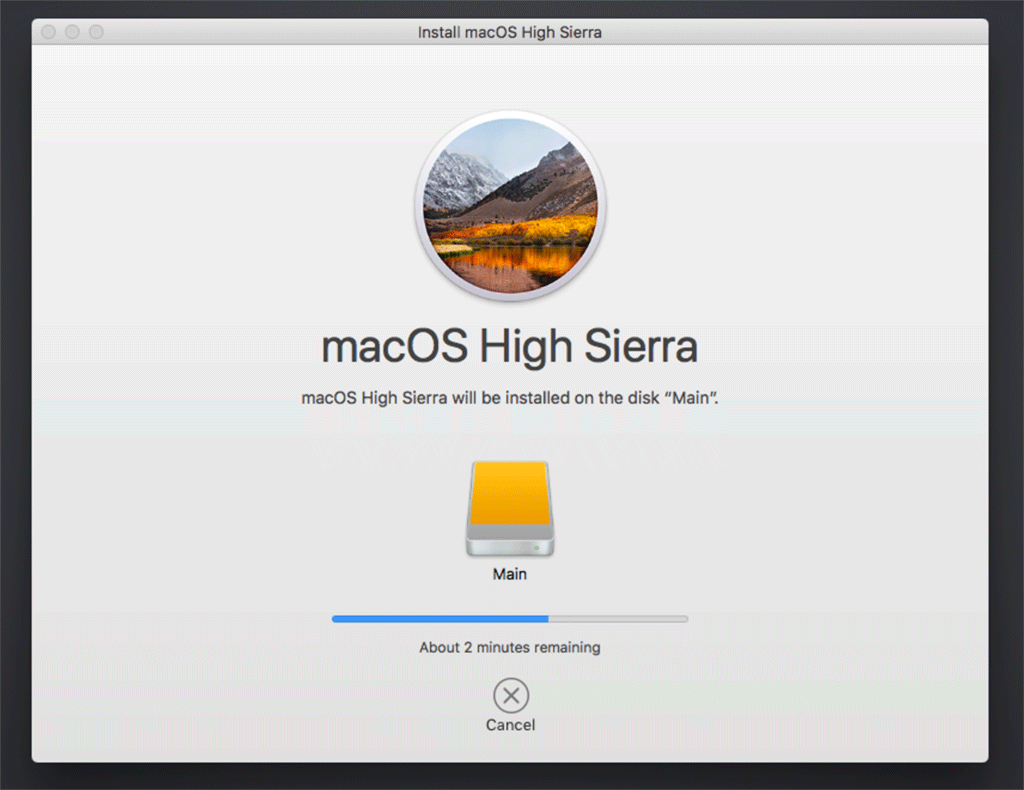
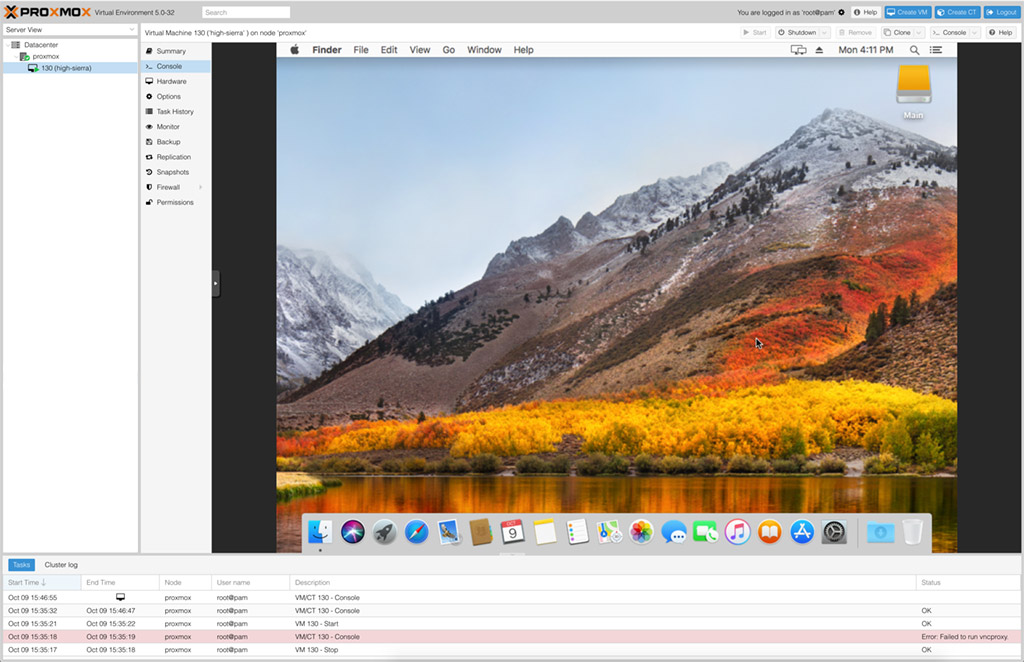
After the first stage of installation, the VM should reboot itself and continue installation by booting from the hard drive. Answer the initial install questions, and you’ll be logged on! (Note that you’ll probably want to hold off on logging into your iCloud account until you’ve configured your SMBIOS to your liking in Clover Configurator)
Make the Clover install permanent
We’re currently booting using Clover from the attached CD image. Let’s install that to the hard drive instead. Pop open Terminal and run “diskutil list” to see what drives we have available.
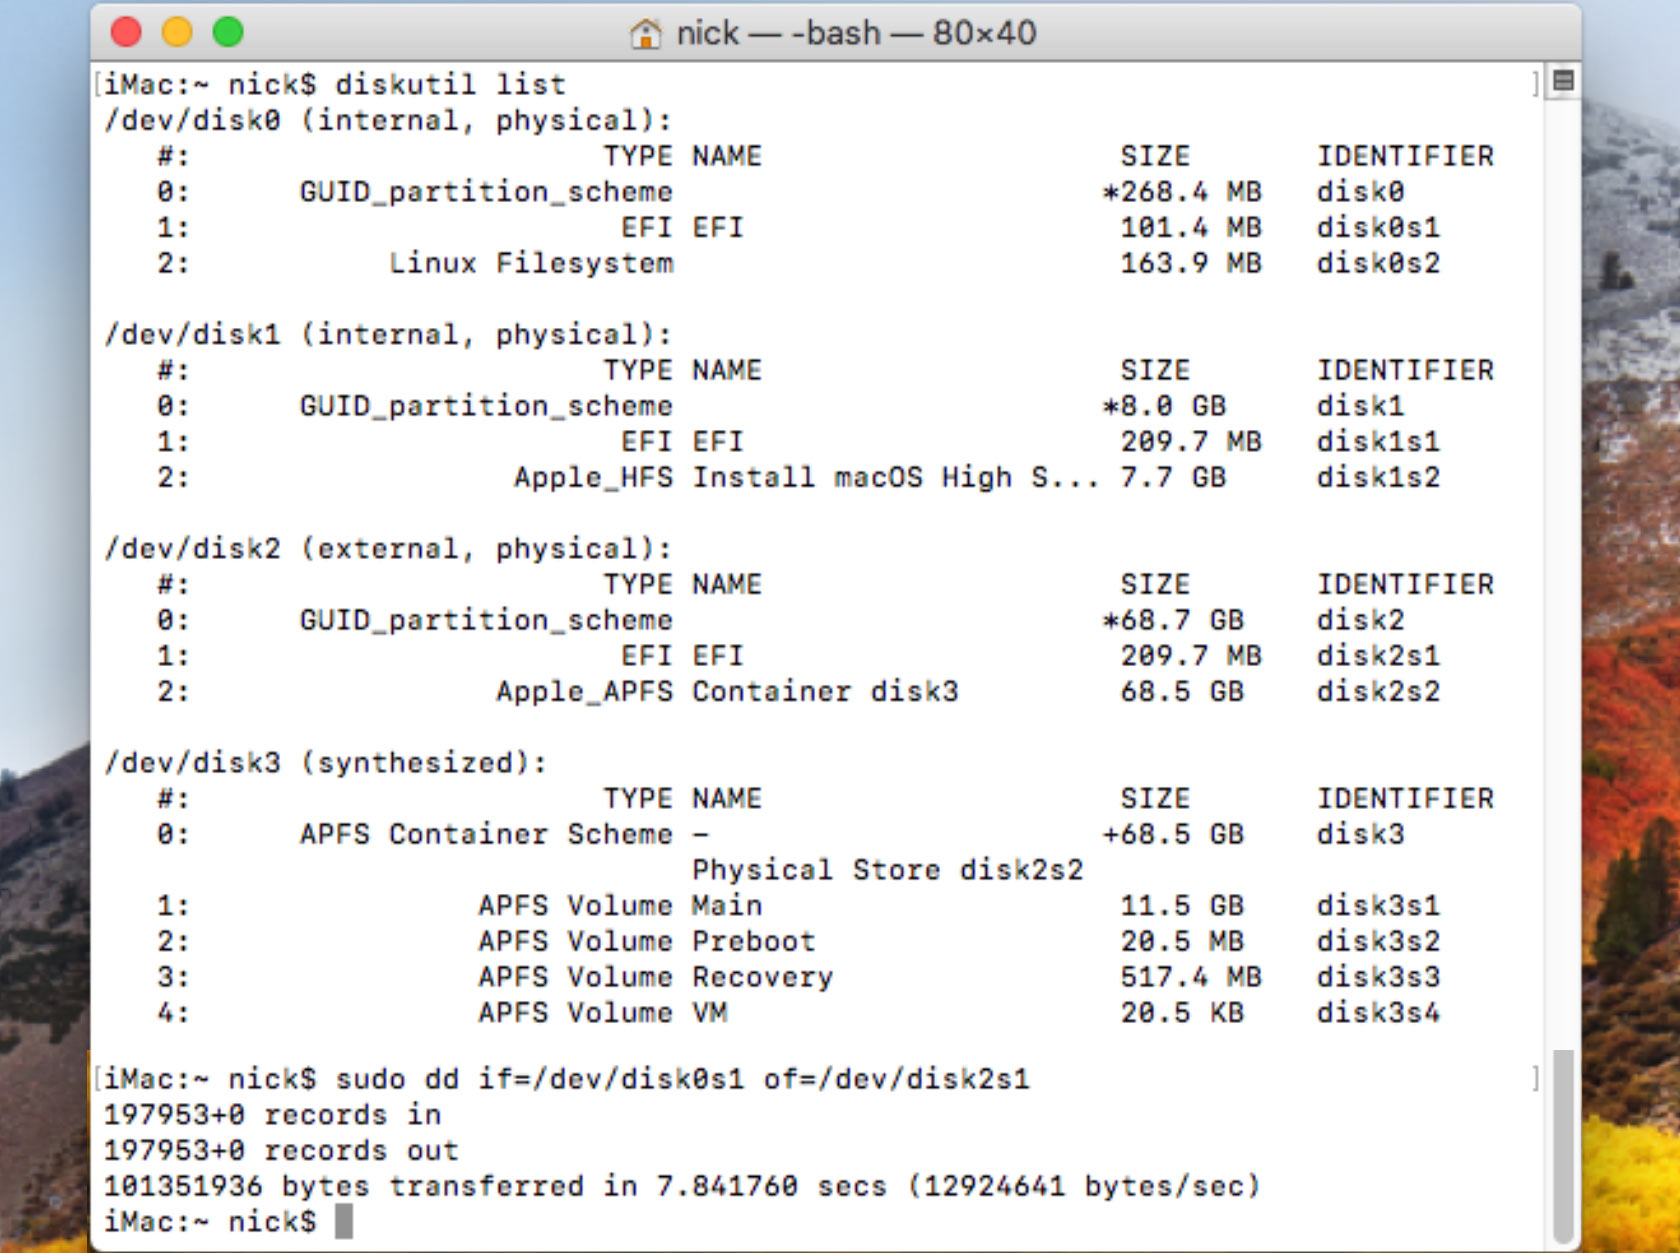
Use “sudo dd if=source of=dest” to copy the EFI partition from the Clover CD and overwrite the EFI partition on the hard disk. The Clover CD is the one with the “linux filesystem” on it, and the main hard disk is the one with the large Apple_APFS container partition on it.
In my case these EFI partitions ended up being called disk0s1 and disk2s1 respectively, so I ran “sudo dd if=/dev/disk0s1 of=/dev/disk2s1” (N.B. if you get these names wrong, you will erase the wrong disk and you’ll have to start the installation over again!).
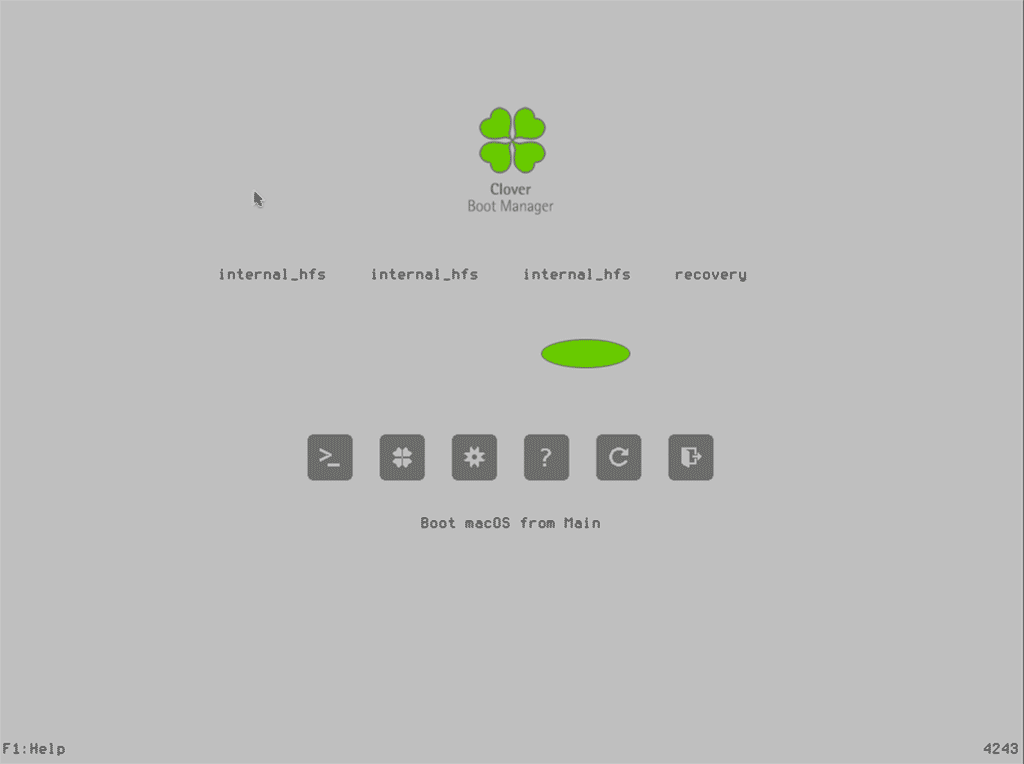
Now shut down the VM, and remove both the Clover and the Sierra CDROM drives from the Hardware tab. On the Options tab, edit the boot order to place SATA0 as the first disk. Boot up. If everything went well, you should see a Clover boot menu, and you can select “boot macOS from *disk*” to boot High Sierra.
Sleep management
I found that I was unable to wake High Sierra from sleep using my mouse or keyboard. You can either disable system sleep in High Sierra’s Energy Saver settings to avoid this, or you can manually wake the VM up from sleep from Proxmox by running:
qm monitor YOUR-VM-ID-HERE
system_wakeup
quit
Editing your Clover/EFI settings
You can use the Clover Configurator tool to edit your Clover configuration, which is stored in the hard drive’s EFI partition. This tool should mount the EFI partition for you. If you want to mount it without using Clover Configurator, first check the device name of the EFI partition in the terminal:
~$ diskutil list
/dev/disk0 (external):
   #:             TYPE   NAME           SIZE       IDENTIFIER
   0: GUID_partition_scheme             512.1 GB   disk0
   1:              EFI   EFI            209.7 MB   disk0s1
   2:        Apple_HFS   Main           511.8 GB   disk0s2
Then you can mount it like so:
sudo mkdir /Volumes/EFI
sudo mount -t msdos /dev/disk0s1 /Volumes/EFI
Passing through advanced CPU features
You can pass through CPU features like AVX and AES-NI for increased guest performance, see here for details.
USB passthrough
Since I want to use this as my primary computer, I want to use a USB keyboard and mouse plugged directly into Proxmox, rather than sending my input through the web VNC console.
Proxmox has good documentation for USB passthrough. Basically, run “qm monitor YOUR-VM-ID-HERE”, then “info usbhost” to get a list of the USB devices connected to Proxmox:
qm> info usbhost
 Bus 3, Addr 12, Port 6, Speed 480 Mb/s
 Class 00: USB device 8564:1000, Mass Storage Device
 Bus 3, Addr 11, Port 5.4, Speed 12 Mb/s
 Class 00: USB device 04d9:0141, USB Keyboard
 Bus 3, Addr 10, Port 5.1.2, Speed 12 Mb/s
 Class 00: USB device 046d:c52b, USB Receiver
 Bus 3, Addr 9, Port 14.4, Speed 12 Mb/s
 Class 00: USB device 046d:c227, G15 GamePanel LCD
 Bus 3, Addr 8, Port 14.1, Speed 1.5 Mb/s
 Class 00: USB device 046d:c226, G15 Gaming Keyboard
 Bus 3, Addr 6, Port 11, Speed 12 Mb/s
 Class e0: USB device 0b05:17d0,
 Bus 3, Addr 2, Port 1, Speed 1.5 Mb/s
 Class 00: USB device 068e:00f2, CH PRO PEDALS USB
In this case I can add my keyboard and mouse to USB passthrough by quitting qm, then running:
qm set YOUR-VM-ID-HERE -usb1 host=04d9:0141
qm set YOUR-VM-ID-HERE -usb2 host=046d:c52b
This saves the devices to the VM configuration for you. It’s possible to hot-add USB devices, but I just rebooted my VM to have the new settings apply.
You can also pass through USB devices by passing through an entire USB controller using Proxmox’s PCIe passthrough feature.
PCIe GPU passthrough
For near-native graphics performance you can pass through a video card. There are details in the Proxmox manual. You should also check out Hackintosh tutorials for more details on installing the drivers correctly (and configuring Clover correctly) for the card you want to install.
If you don’t want to pass through a video card, but want to bump the screen resolution up to 1920×1080, use Clover Configurator to set Clover’s screen resolution to match that, then enter the OVMF settings at boot time by pressing escape, and set the new resolution there as well.
My Mojave installation
I’ve described my host hardware and the Proxmox and VM configuration for the Mojave VM I use daily in this post, including my PCIe passthrough configuration.
hi !
i have not tested yet, but does it work whit filevault ?
even with sierra ? (i have one working but i’m looked out when i have activated filevault, i can’t type anything at the pre-login screen)
even on a remote proxmox ?
I have not tested FileVault yet, I’ll give it a try tomorrow.
It encrypted my disk for me, but the FileVault preboot option doesn’t work properly. It seems like the keyboard and mouse both stop working, so I’m unable to enter the password, and the screen doesn’t paint correctly:
https://i.imgur.com/Ppb2Krl.png
I was able to use the Recovery environment to unlock the drive.
It might be that some combination of input device kexts could fix this.
I don’t know what version of OVMF promox uses but there is a problem with Clover + recent OVMF’s that make certain pages readonly.
The Clover revision noted in this post and the very newest OVMF from Proxmox 5.1 definitely works, as this is the combination I use as my daily-driver. Proxmox supply a customised version of OVMF.
It might be possible that the High Sierra installer has issues with it though?
I would probably guess that it is the APFS.efi UEFI driver that is the problem. So it might be only if you are running APFS. Anyhow, debugging OVMF+Clover will take a lot of time at the moment.
I was able to reproduce this problem this using kraxels latest build. I then git bisected this and found that the problem occurs since commt 2ac1730bf2a51d6d0483347a.
If anyone needs to build clover again, I used linux, and checked out edk2 the added Clover as a submodule. I didn’t bother with any of the patches for edk2 in clover. I then built the tools in edk2 (make -C BuildTools), sourced the setup in the edksetup.sh and the “build -p Clover/Clover.dsc -a X64 -b RELEASE -t GCC5”
I just needed 3 files in the ESP parition, clover.efi into EFI/BOOT/BOOTX64 and DataHubDxe.efi and OsxAptioFix2Fdx.efi into the driversUEFI directory.
The crash happens when the OsxAptio module tries to load the mach kernel.
Do you still need to install the Patcher Version of Qemu? Or did it already get merged into mainstream?
As of 2.9.1-5, the patch still hasn’t been merged, so you need to install my patched version.
Love these tutorials, Nick! Never noticed the comments section on your site. Half way through this High Sierra tutorial now – will report back shortly. 😀
Had an issue with getting the High Sierra installer to appear in Clover. This was fixed by leaving `media=cdrom` in the HighSierra.iso line. Installer seems to be working fine with this setting.
Thank you! This solved my issue with the installer not showing up in clover.
No problem! I’ve got a few more issues which I’m still trying to iron out. Hoping to fix them over the next week
great, thanks that really helped me
Another update! I found that my mouse had an irritating offset when using Proxmox’s console. Fixed by using this in the pve-q35.cfg file in place of your mouse1 device….
[device “mouse1”]
driver = “usb-tablet”
bus = “ehci.0”
port = “1”
Working perfectly in the installer!
Huh. How did you get this working? If I add it in, my vms become unbootable and it throws an error message about it being an invalid arg.
thanks for your solution, it works for me too.
Hi, first, thanks for the tutorial.
I am not sure what is wrong, but I am not able to boot clover. There is just a hang, and the UEFI shell is opening. So no boot in the clover. :-<
Thanks for any idea,
Ronny
Hm, maybe try the suggestion in the other comment to add back the media=cdrom part on the High Sierra CD drive in the VM configuration.
Up voted. That the only way I got it to show up as well.
Question – can you enable the caching service with this? System preferences, sharing, caching.
Or terminal, sudo assetcachemanagerutil activate (I think)
I can’t get those working on any vm yet
Did you get it running?
First of all I want to thank you for this great tutorial!
I encountered a strange behavior of the SATA disk I attached to Promox. It did not show up. When hot plugging an IDE drive, the SATA drive did show up in the disk util. Any idea?
I would really like to see a tutorial, that includes GPU redirection, as this would be an way of setting up powerful VR-ready setups.
I’m sorry for the noobish question, but how are you running Proxmox?
Proxmox is a hypervisor, so it acts as an operating system itself. You install it as an OS on a bare computer. If you’re currently running Debian Linux then it’s also possible to just install it into your current OS as a package.
Thanks for your reply! So I install it on a clean computer, afterwards I can configure the VM through the WebUI on a different machine, is that correct?
Yep, that’s right!
Awesome! Seems clear to me now. Last question (I promise) Do you boot into the VM directly when booting up your machine? Or do you need to run an additional command through Proxmox first?
You can set a “start on boot” flag on a VM which will cause it to start automatically after Proxmox boots with no user interaction required (just hit the power button and wait).
Thanks for the help, Nick!
Do you use WLAN btw or just LAN?
There’s actually a wrinkle with Proxmox and WiFi. The problem is that Proxmox sets up a network bridge to connect itself and the guests to the network, and this bridge is supposed to be responsible for choosing the Proxmox host IP address. However, it seems that a lot of WiFi systems don’t allow this, they want to manage one single address for the interface themselves.
The net result was that I just couldn’t figure out how to achieve it with my hardware. Maybe turning on WDS on the hotspot could fix it?
If you search for “vmbr0 WiFi” you’ll find other people’s efforts to solve it. (vmbr0 is the name of the default bridge). For example:
https://forum.proxmox.com/threads/proxmox-laptop-wireless-adapter-wifi.712/
“Don’t bother. Most wireless cards, including Broadcom cards, cannot see traffic for more than one MAC address. So even if you find 64-bit Windows XP drivers for the card that actually work with ndiswrapper, you won’t be able to use it usefully with Proxmox VE. (You won’t be able to successfully bridge your VMs virtual adapters over the wireless network.)”
Hi Nick!
Just wondering if you’re getting any CPU stuttering on your setup?
I’m getting random lag spikes for a split second – wondering if it’s anything to do with the emulated frequency?
Mine’s pretty smooth. MacOS can read the actual CPU frequency using the vmware-cpuid-freq option in the VM args, so it should see the correct frequency. The invtsc option should allow macOS to perform accurate timekeeping for smooth animations.
I do sometimes get lag spikes when there is disk IO on the host, but I assumed that was just down to my hardware. Since I pass through an NVMe SSD for macOS, there’s no good reason for it to stall when the host is doing disk IO on other drives…
Thanks Nick! I’ll pick up an NVMe drive when I get the chance and give that a go – worst case scenario I can just use it as a cache or a new boot drive on another machine.
A regular SSD presented as a virtual SATA drive, or a regular SSD attached to a passthrough SATA controller, should both be an improvement too, if you have a spare SSD to try that with.
NVMe is so perfect for passthrough since each drive is its own PCIe device.
I’m having some weird display issues. The display is all teared up, although it does boot fine into the installer. Any idea how to fix this or what could have caused it?
This will happen if the screen resolution set in the guest UEFI options doesn’t match the resolution configured in Clover’s options.
I’m absolutely sure I configured it correctly, but after setting the resolution in the bios again, the display is now working. Maybe I did make a mistake… Thanks for the tip and the great guide!
I had to set it to a different resolution, reset, boot, more tearing, reset, change resolution to 1024×768 again, reset, boot.
The giveaway is that the Apple icon whilst booting is not centered.
Hey, I have the same problem…
Either I have a working display or I have the USB keyboard enabled correctly… It doesn’t work both…
Help pls!
(With correct keyboard I mean this:
[device “keyboard1”]
driver = “usb-kbd”
bus = “ehci.0”
port = “2”
)
Hi,
after changing the keyboard the first time I have also a weird Apple Logo and a crashed display.
I wait until the first “weird” setup screen appears and then push reset directly in the console (without leaving the proxmox console window) “Switch-Off Button-> Reset” and after the next boot the Apple logo and the whole display is fine…
I’m having great difficulty in getting the OSK authentication key. When I run the code with Xcode, the only output I seem to be able to get is a message along the lines of “our hard-work…”.
Could you please inform me how I can get this key.
That is the correct key!
Hi,
thank’s for your tutorial.
I have a little problem, I can’t see HighSierra.iso in clover.
I can see it on the console tab, in boot manager (named UEFI QEMU HARDDISK QM00003), but not in clover.
My clover.iso is saw as UEFI QEMU HARDDISK QM00001) in boot manager.
I make a lot of tests, inspired by your 2 tutorials.
For example, I can’t start with vmware-cpuid-freq=on option
-> kvm: can’t apply global Penryn-x86_64-cpu.vmware-cpuid-freq=on: Property ‘.vmware-cpuid-freq’ not found
So I start without it.
I tried to start using enoch, not better.
Any ideas ?
proxmox 4.4.13
kernel 4.4.59-1-pve
Thank’s
This tutorial requires Proxmox 5 for those new QEMU features like the frequency one.
If the ISO does not appear then try removing or adding media=cdrom to the line for that ISO in the VM configuration
With media=cdrom it’s ok
I’ve try with cache=unsafe and with no option, it was not good.
Thank’s
Thanks nick. I wondered whether that might be the case – but thought “most unlikely”.
Sorry, another what is probably another silly question. When trying to set boot order, I don’t get the option for ide2. Just sata0, CD rom, network.
Would it start off with Cd rom first?
Ah yep if you have media=cdrom included in the line for that ISO then it’ll appear as cdrom in that dialog.
Very nice step by step tutorial, but I am running into the same problem a few above have brought up. I am not seeing the mounted CDROM iso in clover.
proxmox-ve: 5.1-26 (running kernel: 4.13.4-1-pve)
pve-manager: 5.1-36 (running version: 5.1-36/131401db)
pve-kernel-4.13.4-1-pve: 4.13.4-26
I have the following disks:
Hard Disk (ide0): local:iso/MacOS_High_Sierra_13.1.05.iso,cache=unsafe,size=5510527K
Hard Disk (ide2): local:iso/clover-r4243-amd64.iso,cache=unsafe
Hard Disk (sata0): local-vm:vm-103-disk-1,cache=unsafe,size=32G
Boot Order: Disk ‘ide2’, CD-ROM, Network
I’ve tried toggling media=cdrom and a few other things, but not seeing any install option in Clover. Any ideas?
Thanks,
Jacob
Gee, I hope this isn’t an incompatibility with Proxmox 5.1 (I’m still on 5.0)! I’ll have to upgrade here and see what happens.
Try rebuilding the Sierra ISO just in case. I can’t think of anything else that would modulate this behaviour… is the VM set for UEFI/OVMF boot?
No I don’t think so, I just upgraded to 5.1 today since I was running into the same issue on 5.0 and ran out of easy troubleshooting and thought I would give it a try. The VM is set for UEFI and clover comes up fine, just no mounted cdroms. I’ll try rebuilding the iso and try some other isos and then dive into more detail if that doesn’t work.
Thanks!
Looks like it was a bad ISO; rebuilding it fixed the issue. Now I seem to have a problem with the display. Clover looks fine, but when going to install I get a mac logo shifted up and left. During the loading step the screen is totally scrambled. Making the display 1024×768 didn’t help (and have been trying other resolutions).
Thanks!
That’s definitely a screen resolution issue. Are you picking the option in the UEFI to save and reboot correctly?
You can probably confirm what resolution Clover is set for within its configuration menus.
Install went fine, but after reboot when going through the initial options it reboots after the networking section. If I set it up without a network connection it finishes correctly. But the Networking section in preferences does not open. Any ideas?
That’s weird, I’ve not seen that before! Does the dialog open if you remove the emulated network card? If so, maybe you can pass through a real network card instead so it’ll use a different driver.
Thank you so much for this site, which helps a lot!
Unfortunately I’ve got a problem.
When booting into Clover for the first time, I can see a device, named “optical”. When I choose that one and pressing Enter, nothing happens. If I press Space on the keyboard, everything freezes.
Also, when marking the “optical”-device, it’s name is:
—
Boot Legacy OS from APPLE INC., TYPE: 002
—
It should look as in your screenshot.
What is wrong?
Try removing media=cdrom from the High Sierra ISO line in your VMs config.
Is your VM set up for UEFI/OVMF boot?
Thanks for your answer. Yes, I’ve tried removing that, but then Clover doesn’t recognize any OS at all.
Yes, the VM is set up for UEFI/OVMF. Have also tried to rebuild the High Sierra ISO two times (even downloaded High Sierra from AppStore each time).
I’m running Proxmox 5.1.
I tried with an old Lion ISO, and it started – I got to the installation and doing a testinstallation now! So it has to be my High Sierra ISO that has some issues. Strange…
The problem was the ISO. Now it works.
Nick your blog has been priceless for setting up macOS guests in proxmox for me. Thanks.
I have a couple questions if you can spare some time.
In your experience when using an UEFI compatible GPU and OVMF/EFI BIOS guest in Proxmox does the system shutdown/reset properly AND allow you to start up the guest VM without restarting the HOST?
I have used your blog to build a guest VM with SeaBIOS using my GTX 580. My GPU will only properly reset in Windows. Linux and OSX systems cause my host to require a restart when shutting down the VM. If using UEFI doesn’t resolve this than I hope to avoid spending the money to upgrade my GPU. Your answer would be valuable to me. Thanks in advance.
Furthermore, are you doing any USB controller passthrough? I have read many success stories at insanelymac. But I am having the hardest time. I can USB Passhthrough my host keyboard and mouse. But known native working USB devices will not USB Passthrough (USB Webcam works perfectly on hardware Mac – wont USB Passthrough without error) and when I PCI Passthrough a USB Controller I get mild success — Hard/flash disks work fine. That same webcam will not work. And even an Apple mouse and host mouse when moved to passed-through port will not work.
If you have PCI passthrough working with a USB Controller can you share your PCI device details?
Thanks again for sharing your research and guides.
God bless.
>UEFI compatible GPU and OVMF/EFI BIOS guest, system shutdown/reset properly without restarting the HOST?
I used to have troubles with my Radeon R9 280X hanging the host when trying to move it between OS X and Windows guests, but I don’t recall if the host or guest was using UEFI at that time, sorry!
My host and my Windows, Linux and High Sierra guests currently boot UEFI. (Note that Proxmox can’t use a ZFS root volume when booting UEFI). My eVga GTX 750 Ti and eVga GTX 1060 both passthrough great in this configuration, and don’t need a host restart between guest boots. I’m switching the GTX 1060 between macOS and Windows guests, and the GTX 750 Ti between macOS, Linux and Windows guests. Another thing that I think helps this configuration is that my host has a VGA adapter onboard which is set as the primary video adapter in its UEFI setup, which I believe avoids initialising the discrete video cards during host boot.
>Furthermore, are you doing any USB controller passthrough?
I used to pass through individual USB devices, but it was a pain having to change my configuration for each new USB device I wanted to attach. So now I just use PCIe (not PCI) passthrough to pass 3 USB controllers to macOS: 2x “Intel Corporation C600/X79 series chipset USB2 Enhanced Host Controller” and 1x “Fresco Logic FL1100 USB 3.0 Host Controller [1b73:1100]”. That Fresco Logic chip is on this adapter: https://www.amazon.com/gp/product/B00JFR2H64/ref=oh_aui_detailpage_o02_s00?ie=UTF8&psc=1
Hello, first thank you for this guide.
I have done all the things above and mostly everything is working on my Dell T30 with Geforce TI 1050 GTX.
I only have 2 problems at the moment:
1. I can only passtrough one USB-Device (in my case a Logitech Unify for mouse and keyboard), but no other device at the same time. The macos system stopps using any of them, but it doesnt freeze. I can connect to it over Apples Screeen Sharing. If i delete the second USB and only use the Logitech, it just boots fine. Do you have a solution for this?
2. Did somebody find a solution for the sleep issue, i dont want to use another pc for waking up the macos
3. I cant passtrough -AVX and -AVX2, if i do it like you said, the macos won’t start. But thats no big problem for me.
thx in advance.
Instead of USB passthrough, I use PCIe passthrough and pass through an entire USB controller, I find that this works much better.
I just disable sleep in macOS to avoid it, which is a bummer.
If your CPU is the Pentium G4400, then I don’t think it supports AVX. You should be able to passthrough AES-NI though.
ok, thank you.
Just bought a Usb 3.0 PCiE Board Controller.
@Processor
No it is a Xeon E3 1225v5, so it should work. But Ok. Performance is good.
The sleep issue is really a bad thing on a 24/7 server… 😉
Nick, thanks for your great post, very helpful.
Are ACPI power commands from Proxmox supposed to work with this setup or are additional steps required?
Cheers
They don’t work for me either, which is annoying. Let me know if you find a solution!
I suspect the answer is that real Macs don’t use ACPI for the power button, but I don’t know for sure.
Hello. Thank you for putting together this guide! I currently have a hackintosh so I get all the clover part. Is it the same standard upgrade process as a Hackintosh after the intial install? Where you can just install the next major MacOS release as long as you have updated Clover first? Or do you have to wait for Proxmox updates to be pushed to mess with the proxmox config file every time?
The only time I had to mess with things was when Sierra 10.12.4 added more copy protection and I had to patch QEMU (I could have used FakeSMC instead to fix this). Apart from that, it upgrades just like a regular Hackintosh – with the bonus that you can take drive snapshots to roll things back instantly if something goes wrong!
Hi All,
Working my way though this tutorial..
Im able to boot into CloverLeaf and select Boot OSX, But then my system just hangs on the Apple logo 🙁
And Ideas whats causing it?
Hit space at the Clover menu and choose the Verbose boot option. The last message printed will suggest why it’s going wrong.
Which CPU do you have by the way?
Hi,
I found a pretty good solution on the suspend issue for me.
Since we are all using Proxmox, I think we all have other small Linux VMs running in the background. With this setup and a small IoT Button I can wake up my “iMac” without going to a terminal.
What I have done is to use an Amazon Dash Button and Dasher, a tool for triggering commands if the AMZ button is pushed. Link: https://github.com/maddox/dasher
So dasher is waiting (in a virtual Linux VM) for a push and triggering a ssh command on my server with sshpass.
The command script is much simpler than described above, it is just: “qm sendkey 100 a” It does only send a key input to the macos VM for wakeup.
#!/bin/bash
export SSHPASS=’YOURpasswd’
sshpass -e ssh -o strictHostKeyChecking=no root@yourIP ‘qm sendkey 100 a’
You could also make a small script for Android or other OS with the key send command.
My solution costs about 6 $ for the AMZ-Dash button and works fine.
I hope I could help sb out there.
Now my machine is fully functional and also WAF ready. 😉
Have Fun.
br
“qm sendkey 100 a” <– should be "qm sendkey yourVMID a" for you
yourVMID = number of macos VM
a is for a random button, in my case "a"
I can get through until the first reboot (after the first stage of OSX install), but then get stuck in a reboot loop. Clover will come up, attempt to boot from ‘macOS Install Prebooter’ I’ll see the Apple Logo for a second and then the whole system will reboot. Anyone have any ideas?
Does this method still work for ProxMox 5.1?
Sorry, I haven’t tested this installation process on 5.1. However, once it is installed using these directions on 5.0, it certainly runs on 5.1 (I use High Sierra on 5.0-upgraded-to-5.1 as my daily-use machine).
Thanks for the guide! I got up and running 1 MacOS vm with relatively low specs since its not doing anything hardcore. However I was trying to create a second MacOS Vm, that use I want to use for Plex so need beefy settings, 32gb of ram and 18core cpu. However everytime I try and boot it loads up the Clover screen just fine and starts to load MacOS and just boot loops. I tried booting in versbose mode but it didn’t show any issue.
I had this issue and it seemed to be triggered by the core/thread count I was passing in. Check here:
http://www.nicksherlock.com/2017/10/passthrough-of-advanced-cpu-features-for-macos-high-sierra-guests/
I didn’t do enough experiments to verify, but my hypothesis was that macOS rejects CPUs with an unreasonable number of cores (>8+), so you need to pass a more realistic topology.
Hi Nick,
thank you so much for that guide, fulfilled a wish…
But while following your instructions by the word on my 5.1 machine a faced one issue: The 32GB SATA0 disk I’ve added to the VM show’s up as 32kb!
I’m grateful for any hint I can get… 😉
Really? That’s very strange! Can you paste the line from your VM config file for that sata0 disk? Where does it show as 32kb, is that in the High Sierra installer? Does it refuse to install into it?
Hi Nick, did some more test’s and realized that the drive doesn’t show up at all. If I remove the HDD and only boot with:
efidisk0: RAID1-550:105/vm-105-disk-2.qcow2,size=128K
ide0: local:iso/HighSierra.iso,media=cdrom,size=5600M
ide2: local:iso/clover-r4243-amd64.iso,cache=unsafe
I don’t see it…
And the line I add for the HDD is:
sata0: RAID1-550:105/vm-105-disk-1.qcow2,cache=unsafe,size=32G
But whatever combination I try I can’t see it…
And yes I’ve installed & pinned your qm package. 😉
Where is it that it doesn’t appear, in the installer’s Disk Utility tool? Are you ticking the Show All Devices menu option, quitting Disk Utility completely (disk utility -> quit disk utility), and reopening it?
If you use the terminal in the installer, does “diskutil list” show the disk? If so, you may be able to partition/format it using the command-line instead.
I’ve never tried qcow2, I’m using ZFS, which offers raw disk images. On the off-chance that the problem is triggered by qcow2 (quite unlikely) try adding a “Raw Disk Image (raw)” instead of qcow2.
THX a ton, I should have come up with that by myself!
ran “diskutil list” saw like 20 disk’s and disk1 was the one I expected, so I ran:
diskutil partitionDisk /dev/disk1 GPT APFS macOS 0b
and now it’s installing…
hi there
i followed this guide perfectly…
but i face up with this error.. with -v option..
“AppleSMBusPCI::start failed to get acpi path for provider”
my system spec is below
– proxmox 5.1
– x5670 2 cpu
– above 64Gb ram..
in my osx vm, i followed this guide ( cpu , ram size, etc..)
Did you install the patched QEMU package?
thanks nick…
i remember that i try to install qemu package, i meet some error..i can’t see detail because i am working now..
i will check it again tonight…
hi
i patched qemu package yesterday, and sucess boot…
but, i can see console with GraphicsEnabler=No option
thanks nick
Thanks for the tutorial! I was able to install High Sierra and it’s working with GPU passthrough, but with two issues I’m hoping folks here can help resolve.
1) Audio output is very choppy and cuts out to the point of being unusable. I’ve tried passing through a couple of different USB audio devices. I’ve also experimented with different sampling rates (which fixed the choppiness on Windows VMs) but having no luck there. I’ve tried passing through the native motherboard sound device but it doesn’t seem to be recognized by MacOS. I’ll probably try some more with that. Should I install a dedicated PCI sound card and pass that through to the VM?
2) I am passing through an NVIDIA Quadro K5000 GPU, which is recognized by MacOS. Clover starts in a high (but non-standard resolution) of 1920×2160@30Hz, but MacOS only lets me select up to 1920x1080p, even with the NVIDIA web drivers installed. Any suggestions on how to get higher resolution? My GPU and monitor is capable of 4k, and I was able to get much higher res on a nearly identical computer (HP Z800) with the same GPU running MacOS.
I think there are not many (if any) PCIe soundcards that macOS has drivers for. If you do find one, let me know. Try passing through an entire USB controller using PCIe passthrough if you haven’t already.
You can probably find drivers for your on-board audio, just search for hackintosh audio + your audio brand. People have made custom drivers for most of the popular ones.
Another option for audio is to send it over HDMI or DisplayPort and have your monitor decode it. My monitor has a headphone jack that it puts the decoded audio onto. I haven’t got this to work on the Hackintosh myself, but it can work in theory.
One of the key requirements for audio is accurate timing. The vmware-cpuid-freq and invtsc CPU features are supposed to solve that, as long as your CPU supports invtsc.
As to the resolution problems, are you using the same kind of connector on both systems? I think DisplayPort has the best support. I’m using this tool to set custom resolutions:
https://github.com/avibrazil/RDM
I’m using a 4k monitor over DisplayPort.
Hello Nick, I followed your tutorial twice from the beginning and I have not got the VM to boot. In principle I have everything ready.
Do you know what could be the mistake of not even getting to boot?
I use proxmox 5.1 on an HP gen8 and I have other VMs working without problem (linux, DSM, windows …).
Regards: Óscar
How far does it get through the boot process, are you able to get into Clover and it hangs during the macOS progress bar? If so, press space on the macOS option in Clover and tick the “verbose” mode, so you can see at what point during the boot it fails.
Thanks for your answer Nick!
The boot process does not start. Here you can see screenshots of the configuration. Possibly they can help to solve the problem:
Config – options – hardware – pve-q35:
https://www.dropbox.com/sh/bjvdncm3qff04r2/AABnq6GsE_xxLtN1Pae9rg0ea?dl=0
Starting the VM causes an error? It’s easier to read the error message if you start the VM from the Proxmox command line like “qm start 100”
¡SOLVED! The problem was with the file pve-q35 😀
Nick,
This is a great tutorial and got through the full installation with minimal issues and appreciate all the little details that helped! I had a quick question, and this might be obvious, so I apologize for it in advance, but once the MacOS VM is setup, can it be clone just like other VMs in ProxMox 5.1?
Thanks!
I’m not sure if I’ve ever cloned one before, but I think that should be just fine. However if you’re planning to log in to iCloud on those VMs, you probably want to use Clover Configurator to generate a new serial number for the cloned VM before you go online.
Ok great and thanks. Just thought I should ask, before potentially messing up what I’ve done. I created an Apple ID for the machine I setup so far, so I could install XCode. Will the cloned Apple ID cause any issue? As far as using the Configurator to create a new serial number, is it easy to figure out how to do this? Thanks again!!
I’m not sure about the cloned Apple ID, I’m thinking it’ll probably be fine because real macs can be cloned too…
In Clover Configurator, you mount the EFI volume, open the config.plist from it, then on the SMBIOS tab there’s a button to randomly generate a new serial number.
Hi, I previously had this booting up until the scrambled mac OS screen. I am getting back to this now and am having trouble even getting clover to boot; I just always end up at the UEFI interactive shell. I’m struggling to find ways to debug my issue. I’ve gone through the procedure from scratch 4-5 times and clover does not want to come up! I tried building the qemu package myself and also using your prebuilt deb, I have the qemu package pinned, I tried just mounting the clover image trying to at least see that booted, etc. Any insight would be really helpful.
Thanks
Hm, so Proxmox doesn’t even consider the Clover disk image to be bootable. I haven’t seen that before. Double check that the boot order option is correctly set to point to the Clover drive. Maybe post your VM configuration file to pastebin.com and post the link here.
Thanks, here is my vm config: https://pastebin.com/MFLciM4R
Hm my config is the exact same as that and Clover boots. I wonder if the UEFI entries for Clover somehow got wrecked. Try destroying and re-adding the “EFI disk” to your VM in Proxmox’s GUI, which should reset the UEFI settings.
If you end up at the shell, are there any filesystems mounted (FS0, FS1 etc)? If so, you can typically do something like this to start Clover if it’s available on one of those filesystems:
FS1:cd efi
cd clover
CLOVERX64.efi
Here is what I see in the interactive shell: https://imgur.com/a/uIcWC unfortunately it doesn’t seem like much to go; no filesystems. I’ve tried recreating the EFI disk multiple times, and I see the size is only 128K.
Is the MD5 sum of your unpacked clover ISO d5c3b73b968157590927d8f1f93293fb?
Wow nice call; clover md5 was not correct. Not sure how that happened. Got clover running after fixing that and all the other steps went fine. Thanks!
Cheers
Hi
I have the same Jacob’s issue.
I tried to download and unzip the Clover ISO on Windows 10 7-zip and Debian unzip and I still get a wrong md5 (581507b2d7d57ada79642d102311bf57). Is the download stil valid ?
I’m using Proxmox 5.2
Regards
The Clover ISO has been updated since I last replied, the current MD5 is correctly 581507b2d7d57ada79642d102311bf57
Thanks for provide such guide, Nick. I do have Proxmox 5.1, but my pve-qemu is already newer than your patch. My is pve-qemu-kvm: 2.9.1-9. I can’t seem to compile the patch with Kholia’s repo. Must I downgrade the qemu package?
I’ve now updated my package to 2.9.1-9:
https://github.com/thenickdude/pve-qemu/releases/tag/2.9.1-9-smc
It appears that there is a new version 2.11.1-2 available upstream which actually includes this SMC patch already, but my High Sierra install wouldn’t boot with it.
Thanks, this new patched package works for my Proxmox 5.1 install. Any plan to update the Clover image to the latest version as well?
I usually only update Clover when there is a known benefit in doing so. I can confirm that upgrading Clover after installation to r4411 works nicely, since that’s what I’m using at the moment.
I’ve now updated Clover to r4243 because I’ve heard that newer Clover versions are required in order to boot the 10.13.4 system update.
Hey Nick, thanks for the write up and all of the help you’ve been providing in the comments.
I’m having issues booting, I’ve gotten clover to boot and can see the High Sierra iso but when trying to boot into the installer it boot loops. Verbose mode gives the error “AppleSMBusPCI::start failed to get acpi path for provider” which I see from the other comments could be a qemu issue but I’ve downloaded and depackaged your patched deb with no errors. Anything you can think of to help?
Heres my vm config if it helps at all: https://pastebin.com/fxidwkH3
Double check that the QEMU package is installed by making sure its filesize matches mine:
ls -l /usr/bin/qemu-system-x86_64-rwxr-xr-x 1 root root 10461288 Feb 19 22:42 /usr/bin/qemu-system-x86_64
Yep, my listing is identical except the modified date:
-rwxr-xr-x 1 root root 10461288 Feb 19 01:42 /usr/bin/qemu-system-x86_64
Hey Nick,
Thank you for the effort to put this guide together.
I have an weird issue, after following your guide to the letter, Clover boots up to a point and it comes up with ” Welcome to Clover 4243 … testing hardware …
Can you give me some insight on what to do?
What’s your CPU model?
Nick
I have followed along, and when clover boots there is no internal hdd.
I have tried to set the IDE2 back to media=cdrom, but then the boot does not even get to clover
Hello! Great job!
But by now i’ve got scrambled graphics when launching OS X installer.
I tried 1024×760 and 800×600, but i can’t see OS X installer. I see it is booted and running, reacts to keyboard, but nothing i can understand, seems wrong resolution.
What should I do?
By the way, clover is running with 800×600 resolution set, not 1024×768
Sorry, please remove comments.
Semms first time i hit wrong resolution while configuring OVMF
Nick
I have everything set up with host hardware being a late 2012 Mac mini.
This mini has a HDMI and a Thunderbolt output, do you think it is possible to use a thunderbolt GPU and pass it through to the High Sierra VM and retain the HDMI port for the Proxmox host?
Thanks for this great Tutorial.
Anyone have a step by step IGP passthrough ?
Xeon 1235l v5, D3417,
00:02.0 VGA compatible controller: Intel Corporation HD Graphics P530 (rev 06)
bg
so far so good, HighSierra works like a charm, I’m just using an old qemu-kvm, now going to try the patch.
Just a follow up, on HDMI audio, it Will break after updating to 10.13.4, I found an easy fin without hey editing of kexts, just
1:download MultiBeast and add audio drives [Realtek ALC1150] and [100 / 200 / 300 Series Audio Support]
2: add AppleALC.kext, AppleHDA.kext and Lilu.kext to /System/Library/Extensions, change the owner to root:wheel of the new kexts
3: do “kextcache -i /”
reboot and HDMI audio from nvidia cards should work.
if kextcache update complains about permissions, find the kext and change the owner to root:wheel. (remember to use chown -R for recursive)
Thought I followed these directions precisely, but everytime I try to start the VM get: failed: got timeout
Never able to get a console window up at all.
Here is an edited version of my conf file:
args: -device isa-applesmc,osk=”NOTSHOWN” -smbios type=2 -cpu Penryn,kvm=on,vendor=GenuineIntel,+invtsc,vmwa
re-cpuid-freq=on
bios: ovmf
boot: cdn
bootdisk: ide2
cores: 4
cpu: Penryn
efidisk0: local-zfs:vm-105-disk-2,size=128K
ide0: local:iso/HighSierra.iso,media=cdrom,size=5600M
ide2: local:iso/clover-r4243-amd64.iso,cache=unsafe
machine: pc-q35-2.9
memory: 8192
name: MacOS
net0: e1000-82545em=11:22:33:44:55:66,bridge=vmbr0
numa: 0
ostype: other
sata0: local-zfs:vm-105-disk-1,cache=unsafe,size=512G
scsihw: virtio-scsi-pci
smbios1: uuid=c3c22981-c740-4c95-985f-f17ed1cfcc84
sockets: 1
vga: std
I sometimes get a timeout too if I’ve just stopped one VM and want to start macOS, then the VM stays in the “running” state for about 10 seconds, then stops. But when I start it again, it always runs correctly the second time.
I’m not sure which component is implementing the timeout exactly, but I think it’s Proxmox’s VM management system. Potentially you could use “qm showcmd VM-ID-HERE” to get the kvm launch command that Proxmox is running, and run that yourself manually.
One thing that seems to trigger timeouts for me is allocating a lot of RAM to the VM, but having that RAM already occupied by the ZFS disk cache. I’m guessing it takes too long for that cache to be torn down, and memory allocation fails. Running `echo 1 > /proc/sys/vm/drop_caches` fixes this when that happens to me.
By the way, I just updated the link to Clover to a new revision (4428) which I think is required to boot High Sierra install ISOs built from the latest 10.13.4 version, and updated my QEMU patch article with notes on downgrading qemu-server and pve-manager to be compatible.
Hmm, my qemu-server (5.0-22) and pve-manager (5.1-46) are at their latest update. I am running a licensed version and the pve-enterprise chain for my home system. I am guessing you are on the dev version?
I did update my Clover to the 4428 version, but no changes, console still never displayed.
From SSH ran the “qm showcmd xxx” and then ran that from the command line. Oddly this seemed to work and then I saw the console in the web interface! After clover though I just get the Apple in the middle of the screen and sits there going nowhere (almost like my Win10 – see below).
Seems like this may have also caused issues with my Win10 VM as it boots, get Windows logo and never finishes, though graphs seem to indicate things are happening. Will leave it for a long time
Open to ideas, would really like to see all this running. Thanks!
Oh you’re right, I have the pvetest repository installed, I didn’t even notice that!
What version of pve-qemu-kvm do you have installed? It should be my patched 2.9.1-9.
Try rebooting the host after installing new packages, sometimes on mine it seems like a service remains unrestarted and it keeps on using the old version.
Got it going after reboot, thanks for the help!
I recently updated, and my qmue is now pve-qemu-kvm: 2.11.1-5. It still doesn’t contain the upstream fix. I haven’t try to re-install the patched 2.9.1-9 yet. Wondering if it will conflict with other package version.
The High Seirra VM now will boot and stuck at the Apple iCon screen.
2.11.1 does contain the upstream fix, but has some other problem which breaks the boot. I haven’t tracked it down yet.
Downgrade to my patched version and also downgrade proxmox packages to match:
apt-get install qemu-server=5.0-23 pve-manager=5.1-47
You’ll probably need to restart the host after doing that.
It looks like the problem is an updated OVMF firmware. I eventually found this bug report which seems to be the problem (learned how to use a serial console in Qemu…):
https://sourceforge.net/p/cloverefiboot/tickets/439/
If I replace the OVMF_CODE.fd in /usr/share/pve-edk2-firmware with the one from kholia’s repository, I can get High Sierra to boot and install.
Is there a recommended way to replace this OVMF code? I tried uploading it to the ISO directory and appending an extra argument that mimics the one Proxmox uses, except using the path to my OVMF code. But this fails because Qemu says drive 0, index 0, blah blah already exists.
I thought about grabbing Proxmox’s code and reverting the two commits mentioned in that bug report. But without a reliable way to override the OVMF file, I’m thinking of just using enoch (I don’t need all the fancy passthrough).
Wow, thanks for that investigation! I should build a version of Proxmox’s OVMF without those commits. It seems like it’d be okay to just use that customised OVMF for all VMs.
EDIT: Ahhh I see, my old QEMU version loads `/usr/share/kvm/OVMF_CODE-pure-efi.fd` instead, ignoring the new OVMF file in `/usr/share/pve-edk2-firmware`, so the new QEMU version isn’t to blame for anything.
I’ve now published a patched OVMF based on Proxmox’s version, which fixes the problem:
https://www.nicksherlock.com/2018/04/patch-ovmf-to-support-macos-in-proxmox-5-1/
This allows the latest vanilla Proxmox QEMU packages to be used.
It exist another solution, it is possible to maintain the original Proxmox OVMF and, at the same time use your modded version:
you have to extract your deb file inside a new directory /usr/share/pve-edk2-firmware/osx/
add this line to args:
-drive if=pflash,unit=0,format=raw,readonly,file=/usr/share/pve-edk2-firmware/osx/OVMF_CODE.fd
and comment (#)
bios: ovmf
so, the other VM start with the original OVMF while OSX start with the modded one 😀
Hi Nick, I just wanted to check in and see if this setup is still working well for you as I’m considering it.
My current desktop (i7-7700, 32GB RAM, Quadro P1000) is running as hackintosh, and for the most part has been great (running Sierra). I’ve had several issues rebuilding it with High Sierra, and haven’t had any success so I was considering giving this setup a go. My plan is Proxmox 5.1 directly on the hardware, QEMU instance for OSX, passthrough my Quadro P1000 (install Nvidia Web Drivers), and passthrough 2 USB ports (1 for keyboard/mouse combo, the other for my SMSL AD-18 DAC/amp). I’ve thought a good bit about it and I think it will work well, assuming I can get OSX installed and stable, and I have no plans to run any other QEMU or LXC instances on this box (I have a few servers in the basement for that).
So overall, what has your experience been like with this setup? Any major issues? Do OSX updates ever kill things for you?
Thanks!
Right now I actually have to run a downgraded version of Proxmox to be able to boot, so updates do continue to be an issue! macOS updates have been mostly okay, with about the same effort required as a normal Hackintosh (typically upgrading Clover and reinstalling drivers).
Beware that I’ve never managed to get CPU scheduling or timing reliable enough to fix some small hitches in the audio output (pinning threads to cores might fix this, but I’m not holding my breath). I’ve tried two USB DACs, and DisplayPort audio, and they both have the same issue.
Hey Nick,
I’ve actually spent a bit of time playing with this, and am very happy with the results. As of this morning, I have a working setup using PVE 5.1, patched 2.9.1-9 QEMU, and OSX 10.13.4. My SMSL AD-18 DAC/Amp is working great and no audio hiccups. I did pass the entire USB controller through via PCI passthrough, same as my GPU (Quadro P1000), because passing the USB device itself through did have lots of hiccups. Also worth mentioning that I’m using a Bluetooth USB dongle so I have native bluetooth in OSX, so I can use my Magic Mouse without issue. Pretty neat.
In reality, I actually installed OSX 10.13.2 and patched to x.4 with no issue. Performance has been great (slightly less than native hackintosh, which was expected) but was able to get to High Sierra which is a big step up since I couldn’t get my onboard network and my Quadro P1000 working quite right in 10.13.3/.4 doing native hackintosh.
One thing I would like to share is I set my boot drive to “ide0” instead of “sataX”, so that OSX would see it as an “Internal” drive instead of “External” drive. I set clover iso to “sata0” and macOS install to “sata1” during the install, and I did not need to remove “media=cdrom” or add “cache=unsafe” to the macOS install media, though I did have to do both with the Clover iso. I had a few other minor changes that I did, but big thanks to you.
One pretty big issue I fought with was my displays. OSX sees the PVE console window as “Display”, so that plus my 2 monitors showed up as 3 displays, which I didn’t want. So what I had to do was set clover to 2560×1440 resolution, as well as set that in OVMF and then mirror my primary monitor and “Display” and now I only have 2 displays. Did you run into a similar issue with this? I’ve considered this a workaround, but I’m happy with it.
Should I decide to throw this up on my blog (https://deviantengineer.com), I will definitely link back here for credit.
Thanks again!
Oh, you should set the display adapter to none (instead of VGA) once you have passthrough video working!
The audio hiccups I have are an infrequent small gap in the output, exacerbated by IO on the host. It probably only amounts to a few ms every minute, but is particularly noticeable during a low bass moment (because the gap causes a high frequency spike that isn’t masked by the bass).
Has anyone else had any trouble getting the OVMF menu to appear? I’ve rebooted the VM several times and have had no luck getting it to work.
Yes. No matter what I do I can’t get into the OVMF menu by hitting escape. I tried close the console window, restarting the VM, etc.
I built an updated Clover image that sets the resolution to 1600×900 and this seems to avoid any graphics corruption this article mentions. I don’t know what the OVMF default is, maybe its 16×9 too?
It looks like the USB keyboard now needs to be commented out in pve-q35.cfg in order to enter the OVMF menu. (I also set my machine to “pc-q35-2.11”)
I’m having the same issue, in combination with another issue.
I can set the resolution in the OVMF settings, but it doesn’t seem to apply next time I start the VM. It does however seem to be saved in the OVMF menu. So right now, for each boot I need to set the resolution there and reset.
This in combination with the other issue makes it so I don’t have a keyboard during install. Any idea what to do?
THX!!!! Good job. But i get un issue… When I configure keybord in cfg I can’t enter to boot to configure resolution but I can boot OSX to install without any enabled keyboard, and if I comment this section, I can enter to boot section but Apple logo isn’t centered and the screen is corrupt.
Can anybody help please? Thanksss!!!
You need to configure and save the resolution with the keyboard disabled, then shut down and enable the keyboard so you can use Clover and boot with the new resolution.
I’ve done this, but still happends! sorry! ;( I use mac wireless keybord, any problem with that?
Thx!!
Are you sure that the resolution change is being saved? Do you have an EFI disk attached, and are you choosing the option to save the setting and reboot?
Proxmox 5.2 was released yesterday, has anybody had a chance to see if this will work with the default packages still?