
I’ve now created a new tutorial that uses OpenCore instead of Clover, and it fixes a lot of problems. I recommend using the new tutorial for all new builds
This tutorial for installing macOS Catalina has been adapted for Proxmox 6 from Kholia’s GitHub project for installing into vanilla KVM. There is more documentation there which will help out with enabling extra features and diagnosing problems!
If you run into trouble, also check out the comment section of my previous tutorial on Mojave – these two versions are very similar so the problems and solutions are likely to be the same.
Requirements
I’ll assume you already have Proxmox 6 installed. You also need a real Mac available in order to fetch the OSK key.
Your Proxmox host computer’s CPU must support SSE 4.2, so for Intel your CPU must be at least as new as Nehalem, which was the first CPU generation to bear the “Core” i5/i7 branding. Older CPUs will cause the finder to repeatedly crash after installation completes (with an Illegal Instruction exception in the graphics code).
Apparently modern AMD CPUs also support SSE 4.2 and can be used with this guide without any modification (maybe Bulldozer and certainly Ryzen), but I haven’t tested this myself.
First step: Create an installation ISO
Download and run fetch-macOS.py in a terminal to download the Catalina recovery image from the Apple software distribution server (this can be run on Linux, Proxmox, or on a Mac):
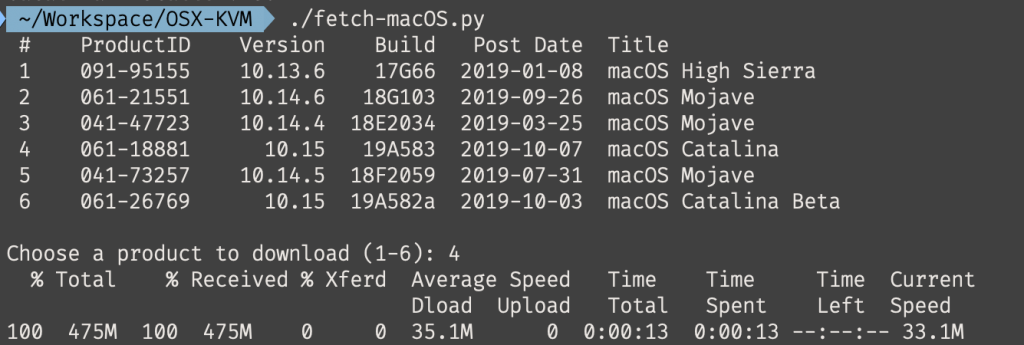
This results in a ~500MB “BaseSystem.dmg” file in the current directory. Convert that dmg into an “iso” like so if you’re building this on macOS:
hdiutil convert BaseSystem.dmg -format UDRW -o Catalina-installer.iso
mv Catalina-installer.iso.img Catalina-installer.iso
Or like so if you’re building this on Linux:
# Install the dmg2img package and...
dmg2img BaseSystem.dmg Catalina-installer.iso

# Or use qemu-img from the qemu-utils package to do it instead:
qemu-img convert BaseSystem.dmg -O raw Catalina-installer.iso
The result is actually a raw disk image, not a true ISO, but Proxmox has better tools for picking and re-using ISO images than disk images. Upload the “ISO” to your Proxmox server’s ISO store (typically /var/lib/vz/template/iso).
If you don’t have an Internet connection available to Catalina during installation you’ll need to build an offline installer instead. Building the offline installer requires you to have a Mac, here are the instructions.
Prepare a Clover image
We’ll be using Clover as a bootloader for Catalina.
Download this Clover disk image (that I built using kholia’s build script from Clover r5107 on Fedora 27), unpack it, and upload it to Proxmox’s ISO store at /var/lib/vz/template/iso. Although it has a .iso file extension, this is actually a hard disk image.
Fetch the OSK authentication key
macOS checks that it is running on real Mac hardware, and refuses to boot on third-party hardware. You can get around this by reading an authentication key out of your real Mac hardware (the OSK key). Save the first block of C code from this page as smc_read.c. In a command prompt, change into the same directory as that file and run:
xcode-select --install # If you don't already have gcc
gcc -o smc_read smc_read.c -framework IOKit
./smc_read
It’ll print out the 64 character OSK for you. Make a note of it.
Every Mac uses the same OSK, so don’t be surprised that it doesn’t look like a random string!
Create the VM
From the Proxmox web UI, create a new virtual machine as shown below.

Keep a note of your VM’s ID 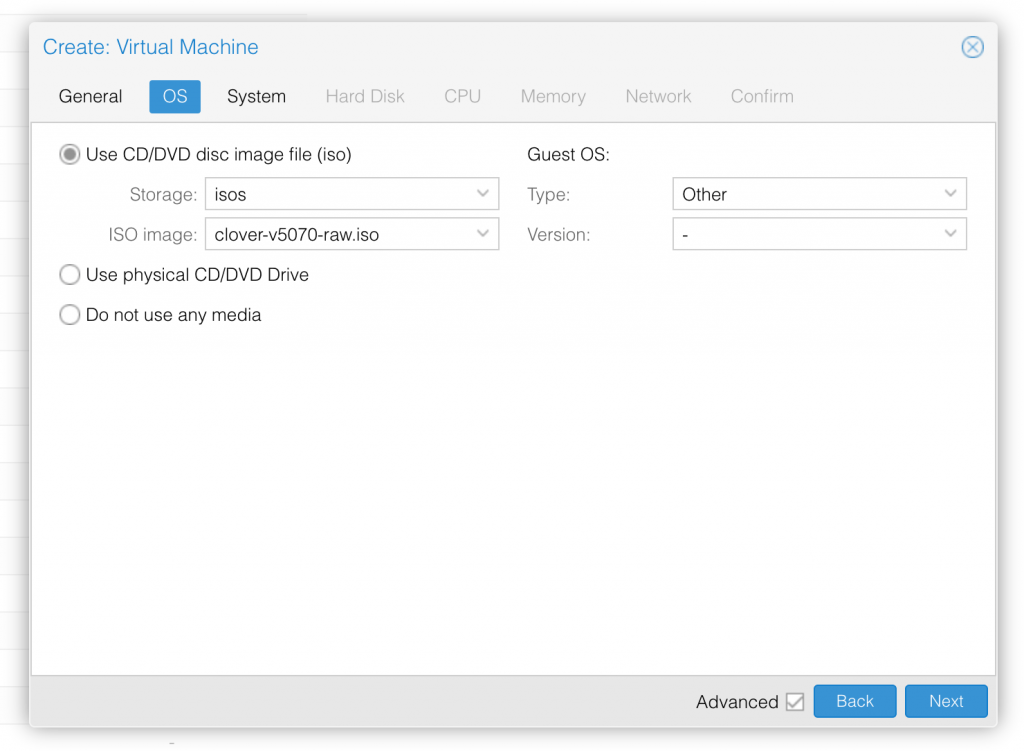
Select the Clover ISO you uploaded and set OS type to “Other” 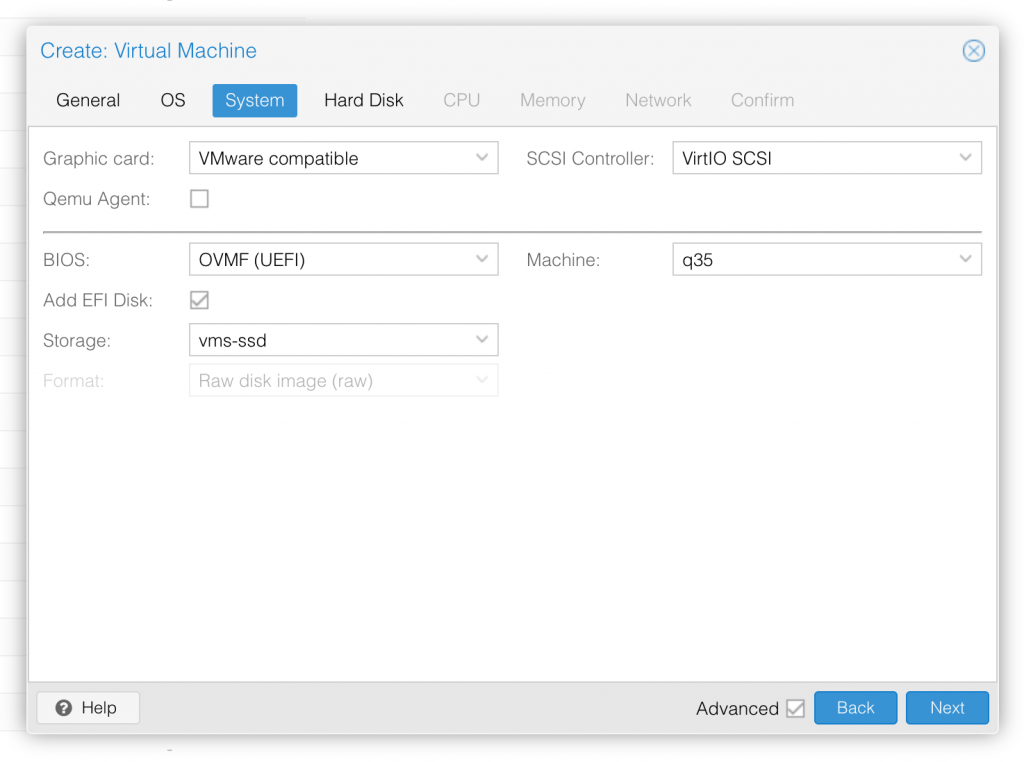
Set graphics to “VMWare Compatible”, set BIOS to OVMF (UEFI), set Machine to Q35, Tick Add EFI Disk and pick storage for it 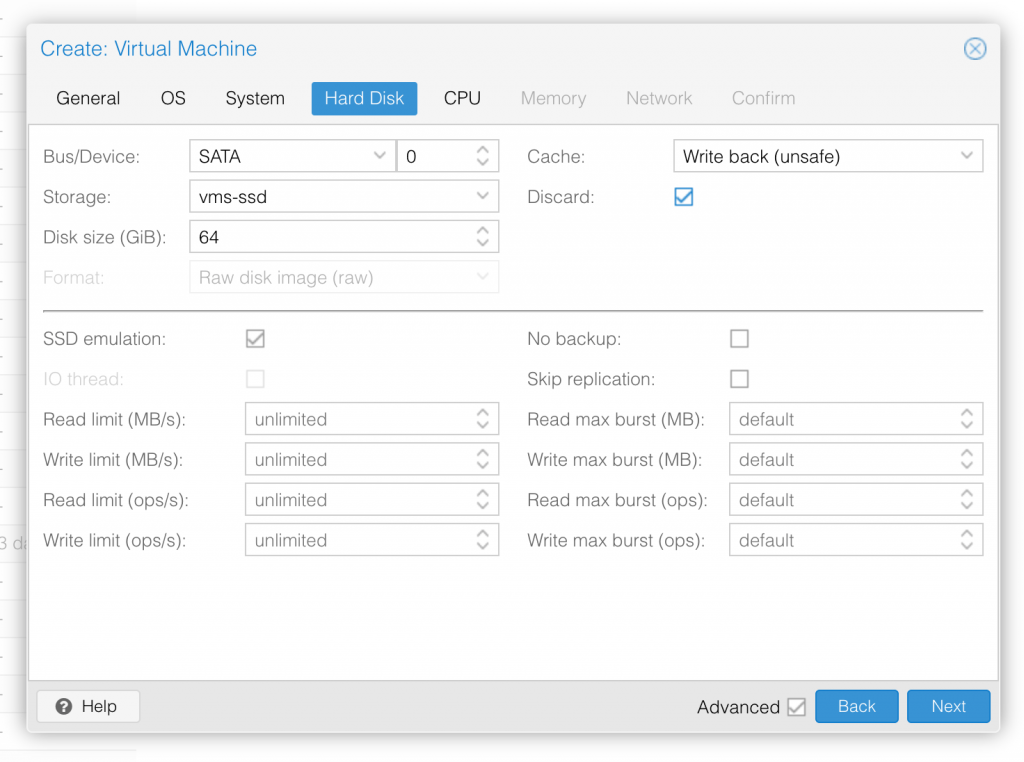
Set the size of the hard disk (I chose 64GB). Attach it to SATA0. Enable discard and SSD emulation to support TRIM. 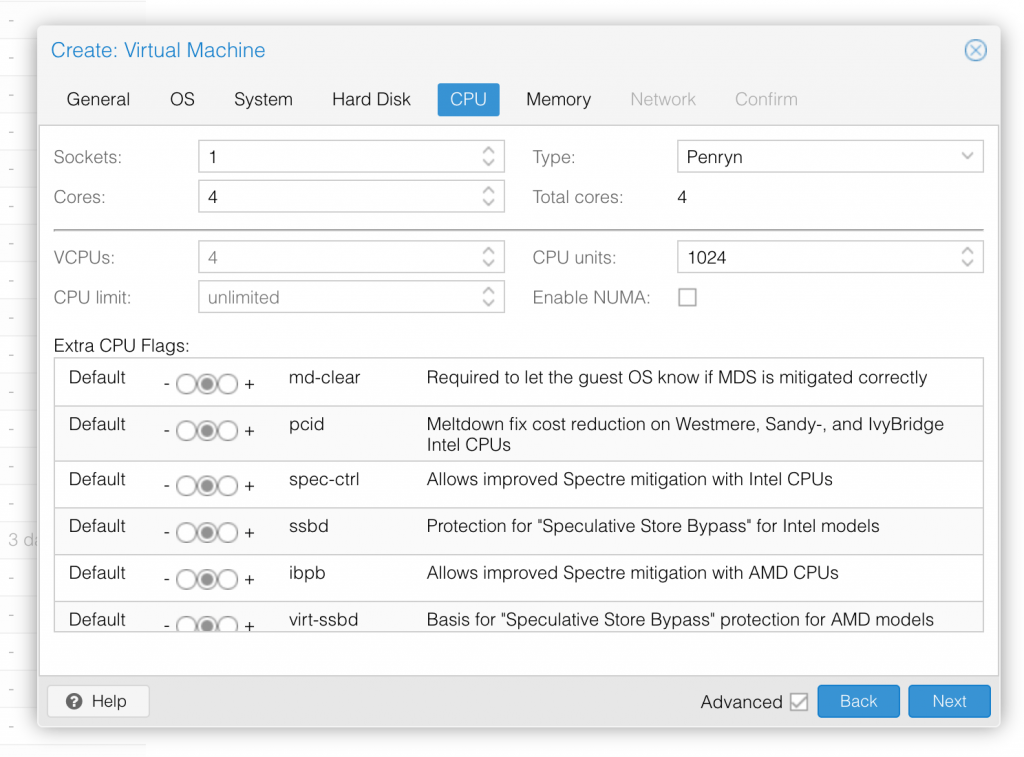
Set the number of cores for the VM, I chose 4 (note that some core counts are troublesome, try 4 first). Set the CPU to Penryn. 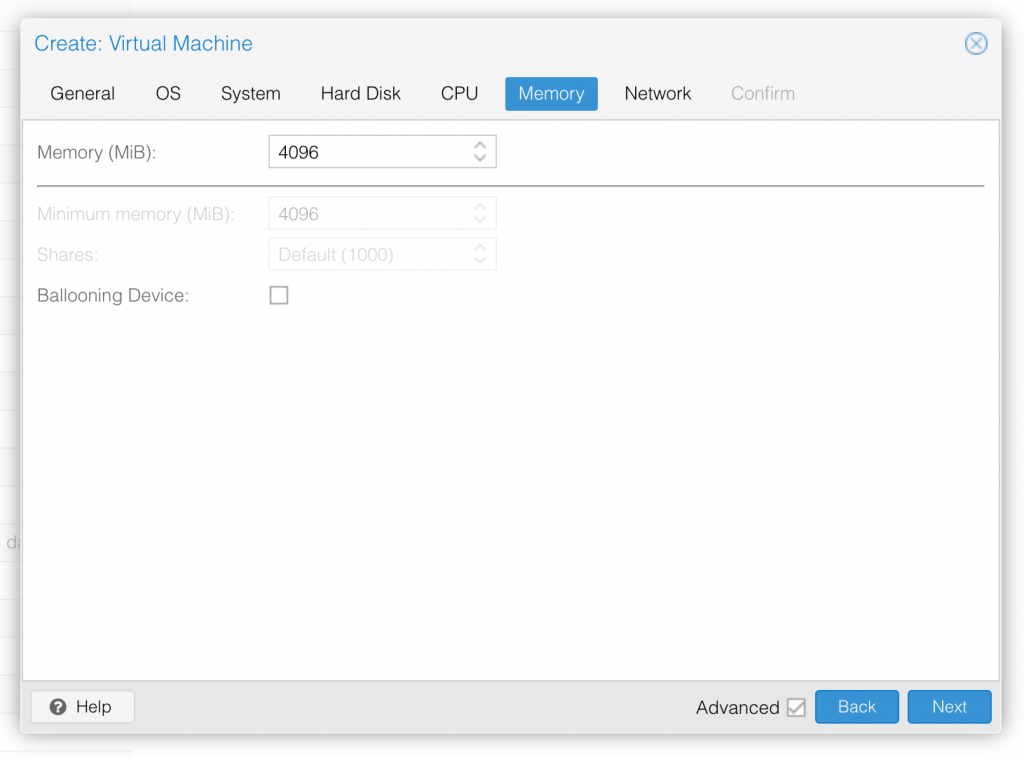
I chose a fixed memory of 4096MB. Disable ballooning because there is no balloon driver available for macOS. 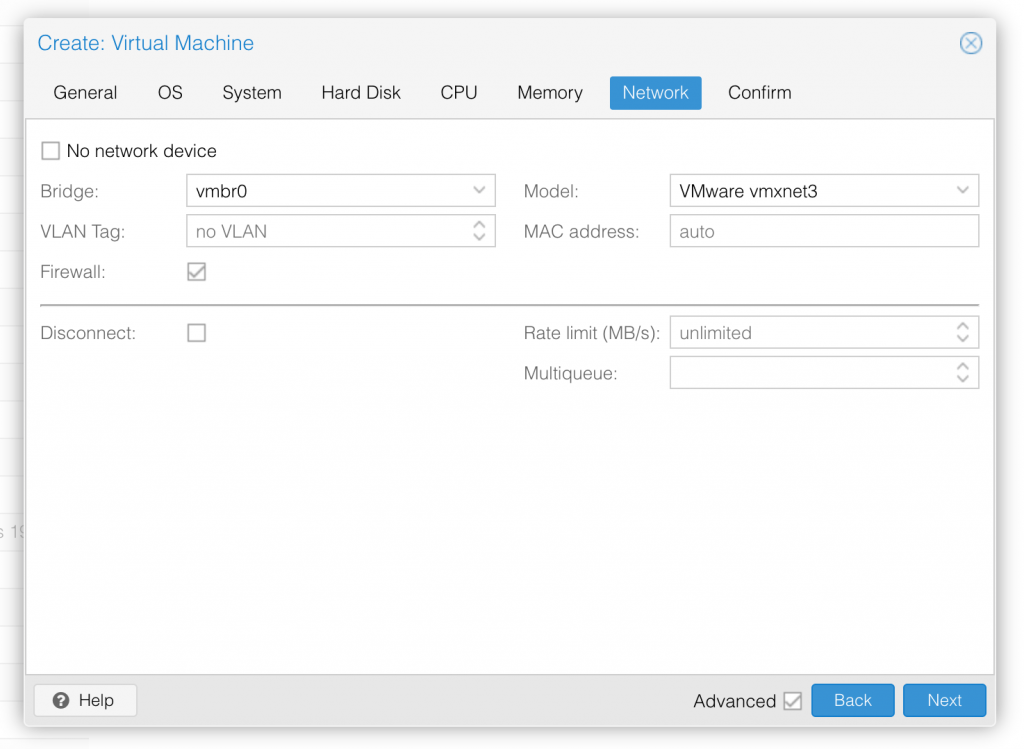
Choose VMWare vmxnet3 for the network model 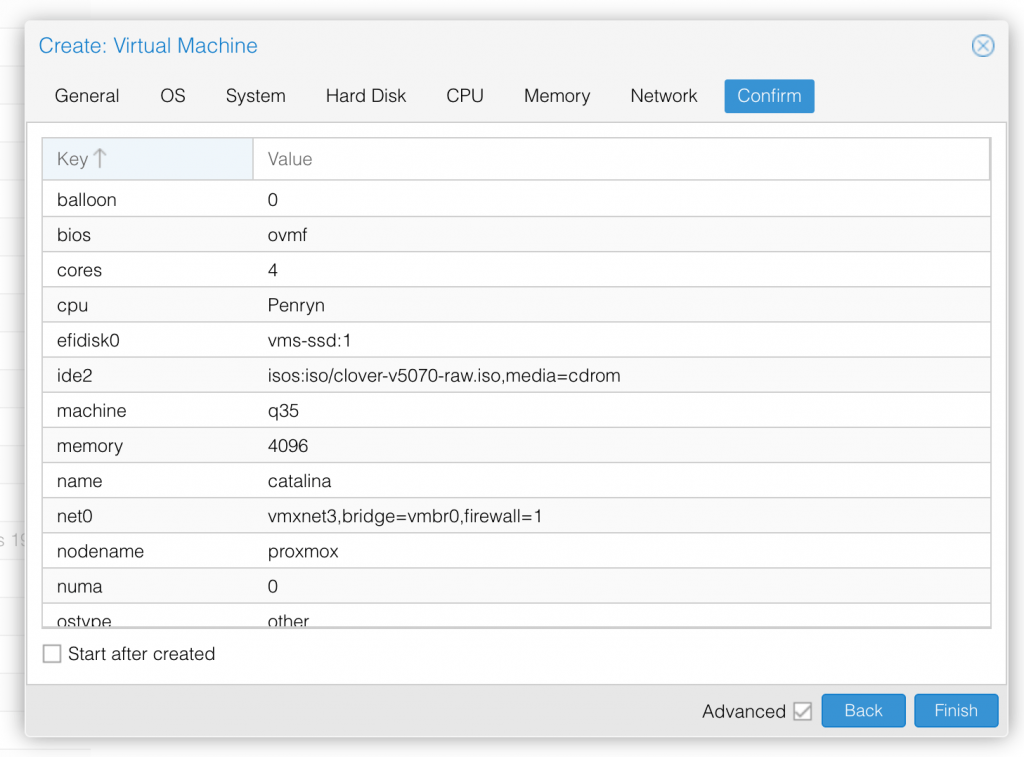
In the Options page for the VM, ensure that “use tablet for pointer” is set to “Yes”.
In the Hardware page for the VM, add a second DVD drive at IDE0, set it to use your Catalina-installer.iso.
Don’t try to start the VM just yet. First, SSH into your Proxmox server so we can make some edits to the configuration files.
Edit /etc/pve/qemu-server/YOUR-VM-ID-HERE.conf (with nano or vim). Add this line, being sure to substitute the OSK you extracted earlier into the right place:
args: -device isa-applesmc,osk="THE-OSK-YOU-EXTRACTED-GOES-HERE" -smbios type=2 -cpu Penryn,kvm=on,vendor=GenuineIntel,+kvm_pv_unhalt,+kvm_pv_eoi,+invtsc,vmware-cpuid-freq=on,+pcid,+ssse3,+sse4.2,+popcnt,+avx,+aes,+xsave,+xsaveopt,check -device usb-kbd,bus=ehci.0,port=2
We’re telling macOS that the CPU is Penryn (it doesn’t seem to like booting otherwise), but we’re enabling all the new CPU features found in Nehalem which macOS will require, plus some optional features found in later generations (AVX/AES). A USB keyboard is added here because macOS doesn’t support QEMU’s default PS/2 keyboard.
Find the line that define the two “ISOs” (ide0 and ide2), and remove the “,media=cdrom” part from them. Add “,cache=unsafe” in its place. This will treat these as hard disks rather than DVD drives.
Save your changes, return to the Options tab, and change the boot order to put IDE2 (the Clover image) first. Your final VM configuration file should resemble this:
args: -device isa-applesmc,osk="..." -smbios type=2 -cpu Penryn,kvm=on,vendor=GenuineIntel,+kvm_pv_unhalt,+kvm_pv_eoi,+invtsc,vmware-cpuid-freq=on,+pcid,+ssse3,+sse4.2,+popcnt,+avx,+aes,+xsave,+xsaveopt,check -device usb-kbd,bus=ehci.0,port=2
balloon: 0
bios: ovmf
boot: cdn
bootdisk: ide2
cores: 4
cpu: Penryn
efidisk0: vms:vm-144-disk-1,size=128K
ide0: isos:iso/Catalina-installer.iso,cache=unsafe
ide2: isos:iso/clover-r5107.iso,cache=unsafe
machine: q35
memory: 4096
name: catalina
net0: vmxnet3=xx:xx:xx:xx:xx:xx,bridge=vmbr0,firewall=1
numa: 0
ostype: other
sata0: vms:vm-144-disk-0,cache=unsafe,size=64G
smbios1: uuid=xxxxxx-xxxx-xxxx-xxxx-xxxxxxxxxxx
sockets: 1
vga: vmware
Configure Proxmox
On Proxmox, run “echo 1 > /sys/module/kvm/parameters/ignore_msrs” to avoid a bootloop during macOS boot. To make this change persist across Proxmox reboots, run:
echo "options kvm ignore_msrs=Y" >> /etc/modprobe.d/kvm.conf && update-initramfs -k all -u
You must now install a patched version of Proxmox’s OVMF library in order to be able to boot Catalina.
Install Catalina
Now start up your VM.
Go to the Console tab, quickly hit Escape or F2 at the Proxmox logo to enter the OVMF configuration. If your keyboard doesn’t work, leave the Console tab, stop the VM, start the VM, then re-enter the console tab.
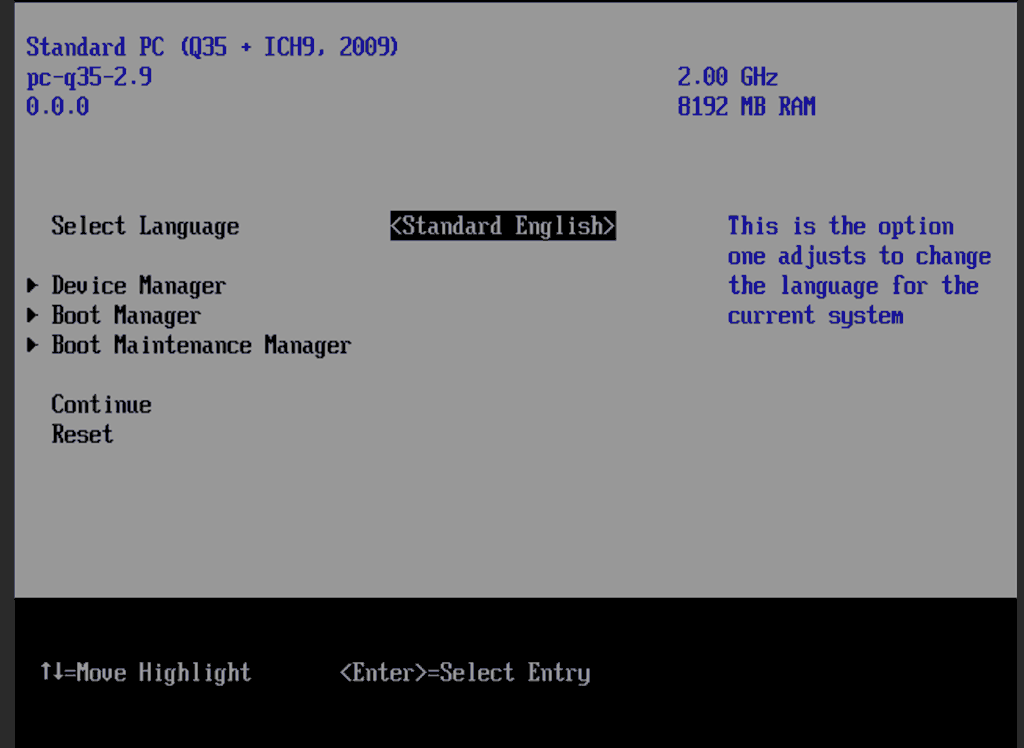
Select Device Manager 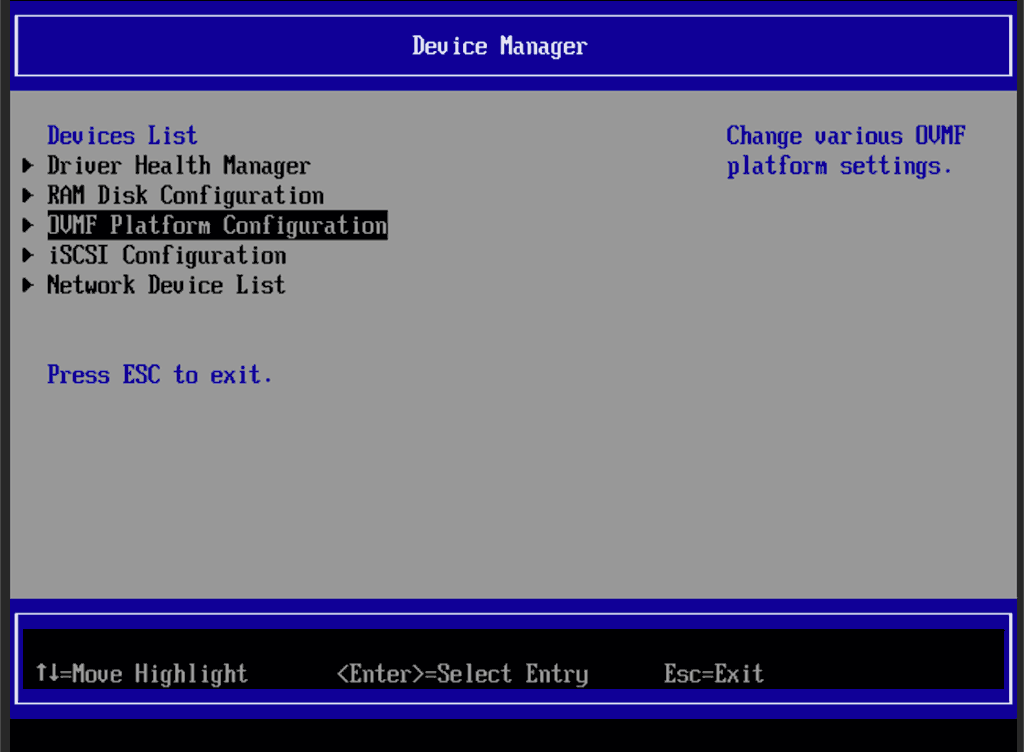
Select OVMF platform configuration 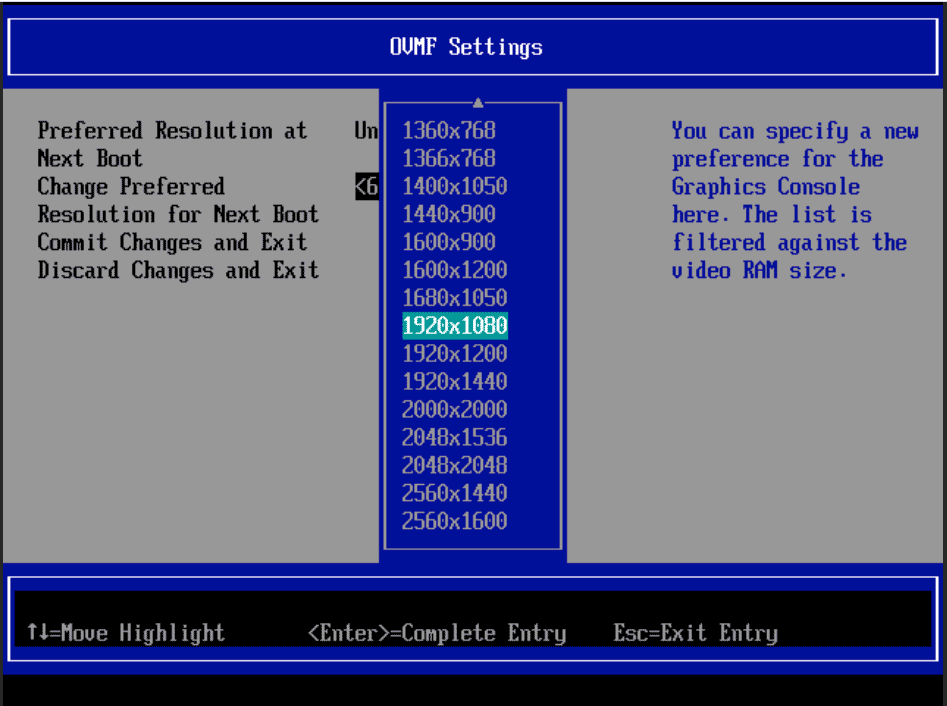
Set the preferred resolution to 1920×1080 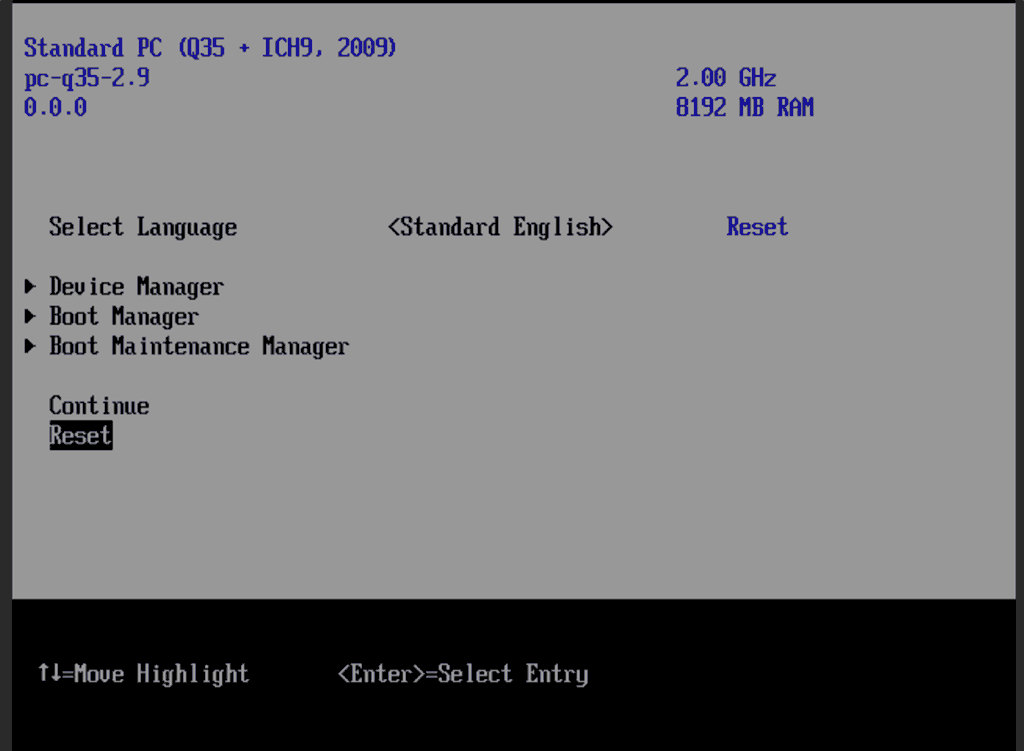
Save changes, then Reset
Follow the steps above to set the screen resolution to 1920×1080, press F10 to save your changes, and “reset” to apply the new settings (not “continue”). This step is required to avoid scrambled graphics on boot and a hang (Clover resolution must match OVMF resolution, or else the Apple logo will be off-centre and the progress bar will be smeared across the screen, resulting in a lockup).
Note that in future you’ll find that when initially started, your VM doesn’t properly apply the the 1920×1080 screen resolution until you hit “Restart Computer” in Clover when the Clover menu appears (or “Reset” on the VM). You’ll notice this happening when the “Proxmox” logo fills a large area of the screen on boot due to the low resolution.
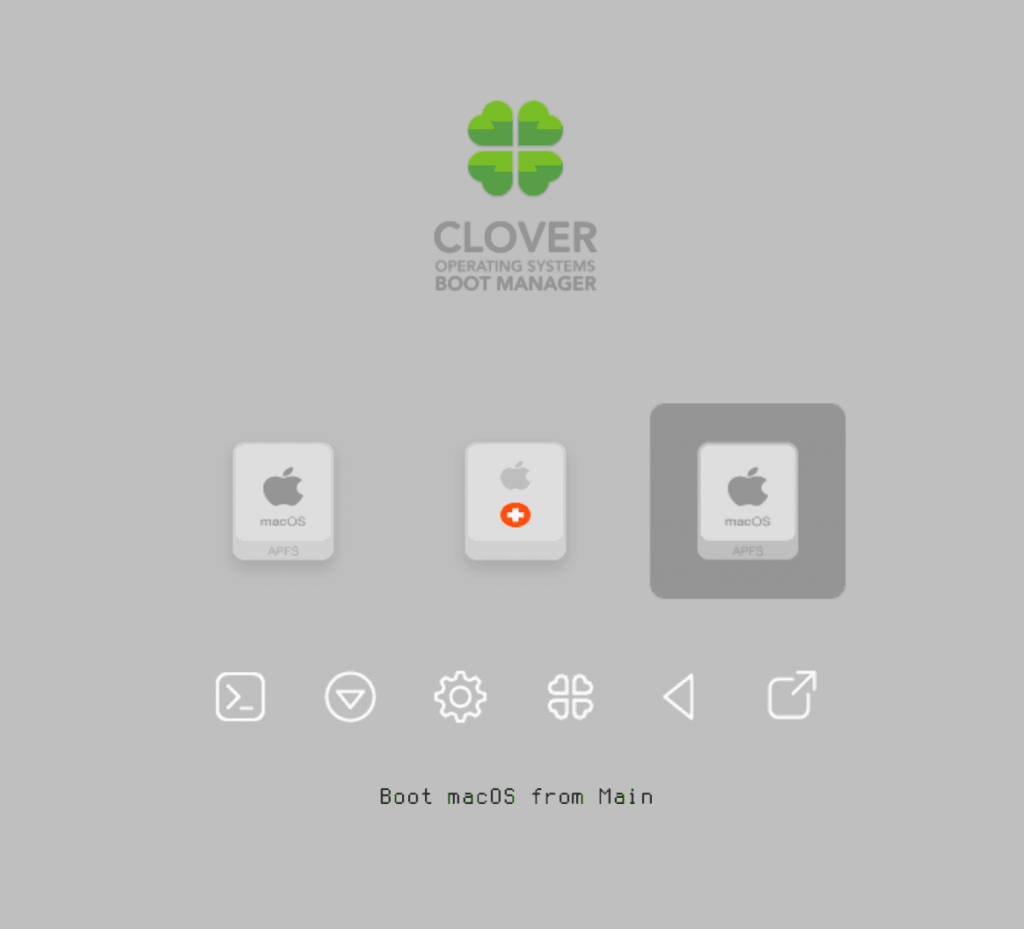
It should now boot into Clover.
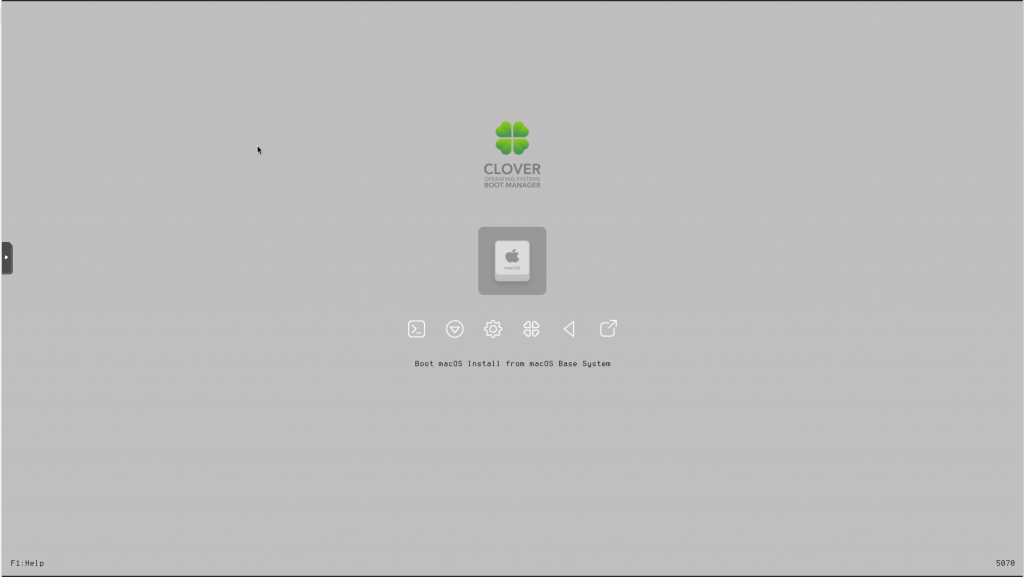
Press enter to boot the “Boot macOS Install from macOS Base System” entry and the installer should appear. Choose your language.
Our virtual hard drive needs to be erased/formatted before we can install to it, so select the Disk Utility option. Follow the steps below to format the disk:
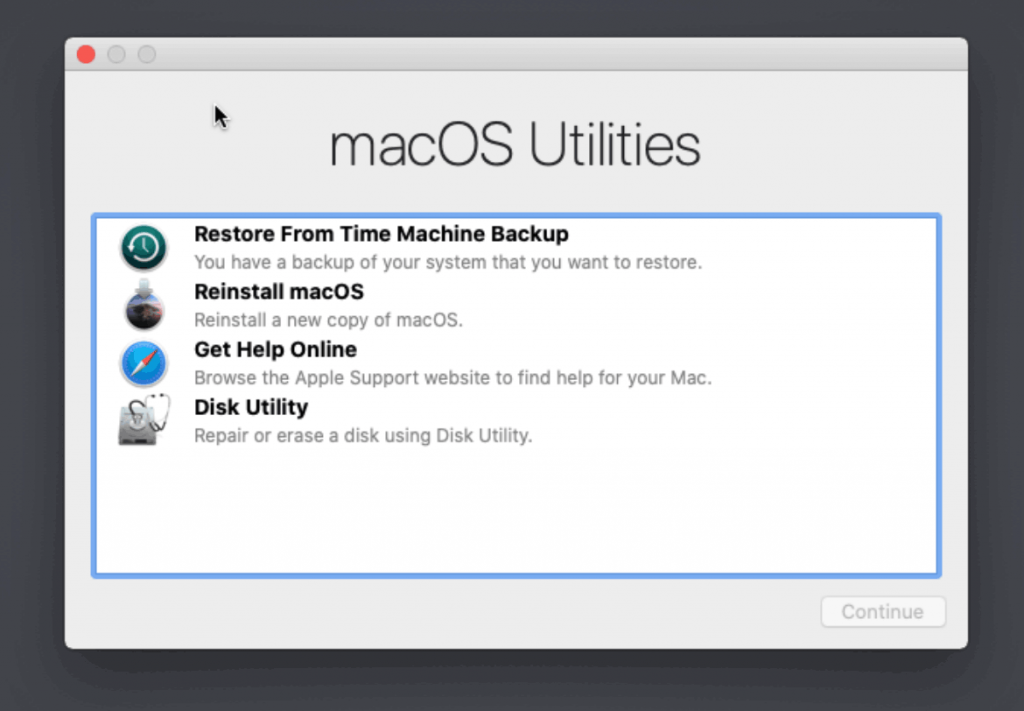
Select Disk Utility 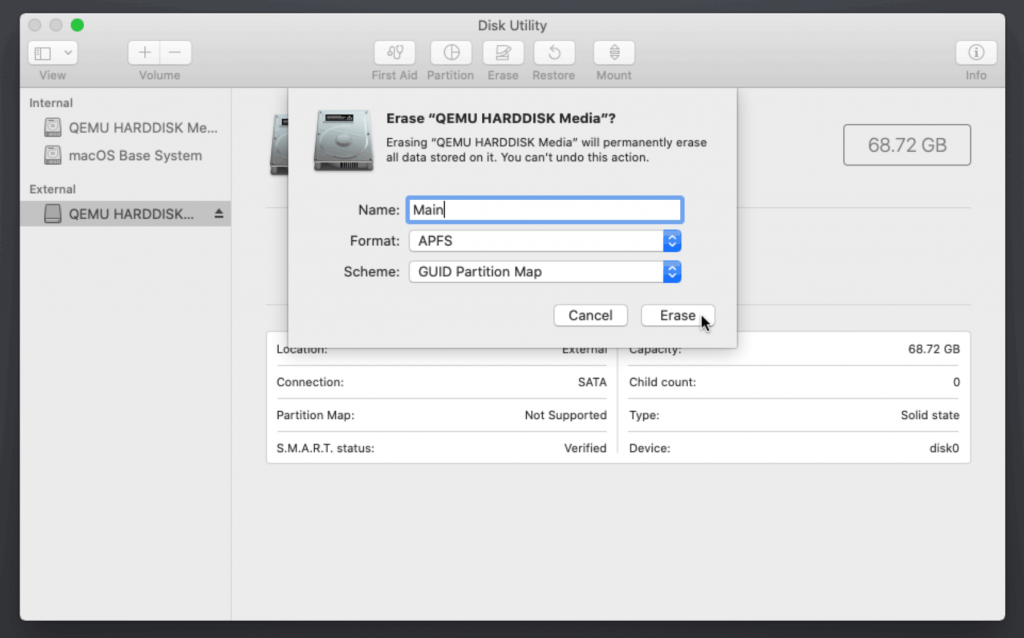
Erase the main disk (it’ll appear as an external drive). Choose APFS. I called mine “Main”. Avoid “Encrypted” at this stage
Now we’re ready to begin installation!
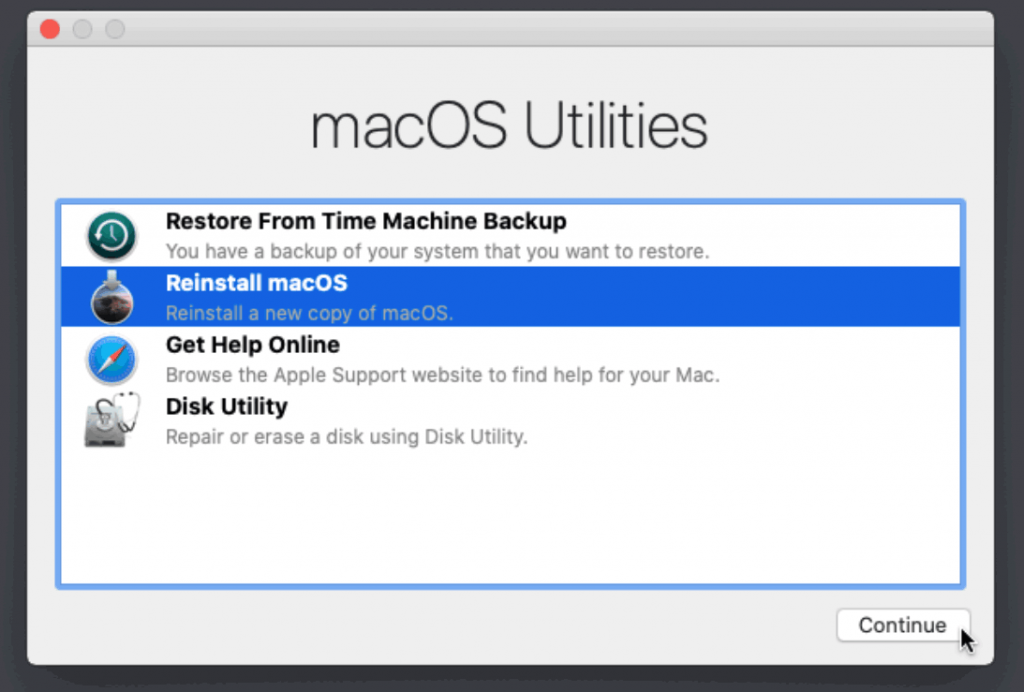
Reinstall macOS 
Continue… 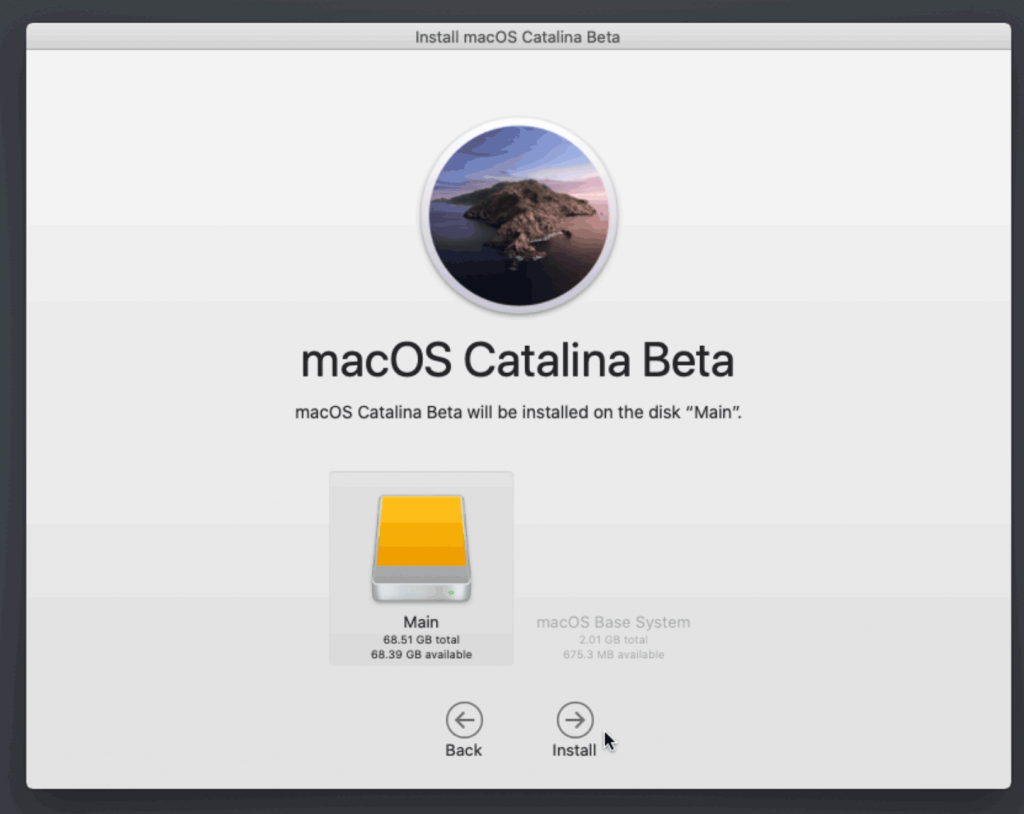
Choose the drive you erased 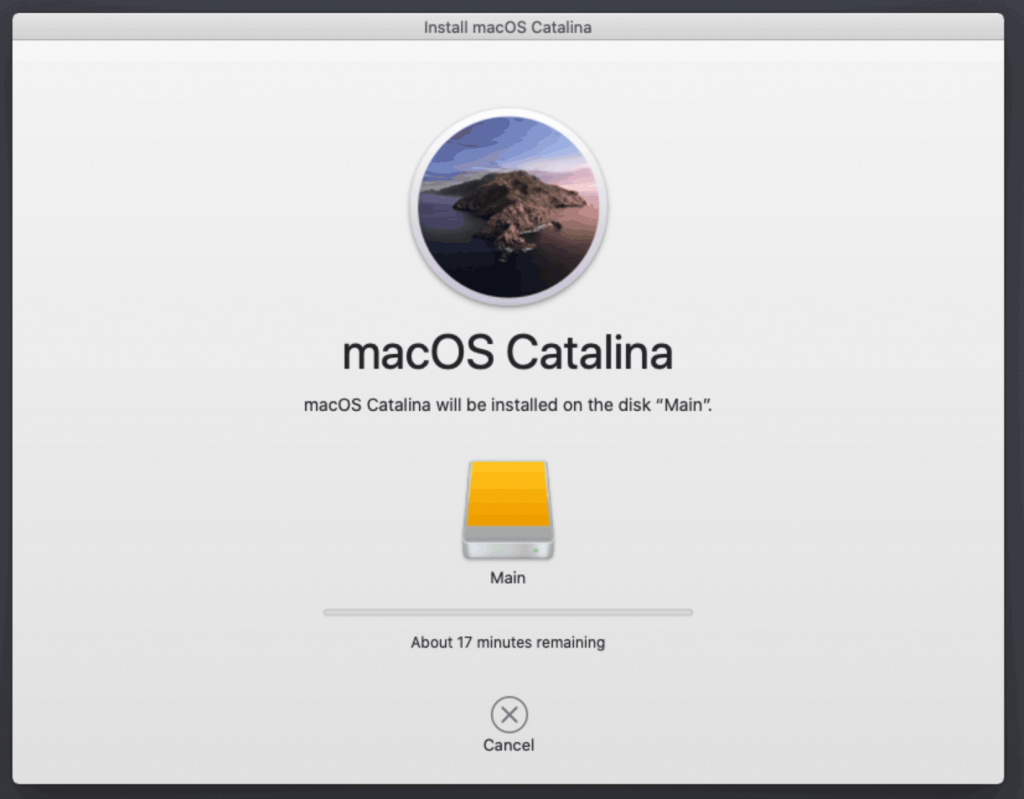
It’s installing!
After the first stage of installation, the VM should reboot itself and automatically continue installation by booting from the hard drive, then reboot itself a second time and automatically boot from “filevault prebooter”. Note that an Internet connection is required during installation, as the installer needs to download Catalina.
Answer the initial install questions, and you’ll be logged on! (Note that you’ll probably want to hold off on logging into your iCloud account until you’ve configured your SMBIOS to your liking in Clover Configurator)
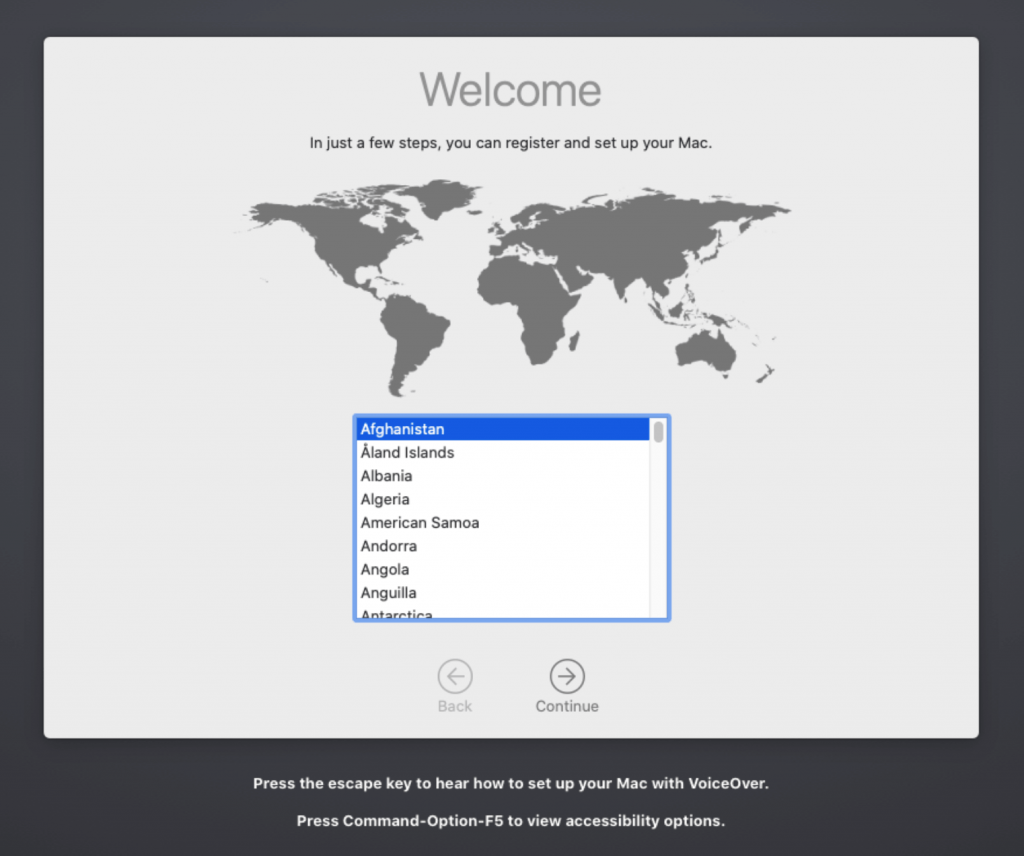
Answer the install questions 
New features! 
New automatic theme switching!
Make the Clover install permanent
We’re currently booting using Clover from the attached Clover ISO. Let’s install that to the hard drive instead. Pop open Terminal and run “diskutil list” to see what drives we have available.
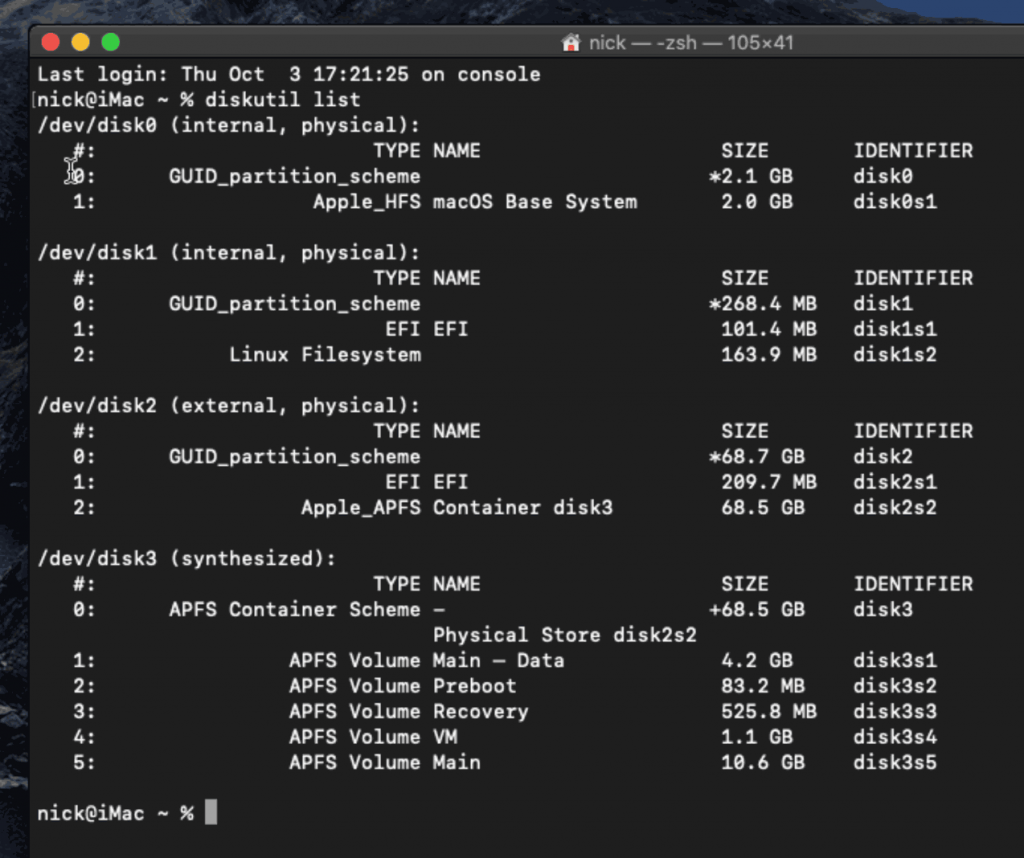
Use “sudo dd if=<source> of=<dest>” to copy the “EFI” partition from the Clover CD and overwrite the EFI partition on the hard disk. The Clover CD is the small disk with the “linux filesystem” on it, and the main hard disk is the one with the large Apple_APFS “Container” partition on it.
In my case these EFI partitions ended up being called disk1s1 and disk2s1 respectively, so I ran “sudo dd if=/dev/disk1s1 of=/dev/disk2s1” (N.B. if you get these names wrong, you will overwrite the wrong disk and you’ll have to start the installation over again!).
Now shut down the VM, and remove both the Clover and the Catalina installer drives from the Hardware tab. On the Options tab, edit the boot order to place SATA0 as the first disk. Boot up. If everything went well, you should see the Clover boot menu, and you can select “Boot macOS from Main” to boot Catalina.
Sleep management
I found that I was unable to wake Catalina from sleep using my mouse or keyboard. You can either disable system sleep in Catalina’s Energy Saver settings to avoid this, or you can manually wake the VM up from sleep from Proxmox by running:
qm monitor YOUR-VM-ID-HERE
system_wakeup
quit
“Prohibited” sign on boot
On a regular Hackintosh this is typically a sign that the boot drive can’t be read, but that situation is difficult to encounter with this VM setup. Nevertheless, I receive a “prohibited” sign during boot in perhaps 1 out of 20 system boots at random (maybe a timing bug?) If this happens, just hit “reset” for the VM to retry (no need to stop and start).
If you get it persistently, something is going wrong with the boot. You can boot macOS in “verbose” mode by hitting space on the macOS option in Clover and ticking the verbose option. This’ll give you a log during booting that can narrow down when the problem occurs.
Editing your Clover/EFI settings
You can use the Clover Configurator tool (Global Edition) to edit your Clover “config.plist” configuration file, which is stored in the hard drive’s EFI partition. This tool should mount the EFI partition for you. If you want to mount it without using Clover Configurator, first check the device name of the EFI partition in the terminal:
~$ diskutil list
/dev/disk0 (external):
   #:             TYPE   NAME           SIZE       IDENTIFIER
   0: GUID_partition_scheme             512.1 GB   disk0
   1:              EFI   EFI            209.7 MB   disk0s1
   2:        Apple_HFS   Main           511.8 GB   disk0s2
Then you can mount it like so:
sudo mkdir /Volumes/EFI
sudo mount -t msdos /dev/disk0s1 /Volumes/EFI
Note that if you upgrade Clover in the future, you must untick the “AudioDxe” driver during installation, because this causes Clover to hang.
Video performance
Because there is no guest video acceleration available for macOS, video performance is poor.
In Google Chrome in the guest you will need to toggle off the setting to “use hardware acceleration when available” to improve issues with elements not being drawn or flickering (especially video). Safari may be a better choice.
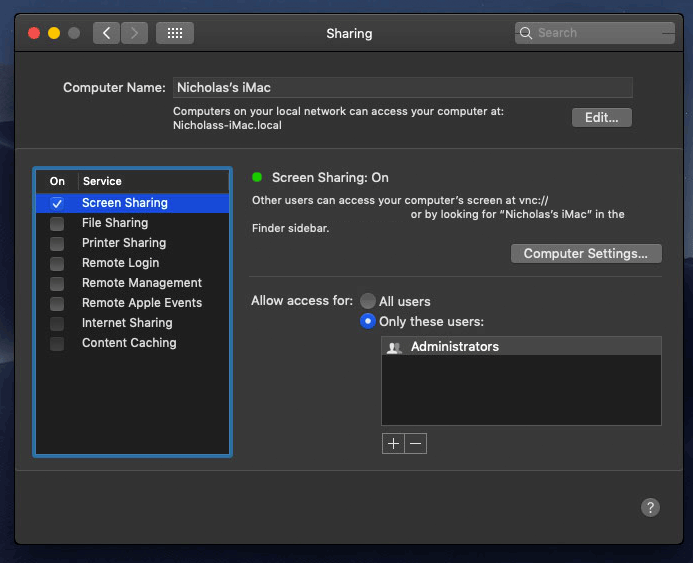
macOS’s built in “Screen Sharing” feature offers dramatically better framerates and latency than Proxmox’s browser-based VNC console, so if you have a real Mac to act as a viewing console, you can enable that in the VM’s “Sharing” settings and connect to the VM using the Screen Sharing app from your Mac instead:
Apparently Screen Sharing is also compatible with VNC clients like RealVNC, so you should be able to connect to it from Linux or Windows consoles using RealVNC.
The real magic bullet for video performance is to pass through a compatible video card using PCIe passthrough (though note that Catalina does not support most NVidia cards). This offers near-native performance. You can read more about how I’m using PCIe passthrough on my own installation here.
USB passthrough
Since I want to use this as my primary computer, I want to use a USB keyboard and mouse plugged directly into Proxmox, rather than sending my input through the web VNC console.
Proxmox has good documentation for USB passthrough. Basically, run “qm monitor YOUR-VM-ID-HERE”, then “info usbhost” to get a list of the USB devices connected to Proxmox:
qm> info usbhost
 Bus 3, Addr 12, Port 6, Speed 480 Mb/s
 Class 00: USB device 8564:1000, Mass Storage Device
 Bus 3, Addr 11, Port 5.4, Speed 12 Mb/s
 Class 00: USB device 04d9:0141, USB Keyboard
 Bus 3, Addr 10, Port 5.1.2, Speed 12 Mb/s
 Class 00: USB device 046d:c52b, USB Receiver
 Bus 3, Addr 9, Port 14.4, Speed 12 Mb/s
 Class 00: USB device 046d:c227, G15 GamePanel LCD
 Bus 3, Addr 8, Port 14.1, Speed 1.5 Mb/s
 Class 00: USB device 046d:c226, G15 Gaming Keyboard
In this case I can add my keyboard and mouse to USB passthrough by quitting qm, then running:
qm set YOUR-VM-ID-HERE -usb1 host=04d9:0141
qm set YOUR-VM-ID-HERE -usb2 host=046d:c52b
This saves the devices to the VM configuration for you. It’s possible to hot-add USB devices, but I just rebooted my VM to have the new settings apply.
You can also pass through USB devices by passing through an entire USB controller using Proxmox’s PCIe passthrough feature.
FileVault 2
FileVault disk encryption is a little janky at the moment. It takes a long time (a couple of minutes) for the password prompt to appear on boot, and then the graphics are scrambled so you have to enter your password blind.
If you really want to use it, be certain to keep a copy of your recovery key and keep your backups up to date!
Upgrading from Mojave
First make a backup or snapshot of your system! Catalina has a new disk layout that separates user data from the system partition, so there’s a higher than normal chance of the installer destroying everything.
Update Clover to r5107 by running the Clover installer. Choose the Customise option. Choose:
- Install for UEFI booting only
- UEFI drivers section:
- Recommended Drivers: Tick all, except untick AudioDxe (it causes Clover to hang)
- Filesystem drivers: Tick ApfsDriverLoader
- Memory fix drivers: Tick OsxAptioFix3Drv
- FileVault 2 drivers: Tick all
- Additional drivers: Tick PartitionDxe
Update any kexts you have installed (Lilu, WhateverGreen, etc). Now reboot to check that Mojave still boots properly using this updated Clover install.
If you’re using any PCIe passthrough devices (particularly video cards) you’ll probably want to disable those and set “vga: vmware” instead, so you can install using Proxmox’s web console. This avoids installer problems triggered by flaky video card passthrough.
Now you can upgrade to Catalina by adding the Catalina-intaller.iso as a DVD drive, editing the VM config to replace “media=cdrom” with “cache=unsafe” and booting from that. You can probably also just install Catalina from the Mac App Store, but I haven’t tested that approach myself.
After upgrading, you may find that on boot you are dropped into the UEFI shell instead of booting Clover. If so, you can manually find and run Clover (e.g. by running “fs0:” “cd EFI\CLOVER “CLOVERX64.efi”), then use Clover’s “Boot Menu Options” menu to remove the Clover UEFI entries and re-add them.
Thank you! How the heck did you figure all this out. You’re not human. lol
Hi,
Made a fresh install as per this guide. Everything boots fine to the console, but as soon as I pass the 5700XT the vm will not boot. The progress bar will stop near the end. Nothing else is passed through except for the NVME. Latest Lilu, WEG and AppleALC installed . I also set agdpmod=pikera.
Any help is greatly appreciated.
Try setting SMBIOS to iMac 14,2 if you haven’t already (e.g. using Clover Configurator), it improved GPU compatibility for me. It can also improve compatibility to disable the emulated video (vga: none) when using passthrough.
Thanks for the help.
I tried iMac 14,2 as well as iMac Pro 1,1 and Mac Pro 7,1 with no luck. I also did set vga=none when I passed through the gpu. For some reason it will not finish booting.
Any other tips would be greatly appreaciated.
Update:
I followed your new guide using OpenCore and now I can pass through the gpu!
If only I could fix the AMD reset bug too.
Ah, I was just about to suggest that to you myself, I’m currently testing OpenCore passthrough on my own setup and it’s going well so far.
Most likely it fixed it for you because I’ve bundled the WhateverGreen kext in with my OpenCore image, and that fixes a bunch of graphics card issues.
Interestingly one person I talked to has a Vega 64, which should be affected by the reset issue, but even with an unpatched Proxmox kernel they are able to seamlessly pass it between their Windows and Mac VMs! It has to be magic because I can’t think of any other explanation.
I wish they could pass some of that magic to me. That bug is driving me crazy. 😡
Look here : https://github.com/gnif/vendor-reset
What Was wrong with your OpenCore configuration ?
Thanks for the help.
I tried iMac 14,2 iMac Pro 1,1 and Mac Pro 7,1 all with no luck. I also did set vga=none when passing through.
Hi, in this part of my guide a user (Imanol) has configured a 5700xt..maybe could be useful also for your problem
https://www.macos86.it/topic/2509-guide-trx40-osx-bare-metal-proxmox-setup61-3/?do=findComment&comment=64138
Hi there,
I am currently following your tutorial and arriving at this step:
./smc_read
the result is unexpectedly:
[…]
Can someone help please? I am sure this is not the correct and expected result 🙂
That’s the correct result.
Does anybody have experiences with USB-Sound Passthrough? I bought a cheap USB Media Soundcard from amazon which runs on my MacBook without any issues. When I pass through the device through the webinterface I get stuttering sounds and lags.
Any ideas?
Regards
Markus
I saw in your config you set vga to none if you passthrough your graphic. If i do this i get a failure and my system don‘t boot. If i let vmware graphics in i see my other graphic card with „3“ monitors 2 i installed and one of vmware graphic.
Any Idea how to fix this ?
Hello, when trying to retrieve OSK key, I get this:
“…”
What am not doing correctly?
Nothing, that’s the correct OSK.
Dear Nick,
Thanks for your tutorial.
When I try to start VM it stops immediately and displays:
kvm: -cpu: requires an argument
TASK ERROR: start failed: QEMU exited with code 1
Using: pve-manager/6.2-4/9824574a (running kernel: 5.4.41-1-pve)
Run your Proxmox 5 OVMF – should I of used the Version 6 OVMF?
Best Wishes
Yes you’ll want to use the correct OVMF or you’ll get nowhere.
Show your args line from your VM config, sounds like you have a typo in the -cpu argument.
args: -device isa-applesmc,osk=… -smbios type=2 -cpu
Penryn,kvm=on,vendor=GenuineIntel,+kvm_pv_unhalt,+kvm_pv_eoi,+invt
sc,vmware-cpuid-
freq=on,+pcid,+ssse3,+sse4.2,+popcnt,+avx,+aes,+xsave,+xsaveopt,ch
eck -device usb-kbd,bus=ehci.0,port=2
balloon: 0
bios: ovmf
boot: cdn
bootdisk: ide2
cores: 4
cpu: Penryn
efidisk0: local-zfs:vm-104-disk-1,size=128K
ide0: pool1-iso:iso/clover-r4920.iso,cache=unsafe,size=256M
ide2: pool1-iso:iso/Catalina-installer.iso.img,cache=unsafe,size=2096496K
machine: q35
memory: 4096
name: Catalina
net0: vmxnet3=82:DC:CB:C4:C4:F9,bridge=vmbr0,firewall=1
numa: 0
ostype: other
sata0: local-zfs:vm-104-disk-0,cache=unsafe,discard=on,size=64G,ssd=1
scsihw: virtio-scsi-pci
smbios1: uuid=7be44331-05ce-48d4-8702-7cb0a31a99ad
sockets: 1
vga: vmware
vmgenid: da4b9c8a-b373-451f-b71f-d46e724bade2
Right, I’ve got it to boot, but with issues.
On Proxmox screen it stops and gives the error:
BdsDxe: failed to load Boot0001………
I’ve found that choosing another entry from the Boot Manager menu allows Clover to start, but not always the same option boots Clover.
When I have got it working, I’ve got Catalina installed and got as far as being able to use Safari and bring up Youtube.
Is there anyway I can use the Keyboard on my MacBook Air (MBA’s trackpad functions with no-VNC) to control Catalina VM with no-VNC? I have been using the host’s keyboard, but its inconvenient.
Thanks for the tip with -cpu argument on the args line and using the correct OVMF – Doh!
Going back into the .conf file,
All of this:
,kvm=on,vendor=GenuineIntel,+kvm_pv_unhalt,+kvm_pv_eoi,+invtsc,vmware-cpuid-freq=on,+pcid,+ssse3,+sse4.2,+popcnt,+avx,+aes,+xsave,+xsaveopt,check -device usb-kbd,bus=ehci.0,port=2
has disappeared from the .conf file.
Any ideas why I’m getting what I’m getting?
Cheers David
You had linebreaks in the middle of your args line, it must all be on one line. (That’s why it was complaining that -cpu didn’t have an argument, and why the subsequent lines are being dropped from your config)
Hi,
at first, thanks for this helpful article.
But I have an issue during the installation.
When the first stage of installation finished, it does not reboot from the hard drive. Instead, it boots to Clover again.
Any suggestions why?
Regards Gino
It’s gonna boot to Clover every time, because Clover is your bootloader. You need to pick the option for the installer (which isn’t the ISO) if it doesn’t pick it for you automatically.
This tutorial is obsolete because OpenCore is way better than Clover, click the link at the top of the article to go to the new post.
Hi,
First thank you Nick, for this guide. If it works it will be a great experience.
Maybe i’m a little late using this guide, but at the start i got 2 problems. Maybe you can help me with this:
1. Getting the installing iso doesnt work. When i start the script, it says:
File “./fetch-macOS.py”, line 325
[print(“- {}”.format(product_info[pid][‘version’])) for _, pid in enumerate(product_info)]
^
SyntaxError: invalid syntax
2. When i want to fetch the OSK authentication key, the Website with the C code is not available anymore. I get a 404 not found for the whole address. Maybe its temporarily not available.
Can you help me out with alternatives or fixes?
Regards,
Dan
1: Looks like an incompatibility was introduced when running the script on Python 2, I’ve fixed that now.
2: I’ve added a link to the Archive.org version of that page now.
This Clover-based tutorial is effectively obsolete now, since OpenCore works much better, I would suggest using that newer tutorial instead for any new installs:
https://www.nicksherlock.com/2020/04/installing-macos-catalina-on-proxmox-with-opencore/
Thanks Nick for fast reply. It now works fine, i will use opencore.
Hello, I’ve followed your previous guide and have Catalina running with Clover under Proxmox with PCI / GPU passtrough , however, I have not been able to get it fully working with OpenCore.
This works:
1. Clover, Display: none, GPU/pci passtrough.
2. OpenCore, Display: Standard (no GPU).
3. OpenCore, Display: Standard, GPU/pci passtrough (I have to configure Display Mirror but the gpu seems to work ok)
This fails:
1. OpenCore, Display: none, GPU/pci passtrough
Seems like as soon as I remove the Display from the VM configuration, EFI doesnt continue booting to OpenCore/macOS. Any idea what else should I try?
Thanks!
The critical difference between your old Clover config and the new OpenCore one would be the version of Whatevergreen that is included in both, and their interaction with any device renames that the bootloader does.
Try editing config.plist to add agdpmod=pikera to the kernel args (next to keepsyms=1)
Thanks for this nice tutorial. Running fine on a Ryzen7.
Here are some hints for people using GPU passtrough.
For some reason the proxmox web configuration sets the passtrough options to: pcie=1,x-vga=1
I found out that pcie=on,x-vga=on are correct values for my case otherwise my RX590 GPU won’t start. (It took me ages to figure this out)
This additional command should do the trick:
Replace the 100 by the ID of your VM.
Replace the 29:00 by the address of your GPU.
qm set 100 -hostpci0 29:00,pcie=on,x-vga=on
People who have a reset bug affected GPU like Radeon RX580/590 might like to try this trick:
In case the GPU isn’t starting up (You see a black screen instead of a Proxmox boot screen and you don’t see/hear fan spin of your GPU at startup)
Kill the running qemu VM and execute these commands to rescan the PCI bus. The GPU should boot next time when starting the VM. Unfortunatly the GPU needs to crash the first time after booting the Proxmox server before this command are effective. The VM process can’t be killed on the graphical interface.
Replace 29:00 below by the address of your GPU / GPU-audio
echo 1 > /sys/bus/pci/devices/0000\:29\:00.0/remove
echo 1 > /sys/bus/pci/devices/0000\:29\:00.1/remove
echo 1 > /sys/bus/pci/rescan
Does anyone have a USB3 passtrough trick?
I read about remapping hardware IDs, or passing trough an entire compatible USB3 PCI card.
Has anybody tried to passtrough all cores/treads on bigger CPUs?
It is curently stable with 1CPU/8Cores from, which I think perorms faster, or 4CPU/4Cores. Other options like 1CPU/16Cores won’t boot.
Try adding this to your args:
-smp 16,sockets=1,cores=8,threads=2
(You may need to set cores:16 too)
Alternatively:
-smp 16,sockets=2,cores=8,threads=1
I was unable to boot mine with more than 1 core until I added the -smp… type arguments. My Host CPU is Xeon E5-2640, if that matters. That fixed the issue for me, so
args: -device isa-applesmc,osk=”…” -smbios type=2 -cpu host,kvm=on,vendor=GenuineIntel,+kvm_pv_unhalt,+kvm_pv_eoi,+hypervisor,+invtsc -smp 8,sockets=1,cores=4,threads=2
cores: 8
In order to do 8 cores.
Thanks for the tutorial. Wondering if this is a common enough issue that it may warrant an update?
Hmm, I’ve only seen this trigger issues for systems with weird core counts. I thought 8 cores would be fine, but maybe it maxes out at 4?
My newer tutorial that uses OpenCore avoids this issue since it patches the kernel to remove the core-count checking code: https://www.nicksherlock.com/2020/04/installing-macos-catalina-on-proxmox-with-opencore/
Hello,
I have an issue when accessing the Mac Remotely. I have installed MacOS on a VPS I rented having Proxmox installed on it. When I access the Mac it’s very slow sometimes 1 click takes almost 10 minutes to get the result. The resolution as you have mentioned in the tutorial is 1920×1080, I tried lowering down the resolution however the screen starts to scramble. Is there any suggestion how to speed-up the response as if it’s a normal MAC and can I apply a lower resolution with no issues?
10 minutes is three orders of magnitude slower than the slowest performance I’ve seen, something is very wrong there. How much RAM do you have? That’s the performance I’d expect if you only had like 512MB of real RAM, and were thrashing through the host’s pagefile which was stored on spinning rust. EDIT: Wait, you probably got some error message about KVM not working, and turned off KVM Hardware Virtualisation, right? That means your guest CPU will be emulated in software, which is completely unusable. You need KVM to be enabled, which means your VPS will need to support Nested Virtualisation.
If you share your mac’s screen using macOS’s built-in Screen Sharing feature, the performance is much better than Proxmox’s web VNC console.
Clover’s configured resolution in its config.plist needs to match the resolution set in your guest’s UEFI settings. If you change one you need to change the other. Or replace your bootloader with OpenCore, it doesn’t suffer from this problem, so you only need to set the resolution in its config.plist, and don’t need to make UEFI match:
https://www.nicksherlock.com/2020/04/installing-macos-catalina-on-proxmox-with-opencore/
Hello,
Yes the server should accept virtualization. And the RAM I dedicated was 8GB in real shouldn’t be less than 2GB. According to Proxmox Panel the KVM is on, I’m not sure if it’s in reality it’s not.
Is there a way to contact you and you do a checkup as a service?
Trying to launch a VM with KVM ticked on the Options page, but actually unavailable on the host, results in a VM launch failure with the error “TASK ERROR: KVM virtualisation configured, but not available. Either disable in VM configuration or enable in BIOS.”. If you’re not seeing that message then I guess you do have KVM available for use.
I’ll shoot you an email about a checkup.
Is there a way to migrate from Clover to Opencore without the re-installation process and data loss? Saving time elsewhere we have to do everything all over again from 0.
Yes, you simply need to ‘dd’ the new OpenCore image on top of your current EFI partition, just like the method for installing Clover or OpenCore to the hard drive (at the end of the tutorial normally). (If you’ve made any customisations to your Clover config.plist you’ll need to port those over).
Alternatively you can mount your current EFI partition inside macOS (using the instructions in the tutorial) then delete the EFI folder from there and replace it with the contents of my OpenCore “OpenCoreEFIFolder.zip” zip file.
Take a snapshot first.
Well I got one machine running with VFIO macOS+GTX760 (and Linux+iGPU). Performance is pretty good but I’m not satisfied yet!
I’m trying to get my beefier machine (Ryzen 3900X) to work with Win10+GT1080 and MacOS+R9380.
MacOS doesn’t want to boot with VFIO for either GPU.
Win10 boots fine with either GPU (and no resets!)
I even moved the GTX760 into the Ryzen machine and I couldn’t get macOS+ to work on it when the same setup is working on the intel box.
Catalina and Big Sur both give same results. I’ve read you need DSDT timings and some weird kext’s for the R9 cards. I’ve tried passing a 380x rom to the VM but that doesn’t work either. Every scenario is just a hung macOS boot. Is there a way to turn on some boot logging to see what’s going on? Doesn’t look like the kernel even starts so I’m thinking the problem is in opencore.
It’s likely to be a problem on the Proxmox side, what are you getting in your dmesg output / kern.log?
What’s the symptom when it hangs, does it switch to a black screen?
Make sure you’re not using my Big Sur OpenCore image because it’ll cause both Catalina and Big Sur to fail to boot in this config.
Hey,
I got a problem executing the fetch-macOS.py script. Executing it with python2 or 3 the error would be the same, ive tried it on macOS and Linux 18.04:
$ python fetch-macOS.py
[+] Fetching https://swscan.apple.com/content/catalogs/others/index-10.16seed-10.16-10.15-10.14-10.13-10.12-10.11-10.10-10.9-mountainlion-lion-snowleopard-leopard.merged-1.sucatalog
[+] Fetching http://swcdn.apple.com/content/downloads/20/55/001-51042-A_2EJTJOSUC2/rsvf13iphg5lvcqcysqcarv8cvddq8igek/InstallAssistantAuto.smd
[+] Fetching https://swdist.apple.com/content/downloads/20/55/001-51042-A_2EJTJOSUC2/rsvf13iphg5lvcqcysqcarv8cvddq8igek/001-51042.English.dist
Invalid XML in content/downloads/20/55/001-51042-A_2EJTJOSUC2/rsvf13iphg5lvcqcysqcarv8cvddq8igek/001-51042.English.dist
I’ve updated fetch-macOS.py from the upstream to fix this now, please grab the newest version:
https://raw.githubusercontent.com/thenickdude/OSX-KVM/master/fetch-macOS.py
And delete the cached “content” directory (in the same directory as you ran fetch-macOS) to clear the cache before running it again!
Hi, I’m having issues trying to get to the macOS install screen. All’s good until I get frozen at the apple logo, so I rebooted, and enabled verbose and got this: https://media.discordapp.net/attachments/746950367262146752/766301523198083112/unknown.png
Is there anything to help me fix this?
Hi, I get in the same issue.
To solve, I used this tutorial https://www.nicksherlock.com/2020/04/installing-macos-catalina-on-proxmox-with-opencore/
It uses the opencore instead of clover!
Hi.
I do all the steps, but when I boot the installer from clover a black screen appears with the “apple” logo an stuck there…
This is normal? I need to wait? This will take several minutes to the macOS installer to come on?
I suggest upgrading to my OpenCore version of this Catalina tutorial: Installing macOS Catalina 10.15 on Proxmox 6.1 or 6.2 using OpenCore or even my new Big Sur one: Installing macOS 11 “Big Sur” on Proxmox 6
I no longer remember enough about Clover to debug this