
macOS 11 Big Sur has now been released! If you’d like that version instead then please use my new Big Sur installation guide!
This tutorial for installing macOS Catalina using OpenCore has been adapted for Proxmox from Kholia’s OSX-KVM project and Leoyzen’s OpenCore configuration for KVM. You can get the full sourcecode on my GitHub here.
If you’d like to use Clover instead, use my older tutorial, but OpenCore works better!
Requirements
I’ll assume you already have Proxmox 6.1 or 6.2 installed. You also need a real Mac available in order to fetch the OSK key.
Your Proxmox host computer’s CPU must support SSE 4.2, so for Intel your CPU must be at least as new as Nehalem, which was the first CPU generation to bear the “Core” i5/i7 branding. Older CPUs will cause the finder to repeatedly crash after installation completes (with an Illegal Instruction exception in the graphics code).
Modern AMD CPUs also support SSE 4.2 and will work with this guide.
First step: Create an installation ISO
The easiest installer to build is a recovery image, which will download Catalina during installation. Download and run fetch-macOS.py in a terminal to download the Catalina recovery image from the Apple software distribution server (this can be run on Linux, Proxmox, or on a Mac):
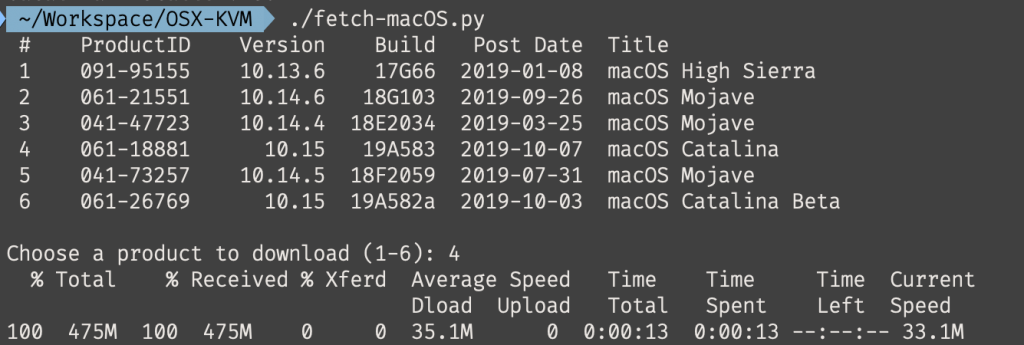
This results in a ~500MB “BaseSystem.dmg” file in the current directory. Convert that dmg into an “iso” like so if you’re building this on macOS:
hdiutil convert BaseSystem.dmg -format UDRW -o Catalina-installer.iso
mv Catalina-installer.iso.img Catalina-installer.iso
Or like so if you’re building this on Linux:
# Install the dmg2img package and...
dmg2img BaseSystem.dmg Catalina-installer.iso

# Or use qemu-img from the qemu-utils package to do it instead:
qemu-img convert BaseSystem.dmg -O raw Catalina-installer.iso
The result is actually a raw disk image, not a true ISO, but Proxmox has better tools for picking and re-using ISO images than disk images. Upload the “ISO” to your Proxmox server’s ISO store (typically /var/lib/vz/template/iso).
If you won’t have an Internet connection available to Catalina during installation, or your network can’t provide an IP address by DHCP you’ll need to build an offline installer instead. Building the offline installer requires you to have a Mac, here are the instructions.
Prepare an OpenCore image
We’ll be using OpenCore as a bootloader for Catalina. This has several improvements over my old Clover-based tutorial, like fixes to screen resolution problems, better CPU feature support, and better FileVault compatibility, and is recommended for all future builds.
Download the latest OpenCore.iso.gz release from my repository, unpack it, and upload it to Proxmox’s ISO store at /var/lib/vz/template/iso. Although it has a .iso file extension, this is actually a hard disk image.
Fetch the OSK authentication key
macOS checks that it is running on real Mac hardware, and refuses to boot on third-party hardware. You can get around this by reading an authentication key out of your real Mac hardware (the OSK key). Save the first block of C code from this page as smc_read.c. In a command prompt, change into the same directory as that file and run:
xcode-select --install # If you don't already have gcc
gcc -o smc_read smc_read.c -framework IOKit
./smc_read
It’ll print out the 64 character OSK for you. Make a note of it.
Every Mac uses the same OSK, so don’t be surprised that it doesn’t look like a random string!
Create the VM
From the Proxmox web UI, create a new virtual machine as shown below.
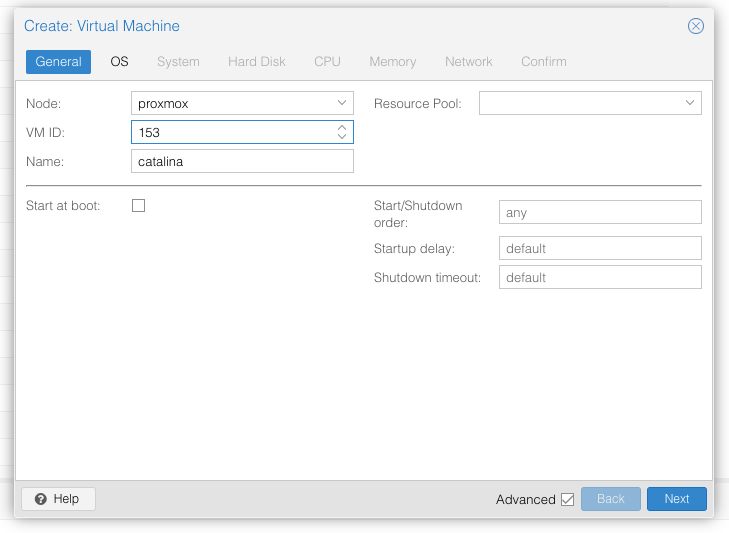
Keep a note of your VM’s ID 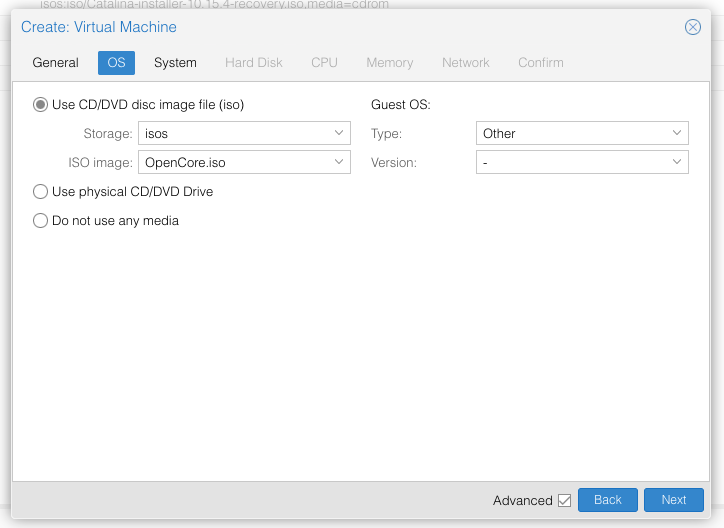
Select the OpenCore ISO you uploaded and set OS type to “Other” 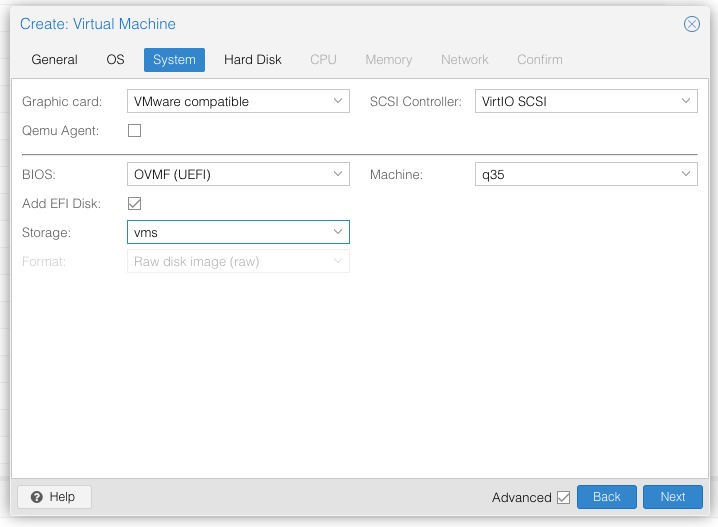
Set graphics to “VMWare Compatible”, set BIOS to OVMF (UEFI), set Machine to Q35, Tick Add EFI Disk and pick storage for it. On Proxmox 7 you must untick “pre-enroll keys” 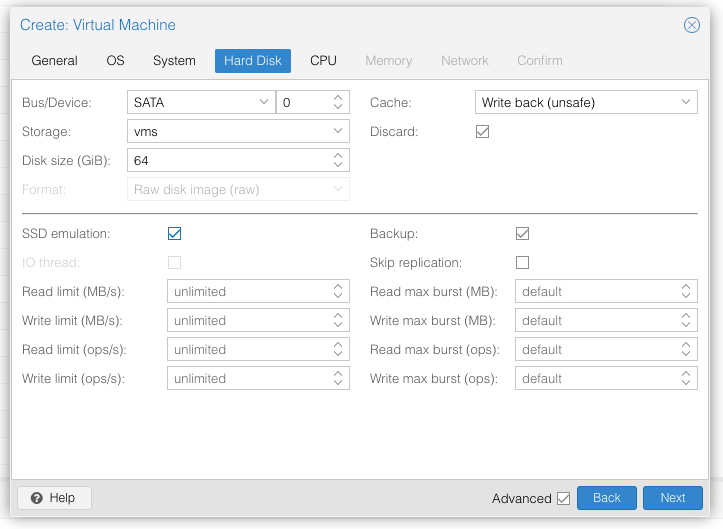
Set the size of the hard disk (I chose 64GB). Attach it to SATA0. Enable discard and SSD emulation to support TRIM. 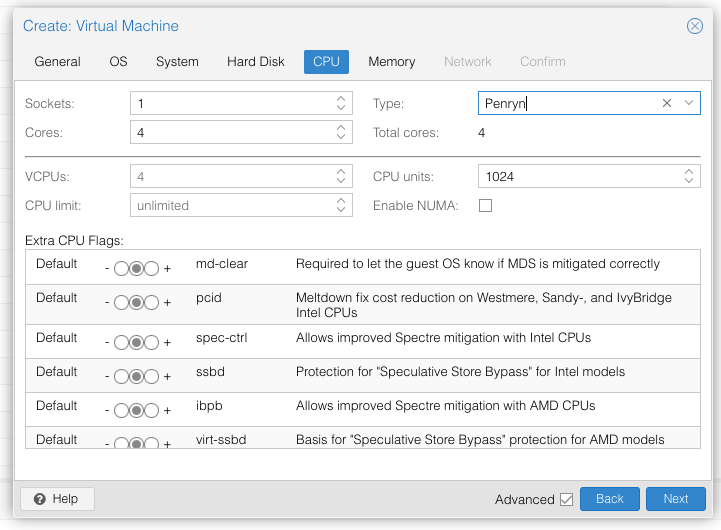
Set the number of cores for the VM, use a power of two (e.g. 1, 2, 4, 8, see note later). Set the CPU to Penryn. 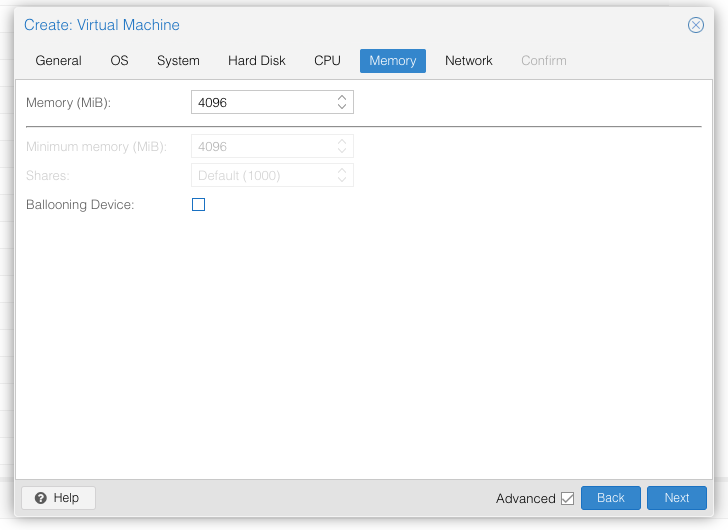
I chose a memory size of 4096MB. Disable ballooning because there is no balloon driver available for macOS. 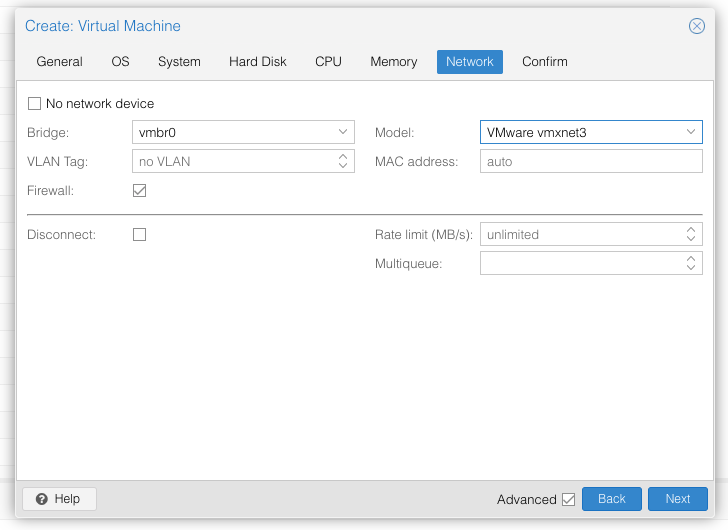
Choose VMWare vmxnet3 for the network model
In the Options page for the VM, ensure that “use tablet for pointer” is set to “Yes”.
In the Hardware page for the VM, add a second DVD drive at IDE0, set it to use your Catalina-installer.iso.
Don’t try to start the VM just yet. First, SSH into your Proxmox server so we can make some edits to the configuration files.
Edit /etc/pve/qemu-server/YOUR-VM-ID-HERE.conf (with nano or vim). Add this line, being sure to substitute the OSK you extracted earlier into the right place:
args: -device isa-applesmc,osk="THE-OSK-YOU-EXTRACTED-GOES-HERE" -smbios type=2 -device usb-kbd,bus=ehci.0,port=2
(A USB keyboard is added here because macOS doesn’t support QEMU’s default PS/2 keyboard.) Ensure the args are all on a single line!
We also need to add a -cpu argument. If your host CPU is Intel, add this to the end of the “args” line:
-cpu host,kvm=on,vendor=GenuineIntel,+kvm_pv_unhalt,+kvm_pv_eoi,+hypervisor,+invtsc
This will pass through all of the features that your CPU supports. OpenCore’s config will pretend to macOS that the CPU’s model name is Penryn for compatibility.
If your host CPU is AMD, or the above argument doesn’t work for you, use this more-compatible alternative:
-cpu Penryn,kvm=on,vendor=GenuineIntel,+kvm_pv_unhalt,+kvm_pv_eoi,+hypervisor,+invtsc,+pcid,+ssse3,+sse4.2,+popcnt,+avx,+avx2,+aes,+fma,+fma4,+bmi1,+bmi2,+xsave,+xsaveopt,check
This pretends that your CPU is Penryn, which will keep macOS happy even if your host CPU is AMD, and adds a bunch of newer required and optional CPU features on top. Features that your host CPU doesn’t support will be ignored (a warning will be printed to the console during launch with qm start 1xx), but note that macOS won’t work without SSE4.2 support.
Now find the lines that define the two “ISOs” (ide0 and ide2), and remove the “,media=cdrom” part from them. Add “,cache=unsafe” in its place. This will treat these as hard disks rather than DVD drives.
Save your changes, return to the Options tab, and change the boot order to put IDE2 (the OpenCore image) first. Your final VM configuration file should resemble this:
args: -device isa-applesmc,osk="..." -smbios type=2 -device usb-kbd,bus=ehci.0,port=2 -cpu host,kvm=on,vendor=GenuineIntel,+kvm_pv_unhalt,+kvm_pv_eoi,+hypervisor,+invtsc
balloon: 0
bios: ovmf
bootdisk: ide2
cores: 4
cpu: Penryn
efidisk0: vms:vm-100-disk-1,size=1M
ide0: isos:iso/Catalina-installer.iso,cache=unsafe,size=2094688K
ide2: isos:iso/OpenCore.iso,cache=unsafe,size=150M
machine: q35
memory: 4096
name: catalina
net0: vmxnet3=...,bridge=vmbr0,firewall=1
numa: 0
ostype: other
sata0: vms:vm-100-disk-0,cache=unsafe,discard=on,size=64G,ssd=1
scsihw: virtio-scsi-pci
smbios1: uuid=...
sockets: 1
vga: vmware
Configure Proxmox
On Proxmox, run “echo 1 > /sys/module/kvm/parameters/ignore_msrs” to avoid a bootloop during macOS boot. To make this change persist across Proxmox reboots, run:
echo "options kvm ignore_msrs=Y" >> /etc/modprobe.d/kvm.conf && update-initramfs -k all -u
Unlike Clover, OpenCore doesn’t require Proxmox’s OVMF package to be patched, so if you had previously installed my pve-edk2-firmware package, and you don’t have any Clover VMs left, you can revert to the vanilla Proxmox package by running “apt-mark unhold pve-edk2-firmware; apt install pve-edk2-firmware”. If you still have Clover VMs that need it, you can continue to use my patched package, it’ll work too.
Install Catalina
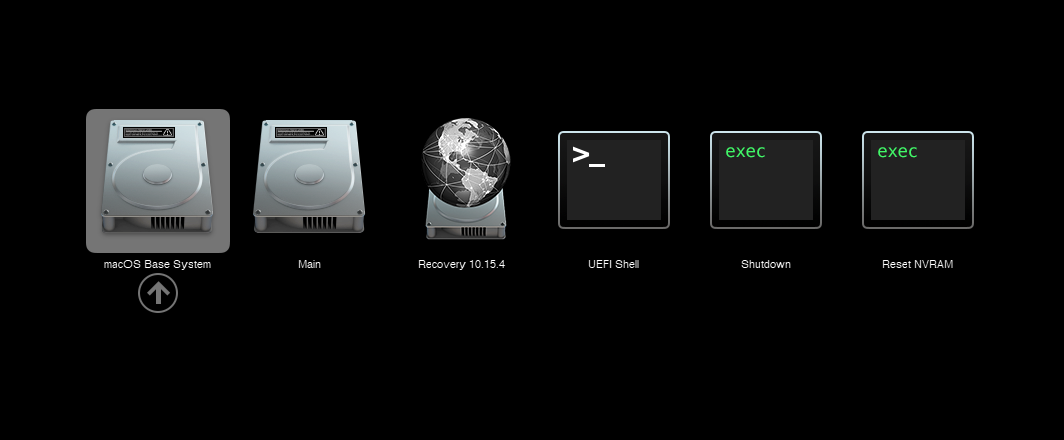
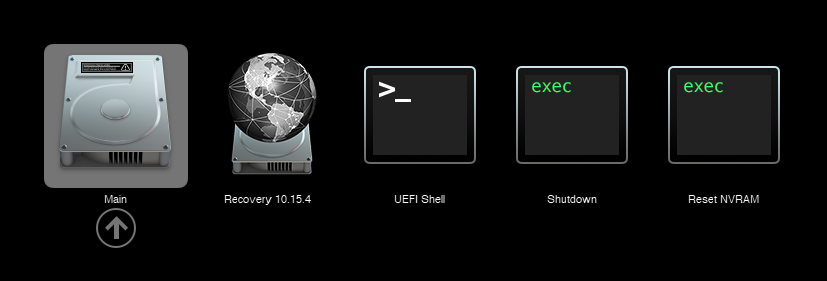
Now start up your VM, it should boot to the OpenCore boot picker:
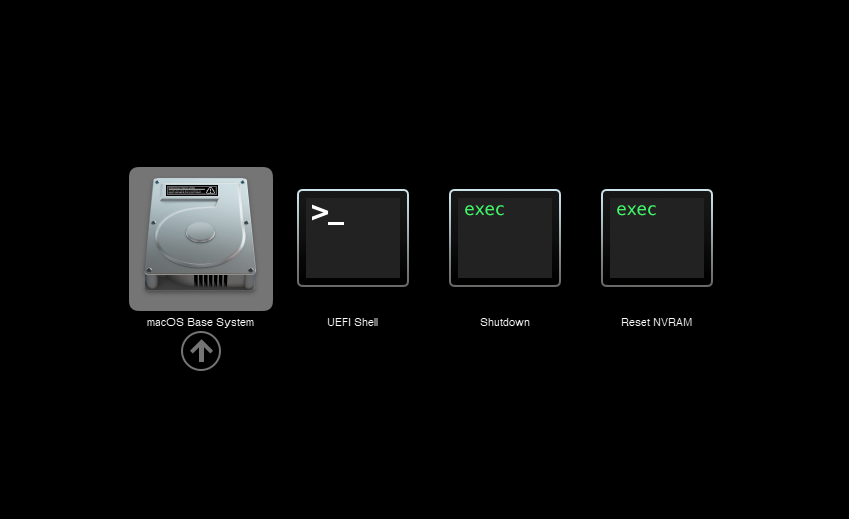
Press enter to boot the “macOS Base System” entry and the installer should appear.
Our virtual hard drive needs to be erased/formatted before we can install to it, so select the Disk Utility option. Follow the steps below to format the disk:
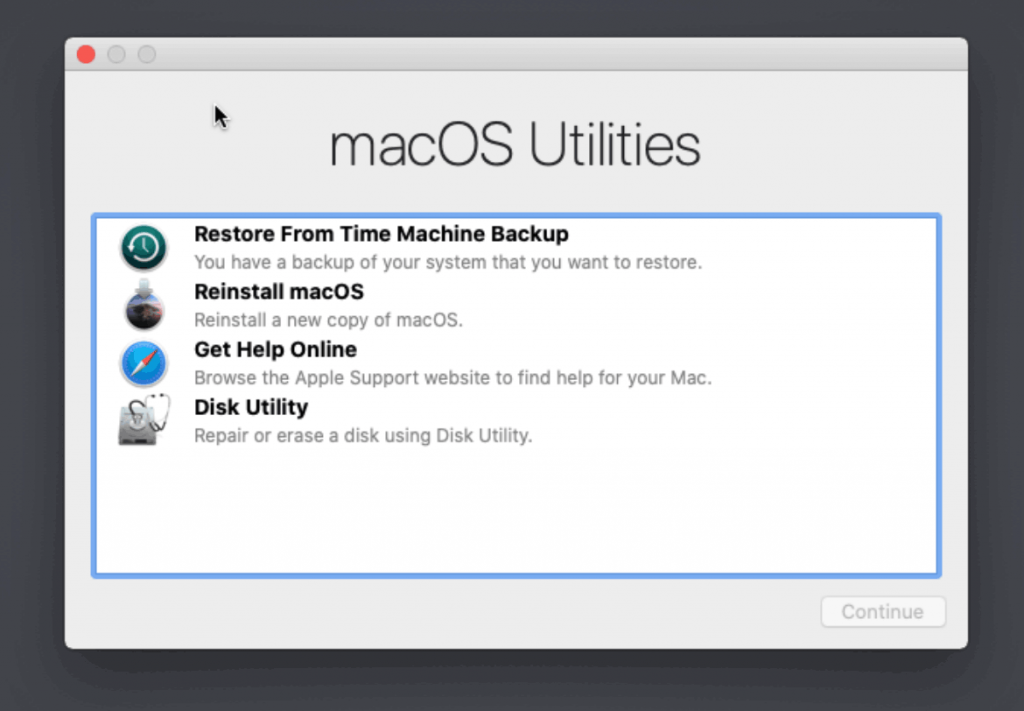
Select Disk Utility 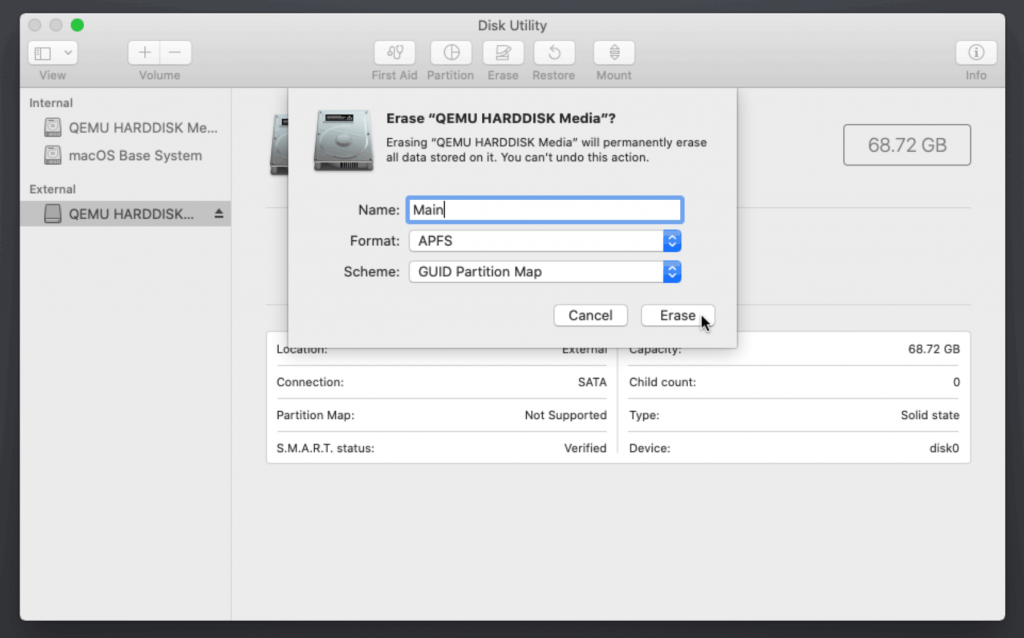
Erase the main disk (it’ll appear as an external drive). Choose APFS. I called mine “Main”. Avoid “Encrypted” at this stage
Now we’re ready to begin installation!
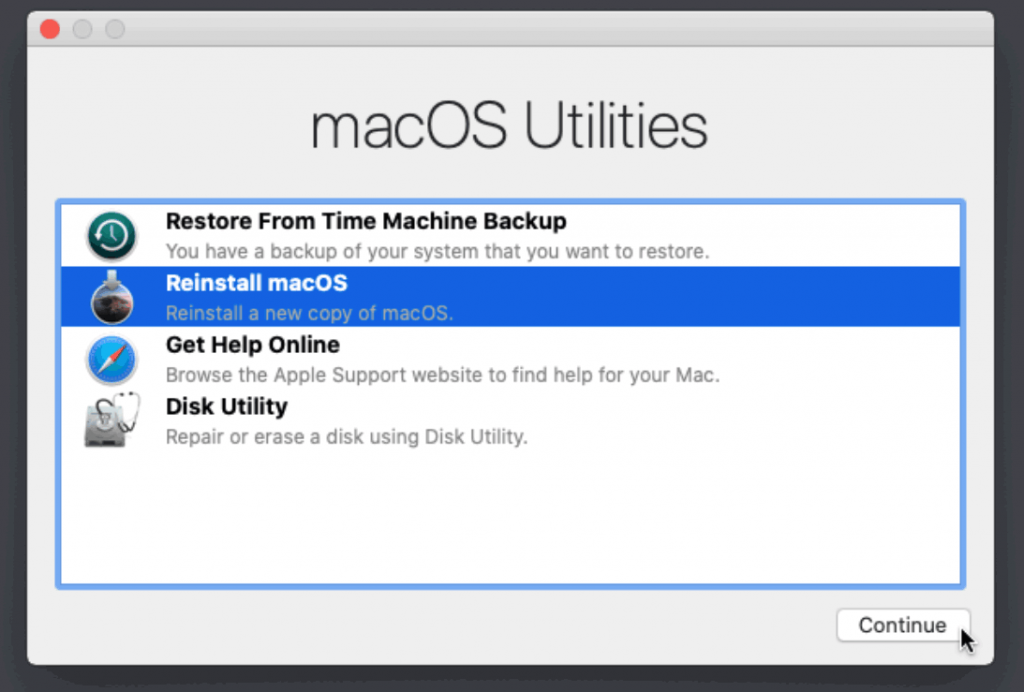
Reinstall macOS 
Continue… 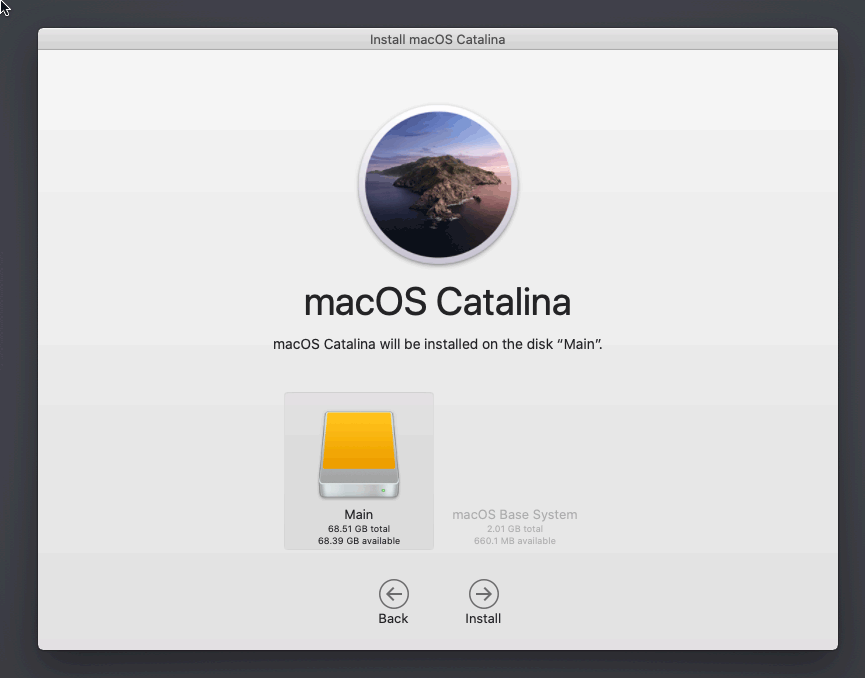
Choose the disk you erased 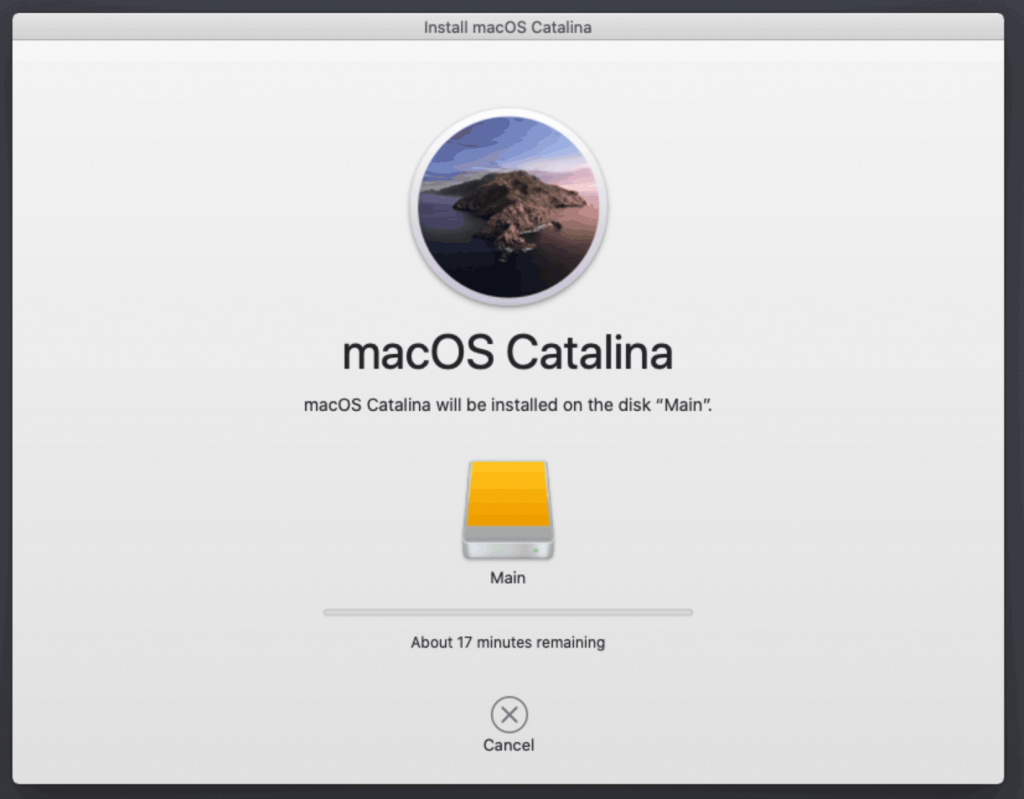
It’s installing!
After the first stage of installation, the VM will reboot. Pick the “macOS Installer” entry to continue installation:

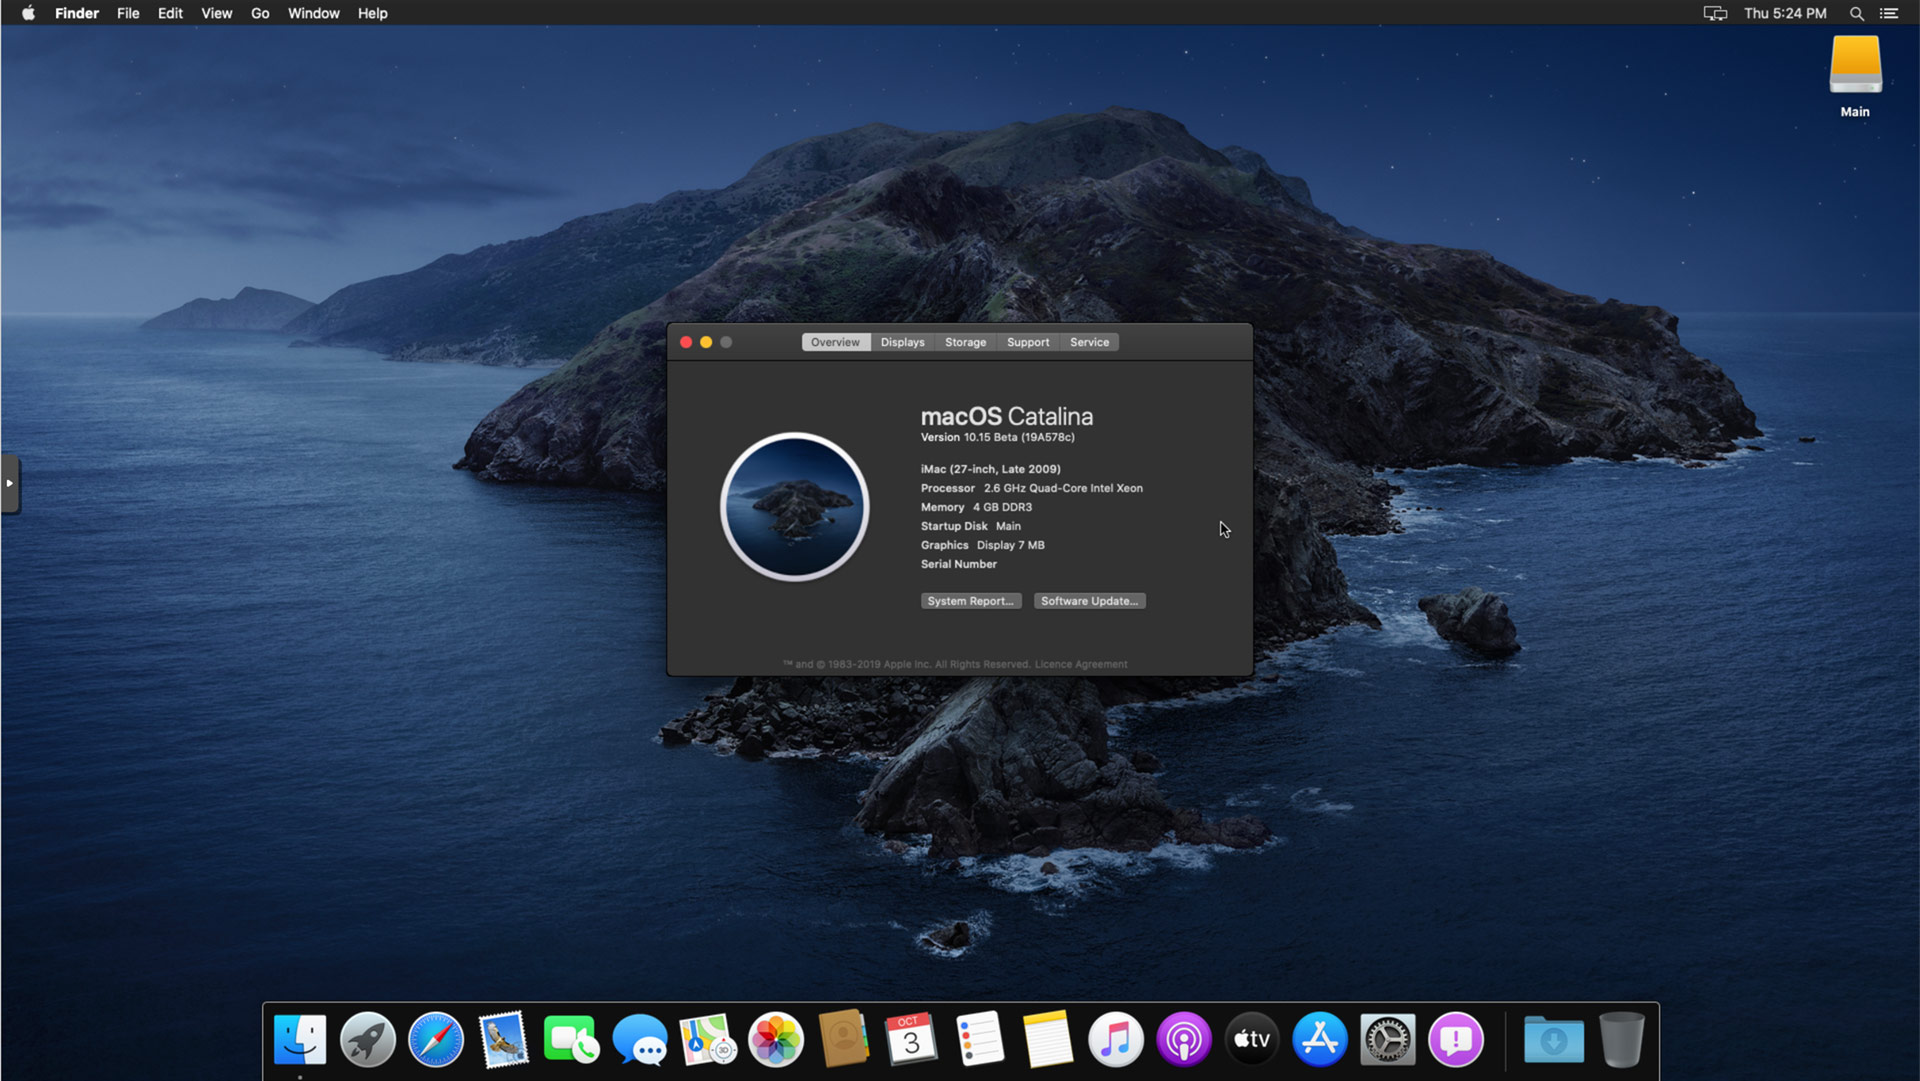
The VM will finish installation and reboot itself a second time. Now the installation is complete, so choose the name of your main disk to boot (mine’s called Main):
Answer the initial install questions, and you’ll be logged on! (Note that you’ll want to hold off on logging into your iCloud account until you’ve configured your SMBIOS to your liking)
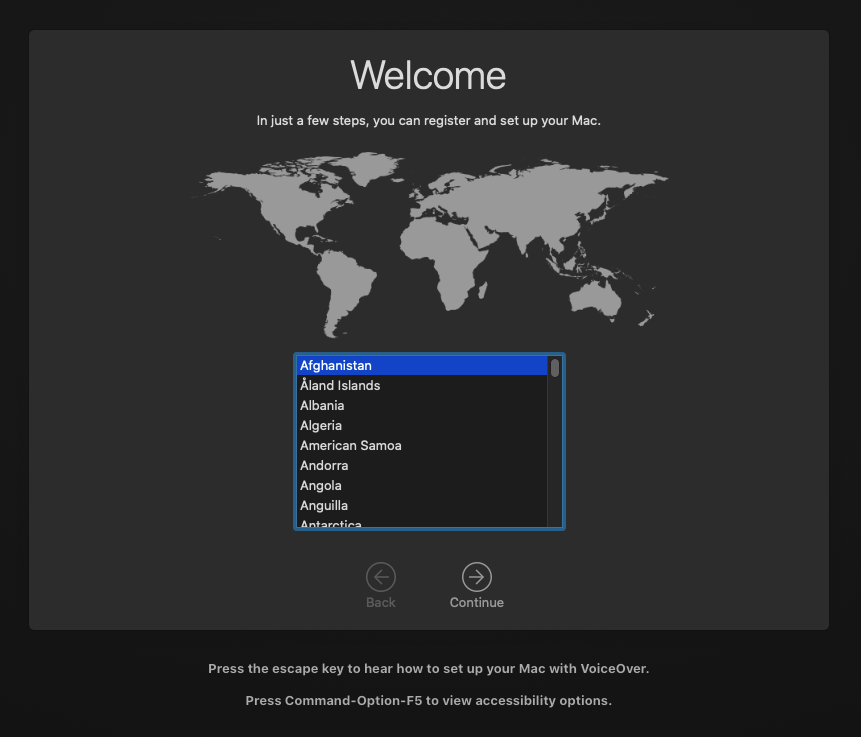
Answer the install questions 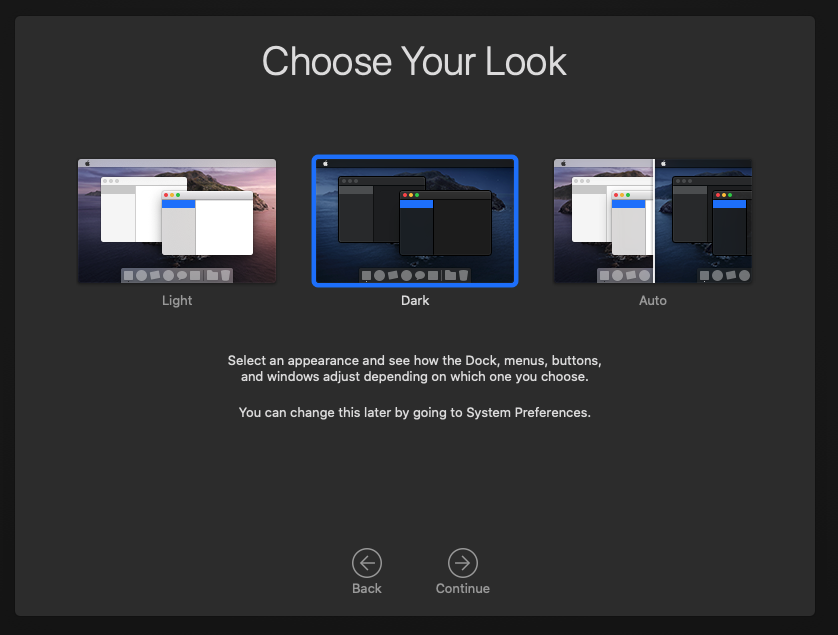
New automatic theme switching! 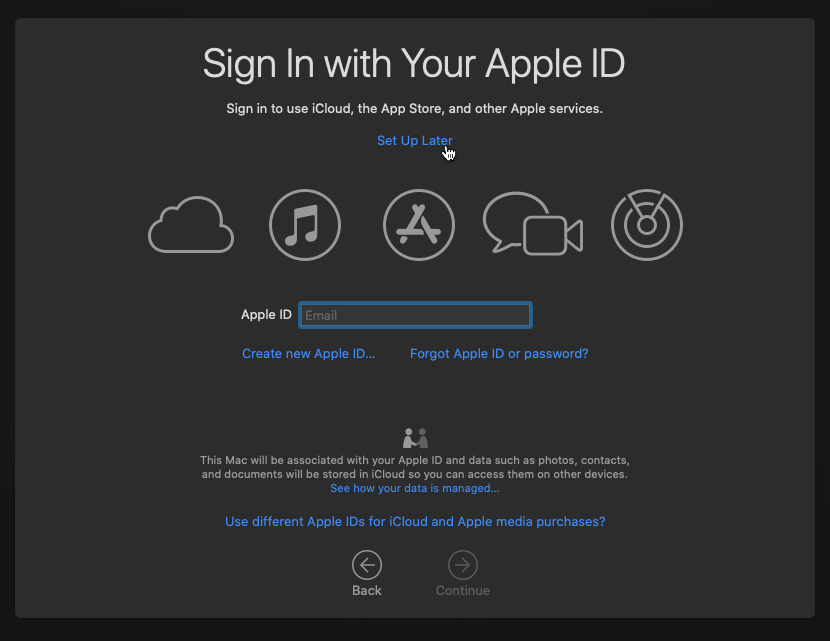
Avoid logging into iCloud just yet
Make the OpenCore install permanent
We’re currently booting using OpenCore from the attached OpenCore ISO. Let’s install that to the hard drive instead. Pop open Terminal and run “diskutil list” to see what drives we have available.
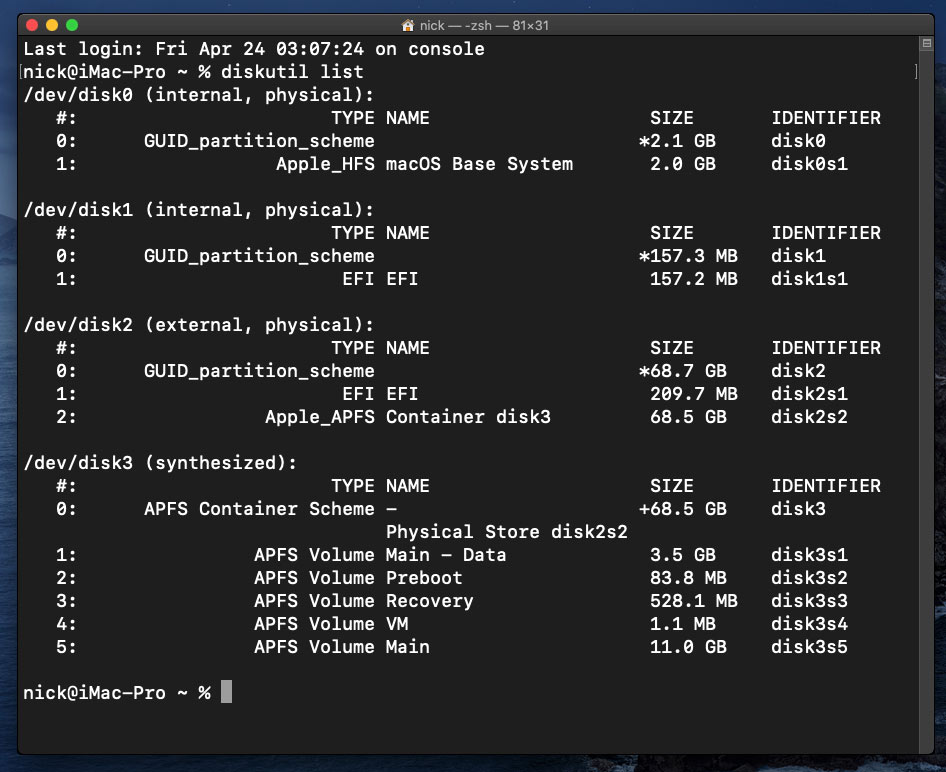
Use “sudo dd if=<source> of=<dest>” to copy the “EFI” partition from the OpenCore CD and overwrite the EFI partition on the hard disk. The OpenCore CD is the small disk (~150MB) that only has an EFI partition on it, and the main hard disk is the one with the large Apple_APFS “Container” partition on it.
In my case these EFI partitions ended up being called disk1s1 and disk2s1 respectively, so I ran “sudo dd if=/dev/disk1s1 of=/dev/disk2s1” (note that if you get these names wrong, you will overwrite the wrong disk and you’ll have to start the installation over again!).
Now shut down the VM, and remove both the OpenCore and the Catalina installer drives from the Hardware tab. On the Options tab, edit the boot order to place your SATA disk as the first disk. Boot up. If everything went well, you should see the OpenCore boot menu, and you can select your “Main” disk to boot Catalina:
Sleep management
I found that I was unable to wake Catalina from sleep using my mouse or keyboard. If you encounter the same problem, you can either disable system sleep in Catalina’s Energy Saver settings to avoid the issue, or you can manually wake the VM up from sleep from Proxmox by running:
qm monitor YOUR-VM-ID-HERE
system_wakeup
quit
Editing your OpenCore/EFI settings
The Configuration.pdf that explains the OpenCore config.plist file can be found along with the OpenCore release on my GitHub.
To mount your EFI partition in macOS so you can edit config.plist, first check the “identifier” of your EFI partition in the terminal:
~$ diskutil list
/dev/disk0 (external, physical):
   #:                   TYPE NAME              SIZE       IDENTIFIER
   0:  GUID_partition_scheme                  *512.1 GB   disk0
   1:                    EFI EFI               209.7 MB   disk0s1
   2:             Apple_APFS Container disk1   511.9 GB   disk0s2
Then you can mount it like so:
sudo mkdir /Volumes/EFI
sudo mount -t msdos /dev/disk0s1 /Volumes/EFI
Now you can edit /Volumes/EFI/OC/config.plist with your favourite text editor to make your changes. (TextEdit is not a great choice because it likes to insert curly quotes into the file and otherwise break things, there are some dedicated plist editors available such as XCode).
If you’re unable to boot macOS, you can edit the config.plist using the “UEFI Shell” option in the OpenCore boot menu instead.
Enter “FS0:” and press enter to open up the first available filesystem, then run “edit EFI\OC\config.plist” (if the file isn’t found, try switching to another filesystem like fs1:). When you’re done editing, press control+Q to exit, “Y” to save, then run “exit” to return to the OpenCore menu. You need to reboot for your changes to take effect.
Automatic boot
In config.plist, set Misc/Boot/Timeout to a non-zero value to allow the default boot option be chosen automatically after that delay in seconds. I’ve disabled this by default because it causes the installer ISO to re-enter its main menu instead of continuing the second stage of installation.
Verbose boot
To boot macOS in Verbose mode to diagnose boot problems, edit config.plist to change the “bootargs” in the NVRam section from “keepsyms=1” to “keepsyms=1 -v”.
Changing screen resolution
To change macOS’ screen resolution, you need to edit the UEFI/Output/Resolution setting in config.plist, the default is 1920×1080@32.
You should be able to change this to any of the modes that the system OVMF menu offers (hit F2 at the start of guest boot and choose “Device Manager/OVMF Platform Configuration” to see which resolutions are available).
Video performance
Because there is no guest video acceleration available for macOS, video performance is poor.
In Google Chrome in the guest you will need to toggle off the setting to “use hardware acceleration when available” to improve issues with elements not being drawn or flickering (especially video). Safari may be a better choice.
macOS’s built in “Screen Sharing” feature offers dramatically better framerates and latency than Proxmox’s browser-based VNC console, so if you have a real Mac to act as a viewing console, you can enable that in the VM’s “Sharing” settings and connect to the VM using the Screen Sharing app from your Mac instead:
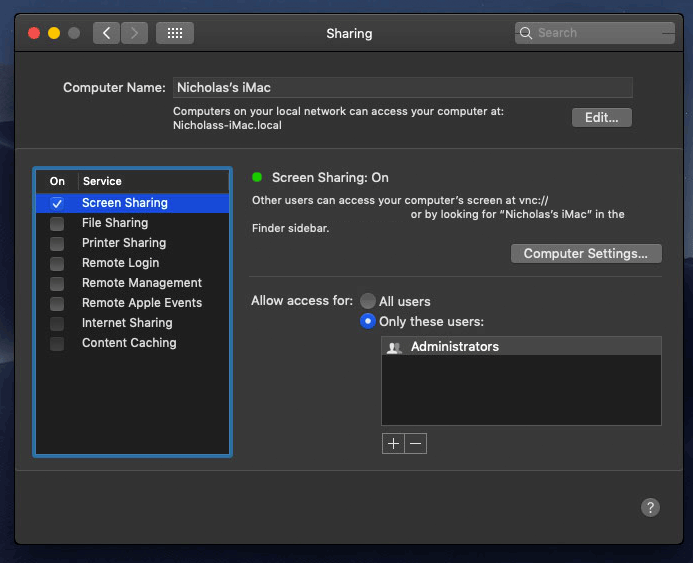
Apparently Screen Sharing is also compatible with VNC clients like RealVNC, so you should be able to connect to it from Linux or Windows consoles using RealVNC.
The real magic bullet for video performance is to pass through a compatible video card using PCIe passthrough (though note that Catalina does not support most NVidia cards). This offers near-native performance. You can read more about how I’m using PCIe passthrough on my own installation here.
USB passthrough
Since I want to use this as my primary computer, I want to use a USB keyboard and mouse plugged directly into Proxmox, rather than sending my input through the web VNC console.
Proxmox has good documentation for USB passthrough. Basically, run “qm monitor YOUR-VM-ID-HERE”, then “info usbhost” to get a list of the USB devices connected to Proxmox:
qm> info usbhost
 Bus 3, Addr 12, Port 6, Speed 480 Mb/s
 Class 00: USB device 8564:1000, Mass Storage Device
 Bus 3, Addr 11, Port 5.4, Speed 12 Mb/s
 Class 00: USB device 04d9:0141, USB Keyboard
 Bus 3, Addr 10, Port 5.1.2, Speed 12 Mb/s
 Class 00: USB device 046d:c52b, USB Receiver
 Bus 3, Addr 9, Port 14.4, Speed 12 Mb/s
 Class 00: USB device 046d:c227, G15 GamePanel LCD
 Bus 3, Addr 8, Port 14.1, Speed 1.5 Mb/s
 Class 00: USB device 046d:c226, G15 Gaming Keyboard
In this case I can add my keyboard and mouse to USB passthrough by quitting qm, then running:
qm set YOUR-VM-ID-HERE -usb1 host=04d9:0141
qm set YOUR-VM-ID-HERE -usb2 host=046d:c52b
This saves the devices to the VM configuration for you. You need to reboot to have the new settings apply. Note that the emulated USB3 device doesn’t work with macOS, so don’t set “usb3=1”.
You can also pass through USB devices by passing through an entire USB controller using Proxmox’s PCIe passthrough feature, which gives much better compatibility.
FileVault

FileVault now works with OpenCore, so you can encrypt your boot disk by using the option in macOS’ system security preferences. But be certain to keep a copy of your recovery key and keep your backups up to date.
Using an odd number of CPU cores
macOS doesn’t like it if your CPU has a weird number of cores, like 3 or 6. You can fix this on the Hardware tab. Edit the Processors settings, and tick the Advanced box. Round up the number of cores you want (e.g. 3) to a nice power of two (4, 8, 16, etc) and use that for the “Cores” setting, but set the “VCPUs” setting to the number of cores you actually want to be used (3), like so:
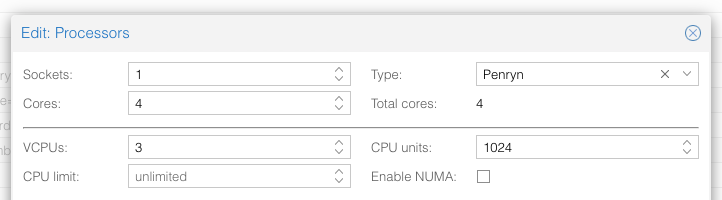
This will cause macOS to see that system supports a maximum of 4 cores, but that one core is absent since it hasn’t been hotplugged yet, so macOS will only use 3 cores.
Another approach is to use an odd number of sockets in order to make the core count a power of two. e.g. to pass 6 cores, set Sockets to 3, and Cores to 2 (or 4 to pass both threads per core).
Proxmox doesn’t let us set the number of threads per core in the VM config, so if you want to pass every thread of a hyperthreaded 6-core CPU, and have them reported to the guest as hyperthreads, add -smp 12,sockets=3,cores=2,threads=2 to your “args”, or for a 56-core hyperthreaded CPU, -smp 112,sockets=7,cores=8,threads=2.
Nested emulation
If your host CPU is Intel, and you used “-cpu host” in your VM config file (explained above), you can use Nested Virtualisation in macOS. This allows you to run VirtualBox VMs, the Android emulator, or Docker inside your macOS guest. You just need to tweak your Proxmox system config to enable this as explained in the Wiki:
https://pve.proxmox.com/wiki/Nested_Virtualization
macOS’s Hypervisor framework doesn’t support nested virtualisation on AMD host CPUs, but apparently VirtualBox uses their own virtual machine driver which does work (I haven’t tried this myself). I imagine this will stop working in the next version of macOS, since they’re planning to add a bunch of restrictions on third-party kexts and might force VirtualBox to use Hypervisor.framework.
Getting iMessage and FaceTime to work
Unlike the App Store and iCloud, these Apple services actually pay attention to your Mac’s serial number.
Following this guide should get these working for you:
https://dortania.github.io/OpenCore-Post-Install/universal/iservices.html#generate-a-new-serial
I had already generated a serial number for my Mac (when I check the Support Status for it, it says “We’re sorry, but this serial number isn’t valid. Please check your information and try again”) and added it to my OpenCore config, so all I had to do on top of that was use Hackintool to help me mark my Ethernet adapter en0 as built-in. FaceTime then worked immediately. I didn’t need to follow the rest of the guide.
Fixing “guest boots to UEFI shell”
If your guest ends up booting to the UEFI shell instead of showing the OpenCore boot menu, especially if you’ve just updated OpenCore to a new version, you’ll need to edit the guest’s UEFI boot entries to fix this.
At the very start of guest boot, hit F2 to enter guest UEFI settings.
First we’ll remove the old entries. Choose the Boot Maintenance option, then Boot Options -> Delete Boot Option. Use the spacebar to tick any old Clover or OpenCore entries (avoid ticking the EFI Internal Shell option, you want to keep that!). Select “Commit Changes and Exit”.
Now we’ll add the correct entry for OpenCore back in. Select Add Boot Option. Navigate through the device tree to EFI/BOOT/BOOTx64.efi and select it, name this new option “OpenCore” or similar. Again Commit Changes and Exit.
Go to the Change Boot Order and move OpenCore to the top. Commit Changes and Exit.
Now back out to the main menu and choose Reset, and you should successfully boot into OpenCore this time.
Hi Nick, is there any problem you known if I passthrough a radeon pro graphics card like wx 5100 or 4100 to the macOS guest?
You should be okay with that. You may need to add an agdpmod argument to your boot arguments:
https://dortania.github.io/GPU-Buyers-Guide/modern-gpus/amd-gpu.html#hd-7000-series-7xxx
Your card is probably affected by the AMD reset bug, so you must ensure that the card is not initialised during host boot, and you must power cycle the host in between uses of the card.
Thank you for your quick reply.
About AMD reset bug, now I passthrough my RX580 to the macOS guest and it works perfect, I means that if I use a Polaris 10 and 20 series graphics card like wx5100, can I void the reset bug happen?
The host has AMD. The car was created and installed, but it stops at the start.
I see the following errors on the node:
[520409.831841] kvm [10353]: vcpu1, guest rIP: 0xffffff800fcbfd75 ignored rdmsr: 0x60d
….
[520409.833143] kvm [10353]: vcpu1, guest rIP: 0xffffff800fcbfd92 ignored rdmsr: 0x621
[520442.463985] kvm[10353]: segfault at 4 ip 000055e5d8a8e277 sp 00007ff2b0aa6e98 error 6 in qemu-system-x86_64[55e5d8861000+4af000]
I need help…
more:
I tried to start the VM with a command from ssh (I got the full parameters using “#qm showcmd 707”)
At the exit, I immediately received:
kvm: warning: host doesn’t support requested feature: CPUID.01H:ECX.pcid [bit 17]
kvm: warning: host doesn’t support requested feature: CPUID.80000001H:ECX.fma4 [bit 16]
maybe this information will be useful…
I have a problem: after selecting the “macOS Base system”, the bar below the Apple logo is loading very slow until its full, and at this point the setup stucks (so I don’t get the “disk utility” screen). any hints, ideas how to solve this problem?
ciao
manuel
Hi Nicholas,
thanx al lot for this great instruction, which in fact worked like a charm. I have been running macos on ESXI for quite some time and I cannot see any difference in performance connected via a mac vnc client.
Given the simple backup and restore features of proxmox I just upgraded my install to Big Sur. And also this is working without any noticeable flaw yet.
Stay save
I’m able to boot to Opencore but as soon as I add the catalina.iso and change it’s conf file the vm doesn’t start at all
Start your VM from the Proxmox command line like “qm start 1xx” (where 1xx is your VM ID), that’ll show you error messages and warnings.
Also show your config file lines that you edited so I can check them.
I had forgot to set the 64gb hdd to SATA, which cause me to attempt to create IDE1, which gave an error trying to start the vm via proxmox cli.
Got it working now.
Thanks for the tip and the guide!
Hi, Thanks to you a lot for sharing your expertise with all of us. I saw that your works became a reference for many others.
So I am a newbie to run a vm in a proxmox server by i’ve already installed 3 vm that’s working very well with gpu passthrough ( 1 win10 an 2 linux) by tryig ow to install a Mas os High sierra one.
So these are my questions :
1 – is it possible to run a Vm with high sierra with the last version of opencore (V.10)? (my gpu is a nvidia 960 gtx and the driver doesn’t go further the High Sierra version)
2 – I don’t have anymore a mac computer so there is a way to have an osk, or may be i did not understand how to have it ! can you give a few more detail, please?
And an another thanks for awsering
Best regards
It should boot High Sierra fine. If you’re creating a new HS VM, then I think the main disk must be SATA rather than vfio-blk like this tutorial suggests, because I don’t think virtio was supported in High Sierra.
You can find the OSK on Google, a lot of sources about running it on KVM post it.
Thanks for your precious information!
Another question, I ‘ve already made a long time ago a hackinstosh with clover, and i didn’t use any osk key, and it works very well for 2 years, so is it absolutely necesary using it to install a high sierra Vm?
Thanks again for your help
Instead of supplying an OSK you can enable the VirtualSMC kext in OpenCore’s config, which you would have been using with Clover too.
Thanks for all this information. I have succeded in the installation up to the connection to my apple count, and then i have this information banner :
“ProtocolVersion2Defaultutton Label Ok Body try signing in again. ErrorID GENERIC_SERVER_ERROR DialogType GenericDialog AlternateButtonLink.skipped AlternateButtonLabel.skipped localizedError GENERIC_SERVER_ERROR….unable to sign in because of a problem communicating with icloud. description Generic server error when setup is down Helplink.skipped.”
I try several time and have the same result after entering the code for sign in.
Have you a clue for me to explain that error?
Thank for yours help.
During install you don’t have to sign into iCloud, I’d just hit the skip button.
Thanks to you!! it works !! Thank you again for your great advices. For sure you definitely know what you’re talking about!
Hello Nick et al,
My team finds your docs to be excellent. Thanks taking the time to create and share them.
Is there a way to somehow “clone” (think Carbon Copy Cloner, although I am tied to any specific tool/app/procedure) a copy of my MacBook Pro to a ProxmoxVE (k)vm, rather than building the macOS image (for the (k)vm) from scratch?
~Johnny
Yes, that should work fine, just gotta add an image of your disk, then add an OpenCore disk alongside it and boot from the OpenCore disk (like normal).
“Migration of servers to Proxmox VE – Proxmox VE” https://pve.proxmox.com/wiki/Migration_of_servers_to_Proxmox_VE#Physical-to-Virtual_.28P2V.29
Followed the instructions to the T. The only difference being I have a BigSur ISO. But, the Mac OS boot option is not appearing in OpenCore boot picker when I start the VM. All I see is UEFI shell, Shutdown and Reset executables. I don’t see the BigSur ISO boot option. Any suggestions would be greatly appreciated.
Please use my Big Sur tutorial instead Installing macOS 11 “Big Sur” on Proxmox 6
The most likely cause is that your installer image is formatted MBR instead of GUID
Thanks for the link to the BigSur tutorial. Wish I discovered that earlier, wouldn’t have wasted so much time. I think it’s something to do with MBR as well. But, I’m gonna defer that troubleshooting to a later time. For now, I am going to do this on Ubuntu instead of Mac. Will follow your new tutorial and let you know if I run into any issues.
Hi Nick, you have done a great job for many of us mac os users.
I use PVE 6.3 and mostly interested in HA options so pass through is no option for me.
I tested successfully the live migration with 10.15.7 Catalina and this Args.
args: -device isa-applesmc,osk=”xxxxxxxx” -smbios type=2 -device usb-kbd,bus=ehci.0,port=2
balloon: 0
bios: ovmf
boot: order=sata0
cores: 4
cpu: kvm64
I left out the -cpu host stuff what kill me the live migration and now it works.
What is your opinion?
Best Tim
kvm64 is a Pentium 4 lookalike which doesn’t support the CPU features macOS needs to operate. I think what’s happening here is that macOS is just assuming that those features exist without actually checking the limited cpuid that QEMU’s -cpu arg selects, so it’s able to just use the instructions anyway. (On the assumption that QEMU can’t actually disable host CPU instructions, just change the reported cpuid)
However, apps that do check for the features being present in the cpuid will avoid using them, and run more slowly or not at all.
Does my suggested -cpu Penryn… really prevent migration? You can trim the list of CPU features on that one to match the weakest member of your fleet.
Hi Nicholas, yes it works with Penryn and live migration.
args: -device isa-applesmc,osk=”…” -smbios type=2 -device usb-kbd,bus=ehci.0,port=2
balloon: 0
bios: ovmf
boot: order=sata0
cores: 4
cpu: Penryn
You need to take out all cpu options to have no other effects like time leaps etc.
The migration it self just hangs on this arg >> +invtsc << but if you take it out only the OSX becomes instable with "time speed effects".
I think the performance is Ok but for Video Editing you need GPU pass through or the MxGPU with AMD S7150 or MI6, MI8, and MI25 products. We need Mac OSX for or clients for special Mac Apps like Osirix and other stuff with Xcode.
Best Tim
Hi Nick,
Thank you for this excellent guide. I have been running my VM for a couple of months now and keep tweaking and optimizing it.
Currently, I am looking at replacing the virtual vmxnet NIC with a virtio NIC. Catalina does recognize the virtio NIC but for some reason it fails to obtain an IP address.
Do you have any tips for me?
Thanks!
Sorry, I’ve never tried it, I haven’t heard that it supports it.
Hello.
I’m trying to install Catalina, but as a result i have black screen with apple on it.
only 1 core of cpu is loaded (16.67% of 4 cpus, also tried 3 cpus)
and 497Mb of RAM is used.
In that state waited for above 1 hour((
tried on AMD EPYC 7782, AMD Rynen 9 3950X, Xeon E5-2630v4
the result is the same.
Also tried opencore V10,V9, V5 (for catalina only as described)
tried to download different catalina/mojave “basesystem” via fetch-macos.py script
Double check your OSK, it’s probably wrong.
Hi Nick,
Thank you for sharing the guide.
I have been using mac on ESXi for years on an Intel i5 machine.
I’m switching to an older machine with Opteron 2435 AMD processor but with more RAM.
ESXi works fine but couldn’t start any mac VM.
I installed Proxmox 6.3 and followed the guide, but the install sucks at the Apple logo with even no progress bar.
I tried to start the VM from command line and received a lot of warning messages about missing requested features.
I guess the CPU is missing sse4.2 which you said without it, macOS will not work, Do you have any other workarounds to try??
Anyway, I’ll post the warning messages and my VM config file for your reference.
Than you,
Ahmed
—————————————————————
kvm: warning: host doesn’t support requested feature: CPUID.01H:ECX.aes [bit 25]
kvm: warning: host doesn’t support requested feature: CPUID.01H:ECX.avx [bit 28]
kvm: warning: host doesn’t support requested feature: CPUID.01H:ECX.fma [bit 12]
kvm: warning: host doesn’t support requested feature: CPUID.01H:ECX.pcid [bit 17]
kvm: warning: host doesn’t support requested feature: CPUID.01H:ECX.sse4.1 [bit 19]
kvm: warning: host doesn’t support requested feature: CPUID.01H:ECX.sse4.2 [bit 20]
kvm: warning: host doesn’t support requested feature: CPUID.01H:ECX.ssse3 [bit 9]
kvm: warning: host doesn’t support requested feature: CPUID.01H:ECX.xsave [bit 26]
kvm: warning: host doesn’t support requested feature: CPUID.07H:EBX.avx2 [bit 5]
kvm: warning: host doesn’t support requested feature: CPUID.07H:EBX.bmi1 [bit 3]
kvm: warning: host doesn’t support requested feature: CPUID.07H:EBX.bmi2 [bit 8]
kvm: warning: host doesn’t support requested feature: CPUID.0DH:EAX [bit 0]
kvm: warning: host doesn’t support requested feature: CPUID.0DH:EAX [bit 1]
kvm: warning: host doesn’t support requested feature: CPUID.0DH:EAX [bit 2]
kvm: warning: host doesn’t support requested feature: CPUID.0DH:EAX.xsaveopt [bit 0]
kvm: warning: host doesn’t support requested feature: CPUID.80000001H:ECX.fma4 [bit 16]
—————————————————————
Sorry, as far as I know there is no workaround to this missing feature support.
is there any syntax issue with hdiutil?
hdiutil convert BaseSystem.dmg -format RdWr …..
on 11.1 RdWr is not supported. When I checked syntax via manpage, UDRW seems to be the option for read/write image.
I got the command to completed with the following:
hdiutil convert BaseSystem.dmg -format UDRW
Thanks, it looks like support for RdRw was dropped in Big Sur, but UDRW works fine so I’ve updated the command now.
THANKS for the information, i tested this on ubuntu with kvm enabled and worked well and fast. Expect i noticed if kvm wasnt enabled it ,it couldnt load the OSX GUI was stuck in CLI
Without KVM/acceleration on windows at last after a number of minutes the OSX GUI came up but distorted and laggy
_cpuid_set_cpufamily with algrey – cpuid_set_cpufamily – force CPUFAMILY_INTEL_PENRYN patch
i wanna passthrough my host CPU ryzen 3600 to VM macOS catalina,i applied kernel Patch
√AMD kernel patches
√Catalina 10.15.4 CPUFAMILY_INTEL_PENRYN patch found
but boot OC come with
”
OCAK: Failed to locate _cpuid_set_cpufamily (0xxxxxxx) not found”
https://opencore.slowgeek.com/?file=amd065wxYuIT&rs=amd065
I think the AMD kernel patches should already include a Penryn patch for you, so remove the one that is included with my config.
Download python script does not work on macOS 11
Use ./fetch-macOS-v2.py
Hi Nicholas,
I see through the diskutil list that the disk where macOS is installed is shown as external, is there any way to set the disk to internal?
There probably is but I’ve never bothered to fix it. Check Dortania for instructions because I’ve seen this affect bare metal hardware too.
Hi, nick, tks for you post!
I follow your article and run success in my x99 pve machine(2680v4*2), pass my 580 card to vm, everything is ok except 2 little things, can you give me some advices?
One is the memory speed is 0mhz, and the host memory is 2133 speed, Another issue is the system will freeze a while when I start up and login into the system, after over 5 minutes, everything will become normal. the opencore config is just downloaded from your github repo, and I tried to v10 and v11 version, nothing changed. Is there anything I missed?
The reported memory speed is cosmetic and doesn’t have any real effect, you can just ignore it.
If that was your first boot macOS was probably busy building its search index.
tks a million, now I ignore memory speed display issue, and the boot problem is just for nest emulation by docker on mac, I close this application and switch my docker containers into pve host, now everything is ok 🙂
Hey, thanks for this guide!
I am up and running for a while now but today ran into this: OSX is giving me a “Force Quit Applications pop up for running out of memory because Adobe After Effects has run itself up to 140GB of used memory (I only have 64GB physically installed and I only gave OS X 32GB. Doesn’t freeze the system but I have to force quit AE. This happens after the app is open for 30min or so and I’m using it. This is a TRX40 build. Every other app works great.
Any possible proxmox settings that could confuse AE into thinking there is more memory? Been googling and haven’t come up with any non-proxmox similar bugs although After Effects is prone to memory/cache weirdness historically.
I think this would have to be an After Effects memory leak bug. macOS dynamically grows the swapfile to keep the system running, which proceeds until the disk fills up too and really puts you in a bind…
You must be using a passthrough GPU, right? Check if it’s a known problem with AE and that GPU even on vanilla Macs.
Thanks for answering. Yes, I’m passing through a Radeon vii. I will look into that 👍
Update just for anyone who finds this useful. Much googling (memory “leak” was a term I hadn’t tried yet) brought up a lot of after effects issues unrelated to Proxmox. Played with this more today. I can get around it using the Purge Memory command from the edit menu (keystroke). I’m basically purging every time I make some adjustments and want AE to render for playback. Digging through AE settings I’m pretty sure all the boxes are checked correctly but people are generally frustrated going back to 2016 that AE doesn’t automatically purge better when you tweak something and it needs to re-render.
Apparently 32GB of RAM is also the Minimum suggested for AE to work so maybe I should play with getting more of my 64GB to Catalina although I haven’t figured that out yet. The most stable configuration for my 3960x was 3 Sockets x 16 cores and 32GB Ram. Was unstable or didn’t boot otherwise, but I can play with it more.
Hi Nicholas, firstly thank you for the detailed publication. I tried it today with Proxmox 6.4-4 and when I try to run the qm start XXX I get the below error. I am running on an intel xeon platinum server.
kvm: -device usb-kbd,bus=ehci.0,port=2: Bus ‘ehci.0’ not found
start failed: QEMU exited with code 1
I did remove the bus=ehci.0.port=2 and it got the boot screen with the prompt trying to boot from hard disk.
Any ideas greatly appreciated.
Hi Nicholas, I managed to get it to boot into the installer and I could format the apfs drive etc. When I click on the Catalina screen to install it complains that I need to be connected to the internet to install?
Making progress.
That’s correct, make sure your VM is connected to a network with DHCP and Internet access.
Hi Nicholas, Once I got a dhcp server running it started to install ok. The only other adjustment I had to make was changing the machine type from 1440x to q35 and its booted into the Catalina iso.
I was able to install this on an i7 4790 and Platinum Xeon processors. I did have to remove the bus=ehci.0.port=2 from the config file.
all running great here and thanks
I have followed instructions and once I boot up my Catalina VM for the first time, select the MacOS Base System, I get stuck on a black screen with the Apple logo. I have left it over night, plugged in ethernet, still stuck.
I get an OK start log. Console shows it booting up just fine as well.
I do have trouble shutting it down however. I get: TASK ERROR: VM quit/powerdown failed – got timeout; from every ‘Shutdown’ button I can try. I have to right-click<Stop.
Host: Supermicro Server
Motherboard: H8DGU-F
Processor: 2x AMD Opteron AMD 6168 (12) Core 1.7Ghz ( 24 Total Cores )
Memory: 32GB DDR3 (8 x 4GB – DDR3 – REG )
–Latest version of Proxmox installed on SATA SSD
I am accessing the GUI and trying to run the VM via an Intel Macbook Pro (if that even matters).
I have used both -cpu ……. options listed, Intel and AMD. Each on seperate, fresh VMs. Same result, black screen with Apple logo.
————-
The only other comment I have read similar to mine, they were told that the OSK may be incorrect. But I am getting the same passphrase every time I run "./sms_read". Just to confirm, the phrase I get is 10 words (no spaces), tailed by (c)AppleComputerInc -totaling 64 characters.
Please, help me resolve this, have wasted too many days.
Your CPUs don’t support the required SSE 4.2 instruction set.
So my server can not run this VM at all, it will always hang on the Apple logo after I select Base System, without a cpu swap?
There are older macOS versions that don’t require SSE4.2 (I forget which version it was, maybe Sierra?). You would set your CPU as a core2duo with those older versions.
And there’s a kext that adds emulation for a handful of SSE4.2 instructions, but no SSE 4.1 instructions (which your CPU also lacks): https://forums.macrumors.com/threads/mp3-1-others-sse-4-2-emulation-to-enable-amd-metal-driver.2206682/
As I need to do occasional testing on a mac this has been invaluable testing software installs on different versions. Thank you very much.
Have you noticed a disk speed problem write access. I have ssd’s in mirror raid and OSX is half the speed of a windows guest on same proxmox server (crystal vs amorpheous disk mark). I am using no machine as rdp so this should not affect the disk speed test. Generally the vm are a bit sluggish.
Are both using “virtio” as their disk type? There is a performance difference between each type of emulated disk.
I use PCIe passthrough of an NVMe SSD to avoid emulation entirely
The windows guest is using virtio scsi with latest drivers and with the mac guest ive tried sata and virtio scsi. I assumed it must be the emulation of the Sata interface but I couldn’t get scsi to work. Get the no entry sign. Searched but cant find virtio driver. Ill give pass through a go.
I don’t think macOS has virtio SCSI support. However it does have virtio-blk support. Rename the disk to “virtio1” (and remove ssd=1 if you have it) to use virtio-blk. It should be much faster than SATA.
Thanks for that tip. virtio-blk with writeback cache (BBU raid) way faster.
I’m trying to get the network interface to recognize as built-in. I see in your guide you say to use VMXNET3 and then further down you say that you got Hackintool to be able to mark it as built-in. I am wondering how you were able to do that? I unlocked the padlock but the built-in box is still grayed out. I also tried the guide without much success. I am trying to inject the dummy ethernet kext but can’t figure out how to make that work either. All I really need from this VM is imessage as I am using it as a bridge.
Hackintool doesn’t enable built-in for you, it just gives you the device ID you need to edit your OpenCore config with. See the full instructions here:
https://dortania.github.io/OpenCore-Post-Install/universal/iservices.html#serial-number-validity
Hi Nick.
Thanks fro your detailed explanation. I’ve had Catalina working well (due to having older Nvidia GPUs)
I’m repeatedly having issues when it comes to permanently moving opencore to the (main) disk efi partition – for example, to from /dev/disk0s1 to /dev/disk1s1.
I’ve followed your instructions, and can use diskutility to identify what SHOULD be the correct partitions on each disk, but on two occasions, I’ve fried my install – even re-importing a backed-up efi disk and reattaching Opencore iso (with “cache=unsafe”) hasn’t helped.
Is there any other method – such as mounting both efi partitions, and copying the content across? I do understand that dd is different that copying, so that particular idea is possibly faulty
Thanks
M.
Yes, you can indeed mount both and copy the files over manually!
Hi Nick,
it’me again some time later.
I tried to connect my iPad because I need to debug a safari web app. But unfortunately the vm does not find the iPad in the system report though I added an usb port by using the webinterface, but also your way by editing the .conf-file with “usb1: host=xxxx:xxxx”. Under info usbhost it found by proxmox with
“Bus 3, Addr 20, Port 4, Speed 480 Mb/s
Class 00: USB device 05ac:12ab, iPad”
Do you have any idea what I can try next?
Greetz
Tom
It seems like iDevices aren’t easily compatible with USB passthrough, because it sounds like they attempt to re-enumerate under a new device ID during connection, and this causes them to be disconnected from the passthrough.
If you PCIe passthrough an entire USB controller, it avoids this problem.
Thanks for the instructions.
On proxmox 7.0 when I boot up for the first time I get
“OCB LoadImage failed – Not Found”
Also the mouse doesn’t work – anyone know how to fix this? I’ve recreated the VM a few times to make sure I did it correctly.
Hi NIck,
somebody wrote above, he upgraded to Big Sur without problems. On my side this does not work after having solved the allocation size problem. The macos installer won’t start after ENTER. Do you know a way to find out why? Thx.
Greetz
Tom
Sorry, I didn’t have any trouble upgrading either so I’m not sure what’s going wrong there.
Make sure you’re booting from a recent version of my OpenCore, because older versions couldn’t boot Big Sur.
I tried to upgrade catalina to Big Sur from inside the macos system. I can’t see how I will get OpenCore into the game. Do you mean this is impossible?
No, in Proxmox just attach a new OpenCore device with the latest OpenCore image and set that as your boot disk, then upgrade macOS as you would on a normal Mac from the App Store. Everything should work fine (it’s what I did with my system).
Great, thx.
Hi nick ! The tuto is perfect but I’ve got an issue when run the VM :
kvm: -device isa-applesmsc,osk=”IputmyOSKbutidontshowit”: ‘isa-applesmsc’ is not a valid device model name
TASK ERROR: start failed: QEMU exited with code 1
>isa-applesmsc
This is misspelled, should be isa-applesmc
Thanks a lot, it should work now.
Hi Nick,
today I wanted to clone my Mojave machine and upgrade it to Catalina.
After the clone I hit the UEFI shell problem.
Following your advice I removed the obsolete options (well I don’t know if they were) and add the correct OpenCore item.
Alas, the File Explorer after “Add” does not show any items.
I tried to do a fresh setup using this guide but I get to the same point. So I fear my ProxMox installation does not see my UEFI files anymore?
Any idea where to look now?
Thanks
Peter
If you’re using Proxmox 7 make sure the pre-enroll keys option is not ticked on the EFI disk.
Hi Nicholas!
here and in most other places in internet it is “recommended” to use vmxnet3 as the model type.
Please take into account that this may cause issues with the network (especially with upload speed) and also with apple services: I remember in the past I was not able to login to appleid site through the browser.
A more recent issue was raised in patching VmAssetCacheEnable to enable content caching in vm for HS, Mojave, Catalina, Big Sur, Monterey.
One user was unable to register to lcdn apple server with monterey, and he was using vmxnet3: changing it to virtio/virtio-net solved his issue.
virtio/virtio-net model type should be preferred for big sur and monterey, for older mac os versions (Catalina/mojave/highsierra) e1000-82545em model type should be preferred.
With these changes, as far as I tested, no issues in upload speed and in using apple services.
Thank you!
Hi! I would like to know so is possible with fetch-macos.py create another iso from lion leopard and more …
And have u alternative with another script or disk utility to craate this iso for another os..
Ty
Hello,
Thank you for the tutorial, it’s working well on Catalina 🙂
I would like to avoid to select the HD in the bootloader, so it can boot quickly without having to login in PVE.
Do I have to make a new OpenCore img? Or is there some arguments I can pass to the VM?
Thank you.
You to edit your OpenCore’s config.plist to set the Timeout to a non-zero value, then at the OpenCore menu you can nominate the default boot option by pressing Ctrl + Enter on it. Afterwards that option will automatically be booted for you once the timeout expires.
Thank you.
It’s working 🙂
I have another question :p
Is it normal that ACPI order to shutdown is not working?
Is there a tuto somewhere that explain it?
Sorry I’m new to Hackintosh.
On the Options tab for the VM, enable the QEMU Agent option. This seems to be required for the Proxmox “Shutdown” command to work on macOS guests.
Thank you, it’s working.
Hi Nicholas,
Thanks for this guide it’s been very helpful.
I got my VM up and running and been using it through the proxmox console (noVNc) viewer.
I’ve been trying to passthru my nvidia gpu to the VM which seems to be working but my usb passthru of my keyboard and mouse fails a few seconds of using the them after logging into the VM and the whole screen freezes.
usb1: host=04f2:0402
usb2: host=062a:4180
hostpci0: 0a:00,pcie=1,romfile=GTX1050Ti.rom,x-vga=1
Any thoughts what might be happening here?
Catalina doesn’t support this GPU
Question, I’m running Proxmox 7.2 on a MacPro6,1 – do I still need to supply the key or ?? What changes in thus would you make for someone using a Mac Pro as the hardware?
Yeah you still need to supply the key, as QEMU won’t automatically read it from the host for you. You shouldn’t have to make any changes for the Mac host.
Hello, after the installation according to the tutorial, it is found that after using the remote desktop to connect to the Mac, opening Chrome to play web video will crash. Is there a solution?
Through the rx460 graphics card
Hi Nick, I am installing this on another PC
AMD 6900HX CPU
RX 6600M GPU Passthrough
I am getting stuck at IOAPIC: Version 0x11 Vectors 64:87
I am pretty sure I have the proper args
-cpu Haswell-noTSX,vendor=GenuineIntel,+invtsc,+hypervisor,kvm=on,vmware-cpuid-freq=on -global nec-usb-xhci.msi=off -global ICH9-LPC.acpi-pci-hotplug-with-bridge-support=off
Do you know what might cause this?
Works perfectly fine on windows 10 passthrough. stuck with ventura with the above error
macOS does not have native support for the M (mobile) GPU variants, are you doing something to spoof it to a supported model?
Nope, i donno how. Is there a way to go around this?
It looks like the RX 6600M has the same device ID as the desktop variant, so it should work actually. You’ll need to add “agdpmod=pikera” to your boot-args in your OpenCore config.plist.
For laptops you’ll probably need to disable the integrated graphics in your BIOS in order for the dGPU to output to the integrated monitor. Otherwise if you don’t need it to be displayed there, try plugging a monitor up to the HDMI port and see if it outputs there instead.
The args for pikera is already added in config.plist.
It’s a Mini PC, no iGPU just the 6600M chip and the CPU. There are monitor outputs ( startup menu where I select Boot Mac, upon booting thats when im stuck on the apple logo, and verbose mode shows it stuck on IOAPIC )
out of topic as im working my desktop pc with 5600XT, its also stuck at Apple Logo ( with 640 x 480 resolution on boot menu ), does Ventura support this card natively?
Check for error messages in host “dmesg” output, especially BAR errors telling you that passthrough failed because a host driver was holding on to the memory regions used by the GPU.
The basically-official reference is this website, looks like 5600 XT should be fine:
https://dortania.github.io/GPU-Buyers-Guide/modern-gpus/amd-gpu.html
Not seeing any bad dmesg errors thats relating to passthrough.
The initial vzdump was built upon RX 570, as that GPU got fried i am testing new GPUs, so I am not sure if the dump from RX 570 and restoring it on the new GPU proxmoxes is causing these stucks. Maybe I shall try to redo an install and see.
I wouldn’t bother, the macOS install seems to be pretty much immutable, so it doesn’t care what hardware it saw previously, only what it sees this boot.
Yea, you right, no point in installing when all OpenCores the same.
I guess I will dig around further on why 6600M and 5600XT passthroughs are stuck at boot.
Update: Desktop GPU 5600XT went thru with agdp=pikera
Mini PC with Embedded RX 6600M still stuck, will play around and let you know.
Out of curiousity have you ever encountered these messages from dmesg
[53509.855141] vfio-pci 0000:0d:00.0: vfio_ecap_init: hiding ecap 0xffff@0xffc
[53509.855142] vfio-pci 0000:0d:00.0: vfio_ecap_init: hiding ecap 0xffff@0xffc
[53509.882978] fwbr551i0: port 2(tap551i0) entered disabled state
[53509.883102] fwbr551i0: port 2(tap551i0) entered disabled state
[53510.031100] vfio-pci 0000:0d:00.0: Unable to change power state from D3cold to D0, device inaccessible
[53510.032994] vfio-pci 0000:0d:00.1: Unable to change power state from D3cold to D0, device inaccessible
[53510.033002] vfio-pci 0000:0d:00.0: Unable to change power state from D3cold to D0, device inaccessible
[53510.034302] vfio-pci 0000:0d:00.1: Unable to change power state from D3cold to D0, device inaccessible
[53512.082938] pcieport 0000:0c:00.0: Data Link Layer Link Active not set in 1000 msec
[53512.087988] vfio-pci 0000:0d:00.1: Unable to change power state from D3cold to D0, device inaccessible
[53512.088000] vfio-pci 0000:0d:00.0: Unable to change power state from D3cold to D0, device inaccessible
After stopping a container, turning up a Mac/Win container shows this error. Takes a reboot of the node to boot VM back to normal again, after a stop on the VM issue persists.
Vendor-Reset is installed.
I think that’s probably a failure for vendor-reset to handle the card properly
I was looking through your Vendor-reset post comments, I changed the reset file to device_specific. Works so far, but there’s a problem when my display goes idle mode, it wont come back from Mouse/Keyboard. Shows suspended mode on pve, and i resumed it wouldnt come back either.
Maybe the guest is going into sleep mode? Disable sleep mode in macOS power saving settings, I’ve never seen a VM successfully sleep with PCIe devices attached.
Yea disabling sleep works, but not very energy conserving friendly.
My RX 570 works fine with Sleep and wakeup by keyboard.
But anywho thanks for the assistance.
I understand this guide is a bit old but I have been attempting to install MacOS 10.10 (aka Yosemite) and have been having issues when inside of OpenCore. When using the UEFI shell I’ve been trying to manually use the boot.efi file (since it’s not showing up normally. I understand this version is under the guide but I was wondering if you could help. When i go to FS0:\System\Library\CoreServices\ there is nothing. Even if I try to boot into the “boot.efi” file there doesn’t seem to be any there though there is when I check the iso and dmg of the file on my local computer. Is there something I am doing wrong? I am running Proxmox 7.2-11. Any help would be appreciated.