
A new version of this tutorial is now available for the release of macOS 13 Ventura, you can see that here
This tutorial for installing macOS 12 Monterey has been adapted for Proxmox from Kholia’s OSX-KVM project and Leoyzen’s OpenCore configuration for KVM. You can get the full sourcecode of my OpenCore release on my GitHub here.
Requirements
I’ll assume you already have Proxmox 7 installed. You also need a real Mac available in order to fetch the OSK key.
Your Proxmox host computer’s CPU must support SSE 4.2, so for Intel your CPU must be at least as new as Nehalem, which was the first CPU generation to bear the “Core” i5/i7 branding. Older CPUs will cause Illegal Instruction crashes when apps/extensions attempt to use these missing instructions.
Modern AMD CPUs also support SSE 4.2 and will work with this guide.
First step: Create an installation ISO
Download my copy of the OSX-KVM repository using the download button, and unzip it:
https://github.com/thenickdude/OSX-KVM
First we need to install some build requirements. If you will be building the installer ISO on macOS, open up the Terminal and run this command to install the commandline tools:
xcode-select --installIf you’re building the ISO on Linux, you instead need to run this command (these are the package names for Ubuntu or similar distributions, they may need adjustment on other distributions):
sudo apt install qemu-utils make
Now in the Terminal, from the root of OSX-KVM, run:
cd scripts/monterey
make Monterey-recovery.img
This will download the Monterey installer from Apple’s software distribution servers and build a Monterey-recovery.img file for you. Upload this file to your Proxmox’s ISO store directory (typically /var/lib/vz/template/iso). Although we’re putting it in the ISO directory so that we can use it with Proxmox’s ISO picker later, this a raw disk image rather than a true ISO.
If you’re building the installer on macOS, you can build a full installer instead of just a recovery, which will mean that macOS won’t have to download Monterey files during installation, and so won’t require an Internet connection. Simply ask it to build Monterey-full.img instead:
cd scripts/monterey
make Monterey-full.img
This option is not available when building the installer on Linux.
Prepare an OpenCore image
Download the OpenCore.iso.gz file from the newest release in my repository (you want v15 or newer), double click it to unpack it, and upload it to Proxmox’s ISO store at /var/lib/vz/template/iso. Although it has a .iso file extension, this is actually a hard disk image.
Fetch the OSK authentication key
macOS checks that it is running on real Mac hardware, and refuses to boot on third-party hardware. You can get around this by reading an authentication key out of your real Mac hardware (the OSK key). Save the first block of C code from this page as smc_read.c. In a command prompt, change into the same directory as that file and run:
xcode-select --install # If you don't already have gcc
gcc -o smc_read smc_read.c -framework IOKit
./smc_read
It’ll print out the 64 character OSK for you. Make a note of it.
Every Mac uses the same OSK, so don’t be surprised that it doesn’t look like a random string!
Create the VM
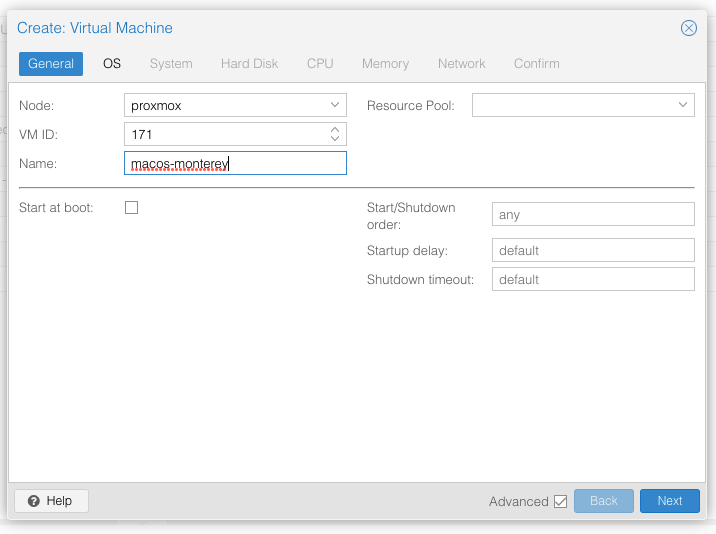
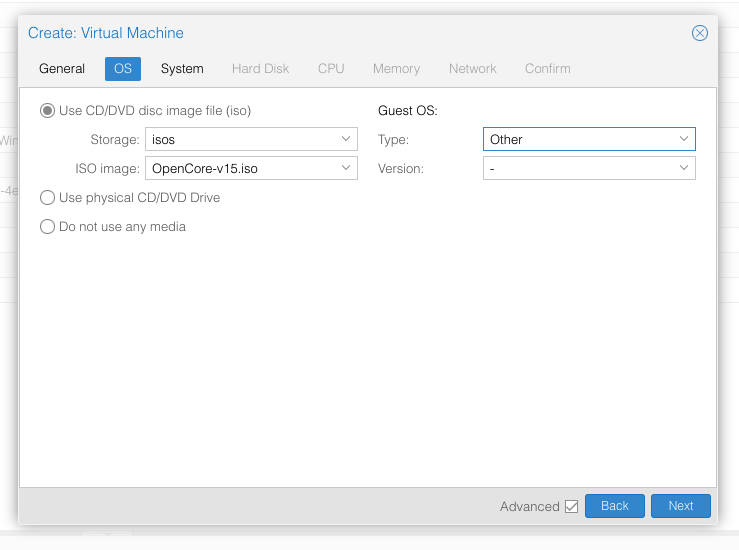
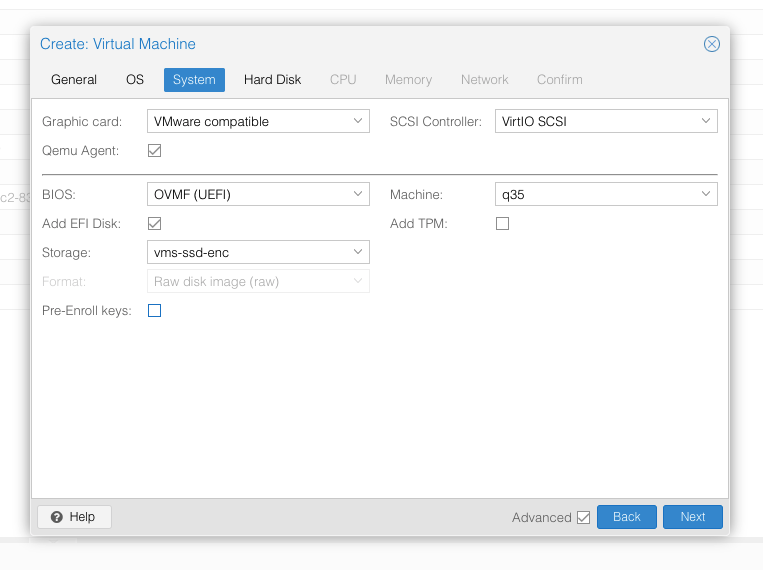
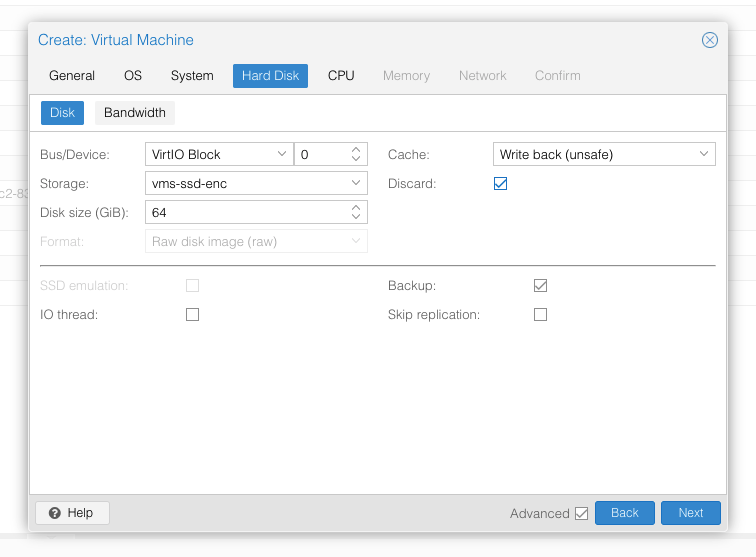
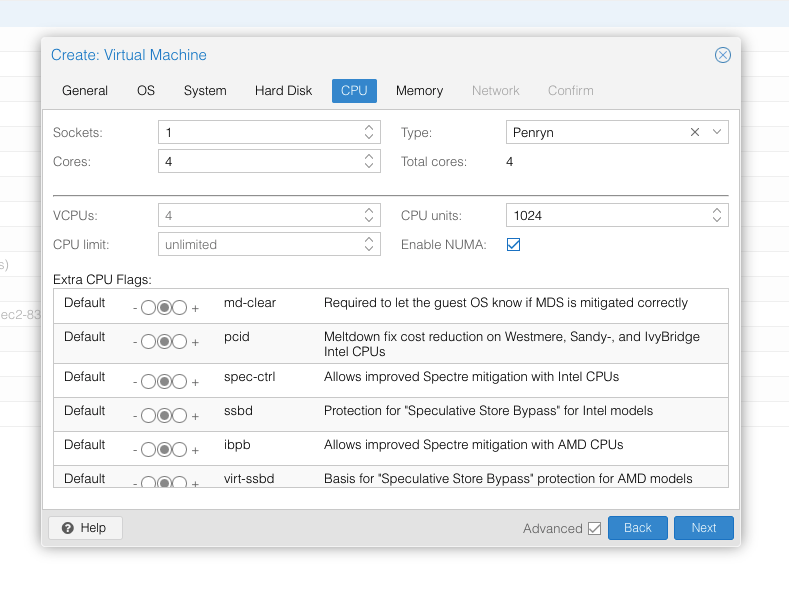
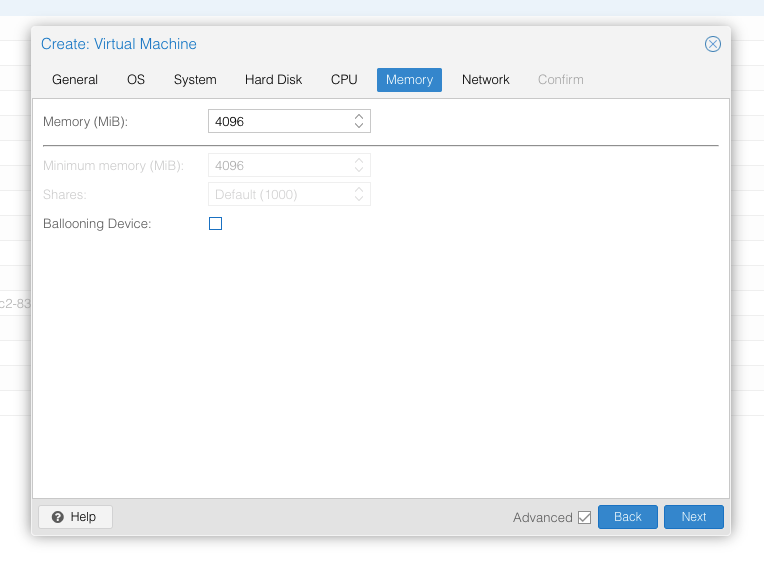
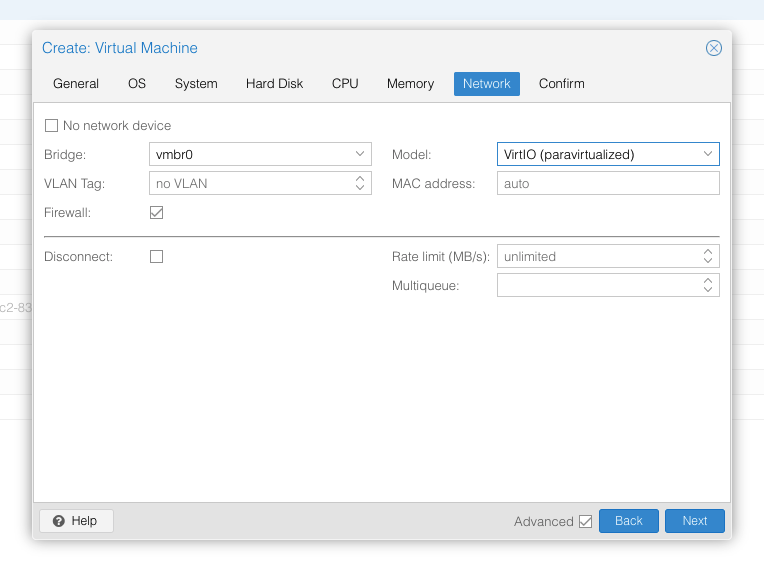
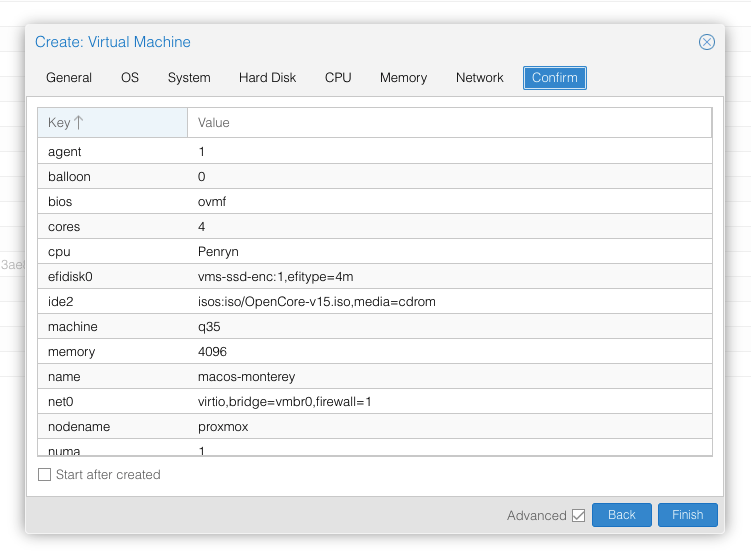
From the Proxmox web UI, create a new virtual machine as shown below.
In the Options page for the VM, ensure that “use tablet for pointer” is set to “Yes” (this is the default).
In the Hardware page for the VM, add a second DVD drive at IDE0, set it to use your Monterey-full.img or Monterey-recovery.img.
Don’t try to start the VM just yet. First, SSH into your Proxmox server so we can make some edits to the configuration files.
Edit /etc/pve/qemu-server/YOUR-VM-ID-HERE.conf (e.g. with nano or vim). Add this line, being sure to substitute the OSK you extracted earlier into the right place:
args: -device isa-applesmc,osk="THE-OSK-YOU-EXTRACTED-GOES-HERE" -smbios type=2 -device usb-kbd,bus=ehci.0,port=2 -global nec-usb-xhci.msi=off -global ICH9-LPC.acpi-pci-hotplug-with-bridge-support=off
A USB keyboard is added here because macOS doesn’t support QEMU’s default PS/2 keyboard.
MSI has been disabled for the USB controller to fix QEMU panics when USB 3 devices are passed through.
ACPI PCIe hotplug support needs to be disabled for VMs with passthrough devices since QEMU Q35 machine model 6.1, which is what that final argument does. (You could instead choose Q35 6.0 for your Machine type on the Hardware tab). If you haven’t updated your QEMU to version 6.1 yet then remove this argument from the args. (Proxmox 7 ships with 6.0 and updated to 6.1 later on)
Ensure the args are all on a single line!
We also need to add a -cpu argument. If your host CPU is Intel, add this to the end of the “args” line:
-cpu host,kvm=on,vendor=GenuineIntel,+kvm_pv_unhalt,+kvm_pv_eoi,+hypervisor,+invtsc
This will pass through all of the features that your CPU supports. OpenCore’s config will pretend to macOS that the CPU’s model name is Penryn for compatibility.
If your host CPU is AMD, or the above argument doesn’t work for you, use this more-compatible alternative:
-cpu Penryn,kvm=on,vendor=GenuineIntel,+kvm_pv_unhalt,+kvm_pv_eoi,+hypervisor,+invtsc,+pcid,+ssse3,+sse4.2,+popcnt,+avx,+avx2,+aes,+fma,+fma4,+bmi1,+bmi2,+xsave,+xsaveopt,+rdrand,check
This pretends that your CPU is Penryn, which will keep macOS happy even if your host CPU is AMD, and adds a bunch of newer required and optional CPU features on top. Features that your host CPU doesn’t support will be ignored (a warning will be printed to the console during launch with qm start 1xx), but note that macOS won’t work without SSE4.2 support.
You can remove the “+invtsc” feature from the list if your CPU doesn’t support it, or if you want to be able to migrate a running VM between Proxmox nodes.
Now find the lines that define the two “ISOs” (ide0 and ide2), and remove the “,media=cdrom” part from them. Add “,cache=unsafe” in its place. This will treat these as hard disks rather than DVD drives.
Save your changes, return to the Options tab, and change the boot order to put IDE2 (the OpenCore image) first. Your final VM configuration file should resemble this:
args: -device isa-applesmc,osk="..." -smbios type=2 -device usb-kbd,bus=ehci.0,port=2 -cpu host,kvm=on,vendor=GenuineIntel,+kvm_pv_unhalt,+kvm_pv_eoi,+hypervisor,+invtsc -global nec-usb-xhci.msi=off -global ICH9-LPC.acpi-pci-hotplug-with-bridge-support=off
agent: 1
balloon: 0
bios: ovmf
boot: order=ide2
cores: 4
cpu: Penryn
efidisk0: vms-ssd-enc:vm-171-disk-1,efitype=4m,size=1M
ide0: isos:iso/Monterey-full.img,cache=unsafe,size=14G
ide2: isos:iso/OpenCore-v15.img,cache=unsafe,size=150M
machine: q35
memory: 4096
name: macos-monterey
net0: virtio=...,bridge=vmbr0,firewall=1
numa: 1
ostype: other
virtio0: vms:vm-171-disk-0,cache=unsafe,discard=on,size=64G
scsihw: virtio-scsi-pci
smbios1: uuid=...
sockets: 1
vga: vmware
Configure Proxmox
On Proxmox, run “echo 1 > /sys/module/kvm/parameters/ignore_msrs” to avoid a bootloop during macOS boot. To make this change persist across Proxmox reboots, run:
echo "options kvm ignore_msrs=Y" >> /etc/modprobe.d/kvm.conf && update-initramfs -k all -u
Install Monterey
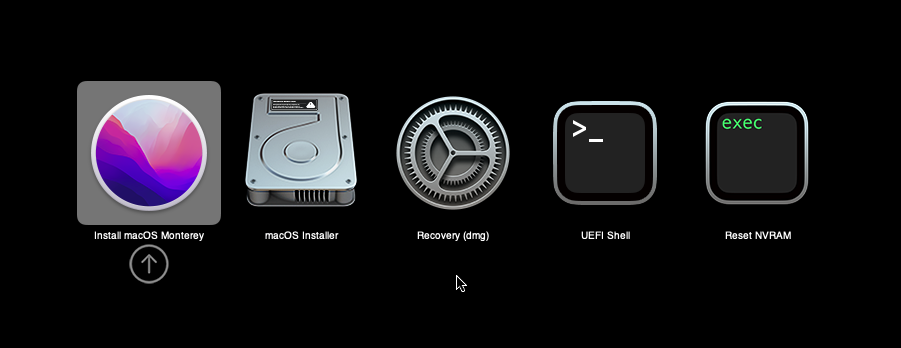
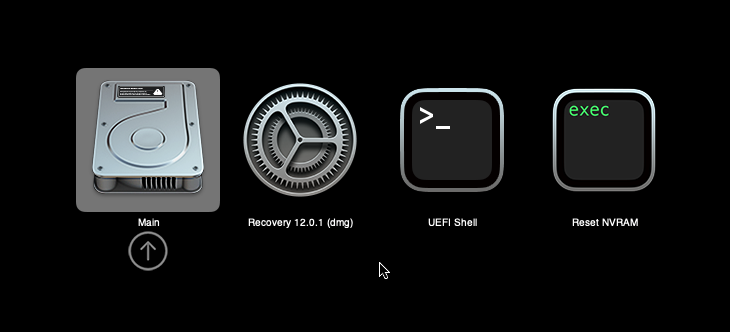
Now start up your VM, it should boot to the OpenCore boot picker:
Press enter to boot the “Install macOS Monterey” entry and the installer should appear. (If your keyboard isn’t working, leave the Proxmox Console page and re-enter it)
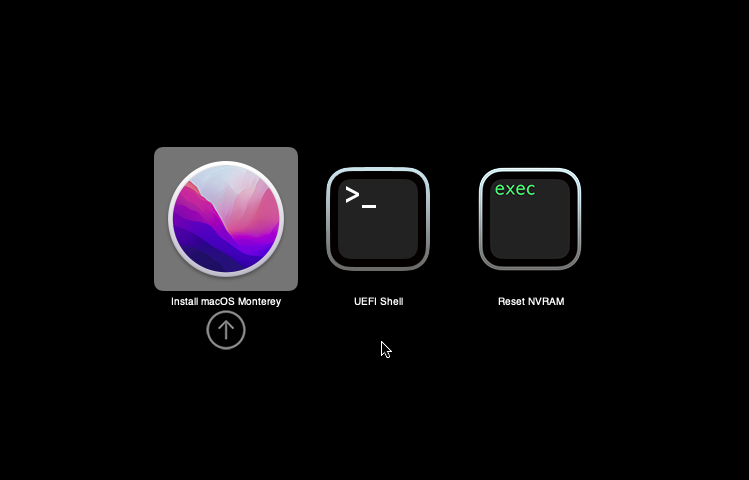
If you built a recovery installer, the icon will instead be an image of a hard disk and be labelled “MacOS Base System”.
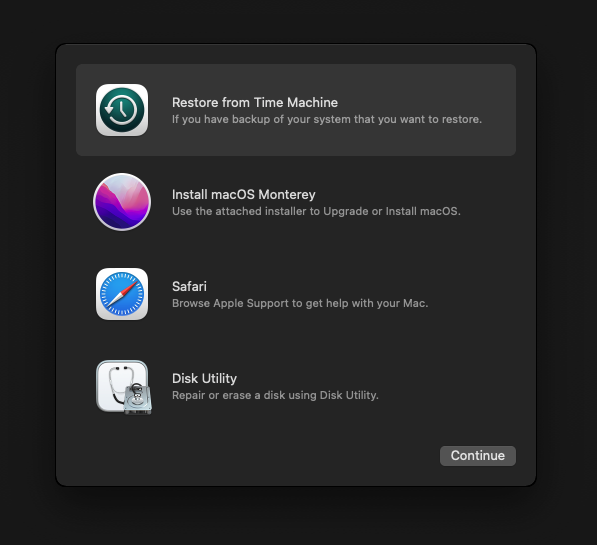
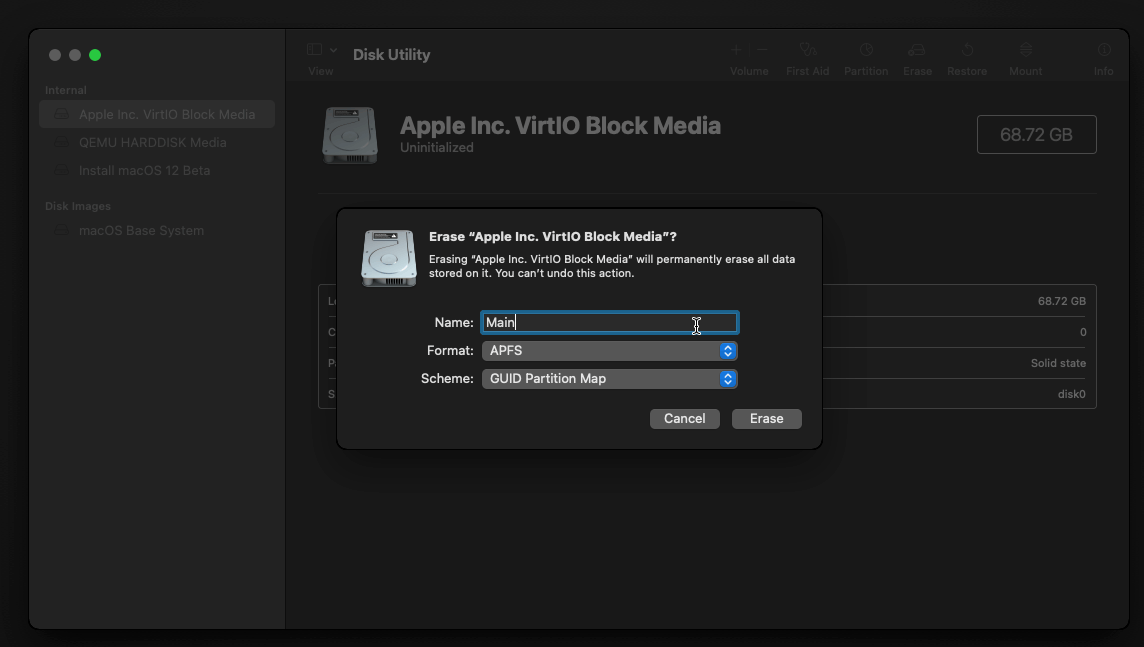
Our virtual hard drive needs to be erased/formatted before we can install to it, so select the Disk Utility option. Follow the steps below to format the disk:
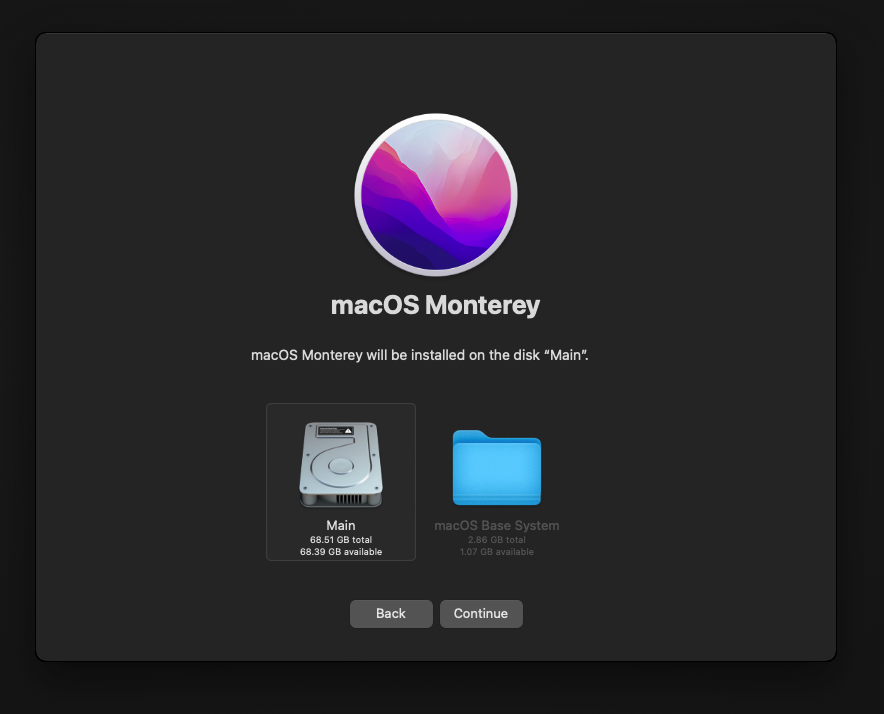
Now you can quit Disk Utility from the top menu (Disk Utility > Quit Disk Utility), and we’re ready to begin installation!
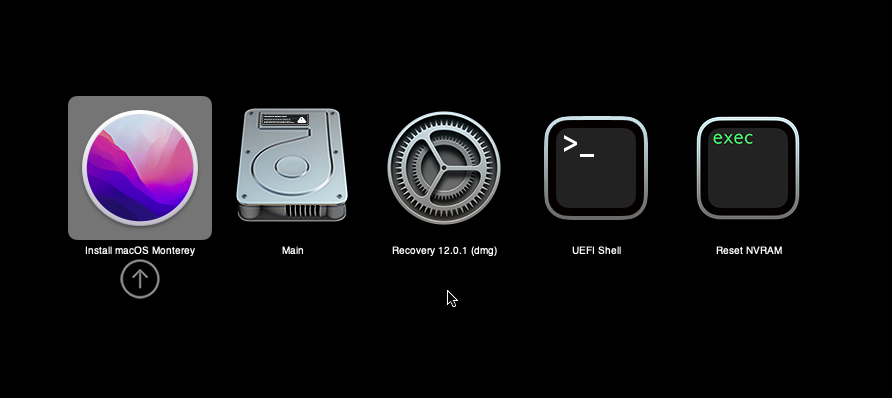
After the first stage of installation, the VM will reboot 2 or 3 times in quick succession, and each time you must manually pick the “macOS Installer” entry (the second one here, with the hard disk icon) to continue installation. It will not be selected for you automatically:
If your keyboard isn’t responding on this screen, exit the Console tab in Proxmox and re-enter it. If you get a “prohibited” sign like this appearing, hit the Reset button on the VM to try again:

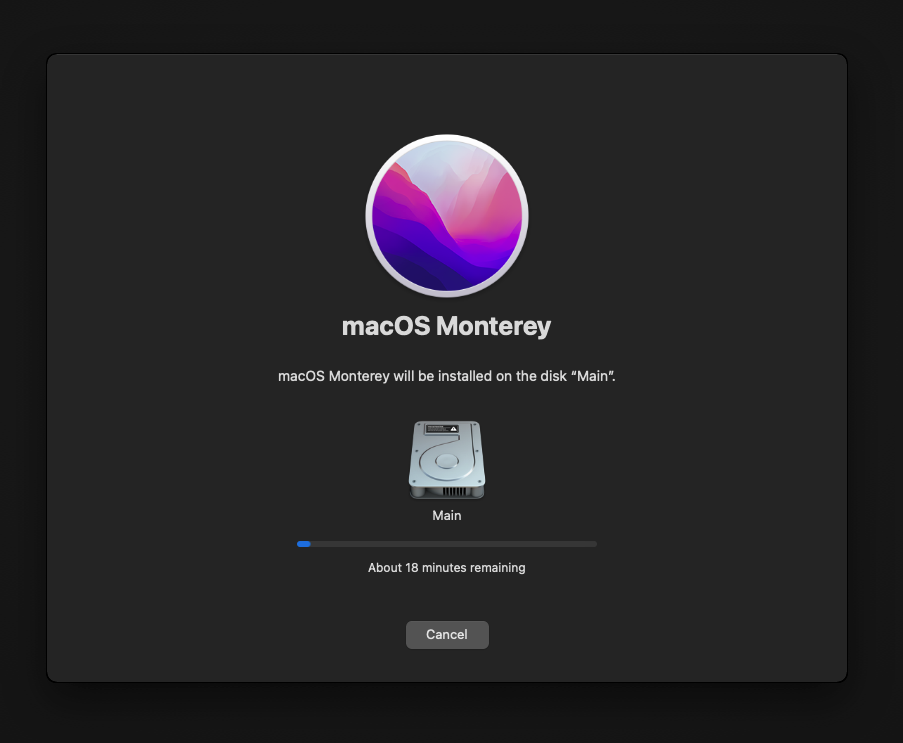
Now the installation is nearly complete and the macOS Installer entry disappears, so pick the name of your main disk to boot (mine’s called Main).
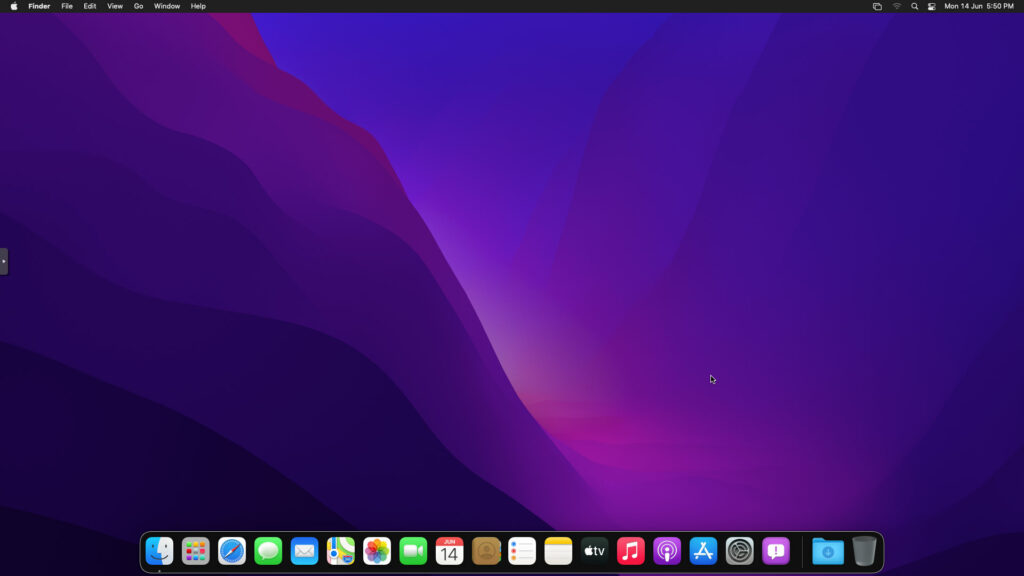
There’s just one more reboot to come. Afterwards pick the “Main” entry again and this time you’ll finally boot into Monterey!
Answer the initial install questions, and you’ll be logged on! Note that you will want to hold off on logging into your Apple ID until you’ve configured your Mac’s serial number in OpenCore (because otherwise a Mac with the default shared serial number in my OpenCore image will be added to your Apple ID).
Note that it will be really sluggish for a few minutes after the first boot while the system performs housekeeping tasks.
Make the OpenCore install permanent
We’re currently booting using OpenCore from the attached OpenCore ISO. Let’s install that to the hard drive instead. Pop open Terminal and run “diskutil list” to see what drives we have available.

Use “sudo dd if=<source> of=<dest>” to copy the “EFI” partition from the OpenCore CD and overwrite the EFI partition on the hard disk. The OpenCore CD is the small disk (~150MB) that only has an EFI partition on it, and the main hard disk is the one with the large (>30GB) Apple_APFS “Container” partition on it.
In my case these EFI partitions ended up being called disk1s1 and disk0s1 respectively, so I ran “sudo dd if=/dev/disk1s1 of=/dev/disk0s1” (note that if you get these names wrong, you will overwrite the wrong disk and you’ll have to start the installation over again!).
Now shut down the VM, and remove both the OpenCore and the Monterey installer drives from the Hardware tab. On the Options tab, edit the boot order to place your virtio0 disk as the first disk. Boot up. If everything went well, you should see the OpenCore boot menu, and you can select your “Main” disk to boot Monterey:
Sleep management
I found that I was unable to wake Monterey from sleep using my mouse or keyboard. If you encounter the same problem, you can either disable system sleep in Monterey’s Energy Saver settings to avoid the issue, or you can manually wake the VM up from sleep from Proxmox by running:
qm monitor YOUR-VM-ID-HERE
system_wakeup
quit
Editing your OpenCore/EFI settings
The Configuration.pdf that explains the OpenCore config.plist file can be found along with the OpenCore release on my GitHub.
To mount your EFI partition in macOS so you can edit your config.plist, first check the “identifier” of your EFI partition in the terminal:
~$ diskutil list
/dev/disk0 (external, physical):
   #:                   TYPE NAME              SIZE       IDENTIFIER
   0:  GUID_partition_scheme                  *512.1 GB   disk0
   1:                    EFI EFI               209.7 MB   disk0s1
   2:             Apple_APFS Container disk1   511.9 GB   disk0s2
Then you can mount it like so:
sudo mkdir /Volumes/EFI
sudo mount -t msdos /dev/disk0s1 /Volumes/EFI
Now you can edit /Volumes/EFI/OC/config.plist with your favourite text editor to make your changes. (TextEdit is not a great choice because it likes to insert curly quotes into the file and otherwise break things, there are some dedicated plist editors available such as XCode).
If you’re unable to boot macOS, you can edit the config.plist using the “UEFI Shell” option in the OpenCore boot menu instead.
Enter “FS0:” and press enter to open up the first available filesystem, then run “edit EFI\OC\config.plist” (if the file isn’t found, try switching to another filesystem like fs1:). When you’re done editing, press control+Q to exit, “Y” to save, then run “exit” to return to the OpenCore menu. You need to reboot for your changes to take effect.
If you prefer, you can edit config.plist from the comfort of your Proxmox host instead. If you’re booting from an attached OpenCore.img file, you can mount that file as a disk on the host. If you’re booting from the VM’s disk instead, it must be in raw format in order to be mounted (e.g. typical LVM or ZFS usage) rather than qcow2.
# Mount an OpenCore image:
losetup --partscan /dev/loop0 /var/lib/vz/template/iso/OpenCore-v15.img
# or a VM boot disk:
losetup --partscan /dev/loop0 /dev/zvol/tank/vms/vm-100-disk-1

mount /dev/loop0p1 /mnt
Now the contents of that first partition are available in /mnt, so you can edit /mnt/EFI/OC/config.plist in your favourite editor. When you’re done, do this to unmount the disk:
umount /mnt
losetup --detach /dev/loop0
Automatic boot
In config.plist, you can set Misc/Boot/Timeout to a non-zero value to allow the default boot option be chosen automatically after that delay in seconds. I’ve disabled this by default because it causes the installer ISO to re-enter its main menu instead of continuing the second stage of installation.
You can set the default boot option by pressing control+enter on it.
Verbose boot
To boot macOS in Verbose mode to diagnose boot problems, at the OpenCore boot menu press Cmd+V before pressing enter to boot macOS (you don’t need to hold it down).
If there is a kernel panic during boot and it reboots too quickly to be read, edit config.plist to add “debug=0x100” to the kernel arguments.
Changing screen resolution
To change macOS’ screen resolution, you need to edit the UEFI/Output/Resolution setting in config.plist, the default is 1920×1080@32.
You should be able to change this to any of the modes that the system OVMF menu offers (hit F2 at the start of guest boot and choose “Device Manager/OVMF Platform Configuration” to see which resolutions are available).
Video performance
Because there is no guest video acceleration available for macOS, video performance is poor.
In Google Chrome in the guest you will need to toggle off the setting to “use hardware acceleration when available” to improve issues with elements not being drawn or flickering (especially video). Safari may be a better choice.
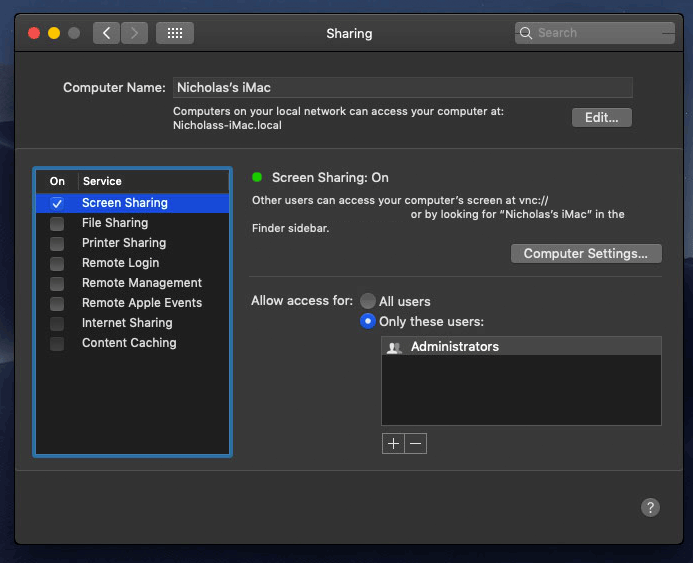
macOS’s built in “Screen Sharing” feature offers dramatically better framerates and latency than Proxmox’s browser-based VNC console, so if you have a real Mac to act as a viewing console, you can enable that in the VM’s “Sharing” settings and connect to the VM using the Screen Sharing app from your Mac instead:
Apparently Screen Sharing is also compatible with VNC clients like RealVNC, so you should be able to connect to it from Linux or Windows consoles using RealVNC.
The real magic bullet for video performance is to pass through a compatible video card using PCIe passthrough (though note that macOS now only supports a handful of very old NVidia cards). This offers near-native performance. You can read more about how I’m using PCIe passthrough on my own installation here.
USB passthrough
Since I want to use this as my primary computer, I want to use a USB keyboard and mouse plugged directly into Proxmox, rather than sending my input through the web VNC console.
Proxmox has good documentation for USB passthrough. Basically, run “qm monitor YOUR-VM-ID-HERE”, then “info usbhost” to get a list of the USB devices connected to Proxmox:
qm> info usbhost
 Bus 3, Addr 12, Port 6, Speed 480 Mb/s
 Class 00: USB device 8564:1000, Mass Storage Device
 Bus 3, Addr 11, Port 5.4, Speed 12 Mb/s
 Class 00: USB device 04d9:0141, USB Keyboard
 Bus 3, Addr 10, Port 5.1.2, Speed 12 Mb/s
 Class 00: USB device 046d:c52b, USB Receiver
 Bus 3, Addr 9, Port 14.4, Speed 12 Mb/s
 Class 00: USB device 046d:c227, G15 GamePanel LCD
 Bus 3, Addr 8, Port 14.1, Speed 1.5 Mb/s
 Class 00: USB device 046d:c226, G15 Gaming Keyboard
In this case I can add my keyboard and mouse to USB passthrough by quitting qm, then running:
qm set YOUR-VM-ID-HERE -usb1 host=04d9:0141
qm set YOUR-VM-ID-HERE -usb2 host=046d:c52b
This saves the devices to the VM configuration for you. You need to reboot to have the new settings apply.
You can also pass through USB devices by passing through an entire USB controller using Proxmox’s PCIe passthrough feature, which gives much better compatibility.
Odd core counts
If your host CPU is AMD, you might have a core count which is divisible by 3, like 6 cores. macOS doesn’t like it if the core count isn’t a power of 2 (1, 2, 4, 8), but it doesn’t mind odd socket counts.
So in order to pass 6 total cores, configure the VM for 3 sockets and 2 cores per socket.
Fixing “guest boots to UEFI shell”
If your guest ends up booting to the UEFI shell instead of showing the OpenCore boot menu, especially if you’ve just updated OpenCore to a new version, you’ll need to edit the guest’s UEFI boot entries to fix this.
At the very start of guest boot, hit F2 to enter guest UEFI settings.
First we’ll remove the old entries. Choose the Boot Maintenance option, then Boot Options -> Delete Boot Option. Use the spacebar to tick any old Clover or OpenCore entries (avoid ticking the EFI Internal Shell option, you want to keep that!). Select “Commit Changes and Exit”.
Now we’ll add the correct entry for OpenCore back in. Select Add Boot Option. Navigate through the device tree to EFI/OC/OpenCore.efi and select it, name this new option “OpenCore” or similar. Again Commit Changes and Exit.
Go to the Change Boot Order and move OpenCore to the top. Commit Changes and Exit.
Now back out to the main menu and choose Reset, and you should successfully boot into OpenCore this time.
Fixing iMessage
iCloud and the App Store should already be working for you, but for iMessage support you must follow these steps to mark your network adapter as built-in:
https://dortania.github.io/OpenCore-Post-Install/universal/iservices.html#fixing-en0
Disabling SIP (System Integrity Protection)
You can disable SIP by selecting the Recovery option from the OpenCore boot menu, then use the top menu to open the Terminal and run csrutil disable --no-internal. Then reboot.
This may be needed to run unsigned kexts or perform other hacks.
Upgrading OpenCore
Sometimes you need to update OpenCore to a new release in order to support a new macOS update. I’ll assume you don’t have any customisations to config.plist you want to save.
First take a snapshot! It’s great to be able to roll back if something goes wrong.
If you’re still able to boot macOS, you can update it from within the guest. Follow the instructions in the “Editing your OpenCore/EFI settings” section to mount your EFI partition. Then you can delete the EFI folder in there and replace it with the one from the OpenCoreEFIFolder.zip file from my OpenCore release (you’ll probably need to empty the trash first to make room for the new folder). You’re done!
If you aren’t able to boot macOS, unpack and upload the new OpenCore ISO to Proxmox’s ISO store instead. Add a new CD drive to the VM that uses that ISO. Then in Proxmox’s terminal edit the VM’s config (in /etc/pve/qemu-server) to replace “media=cdrom” with “cache=unsafe” for the OpenCore drive. Now on the “Options” tab, change the boot order to put the new OpenCore drive first.
Start the VM and boot into macOS using the new OpenCore drive. From within macOS you can now follow the instructions from the “Make the OpenCore install permanent” section to install the new OpenCore image to your main macOS disk, after which the OpenCore drive can be detached from the VM.
Upgrading from macOS Big Sur
First make a backup or snapshot of your system! Being able to roll back when the upgrade goes wrong is a real lifesaver.
You’ll need to update OpenCore to my v15 release before the upgrade. You can follow the instructions in the “Editing your OpenCore settings” section above to mount your EFI disk. Then you can replace the OpenCore files in the mounted “EFI” disk with the ones from the OpenCoreEFIFolder.zip file in my newest OpenCore release.
Reboot to make sure that you can still boot Big Sir.
If you’re using any PCIe passthrough devices (particularly video cards) you’ll want to disable those and set “vga: vmware” instead, so you can install using Proxmox’s web console from a different machine during the upgrade. This avoids installer problems triggered by flaky video card passthrough, especially host lockups caused by the AMD Reset Bug.
Now you can upgrade to Monterey using Software Update or from the App Store like you would on a real Mac.
If the update fails to appear, your SIP mode might be set to “Apple Internal”. You can check this by running “csrutil status” in the Terminal.
To fix this, reboot your VM and at the OpenCore menu select Recovery. Open up the Terminal, and in there run “csrutil enable --no-internal” (“csrutil disable --no-internal” is fine too), then reboot back into macOS and try again.
Thank you very much, I cannot wait to find time to check this out!
Anyone having issues resizing their disk after increasing disk size in Proxmox? I don’t have enough space to run the upgrade, and after increasing raw disk size, APFS resize says it increases, but then don’t see more space on the volume?
In disk utility you need to show all volumes
Thanks I have it showing all devices, but this made no difference. I restored from backup of the VM, cleared out enough space to upgrade to Monterrey. @Nick the OpenCore settings work great – thank you!
After the upgrade see the same behaviour in Monterrey. I update the disk spice in Proxmox, boot into Monterrey I can see that the hard disk has the additional size, I update the Container to use up the new free space and it does all the work to resize everything, but then after it finishes, the container and the volume size is the same. If I try and do it again, it says the target size needs to be different, so its definitely doing something! Anyone else can try and see if they see the same?
thanks!
I have the same issue too, did you solve it in someway? Thanks
I think it’s because the revert partition is created after the main Partition when installing on completely blank disk. So I need to delete recovery partition and then expand. Going to try out tomorrow will post back if it works.
Hey, great article!
Do you think it would be doable to clone an old mac with filezilla then restore it on a VM?
Thanks.
Absolutely, then you just need to boot from my OpenCore image and it should work fine.
Which macOS version though, because for versions as old as High Sierra I’ve only managed to boot them using Clover rather than OpenCore.
Thanks for this
Sorry I meant clonezilla and not filezilla.
Hi, I can’t install it, it gives error when loading OpenCore to start the installation,
I try too to manually boot through the uefi the BOOT_x64.efi file but it tells me I don’t have the permissions.
Anyone else have this problem?
Thanks
Make sure you unticked the “enroll keys” option when adding the EFI disk. You can remove it and readd it to edit this.
Not sure why but when I try booting the VM with GPU-passthrough, it never actually boots. If I enable the display in hardware, it will boot fine.
Is there a log somewhere that I can see what’s going on? Running dmesg in the proxmox console doesn’t really show much, just generic events.
Which GPU? If it’s a GPU affected by the AMD Reset Bug then it’ll hang at the 75% loading mark if the GPU has already been initialised since the last host power cycle.
If power cycling is not an option, check out this workaround:
https://www.nicksherlock.com/2020/11/working-around-the-amd-gpu-reset-bug-on-proxmox/
It is an Nvidia GT710, which I believe is compatible. Would vendor-reset be something I would have to do on an Nvidia card…?
I see according to https://dortania.github.io/GPU-Buyers-Guide/modern-gpus/nvidia-gpu.html#kepler-series-gtx-6xx-7xx I need to set shikigva=40 as a boot flag, but I am not sure in which location to set that in the .plist.
You don’t need vendor reset for that one.
That goes next to the text “keepsyms=1” in the “boot-args” section.
No, it will not work out of the box because apple removed kepler support starting from monterey.
You need to copy old big sur nvidia driver and unseal the volume to have your nvidia back: this means changing sip value and have an unsealed volume.
Thanks apple for this…
so which cheap GPU do you suggest?
The upgrade from Big Sur worked great – thank you!. I needed to remmeber to update all my platform specific info. and the network adapter (to built-in). Curiously, I lost network connectivity on Monterey because my network adapter had switched away from VirtIO – changed it back and everything was fine.
Works a treat !. Thanks man. now I need to find a way top share the same mouse and keyboard across VMs (without installing Synergy 2). Thanks again.
I’m using Barrier, the free fork of Synergy
Hey Nick! Awesome work as always – I have been following your macOS proxmox guides for years now. I believe I have followed these steps to a T, but after the final reboot when the macOS Installer entry disappears replaced with the name of the volume (Main), the boot progress bar hangs at about the 30% mark. I can force shut down and retry, but it never advances beyond 30%. If relevant, my host is a Dell R710 with 24 x Intel(R) Xeon(R) CPU E5649 @ 2.53GHz (2 Sockets) and I am running PVE 7.0-13. Do you know what I could try next? Thanks in advance!
Try pressing Win+V before selecting the boot option in OpenCore to boot in Verbose mode.
Normally hangs here come down to missing CPU features, non-power of two core counts or bad OSK
Absolute rookie move – the OSK key is, of course, case sensitive. Got it working – thank you very much for the logic check. 🙂 Enjoy your weekend!
When trying to take a snapshot, I see the following for this VM:
“The current guest configuration does not support taking new snapshots”
Any suggestions?
Proxmox doesn’t know how to snapshot the OpenCore or macOS Installer harddisk images, so you need to remove those to take a snapshot.
Thanks for this. If I use this method with my AMD 5950x processor can I run Adobe products without the need for any patches?
I’m assuming because Proxmox is setup to use ‘Penryn’ it can overcome the Intel issue – or does opencore change the type of processor back to AMD when it’s installed?
I don’t have AMD myself but from what I’ve heard all the Adobe products work fine unpatched with this approach on AMD.
OpenCore is configured to simulate Penryn too, it doesn’t need any AMD patches unlike on bare metal.
Great stuff – that’s what I was thinking. I rely heavily on Adobe for my job so it needs to work, I shall give it a whirl.
Mind you you will need to PCIe passthrough a compatible GPU to get acceptable performance
I have a Radeon RX 560 set aside for this VM
Actually I have another question Nick.
I have 2 m.2 drives for this build and I’d like to use 1 (larger) for Proxmox, backups, isos etc. Then the other (smaller) just for the MacOS VM.
Should I setup the (larger) Proxmox system first then add the other (smaller) one as separate storage?
I’ve read about passing through whole nvme drives to MacOS but not sure how I would install the OS onto that using the method above? Maybe people just use them for storage within the VM?
I assume adding it as separate storage I can then select it during the VM setup and use the full disk?
Using the “whole disk” is not really practical with Proxmox storages, because that would break the volume snapshot feature. So you’re getting all the downsides and none of the upsides of the managed storage.
Instead you can add the M.2 disk to the VM as a PCIe passthrough device (for best performance), or as a raw emulated disk (if it’s a SATA disk or something). This way the VM gets raw access to the entire disk. You still don’t get snapshot capabilities.
Nothing special needs to be done to install macOS on such a disk.
OK thanks for clarifying – it’s really just performance I’m looking for.
So would passthrough of the ‘performance’ disk allow me to then select and install the VM onto it via disk utility/the installer? Would it not need to be
defined via the VM creation options before booting?
Sorry if my question is unclear – I’m not super experienced with proxmox
Yes, you need to add it to the VM’s config before the VM can use it.
After that it should appear in the macOS Installer’s disk utility.
Thank you Nick
Thanks for the great guide.
My VM runs out of disk space, so I remove couple snapshots, but no space reclaimed. I tried using diskutil apfs resizeContainer without any luck. Do you know how the space of the removed snapshots can be relaimed?
Thanks.
Do you mean APFS snapshots or Proxmox snapshots? Deleting Proxmox snapshots only frees up space on the host disk, it doesn’t change how much space is free from the guest’s point of view.
Hello,
I’m trying to install on server with Intel (R) Xeon (R) CPU E5620 @ 2.40GHz (2 Sockets). I followed step by step and renamed the iso to img when I start the machine but I only see Uefi shell and Reset Nvram. the iso I downloaded from mediafire, image that I used for wmware workstation under windows. Where am I doing wrong?
Thank you
Mediafire? Use my instructions to build the installer ISO, don’t use third party ones.
I upgraded to Monetary using your EFI.
Once it is booted, it works great, normal performance.
When booting though, it takes a couple of minutes on the Apple status bar but boots fine eventually.
Any ideas?
Try pressing Win/Cmd + V once before picking the boot option, to boot in Verbose mode, then you can see if it’s getting hung up on a particular step.
It seems to get stuck at multiple points and I see multiple things that are problematic, but not sure what would cause this total halt or what to do about it.
Here are two snapshots:
https://imgur.com/cdAGUHH
https://imgur.com/lRM4JZ0
Hm from those two snapshots the slow bit appears to be verifying the signature on two of the “helper” tools that are installed.
This could be slow just due to the required disk accesses to hash these apps, or maybe it had to perform an online check for signature revocation and the slow thing is Apple’s servers.
I removed the helpers, and still took 4:30 to boot!
Here is a video in case it helps: https://gopro.com/v/Wy5K4Odl4ZlQM
Thanks for this new guide again! You have helped me in various issues here and in reddit and I always appreciate your help.
Just wondering if Monterey can run on Proxmox 6? (I’m still using 6.2-10). I’m not a tech person and I remember it was painful to upgrade from Proxmox 5 to 6. Plus, the Proxmox site said “Proxmox VE 7.x introduces several new major features. You should plan the upgrade carefully, make and verify backups before beginning, and test extensively.”, which is a bit scary…….
Yes, it should work fine on Proxmox 6. I think the only significant difference is that you won’t need to untick “pre-enroll keys” for your EFI disk (because that option didn’t exist in 6)
Thanks! I just finished the update from Big Sur, it works perfectly on Proxmox 6. It was straight forward once replacing the EFI folder from your v15 OpenCore EFI folder. Thanks again!
Hi Nicholas,
Thank you for another excellent guide!
I am following your guides from Mojave time and every one worked hassle-free.
Now I have my setup running on BigSur with OC V-15 without any issues but I decided to exit Apple ecosystem and to make a change to migrate to Linux 🙂
At the end of my Apple story I wanted to check the latest Monterey OS. This time I experienced troubles. The OC boots to the menu but after few seconds it reboots to the main menu again.
I installed another clean BigSur VM and tried to upgrade it but the result is the same.
My config: cpu: Intel Xeon E5-2689 (SR0L6), ram: 64GB ECC, mb: JINGSHA X79P.
Your CPU is an OEM one without documentation on Intel’s site, check the list of CPU features for me by running “cat /proc/cpuinfo | grep flags | head -n 1” on the host.
Make sure your VM’s core count is set to a power of two and your OSK is set correctly.
My cpu worked fine with Mojave, Catalina and BigSur.
VM’s core count was set to 4. The OSK was correct and tested with Catalina and BigSur.
These are all flags:
cat /proc/cpuinfo | grep flags | head -n 1
flags : fpu vme de pse tsc msr pae mce cx8 apic sep mtrr pge mca cmov pat pse36 clflush dts acpi mmx fxsr sse sse2 ss ht tm pbe syscall nx pdpe1gb rdtscp lm constant_tsc arch_perfmon pebs bts rep_good nopl xtopology nonstop_tsc cpuid aperfmperf pni pclmulqdq dtes64 monitor ds_cpl vmx smx est tm2 ssse3 cx16 xtpr pdcm pcid dca sse4_1 sse4_2 x2apic popcnt tsc_deadline_timer aes xsave avx lahf_lm epb pti ssbd ibrs ibpb stibp tpr_shadow vnmi flexpriority ept vpid xsaveopt dtherm ida arat pln pts md_clear flush_l1d
Hi Nick, just a success message with your guide.
I follow since Cataline your method and always worked in the end. I think this time around I had no problems at all. I even applied the reset bug fix to get my 5700XT working and I can even turn off the VM and start it again.
This is a quick summary of my steps.
1- I created a quick PopOS VM do get the installer, was super easy just copy and paste the steps.
2- Created MacOS VM, followed steps till the end. Modified the Plist to add the special boot-arg for my GPU.
3- Passthrough the Radeon RX 5700XT, applied the Reset bug fix, again just copy and paste on putty.
4- Start the VM, everything working fine so far.
Thanks again!
Thanks so much for this thread, it helped me get Monterey installed on my dual EPYC server! Quick question, does anyone know if the 64 max core limit applies when installed under Proxmox?
The 64 core limit appears to be hardcoded in XNU:
https://github.com/apple/darwin-xnu/blob/main/osfmk/i386/mp.h#L70
You might need to run two Hackintosh VMs simultaneously if you want to take advantage of more threads.
Hi quick comment, there is a typo in the Disabling SIP, you need 2x”-” before no. so the command ends like this.
csrutil disable –-no-internal
thanks
Sorry about that, it shows as two dashes in the WordPress editor, but it changes it to a long dash in the published view! I’ve wrapped those in code tags now to fix that.
Be sure to have at least 40GB of space, the installer doesn’t warn about this. I had to move things with the recovery image
Hey Nick,
Followed your Catalina install a while back, all worked well. I am getting hung up on final boot. I see the setup questions for a few seconds, and then it disappears.
Looking to verbose boot, but holding win-v before selecting the boot option does not work. Is there another way to enable verbose boot?
Thanks
I think Verbose boot won’t help here because it sounds like it completely boots before the problem happens. You need to press and release win+V rather than hold it down.
I’m not sure what could cause a fault like that. How much RAM do you have assigned, at least 4GB? I haven’t tested smaller amounts.
Hi!
I want to know whether it’s doable using a laptop with an integrated GPU (i5 8265U) and a dedicated one (nvidia mx150). If it is possible, can you use the laptop’s display? Or it is restricted to an external display?
Thanks in advance.
Your Nvidia GPU isn’t supported. Your iGPU should work with the internal display, but passthrough of iGPUs is complicated and I wouldn’t bet on getting that working:
https://github.com/vivekmiyani/OSX_GVT-D
If you just want to run with zero graphics acceleration you can install a GUI onto Proxmox and use its web console to view your VM instead, but performance sucks. Fine for running Xcode but not much more.
Oh, that’s a bummer. I am running Big Sur on the same machine without any issues (using the iGPU only, of course). I just wanted to check whether it was possible to use virtualisation because the backups are way more straightforward.
Anyways. Thanks for the great content and for the very informative answer.
First of all, thanks for your work an your awesome guide! Maybe a stupid question but am I supposed to enter the with ” or without ” ?
args: -device isa-applesmc,osk=”THE-OSK-YOU-EXTRACTED-GOES-HERE” -smbios type=2 -device usb-kbd,bus=ehci.0,port=2 -global nec-usb-xhci.msi=off
Is there a way to give you a pledge for your work? Greetings!
Not a stupid question! Keep the quotes.
You can send donations to my PayPal at n.sherlock@gmail.com if you like!
Thanks for posting these guides as they’ve been really helpful! I have a Dell R820 and have two additional GPUs (links below) installed and seem to have problems getting it to work. The MacOS (bigsur for now) sees the card, but when I turn of the console vga, it seems to never boot or display.
https://www.visiontek.com/products/radeon-rx-550-4m-4gb-gddr5-graphics-card-4x-dp
https://www.visiontek.com/products/radeon-rx-560-4m-4gb-gddr5-graphics-card-4x-mdp?variant=40553064235157
RX 550 isn’t supported by macOS, sorry. The 560 should work though. Try swapping those two cards in their slots and try the 560 again (too rule out issues with the host UEFI deciding to init that card during boot)
P.S. You know that the card output won’t appear in the web console right? You need to connect a monitor to the card’s plugs directly.
I am aware the card output won’t appear in the console, thanks. I didn’t attempt to attach a monitor to directly to the card though. I’ll give that a shot. Also, I believe I was able to get the card to work with a Windows 10 VM, so I presume the host UEFI is not grabbing it. Thanks for the reply!
With no monitor plugged in the card will definitely refuse to operate. If you don’t want a monitor attached you can use an HDMI dummy plug to satisfy the card instead.
Looks like that did the trick!! Thanks so much! It’s running quite awesome now it seems. Next question… Do I have to leave a monitor connected all the time?
I upgraded my longterm install from Big Sur to Monterey and was working well. I had some weird slowdowns, so rebooted the VM and it was stuck on boot.
I tried a fresh OpenCore.iso from your GitHub and it gets stuck booting. The last two lines are:
Waiting on ioproviderclass ioresources ioresourcematch boot-uuid-media
AppleFileSystemDriver: using apfs-reboot-uuid
For my main disk, I am using PCI passthrough of a Samsung 970 NVME SSD with “hostpci1: 0000:09:00,pcie=1”
Any ideas?
Is it the 970 Evo Plus? Dortania says “While not natively supported out of the box, a firmware update from Samsung will allow these drives to operate in macOS” https://dortania.github.io/Anti-Hackintosh-Buyers-Guide/Storage.html
As a temporary solution you can replace your hostpci1 line with an emulated passthrough similar to this:
virtio0: file=/dev/nvme1n1The NVMe drive has to be bound to host NVMe drivers for the device to be available.
If it still doesn’t work this would rule out an actual complaint with your drive model.
I had a lot of unexpected problems with GPU passthrough. I may have messed up my working kernel parameters. It is now: root=ZFS=rpool/ROOT/pve-1 boot=zfs intel_iommu=on iommu=pt i915.enable_gvt=1 rootdelay=10 pcie_acs_override=downstream video=efifb:off
Without GPU passthrough, I was able to boot my disk via virtio0: file=/dev/nvme1n1 and I am in the process of making a recent backup, which is great. Thank you! I was beginning to fear data loss!
FWIW, I do not have the 970 EVO Plus, it is the 970 EVO. Anyway, I will try updating the firmware and see what happens.
Hm I can’t find many complaints about macOS on that specific model so probably new firmware won’t fix it. I’m not sure what’s causing that issue sorry. You could continue to run with the virtio workaround with some performance loss.
For what it is worth, the firmware on my Samsung 970 EVO was already up to date….
Thanks always for your willingness to help
So, if you don’t mind taking a look at this console output, this is what happens when I shift from a working system on virtio mount to pci passthrough:
https://imgur.com/b4cB0Bx
Hi,
I can’t boot into OpenCore. Followed the instructions above Fixing “guest boots to UEFI shell” but still only boots into UEFI shell.
Using the latest OpenCoreV15 from github.
Any suggestions??
Thanks.
Most likely you need to remove your EFI disk on the hardware tab and readd it, and this time be sure to un-tick “pre-enroll keys” when you add it.
Thank you so much for this guide!! I think I followed it closely but so far, I’m unable to boot. I get the error message: Bd5Dxe: failed to load Boot0003 “UEFI Misc Device” from PciRoot (0x0)/Pci(0x1E,0x0)/Pci(0x1,0x0) : Not Found. Here is my VM config file:
Is there something I’ve missed?
Thanks!
args: -device isa-applesmc,osk=”…” -smbios type=2 -device usb-kbd,bus=ehci.0,port=2 -global nec-usb-xhci.msi=off
agent: 1
bios: ovmf
boot: order=virtio0;net0;ide0;ide2
cores: 4
cpu: Penryn
efidisk0: local:101/vm-101-disk-1.qcow2,efitype=4m,pre-enrolled-keys=1,size=528K
ide0: local:iso/Monterey-full.img,cache=unsafe,size=14G
ide2: local:iso/OpenCore-v15.iso,cache=unsafe,size=150M
machine: q35
memory: 8192
meta: creation-qemu=6.1.0,ctime=1636779293
name: MacOS-Monterey
net0: virtio=9A:1E:0E:D8:A6:34,bridge=vmbr0,firewall=1
numa: 1
ostype: other
scsihw: virtio-scsi-pci
smbios1: uuid=f1d78100-d841-47c2-aeb8-7c291ab63ec4
sockets: 1
vga: vmware
virtio0: local:101/vm-101-disk-0.raw,cache=unsafe,size=75G
vmgenid: 9d82f06a-7523-4d7a-84f1-614839df9952
You need to remove your EFI disk on the hardware tab and readd it, and this time be sure to un-tick “pre-enroll keys” when you add it.
That did it.
Thank you.
So I am trying a fresh install to my zfs host, no pci passthrough, following your instructions, and every time the Proxmox host reboots during the Monterey installation after a minute of two of copying files. I am virtually following your instructions to the letter. Any ideas?
agent: 1
balloon: 0
bios: ovmf
boot: order=ide2
cores: 4
efidisk0: local-zfs:vm-106-disk-0,efitype=4m,size=1M
ide0: local:iso/Monterey-full.img,cache=unsafe,size=14G
ide2: local:iso/OpenCore-v15.iso,cache=unsafe,size=150M
machine: q35
memory: 32768
name: monterey-local
net0: virtio=02:00:0B:A3:DB:34,bridge=vmbr0,firewall=1
numa: 1
ostype: other
scsihw: virtio-scsi-pci
smbios1: uuid=688d5ba5-6733-44e4-a7e7-381908f152ae
sockets: 1
vga: vmware
virtio0: gudetama_local:vm-106-disk-0,cache=unsafe,discard=on,size=64G
I forgot the top line, it is copied from you instructions verbatim:
args: -device isa-applesmc,osk=”THE-OSK-YOU-EXTRACTED-GOES-HERE” -smbios type=2 -device usb-kbd,bus=ehci.0,port=2 -global nec-usb-xhci.msi=off -cpu host,kvm=on,vendor=GenuineIntel,+kvm_pv_unhalt,+kvm_pv_eoi,+hypervisor,+invtsc
Cpu is 9700k on z390 board.
oh, I am an idiot. I didn’t add the OSK… and only saw it when posting here. smh
Hah. That still wouldn’t cause your host to reboot though. Make sure you didn’t accidentally give macOS 100% of your RAM!
Yeah, after some more fiddling, I removed huge pages from my /etc/kernel/cmdline and it is installing as expected.
Has anyone got qemu 6.1 working with Monterey?
I can install/boot fine with 6.0, but as soon as I switch to 6.1 it gets stuck on the boot logo (Proxmox v7.0.14+1).
I haven’t tried 6.1 yet myself. Try setting the machine model to the 6.0 version.
I’ve upgraded to 6.1 now and Monterey and Big Sur are still booting fine for me (although I’m not running the new kernel yet). Maybe try removing and readding the EFI disk on the Hardware tab, and be sure to untick “pre-enroll keys” when you add it.
You can also try downgrading just QEMU like so: “apt install pve-qemu-kvm=6.0.0-4”
Starting a new thread, specifically for GPU passthrough.
I can boot my old NVMe system, upgraded to Monterey, using virtio device, only when using VMware display.
If I try to GPU passthrough, boot fails consistently at the following screenshot. This is true for a fresh install to a disk image based on your guide as well.
https://imgur.com/AwmmwiA
My Windows GPU passthrough still works… I have a vega64.
Any ideas? I have been using MacOS with GPU passthrough for years now, but this has me stumped. I am going to test a Big Sur install…
I am on ii pve-qemu-kvm 6.1.0-1 amd64 Full virtualization on x86 hardware
Could that be my problem?
Maybe. Try running “apt install pve-qemu-kvm=6.0.0-4” to downgrade and try again, it’ll use the newly-downgraded version for your next VM launch (existing running VMs weren’t affected in my testing).
That was it. Pulling my hair out! Almost ready to buy a Mac mini!
Fresh Monterey on ZFS boots right up in seconds. NVMe passthrough boots as well, but takes 5 minutes, probably due to trim issue with samsung…
Thanks!
Interesting, maybe this problem is passthrough specific. I didn’t test passthrough on 6.1 myself yet.
It does seem odd that gpu passthrough on qemu 6.1 works for windows but not macOS. Clearly above my pay grade.
Please do share an update when you test gpu passthrough on 6.1 to share results.
cheers!
I can confirm that setting “Machine” to “Q35 6.0” in Proxmox’s hardware tab fixes this. Just gotta work out what it is about the 6.1 machine model that macOS doesn’t like
You should be able to upgrade back to 6.1 (with “apt install pve-qemu-kvm”) if you add this to the end of your VM’s args line:
-global ICH9-LPC.acpi-pci-hotplug-with-bridge-support=off
This reverts a change made in Q35 machine model 6.1 that apparently breaks passthrough on macOS
Excellent guide Nick, and I have used it to install both BigSur and Monterey on Proxmox 7. But on a Dell T5610 with dual E5-2650 v2 processor trying to update a BigSur vm created with your OpenCore-v15 iso to Monterey fails. It shows an opencore menu with Macintosh HD, Recovery 11.6.1, Main, Recovery 11.6.1, UEFI, and NVRAM. Selecting Macintosh HD causes it to reboot. Selecting Main boots into BigSur with the Monterey install. I have also tried a clean install, but it too fails. Any ideas would be helpful. Thanks.
Sorry, I don’t have any good guesses on what’s going wrong there, the upgrade went flawlessly for me. Does the Macintosh HD option disappear after it reboots? If not try selecting it a second time.
I think you’d need to boot the Macintosh HD option in Verbose mode to find out more (e.g. by pressing Win/Cmd+V once before selecting that option), but you’d also need to either record the screen or edit your OpenCore config to prevent it rebooting upon failure.
Thanks for the two suggestions. The Macintosh HD option does not disappear after rebooting, and selecting it again leads to another reboot. I tried a clean install of Proxmox 7.0-14+1 on an HP8300 (i7-3770) and Monterey installed like a charm. Both the Hp 8300 and the Dell T5610 are running Proxmox 7.0-14+1 and v6.1 of QEMU. I’m thinking that there is some weirdness in the T5610 hardware or BIOS. Since I have Monterey running I guess I will live without it being on the Dell T5610. I’ll let you know if I ever figure it out, but not a high priority.
Is your Proxmox running QEMU 6.1 already? There may be an issue with that version. You can run “dpkg -l | grep pve-qemu-kvm” to check the version number
Just wondering if there is anyway to get sound working??
USB passthrough of a USB sound dongle or headphones, PCIe passthrough of a GPU and use DP/HDMI audio, or see here for emulated audio: https://github.com/kholia/OSX-KVM/pull/186
I have absolutely zero experience with PROXMOX but willing to learn.
I have followed your guide and used an ISO of macOS Monterey instead .
But upon booting the VM, it does not show up my Monterey.ISO even though the additional CD/DVD drive is added and the boot order is setup.
It just boots to the EFI shell and I do not see my macOS disk to start the boot.efi manually.
If anyone can help me out, it is much appreciated.
If you didn’t build the ISO using my guide then it’s likely in the wrong format, my guide requires it to be a hard disk image formatted GPT/GUID.
Also you should get to OpenCore even if no Monterey installer is attached, OpenCore needs to be the primary boot device.
Make sure you didn’t forget to untick “pre-enroll keys” when adding the EFI disk, you can remove it and readd it from the Hardware tab to fix this.
Thank you Mick, shall try that. I just got ubuntu installed so I can follow your steps to create the recovery img file
But now, when I run the command Make Monterey-recovery.img I get errors (I have already done the previous qemu-utils command)
Now I get
make: ../../fetch-macos-v2.py: Permission denied
make: *** [Makefile:56: BaseSystem.dmg] Error 127
Probably when you unpacked the repository it didn’t mark that file as executable. You can run “chmod +x ../../fetch-macos-v2.py” to fix that.
If you’ve just updated to the QEMU 6.1, and you have PCIe passthrough devices, you’ll need to add “-global ICH9-LPC.acpi-pci-hotplug-with-bridge-support=off” to your args to fix those!
You could also choose the Q35 6.0 machine model on the Hardware tab to revert this new ACPI PCIe hotplug feature.
Hey Nick
I managed to create the macOS recovery image and now when I try to start the VM I get the following error . I am running PROXMOX on a AMD Ryzen 5950x processor and I have copied the -args for the AMD processor and added into the .conf file. Any idea how I can fix this?
Here is my args: string
args: -device isa-applesmc,osk=”THE-OSK-YOU-EXTRACTED-GOES-HERE” -smbios type=2 -device usb-kbd,bus=ehci.0,port=2 -global nec-usb-xhci.msi=off -global ICH9-LPC.acpi-pci-hotplug-with-bridge-support=off -cpu Penryn,kvm=on,vendor=GenuineIntel,+kvm_pv_unhalt,+kvm_pv_eoi,+hypervisor,+pcid,+ssse3,+sse4.2,+popcnt,+avx,+avx2,+aes,+fma,+fma4,+bmi1,+bmi2,+xsave,+xsaveopt,check
kvm: warning: host doesn’t support requested feature: CPUID.01H:ECX.pcid [bit 17]
kvm: warning: host doesn’t support requested feature: CPUID.80000001H:ECX.fma4 [bit 16]
kvm: warning: host doesn’t support requested feature: CPUID.01H:ECX.pcid [bit 17]
kvm: warning: host doesn’t support requested feature: CPUID.80000001H:ECX.fma4 [bit 16]
kvm: warning: host doesn’t support requested feature: CPUID.01H:ECX.pcid [bit 17]
kvm: warning: host doesn’t support requested feature: CPUID.80000001H:ECX.fma4 [bit 16]
kvm: warning: host doesn’t support requested feature: CPUID.01H:ECX.pcid [bit 17]
kvm: warning: host doesn’t support requested feature: CPUID.80000001H:ECX.fma4 [bit 16]
kvm: can’t apply global ICH9-LPC.acpi-pci-hotplug-with-bridge-support=off: Property ‘ICH9-LPC.acpi-pci-hotplug-with-bridge-support’ not found
TASK ERROR: start failed: QEMU exited with code 1
>Property ‘ICH9-LPC.acpi-pci-hotplug-with-bridge-support’ not found
This means you’re still on QEMU 6.0, this part of the args is only for 6.1 and newer.
I managed to fix the args and installation is continuing. Shall update when completed.
args: -device isa-applesmc,osk=”…” -smbios type=2 -device usb-kbd,bus=ehci.0,port=2 -global nec-usb-xhci.msi=off, -cpu Penryn,kvm=on,vendor=GenuineIntel,+kvm_pv_unhalt,+kvm_pv_eoi,+hypervisor,+invtsc,+ssse3,+sse4.2,+popcnt,+avx,+avx2,+aes,+fma,+bmi1,+bmi2,+xsave,+xsaveopt,check
My current args string
Hello
First of all thank u so much for this post, its really helped.
Right now im trying to passthrough my rx460 gpu, it showing picture but the noVNC always stuck like this https://imgur.com/fpOsL26
If i set display to none, the gpu wont showing anything.
here is my VM config file https://textdoc.co/SmIDEt1vwNFHKlUQ
Do you have a monitor plugged in? The card will not operate without either a monitor or HDMI dummy plug plugged into it.
Hey Fakhrul.
I’ve encountered the same exact problem as you.
I am currently trying to passthrough an RX 480 4GB that works on a Windows 10 VM. If the display is set to “VMWare compatible” under the “Hardware” tab I get the VNC output stuck at the same point as your screenshot shows, but the monitors connected to the card actually power up and show MacOS background, just no login screen, supposedly because it’s going to the VNC display, which is stuck in the Apple logo screen. If I do set the display to “none”, then I obviously get no VNC, but I also get absolutely no output on my monitors connected to the graphics card, not even OpenCore’s menu.
If anyone has seen this before, I would really enjoy some pointing in the right direction. For now I will try to mess with OpenCore’s settings and verbose mode and see what I can get out of that.
If you don’t get the Proxmox logo appearing on your GPU’s output then it has already failed before OpenCore has even started loading, so this is not a macOS or OpenCore problem. You would get the same issue on a VM with no disks attached to it.
In this case make sure your card actually supports EFI and the host is not initialising the card during its own boot.
Hi there Nicholas. I’m very sorry for the late reply, as I had not noticed you were that fast replying to me. Let me thank you ahead of time for sparing the time to help with the debugging on this page.
The thing with the Proxmox logo is that my monitors do take a lot of time to start up after getting an HDMI signal. My Windows VM, which boots fine, never displays the Proxmox logo because of this. The first signal I get on my monitors is the Windows login screen. I am sure the host is not grabbing my GPU during boot, as I’ve set the host to display through the iGPU HDMI port, with a monitor attached to it. I am also sure that my card is booting in UEFI mode, as it is running perfectly under other Windows and Linux VMs.
Yesterday I gave it a little more obsessed diagnostic, and came to a weird conclusion, which I should explain in more detail than my previous comment. When the Display option (under Hardware on the VM settings) is set to “VMWare Compatible”, everything boots “ok”, as I had said. First I start the VM and get output on the console through Proxmox’s web GUI, on which I can choose the OpenCore boot option. While this is going, my 3 monitors connected to the GPU are dead. After it starts booting, the console monitor gets stuck on the Apple logo loading bar, at about 25-30%, and my 3 monitors connected to the GPU immediately start up. I cannot see the login screen on any of my 3 monitors (as it still thinks the console monitor is the main display and is trying to output there), but I can see the MacOS background and I can login blindly. I wait for the 3 monitors to come up, enter my password blindly with my keyboard passthrough, and I get a perfectly usable MacOS system. I can do everything on it, it detects my RX 480, I can run Geekbench on it, and the GPU scores normal values for it. I can even rearrange the display order, and there are 4 monitors listed there (the extra one being the Proxmox console one). If I set the Display option to “none”, then nothing ever comes alive.
So, to resume: with Display set to “VMWare compatible” I can boot into macOS (main display is console, which is frozen on Apple boot logo, 3 other displays show MacOS background, so I can not see the login screen and have to blindly type my password), which lets me get to my desktop fully booted, RX 480 is detected and displaying output, performance is normal, with 4 monitors listed (3 physical + 1 console). With Display set to “none”, nothing ever happens. Just big black screen everywhere. Primary Display and PCI Express is always set.
I have messed extensively with the “args:” section of the VM config, particularly the “cpu” flags, to no avail. My last attempt was a BIOS dump from the GPU and the option “romfile=vbios.bin” in the VM config, also to no avail. I did do this dump without moving the GPU to another slot, both while out of use and in use, so I will have to give that a go today in a different slot and see how it turns out. I can very well use the VM by keeping the display set to “VMWare compatible” and inputting my password blindly, but it just isn’t a clean or ideal setup.
If you have any thoughts on this, I’d very much like to hear them.
Thank you, Pedro Ribeiro.
Hello Nick –
Thank you for all the support. I am trying the same setup on an older PC and I am facing this error while starting up the VM, any suggestions?
kvm: -device ide-hd,bus=ide.0,unit=1,drive=drive-ide1,id=ide1,bootindex=101: Can’t create IDE unit 1, bus supports only 1 units
TASK ERROR: start failed: QEMU exited with code 1
The system is a Core2 Duo if that helps. Intel 4th Gen 4790 processor.
Core2 Duo is not compatible with modern macOS because it misses support for SSE4.2
You cannot attach an IDE disk at IDE1, only IDE0 and IDE2 (IDE 0 is the master of the first IDE bus, while IDE 1 is the slave, and QEMU only supports one device per bus)
Thank you Nick for the awesome howto, which leads to a working Monterey system. With one issue: audio.
I end up with a kvm virtual ICH9 device, claimed/renamed as HDEF: 00:1b.0 8086:293e /PCI0@0/HDEF@1B = PciRoot(0x0)/Pci(0x1B,0x0)
Obviously this leads to no audio because there is no such device.
A pass-through codec is visible (06:06.0 1022:15e3 /PCI0@0/SF0@1E/pci-bridge@1/pci1022,15e3@6 = PciRoot(0x0)/Pci(0x1E,0x0)/Pci(0x1,0x0)/Pci(0x6,0x0)) with gfxutil but not detected from AppleALC, no matter what layout I try.
Might be due to the hierarchy of PciRoot and bridges.
I might use a DragonFly DAC. As pass-through of the mainboard controller works properly, still I’m curious why the ALCS1200A is not detected.
Sorry, I think the QEMU-emulated audio devices are poorly/not supported by macOS, and I didn’t play with the passthrough of motherboard audio since my motherboard doesn’t have it. I use HDMI/DP audio from my passthrough GPU instead.
Dragonfly DAC is a good approach but you may need a PCIe-passthrough USB controller to eliminate gaps and popping.
I am not wondering about the poor support for emulated sound. I am rather curious why a ICH9 codec is picked up at all. I have not configured Qemu audio devices. My config follows your explanation, besides details like disk size, ram size or core count for the CPU. And, certainly, at present a pass-through PCIe USB controller and the onboard audio codec as PCI device.
I am getting access denied when booting to OpenCore. I tried Fixing “guest boots to UEFI shell” with the same thing. It gives me access denied when booting to opencore
Remove the EFI disk on the hardware tab, and re-add it, and this time don’t forget to uncheck “pre-enroll keys”
Thanks for the amazing guideline. This is very helpful!
Does promox support the VirtIO sound driver? Qemu doesn’t have this but apparently there are drivers in macOs Monterey
Hey Nick, great guide! I followed your BigSur guide previously and it worked wonders. The only issue I’ve had is MacOS is really really slow to install. I’ve seen on other people’s attempts it predicts from 20-35 minutes. Mine predicts just over 2 hours.
See image: https://imgur.com/a/E7wZzKK
Hi there,
If you’re using the Recovery installer this is the expected performance, it seems to be limited by Apple’s software distribution server download speed. The Full installer is much faster.
Sorry I sent my message pre-maturely. This seems to happen with all disk operations. For example download xcode: https://imgur.com/a/rqE0DZY
The virtual disk is running from an NVMe SSD so I’m a bit confused why it’s so slow. I’ve tested other VM’s off the same storage with no issues.
Does anyone have any pointers of how to go about troubleshooting this?
Thank you again for the great guide. However, is there a guide you can recommend to get iCloud working? I’ve been unsuccessful trying everything I could find on the internet?
I get could not communicate to server. I changed all the necessary items in the config.plist on the EFI drive.
iCloud worked for me without taking any steps.
You might have the Ethernet adapter being called something other than en0 by macOS (run “ifconfig” in the Terminal to check). If so that’s what you need to fix.
The Ethernet adapter is en0 🙁
Hey Nick, wieder mal ein super tutorial!
I tried to pass through some graphics cards that are already working on my hackintosh. But unfortunately without success.
I modified the config.plist to support my AMD W5500 by extending the “boot-args” by “-v agdpmod=pikera”. As I can see, the lilu.kext and whatevergreen.kext are already added and enabled.
When I boot the VM, verbose output stops with some ACPI errors and exceptions that end up as follows:
ACPI: SSDT 0x000000007EB73000 0000CA (v01 BOCHS VMGENID 00000001 BXPC 00000001)
ACPI: HPET 0x000000007EB72000 000038 (v01 BOCHS BXPC 00000001 BXPC 00000001)
ACPI: MCFG 0x000000007EB71000 00003C (v01 BOCHS BXPC 00000001 BXPC 00000001)
ACPI: WAET 0x000000007EB70000 000028 (v01 BOCHS BXPC 00000001 BXPC 00000001)
ACPI: VFCT 0x000000007EB61000 00E884 (v01 BOCHS BXPC 00000001 AMD 31504F47)
ACPI: BGRT 0x000000007EB60000 000038 (v01 INTEL EDK2 00000002 00000001)
ACPI: SSDT 0x000000007EBEC000 00010B (v02 ACDT SsdtEC 00001000 INTL 20190509)
ACPI: SSDT 0x000000007EBEA000 0000B1 (v02 CpuRef CpuPlug 00003000 INTL 20190509)
ACPI: SSDT 0x000000007EBE9000 000064 (v02 KGP DTPG 00001000 INTL 20190509)
ACPI: SSDT 0x000000007EBE8000 0000A3 (v01 KGP QEMUUSB 00000000 INTL 20190509)
ACPI Error: [S38_] Namespace lookup failure, AE_NOT_FOUND (20160930/dwsload-292)
ACPI Exception: AE_NOT_FOUND, During name lookup/catalog (20160930/psobject-310)
ACPI Exception: AE_NOT_FOUND, (SSDT: QEMUUSB) while loading table (20160930/tbxfload-319)
pci (build 17:26:46 Oct 13 2021), flasgs 0x20c3080
AppleACPICPU: ProcessorId=0 LocalApicId=0 Enabled
AppleACPICPU: ProcessorId=1 LocalApicId=1 Enabled
IOAPIC: Version 0x11 Vectors 64:87
ACPI: Executed 3 blocks of module-level executable AML code
ACPI: sleep states S3 S4 S5
HID: Legacy shim 2
Previous shutdown cause: 0
Can you help me with that?
Make sure you have the new addition to “args” required since QEMU 6.1, it prevents passthrough devices from working if you are missing this: -global ICH9-LPC.acpi-pci-hotplug-with-bridge-support=off
Hey Nicholas, what’s up?
Where can I put this “-global ICH9-LPC.acpi-pci-hotplug-with-bridge-support=off”?
In the args of config file of VM? (/etc/pve/qemu-server)?
I have currently migrated to PVE 7.1-6, but I am using pve-qemu-kvm in version 6.0 for work all VMs of macOS and removed EFI Disk from W11 VM’s.
Yes, that’s where to put it. You cannot use this argument on QEMU 6, the VM will refuse to launch. 6.1 and newer only.
Nice, thanks for your quick response 😉
This is the solution to the problem.
Thanks for your quick response!
Hi Nicholas, I’m trying for hackintosh on bare-metal Machine and I’m getting the very same ACIP error.
my doubt is whether this “bootarg” : -global ICH9-LPC.acpi-pci-hotplug-with-bridge-support=off is applicable to OpenCore?
Can I try this boot argument in OpenCore’s config plist??
No, it’s a VM argument and goes on the “args” line in your VM config. Nothing to do with OpenCore.
You are a legend! That worked for me!
I wonder if the group has any thoughts: I’m not sure if it was a recent Proxmox update or a Monterey update, but I’ve lost my GPU (Sapphire Radeon Pulse RX 580 8GB; never suffered from the reset bug).
I can get it back by un-ticking the PCI-Express box (or removing pcie=1 from my config. file), but want to ensure maximum performance. Any ideas?
Many thanks!
If all passthrough devices have broken, check out the new argument you need to add for “args” since QEMU 6.1
Ah, indeed – thank you! Here’s the unfortunately part, though: this whole process seems to have introduced the reset bug. I had never experienced it until this point, but I needed to power down my system to not get a startup delay/timeout on the Mac VM. I should eBay my radeon and just buy a Mini M1 🙂
Try launching the VM from the Proxmox console like “qm showcmd 1xx | bash”, this way you get to see additional warnings during VM launch that aren’t logged anywhere else (replace 1xx with your VM ID). Also check dmesg output at the time of the hang. A common cause of timeouts is that a huge amount of RAM is allocated to the VM and it takes too long to allocate when memory is fragmented, but launching the VM like this also bypasses the timeout mechanism to allow it to eventually succeed in this situation.
If you previously had vendor-reset installed to fix the reset bug for you, this may have been dropped by recent kernel updates and may need updated/reinstalled. (vendor-reset doesn’t fix my RX580 though)
I hadn’t installed the reset fix previously, as I had never seen the error. I’ll try your first paragraph and report back tomorrow – thanks!
Honestly, I have no idea. I’ve been able to shutdown and reboot the VM several times now with no hang. When launch from the console, I don’t get any errors, just the prompt – so everything seems ok, I guess. I do get a kernel message, but not sure it’s at all related: “Disabling IRQ #16”