
A new version of this tutorial is now available for the release of macOS 13 Ventura, you can see that here
This tutorial for installing macOS 12 Monterey has been adapted for Proxmox from Kholia’s OSX-KVM project and Leoyzen’s OpenCore configuration for KVM. You can get the full sourcecode of my OpenCore release on my GitHub here.
Requirements
I’ll assume you already have Proxmox 7 installed. You also need a real Mac available in order to fetch the OSK key.
Your Proxmox host computer’s CPU must support SSE 4.2, so for Intel your CPU must be at least as new as Nehalem, which was the first CPU generation to bear the “Core” i5/i7 branding. Older CPUs will cause Illegal Instruction crashes when apps/extensions attempt to use these missing instructions.
Modern AMD CPUs also support SSE 4.2 and will work with this guide.
First step: Create an installation ISO
Download my copy of the OSX-KVM repository using the download button, and unzip it:
https://github.com/thenickdude/OSX-KVM
First we need to install some build requirements. If you will be building the installer ISO on macOS, open up the Terminal and run this command to install the commandline tools:
xcode-select --installIf you’re building the ISO on Linux, you instead need to run this command (these are the package names for Ubuntu or similar distributions, they may need adjustment on other distributions):
sudo apt install qemu-utils make
Now in the Terminal, from the root of OSX-KVM, run:
cd scripts/monterey
make Monterey-recovery.img
This will download the Monterey installer from Apple’s software distribution servers and build a Monterey-recovery.img file for you. Upload this file to your Proxmox’s ISO store directory (typically /var/lib/vz/template/iso). Although we’re putting it in the ISO directory so that we can use it with Proxmox’s ISO picker later, this a raw disk image rather than a true ISO.
If you’re building the installer on macOS, you can build a full installer instead of just a recovery, which will mean that macOS won’t have to download Monterey files during installation, and so won’t require an Internet connection. Simply ask it to build Monterey-full.img instead:
cd scripts/monterey
make Monterey-full.img
This option is not available when building the installer on Linux.
Prepare an OpenCore image
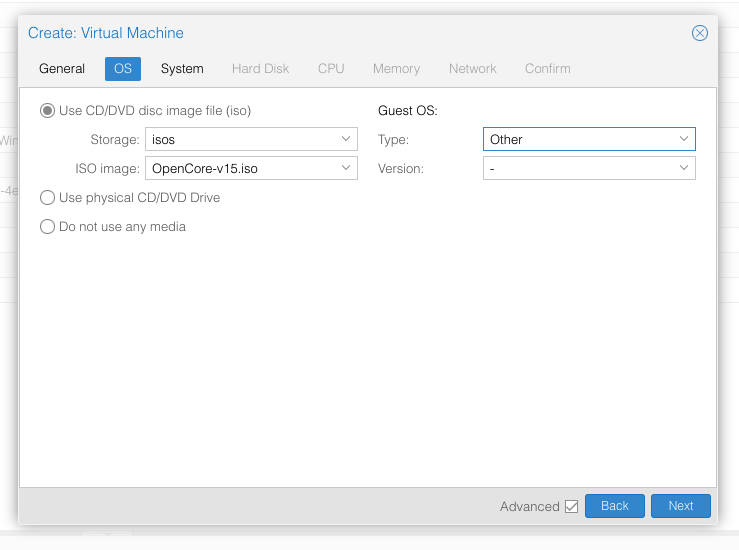
Download the OpenCore.iso.gz file from the newest release in my repository (you want v15 or newer), double click it to unpack it, and upload it to Proxmox’s ISO store at /var/lib/vz/template/iso. Although it has a .iso file extension, this is actually a hard disk image.
Fetch the OSK authentication key
macOS checks that it is running on real Mac hardware, and refuses to boot on third-party hardware. You can get around this by reading an authentication key out of your real Mac hardware (the OSK key). Save the first block of C code from this page as smc_read.c. In a command prompt, change into the same directory as that file and run:
xcode-select --install # If you don't already have gcc
gcc -o smc_read smc_read.c -framework IOKit
./smc_read
It’ll print out the 64 character OSK for you. Make a note of it.
Every Mac uses the same OSK, so don’t be surprised that it doesn’t look like a random string!
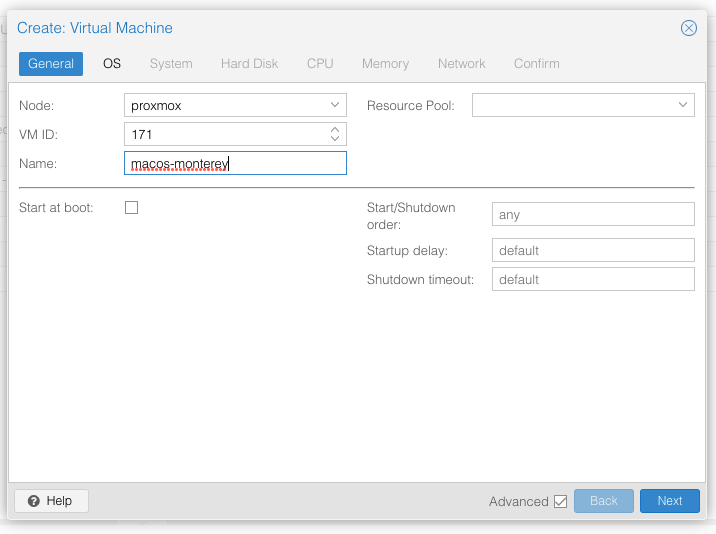
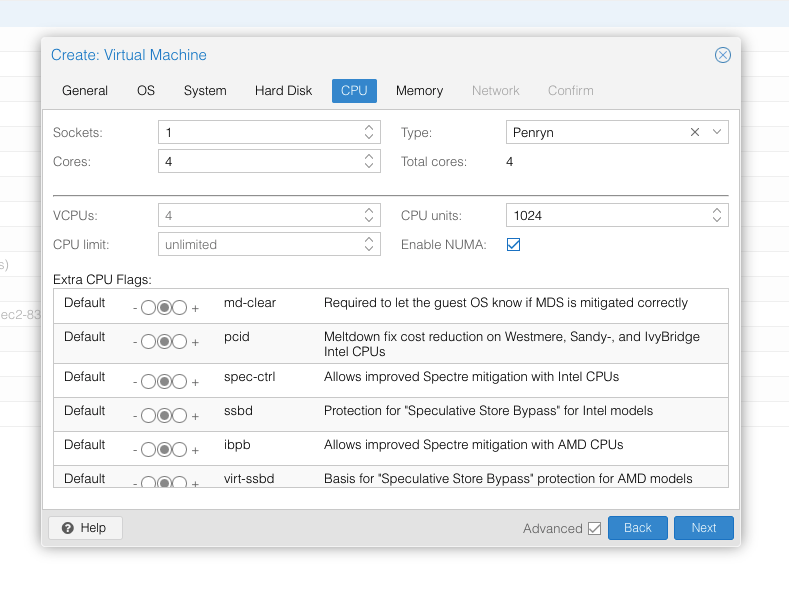
Create the VM
From the Proxmox web UI, create a new virtual machine as shown below.
In the Options page for the VM, ensure that “use tablet for pointer” is set to “Yes” (this is the default).
In the Hardware page for the VM, add a second DVD drive at IDE0, set it to use your Monterey-full.img or Monterey-recovery.img.
Don’t try to start the VM just yet. First, SSH into your Proxmox server so we can make some edits to the configuration files.
Edit /etc/pve/qemu-server/YOUR-VM-ID-HERE.conf (e.g. with nano or vim). Add this line, being sure to substitute the OSK you extracted earlier into the right place:
args: -device isa-applesmc,osk="THE-OSK-YOU-EXTRACTED-GOES-HERE" -smbios type=2 -device usb-kbd,bus=ehci.0,port=2 -global nec-usb-xhci.msi=off -global ICH9-LPC.acpi-pci-hotplug-with-bridge-support=off
A USB keyboard is added here because macOS doesn’t support QEMU’s default PS/2 keyboard.
MSI has been disabled for the USB controller to fix QEMU panics when USB 3 devices are passed through.
ACPI PCIe hotplug support needs to be disabled for VMs with passthrough devices since QEMU Q35 machine model 6.1, which is what that final argument does. (You could instead choose Q35 6.0 for your Machine type on the Hardware tab). If you haven’t updated your QEMU to version 6.1 yet then remove this argument from the args. (Proxmox 7 ships with 6.0 and updated to 6.1 later on)
Ensure the args are all on a single line!
We also need to add a -cpu argument. If your host CPU is Intel, add this to the end of the “args” line:
-cpu host,kvm=on,vendor=GenuineIntel,+kvm_pv_unhalt,+kvm_pv_eoi,+hypervisor,+invtsc
This will pass through all of the features that your CPU supports. OpenCore’s config will pretend to macOS that the CPU’s model name is Penryn for compatibility.
If your host CPU is AMD, or the above argument doesn’t work for you, use this more-compatible alternative:
-cpu Penryn,kvm=on,vendor=GenuineIntel,+kvm_pv_unhalt,+kvm_pv_eoi,+hypervisor,+invtsc,+pcid,+ssse3,+sse4.2,+popcnt,+avx,+avx2,+aes,+fma,+fma4,+bmi1,+bmi2,+xsave,+xsaveopt,+rdrand,check
This pretends that your CPU is Penryn, which will keep macOS happy even if your host CPU is AMD, and adds a bunch of newer required and optional CPU features on top. Features that your host CPU doesn’t support will be ignored (a warning will be printed to the console during launch with qm start 1xx), but note that macOS won’t work without SSE4.2 support.
You can remove the “+invtsc” feature from the list if your CPU doesn’t support it, or if you want to be able to migrate a running VM between Proxmox nodes.
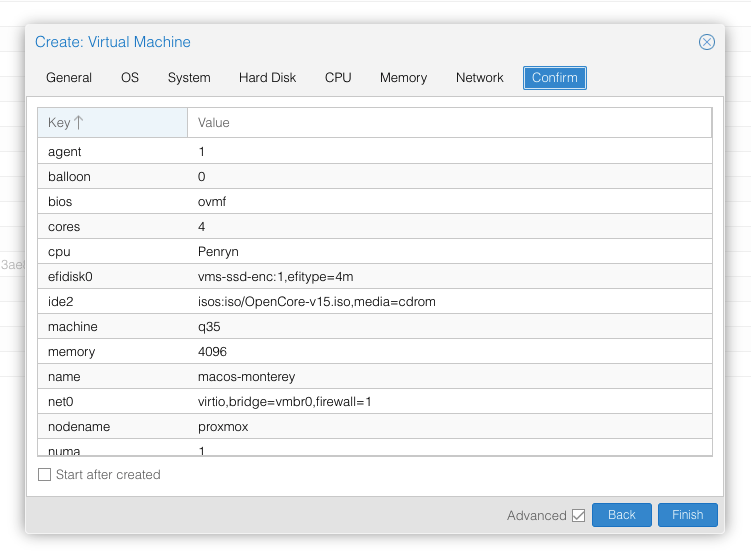
Now find the lines that define the two “ISOs” (ide0 and ide2), and remove the “,media=cdrom” part from them. Add “,cache=unsafe” in its place. This will treat these as hard disks rather than DVD drives.
Save your changes, return to the Options tab, and change the boot order to put IDE2 (the OpenCore image) first. Your final VM configuration file should resemble this:
args: -device isa-applesmc,osk="..." -smbios type=2 -device usb-kbd,bus=ehci.0,port=2 -cpu host,kvm=on,vendor=GenuineIntel,+kvm_pv_unhalt,+kvm_pv_eoi,+hypervisor,+invtsc -global nec-usb-xhci.msi=off -global ICH9-LPC.acpi-pci-hotplug-with-bridge-support=off
agent: 1
balloon: 0
bios: ovmf
boot: order=ide2
cores: 4
cpu: Penryn
efidisk0: vms-ssd-enc:vm-171-disk-1,efitype=4m,size=1M
ide0: isos:iso/Monterey-full.img,cache=unsafe,size=14G
ide2: isos:iso/OpenCore-v15.img,cache=unsafe,size=150M
machine: q35
memory: 4096
name: macos-monterey
net0: virtio=...,bridge=vmbr0,firewall=1
numa: 1
ostype: other
virtio0: vms:vm-171-disk-0,cache=unsafe,discard=on,size=64G
scsihw: virtio-scsi-pci
smbios1: uuid=...
sockets: 1
vga: vmware
Configure Proxmox
On Proxmox, run “echo 1 > /sys/module/kvm/parameters/ignore_msrs” to avoid a bootloop during macOS boot. To make this change persist across Proxmox reboots, run:
echo "options kvm ignore_msrs=Y" >> /etc/modprobe.d/kvm.conf && update-initramfs -k all -u
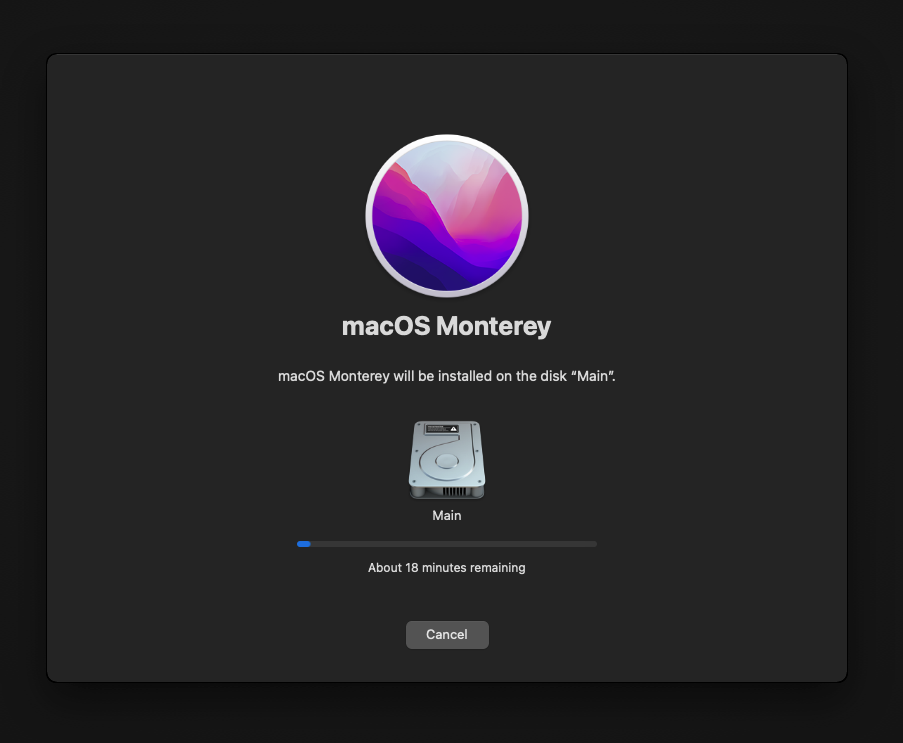
Install Monterey
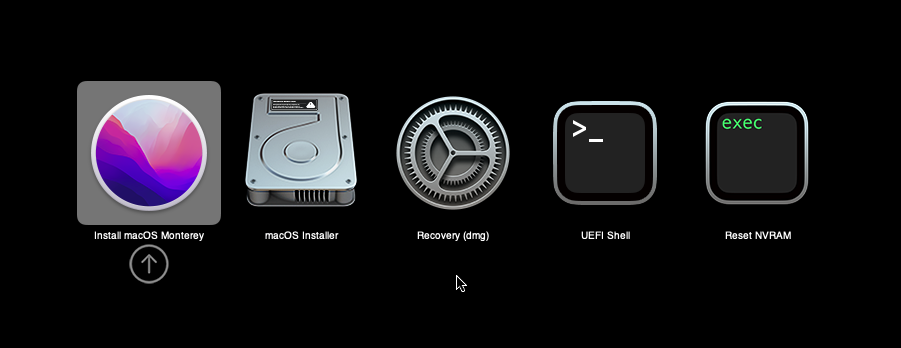
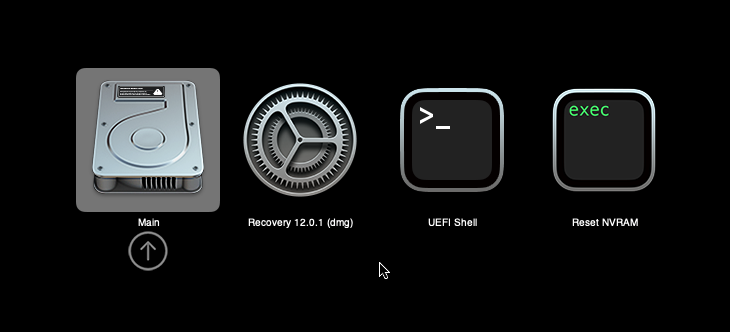
Now start up your VM, it should boot to the OpenCore boot picker:
Press enter to boot the “Install macOS Monterey” entry and the installer should appear. (If your keyboard isn’t working, leave the Proxmox Console page and re-enter it)
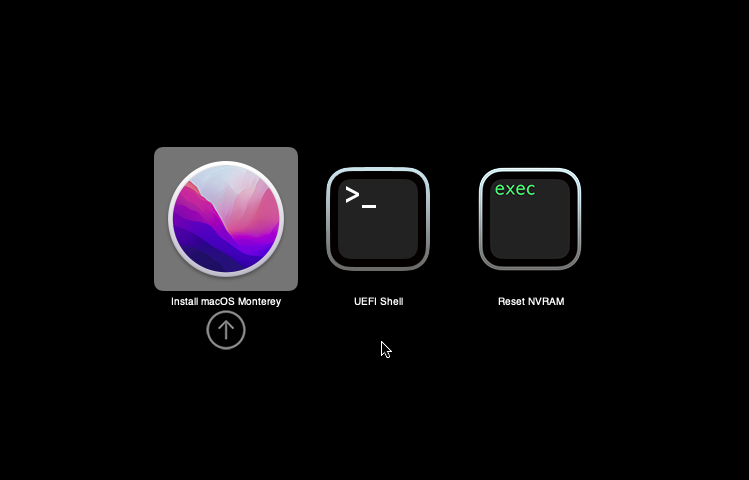
If you built a recovery installer, the icon will instead be an image of a hard disk and be labelled “MacOS Base System”.
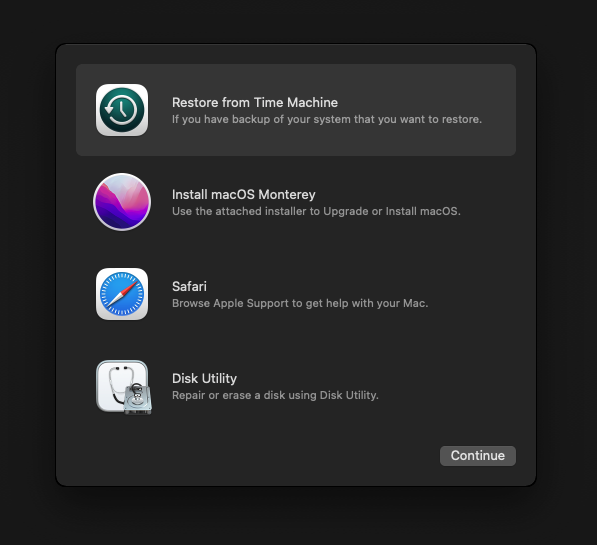
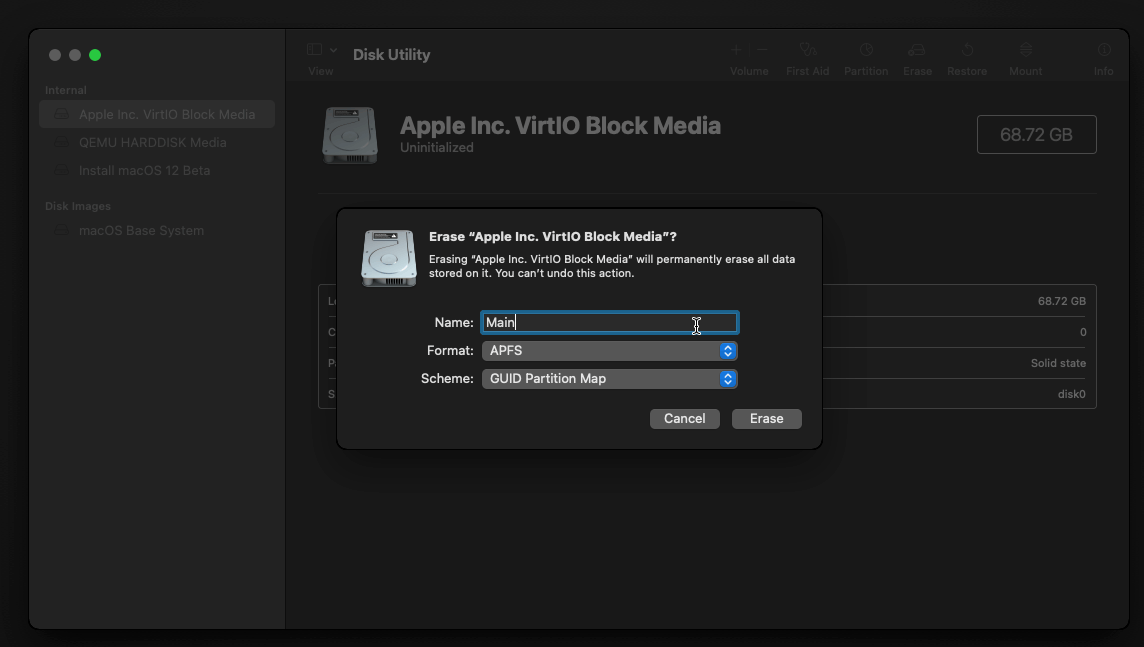
Our virtual hard drive needs to be erased/formatted before we can install to it, so select the Disk Utility option. Follow the steps below to format the disk:
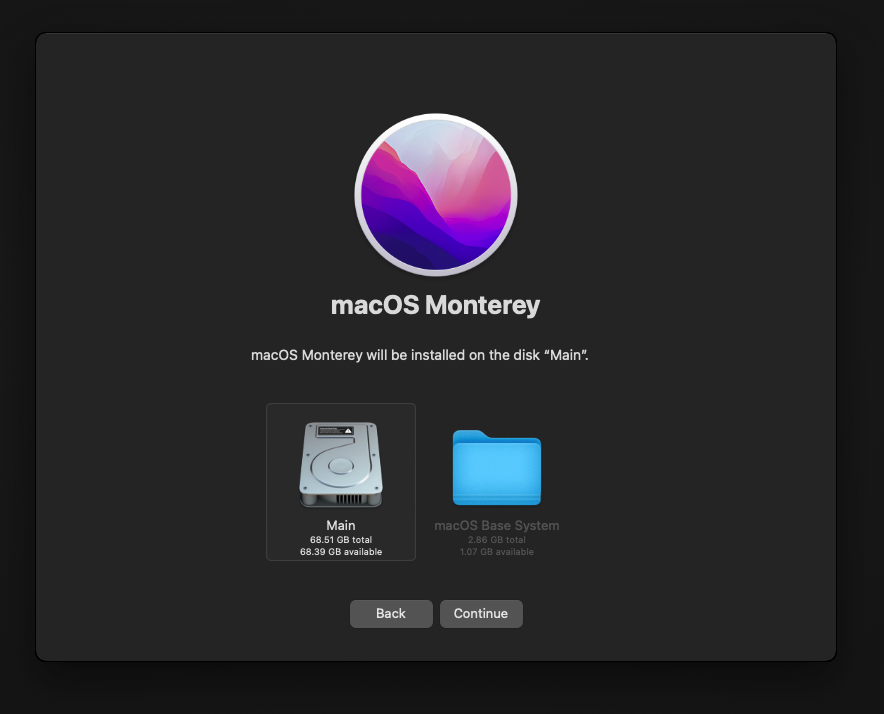
Now you can quit Disk Utility from the top menu (Disk Utility > Quit Disk Utility), and we’re ready to begin installation!
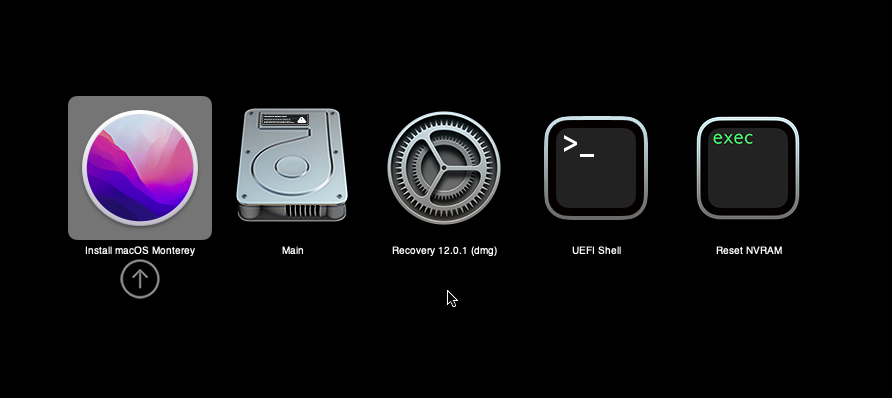
After the first stage of installation, the VM will reboot 2 or 3 times in quick succession, and each time you must manually pick the “macOS Installer” entry (the second one here, with the hard disk icon) to continue installation. It will not be selected for you automatically:
If your keyboard isn’t responding on this screen, exit the Console tab in Proxmox and re-enter it. If you get a “prohibited” sign like this appearing, hit the Reset button on the VM to try again:

Now the installation is nearly complete and the macOS Installer entry disappears, so pick the name of your main disk to boot (mine’s called Main).
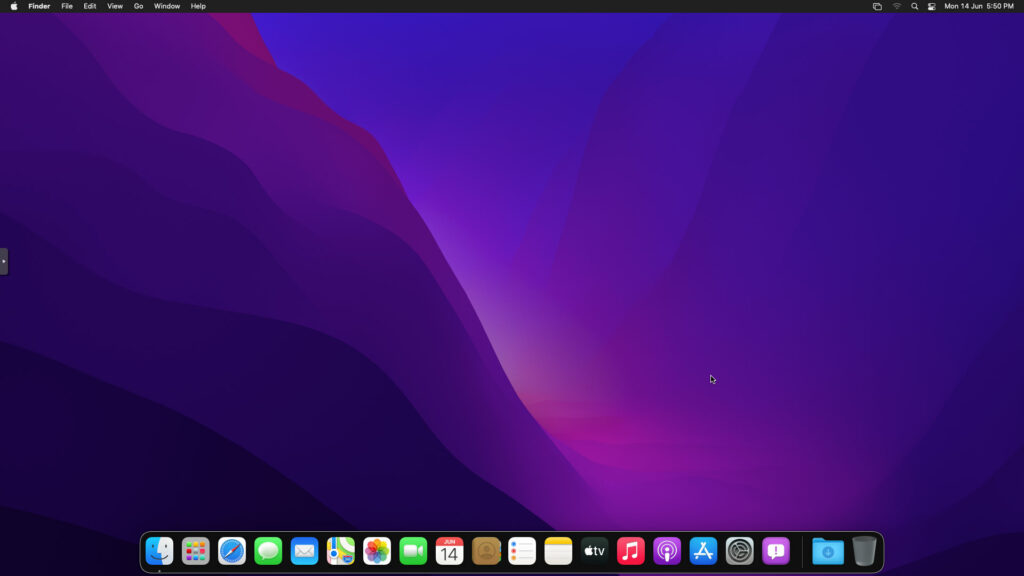
There’s just one more reboot to come. Afterwards pick the “Main” entry again and this time you’ll finally boot into Monterey!
Answer the initial install questions, and you’ll be logged on! Note that you will want to hold off on logging into your Apple ID until you’ve configured your Mac’s serial number in OpenCore (because otherwise a Mac with the default shared serial number in my OpenCore image will be added to your Apple ID).
Note that it will be really sluggish for a few minutes after the first boot while the system performs housekeeping tasks.
Make the OpenCore install permanent
We’re currently booting using OpenCore from the attached OpenCore ISO. Let’s install that to the hard drive instead. Pop open Terminal and run “diskutil list” to see what drives we have available.

Use “sudo dd if=<source> of=<dest>” to copy the “EFI” partition from the OpenCore CD and overwrite the EFI partition on the hard disk. The OpenCore CD is the small disk (~150MB) that only has an EFI partition on it, and the main hard disk is the one with the large (>30GB) Apple_APFS “Container” partition on it.
In my case these EFI partitions ended up being called disk1s1 and disk0s1 respectively, so I ran “sudo dd if=/dev/disk1s1 of=/dev/disk0s1” (note that if you get these names wrong, you will overwrite the wrong disk and you’ll have to start the installation over again!).
Now shut down the VM, and remove both the OpenCore and the Monterey installer drives from the Hardware tab. On the Options tab, edit the boot order to place your virtio0 disk as the first disk. Boot up. If everything went well, you should see the OpenCore boot menu, and you can select your “Main” disk to boot Monterey:
Sleep management
I found that I was unable to wake Monterey from sleep using my mouse or keyboard. If you encounter the same problem, you can either disable system sleep in Monterey’s Energy Saver settings to avoid the issue, or you can manually wake the VM up from sleep from Proxmox by running:
qm monitor YOUR-VM-ID-HERE
system_wakeup
quit
Editing your OpenCore/EFI settings
The Configuration.pdf that explains the OpenCore config.plist file can be found along with the OpenCore release on my GitHub.
To mount your EFI partition in macOS so you can edit your config.plist, first check the “identifier” of your EFI partition in the terminal:
~$ diskutil list
/dev/disk0 (external, physical):
   #:                   TYPE NAME              SIZE       IDENTIFIER
   0:  GUID_partition_scheme                  *512.1 GB   disk0
   1:                    EFI EFI               209.7 MB   disk0s1
   2:             Apple_APFS Container disk1   511.9 GB   disk0s2
Then you can mount it like so:
sudo mkdir /Volumes/EFI
sudo mount -t msdos /dev/disk0s1 /Volumes/EFI
Now you can edit /Volumes/EFI/OC/config.plist with your favourite text editor to make your changes. (TextEdit is not a great choice because it likes to insert curly quotes into the file and otherwise break things, there are some dedicated plist editors available such as XCode).
If you’re unable to boot macOS, you can edit the config.plist using the “UEFI Shell” option in the OpenCore boot menu instead.
Enter “FS0:” and press enter to open up the first available filesystem, then run “edit EFI\OC\config.plist” (if the file isn’t found, try switching to another filesystem like fs1:). When you’re done editing, press control+Q to exit, “Y” to save, then run “exit” to return to the OpenCore menu. You need to reboot for your changes to take effect.
If you prefer, you can edit config.plist from the comfort of your Proxmox host instead. If you’re booting from an attached OpenCore.img file, you can mount that file as a disk on the host. If you’re booting from the VM’s disk instead, it must be in raw format in order to be mounted (e.g. typical LVM or ZFS usage) rather than qcow2.
# Mount an OpenCore image:
losetup --partscan /dev/loop0 /var/lib/vz/template/iso/OpenCore-v15.img
# or a VM boot disk:
losetup --partscan /dev/loop0 /dev/zvol/tank/vms/vm-100-disk-1

mount /dev/loop0p1 /mnt
Now the contents of that first partition are available in /mnt, so you can edit /mnt/EFI/OC/config.plist in your favourite editor. When you’re done, do this to unmount the disk:
umount /mnt
losetup --detach /dev/loop0
Automatic boot
In config.plist, you can set Misc/Boot/Timeout to a non-zero value to allow the default boot option be chosen automatically after that delay in seconds. I’ve disabled this by default because it causes the installer ISO to re-enter its main menu instead of continuing the second stage of installation.
You can set the default boot option by pressing control+enter on it.
Verbose boot
To boot macOS in Verbose mode to diagnose boot problems, at the OpenCore boot menu press Cmd+V before pressing enter to boot macOS (you don’t need to hold it down).
If there is a kernel panic during boot and it reboots too quickly to be read, edit config.plist to add “debug=0x100” to the kernel arguments.
Changing screen resolution
To change macOS’ screen resolution, you need to edit the UEFI/Output/Resolution setting in config.plist, the default is 1920×1080@32.
You should be able to change this to any of the modes that the system OVMF menu offers (hit F2 at the start of guest boot and choose “Device Manager/OVMF Platform Configuration” to see which resolutions are available).
Video performance
Because there is no guest video acceleration available for macOS, video performance is poor.
In Google Chrome in the guest you will need to toggle off the setting to “use hardware acceleration when available” to improve issues with elements not being drawn or flickering (especially video). Safari may be a better choice.
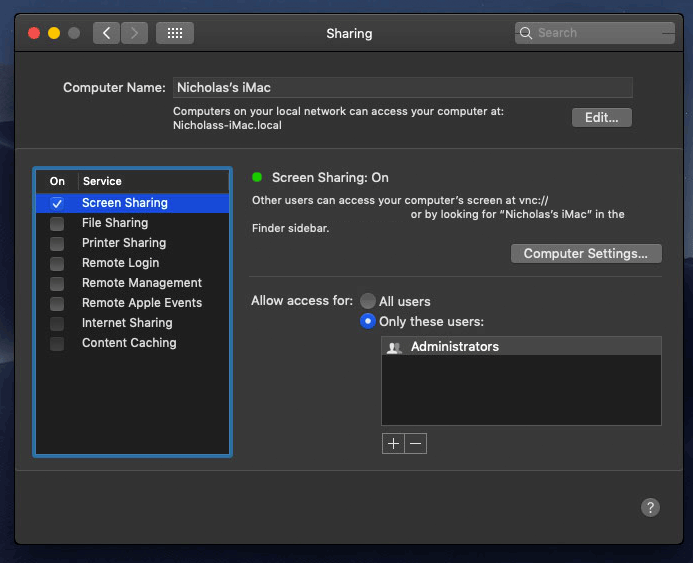
macOS’s built in “Screen Sharing” feature offers dramatically better framerates and latency than Proxmox’s browser-based VNC console, so if you have a real Mac to act as a viewing console, you can enable that in the VM’s “Sharing” settings and connect to the VM using the Screen Sharing app from your Mac instead:
Apparently Screen Sharing is also compatible with VNC clients like RealVNC, so you should be able to connect to it from Linux or Windows consoles using RealVNC.
The real magic bullet for video performance is to pass through a compatible video card using PCIe passthrough (though note that macOS now only supports a handful of very old NVidia cards). This offers near-native performance. You can read more about how I’m using PCIe passthrough on my own installation here.
USB passthrough
Since I want to use this as my primary computer, I want to use a USB keyboard and mouse plugged directly into Proxmox, rather than sending my input through the web VNC console.
Proxmox has good documentation for USB passthrough. Basically, run “qm monitor YOUR-VM-ID-HERE”, then “info usbhost” to get a list of the USB devices connected to Proxmox:
qm> info usbhost
 Bus 3, Addr 12, Port 6, Speed 480 Mb/s
 Class 00: USB device 8564:1000, Mass Storage Device
 Bus 3, Addr 11, Port 5.4, Speed 12 Mb/s
 Class 00: USB device 04d9:0141, USB Keyboard
 Bus 3, Addr 10, Port 5.1.2, Speed 12 Mb/s
 Class 00: USB device 046d:c52b, USB Receiver
 Bus 3, Addr 9, Port 14.4, Speed 12 Mb/s
 Class 00: USB device 046d:c227, G15 GamePanel LCD
 Bus 3, Addr 8, Port 14.1, Speed 1.5 Mb/s
 Class 00: USB device 046d:c226, G15 Gaming Keyboard
In this case I can add my keyboard and mouse to USB passthrough by quitting qm, then running:
qm set YOUR-VM-ID-HERE -usb1 host=04d9:0141
qm set YOUR-VM-ID-HERE -usb2 host=046d:c52b
This saves the devices to the VM configuration for you. You need to reboot to have the new settings apply.
You can also pass through USB devices by passing through an entire USB controller using Proxmox’s PCIe passthrough feature, which gives much better compatibility.
Odd core counts
If your host CPU is AMD, you might have a core count which is divisible by 3, like 6 cores. macOS doesn’t like it if the core count isn’t a power of 2 (1, 2, 4, 8), but it doesn’t mind odd socket counts.
So in order to pass 6 total cores, configure the VM for 3 sockets and 2 cores per socket.
Fixing “guest boots to UEFI shell”
If your guest ends up booting to the UEFI shell instead of showing the OpenCore boot menu, especially if you’ve just updated OpenCore to a new version, you’ll need to edit the guest’s UEFI boot entries to fix this.
At the very start of guest boot, hit F2 to enter guest UEFI settings.
First we’ll remove the old entries. Choose the Boot Maintenance option, then Boot Options -> Delete Boot Option. Use the spacebar to tick any old Clover or OpenCore entries (avoid ticking the EFI Internal Shell option, you want to keep that!). Select “Commit Changes and Exit”.
Now we’ll add the correct entry for OpenCore back in. Select Add Boot Option. Navigate through the device tree to EFI/OC/OpenCore.efi and select it, name this new option “OpenCore” or similar. Again Commit Changes and Exit.
Go to the Change Boot Order and move OpenCore to the top. Commit Changes and Exit.
Now back out to the main menu and choose Reset, and you should successfully boot into OpenCore this time.
Fixing iMessage
iCloud and the App Store should already be working for you, but for iMessage support you must follow these steps to mark your network adapter as built-in:
https://dortania.github.io/OpenCore-Post-Install/universal/iservices.html#fixing-en0
Disabling SIP (System Integrity Protection)
You can disable SIP by selecting the Recovery option from the OpenCore boot menu, then use the top menu to open the Terminal and run csrutil disable --no-internal. Then reboot.
This may be needed to run unsigned kexts or perform other hacks.
Upgrading OpenCore
Sometimes you need to update OpenCore to a new release in order to support a new macOS update. I’ll assume you don’t have any customisations to config.plist you want to save.
First take a snapshot! It’s great to be able to roll back if something goes wrong.
If you’re still able to boot macOS, you can update it from within the guest. Follow the instructions in the “Editing your OpenCore/EFI settings” section to mount your EFI partition. Then you can delete the EFI folder in there and replace it with the one from the OpenCoreEFIFolder.zip file from my OpenCore release (you’ll probably need to empty the trash first to make room for the new folder). You’re done!
If you aren’t able to boot macOS, unpack and upload the new OpenCore ISO to Proxmox’s ISO store instead. Add a new CD drive to the VM that uses that ISO. Then in Proxmox’s terminal edit the VM’s config (in /etc/pve/qemu-server) to replace “media=cdrom” with “cache=unsafe” for the OpenCore drive. Now on the “Options” tab, change the boot order to put the new OpenCore drive first.
Start the VM and boot into macOS using the new OpenCore drive. From within macOS you can now follow the instructions from the “Make the OpenCore install permanent” section to install the new OpenCore image to your main macOS disk, after which the OpenCore drive can be detached from the VM.
Upgrading from macOS Big Sur
First make a backup or snapshot of your system! Being able to roll back when the upgrade goes wrong is a real lifesaver.
You’ll need to update OpenCore to my v15 release before the upgrade. You can follow the instructions in the “Editing your OpenCore settings” section above to mount your EFI disk. Then you can replace the OpenCore files in the mounted “EFI” disk with the ones from the OpenCoreEFIFolder.zip file in my newest OpenCore release.
Reboot to make sure that you can still boot Big Sir.
If you’re using any PCIe passthrough devices (particularly video cards) you’ll want to disable those and set “vga: vmware” instead, so you can install using Proxmox’s web console from a different machine during the upgrade. This avoids installer problems triggered by flaky video card passthrough, especially host lockups caused by the AMD Reset Bug.
Now you can upgrade to Monterey using Software Update or from the App Store like you would on a real Mac.
If the update fails to appear, your SIP mode might be set to “Apple Internal”. You can check this by running “csrutil status” in the Terminal.
To fix this, reboot your VM and at the OpenCore menu select Recovery. Open up the Terminal, and in there run “csrutil enable --no-internal” (“csrutil disable --no-internal” is fine too), then reboot back into macOS and try again.
Hi Nick,
I think my installation of MacOS Monterey is stucked, the installer shows “About 2 hours and 17 minutes remaining”. It shows that text from the beggining of the installation and it doesnt do anything, that time is always the same.
What is wrong? how can i solve it?
Thanks.
Edit:
3 hours later, it changes to 47 hours. I see some activity in the disk graphic on the pve interface but the question is, is it normal that it takes so long?
what can i try to solve this? some idea?
thanks again.
Can you check the network traffic too?
It has to download macOS during installation, and Apple’s update servers are frequently slow. 3 hours total install time is not unusual.
Hi,
It has activity on the network, disk, cpu and the ram goes up progressively.
Regards
What datarate on the network?
300k aprox, with only one peak of 2.72mbit
Well, seems like it actually is downloading then, guess you have a while to wait!
Once you have macOS installed, you can use it to build Full Installers in the future, which don’t need to download anything during install and are much faster.
Good evening!
Followed everything as close as I could and have my VM up and running. Only issue I am having is icloud related. I sign in with my apple ID but when I go to iCloud settings, everything is unchecked. So all my iMessages are showing numbers instead of contacts. When I select the checkbox next to contacts in iCloud settings, it says “setting up” and spins for a second but than doesn’t do anything. It asked for my phone passcode once but hasn’t since that first time. Not sure what to look at to try and fix this. Any suggestions?
That sounds really close to working, try logging out of iCloud and then logging back in.
Hello Nicholas
So I followed this guide and besides one mistake copying the EFI (so I had to redo it all) it all went well, I now have ProxMox running a VM with Monterey.
Now I have questions 🙂
1- The memory setting in the .conf file.
My system has 64 Gb, so if I edit this setting to match that (65536) does it actually tap into the whole memory ? I can see in About this Mac that it says 64 Gb but I don’t know if it just reads the file or really uses the 64 Gb
2- The GPU passthrough
From what I understand, if I want to be able to simply press the power button and have the system boot on Monterey I need this GPU passthrough (instead of running the VM from another system). Am I correct ?
II don’t understand what has to be done to enable it. do I have to declare the PCI ports first ? I’ve tried the GRUB_CMDLINE_LINUX_DEFAULT=”quiet intel_iommu=on” thing but when I run the dmesg | grep -e DMAR -e IOMMU command I get nothing.
3- USB Passthrough
When I follow your commands it seems to be ok, I get the usb info then I can apply qm set etc… and it looks like it works. One of the ports shows my DELL USB Dongle so that should be good but in the VM the mouse and keyboard don’t work.
Anyway, I still need some digging and investigation 🙂
MB: Designare Z390
GPU: RX 5700 XT 8G
64 GB memory
>My system has 64 Gb, so if I edit this setting to match that (65536) does it actually tap into the whole memory ?
You cannot do this because this would leave Proxmox with no memory, you will start swapping to disk. But yes, you can probably give it 62 or 63GB this way and it’ll work as expected.
>If I want to be able to simply press the power button and have the system boot on Monterey I need this GPU passthrough
Yes, see the Proxmox documentation: https://pve.proxmox.com/wiki/Pci_passthrough
You must enable IOMMU/VT-d in your host UEFI settings too
OK, so I’ll go with 32 Gb, that’s plenty enough I guess to run football Manager :p
I have VT-d enabled in my BIOS, is this what you mean ? I’ll check when I’m back home but I’m pretty sure it is.
Hi Nick,
I finally installed MacOS, 15 hours later… I have a problem loging in to iCloud, it gives me a message like my password is not correct. I already changed it to verify it wasnt my problem but still giving that message or similar, in the end, i cant login to iCloud. Some idea why?
Thanks
Si I’ve been through the GPU pass-through document, but that seems to get my VM stuck. I have the proper numbers for the PCI ports, proper IDs for the Radeon 5700, but when I finally reboot the server it doesn’t go to the login prompt, instead it’s pretty much hangs after the initial booting messages (5 logical volumes active, /dev/mapper/pve-roo: clean)
I can start the VM but it crashes, restarts and boot super slow (like 10 minutes to pass the Apple loading bar). I get to the desktop and once passed the initial super sluginesh the Radeon is not showing. Also it states there’s no PCI card installed in there.
I don’t get what’s happening there, what am I missing ?
Hello,
I can very much recommend the following guide:
https://blog.quindorian.org/2018/03/building-a-2u-amd-ryzen-server-proxmox-gpu-passthrough.html/
This worked very well for my Radeon Pro W6600 and is IMHO easier to follow than the proxmox-wiki – BTW – BIOS-extract wasn’t needed for my W6600.
But you might also need to patch for the AMD GPU Reset Bug – which is still present in the Radeon 5xxx – LineUp.
https://forum.level1techs.com/t/navi-reset-kernel-patch/147547
To exclude MacOS-spezific problems you could try to passthourgh the GPU to a Linux or Windows guest and see if it is working there – just to be sure your passthorugh is working flawlessly.
Thanks, I’ll try that later this weekend 🙂
Hello, VirtIO Drivers in the link are only for windows and linux. How did you overcome this problem after installing Macos? Also, I couldn’t add a Sound Card, how did you solve it via proxmox? Thanks.
https://pve.proxmox.com/wiki/Windows_VirtIO_Drivers
macOS has built-in support for all virtio devices it will support, there are no drivers you can add.
You can passthrough a compatible USB or PCIe sound card using passthrough
hello i followd your instruction to make a macos vm with proxmox but i stuck in the apple logo when i want to open the recovery image to install
Share the contents of your VM config file
this is the content of my VM config file
https://ibb.co/fdrrn50
You can’t use cores=6, set that to 4.
cores: 2
sockets: 3
would also help to make use of a 6-core processor. osx struggles with “uneven” core counts (which are not a multiple of two like 2,4,8,16 etc.) but has no problem with odd socket counts.
Hello Nick, first I want to thank you for this great instruction. I closely followed every step and I did enable VT-d in BIOS, however, “VirtIO Block Media” appear after I launched the VM. Is there any way to fix this phenomenon? Thanks in advance!
I don’t understand what you mean. What’s the actual message? Why did you turn on VT-d?
Sorry about my bad presnetation. I mean I successfully managed into Disk Utility but it only showed “macOS base system”.
Screenshot: https://ibb.co/3NgXdvt
And I thought VT-d is neccesary for virtualizartion so I enabled it.
Can you share your “args” line?
Hi Nick.
My setup seesms odd.
I’ll add the optical drives, for instance; go to the options, or edit /etc/pve/qeumu-server/.conf; come back to the hardware, and they’ve disappeared.
Also, the efi disk is created, bu t is not being included in the options > boot options dialogue. So when I try to boot – even to set up – I’m receiving an eror that efi disk The disk I’m using for the vm is a zfs SSD
The “EFI disk” on the Hardware page is the equivalent of the flash memory chip on a motherboard that stores UEFI settings, it isn’t a bootable disk. The OpenCore image is the one you want to boot from.
Note that when you edit the CDs to change “media=cdrom” to “cache=unsafe”, it turns them into hard disks (because they are hard disk images) so you’ll no longer see a CD icon on the hardware page (there’s disk icons instead). If you’re really mangling these lines when you’re editing them, it could be dropping them automatically as syntax errors and removing them for you.
Hi Nicholas, thank you for very useful guide. I have a PC with Ryzen 3900X and Radeon 5700 XT 8GB. I already run an Opencore bare metal installation, but my SSD died and I wanted to try Proxmox. I successfully installed Monterey in the console from laptop and everything runs fine with web console or remote access. But I’m unable to run it on the monitor of the PC. I see only boot Proxmox logo and then Apple boot logo (without progressbar) and the hackintosh looks stuck, but I can access it via remote control (remote desktop). Is there any way how to solve it?
I went thru all the steps here https://youtu.be/5ce-CcYjqe8 with some modifications found in another sources, but with no luck. Any suggestions? Thank you 🙂
Make sure you’ve removed the emulated video device (set vga: none) and that you have “-global ICH9-LPC.acpi-pci-hotplug-with-bridge-support=off” in your VM args. If you’re still having trouble, post your VM config.
Note that your 5700 XT suffers from the AMD Reset Bug, so it can only be used once per host powercycle. To do better you can try adding vendor-reset: https://www.nicksherlock.com/2020/11/working-around-the-amd-gpu-reset-bug-on-proxmox/
Edit: Also you’ll probably have to add agdpmod=pikera to your Hacktintosh boot-args in config.plist: https://dortania.github.io/GPU-Buyers-Guide/modern-gpus/amd-gpu.html#navi-10-series
Thank you for quick reply. I didn’t solve the AMD reset bug, but everything else should be OK. The agdpmod=pikera doesn’t have any influence on functionality so far.
* options https://i.imgur.com/7T7PKrT.png
* .conf https://i.imgur.com/zDUBeqy.png (args are normally on 1 line)
* HW https://i.imgur.com/HSWt32p.png
* GRUB https://pastebin.com/2Y64LxV1
* after boot the hackintosh stops on this screen https://i.imgur.com/SI7KygZ.png, no login prompt, but I can access it via Remote desktop
* also I’m unable to use my Logitech MxKeyboard and mouse (via Unifying device, works ok in BIOS) although it is in USB devices in .conf. Wired keyboard works ok
The conf file subsumes the Options and Hardware tabs, so you don’t also need to include those.
I doubt your keyboard and mouse are USB 3, try removing the “usb3=1” from your VM config.
If your host is initialising your AMD GPU on boot (e.g. if it is your primary display adapter) then the AMD Reset Bug is fatal for you. You can’t run a VM because the GPU has already been initialised and cannot be reset for the VM to use. You will have to fix that first.
Great, thank you, I’m on it…
And what line in my GRUB is the right for my situation? I’m confused about the amd_iommu or intel_iommu (I’m emulating an Intel CPU) and video=vesafb:off,efifb:off – I saw in a comment that you advised to leave out these paramteres. Thanks
This depends only on your actual host CPU architecture. You’ve already got it correct though because if you didn’t the list of devices available to pass through would be empty.
You can add those efifb parameters if you like but they’re unlikely to make any impact on the AMD Reset Bug. They will cause your host to stop updating the screen during boot, so you’ll no longer get a text console on your screen, which can make recovery from networking slip-ups tedious.
So after several try-fail attempts with AMD reset bug I managed to get past the boot selection menu, but when mac boots, it freezes. I see OpenCore log, but it halts after:
ACPI sleep states S3 S4 S5
[ PCI configuration begin ]
After I changed my grub to “GRUB_CMDLINE_LINUX_DEFAULT=”quiet amd_iommu=on video=efifb:off””
I’m stuck on AppleACPICPU:Processor Id=10 LocalA… (it ends in the middle of the line)
The “usb3=1” parameter deletion didn’t help, but I see the devices in dmesg correctly identified (even the wired mouse), but it still doesn’t work
dmesg with AMD Vendor reset:
[ 38.451765] vfio-pci 0000:0b:00.0: enabling device (0400 -> 0403)
[ 38.451934] vfio-pci 0000:0b:00.0: AMD_NAVI10: version 1.1
[ 38.451935] vfio-pci 0000:0b:00.0: AMD_NAVI10: performing pre-reset
[ 38.471792] vfio-pci 0000:0b:00.0: AMD_NAVI10: performing reset
[ 38.575674] ATOM BIOS: 113-D1990103-O09
[ 38.575676] vendor-reset-drm: atomfirmware: bios_scratch_reg_offset initialized to 4c
[ 38.804161] vfio-pci 0000:0b:00.0: AMD_NAVI10: bus reset disabled? yes
[ 38.804166] vfio-pci 0000:0b:00.0: AMD_NAVI10: SMU response reg: 0, sol reg: 0, mp1 intr enabled? no, bl ready? yes
[ 38.804169] vfio-pci 0000:0b:00.0: AMD_NAVI10: performing post-reset
[ 38.843764] vfio-pci 0000:0b:00.0: AMD_NAVI10: reset result = 0
[ 38.843921] vfio-pci 0000:0b:00.0: vfio_ecap_init: hiding ecap 0x19@0x270
[ 38.843933] vfio-pci 0000:0b:00.0: vfio_ecap_init: hiding ecap 0x1b@0x2d0
[ 38.843938] vfio-pci 0000:0b:00.0: vfio_ecap_init: hiding ecap 0x25@0x400
[ 38.843940] vfio-pci 0000:0b:00.0: vfio_ecap_init: hiding ecap 0x26@0x410
[ 38.843941] vfio-pci 0000:0b:00.0: vfio_ecap_init: hiding ecap 0x27@0x440
[ 38.999846] vfio-pci 0000:0b:00.0: AMD_NAVI10: version 1.1
[ 38.999851] vfio-pci 0000:0b:00.0: AMD_NAVI10: performing pre-reset
[ 39.000004] vfio-pci 0000:0b:00.0: AMD_NAVI10: performing reset
[ 39.103898] ATOM BIOS: 113-D1990103-O09
[ 39.103900] vendor-reset-drm: atomfirmware: bios_scratch_reg_offset initialized to 4c
[ 39.332064] vfio-pci 0000:0b:00.0: AMD_NAVI10: bus reset disabled? yes
[ 39.332069] vfio-pci 0000:0b:00.0: AMD_NAVI10: SMU response reg: 0, sol reg: 0, mp1 intr enabled? no, bl ready? yes
[ 39.332072] vfio-pci 0000:0b:00.0: AMD_NAVI10: performing post-reset
[ 39.371747] vfio-pci 0000:0b:00.0: AMD_NAVI10: reset result = 0
[ 69.389774] usb 3-2.1: reset low-speed USB device number 4 using xhci_hcd
[ 69.804205] usb 1-4.3.3: reset full-speed USB device number 7 using xhci_hcd
[ 70.061890] usb 3-6: reset full-speed USB device number 6 using xhci_hcd
Should I be looking for solution in Proxmox configuration or in OpenCore and kexts? Thank you very much for your help 🙂
BTW: I was able to Update from 12.3 to MacOS 12.3.1 using the recovery and reinstall MacOS – worked flawlessly.
I use the iMac 14,2 as suggested and pass-through 16 cores, 16 GB, my GPU (Radeon pro W6600 – I use with 4 Screens 2x4k and 2x2k), Bluetooth (onboard Intel) and USB-Port for Mouse/Keyboard.
So far everything seems to work fine. Didn’t bench the GPU right now – but it feels okay so far.
Thanks again!
Best regards,
Michael
Yep, I’ve updated my RX580 passthrough VM to 12.3.1 now and it went flawlessly too.
To make things a bit clearer, the error that I receive at the VM boor screen is:
BdsDxe: failed to load Boot0005 “UEFI QEMU DVD-ROM QM00003” from PciRoot (0x0)/Pci (0x1F,0x2)/Sata(0x1,0xffff,0x0) : Not found
BdsDxe: failed to load Boot000 “UEFI QEMU DVD-ROM QM0000″ from PciRoot (0x0)/Pci (0x1F,0x2)/Sata(0x1,0xffff,0x0) : Not found
If I enter the OVMF UEFI settings, attempting to choose a boot option (in Boot manager) does not work – entries are visible, but unable to be selected. Any attempt to add a boot entry, the file browser is empty. I cannot use UEFI to boot from (as I can do from my physical PC UEFI).
My options file is:
agent: 1
args: -device isa-applesmc,osk=”” -smbios type=2 -device usb-kbd,bus=ehci.0,port=2 -global nec-usb-xhci.msi=off -global ICH9-LPC.acpi-pci-hotplug-with-bridge-support=off -cpu host,kvm=on,vendor=GenuineIntel,+kvm_pv_unhalt,+kvm_pv_eoi,+hypervisor,+invtsc
balloon: 0
bios: ovmf
boot: order=ide2;ide0;virtio1
cores: 8
cpu: Penryn
efidisk0: macOS:vm-100-disk-1,efitype=4m,size=1M
ide0: local:iso/Monterey-recovery.img,media=cdrom,size=3145244K
ide2: local:iso/OpenCore-v16.iso,media=cdrom,size=150M
machine: q35
memory: 8192
meta: creation-qemu=6.1.1,ctime=1649064363
name: macos-monterey
net0: virtio=76:F4:E1:29:3C:9E,bridge=vmbr0,firewall=1
numa: 1
ostype: other
scsihw: virtio-scsi-pci
smbios1: uuid=49110044-e7b8-4663-af11-fcb3c46ba812
sockets: 1
vga: vmware
virtio1: macOS:vm-100-disk-0,cache=unsafe,discard=on,size=64G
vmgenid: f28aa434-82d1-4bfc-82f8-7c3dbe77a4c7
Thanks again
You didn’t follow the required steps to replace media=cdrom with cache=unsafe. Those images cannot be booted as CDROMs, and making this edit treats them as hard disk images instead.
I had changed media=unsafe in both instances, but it keeps being automatically changed
I have never observed such behaviour and I’ve used Proxmox a LOT. I don’t think this is something that can happen automatically, you would have to be overwriting your own changes manually for this to happen.
You’re not rolling back to old snapshots with old settings are you?
No. This is a “Fresh” install, so far as VMs go. No snapshots. I might do a fresh install, back to a minimum.
Thanks for your help. 🙂
“Note that you will want to hold off on logging into your Apple ID until you’ve configured your Mac’s serial number in OpenCore (because otherwise a Mac with the default shared serial number in my OpenCore image will be added to your Apple ID).”
Is there a good noob tutorial how to do this?
https://dortania.github.io/OpenCore-Post-Install/universal/iservices.html
Hello, thanks to you, I made a nice installation. However, I was unable to change the serial number. I’m using it like this right now. What kind of trouble can this make for both you and me. Now I can enter the app store and icloud without any problems. Other than that, I don’t want to use iMessage. Is it okay if I use it this way?
The potential trouble is unknown, only Apple knows what they’ll do with cloned serial numbers in the future. There does not seem to be any immediate impact.
The impact on me is zero because I use custom serials in my own installs.
Hi Nick.
Finally sorted my erroneous conf.
I’ve got through to the install stage, and it’s at the 3rd reboot, but has been stuck at about 1/3 for a couple of hours, at least.
100.conf file:
agent: 1
args: -device isa-applesmc,osk=”” -smbios type=2 -device usb-kbd,bus=ehci.0,port=2 -global nec-usb-xhci.msi=off -global ICH9-LPC.acpi-pci-hotplug-with-bridge-support=off -cpu host,kvm=on,vendor=GenuineIntel,+kvm_pv_unhalt,+kvm_pv_eoi,+hypervisor,+invtsc
balloon: 0
bios: ovmf
boot: order=ide0;ide2;virtio1
cores: 8
cpu: Penryn
efidisk0: macOS:vm-100-disk-1,efitype=4m,size=1M
ide0: local:iso/Monterey-recovery.img,cache=unsafe,size=3145244K
ide2: local:iso/OpenCore-v16.iso,cache=unsafe,size=150M
machine: q35
memory: 8192
meta: creation-qemu=6.1.1,ctime=1649064363
name: macos-monterey
net0: virtio=76:F4:E1:29:3C:9E,bridge=vmbr0,firewall=1
numa: 1
ostype: other
scsihw: virtio-scsi-pci
smbios1: uuid=49110044-e7b8-4663-af11-fcb3c46ba812
sockets: 1
vga: vmware
virtio1: macOS:vm-100-disk-0,cache=unsafe,discard=on,size=64G
vmgenid: f28aa434-82d1-4bfc-82f8-7c3dbe77a4c7
*obviously, “” is a proxy
I think that stage is the boot-into-macOS stage. So the odds are good that it’s actually hung and not trying to make install progress. (Double check by checking the disk/network performance graphs for the VM in Proxmox)
At the OpenCore boot menu you can press win/cmd+V once to enable Verbose boot, then press enter to boot. This’ll show you where it gets stuck.
My bet is on an incorrect OSK (because the installer doesn’t care about it, but macOS hangs forever early in the boot if it’s wrong)
Hi Nick
to follow up on my most recent post: Using verbose output, I see that it doesn’t get past the following point:
Store:7456:113: unexpected session: 100000 uid: -1 requested by: 113
Store 11114:113: operation failed (sel: 7 ret: e00002c2, -1, 100000)
eUsers: time(0) 0->, lin 0, llk 1,
eUsersgIOScreenLockState 3, hs 0, bs 0, now 0, sm 0x0
Store 11114:113: unexpected session: 100000 uid: -1 requested by: 113
Store 11114:113: operation failed (sel: 7 ret: e00002c2, -1, 100000)
Store 11114:113: operation failed (sel: 7 ret: e00002b2, -1, 100000)
Store 11114:236: unexpected session: 100000 uid: -1 requested by: 236
Store 11114:236: operation failed (sel: 7 ret: e00002b2, -1, 100000)
Cheers
M.
Those are not likely to be the cause of the problem, but just the messages that are always printed at the end of that phase. Screenshot the whole page.
Also, post your OSK and I’ll check it (and then edit it out for you)
Hello,
I was having the same issue. Tried to troubleshoot but got back here after a Google search.
Thanks to your comment, I found the issue – my OSK was not 64 characters long 🙂
I had omitted the part (c)…
Thank you for the great tutorial !!
Hi Mike, did you manage to sort this out?
Thanks,
Radu
Hi Nick
I have Mac running correctly but iCloud is not working, i put my right pass and i see the message “not available, try again later”. Why?
This is the guide for fixing iServices:
https://dortania.github.io/OpenCore-Post-Install/universal/iservices.html#using-macserial
The “fixing en0” section is a good place to start
Your mount instructions can be reduced to:
sudo diskutil mount /dev/disk0s1
This will created a (temporary) folder in /Volume and mount the volume.
Hi, thaks for the nice guide. I tried it on Proxmox 7.1 and the VM stucked at the UEFI shell. OpenCore wasn’t booting. I resolved the problem with help of this link:
https://jhartman.pl/2021/11/08/proxmox-7-cant-boot-to-uefi-home-assistant-and-other-uefi-images/?utm_source=rss&utm_medium=rss&utm_campaign=proxmox-7-cant-boot-to-uefi-home-assistant-and-other-uefi-images
Maybe you could mention this in the topic: Fixing “guest boots to UEFI shell”
Thank you this worked for me
Ehh this is already resolved by my VM creation instructions where I say to un-tick pre-enroll keys. I’m not keen to repeat every instruction twice in case you ignored it the first time.
Hi Nick,
First thanks a lot for writing this detailed instructions. i am hitting some weird issues. I had a working setup with monterey VM in proxmox 7, and then after a fatal reboot of my system, its getting stuck at the boot. So i decided to do a clean install but now even Monterey-recovery.img or Monterey-full.img fails to boot. has any one faced an issue. I followed all the steps multiple times with no luck.
My VM config file:
agent: 1
args: -device isa-applesmc,osk=”….” -smbios type=2 -device usb-kbd,bus=ehci.0,port=2 -global nec-usb-xhci.msi=off -cpu Penryn,kvm=on,vendor=GenuineIntel,+kvm_pv_unhalt,+kvm_pv_eoi,+hypervisor,+invtsc,+ssse3,+sse4.2,+popcnt,+avx,+avx2,+aes,+fma,+bmi2,+xsave,+xsaveopt,+rdrand,check -global ICH9-LPC.acpi-pci-hotplug-with-bridge-support=off
balloon: 0
bios: ovmf
boot: order=virtio0;ide2;ide0
cores: 8
cpu: Penryn
efidisk0: local-lvm:vm-101-disk-0,efitype=4m,size=4M
ide0: local:iso/OpenCore-v16.iso,cache=unsafe,size=150M
ide2: local:iso/Monterey-recovery.img,cache=unsafe,size=3145244K
machine: q35
memory: 16384
meta: creation-qemu=6.1.0,ctime=1650064832
name: monterey-1
net0: virtio=EE:A3:56:F2:9A:D5,bridge=vmbr0,firewall=1
numa: 0
ostype: other
scsihw: virtio-scsi-pci
smbios1: uuid=f61ff9e9-4cab-443e-9d9e-e8e345fba707
sockets: 1
vga: vmware
virtio0: Images:101/vm-101-disk-0.raw,cache=unsafe,discard=on,size=256G
vmgenid: 62018e47-3416-40f1-ad9e-d589ea83b4ce
It’s set to boot from your hard disk first, is that intentional? You might need to change the boot order to put OpenCore (IDE0) first.
Where does it get stuck during boot exactly?
I can not login with my apple ID. It tells me to try again later.
Make sure you’ve configured a new serial for your machine:
https://dortania.github.io/OpenCore-Post-Install/universal/iservices.html#using-gensmbios
Otherwise you have the same serial number as everybody else who is using my tutorial, which Apple won’t be thrilled by.
Hi Nick,
Thank you for the guides you post in this blog. They have been very inspiring and helpful to understand how to run a VM on Proxmox with Mac OS Monterey. I succeeded doing so, and to a great extent, this guide has been my main reference every time.
I have been trying to find a way to manage sleep and shutdown to be as similar as possible to the desktop experience.
So far, the best that I could do is disable sleep on Mac OS and to disable hibernation and sleep on Proxmox with the following instructions. I wonder if you have found a better way to manage this.
Disable Resuming and Hibernation on Proxmox:
nano /etc/systemd/sleep.conf
Edit the following commented lines and leave them as:
[Sleep]
AllowSuspend=no
AllowHibernation=no
AllowSuspendThenHibernate=no
AllowHybridSleep=no
SLEEP MAC OS ENABLE/DISABLE:
# Before doing anything, save your current configuration using
pmset -g
# To disable sleep
sudo pmset -a sleep 0; sudo pmset -a hibernatemode 0; sudo pmset -a disablesleep 1;
# And to go back to normal
sudo pmset -a sleep 1
sudo pmset -a hibernatemode 0
sudo pmset -a disablesleep 0
Unfortunately I haven’t. I think passthrough stops most combinations from being possible.
I have yet to try this, but I found that it might be possible to eliminate the sleep menu item from the apple menu by deleting the following code:
https://ibb.co/NY3hKZf
from here:
/System/Library/Frameworks/Carbon.framework/Versions/A/Frameworks/HIToolbox.framework/Versions/A/Resources/English.lproj/StandardMenus.nib
I wonder if this might cause any issues though…
Editing anything in the readonly /System directory is way more trouble than it’s worth, because this makes it impossible to install incremental system updates (you have to use the Full Installer instead to reinstall macOS)
Good to know! Then better not to try that.
Hi again Nick!
I am trying this kext:
CpuTscSync.kext
They say it is needed to avoid wake from sleep kernel panics.
More information here:
https://github.com/acidanthera/CpuTscSync
I have used for some days and I have not yet experienced any kernel panic yet while waking from sleep.
Maybe you want to try it out too!
Cheers,
Jorge
Hello Nick. Thanks for this wonderful guide.
I am trying to install Monterey in Ubuntu 20.04 using the instructions at https://github.com/kholia/OSX-KVM and using your guide as well.
I’m not using proxmox, rather , I just enable vnc in qemu and connect through it to continue the installation. And also, I’m not compiling smc_read.c to read the OSK auth key.
I used your “-cpu” flags for an AMD cpu, and I am getting these warnings: https://ibb.co/Mc69qww
The qemu itself starts fine, and when I connect through vnc, I get the “OpenCore boot picker” screen https://ibb.co/rMcfpFp, then I just proceed to “macOS Base System” (not “Install macOS Montery” like the one from your screenshot https://www.nicksherlock.com/wp-content/uploads/2021/10/Screen-Shot-2021-10-26-at-12.35.04-PM.png).
This just results into a boot loop. (i.e. I enter into “macOS Base System” in boot picker, then eventually I’ll get returned to it again)
This is the command I am using btw: https://ibb.co/51zZt4S
the “mac_hdd_ng.img” is created using “qemu-img create -f qcow2 mac_hdd_ng.img 128G”.
I’m new to hackinstosh world, I’m hoping you could point out if something’s wrong with my current setup? Thanks a lot.
Your screenshot of your command omits the value of a bunch of critical variables, paste the whole file instead.
Double check that your host has a viable TSC clocksource, because macOS panics when this isn’t available:
https://www.nicksherlock.com/2021/10/installing-macos-12-monterey-on-proxmox-7/comment-page-3/#comment-47299
Thank you for all your work in putting together this guide!
I am having an issue getting Monterey to install. I can get the VM to boot to the OpenCore screen, but I have no option to install MacOS, only UEFI shell and Reset NVRAM, here is my conf file. Any help would be appreciated! Thank you!
GNU nano 5.4 /etc/pve/qemu-server/102.conf
agent: 1
args: -device isa-applesmc,osk=”…” -smbios type=2 -device usb-kbd,bus=ehci.0,port=2 -global nec-usb-xhci.>
balloon: 0
bios: ovmf
boot: order=ide2;ide0;virtio0;net0
cores: 4
cpu: Penryn
efidisk0: local-lvm:vm-102-disk-1,efitype=4m,size=4M
ide0: local:iso/Monterey.iso,cache=unsafe,size=8500M
ide2: local:iso/OpenCore-v16.iso,cache=unsafe
machine: q35
memory: 16384
meta: creation-qemu=6.1.0,ctime=1650823977
name: MacOSMonterey
net0: virtio=3E:A4:23:F1:F0:68,bridge=vmbr0,firewall=1
numa: 0
ostype: other
scsihw: virtio-scsi-pci
smbios1: uuid=c896d128-54af-462e-aef2-4ac165615639
sockets: 2
vga: vmware
virtio0: local-lvm:vm-102-disk-0,cache=unsafe,discard=on,size=64G
vmgenid: 5aab9911-2569-4b9e-9175-62d5f0f7ef41
The installer image needs to be formatted GPT/GUID to appear, a bunch of other guides build it in other formats.
Argh!! Yes! Thank you!!!
That seems like such a rookie mistake! Currently installing!
Hey, i’ve passed the MacOS installer part and got stuck on the first boot of the Main partition.
The bar stops progressing and in verbose i get following output:
AppleKeyStore operation failed – quick google search pointed out this error is related to passing GPU’s but i haven’t even started to do that. My config is just as your initial followthrough advised to set up.
Any ideas how to fix this?
Most likely your OSK is wrong or you have cores set to something that isn’t a power of two.
GNU nano 5.4 /etc/pve/qemu-server/100.conf
agent: 1
args: -device isa-applesmc,osk=”workdontcopybla” -smbios type=2 -device usb-kbd,bus=ehci.0,port=2 -global nec-usb-xhci.msi=off -global ICH9-LPC.acpi-pci-hotplug-with-bridge-support=off -cpu Penryn,kvm=on,vendor=GenuineIntel,+kvm_pv_unhalt,+kvm_pv_eoi,+hypervisor,+pcid,+ssse3,+sse4.2,+popcnt,+avx,+avx2,+aes,+fma,+fma4,+bmi1,+bmi2,+xsave,+xsaveopt,+rdrand,check
balloon: 0
bios: ovmf
boot: order=ide2;ide0
cores: 16
cpu: Penryn
efidisk0: local-lvm:vm-100-disk-0,efitype=4m,size=4M
hotplug: disk,usb
ide0: local:iso/Monterey-recovery.img,cache=unsafe,size=3145244K
ide2: local:iso/OpenCore-v16.iso,cache=unsafe
machine: q35
memory: 26112
meta: creation-qemu=6.1.0,ctime=1651006746
name: MacOS
net0: virtio=4A:2E:08:BF:63:43,bridge=vmbr0
numa: 1
ostype: other
scsihw: virtio-scsi-pci
smbios1: uuid=f082a211-3502-4428-ad49-d8d1258358c7
sockets: 1
vga: vmware
virtio0: local-lvm:vm-100-disk-1,cache=unsafe,discard=on,size=640G
vmgenid: 72d891ce-6a5e-4f40-92ed-1fab31b878b4
But i’m still getting this error 🙁 do you see anything that may cause this based on the config?
Try cores: 8
Thanks but i tired – still the same error message.
Anything else i could try?
Maybe the verbose output gives you a hint i don’t understand
https://imgur.com/a/C8WWKfY
You don’t have a passthrough GPU configured using a hostpci line you didn’t include in your config file do you?
No, i haven’t checked everything but i will try to delete everything and start all over from scratch
Post your actual OSK too (I’ll remove it afterwards)
Sir, I tried to boot the pve vm as you metioned above, but it keep rebooting when I select the recovery img in opencore.
I can’t figure out what is going wrong, could you please help me check?
The screen when reboot.
https://i.imgur.com/W2jWImw.jpg
The config file.
https://i.imgur.com/844swDQ.jpg
Thank you.
I think it might be crashing due to an unstable TSC on your host, run this command on the host to see if your host is having issues with the TSC:
dmesg | grep -i -e tsc -e clocksource
Look for an error like “TSC found unstable after boot, most likely due to broken BIOS. Use ‘tsc=unstable’.”
If that’s the issue, sometimes doing a full host poweroff (not a warm reboot) will fix it.
Thank you.
But It keeps rebooting at the installation.
I tried to add tsc=unstable/stable/reliable and change it to acpi_pm instead of hpet, and it is no use.
Keep tring, thank you.
You need to fix the TSC, e.g. by a BIOS update, other timers are not an alternative.
I do update the bios, and it’s no use still.
I jusy don’t know what to do, hehe.
Thank you.
Probably the stupidest question here, but here goes.
I installed Proxmox and Monterey on my desktop computer. I can start up Monterey on my desktop via my laptop through the web interface. I can operate my new Mac via the console. I moved the EFI folder from the USB to the main hard drive and made all the OC adjustments. I can log into Proxmox on my main computer using root/PW, but then what? Is it even possible to then have Monterey operating via my VM on my desktop? Thanks for the help and the very interesting and fun new project.
You would want to PCIe-passthrough a Mac compatible GPU for it to output directly to a monitor connected to Proxmox
I describe my passthrough setup here:
https://www.nicksherlock.com/2018/11/my-macos-vm-proxmox-setup/
Hey, it’s me again – so i’ve set up a completely new VM with all of your recommandations.
…
And the verbose output that’s thrown using exactly this config:
https://imgur.com/bdKGol0
Your OSK is significantly truncated, you’re missing a whole bunch from the end.
Thanks a lot, stupid rookie mistake – works now!
numa feature needs to be disable in order to avoid
installer stuck at
matching deferred by IOUSBHostHIDDevice thus memory hotplug also needs to be disable. whether we could enable later after installation ,wait till i setup done
unless you really have dual socket numa system and you need that option to make vms operate cross numa node
I tried to use GPU-Passthrough but when I try to boot into macOS (already without gpu installed) I briefly see the Apple-Logo and then my monitor goes black and my GPU doesn’t output anything, can anyone help me with this?
CPU: Ryzen 5 2600
GPU: ASRock Radeon RX 6600XT Challenger
Motherboard: ASUS B450-F Gaming
Here’s btw my config from the VM: https://ibb.co/FHkdzvG
Support for the 6600XT is brand new in macOS 12.1, which version are you running?
macOS Version 12.3
Same here, 0% loading bar
I am having the same issue, running Proxmox 7 with Monterey 12.3.1 and Intel CPU + AMD RX 6600XT, Apple logo appears on virtual console but the progress bar gets stuck at around 30%. I tried with/out options “pimary gpu”, romfile and such. No changes of behaviour at all. When I drop pci passthrough, MacOS boots flawlessly.
Btw. Win 11 VM runs without any problems using the same GPU card.
Progress bar stuck at 30% is very unusual for a GPU failure, usually this results in a black screen later on in the boot.
Make sure you’re not missing the required acpi hotplug bit in your VM args line for passthrough device support.
This is my config, maybe you can check for problems?
agent: 1
args: -device isa-applesmc,osk=”OSX-KEY removed” -smbios type=2 -device usb-kbd,bus=ehci.0,port=2 -device usb-mouse,bus=ehci.0,port=3 -cpu host,kvm=on,vendor=GenuineIntel,+kvm_pv_unhalt,+kvm_pv_eoi,+hypervisor,+invtsc -global nec-usb-xhci.msi=off -global ICH9-LPC.acpi-pci-hotplug-with-bridge-support=off
balloon: 0
bios: ovmf
boot: order=virtio0;net0
cores: 4
efidisk0: local-lvm:vm-102-disk-1,efitype=4m,size=4M
hostpci0: 0000:04:00,pcie=1,romfile=xfx-rx6600xt-8gb.rom
machine: q35
memory: 4092
meta: creation-qemu=6.1.1,ctime=1651234945
name: MacOS
net0: vmxnet3=9A:4F:49:D6:BA:EF,bridge=vmbr0
numa: 0
ostype: other
scsihw: virtio-scsi-pci
smbios1: uuid=aa9a7cb0-f9ae-43eb-9ecb-12f43607fbd6
sockets: 1
usb0: host=1-6.3
vga: vmware
virtio0: local-lvm:vm-102-disk-0,cache=none,size=64G,discard=on
vmgenid: 9f2a44ad-57e4-4b56-aaaf-4fa21ea47bed
Hey there, got my setup running. I am now facing the following problem:
I’ve got a RX580 (8GB OC) GPU passed through (working on Win10 machine, so no error related to PCI passthrough in general) and when i try to boot the machine i get to OC, am able to select my boot drive and i am even able to see the progress bar of OSX loading up but there’s no progress as the whole thing freezes in the first second or so. Booting using Display VMware Display output works fine but just not using the GPU.
Config: root@pve:~# tail -f -n +1 /etc/pve/qemu-server/102.conf #hookscript%3A local%3Asnippets/hackintosh.sh
#hugepages%3A 1024
agent: 1
args: -device isa-applesmc,osk=”…” -smbios type=2 -device usb-kbd,bus=ehci.0,port=2 -global nec-usb-xhci.msi=off -global ICH9-LPC.acpi-pci-hotplug-with-bridge-support=off -cpu Penryn,kvm=on,vendor=GenuineIntel,+kvm_pv_unhalt,+kvm_pv_eoi,+hypervisor,+invtsc,+pcid,+ssse3,+sse4.2,+popcnt,+avx,+avx2,+aes,+fma,+fma4,+bmi1,+bmi2,+xsave,+xsaveopt,+rdrand,check
balloon: 0
bios: ovmf
boot: order=virtio0;net0
cores: 8
cpu: Penryn
efidisk0: local-lvm:vm-102-disk-1,efitype=4m,size=4M
hostpci0: 0000:07:00,pcie=1,x-vga=1
hostpci1: 0000:09:00.3
machine: q35
memory: 24576
meta: creation-qemu=6.1.0,ctime=1651212594
name: MacOS
net0: virtio=7E:CC:B8:B7:1C:A4,bridge=vmbr0
numa: 1
ostype: other
parent: Clean
scsihw: virtio-scsi-pci
smbios1: uuid=d451bc20-2e05-4221-9bda-1216b468a3bb
sockets: 3
vga: vmware
virtio0: local-lvm:vm-102-disk-0,cache=unsafe,discard=on,size=640G
vmgenid: 43ff0f1d-97ac-4486-9b6a-e5e408f5f161
[Clean]
agent: 1
args: -device isa-applesmc,osk=”our****(c)AppleComputerInc” -smbios type=2 -device usb-kbd,bus=ehci.0,port=2 -global nec-usb-xhci.msi=off -global ICH9-LPC.acpi-pci-hotplug-with-bridge-support=off -cpu Penryn,kvm=on,vendor=GenuineIntel,+kvm_pv_unhalt,+kvm_pv_eoi,+hypervisor,+invtsc,+pcid,+ssse3,+sse4.2,+popcnt,+avx,+avx2,+aes,+fma,+fma4,+bmi1,+bmi2,+xsave,+xsaveopt,+rdrand,check
balloon: 0
bios: ovmf
boot: order=virtio0;net0
cores: 8
cpu: Penryn
efidisk0: local-lvm:vm-102-disk-1,efitype=4m,size=4M
hostpci0: 0000:07:00,pcie=1,x-vga=1
machine: q35
memory: 6144
meta: creation-qemu=6.1.0,ctime=1651212594
name: MacOS
net0: virtio=7E:CC:B8:B7:1C:A4,bridge=vmbr0
numa: 1
ostype: other
scsihw: virtio-scsi-pci
smbios1: uuid=d451bc20-2e05-4221-9bda-1216b468a3bb
snaptime: 1651671960
sockets: 3
vga: vmware
virtio0: local-lvm:vm-102-disk-0,cache=unsafe,discard=on,size=640G
vmgenid: 43ff0f1d-97ac-4486-9b6a-e5e408f5f161
Any ideas?
I had to use a romfile when using RX 580 with Big Sur on Proxmox so maybe you can try it with that option.
Nope, ROM isn’t working at all. Dumped the Romfile via Gpu-Z on Windows machine and brought it into PVE, used it as Romfile -> no display output at all 🙁
Do you save the rom file at /usr/share/kvm/ ? Try it with a file from http://www.techpowerup.com/vgabios/
Yes I do save the file under the path you wrote.
Using a downloaded ROM for this exact GPU I get only garbled output (grey lines and things scrambled up) – that’s why I extracted the ROM in the first place as I first tried to dl one.
Today i tired again using AMDVBFlash – flashed the image from TPU for this exact GPU onto it again to make sure Version numbers are exactly the same. Works fine on WIN even after reboot and everything – then downloaded a fresh copy from TPU again and tried to start the machine.
I only get garbled output with grey lines but no usable image – i’m now completely clueless because the VBIOS is exactly the same. Has anyone got an idea how to fix this?
Hello Matteo,
I wanted to ask you if you managed to find a solution to this.
I’m currently facing the same issue. And did everything in the guide.
Numa=1 and vga to none
But still no dice.
Hi. I was running a Catalina VM with your OpenCore-13 iso, on a passed-through 2TB SSD which had two partitions. One for system, one reserved for testing upgrades.
After a while I finally decided to upgrade to Monterey. I mounted the OpenCore-16 iso, booted up. Everything worked fine.
Opened up the Monterey installer from within Catalina and told it to install the system on the second partition.
Now I can’t boot to any of my partitions. The OC bootloader shows “macOS”, “Recovery 10.15.7 (dmg)”, “macOS Backup”, “Recovery 12.3.1 (dmg)”, UEFI Shell and Reset NVRAM.
It loads the apple logo and freezes about 1/3 way through.
Tried the debug image and it ends with:
Longterm timer threshold: 1000 ms
mem actual: Ox7fff00000
legacy sane_size: 0x800000000
Darwin Kernel Version 19.6.0: Tue Feb 15 21:39:11 PST 2022; root:xnu-6153.141.591/RELERSE_X86_64
pmap_startup() delaying init/free of page nums > 0x200000
pmap_startup() init/release time: 29819 microsec
pmap_startup() delayed init/release of 6729132 pages
vm_page_bootstrap: 1501557 free pages, 6854027 wired pages, (up to 6729132 of which are delayed free) ext submap [Ox – Oxl, kernel text [Ox – Oxl
zone leak detection enabled
zalloc: allocating memory for zone names buffer
“vm_compressor_mode” is 4
oslog_init completed, 16 chunks, 8 lo pages
standard timeslicing quantum is 10000 us
standard background quantum is 2500 us
WQ[wql_init]: init linktable with max:262144 elements (8388608 bytes)
WQ[wql_init]: init prepost table with max:262144 elements (8388608 bytes)
mig_table_max_displ = 53
timeouts adjusted for virtualization (<
balloon: 0
bios: ovmf
boot: order=ide2
cores: 16
cpu: Penryn
hostpci0: 0000:04:00,pcie=1
hostpci1: 0000:05:00,pcie=1
hostpci2: 0000:10:00,pcie=1,x-vga=1
hostpci3: 0000:09:00,pcie=1
ide2: local:iso/OpenCore-v16-serial-debug.iso,cache=unsafe,size=150M
machine: pc-q35-4.1
memory: 32767
name: Alfheim
net0: vmxnet3=FE:3F:AE:41:9B:02,bridge=vmbr0,firewall=1
numa: 0
ostype: other
scsihw: virtio-scsi-pci
smbios1: uuid=ae031827-b589-40d0-bd6d-58cc661044a9
sockets: 1
startup: order=1
vga: vmware
vmgenid: 52d72f71-63d9-4be9-a469-275cef703c26
Any idea?
Oops, I think my text got cut.
Debug:
Longterm timer threshold: 1000 ms
mem actual: Ox7fff00000
legacy sane_size: 0x800000000
Darwin Kernel Version 19.6.0: Tue Feb 15 21:39:11 PST 2022; root:xnu-6153.141.591/RELERSE_X86_64
pmap_startup() delaying init/free of page nums > 0x200000
pmap_startup() init/release time: 29819 microsec
pmap_startup() delayed init/release of 6729132 pages
vm_page_bootstrap: 1501557 free pages, 6854027 wired pages, (up to 6729132 of which are delayed free) ext submap [Ox – Oxl, kernel text [Ox – Oxl
zone leak detection enabled
zalloc: allocating memory for zone names buffer
“vm_compressor_mode” is 4
oslog_init completed, 16 chunks, 8 lo pages
standard timeslicing quantum is 10000 us
standard background quantum is 2500 us
WQ[wql_init]: init linktable with max:262144 elements (8388608 bytes)
WQ[wql_init]: init prepost table with max:262144 elements (8388608 bytes)
mig_table_max_displ = 53
timeouts adjusted for virtualization (<
balloon: 0
bios: ovmf
boot: order=ide2
cores: 16
cpu: Penryn
hostpci0: 0000:04:00,pcie=1
hostpci1: 0000:05:00,pcie=1
hostpci2: 0000:10:00,pcie=1,x-vga=1
hostpci3: 0000:09:00,pcie=1
ide2: local:iso/OpenCore-v16-serial-debug.iso,cache=unsafe,size=150M
machine: pc-q35-4.1
memory: 32767
name: Alfheim
net0: vmxnet3=FE:3F:AE:41:9B:02,bridge=vmbr0,firewall=1
numa: 0
ostype: other
scsihw: virtio-scsi-pci
smbios1: uuid=ae031827-b589-40d0-bd6d-58cc661044a9
sockets: 1
startup: order=1
vga: vmware
vmgenid: 52d72f71-63d9-4be9-a469-275cef703c26
There must be some HTML magic going on…
vm.conf
#bootdisk%3A ide2
#ide2%3A local%3Aiso/OpenCoreWorking.iso,cache=unsafe,size=150M
#ide0%3A none,media=cdrom
#efidisk0%3A local-lvm%3Avm-101-disk-0,size=4M
agent: 1
args: -device isa-applesmc,osk=”…”
balloon: 0
bios: ovmf
boot: order=ide2
cores: 16
cpu: Penryn
hostpci0: 0000:04:00,pcie=1
hostpci1: 0000:05:00,pcie=1
hostpci2: 0000:10:00,pcie=1,x-vga=1
hostpci3: 0000:09:00,pcie=1
ide2: local:iso/OpenCore-v16-serial-debug.iso,cache=unsafe,size=150M
machine: pc-q35-4.1
memory: 32767
name: Alfheim
net0: vmxnet3=FE:3F:AE:41:9B:02,bridge=vmbr0,firewall=1
numa: 0
ostype: other
scsihw: virtio-scsi-pci
smbios1: uuid=ae031827-b589-40d0-bd6d-58cc661044a9
sockets: 1
startup: order=1
vga: vmware
vmgenid: 52d72f71-63d9-4be9-a469-275cef703c26
And debug message (should end with kdp_core zlib memory 0x7000 )
Longterm timer threshold: 1000 ms
mem actual: Ox7fff00000
legacy sane_size: 0x800000000
Darwin Kernel Version 19.6.0: Tue Feb 15 21:39:11 PST 2022; root:xnu-6153.141.591/RELERSE_X86_64
pmap_startup() delaying init/free of page nums > 0x200000
pmap_startup() init/release time: 29819 microsec
pmap_startup() delayed init/release of 6729132 pages
vm_page_bootstrap: 1501557 free pages, 6854027 wired pages, (up to 6729132 of which are delayed free) ext submap [Ox – Oxl, kernel text [Ox – Oxl
zone leak detection enabled
zalloc: allocating memory for zone names buffer
“vm_compressor_mode” is 4
oslog_init completed, 16 chunks, 8 lo pages
standard timeslicing quantum is 10000 us
standard background quantum is 2500 us
WQ[wql_init]: init linktable with max:262144 elements (8388608 bytes)
WQ[wql_init]: init prepost table with max:262144 elements (8388608 bytes)
mig_table_max_displ = 53
timeouts adjusted for virtualization (<<6)
kdp_core zlib memory 0x7000
Debug ends with
kdp_core zlib memory 0x7000
Can you help me debug my gpu passthrough?
Got it to work for Ubuntu, but macOS is not cooperating.
Details below 👇
Specs: Intel i7 12700k (UHD 770 Graphics), 64GB DDR4, ASRock Z690 Extreme WiFi 6E (has VT-d and apparently VT-x support as well)
The VM works fine in the browser, but when I add PCI Device AlderLake-S GT1 with 0000:00:02 the Mac gives no signal through the graphic card.
Here’s my vm config (id = 200)
/etc/pve/qemu-server/200.conf
—————————————————————————————————-
agent: 0
args: -device isa-applesmc,osk=”…” -smbios type=2 -device usb-kbd,bus=ehci.0,port=2 -global nec-usb-xhci.msi=off -global ICH9-LPC.acpi-pci-hotplug-with-bridge-support=off -cpu host,kvm=on,vendor=GenuineIntel,+kvm_pv_unhalt,+kvm_pv_eoi,+hypervisor,+invtsc
balloon: 0
bios: ovmf
boot: order=ide2;virtio0;net0;ide0
bootdisk: virtio0
cores: 8
cpu: Penryn
efidisk0: local-lvm:vm-200-disk-0,efitype=4m,size=4M
hostpci0: 0000:00:02,x-vga=1
ide0: local-lvm:vm-200-disk-1,cache=unsafe,size=3G
ide2: local-lvm:vm-200-disk-2,cache=unsafe,size=152M
machine: q35
memory: 40960
meta: creation-qemu=6.2.0,ctime=1651903105
name: macos-monterey
net0: virtio=16:0A:D9:A0:0D:CD,bridge=vmbr0,firewall=1
numa: 1
onboot: 1
ostype: other
scsihw: virtio-scsi-pci
smbios1: uuid=3f52506f-c52b-4e1a-9e33-5075f6073096
sockets: 1
usb0: host=045e:082c,usb3=1
usb1: host=045e:082e,usb3=1
virtio0: local-lvm:vm-200-disk-3,cache=unsafe,discard=on,size=256G
vmgenid: 31329fe5-7619-4bce-91d9-e9369382412a
vga: vmware
—————————————————————————————————-
I disabled the intel drivers for proxmox instead of Radeon and NVidia
/etc/modprobe.d/blacklist.conf
—————————————————————————————————-
blacklist snd_hda_intel
blacklist snd_hda_codec_hdmi
blacklist i915
—————————————————————————————————-
I’m using this line in grub
/etc/default/grub
—————————————————————————————————-
GRUB_CMDLINE_LINUX_DEFAULT=”quiet intel_iommu=on vfio-pci.ids=8086:4680″
—————————————————————————————————-
Hello Nick, I installed Macos Monterey as Proxmox 7.2 Vm that I have installed on HP Z820 without any problems, but I have 2 problems?
1. I could not introduce the HP Z820 Onboard sound card MACOS Monterey ?
2. Also, I’m running Proxmox 7.2 on the HP Z820, but I’ve assigned the video card specifically to MAC OS and Windows 11, it starts up smoothly, but to open the computers, I enter the proxmox interface and open the computer by saying Run. How do I get the operating systems to boot automatically when I press the HP Z820 Power button. Thanks.
You can use PCIe passthrough, but only if macOS supports the card. You may have to add a custom AppleALC config or add extra kexts.
On the Options tab of your VM you can turn on the Start on Boot option.
I can’t tell for sure by your description, but it sounds like you are trying to pass through the same video card to 2 different VMs?
If so, while Proxmox does let you assign the same PCIe device to 2 different VMs, you won’t be able to run both VMs at the same time – you’d either need 2 different cards, or you’d need to stop 1 VM before starting the other.
Hello, now I wanted to install a different monitor. However, it does not open in the Monitor, which part should I check? HP Z24n monitor.Windows and Macos Monterey won’t boot with HP Z24N, what could be the reason? What do I need to check?
thankyou.
It turned on when I brought default from the display section in the Virtual Machine settings. Thanks.
Hi nick, very thankful for your post, i’ve created the monterey installer from your script getting the monterey-full.img image, but when i start installing monterey i always get the error “Installation cannot proceed because the installer is damage”.
Could you please give some advice on what is happening?
Tahnks:)
Hi Nick,
What reason do you have for using Penryn as the CPU type, and why not use something more recent like Comet Lake or Ice Lake?
How did you decide on which ACPI files/Drivers/Kexts to use?
Clover and OpenCore both have dedicated support for QEMU’s Penryn emulation.
The ACPI files are inherited from Leoyzen’s OpenCore config, I didn’t adjust them further in my fork:
https://github.com/Leoyzen/KVM-Opencore
The kexts are to support QEMU’s hardware, plus common PCIe-passthrough hardware choices (GPUs with Whatevergreen, Broadcom Bluetooth adapters, and AppleALC for motherboard audio). These are included in all builds since they don’t have any deleterious effect if you don’t actually have this passthrough hardware.
Hello,
Great write-up Nick, as always. I have a different, and arguably better setup than when I last posted under Big Sur article.
This time, I am using a Ryzen 5, 6-core, dual-thread CPU on an ASUS board with an X370 chipset.
I have a real Mac WiFi/BT card compatible with Monterey. However, I can only passthrough the Bluetooth USB portion. If I try to passthrough the PCIe part, the host machine loses access to the Hard drive controller & Ethernet controller. 3 days (and much less hair) later, I realized: Apple WiFi, Ethernet, and SATA controller are all in IOMMU group 13. I don’t understand the correlation or what is meant by IOMMU group, but I think this is as close to a “smoking gun” as I’m going to get.
Could someone tell me what is an IOMMU group in the context of why it might cause my issue, and/or how to remedy it?
Thanks much!
—Aaron
Ok, so I dug into this a bit more. The IOMMU group issue is indeed the problem. I tried moving the WiFi/BT to PCIe caddy adapter to 3 other PCIe slots, including the 3rd 16x video slot. Each time, the device still appears in group 13.
I’ll either need to grab and install a USB3 to Gigabit Ethernet + NVME drive, or put my Video card, Apple WiFi+BT caddy card, back to the original system, and switch the PSUs back around.
So much to learn!!
Every device within a single IOMMU group needs to be passed at once, which is why you’re losing those other devices. Two devices being in the same group means that there is no mechanism available to prevent those two devices from chatting directly to each other, even if one of them is passed to a VM and one is passed to the host, breaking host-VM or VM-VM isolation.
You can add “pcie_acs_override=downstream,multifunction” to your Proxmox kernel’s commandline to have it pretend that those devices belong to different groups, which will allow them to be passed through independently of each other (at the cost of breaking the security isolation between the guest and the host).
For help editing the commandline, see: https://pve.proxmox.com/wiki/Host_Bootloader
Nick,
Never let it be said that you don’t know what you’re doing! Adding the argument to GRUB worked a treat.
As my friend Robert would say (In his thick Scottish brogh): “Every day is a School day”.
Hi Nick,
I’m having trouble with the network not being seen by the installer
Here is my /etc/network /interfaces
auto lo
iface lo inet loopback
auto eno1
iface eno1 inet static
address 192.168.0.200/24
gateway 192.168.0.1
post-up echo 1 > /proc/sys/net/ipv4/ip_forward
post-up echo 1 > /proc/sys/net/ipv4/conf/eno1/proxy_arp
auto vmbr0
iface vmbr0 inet static
address 10.10.10.10/27
bridge-ports none
bridge-stp off
bridge-fd 0
post-up echo 1 > /proc/sys/net/ipv4/ip_forward
post-up iptables -t nat -A POSTROUTING -s ‘10.10.10.0/27’ -o eno1 -j MASQUERADE
post-down iptables -t nat -D POSTROUTING -s ‘10.10.10.0/27’ -o eno1 -j MASQUERADE
post-up iptables -t raw -I PREROUTING -i fwbr+ -j CT –zone 1
post-down iptables -t raw -D PREROUTING -i fwbr+ -j CT –zone 1
iface eno2 inet manual
I can ping vmbr0 with no issues, but the installer can’t see the connection
I also tried setting up OVMF uefi network settings, both manually (to comply to vmbr0 values) and to DHCP
Here is my vm conf file (/etc/pve/qemu-server/100.conf)
agent: 1
args: -device isa-applesmc,osk=”…”
bios: ovmf
boot: order=ide2;ide0;net0
cores: 8
cpu: Penryn
efidisk0: macOS:vm-100-disk-0,efitype=4m,size=1M
ide0: local:iso/Monterey-recovery.img,cache=unsafe,size=3145244K
ide2: local:iso/OpenCore-v16.iso,cache=unsafe,size=150M
machine: q35
memory: 8192
meta: creation-qemu=6.2.0,ctime=1652664611
name: macOS
net0: virtio=16:77:25:A1:22:00,bridge=vmbr0,firewall=1
numa: 1
ostype: other
scsihw: virtio-scsi-pci
smbios1: uuid=50237ea7-37c4-448b-a067-b09b4b7b0e73
sockets: 1
vga: vmware
virtio1: macOS:vm-100-disk-1,cache=unsafe,discard=on,size=100G
vmgenid: a3eeba36-8400-4480-8ac8-154d114fceb5
vmstatestorage: macOS
I currently have no firewall rules. Should I, and if so, what should they be?
Thanks
M.
The macOS Installer requires a DHCP server to be available on its network to get an IP address from.
OVMF settings have no impact because those are for network boot.
I’d leave the firewall turned off for now. You could leave it on but just set the default outbound rule to Allow. You don’t need any inbound permissions.
If I try to create a vlan or additional bridge (eg vmbr0.5) with dhcp enabled, restarting network services, I receive the error:
vlan20: dhclient: timeout failed to detect new ip addresses
if I assign vmbr0 as DHCP, then I receive an address, but lose connection with the proxmox server.
Any solutions appreciated
M.
Enabling DHCP on the bridge is not what you want. That means the bridge wants to get its own IP from a DHCP server, it doesn’t help macOS out with contacting a DHCP server, which it seems you don’t have available on that network currently.
You need to run a DHCP server on your network for macOS to connect to. This is not part of the Proxmox network config.
I encountered the same issue. I’m setting up on a dedicated server. You can either do some container with a dhcp server, or like me, just use the libvirt built in DHCP server
apt install libvirt-daemon libvirt-daemon-system
virsh net-start default
virsh net-autostart default
Then in your .conf change on the “net0” line to from vmbr0 to: bridge=virbr0
This will have a persistent virbr0 on your system that shows up in “ip a” but not in the proxmox network list.
Hi Will,
Thanks.
I tried this. om your recommendation. Alas, I couldn’t get it to work. (the VM refused to start.)
I updated to 12.4 now using Software Update and it worked seamlessly, if anybody was wondering. (Take a snapshot first anyway!)
Hi Nick! Thanks to you I was able to upgrade from Big Sur to Monterey a few months ago after trying to do it on my own for several weeks. I am on 12.1 booting just fine with your EFI and VM config but I can’t upgrade to 12.4 (or 12.3 for that matter).
It downloads and reboots but then it gets to (verbose on):
IOPlatformHaltRestartAction -> AppleSMC
IOPlatformPanicAction -> AppleSMC
Then it reboots and will just keep rebooting at that same part. I have the latest Proxmox 7.2-4 on a Ryzen 5950x based system. I have no idea why 12.1 is working perfectly but this upgrade is not. I’ve tried dozens of OC settings and various things but always that same error. I turned on OC debugging and am trying to make sense of the log at the moment.
Anyway, thanks again for your great work in this area!
Those lines you saw in the log are just noting where macOS is planning to send its log messages, they’re not useful diagnostics in themselves.
Try building a full installer image (from within macOS) and use that to upgrade instead.
Good call, I was able to update using a USB installer key I made. Hopefully it was a one time thing and I can update from the OS again next time. My next challenge is being able to turn on “Resizable BAR” in my x570 motherboard’s UEFI. I have the 5950x CPU and a 6900XT GPU which is supported with this setting. However, every time I enable it, my macOS VM won’t start. I tried setting ResizeAppleGpuBars to 0 as suggested but the VM still locked up during boot up.
I suspect the setting would work if I was running macOS bare metal so not sure it will be possible on Proxmox. In any case, at least I’m on 12.4 now thanks to your help!
You might be able to get resizable BAR to work if you manually expand the BAR region in the guest to match the host:
https://www.reddit.com/r/VFIO/comments/qx4rg7/can_anyone_else_confirm_that_vfio_doesnt_work_w/hlcko46
Yeah – whilst the Update from 12.2 to 12.3 to 12.3.1 only for me only was possible through reinstall with recovery – it ran flawlessly with just hitting update this time!
Just great!
Thanks again!
hi nick i can’t update
echo “options kvm ignore_msrs=Y” >> /etc/modprobe.d/kvm.conf && update-initramfs -k all -u
Running hook script ‘zz-proxmox-boot’..
Re-executing ‘/etc/kernel/postinst.d/zz-proxmox-boot’ in new private mount namespace..
No /etc/kernel/proxmox-boot-uuids found, skipping ESP sync.
That’s not an error, that’s fine.
Hi i did everything like the Tutorial , but after pressing start in Proxmox
It says:
kvm: Penryn,kvm=on,vendor=GenuineIntel,+kvm_pv_unhalt,+kvm_pv_eoi,+hypervisor,+invtsc,+pcid,+ssse3,+sse4.2,+popcnt,+avx,+avx2,+aes,+fma,+fma4,+bmi1,+bmi2,+xsave,+xsaveopt,+rdrand,check: Could not open ‘Penryn,kvm=on,vendor=GenuineIntel,+kvm_pv_unhalt,+kvm_pv_eoi,+hypervisor,+invtsc,+pcid,+ssse3,+sse4.2,+popcnt,+avx,+avx2,+aes,+fma,+fma4,+bmi1,+bmi2,+xsave,+xsaveopt,+rdrand,check’: No such file or directory
And I don’t know what this means.
I would be very grateful for Help.
Your args line must have a syntax error, post that complete line from your config including the args: prefix
First of all, thank you very much for your instructions. I have already been able to set up a few systems with it.
I still have one question, why do you use the “unsafe” cache mode? Is that macOS specific or do you use it to get the highest performance?
For the “CD images” this is required to be set to unsafe if the storage they’re put on is read-only, as it allows writes to them to be ignored.
For the main VM disk this can be set to whatever you like, I just prefer it set to unsafe for performance.
Hi Nick
First of all, thank you for putting this doc together!
Issue I have is at the Disk Utility step to select my drive to install MacOS.
I only see the macOS Base System drive and don’t see any virtIO drive.
Did I miss any step?
See my config below.
args: -device isa-applesmc,osk=”” -smbios type=2 -device usb-kbd,bus=ehci.0,port=2 -global nec-usb-xhci.msi=off -global ICH9-LPC.acpi-pci-hotplug-with-bridge-support=off -cpu Penryn,kvm=on,vendor=GenuineIntel,+kvm_pv_unhalt,+kvm+pv_eoi,+hypervisor,+invtsc,+pcid,+ssse3,+sse4.2,+popcnt,+avx,+avx2,+aes,+fma,+fma4,+bmi1,+bmi2,+xsave,+xsaveopt,+rdrand,check
agent: 1
balloon: 0
bios: ovmf
boot: order=ide2
cores: 4
cpu: Penryn
efidisk0: DIR01:101/vm-101-disk-0.raw,efitype=4m,size=1M
ide0: ISO:iso/Monterey-recovery.img,cache=unsafe,size=3143856K
ide2: ISO:iso/OpenCore-v16.iso,cache=unsafe,size=150M
machine: q35
memory: 4096
meta: creation-qemu=6.2.0,ctime=1654550861
name: MacOS-Monterey
net0: virtio=E6:DE:5F:F7:BE:22,bridge=vmbr0,firewall=1
numa: 1
ostype: other
scsihw: virtio-scsi-pci
smbios1: uuid=d66cbe15-32fb-47bf-85f2-4627573c87d9
sockets: 1
vga: vmware
virtio0: DIR01:101/vm-101-disk-1.raw,cache=unsafe,discard=on,size=100G
vmgenid: 21077737-66f9-401a-b36a-d56ba1b2d9ae
Your OSK was super messed up and had a duplicate of the start of the line inside it, but maybe that was a copy/paste error?
Hi Nick,
I followed your guide and got Monterey to run smoothly. Also got GPU passthrough with the AMD RX580 to work perfectly. I really appreciate all your work!
I’m still having issues with getting bluetooth to work. I bought the BCM94360NG wifi/bluetooth card. The wifi works well via pcie passthrough. The bluetooth is connected via USB, and I had passed the USB device through. However, bluetooth doesn’t work. Bluetooth is able to recognise devices and pair with devices, but it is constantly dropping every 20s.
I have tried keeping the following kexts BlueToolFixup.kext, BrcmFirmwareData.kext, BrcmPatchRAM3.kext and AirportBrcmFixup.kext as per the github guide (https://github.com/acidanthera/BrcmPatchRAM). Also updated the kexts to config.plist via OC snapshot feature with ProperTree.
I have read on forums it maybe a USB mapping issue? Do you know how I can fix this problem?
For the USB mapping issue, maybe macOS requires that port to be marked as “internal”?
Sorry, I’m using an external Bluetooth dongle and didn’t encounter any issues after adding Bluetool to fix Monterey.
Got the wifi/bluetooth working! AirDrop, continuity and handoff all working. Marked the USB port for bluetooth as internal. The network card is supported natively on Monterey, so you don’t need any BRCMPATCHRAM kexts. Also made sure I passed through the entire USB port not just the USB device into the vm.
Also, updated to your v17 KVM-Opencore release. Everything works, no issues.
Hey Sam. I have the same card and I am having this exact issue. I have already tried to remove all the broadcom kexts, update the config on propertree(clean snapshot), then I have passed through the USB port. I dont understand what you mean by marking the USB port as internal. can you explain what you did ther?
Did you remove all the Bluetooth related Kexts like BlueToolFixup, BcrmBluetoothInjector etc? I also passed through the entire USB port and turned on USB 3.0
I tried USB remapping. So I mapped all the USB Ports on Windows and built a custom USB Map Kext. The Bluetooth controller, I had marked as Internal. In recent forums, I’ve read that it isn’t a working solution anymore.
Let me know how you go.
Hey!
I’ve successfully installed MacOS, but when I try to enter the Recovery Partition to disable SIP I get the prohibited sign ( Circle with slash ).
What should I try?
That’s weird. You could turn on OpenCore’s new SIP toggle feature instead, find this section in config.plist on your EFI partition and change the <false/> to <true/> after the Enabled:
<dict><key>Arguments</key>
<string></string>
<key>Comment</key>
<string></string>
<key>Enabled</key>
<false/>
<key>Path</key>
<string>ToggleSipEntry.efi</string>
</dict>
This should add a new dedicated menu entry just for flipping SIP
(this assuming that you’re using my newest OpenCore v17 release)
Hi! Thanks for all your hard work. I have successfully, and easily, installed Monterey following your guide. I have built two Hackintoshes on OpenCore recently (i7 3770K on Catalina, and i7-10700K on Monetery), as well as tinkering with Hackintoshes for the last decade. I recently started playing around with ProxMox, to see if I could reduce the number of machines that have to be on at the same time!
I would like a Mavericks (OS X 10.9) VM to run some old 32-bit OS X software that won’t run on the latest. Do you have any hints on what I might need to change to get the installer to boot? Currently it gets stuck right after choosing the Mavericks installer on the OpenCore menu.
I think the first version I ever installed as a VM was Sierra, I’m not sure about Mavericks.
You’d have to use the -cpu Penryn version of the argument because the kernel patches in my OpenCore config won’t apply.
Disks will have to be IDE or SATA, not virtio.
Network adapter will have to be e1000-82545em, not virtio-net (you have to write this into the config manually as the Proxmox GUI doesn’t offer it)
I think the display adapter might have to be set to Standard rather than vmware
Many thanks for the quick reply and hints, I’ll see how far I get, and see what the Dortania guide says about it.
Thank you for the detailed instructions.
Unfortunately, I always get the following error:
An Internet connection is required to install macOS.
How can I set a static IP, gateway, subnet and DNS?
You can try this, but I haven’t tested those instructions:
https://www.maninara.com/2015/08/setting-static-ip-address-in-os-x.html?m=1
Another way to fix this is to install a DHCP server on Proxmox and have it give the VM an IP address.
Promox 7.2-4
Started to get
Error Message pop-up: “An error occurred while preparing the installation. Try running this application again.”
After about 15 to 20 mins in. Installer logs are saying.
bootbase.efi or baseboot.efi does not exist and trying to look it up.
Same as Reddit user you replied to:
https://www.reddit.com/r/homelab/comments/qg37an/guide_to_installing_macos_12_monterey_as_a_vm_on/ictl350/
Any fixes on that. This happens on OSX-KVM and your guide. Tried everything so far.
Your input would be helpful.
Promox version: 7.2-3
I got the same error msg, Did you find any solution ?
Install the BigSur using Nick’s method.
Create a full-monterey.img via the command line on the BigSur and then use the same VM and replace your BigSur recovery image with full-monterey.img and make changes to VM config file and change cache=unsafe in the ide0 and reboot and install the Monterey as normal.
This method just worked for me 30 mins ago.
hey nick thank you so much for your awesome list and how-to guide. i am having the problem at 18 mins install, no reboots.
It fails with an error saying : unable to find “bootbase.efi” and then gives me the “there was an error with this installation and quits installer.
See my comment above:
—-
Install the BigSur using Nick’s method.
Create a full-monterey.img via the command line on the BigSur and then use the same VM and replace your BigSur recovery image with full-monterey.img and make changes to VM config file and change cache=unsafe in the ide0 and reboot and install the Monterey as normal.
This method just worked for me 30 mins ago.