
A new version of this tutorial is now available for the release of macOS 13 Ventura, you can see that here
This tutorial for installing macOS 12 Monterey has been adapted for Proxmox from Kholia’s OSX-KVM project and Leoyzen’s OpenCore configuration for KVM. You can get the full sourcecode of my OpenCore release on my GitHub here.
Requirements
I’ll assume you already have Proxmox 7 installed. You also need a real Mac available in order to fetch the OSK key.
Your Proxmox host computer’s CPU must support SSE 4.2, so for Intel your CPU must be at least as new as Nehalem, which was the first CPU generation to bear the “Core” i5/i7 branding. Older CPUs will cause Illegal Instruction crashes when apps/extensions attempt to use these missing instructions.
Modern AMD CPUs also support SSE 4.2 and will work with this guide.
First step: Create an installation ISO
Download my copy of the OSX-KVM repository using the download button, and unzip it:
https://github.com/thenickdude/OSX-KVM
First we need to install some build requirements. If you will be building the installer ISO on macOS, open up the Terminal and run this command to install the commandline tools:
xcode-select --installIf you’re building the ISO on Linux, you instead need to run this command (these are the package names for Ubuntu or similar distributions, they may need adjustment on other distributions):
sudo apt install qemu-utils make
Now in the Terminal, from the root of OSX-KVM, run:
cd scripts/monterey
make Monterey-recovery.img
This will download the Monterey installer from Apple’s software distribution servers and build a Monterey-recovery.img file for you. Upload this file to your Proxmox’s ISO store directory (typically /var/lib/vz/template/iso). Although we’re putting it in the ISO directory so that we can use it with Proxmox’s ISO picker later, this a raw disk image rather than a true ISO.
If you’re building the installer on macOS, you can build a full installer instead of just a recovery, which will mean that macOS won’t have to download Monterey files during installation, and so won’t require an Internet connection. Simply ask it to build Monterey-full.img instead:
cd scripts/monterey
make Monterey-full.img
This option is not available when building the installer on Linux.
Prepare an OpenCore image
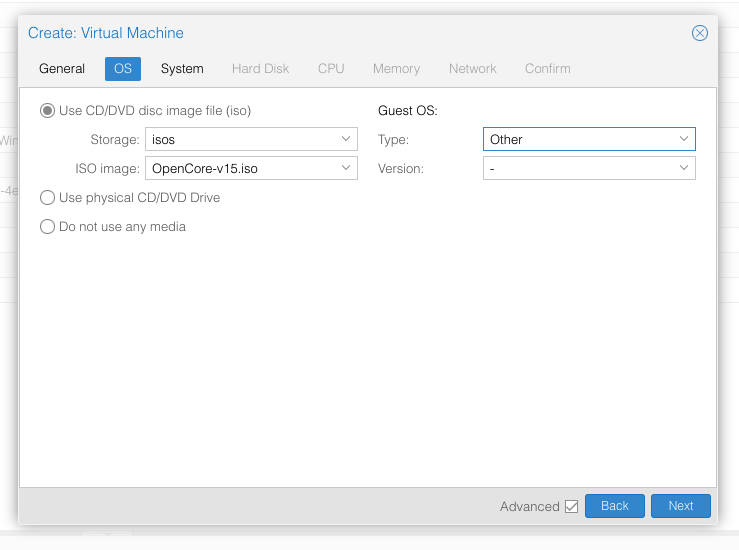
Download the OpenCore.iso.gz file from the newest release in my repository (you want v15 or newer), double click it to unpack it, and upload it to Proxmox’s ISO store at /var/lib/vz/template/iso. Although it has a .iso file extension, this is actually a hard disk image.
Fetch the OSK authentication key
macOS checks that it is running on real Mac hardware, and refuses to boot on third-party hardware. You can get around this by reading an authentication key out of your real Mac hardware (the OSK key). Save the first block of C code from this page as smc_read.c. In a command prompt, change into the same directory as that file and run:
xcode-select --install # If you don't already have gcc
gcc -o smc_read smc_read.c -framework IOKit
./smc_read
It’ll print out the 64 character OSK for you. Make a note of it.
Every Mac uses the same OSK, so don’t be surprised that it doesn’t look like a random string!
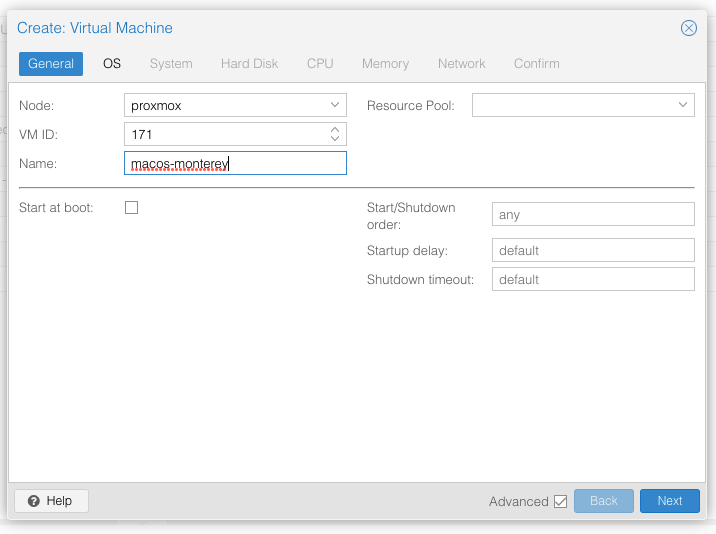
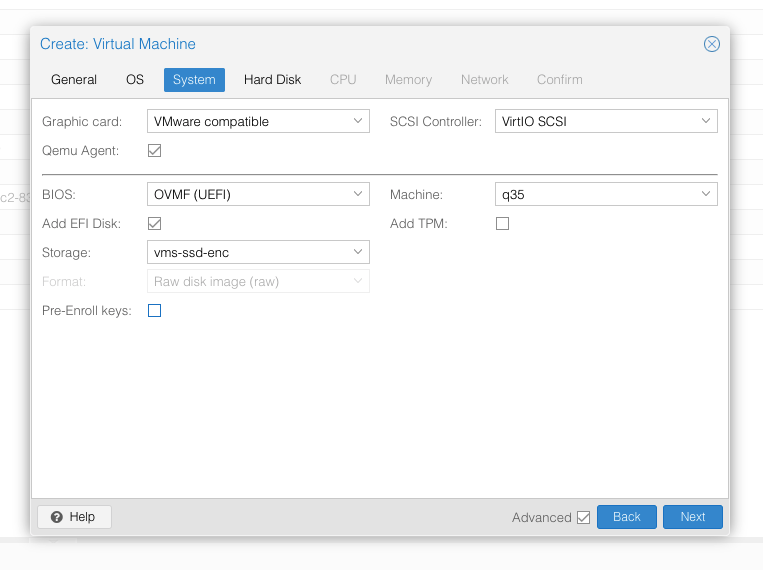
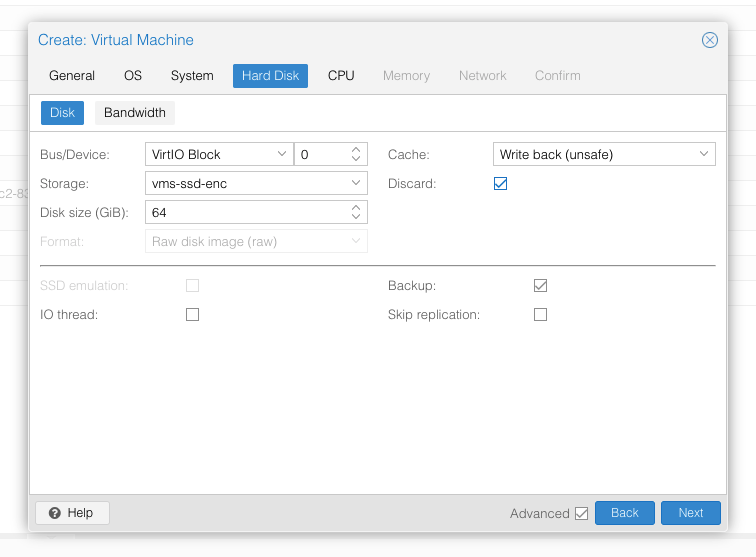
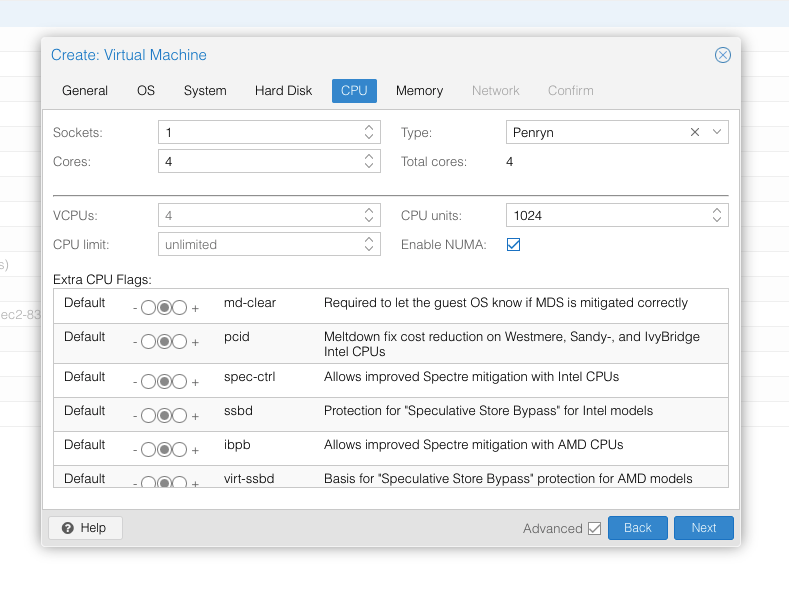
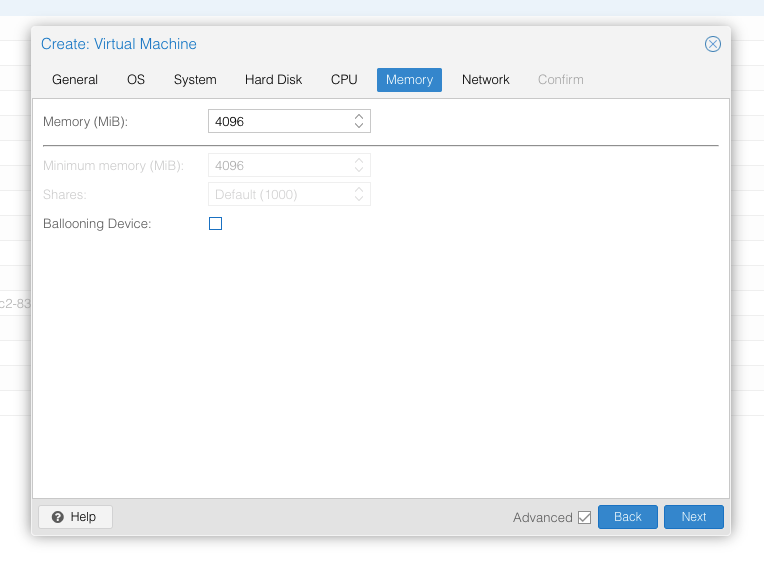
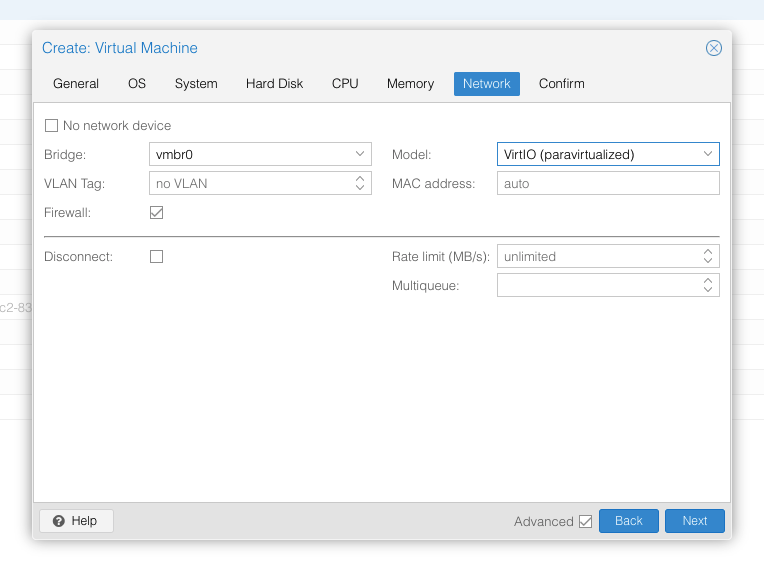
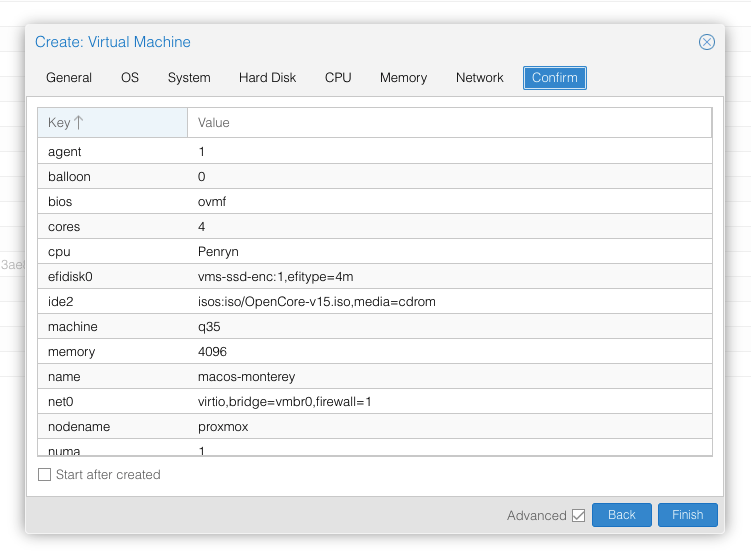
Create the VM
From the Proxmox web UI, create a new virtual machine as shown below.
In the Options page for the VM, ensure that “use tablet for pointer” is set to “Yes” (this is the default).
In the Hardware page for the VM, add a second DVD drive at IDE0, set it to use your Monterey-full.img or Monterey-recovery.img.
Don’t try to start the VM just yet. First, SSH into your Proxmox server so we can make some edits to the configuration files.
Edit /etc/pve/qemu-server/YOUR-VM-ID-HERE.conf (e.g. with nano or vim). Add this line, being sure to substitute the OSK you extracted earlier into the right place:
args: -device isa-applesmc,osk="THE-OSK-YOU-EXTRACTED-GOES-HERE" -smbios type=2 -device usb-kbd,bus=ehci.0,port=2 -global nec-usb-xhci.msi=off -global ICH9-LPC.acpi-pci-hotplug-with-bridge-support=off
A USB keyboard is added here because macOS doesn’t support QEMU’s default PS/2 keyboard.
MSI has been disabled for the USB controller to fix QEMU panics when USB 3 devices are passed through.
ACPI PCIe hotplug support needs to be disabled for VMs with passthrough devices since QEMU Q35 machine model 6.1, which is what that final argument does. (You could instead choose Q35 6.0 for your Machine type on the Hardware tab). If you haven’t updated your QEMU to version 6.1 yet then remove this argument from the args. (Proxmox 7 ships with 6.0 and updated to 6.1 later on)
Ensure the args are all on a single line!
We also need to add a -cpu argument. If your host CPU is Intel, add this to the end of the “args” line:
-cpu host,kvm=on,vendor=GenuineIntel,+kvm_pv_unhalt,+kvm_pv_eoi,+hypervisor,+invtsc
This will pass through all of the features that your CPU supports. OpenCore’s config will pretend to macOS that the CPU’s model name is Penryn for compatibility.
If your host CPU is AMD, or the above argument doesn’t work for you, use this more-compatible alternative:
-cpu Penryn,kvm=on,vendor=GenuineIntel,+kvm_pv_unhalt,+kvm_pv_eoi,+hypervisor,+invtsc,+pcid,+ssse3,+sse4.2,+popcnt,+avx,+avx2,+aes,+fma,+fma4,+bmi1,+bmi2,+xsave,+xsaveopt,+rdrand,check
This pretends that your CPU is Penryn, which will keep macOS happy even if your host CPU is AMD, and adds a bunch of newer required and optional CPU features on top. Features that your host CPU doesn’t support will be ignored (a warning will be printed to the console during launch with qm start 1xx), but note that macOS won’t work without SSE4.2 support.
You can remove the “+invtsc” feature from the list if your CPU doesn’t support it, or if you want to be able to migrate a running VM between Proxmox nodes.
Now find the lines that define the two “ISOs” (ide0 and ide2), and remove the “,media=cdrom” part from them. Add “,cache=unsafe” in its place. This will treat these as hard disks rather than DVD drives.
Save your changes, return to the Options tab, and change the boot order to put IDE2 (the OpenCore image) first. Your final VM configuration file should resemble this:
args: -device isa-applesmc,osk="..." -smbios type=2 -device usb-kbd,bus=ehci.0,port=2 -cpu host,kvm=on,vendor=GenuineIntel,+kvm_pv_unhalt,+kvm_pv_eoi,+hypervisor,+invtsc -global nec-usb-xhci.msi=off -global ICH9-LPC.acpi-pci-hotplug-with-bridge-support=off
agent: 1
balloon: 0
bios: ovmf
boot: order=ide2
cores: 4
cpu: Penryn
efidisk0: vms-ssd-enc:vm-171-disk-1,efitype=4m,size=1M
ide0: isos:iso/Monterey-full.img,cache=unsafe,size=14G
ide2: isos:iso/OpenCore-v15.img,cache=unsafe,size=150M
machine: q35
memory: 4096
name: macos-monterey
net0: virtio=...,bridge=vmbr0,firewall=1
numa: 1
ostype: other
virtio0: vms:vm-171-disk-0,cache=unsafe,discard=on,size=64G
scsihw: virtio-scsi-pci
smbios1: uuid=...
sockets: 1
vga: vmware
Configure Proxmox
On Proxmox, run “echo 1 > /sys/module/kvm/parameters/ignore_msrs” to avoid a bootloop during macOS boot. To make this change persist across Proxmox reboots, run:
echo "options kvm ignore_msrs=Y" >> /etc/modprobe.d/kvm.conf && update-initramfs -k all -u
Install Monterey
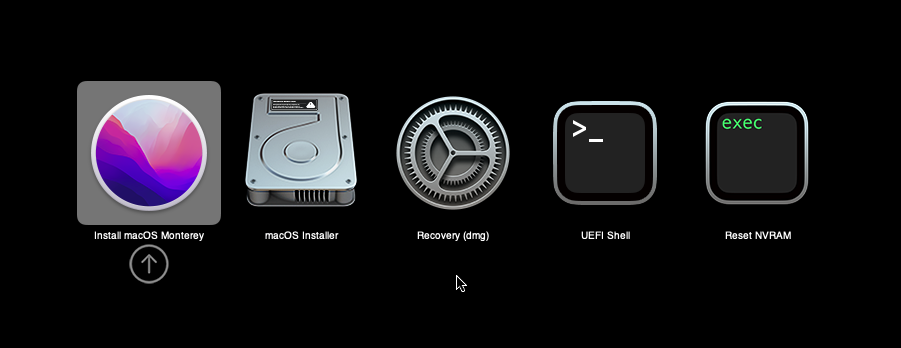
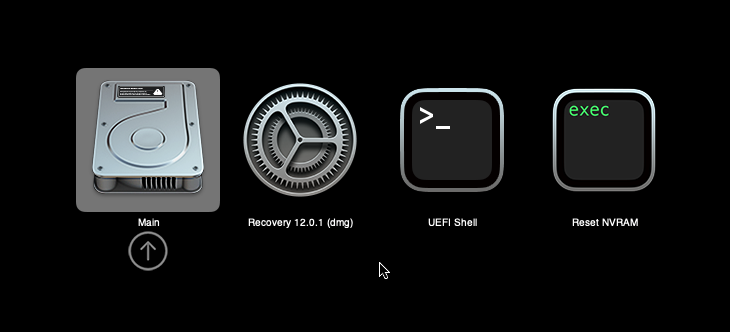
Now start up your VM, it should boot to the OpenCore boot picker:
Press enter to boot the “Install macOS Monterey” entry and the installer should appear. (If your keyboard isn’t working, leave the Proxmox Console page and re-enter it)
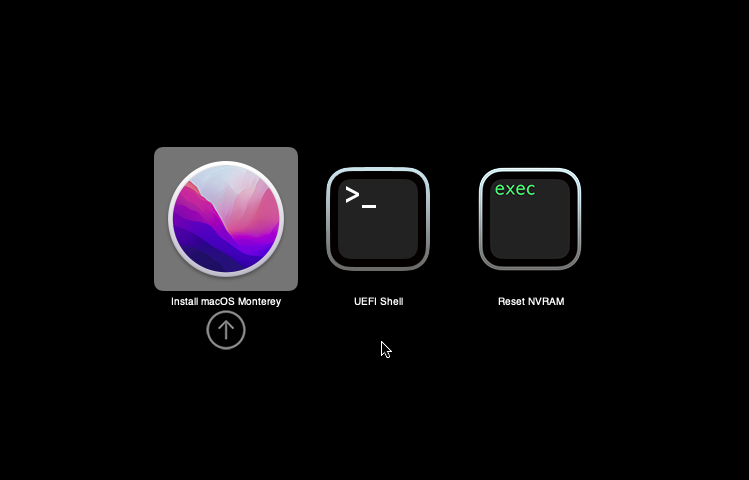
If you built a recovery installer, the icon will instead be an image of a hard disk and be labelled “MacOS Base System”.
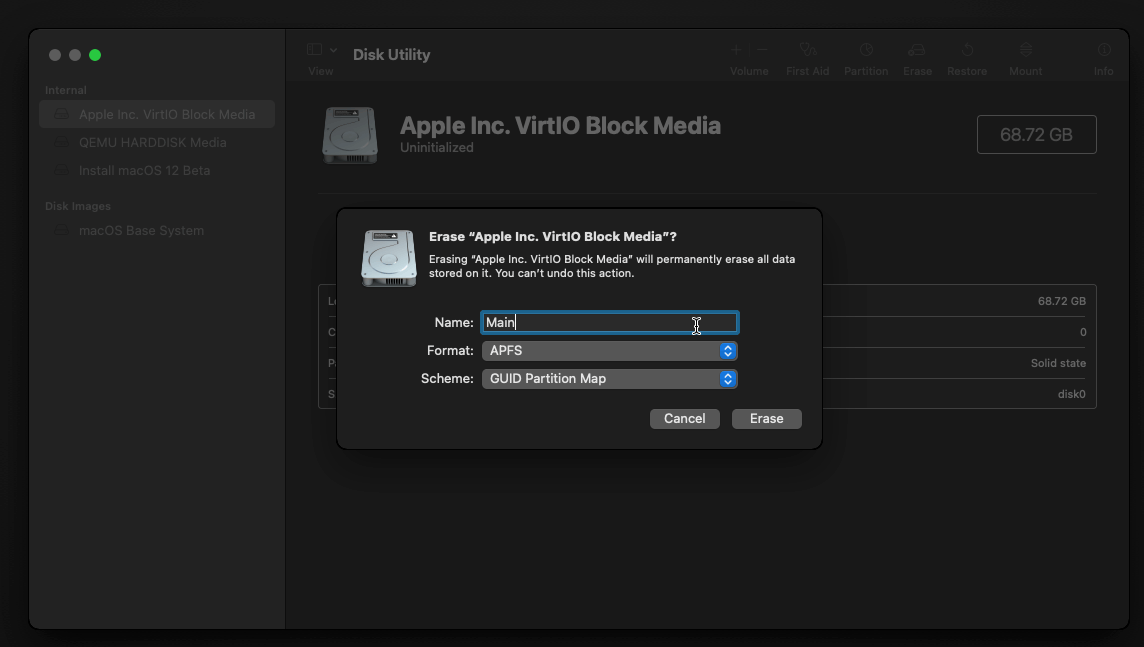
Our virtual hard drive needs to be erased/formatted before we can install to it, so select the Disk Utility option. Follow the steps below to format the disk:
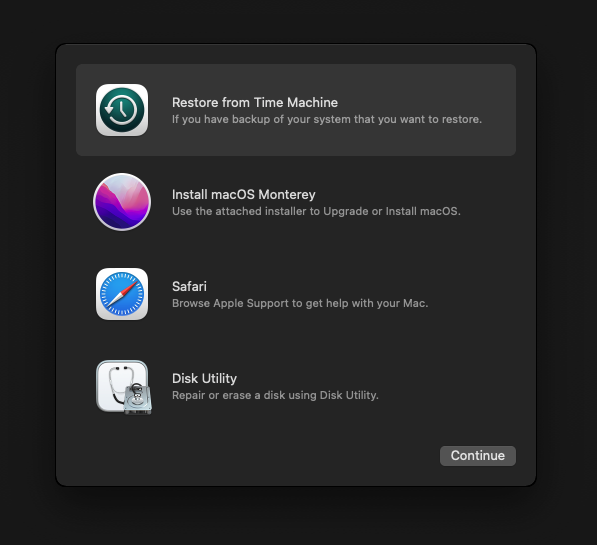
Now you can quit Disk Utility from the top menu (Disk Utility > Quit Disk Utility), and we’re ready to begin installation!
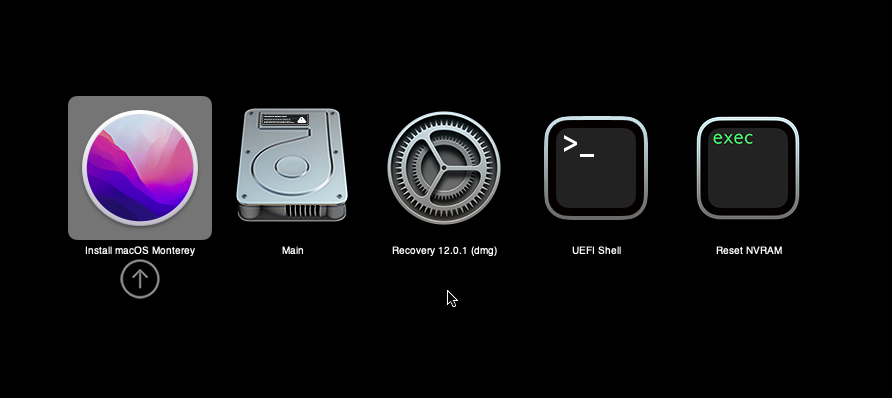
After the first stage of installation, the VM will reboot 2 or 3 times in quick succession, and each time you must manually pick the “macOS Installer” entry (the second one here, with the hard disk icon) to continue installation. It will not be selected for you automatically:
If your keyboard isn’t responding on this screen, exit the Console tab in Proxmox and re-enter it. If you get a “prohibited” sign like this appearing, hit the Reset button on the VM to try again:

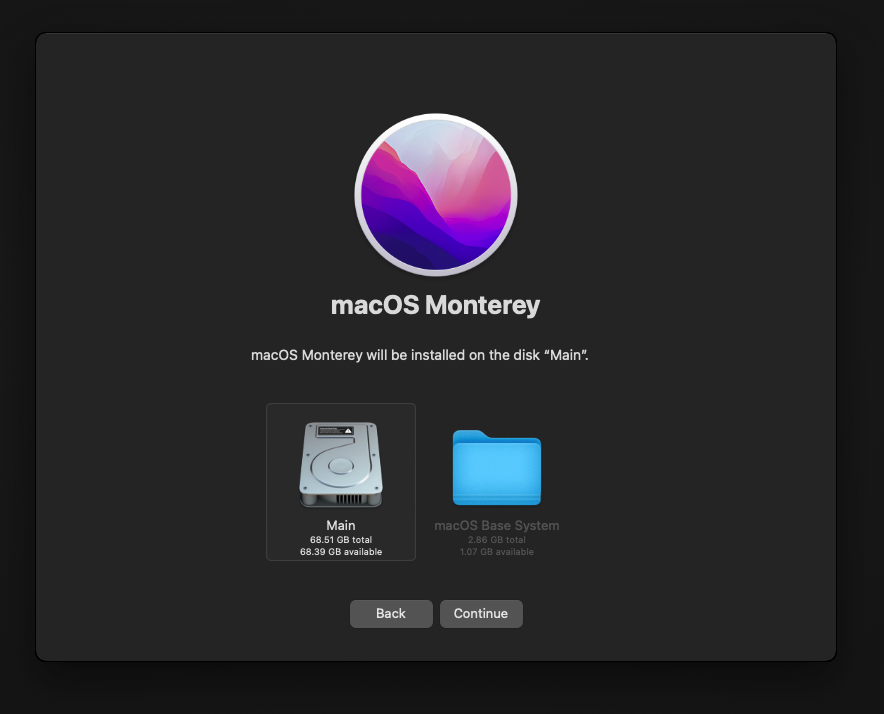
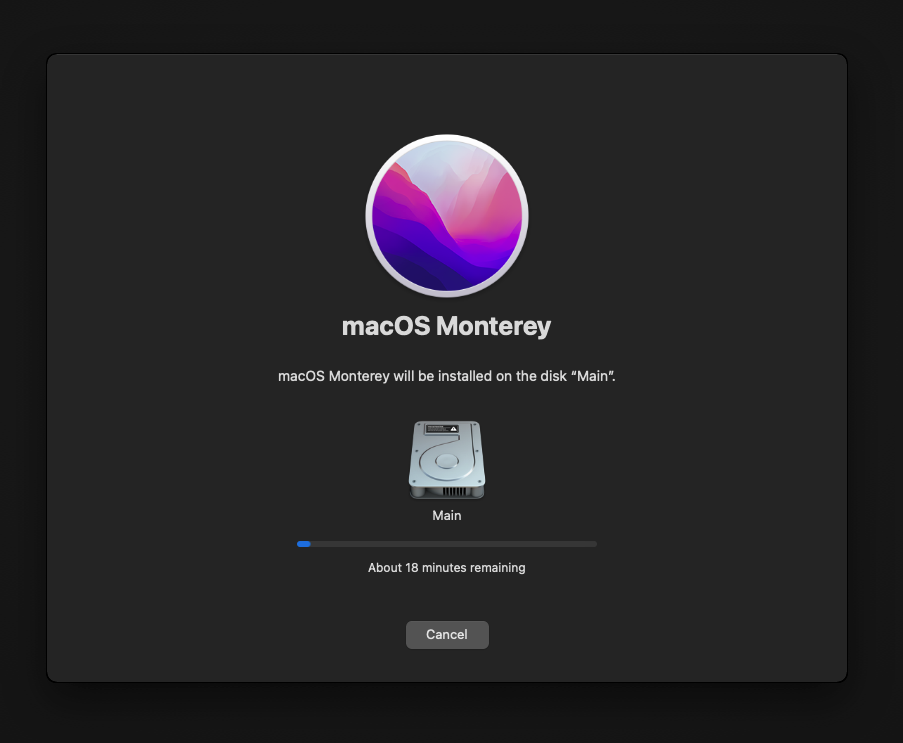
Now the installation is nearly complete and the macOS Installer entry disappears, so pick the name of your main disk to boot (mine’s called Main).
There’s just one more reboot to come. Afterwards pick the “Main” entry again and this time you’ll finally boot into Monterey!
Answer the initial install questions, and you’ll be logged on! Note that you will want to hold off on logging into your Apple ID until you’ve configured your Mac’s serial number in OpenCore (because otherwise a Mac with the default shared serial number in my OpenCore image will be added to your Apple ID).
Note that it will be really sluggish for a few minutes after the first boot while the system performs housekeeping tasks.
Make the OpenCore install permanent
We’re currently booting using OpenCore from the attached OpenCore ISO. Let’s install that to the hard drive instead. Pop open Terminal and run “diskutil list” to see what drives we have available.

Use “sudo dd if=<source> of=<dest>” to copy the “EFI” partition from the OpenCore CD and overwrite the EFI partition on the hard disk. The OpenCore CD is the small disk (~150MB) that only has an EFI partition on it, and the main hard disk is the one with the large (>30GB) Apple_APFS “Container” partition on it.
In my case these EFI partitions ended up being called disk1s1 and disk0s1 respectively, so I ran “sudo dd if=/dev/disk1s1 of=/dev/disk0s1” (note that if you get these names wrong, you will overwrite the wrong disk and you’ll have to start the installation over again!).
Now shut down the VM, and remove both the OpenCore and the Monterey installer drives from the Hardware tab. On the Options tab, edit the boot order to place your virtio0 disk as the first disk. Boot up. If everything went well, you should see the OpenCore boot menu, and you can select your “Main” disk to boot Monterey:
Sleep management
I found that I was unable to wake Monterey from sleep using my mouse or keyboard. If you encounter the same problem, you can either disable system sleep in Monterey’s Energy Saver settings to avoid the issue, or you can manually wake the VM up from sleep from Proxmox by running:
qm monitor YOUR-VM-ID-HERE
system_wakeup
quit
Editing your OpenCore/EFI settings
The Configuration.pdf that explains the OpenCore config.plist file can be found along with the OpenCore release on my GitHub.
To mount your EFI partition in macOS so you can edit your config.plist, first check the “identifier” of your EFI partition in the terminal:
~$ diskutil list
/dev/disk0 (external, physical):
   #:                   TYPE NAME              SIZE       IDENTIFIER
   0:  GUID_partition_scheme                  *512.1 GB   disk0
   1:                    EFI EFI               209.7 MB   disk0s1
   2:             Apple_APFS Container disk1   511.9 GB   disk0s2
Then you can mount it like so:
sudo mkdir /Volumes/EFI
sudo mount -t msdos /dev/disk0s1 /Volumes/EFI
Now you can edit /Volumes/EFI/OC/config.plist with your favourite text editor to make your changes. (TextEdit is not a great choice because it likes to insert curly quotes into the file and otherwise break things, there are some dedicated plist editors available such as XCode).
If you’re unable to boot macOS, you can edit the config.plist using the “UEFI Shell” option in the OpenCore boot menu instead.
Enter “FS0:” and press enter to open up the first available filesystem, then run “edit EFI\OC\config.plist” (if the file isn’t found, try switching to another filesystem like fs1:). When you’re done editing, press control+Q to exit, “Y” to save, then run “exit” to return to the OpenCore menu. You need to reboot for your changes to take effect.
If you prefer, you can edit config.plist from the comfort of your Proxmox host instead. If you’re booting from an attached OpenCore.img file, you can mount that file as a disk on the host. If you’re booting from the VM’s disk instead, it must be in raw format in order to be mounted (e.g. typical LVM or ZFS usage) rather than qcow2.
# Mount an OpenCore image:
losetup --partscan /dev/loop0 /var/lib/vz/template/iso/OpenCore-v15.img
# or a VM boot disk:
losetup --partscan /dev/loop0 /dev/zvol/tank/vms/vm-100-disk-1

mount /dev/loop0p1 /mnt
Now the contents of that first partition are available in /mnt, so you can edit /mnt/EFI/OC/config.plist in your favourite editor. When you’re done, do this to unmount the disk:
umount /mnt
losetup --detach /dev/loop0
Automatic boot
In config.plist, you can set Misc/Boot/Timeout to a non-zero value to allow the default boot option be chosen automatically after that delay in seconds. I’ve disabled this by default because it causes the installer ISO to re-enter its main menu instead of continuing the second stage of installation.
You can set the default boot option by pressing control+enter on it.
Verbose boot
To boot macOS in Verbose mode to diagnose boot problems, at the OpenCore boot menu press Cmd+V before pressing enter to boot macOS (you don’t need to hold it down).
If there is a kernel panic during boot and it reboots too quickly to be read, edit config.plist to add “debug=0x100” to the kernel arguments.
Changing screen resolution
To change macOS’ screen resolution, you need to edit the UEFI/Output/Resolution setting in config.plist, the default is 1920×1080@32.
You should be able to change this to any of the modes that the system OVMF menu offers (hit F2 at the start of guest boot and choose “Device Manager/OVMF Platform Configuration” to see which resolutions are available).
Video performance
Because there is no guest video acceleration available for macOS, video performance is poor.
In Google Chrome in the guest you will need to toggle off the setting to “use hardware acceleration when available” to improve issues with elements not being drawn or flickering (especially video). Safari may be a better choice.
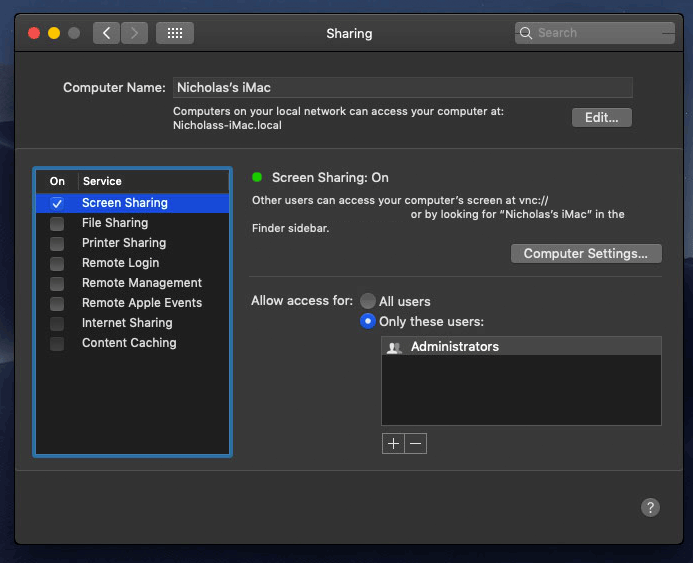
macOS’s built in “Screen Sharing” feature offers dramatically better framerates and latency than Proxmox’s browser-based VNC console, so if you have a real Mac to act as a viewing console, you can enable that in the VM’s “Sharing” settings and connect to the VM using the Screen Sharing app from your Mac instead:
Apparently Screen Sharing is also compatible with VNC clients like RealVNC, so you should be able to connect to it from Linux or Windows consoles using RealVNC.
The real magic bullet for video performance is to pass through a compatible video card using PCIe passthrough (though note that macOS now only supports a handful of very old NVidia cards). This offers near-native performance. You can read more about how I’m using PCIe passthrough on my own installation here.
USB passthrough
Since I want to use this as my primary computer, I want to use a USB keyboard and mouse plugged directly into Proxmox, rather than sending my input through the web VNC console.
Proxmox has good documentation for USB passthrough. Basically, run “qm monitor YOUR-VM-ID-HERE”, then “info usbhost” to get a list of the USB devices connected to Proxmox:
qm> info usbhost
 Bus 3, Addr 12, Port 6, Speed 480 Mb/s
 Class 00: USB device 8564:1000, Mass Storage Device
 Bus 3, Addr 11, Port 5.4, Speed 12 Mb/s
 Class 00: USB device 04d9:0141, USB Keyboard
 Bus 3, Addr 10, Port 5.1.2, Speed 12 Mb/s
 Class 00: USB device 046d:c52b, USB Receiver
 Bus 3, Addr 9, Port 14.4, Speed 12 Mb/s
 Class 00: USB device 046d:c227, G15 GamePanel LCD
 Bus 3, Addr 8, Port 14.1, Speed 1.5 Mb/s
 Class 00: USB device 046d:c226, G15 Gaming Keyboard
In this case I can add my keyboard and mouse to USB passthrough by quitting qm, then running:
qm set YOUR-VM-ID-HERE -usb1 host=04d9:0141
qm set YOUR-VM-ID-HERE -usb2 host=046d:c52b
This saves the devices to the VM configuration for you. You need to reboot to have the new settings apply.
You can also pass through USB devices by passing through an entire USB controller using Proxmox’s PCIe passthrough feature, which gives much better compatibility.
Odd core counts
If your host CPU is AMD, you might have a core count which is divisible by 3, like 6 cores. macOS doesn’t like it if the core count isn’t a power of 2 (1, 2, 4, 8), but it doesn’t mind odd socket counts.
So in order to pass 6 total cores, configure the VM for 3 sockets and 2 cores per socket.
Fixing “guest boots to UEFI shell”
If your guest ends up booting to the UEFI shell instead of showing the OpenCore boot menu, especially if you’ve just updated OpenCore to a new version, you’ll need to edit the guest’s UEFI boot entries to fix this.
At the very start of guest boot, hit F2 to enter guest UEFI settings.
First we’ll remove the old entries. Choose the Boot Maintenance option, then Boot Options -> Delete Boot Option. Use the spacebar to tick any old Clover or OpenCore entries (avoid ticking the EFI Internal Shell option, you want to keep that!). Select “Commit Changes and Exit”.
Now we’ll add the correct entry for OpenCore back in. Select Add Boot Option. Navigate through the device tree to EFI/OC/OpenCore.efi and select it, name this new option “OpenCore” or similar. Again Commit Changes and Exit.
Go to the Change Boot Order and move OpenCore to the top. Commit Changes and Exit.
Now back out to the main menu and choose Reset, and you should successfully boot into OpenCore this time.
Fixing iMessage
iCloud and the App Store should already be working for you, but for iMessage support you must follow these steps to mark your network adapter as built-in:
https://dortania.github.io/OpenCore-Post-Install/universal/iservices.html#fixing-en0
Disabling SIP (System Integrity Protection)
You can disable SIP by selecting the Recovery option from the OpenCore boot menu, then use the top menu to open the Terminal and run csrutil disable --no-internal. Then reboot.
This may be needed to run unsigned kexts or perform other hacks.
Upgrading OpenCore
Sometimes you need to update OpenCore to a new release in order to support a new macOS update. I’ll assume you don’t have any customisations to config.plist you want to save.
First take a snapshot! It’s great to be able to roll back if something goes wrong.
If you’re still able to boot macOS, you can update it from within the guest. Follow the instructions in the “Editing your OpenCore/EFI settings” section to mount your EFI partition. Then you can delete the EFI folder in there and replace it with the one from the OpenCoreEFIFolder.zip file from my OpenCore release (you’ll probably need to empty the trash first to make room for the new folder). You’re done!
If you aren’t able to boot macOS, unpack and upload the new OpenCore ISO to Proxmox’s ISO store instead. Add a new CD drive to the VM that uses that ISO. Then in Proxmox’s terminal edit the VM’s config (in /etc/pve/qemu-server) to replace “media=cdrom” with “cache=unsafe” for the OpenCore drive. Now on the “Options” tab, change the boot order to put the new OpenCore drive first.
Start the VM and boot into macOS using the new OpenCore drive. From within macOS you can now follow the instructions from the “Make the OpenCore install permanent” section to install the new OpenCore image to your main macOS disk, after which the OpenCore drive can be detached from the VM.
Upgrading from macOS Big Sur
First make a backup or snapshot of your system! Being able to roll back when the upgrade goes wrong is a real lifesaver.
You’ll need to update OpenCore to my v15 release before the upgrade. You can follow the instructions in the “Editing your OpenCore settings” section above to mount your EFI disk. Then you can replace the OpenCore files in the mounted “EFI” disk with the ones from the OpenCoreEFIFolder.zip file in my newest OpenCore release.
Reboot to make sure that you can still boot Big Sir.
If you’re using any PCIe passthrough devices (particularly video cards) you’ll want to disable those and set “vga: vmware” instead, so you can install using Proxmox’s web console from a different machine during the upgrade. This avoids installer problems triggered by flaky video card passthrough, especially host lockups caused by the AMD Reset Bug.
Now you can upgrade to Monterey using Software Update or from the App Store like you would on a real Mac.
If the update fails to appear, your SIP mode might be set to “Apple Internal”. You can check this by running “csrutil status” in the Terminal.
To fix this, reboot your VM and at the OpenCore menu select Recovery. Open up the Terminal, and in there run “csrutil enable --no-internal” (“csrutil disable --no-internal” is fine too), then reboot back into macOS and try again.
Proxmox version: 7.2-3
Getting following error while installing mac-os
https://i.imgur.com/T8a8NsC.png
error log: “will not load trust cache because required files are missing”
Could you please help me move to this error
simplemento haz todo con la version 7.1
Hi, thanks for this great description.
I have set up Monterey with GPU Passthrough on Proxmox and it is working fine.
Just one thing is annoying. When I activate Start on boot in Proxmox options it will not work. Screen stays dark and I have to use my Laptop to restart the VM. After Restart Monterey boots and works fine.
Any Idea how to solve this?
That’s weird, check dmesg for errors about passthrough.
I am not very experienced with Linux.
I made the check with following command and get this result:
dmesg | grep -i “error”
[ 1.459990] RAS: Correctable Errors collector initialized.
[ 6.876127] EXT4-fs (dm-1): re-mounted. Opts: errors=remount-ro. Quota mode: none.
[ 7.085793] platform regulatory.0: Direct firmware load for regulatory.db failed with error -2
[ 7.161414] b43-phy1 ERROR: FOUND UNSUPPORTED PHY (Analog 12, Type 11 (AC), Revision 1)
[ 7.161496] b43: probe of bcma0:1 failed with error -95
[ 8.105034] nvidia-gpu 0000:41:00.3: i2c timeout error e0000000
[ 8.105219] ucsi_ccg: probe of 0-0008 failed with error -110
Is theire a better way to check with dmesg?
Mentioned in there is nvidia-gpu, the Nvidia host driver. Ideally you would be assigning your GPU to vfio-pci on boot before the Nvidia driver loads, so that it never gets used.
Did you assign your GPU to vfio-pci in your modprobe config? If not, find a guide for that.
There seems to currently be a problem in the data that macOS downloads during installation if you choose the Recovery method for installing Monterey. Installation fails with this message:
https://i.imgur.com/vFlA9DT.png
Even using working OpenCore and Recovery images from 6 months ago also replicates the problem, so it has to be an issue with the new data the Recovery is downloading.
I’m investigating why that’s happening
Hi ! Resolved ?
Not yet
I find a temporary solution, install Big Sur Bigsur-recovery.img then update it to Monterey
Hey, Someone help me to get me out from this error
Every time I stuck at this point
Log: https://i.imgur.com/A603nEi.png
Thanks
I get the error:
The file “bootbase.efi” couldn’t be opened because there is no such file.
How to fix that problem?
I too had the error about bootbase.efi not being found and it stalled out.
I believe this is a problem that is common to trying to upgrade unsupported Macs that have had their original SSDs replaced and the installer is trying to upgrade some firmware component that doesn’t pass validation, but I don’t know if this 100% the case. In the situation of the real macs, simply having an original SSD detected somehow gets past this situation but not everyone had their original SSD on hand.
Regardless, I managed to bypass this issue by seeing that this problem only started recently, likely started with Monterey 12.4.
I managed to mangle my way to get the full 12.3.1 installer downloaded (Mr. Macintosh or MDS) and pushed into the proxmox ISO directory (16GB). It installed successfully and things are looking OK, and now I’m walking through the next steps.
MacOS software update installed 12.4 successfully for me after that. Looks like it crashed the entire proxmox system during the update but I had a similar crash installing Windows 11 too, but now after a couple of VM reboots everything looks OK.
Also I have 12.5 beta 3 on deck to see if Apple has addressed this installation issue but now that I went 12.3.1 -> 12.4 successfully I’m going to leave it for now.
I have the same problem 🙁
Hi Nick,
When I try to run the installer, I get this image and nothing happens anymore:
https://share.zkr.io/img/Tw4ik.png
Did I configure something wrong?
Thanks!
did you solved this ?
Your config would have to have something really weird wrong with it, because macOS thinks you don’t have a mouse attached. Post your VM config file.
An Error Occurred while preparing the installation. Try running this application again…
I got the same error , If you found any solution Please Ping me
Did you find a solution to this error? I’m coming up with the same thing
Can you elaborate on passing through usb host controller pci devices. Simply adding them in proxmox doesn’t seem to work. I assume there’s something more to be done in OpenCore like for the sound chip, but everything I search for just shows how to do single usb devices and only mentions you can do it the other way without giving any instructions.
Also , I’m having an issue that I can get video passthrough to work, but I cannot boot if I remove the VMWARE video option. Anyone have a fix? I am using an nvidia 650ti (Which hasn’t had any other problems , supposedly a memory leak has made them unstable for other people) (That’s on Big Sur by the way,)
Gigabyte X570 Aorus , Ryzen 9 3900x ,16GB Ram. I followed everything to the latter. But after running the VM, it just stuck/freeze at Apple Logo, there is no progress bar displayed here. Anyone having same problem? What is the solution(s). Thanks
Getting same error i7-12700f RTX3050
I Fixed my error to change the CPU cores
My CPU(i7-12700f) hase 12 cores but its stuck on Apple logo than I set to 8 cores than its working fine
So try to change the cores number
Same here.
Hey,
does anyone know, why the graphic is so slow?
Do you really need a strong graphics card or can you use Remote Desktop as with Windows servers?
That’s because there is no video acceleration available.
You can use macOS’s built-in screen sharing feature, it’s much faster than the Proxmox Web UI.
But the only way to get proper 2D/3D acceleration is to PCIe passthrough a compatible GPU
“You can use macOS’s built-in screen sharing feature, it’s much faster than the Proxmox Web UI.”
But how can I connect to mac like RDP? And where can I activate it?
System Preferences, the Sharing button.
You may be able to connect to it with a generic VNC client.
I’ve narrowed down why the Recovery installer is broken right now, it looks like it’s accidentally downloading the new 21F2092 build of macOS during install, which is for M2 Macs.
Seeing if I can fix this now
Thanks for the guide. I am using a Ryzen 3900X and I have found that it does not like the cpu args: +pcid and +fma4 so I left them out. Also, I can’t seem to get my GPU to passthru without enabling the display=Vmware compatiable. Also is the normal warning at startup:
no efidisk configured! Using temporary efivars disk.
Hi Nick thanks for all you do – any ETA on this fix?
“it looks like it’s accidentally downloading the new 21F2092 build of macOS”
If you want a quicker fix, you can use my previous tutorial to install a Big Sur VM, then use that VM to build a Full Installer for Monterey. The Full Installer isn’t affected by this problem.
Update: like other commentators have mentioned, I was able to get Monterey going by installing Big Sur and upgrading to Monterey. Thanks!
For anyone who has the smc_read execution issue which shows error “smc_read.c:24:56: warning: ‘kIOMasterPortDefault’ is deprecated: first deprecated in macOS 12.0 [-Wdeprecated-declarations]”, you have to modify “kIOMasterPortDefault” to “kIOMainPortDefault” according to
https://github.com/kovidgoyal/kitty/issues/3719
damn seems it does not work anymore, after I execute the smc_read, it shows:
“…” [removed – nick]
Monterey 12.4
That’s the correct key.
Hi, I output lspci on Nick Video Card as follows. Under normal conditions, I get the Gpu transition with the Nvidia GT630 Graphic Card without any problems. However, I could not switch the gpu with the following card.
My Card lspci proxmox output.
05:00.0 VGA compatible controller [0300]: Advanced Micro Devices, Inc. [AMD/ATI] Cape Verde PRO / Venus LE / Tropo PRO-L [Radeon HD 8830M / R7 250 / R7 M465X] [1002:6… (rev 87)
My Card Real Name ; Dell R7 450
https://www.techpowerup.com/gpu-specs/dell-r7-450-4-gb.b4966
I did the procedures according to the steps below, but somehow I could not boot with the proxmox vm mac os new amd video card
https://dortania.github.io/Getting-Started-With-ACPI/Universal/spoof.html
https://pci-ids.ucw.cz/read/PC/1002/683d
I enter the following path as the device path.
PciRoot(0x0)/Pci(0x1C,0x0)/Pci(0x0,0x0)
I enter the presentation as the fake id.
683dCape Verde XT [Radeon HD 7770/8760 / R7 250X]
3D680000
I add ssdt-gpu-spoof.aml to the acpi part with opencore. In the device properties, I enter in “PciRoot(0x0)/Pci(0x1C,0x0)/Pci(0x0,0x0) in the device section, but the mac os does not boot. The screen goes black and interestingly, the proxmox server resets completely.
I need your help on this. Where could I be doing wrong? Am I entering the Device Path incorrectly? Or is this related to proxmox? Located on the following port on the Proxmox server
05:00.0 VGA compatible controller [0300]: Advanced Micro Devices, Inc. [AMD/ATI] Cape Verde PRO / Venus LE / Tropo PRO-L [Radeon HD 8830M / R7 250 / R7 M465X] [1002:6… (rev 87)
When I add the video card gpu passtrough as a mac os , the proxmox server resets the whole machine.
My English is not very good, I tried to write with google translate. I hope I was able to explain my problem.
Thanks for your support.
Instead of using an SSDT you can just set the device ID to whatever you like in Proxmox. This way is much easier.
Do you get any crash logs printed to the host console? Or logged in /var/log/kern.log (or the previous .1 version of that file)
How exactly should I do it in Proxmox? I need support on this matter.
At the moment, the card appears with the following ID.
05:00.0 VGA compatible controller [0300]: Advanced Micro Devices, Inc. [AMD/ATI] Cape Verde PRO / Venus LE / Tropo PRO-L [Radeon HD 8830M / R7 250 / R7 M465X] [1002:6… (rev 87)
How do I get it to look like this?
683dCape Verde XT [Radeon HD 7770/8760 / R7 250X]
3D680000
I think it is done from the place shown in the link here. but I don’t quite understand how to do it.
https://forum.proxmox.com/threads/pcie-passthrough-vendor-id.108935/
I also reached the logs, but where exactly do I need to consider?
thnakyou for support.
You can put 0x1002 in the Vendor ID box and 0x683D in the Device ID box.
You want to look for logs that happened at the timestamp the VM crashed at
When I enter the Vendor id and device id you have given, it boots without any problems and does not reset. However, the codes keep flowing in a loop on the Mac Loading screen. Mac os doesn’t hurt. We did it right on the proxmox side, but I guess I need to do something on the mac os side?
But what can I do to make it hurt? Maybe it was Vendor id and Device id didn’t like mac os Maybe I need to try another. However, with the Vendor id and Device id you provided, I was able to open in Ubuntu without any problems. Before entering these ids, the proxmox reset I wanted to do the Ubuntu gpu passtrough was happening. Thank you.
I was able to help by trying different ids here. 260X 280X 350X runs smoothly. However, the Graphics Card seems to be 3mb, how can I overcome this problem? My Graphics Card is actually 4GB.
That means you’ve picked an ID that macOS doesn’t support acceleration for, so the AMD GPU driver isn’t even being used. You’ll need to pick another.
Hey Is there any way to bypass RTX3050 Graphics card for hackintosh?
No, absolutely none, the 2000 and 3000 series never had drivers written for them.
Thanks for your response
Hey, Is there any way to shutdown proxmox When hackintosh VM goes shutdown?
Hi nick,
Thanks for your guide,
I’ve downloaded a full-img of Monterey using your script, but when i’m installing it on the vm i always get the error:
https://imgur.com/uDJ0Xmm
It seems that the installer cant validate the downloaded img.
Could yo please give some advice on what it’s going on?
Thanks in advance!
Regards!
Hi,
first, sorry fore noob question , but … I installed OSX successfully, thanks for this tutorial. I can login to it via browser on another PC. But how can I setup physical PC, wher it is installed to boot OSX after start? When I start the PC, I still get PVE login ….
Thanks
To do that you would need to use PCIe passthrough to give a Mac compatible GPU to the guest
I was able to boot into MacOS. However, while re-reading through the post, I came across this:
> Note that you will want to hold off on logging into your Apple ID until you’ve configured your Mac’s serial number in OpenCore (because otherwise a Mac with the default shared serial number in my OpenCore image will be added to your Apple ID).
I don’t remember doing this. Could you please elaborate on how to replace the default shared serial with a serial from my MacBook?
I wouldn’t recommend cloning the serial from your MacBook. That’d look even odder for your account.
https://dortania.github.io/OpenCore-Post-Install/universal/iservices.html#using-gensmbios
Hi, thank you for a great tutorial!
I am getting this error after I done the GPU passthrough:
kvm: -device vfio-pci,host=0000:28:00.0,id=hostpci0.0,bus=ich9-pcie-port-1,addr=0x0.0,multifunction=on: Failed to mmap 0000:28:00.0 BAR 0. Performance may be slow
I already followed the guide on how to pass through the GPU. Here is my GPU:
8:00.0 VGA compatible controller [0300]: Advanced Micro Devices, Inc. [AMD/ATI] Navi 10 [Radeon RX 5600 OEM/5600 XT / 5700/5700 XT] [1002:731f] (rev ca)
It makes me stuck on the Apple logo while booting. Any idea how to solve this? Thank you!
A host driver is still holding on to the card, so it can’t be passed properly.
Most likely the culprit is bootfb, which you can fix by adding this to your host kernel args:
initcall_blacklist=sysfb_init
Note that your card suffers from the AMD Reset Bug and will only work once per host power cycle. Some cards can be fixed by adding “vendor-reset” to Proxmox
Hi, thank you for the assistance. I already added in the /etc/default/grub. So, it is now like this:
GRUB_DEFAULT=0
GRUB_TIMEOUT=5
GRUB_DISTRIBUTOR=`lsb_release -i -s 2> /dev/null || echo Debian`
GRUB_CMDLINE_LINUX_DEFAULT=”quiet amd_iommu=on iommu=pt pcie_acs_override=downstream,multifunction nofb nomodeset video=vesafb:off,efifb:off,simplefb:off initcall_blacklist=sysfb_init”
GRUB_CMDLINE_LINUX=””
I also followed your instruction to install vendor reset here https://www.nicksherlock.com/2020/11/working-around-the-amd-gpu-reset-bug-on-proxmox/
Finally, the error (Failed to mmap) is gone. I am not stuck in the apple logo (it is now showing progress bar loading). But, after the progress bar loading is gone, the screen turned off 🙁 Did I do something wrong?
Most likely you still have the emulated video attached, and macOS is displaying there instead. Use vga: none in your VM config
Sorry Nick, could you delete my comment above after? I forgot posted the sensitive data. Thank you.
Config looks good, did you try adding agdpmod=pikera to your macOS kernel args in config.plist?
Thank you Nick. Yup, I already added vga:none to my config. But my monitor still turned off after Apple logo loading finished.
ahh, I found the culprit. So I need to add agdpmod=pikera to the boot-args.
where did you add that?
I have the same issue. Monitor attached to 6600XT shows Proxmox logo, then opencore picker, then apple logo with loading bar for a few seconds, then no signal.
VM is not crashed, still running, just no video output
The boot-args are in OpenCore’s config.plist:
https://github.com/thenickdude/KVM-Opencore/blob/6750c11cd78696edd45a117753929c6999d551f2/EFI/OC/config.plist#L1138
Instructions for editing that are in this blog post
Installing MacOS does not work anymore (for me) on Proxmox 7.2-7.
I have just upgraded from 7.1-… to the latest version and now my installation is broken.
See also: https://forum.proxmox.com/threads/macos-monterey-not-booting-anymore-after-upgrade-to-7-2-7.112199/#post-484577
Have you an idea how to come around this issue?
Are you using GPU passthrough? Check host dmesg for errors
No GPU passthrough. dmesg does not log any errors.
I changes NUMA to 1 (as advised above) and now I get two different behaviors. In both cases the system stalls.
https://wtf.roflcopter.fr/pics/gallery#r5CDMwrS/0HBYrE8N.png,4Q7U1yHy/m0NwePvF.png
My config: which was perfectly working with 7.1
acpi: 1
agent: 0
args: -device isa-applesmc,osk=”…” -smbios type=2 -device usb-kbd,bus=ehci.0,port=2 -global nec-usb-xhci.msi=off -global ICH9-LPC.acpi-pci-hotplug-with-bridge-support=off -cpu Icelake-Server,kvm=on,vendor=GenuineIntel,+kvm_pv_unhalt,+kvm_pv_eoi,+hypervisor,+invtsc,+pcid,+ssse3,+sse4.2,+popcnt,+avx,+avx2,+aes,+fma,+fma4,+bmi1,+bmi2,+xsave,+xsaveopt,check
balloon: 0
bios: ovmf
boot: order=virtio0
cores: 4
cpu: Icelake-Server,flags=+aes
efidisk0: local-zfs:vm-110-disk-1,efitype=4m,size=1M
hotplug: disk,network,usb
kvm: 1
machine: q35
memory: 4096
name: b…
net0: virtio=..:..:..:..:..:..,bridge=vmbr0,firewall=1
numa: 1
ostype: other
scsihw: virtio-scsi-pci
smbios1: uuid=60c2…
sockets: 1
startup: order=900
tablet: 1
vga: vmware
virtio0: local-zfs:vm-110-disk-0,cache=unsafe,discard=on,size=128G
vmgenid: 2bf…
Status running
HA State none
Node pve1
CPU usage 100.16% of 4 CPU(s)
Memory usage 13.93% (570.72 MiB of 4.00 GiB)
Bootdisk size 128.00 GiB
CPU permanently on 100% (moving between 99 and 101% – so system is doing something). memory usage not changing.
Any news here?
With this configuration it is not even possible (for me) to install from scratch.
Installer disc image will not boot
Hey Nick, I’ve followed your guide, but hit a roadblock. When I start the newly created and edited VM, it does not load the open-core boot picker. I get a proxmox logo screen with the following errors.
BdsDxe: loading Boot0005 “UEFI QMU HARDDISK QM00003 ” from PciRoot (0x0) /Pci (0x1
F.0x2) /Sata (0x1.0xFFFF ,Ox0)
BdsDxe: failed to load Boot0005 “UEFI QEMU HARDDISK QM00003 “, from PciRoot (0x0) /
Pci (0x1F,0x2) /Sata (0x1,OxFFFF .Ox0) : Access Denied
BdsDxe: failed to load Boot0006
“UEFI QEMU HARDDISK QM00001 ” from PciRoot (Ox0) /
Pci (Ox1F,0x2) /Sata (0x0 ,OxFFFF •Ox0) : Not Found
»›Start PXE over IP04.
When I run the “echo “options kvm ignore_msrs=Y” >> /etc/modprobe.d/kvm.conf && update-initramfs -k all -u” command it returns:
update-initramfs: Generating /boot/initrd.img-5.13.19-2-pve
Running hook script ‘zz-proxmox-boot’..
Re-executing ‘/etc/kernel/postinst.d/zz-proxmox-boot’ in new private mount namespace..
No /etc/kernel/proxmox-boot-uuids found, skipping ESP sync.
Any help or direction you could provide is greatly appreciated. Thank you for documenting all of your hard work.
Remove the EFI disk from the Hardware page and delete it, then add a replacement and this time be sure to un-tick the “pre-enroll keys” tickbox
Also double check your boot order on the Options page
Hello, I got the same issue:
update-initramfs: Generating /boot/initrd.img-5.15.39-4-pve
Running hook script ‘zz-proxmox-boot’..
Re-executing ‘/etc/kernel/postinst.d/zz-proxmox-boot’ in new private mount namespace..
No /etc/kernel/proxmox-boot-uuids found, skipping ESP sync.
I checked everything according to what you said and nothing
I tried to run the vm also and got this issue:
“kvm: type=2: Could not open ‘type=2’: No such file or directory
TASK ERROR: start failed: QEMU exited with code 1”
Would you have any clue?
That first one isn’t an error, that’s a success.
The second one is a syntax error in your VM args next to the -smbios arg, post your args line if you can’t spot it.
Thank you, I figured that after a while … dumb me
was the issue with the Monterey installer not showing ever resolved?
The solution for the “an error occured..” error from the recovery image is simple: don’t use APFS! Use the old filesystem and it will work. (it did at least in my OSX-KVM installation).
I have a much more basic error at my to following this guide.
I can’t boot the opencore-v17.iso
I get access denied errors from the vm.
https://postimg.cc/pyCTfr1T
Remove the EFI disk from the Hardware page and delete it, then add a replacement and this time be sure to un-tick the “pre-enroll keys” tickbox
Also double check your boot order on the Options page
oh no, i thought i did it right. Thanks a lot.
Your guide is amazing.
Thanks for all the help. but still no signal on monitor. “agdpmod=pikera” did not help. I added the gpu rom file,..always the same.
I’ve installed TeamViewer inside of the vm to check if only the screen is black or if it freezes or something:
Well, macOS is working! it just does not detect the monitor, connected to one of the DisplayPort sockets at the graphics card!
https://postimg.cc/bD8Z6ZWw
I also read in German it-news (heise.de) that macOS 12.5 is no longer working with OpenCore because apple changed something at the gpu handling. maybe this is related?
Thanks for the great tutorial.
The GPU passthrough is giving me problems at startup. I have a Firepro W7000.
On startup, the status bar under the Apple logo gets stuck at 1/3 and nothing happens.
If I take out the passthrough and go through the console, it starts normally.
However, the passthrough with the W7000 works fine with a Windows and a Linux VM on the same host.
It also works when installing MacOs. Until then the installation is finished and the “Main” operating system should start.
I also tested it with Big Sur – it makes no difference.
I do not get any error messages. Any idea what is I could still do to debug?
Hi Nick!
Do you happen to know if Mojave (macOS 10.14) would still work with these instructions, and using the current OpenCore (v17) image from the repo?
I think that’ll work fine, but with Mojave you need to use SATA disks instead of virtio-blk, and vmxnet3 networking instead of virtio-net.
I can give it a try, and report back.
In terms of creating the Mojave installer – what is the best way?
I noticed there’s a scripts/create_dmg_mojave.sh – should I be trying with that? Is that reasonably up to date
(Your earlier instructions on Mojave from 2018 – https://www.nicksherlock.com/2018/06/installing-macos-mojave-on-proxmox/ – referenced a fetch-macOS-v2.py – but that’s no longer in the repo – I assume it got replaced with something else?)
Just as information for anybody who has problems with BlueTooth on Monterey.
On Big Sur I used a Laird BT851 BT 5.0 Dongle, but this doesn’t work on Monterey anymore, as Apple has reimplemented the BT stack.
After ignoring the problem for a time, I am running now on a Hideez BT 4.0 dongle, which seems to work fine so far.
Hopes this helps somebody, as Nick’s tutorial helped me with installing.
Hello,
I followed your tutorial and I finally succeeded in launching the vm.
However when I launch it, the vm doesn’t show up on the host, only in the console. And I can’t interact with the console.
Also, the boot menu doesn’t show the monterey installer. I saw that I had to type on F12, but obviously I can’t.
Did I miss something? How should I interact with my vm?
It won’t show on the host, for that you would have to PCIe passthrough a compatible GPU.
Console should work fine, try reopening the console page if the keyboard isn’t operating.
Thanks, yes, it did work!
I can’t figure why the monterey img is not showing up though.
I put the Opencore iso first in the order setting. The Monterey img is showing up in the hardware settings, as hard drive. (I mounted it as a dvd drive, but it changed by itself).
I tried to check the UEFI shell but the FS0: command is not recognized.
Hey, Thanks for u time with this tutorial, when i pass my gpu my monitor (with external GPU) only show a proxmox logo, but i can access the vm by vnc and all its OK, you know some fix?
Set vga to none in your VM hardware page to disable the emulated video, it sounds like macOS is outputting there instead.
Hi,
The Update on 12.5.1 hangs. Tried twice. Reverted to snapshot. 1st time on shutdown, second on reboot.
How can I troubleshoot and get more information? Is this happening to anyone else?
IIRC this has happened before, but eventually one try came through.
Thanks in advance.
Mine installed fine today, make sure you’re not running out of room on your host disk or anything!
The easy way to bypass incremental update problems is to build a new Full Installer ISO of the new version instead, and then use that to reinstall macOS (the installer just calls it installing macOS, it doesn’t have a specific “Reinstall”-labelled option). No user data is lost, only the system partition is updated.
You could also use Recovery tab to make a new full Reinstall.
Hi Nick and thanks for your great tutorials.
Is it possible to run Monterey on the latest Proxmox? I have installed PVE 5.15.39-2, exactly followed your instructions but the MacOS installer stucks at apple logo with empty progress bar (and sometimes it reboots after a minute).
Windows and Debian OS are running fine.
My hardware is a Ryzen 7 5700G8C with 64G DDR4-3200 on Asus B550-A.
Thank you for you support.
Yes it is, I’m currently running on Proxmox 7.2-7, kernel 5.15.39-3-pve.
Run this command on Proxmox to double check your TSC isn’t broken:
dmesg | grep -i -e tsc -e clocksource
Look for an error like “TSC found unstable after boot, most likely due to broken BIOS. Use ‘tsc=unstable’.”
Thanks for the quick reply, Nick!
The output is:
[ 2.732464] tsc: Marking TSC unstable due to clocksource watchdog
[ 2.732471] TSC found unstable after boot, most likely due to broken BIOS. Use ‘tsc=unstable’.
[ 2.732973] clocksource: Checking clocksource tsc synchronization from CPU 7 to CPUs 0,2,5-6.
[ 2.733066] clocksource: Switched to clocksource hpet
[ 60.701730] kvm: SMP vm created on host with unstable TSC; guest TSC will not be reliable
What means “broken BIOS” in this context and how can this be resolved now?
The only solution I’m aware of for that is a motherboard or AGESA firmware update.
Sometimes it seems that the TSC drifts once host uptime is too high, and rebooting the host fixes it.
Thanks for the hint.
There is a quite new update available that should hopefully fix it:
1. Update AMD AM4 AGESA V2 PI 1.2.0.7.
2. Fix AMD fTPM issue causes random stuttering.
I will keep you posted.
It seems that this is not an issue. See https://en.m.wikipedia.org/wiki/Time_Stamp_Counter
“The Time Stamp Counter was once an excellent high-resolution, low-overhead way for a program to get CPU timing information. With the advent of multi-core/hyper-threaded CPUs, systems with multiple CPUs, and hibernating operating systems, the TSC cannot be relied upon to provide accurate results…”
The TSC is also not used for timing anyway:
root@pve1:~# cat /sys/devices/system/clocksource/clocksource0/current_clocksource
hpet
root@pve1:~# cat /sys/devices/system/clocksource/clocksource0/available_clocksource
hpet acpi_pm
I tested a MacOS on the same hardware (and same BIOS version) roughly a year ago without issues.
The TSC isn’t being used as a clocksource on Linux because your TSC is unstable, so it has to fall back to the much lower resolution HPET timer. Linux always prefers to use the TSC if it isn’t broken because it’s the best timer available.
That Wikipedia extract is simply wrong, those concerns were fixed decades ago by CPU features like constant-tsc.
“On processors with invariant TSC support, the OS may use the TSC for wall clock timer services (instead of ACPI or HPET timers). TSC reads are much more efficient and do not incur the overhead associated with a ring transition or access to a platform resource.”
macOS does use the TSC, and panics when it sees it jumping backwards as it is migrated across host cores.
I did the FW update now, but nothing changed. On the internet there’s no hint that TSC has a problem with my board (or vice versa).
The log now says that everything is ok (possibly there was a temp problem? I will check later), but MacOS will still not boot up.
I do not assume to have any hardware error as other VMs are running without any issue for months.
[ 0.000000] tsc: Fast TSC calibration using PIT
[ 0.000000] tsc: Detected 3792.915 MHz processor
[ 0.085885] clocksource: refined-jiffies: mask: 0xffffffff max_cycles: 0xffffffff, max_idle_ns: 7645519600211568 ns
[ 0.193402] clocksource: hpet: mask: 0xffffffff max_cycles: 0xffffffff, max_idle_ns: 133484873504 ns
[ 0.213426] clocksource: tsc-early: mask: 0xffffffffffffffff max_cycles: 0x6d586777693, max_idle_ns: 881590985284 ns
[ 0.366118] clocksource: jiffies: mask: 0xffffffff max_cycles: 0xffffffff, max_idle_ns: 7645041785100000 ns
[ 0.403487] clocksource: Switched to clocksource tsc-early
[ 0.415310] clocksource: acpi_pm: mask: 0xffffff max_cycles: 0xffffff, max_idle_ns: 2085701024 ns
[ 1.445854] tsc: Refined TSC clocksource calibration: 3819.582 MHz
[ 1.445869] clocksource: tsc: mask: 0xffffffffffffffff max_cycles: 0x6e1d34ae8e5, max_idle_ns: 881590574911 ns
[ 1.641350] clocksource: Switched to clocksource tsc
So I have no further ideas and after a lot of hours investing into this, I tried to move back to an older PVE kernel (5.13.19 instead of 5.15.39) and BOOM… my machine is booting up and working.
Conclusion: the kernel is “buggy”!
Nevertheless, no clue where to report and no one else seems to have this behavior… I will check later, if newer kernels will work again.
Thank you for your support!
Hi Nick
I’m receiving this error when I try to start the install:
kvm: can’t apply global ICH9-LPC.acpi-pci-hotplug-with-bridge-support=off: Property ‘ICH9-LPC.acpi-pci-hotplug-with-bridge-support’ not found
I’m running the most recent version (v7.2) of proxmox on a xeon e5 v2
If I try to boot the vm, I receive the aforementioned error. If I delete the -global ICH9-LPC.acpi-pci-hotplug-with-bridge-support=off flag, the vm will boot, but won’t see the qmu disk
Here is my conf file:
agent: 1
args: -device isa-applesmc,osk=”ourhardwork…” -smbios type=2 -device usb-kbd,bus=ehci.0,port=2 -global nec-usb-xhci.msi=off -global ICH9-LPC.acpi-pci-hotplug-with-bridge-support=off -cpu host,kvm=on,vendor=GenuineIntel,+kvm_pv_unhalt,+kvm_pv_eoi,+hypervisor,+invtsc
balloon: 0
bios: ovmf
boot: order=ide2;net0;ide0
cores: 8
cpu: Penryn
efidisk0: macOS:vm-101-disk-0,size=1M
ide0: local:iso/OpenCore-v16.iso,cache=unsafe,size=150M
ide2: local:iso/Monterey-recovery.img,cache=unsafe
machine: q35
memory: 8192
name: monterey
net0: virtio=FA:3D:A4:90:50:1B,bridge=vmbr0,firewall=1
numa: 1
ostype: other
scsihw: virtio-scsi-pci
smbios1: uuid=dfe9443c-2062-4b37-8f79-48fb5fc0688a
sockets: 1
vga: vmware
virtio1: macOS:vm-101-disk-2,cache=unsafe,discard=on,size=480G
vmgenid: c714d3a1-61f2-401b-bf91-a6dae4bead00
Thanks for all your help
You must be running Proxmox without updates, so you’re still on QEMU 6.0, which didn’t support this argument. If you don’t have a Proxmox subscription then you need to manually enable the no-subscription repo to get updates:
https://pve.proxmox.com/wiki/Package_Repositories#sysadmin_no_subscription_repo
my current sources list has PVE non-subscription updates sources as:
deb http://download.proxmox.com/debian/pve/ bullseye pve-no-subscription.
I have also made sure that i have the latest updates (as of today)
M.
What does qemu-system-x86_64 –version return? (that should be two – characters and not an em-dash). Make sure you’re running dist-upgrade.
I had updated today, but when I run apt full-upgrade I receive the new that some packages are being held back:
The following packages have been kept back:
libpve-access-control libpve-common-perl libpve-guest-common-perl libpve-http-server-perl
libpve-rs-perl libpve-storage-perl proxmox-ve pve-container pve-kernel-5.11 pve-manager
pve-qemu-kvm qemu-server zfs-initramfs zfs-zed zfsutils-linux
As I’m on proxmox V7.2, I had assumed that qemu would already be > 6.0, as this was an option when I was running 7.1 without subscription
M
You’ve held pve-qemu-kvm (perhaps transitively) so you’re stuck on the old QEMU version. Run “apt-mark showhold” to see what you’ve held back.
as per your advice:
sudo apt-mark showhold
[sudo] password for worker_bee:
libpve-access-control
libpve-common-perl
libpve-guest-common-perl
libpve-http-server-perl
libpve-rs-perl
libpve-storage-perl
proxmox-ve
pve-container
pve-kernel-5.11
pve-manager
pve-qemu-kvm
qemu-server
zfs-initramfs
zfs-zed
zfsutils-linux
It seems there are broken and resolvable packages. I found this link which discusses a very similar scenario:
https://forum.proxmox.com/threads/solved-packages-have-been-kept-back.83280/
sudo apt upgrade libpve-common-perl
Reading package lists… Done
Building dependency tree… Done
Reading state information… Done
Calculating upgrade… Done
Some packages could not be installed. This may mean that you have
requested an impossible situation or if you are using the unstable
distribution that some required packages have not yet been created
or been moved out of Incoming.
The following information may help to resolve the situation:
The following packages have unmet dependencies:
libproxmox-rs-perl : Depends: libpve-rs-perl (>= 0.7.0) but 0.2.3 is to be installed or
libpmg-rs-perl (>= 0.6.0) but it is not installable
Breaks: libpve-rs-perl (< 0.6.0) but 0.2.3 is to be installed
libpve-common-perl : Breaks: qemu-server (< 7.0-19) but 7.0-13 is to be installed
E: Broken packages
I'm aware that this is specifically about Installing macOS, but wondering if you can help me to progress and resolve theses Proxmox errors?
You can try removing the holds on those and then attempting the full-upgrade again:
sudo apt-mark unhold libpve-access-control libpve-common-perl libpve-guest-common-perl libpve-http-server-perl libpve-rs-perl libpve-storage-perl proxmox-ve pve-container pve-kernel-5.11 pve-manager pve-qemu-kvm qemu-server zfs-initramfs zfs-zed zfsutils-linux
I’m unsure how those came to be held in the first place.
Thanks SO MUCH, Nick!
That completely resolved that issue. Now back to macOS madness!
M 🙂
Thanks for you providing the guide.
Would you consider to include OpenCore Legacy Nvidia GPU patch to your OpenCore configuration?
https://github.com/dortania/OpenCore-Legacy-Patcher/commit/cd1276251cf3ec2f0e5e25429b3d14cd51f3be85
No, there’s no real point in using that patch since it doesn’t support Metal, so any app that uses Metal acceleration won’t work (and there are lots).
Thank you for the great tutorial. I managed to make it work, with GPU passthrough (Radeon Pro WX 5100) but I have one issue. When I leave the VM overnight however, I get a warning sign on it, with status Internal Error.
Any idea what could do this. I run on Intel 12700K, 128Gb RAM, proxmox 7.2.3, I heard people having trouble starting their Monterey VM updating to 7.2.7 so I haven’t made an update yet.
The CPU still seems to use a tiny amount in error state, 0.01%, so I doubt that’s even doing anything really. Guest agent says it’s not running. Tried to see if waking it up could fix it but it says VM not in sleep state.
Thanks in advance if anyone has an idea.
Cheers,
Chris
If you didn’t already disable sleep in macOS power saving options then I’d start with that and see if the problem goes away.
I had disabled sleep, yes.
Check the host’s “dmesg” output for errors happening overnight (or /var/log/kern.log and kern.log.1 for older messages)
Hi Cris,
Thank you for the tutorial I maneged to make the installation but on the initial setup, I’m not able to get keyboard and mouse support only one of them, sometimes i have keyboard and other times i have mouse, so completing the initial setuo is impossible. Do you a have a clue of whats happening?
Thanks.
Paulo
I haven’t encountered that before so I’m not sure what to suggest except for exiting and re-entering the Console tab in your browser to fix WebVNC issues.
Mouse should work everywhere except the OpenCore boot menu, keyboard should work everywhere
Hi Nick,
thanks for awesome article! I took a ton from it while my QEMU/KVM machine was still in making.
Did you have any problems with sleep while doing GPU passthrough? I got RX570, like you. macOS goes to sleep, and it wakes up, but it kinda “locks” (rainbow loading cursor) when I type even one character in password field. Did you encounter such a problem? Did you find a solution?
My best 🙂
I turned off sleep entirely in macOS power saving options very early on because I couldn’t see a good way to troubleshoot that issue.
Hi Nick,
Great guide, everything worked for me up until after the reboot from install to the main hard drive, it gets stuck on the apple logo screen with the progress bar about 1/4 of the way and stays there forever.
Have a coffeelake i5, z390 gigabyte and followed all your steps. Any suggestions?
Most likely due to bad OSK, but if you press Win/Cmd+V before pressing enter to select the boot option, you can boot in Verbose mode which’ll reveal more details.
Continued from above, using onboard intel 630 video, have 32gb ram and a 500gb ev0 970 ssd.
Here is a screen shot of the console… config 1st
https://ibb.co/b21vQC1
Error message
https://ibb.co/WssY22b
OSK is completely truncated
That fixed it, it booted monterey now. Thank you!
Hi Nick, tnx for great tutorial.
I have a problem, got this error message:
https://imgur.com/a/nzFglkz
Then it stays stuck forever.
Thank you
I’ve never seen that one. How much RAM did you give the VM?
I’d rebuild the installer and try again.
Hi, thank you for fast respond.
I followed the tutorial – i gave vm 4096 mb of ram, 4 cores…
My is cpu i7 920, 6gb ram, 128 gb ssd.
I’ve managed to the install menu, i formatted the disk, passed through installation, after first reboot i see apple logo, it boot to macOS Update Assistant and i see that message.
brlja
I’ve deleted VM,
made a new one, now i cant pass installation, i am getting this message:
https://imgur.com/a/c8CNuzT
tnx
Halo, i just follow ur Guide and success to use monterey os using VMware Compatible Display, however when i pass the GPU (AMD RX560) it stuck from the first Apple boot logo, if i remove the PCIE GPU it work again. How can i pass the GPU to monterey?
GPU Passthrough success on Windows 10 without any problem, the problem only in MacOS Monterey. Thank for your help 🙂
Most likely you’re getting hit by the AMD Reset Bug, check out my blog post on adding vendor-reset
console display message when Guest has not initialized the display (yet)
Hi Nick,
Thank you for your guide, I used it to install Mac OS Monterey. Everything seemed to go fine until I tried to start the Mac Installer. The VM suddenly reboots when the apple logo with the loading bar appears. Tried various things, found someone who suggested to use 1 cpu and 1 core. I did manage to install the OS with 1 cpu and 1 core, OS is booting fine and even GPU passthrough is working well.
However, when trying to set some more cores again the OS does not load anymore, same as before. As long as I use 1 vcpu all is fine, 1 vcpu is not ideal however, would be nice to have a bit more power.
Do you have any clue what my problem might be and how I can fix this?
Run this command on Proxmox to double check your TSC isn’t broken:
dmesg | grep -i -e tsc -e clocksource
Look for an error like “TSC found unstable after boot, most likely due to broken BIOS. Use ‘tsc=unstable’.”
Thank you for your reply,
I’m getting the following output:
[ 0.000000] tsc: Fast TSC calibration using PIT
[ 0.000000] tsc: Detected 2793.389 MHz processor
[ 0.164999] TSC deadline timer available
[ 0.165052] clocksource: refined-jiffies: mask: 0xffffffff max_cycles: 0xffffffff, max_idle_ns: 7645519600211568 ns
[ 0.426996] clocksource: hpet: mask: 0xffffffff max_cycles: 0xffffffff, max_idle_ns: 133484882848 ns
[ 0.447011] clocksource: tsc-early: mask: 0xffffffffffffffff max_cycles: 0x2843db8bc8a, max_idle_ns: 440795326934 ns
[ 0.477155] TSC synchronization [CPU#0 -> CPU#1]:
[ 0.477159] Measured 357224 cycles TSC warp between CPUs, turning off TSC clock.
[ 0.477161] tsc: Marking TSC unstable due to check_tsc_sync_source failed
[ 0.503549] clocksource: jiffies: mask: 0xffffffff max_cycles: 0xffffffff, max_idle_ns: 7645041785100000 ns
[ 0.764076] clocksource: Switched to clocksource hpet
[ 0.781261] clocksource: acpi_pm: mask: 0xffffff max_cycles: 0xffffff, max_idle_ns: 2085701024 ns
[ 19.111905] kvm: SMP vm created on host with unstable TSC; guest TSC will not be reliable
Seems like the TSC clock is indeed turned off, but not by a broken BIOS. Any idea how to fix this?
I’ve added “clocksource=tsc” and “tsc=reliable” to my boot settings, now i’m getting slightly different results, but still an unstable tsc:
[ 0.000000] Command line: BOOT_IMAGE=/boot/vmlinuz-5.15.60-1-pve root=/dev/mapper/pve-root ro clocksource=tsc tsc=reliable quiet intel_iommu=on iommu=pt pcie_acs_override=downstream,multifunction video=efifb:off trace_clock=local
[ 0.000000] tsc: Fast TSC calibration using PIT
[ 0.000000] tsc: Detected 2793.219 MHz processor
[ 0.167235] TSC deadline timer available
[ 0.167288] clocksource: refined-jiffies: mask: 0xffffffff max_cycles: 0xffffffff, max_idle_ns: 7645519600211568 ns
[ 0.168004] Kernel command line: BOOT_IMAGE=/boot/vmlinuz-5.15.60-1-pve root=/dev/mapper/pve-root ro clocksource=tsc tsc=reliable quiet intel_iommu=on iommu=pt pcie_acs_override=downstream,multifunction video=efifb:off trace_clock=local
[ 0.434697] clocksource: hpet: mask: 0xffffffff max_cycles: 0xffffffff, max_idle_ns: 133484882848 ns
[ 0.454714] clocksource: tsc-early: mask: 0xffffffffffffffff max_cycles: 0x28433b3fbbe, max_idle_ns: 440795349213 ns
[ 0.511264] clocksource: jiffies: mask: 0xffffffff max_cycles: 0xffffffff, max_idle_ns: 7645041785100000 ns
[ 0.775780] clocksource: Switched to clocksource tsc-early
[ 0.793068] clocksource: acpi_pm: mask: 0xffffff max_cycles: 0xffffff, max_idle_ns: 2085701024 ns
[ 1.875802] tsc: Refined TSC clocksource calibration: 2793.268 MHz
[ 1.875810] clocksource: tsc: mask: 0xffffffffffffffff max_cycles: 0x28436928c28, max_idle_ns: 440795267499 ns
[ 1.875847] clocksource: Switched to clocksource tsc
[ 22.179166] tsc: Marking TSC unstable due to KVM discovered backwards TSC
[ 22.179176] TSC found unstable after boot, most likely due to broken BIOS. Use ‘tsc=unstable’.
[ 22.515809] clocksource: Checking clocksource tsc synchronization from CPU 9 to CPUs 0-1,3-5,11,14,18.
[ 22.515809] clocksource: CPUs 0-1,3-5,11,14,18 ahead of CPU 9 for clocksource tsc.
[ 22.515809] clocksource: CPU 9 check durations 1285ns – 2388ns for clocksource tsc.
[ 22.515809] clocksource: Override clocksource tsc is unstable and not HRT compatible – cannot switch while in HRT/NOHZ mode
[ 22.515876] clocksource: Switched to clocksource hpet
I’m running an Intel Xeon E5-2680v2 in a Dell Precision T3610, disabled C-states and Turbo-Boost in the BIOS.
I am stuck at the moment, is there anything else I can try?
I installed everything as per the instructions on Proxmox
Virtual Environment 7.2-7.
But, when I go to the page below, I don’t see the spinning cube. Doesn’t matter which browser I use.
https://get.webgl.org/
I tried all suggested solutions on the above website, it doesn’t work. Looks like some issue with the graphics driver configuration. Please help.
There is zero emulated 2D or 3D acceleration available for macOS guests.
If you want OpenGL support you must PCIe-passthrough a compatible GPU.
How do I PCIe-passthrough a compatible GPU to a macOS guest? What changes are required in the above tutorial?
Also, how do I know which GPU is compatible? You mean compatible with proxmox 7 or compatible with the macOS guest? Either case, is there a list somewhere?
GPU must compatible with MacOS.
Best place to look for a list is here:
https://dortania.github.io/GPU-Buyers-Guide/
Good guide for GPU-Passthrough for Proxmox here:
https://blog.quindorian.org/2018/03/building-a-2u-amd-ryzen-server-proxmox-gpu-passthrough.html/