
A new version of this tutorial is now available for the release of macOS 13 Ventura, you can see that here
This tutorial for installing macOS 12 Monterey has been adapted for Proxmox from Kholia’s OSX-KVM project and Leoyzen’s OpenCore configuration for KVM. You can get the full sourcecode of my OpenCore release on my GitHub here.
Requirements
I’ll assume you already have Proxmox 7 installed. You also need a real Mac available in order to fetch the OSK key.
Your Proxmox host computer’s CPU must support SSE 4.2, so for Intel your CPU must be at least as new as Nehalem, which was the first CPU generation to bear the “Core” i5/i7 branding. Older CPUs will cause Illegal Instruction crashes when apps/extensions attempt to use these missing instructions.
Modern AMD CPUs also support SSE 4.2 and will work with this guide.
First step: Create an installation ISO
Download my copy of the OSX-KVM repository using the download button, and unzip it:
https://github.com/thenickdude/OSX-KVM
First we need to install some build requirements. If you will be building the installer ISO on macOS, open up the Terminal and run this command to install the commandline tools:
xcode-select --installIf you’re building the ISO on Linux, you instead need to run this command (these are the package names for Ubuntu or similar distributions, they may need adjustment on other distributions):
sudo apt install qemu-utils make
Now in the Terminal, from the root of OSX-KVM, run:
cd scripts/monterey
make Monterey-recovery.img
This will download the Monterey installer from Apple’s software distribution servers and build a Monterey-recovery.img file for you. Upload this file to your Proxmox’s ISO store directory (typically /var/lib/vz/template/iso). Although we’re putting it in the ISO directory so that we can use it with Proxmox’s ISO picker later, this a raw disk image rather than a true ISO.
If you’re building the installer on macOS, you can build a full installer instead of just a recovery, which will mean that macOS won’t have to download Monterey files during installation, and so won’t require an Internet connection. Simply ask it to build Monterey-full.img instead:
cd scripts/monterey
make Monterey-full.img
This option is not available when building the installer on Linux.
Prepare an OpenCore image
Download the OpenCore.iso.gz file from the newest release in my repository (you want v15 or newer), double click it to unpack it, and upload it to Proxmox’s ISO store at /var/lib/vz/template/iso. Although it has a .iso file extension, this is actually a hard disk image.
Fetch the OSK authentication key
macOS checks that it is running on real Mac hardware, and refuses to boot on third-party hardware. You can get around this by reading an authentication key out of your real Mac hardware (the OSK key). Save the first block of C code from this page as smc_read.c. In a command prompt, change into the same directory as that file and run:
xcode-select --install # If you don't already have gcc
gcc -o smc_read smc_read.c -framework IOKit
./smc_read
It’ll print out the 64 character OSK for you. Make a note of it.
Every Mac uses the same OSK, so don’t be surprised that it doesn’t look like a random string!
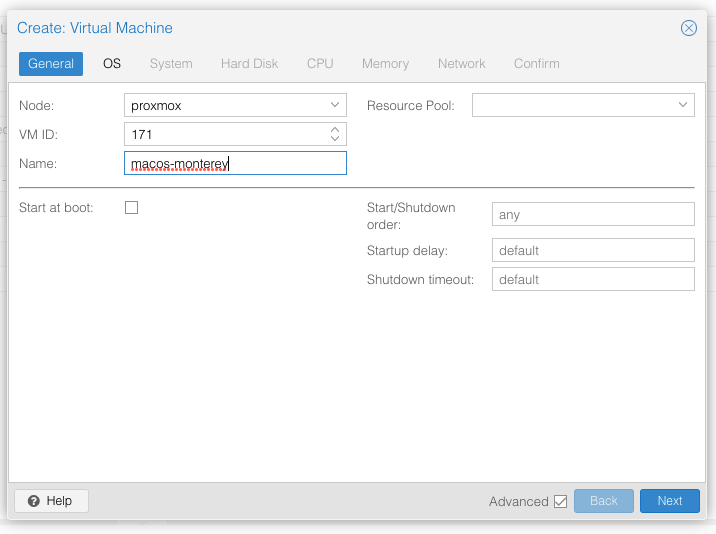
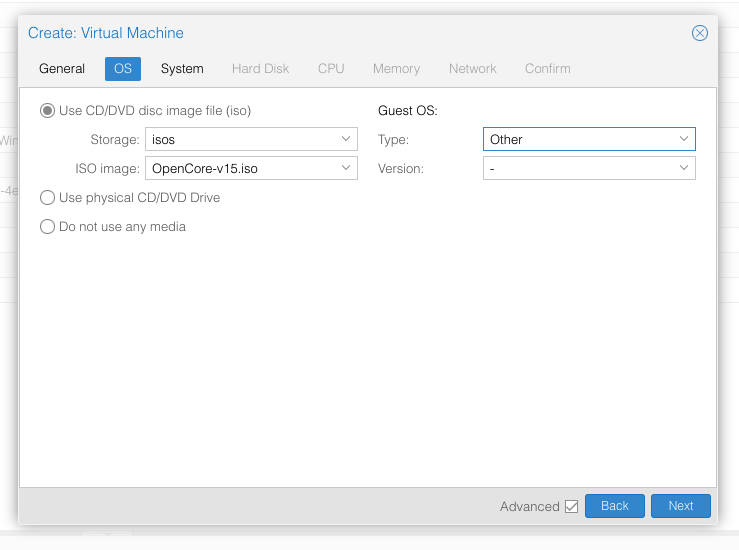
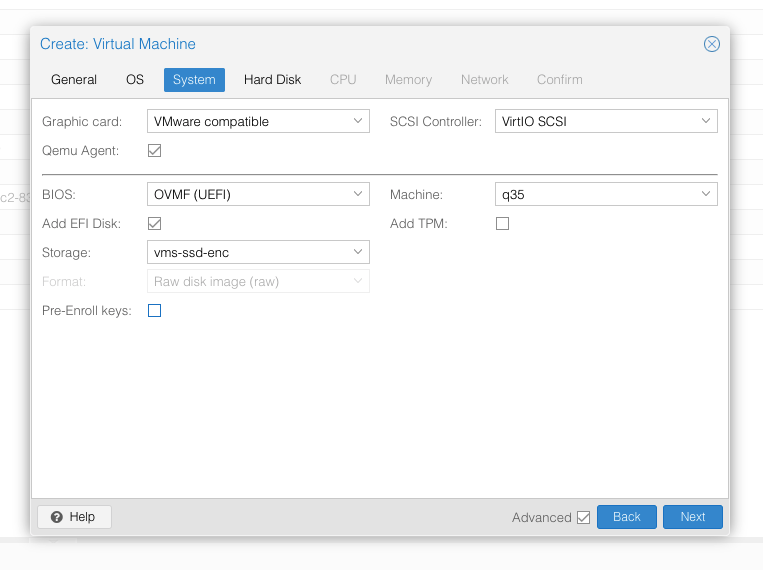
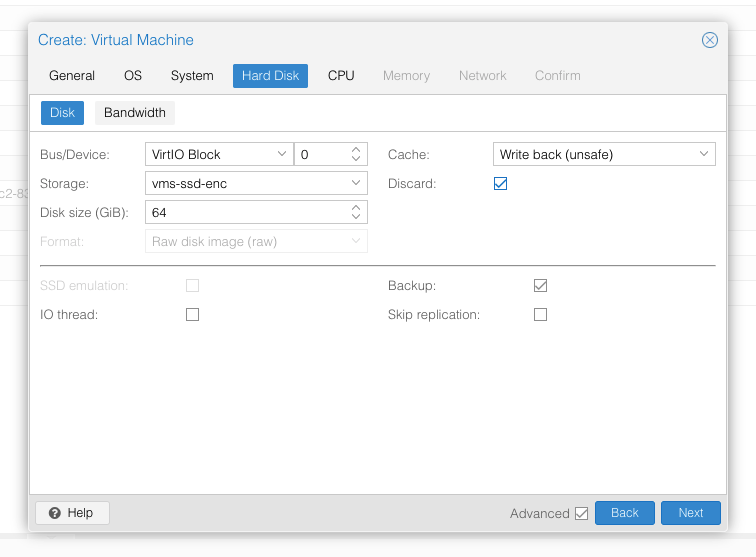
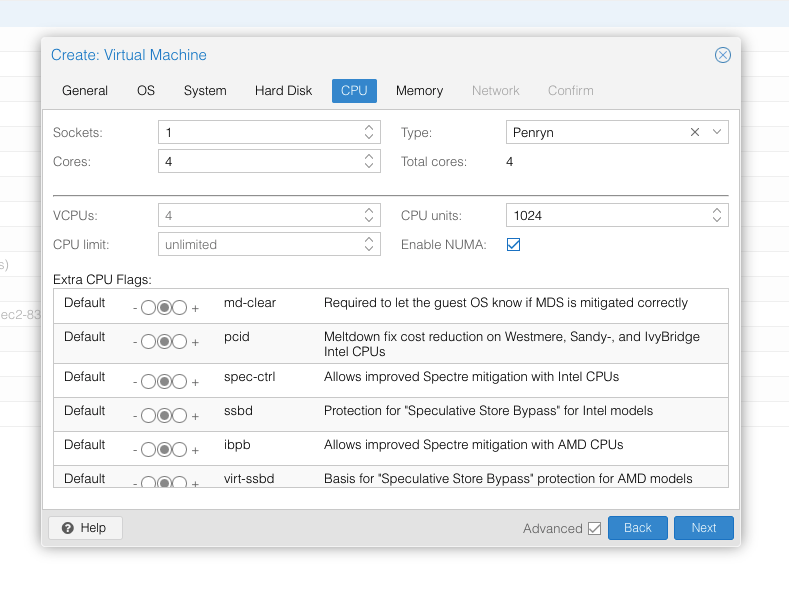
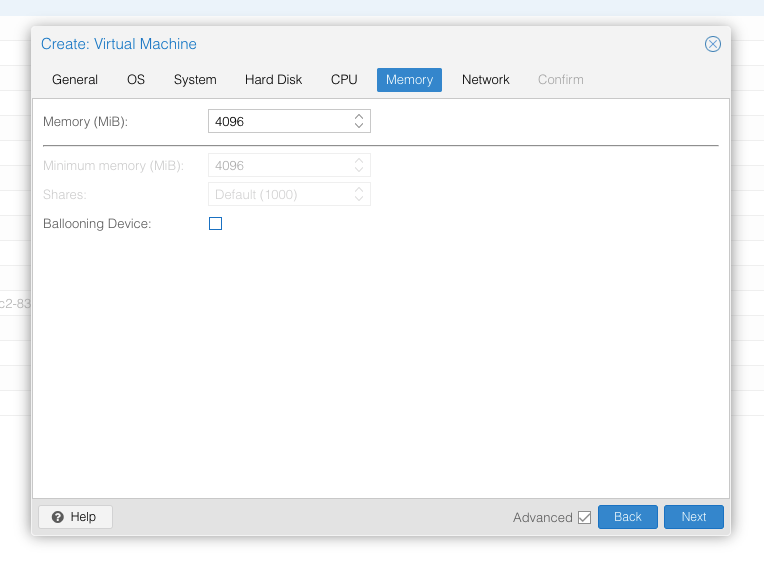
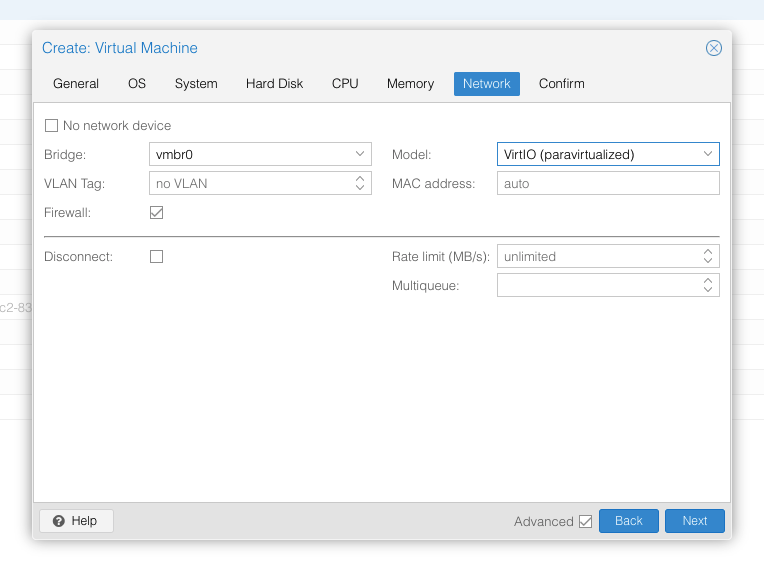
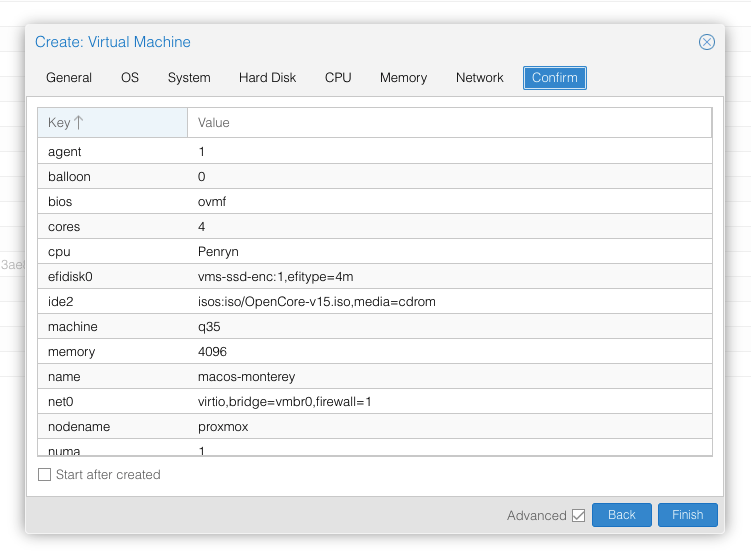
Create the VM
From the Proxmox web UI, create a new virtual machine as shown below.
In the Options page for the VM, ensure that “use tablet for pointer” is set to “Yes” (this is the default).
In the Hardware page for the VM, add a second DVD drive at IDE0, set it to use your Monterey-full.img or Monterey-recovery.img.
Don’t try to start the VM just yet. First, SSH into your Proxmox server so we can make some edits to the configuration files.
Edit /etc/pve/qemu-server/YOUR-VM-ID-HERE.conf (e.g. with nano or vim). Add this line, being sure to substitute the OSK you extracted earlier into the right place:
args: -device isa-applesmc,osk="THE-OSK-YOU-EXTRACTED-GOES-HERE" -smbios type=2 -device usb-kbd,bus=ehci.0,port=2 -global nec-usb-xhci.msi=off -global ICH9-LPC.acpi-pci-hotplug-with-bridge-support=off
A USB keyboard is added here because macOS doesn’t support QEMU’s default PS/2 keyboard.
MSI has been disabled for the USB controller to fix QEMU panics when USB 3 devices are passed through.
ACPI PCIe hotplug support needs to be disabled for VMs with passthrough devices since QEMU Q35 machine model 6.1, which is what that final argument does. (You could instead choose Q35 6.0 for your Machine type on the Hardware tab). If you haven’t updated your QEMU to version 6.1 yet then remove this argument from the args. (Proxmox 7 ships with 6.0 and updated to 6.1 later on)
Ensure the args are all on a single line!
We also need to add a -cpu argument. If your host CPU is Intel, add this to the end of the “args” line:
-cpu host,kvm=on,vendor=GenuineIntel,+kvm_pv_unhalt,+kvm_pv_eoi,+hypervisor,+invtsc
This will pass through all of the features that your CPU supports. OpenCore’s config will pretend to macOS that the CPU’s model name is Penryn for compatibility.
If your host CPU is AMD, or the above argument doesn’t work for you, use this more-compatible alternative:
-cpu Penryn,kvm=on,vendor=GenuineIntel,+kvm_pv_unhalt,+kvm_pv_eoi,+hypervisor,+invtsc,+pcid,+ssse3,+sse4.2,+popcnt,+avx,+avx2,+aes,+fma,+fma4,+bmi1,+bmi2,+xsave,+xsaveopt,+rdrand,check
This pretends that your CPU is Penryn, which will keep macOS happy even if your host CPU is AMD, and adds a bunch of newer required and optional CPU features on top. Features that your host CPU doesn’t support will be ignored (a warning will be printed to the console during launch with qm start 1xx), but note that macOS won’t work without SSE4.2 support.
You can remove the “+invtsc” feature from the list if your CPU doesn’t support it, or if you want to be able to migrate a running VM between Proxmox nodes.
Now find the lines that define the two “ISOs” (ide0 and ide2), and remove the “,media=cdrom” part from them. Add “,cache=unsafe” in its place. This will treat these as hard disks rather than DVD drives.
Save your changes, return to the Options tab, and change the boot order to put IDE2 (the OpenCore image) first. Your final VM configuration file should resemble this:
args: -device isa-applesmc,osk="..." -smbios type=2 -device usb-kbd,bus=ehci.0,port=2 -cpu host,kvm=on,vendor=GenuineIntel,+kvm_pv_unhalt,+kvm_pv_eoi,+hypervisor,+invtsc -global nec-usb-xhci.msi=off -global ICH9-LPC.acpi-pci-hotplug-with-bridge-support=off
agent: 1
balloon: 0
bios: ovmf
boot: order=ide2
cores: 4
cpu: Penryn
efidisk0: vms-ssd-enc:vm-171-disk-1,efitype=4m,size=1M
ide0: isos:iso/Monterey-full.img,cache=unsafe,size=14G
ide2: isos:iso/OpenCore-v15.img,cache=unsafe,size=150M
machine: q35
memory: 4096
name: macos-monterey
net0: virtio=...,bridge=vmbr0,firewall=1
numa: 1
ostype: other
virtio0: vms:vm-171-disk-0,cache=unsafe,discard=on,size=64G
scsihw: virtio-scsi-pci
smbios1: uuid=...
sockets: 1
vga: vmware
Configure Proxmox
On Proxmox, run “echo 1 > /sys/module/kvm/parameters/ignore_msrs” to avoid a bootloop during macOS boot. To make this change persist across Proxmox reboots, run:
echo "options kvm ignore_msrs=Y" >> /etc/modprobe.d/kvm.conf && update-initramfs -k all -u
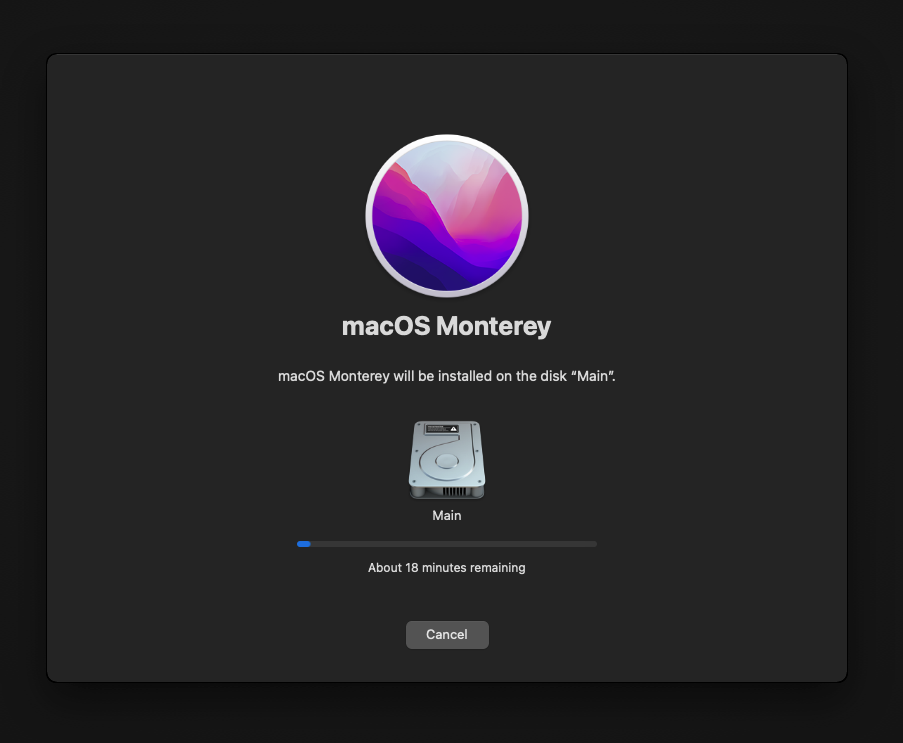
Install Monterey
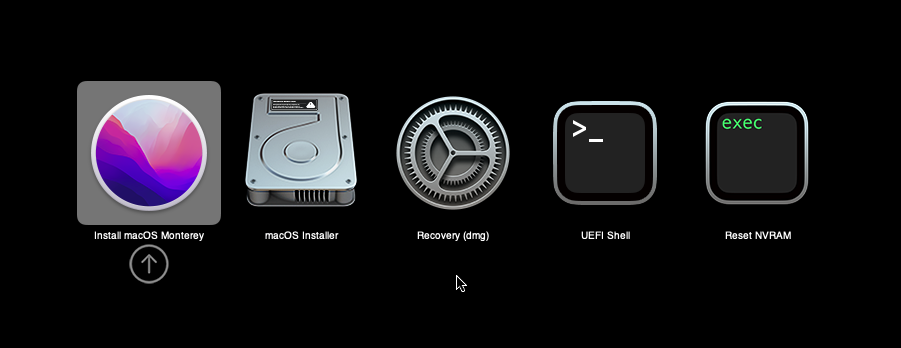
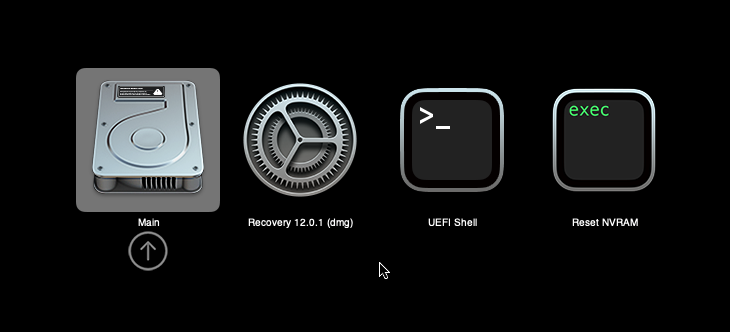
Now start up your VM, it should boot to the OpenCore boot picker:
Press enter to boot the “Install macOS Monterey” entry and the installer should appear. (If your keyboard isn’t working, leave the Proxmox Console page and re-enter it)
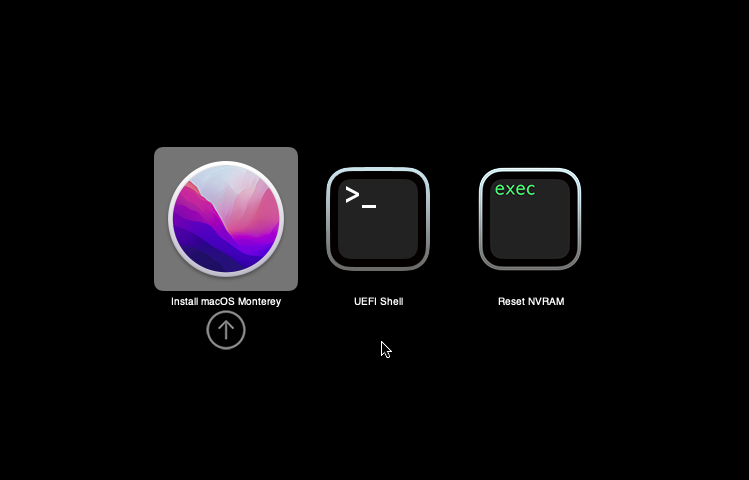
If you built a recovery installer, the icon will instead be an image of a hard disk and be labelled “MacOS Base System”.
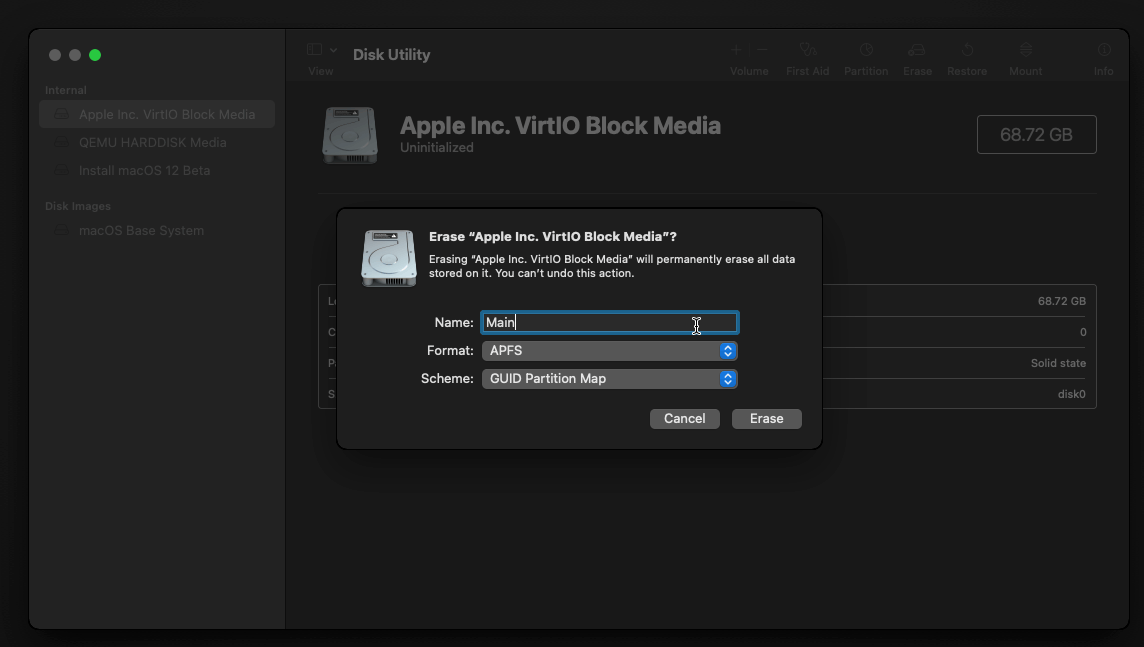
Our virtual hard drive needs to be erased/formatted before we can install to it, so select the Disk Utility option. Follow the steps below to format the disk:
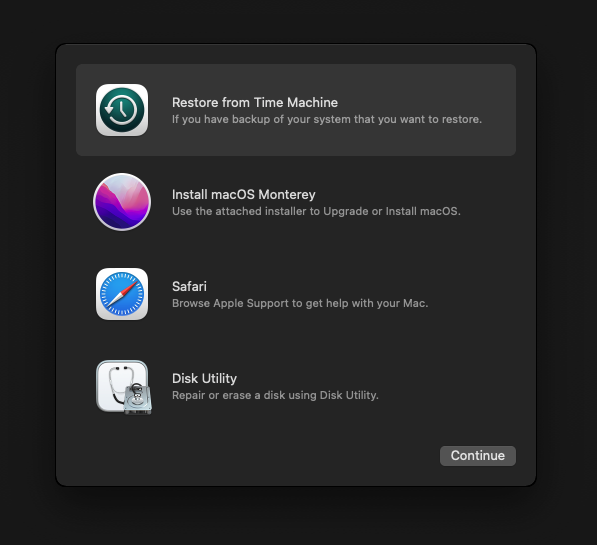
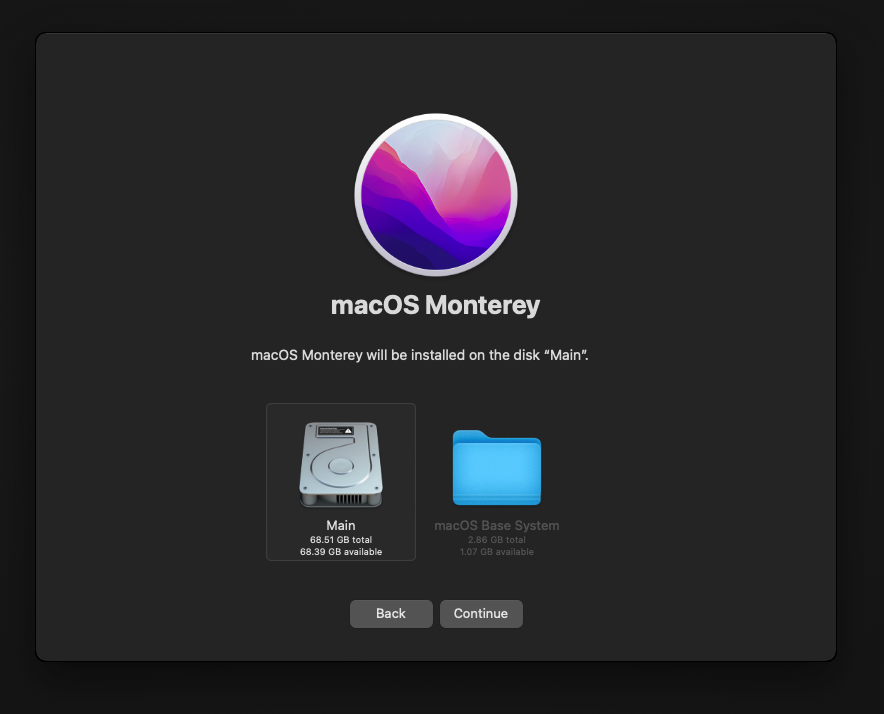
Now you can quit Disk Utility from the top menu (Disk Utility > Quit Disk Utility), and we’re ready to begin installation!
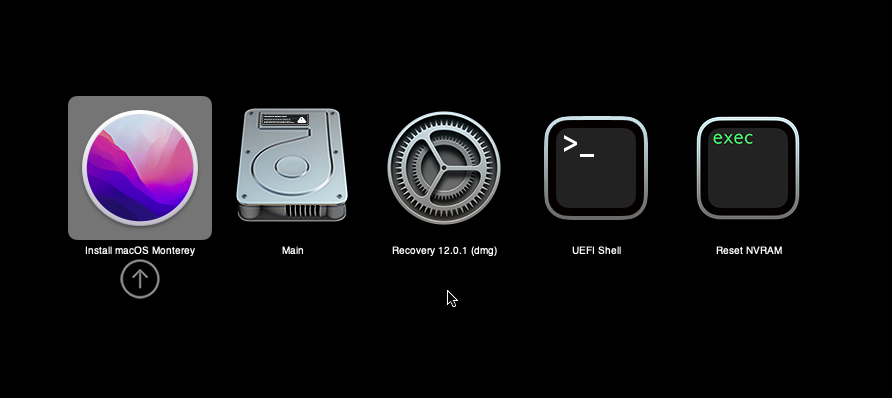
After the first stage of installation, the VM will reboot 2 or 3 times in quick succession, and each time you must manually pick the “macOS Installer” entry (the second one here, with the hard disk icon) to continue installation. It will not be selected for you automatically:
If your keyboard isn’t responding on this screen, exit the Console tab in Proxmox and re-enter it. If you get a “prohibited” sign like this appearing, hit the Reset button on the VM to try again:

Now the installation is nearly complete and the macOS Installer entry disappears, so pick the name of your main disk to boot (mine’s called Main).
There’s just one more reboot to come. Afterwards pick the “Main” entry again and this time you’ll finally boot into Monterey!
Answer the initial install questions, and you’ll be logged on! Note that you will want to hold off on logging into your Apple ID until you’ve configured your Mac’s serial number in OpenCore (because otherwise a Mac with the default shared serial number in my OpenCore image will be added to your Apple ID).
Note that it will be really sluggish for a few minutes after the first boot while the system performs housekeeping tasks.
Make the OpenCore install permanent
We’re currently booting using OpenCore from the attached OpenCore ISO. Let’s install that to the hard drive instead. Pop open Terminal and run “diskutil list” to see what drives we have available.

Use “sudo dd if=<source> of=<dest>” to copy the “EFI” partition from the OpenCore CD and overwrite the EFI partition on the hard disk. The OpenCore CD is the small disk (~150MB) that only has an EFI partition on it, and the main hard disk is the one with the large (>30GB) Apple_APFS “Container” partition on it.
In my case these EFI partitions ended up being called disk1s1 and disk0s1 respectively, so I ran “sudo dd if=/dev/disk1s1 of=/dev/disk0s1” (note that if you get these names wrong, you will overwrite the wrong disk and you’ll have to start the installation over again!).
Now shut down the VM, and remove both the OpenCore and the Monterey installer drives from the Hardware tab. On the Options tab, edit the boot order to place your virtio0 disk as the first disk. Boot up. If everything went well, you should see the OpenCore boot menu, and you can select your “Main” disk to boot Monterey:
Sleep management
I found that I was unable to wake Monterey from sleep using my mouse or keyboard. If you encounter the same problem, you can either disable system sleep in Monterey’s Energy Saver settings to avoid the issue, or you can manually wake the VM up from sleep from Proxmox by running:
qm monitor YOUR-VM-ID-HERE
system_wakeup
quit
Editing your OpenCore/EFI settings
The Configuration.pdf that explains the OpenCore config.plist file can be found along with the OpenCore release on my GitHub.
To mount your EFI partition in macOS so you can edit your config.plist, first check the “identifier” of your EFI partition in the terminal:
~$ diskutil list
/dev/disk0 (external, physical):
   #:                   TYPE NAME              SIZE       IDENTIFIER
   0:  GUID_partition_scheme                  *512.1 GB   disk0
   1:                    EFI EFI               209.7 MB   disk0s1
   2:             Apple_APFS Container disk1   511.9 GB   disk0s2
Then you can mount it like so:
sudo mkdir /Volumes/EFI
sudo mount -t msdos /dev/disk0s1 /Volumes/EFI
Now you can edit /Volumes/EFI/OC/config.plist with your favourite text editor to make your changes. (TextEdit is not a great choice because it likes to insert curly quotes into the file and otherwise break things, there are some dedicated plist editors available such as XCode).
If you’re unable to boot macOS, you can edit the config.plist using the “UEFI Shell” option in the OpenCore boot menu instead.
Enter “FS0:” and press enter to open up the first available filesystem, then run “edit EFI\OC\config.plist” (if the file isn’t found, try switching to another filesystem like fs1:). When you’re done editing, press control+Q to exit, “Y” to save, then run “exit” to return to the OpenCore menu. You need to reboot for your changes to take effect.
If you prefer, you can edit config.plist from the comfort of your Proxmox host instead. If you’re booting from an attached OpenCore.img file, you can mount that file as a disk on the host. If you’re booting from the VM’s disk instead, it must be in raw format in order to be mounted (e.g. typical LVM or ZFS usage) rather than qcow2.
# Mount an OpenCore image:
losetup --partscan /dev/loop0 /var/lib/vz/template/iso/OpenCore-v15.img
# or a VM boot disk:
losetup --partscan /dev/loop0 /dev/zvol/tank/vms/vm-100-disk-1

mount /dev/loop0p1 /mnt
Now the contents of that first partition are available in /mnt, so you can edit /mnt/EFI/OC/config.plist in your favourite editor. When you’re done, do this to unmount the disk:
umount /mnt
losetup --detach /dev/loop0
Automatic boot
In config.plist, you can set Misc/Boot/Timeout to a non-zero value to allow the default boot option be chosen automatically after that delay in seconds. I’ve disabled this by default because it causes the installer ISO to re-enter its main menu instead of continuing the second stage of installation.
You can set the default boot option by pressing control+enter on it.
Verbose boot
To boot macOS in Verbose mode to diagnose boot problems, at the OpenCore boot menu press Cmd+V before pressing enter to boot macOS (you don’t need to hold it down).
If there is a kernel panic during boot and it reboots too quickly to be read, edit config.plist to add “debug=0x100” to the kernel arguments.
Changing screen resolution
To change macOS’ screen resolution, you need to edit the UEFI/Output/Resolution setting in config.plist, the default is 1920×1080@32.
You should be able to change this to any of the modes that the system OVMF menu offers (hit F2 at the start of guest boot and choose “Device Manager/OVMF Platform Configuration” to see which resolutions are available).
Video performance
Because there is no guest video acceleration available for macOS, video performance is poor.
In Google Chrome in the guest you will need to toggle off the setting to “use hardware acceleration when available” to improve issues with elements not being drawn or flickering (especially video). Safari may be a better choice.
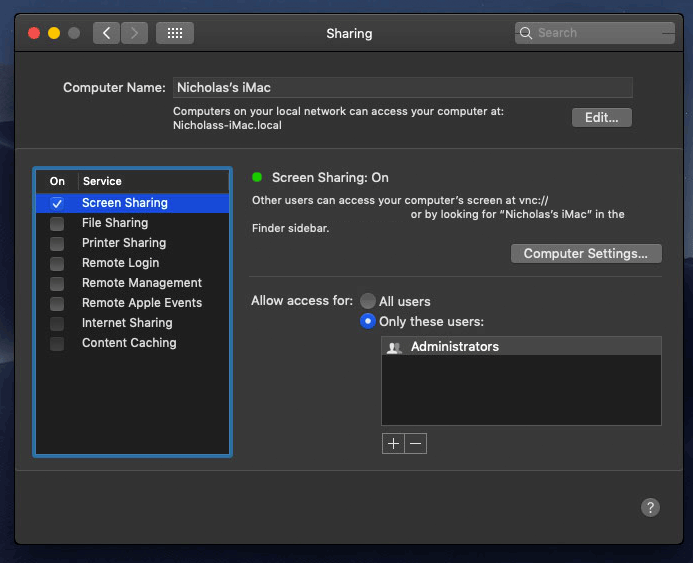
macOS’s built in “Screen Sharing” feature offers dramatically better framerates and latency than Proxmox’s browser-based VNC console, so if you have a real Mac to act as a viewing console, you can enable that in the VM’s “Sharing” settings and connect to the VM using the Screen Sharing app from your Mac instead:
Apparently Screen Sharing is also compatible with VNC clients like RealVNC, so you should be able to connect to it from Linux or Windows consoles using RealVNC.
The real magic bullet for video performance is to pass through a compatible video card using PCIe passthrough (though note that macOS now only supports a handful of very old NVidia cards). This offers near-native performance. You can read more about how I’m using PCIe passthrough on my own installation here.
USB passthrough
Since I want to use this as my primary computer, I want to use a USB keyboard and mouse plugged directly into Proxmox, rather than sending my input through the web VNC console.
Proxmox has good documentation for USB passthrough. Basically, run “qm monitor YOUR-VM-ID-HERE”, then “info usbhost” to get a list of the USB devices connected to Proxmox:
qm> info usbhost
 Bus 3, Addr 12, Port 6, Speed 480 Mb/s
 Class 00: USB device 8564:1000, Mass Storage Device
 Bus 3, Addr 11, Port 5.4, Speed 12 Mb/s
 Class 00: USB device 04d9:0141, USB Keyboard
 Bus 3, Addr 10, Port 5.1.2, Speed 12 Mb/s
 Class 00: USB device 046d:c52b, USB Receiver
 Bus 3, Addr 9, Port 14.4, Speed 12 Mb/s
 Class 00: USB device 046d:c227, G15 GamePanel LCD
 Bus 3, Addr 8, Port 14.1, Speed 1.5 Mb/s
 Class 00: USB device 046d:c226, G15 Gaming Keyboard
In this case I can add my keyboard and mouse to USB passthrough by quitting qm, then running:
qm set YOUR-VM-ID-HERE -usb1 host=04d9:0141
qm set YOUR-VM-ID-HERE -usb2 host=046d:c52b
This saves the devices to the VM configuration for you. You need to reboot to have the new settings apply.
You can also pass through USB devices by passing through an entire USB controller using Proxmox’s PCIe passthrough feature, which gives much better compatibility.
Odd core counts
If your host CPU is AMD, you might have a core count which is divisible by 3, like 6 cores. macOS doesn’t like it if the core count isn’t a power of 2 (1, 2, 4, 8), but it doesn’t mind odd socket counts.
So in order to pass 6 total cores, configure the VM for 3 sockets and 2 cores per socket.
Fixing “guest boots to UEFI shell”
If your guest ends up booting to the UEFI shell instead of showing the OpenCore boot menu, especially if you’ve just updated OpenCore to a new version, you’ll need to edit the guest’s UEFI boot entries to fix this.
At the very start of guest boot, hit F2 to enter guest UEFI settings.
First we’ll remove the old entries. Choose the Boot Maintenance option, then Boot Options -> Delete Boot Option. Use the spacebar to tick any old Clover or OpenCore entries (avoid ticking the EFI Internal Shell option, you want to keep that!). Select “Commit Changes and Exit”.
Now we’ll add the correct entry for OpenCore back in. Select Add Boot Option. Navigate through the device tree to EFI/OC/OpenCore.efi and select it, name this new option “OpenCore” or similar. Again Commit Changes and Exit.
Go to the Change Boot Order and move OpenCore to the top. Commit Changes and Exit.
Now back out to the main menu and choose Reset, and you should successfully boot into OpenCore this time.
Fixing iMessage
iCloud and the App Store should already be working for you, but for iMessage support you must follow these steps to mark your network adapter as built-in:
https://dortania.github.io/OpenCore-Post-Install/universal/iservices.html#fixing-en0
Disabling SIP (System Integrity Protection)
You can disable SIP by selecting the Recovery option from the OpenCore boot menu, then use the top menu to open the Terminal and run csrutil disable --no-internal. Then reboot.
This may be needed to run unsigned kexts or perform other hacks.
Upgrading OpenCore
Sometimes you need to update OpenCore to a new release in order to support a new macOS update. I’ll assume you don’t have any customisations to config.plist you want to save.
First take a snapshot! It’s great to be able to roll back if something goes wrong.
If you’re still able to boot macOS, you can update it from within the guest. Follow the instructions in the “Editing your OpenCore/EFI settings” section to mount your EFI partition. Then you can delete the EFI folder in there and replace it with the one from the OpenCoreEFIFolder.zip file from my OpenCore release (you’ll probably need to empty the trash first to make room for the new folder). You’re done!
If you aren’t able to boot macOS, unpack and upload the new OpenCore ISO to Proxmox’s ISO store instead. Add a new CD drive to the VM that uses that ISO. Then in Proxmox’s terminal edit the VM’s config (in /etc/pve/qemu-server) to replace “media=cdrom” with “cache=unsafe” for the OpenCore drive. Now on the “Options” tab, change the boot order to put the new OpenCore drive first.
Start the VM and boot into macOS using the new OpenCore drive. From within macOS you can now follow the instructions from the “Make the OpenCore install permanent” section to install the new OpenCore image to your main macOS disk, after which the OpenCore drive can be detached from the VM.
Upgrading from macOS Big Sur
First make a backup or snapshot of your system! Being able to roll back when the upgrade goes wrong is a real lifesaver.
You’ll need to update OpenCore to my v15 release before the upgrade. You can follow the instructions in the “Editing your OpenCore settings” section above to mount your EFI disk. Then you can replace the OpenCore files in the mounted “EFI” disk with the ones from the OpenCoreEFIFolder.zip file in my newest OpenCore release.
Reboot to make sure that you can still boot Big Sir.
If you’re using any PCIe passthrough devices (particularly video cards) you’ll want to disable those and set “vga: vmware” instead, so you can install using Proxmox’s web console from a different machine during the upgrade. This avoids installer problems triggered by flaky video card passthrough, especially host lockups caused by the AMD Reset Bug.
Now you can upgrade to Monterey using Software Update or from the App Store like you would on a real Mac.
If the update fails to appear, your SIP mode might be set to “Apple Internal”. You can check this by running “csrutil status” in the Terminal.
To fix this, reboot your VM and at the OpenCore menu select Recovery. Open up the Terminal, and in there run “csrutil enable --no-internal” (“csrutil disable --no-internal” is fine too), then reboot back into macOS and try again.
Hi Nicholas,
Thank you for creating this guide. I’ve come from some success hackintoshing a few laptops with opencore but when I found this post I’ve been so glued to it.
I’m attempting to passthrough a couple pcie devices. A half height MSI RX 560 4GB GPU and a WD Black SN 750 M.2 NVMe SSD. Both of which should be compatible according to the dortania guides. I verified IOMMU is enabled, added this to my /etc/default/grub file
GRUB_CMDLINE_LINUX_DEFAULT=”quiet intel_iommu=on pcie_acs_override=downstream,multifunction video=efifb:off” rootdelay=10″
blacklisted the radeon, nouveau, nvidia drivers,
added the vfio, vfio_iommu_type1, vfio_pci, vfio_virqfd modules. Lastly I added the vendor and device IDs to the /etc/modprobe.d/vfio.conf file. Then I rebooted.
So for the NVMe ssd, MacOS doesn’t see it when i’m in recovery mode using disk utility. Do I need to modify the opencore config.plist file to get this seen by macos?
Then my GPU, when I pass it through, I stuck at the apple boot screen, the loading bar does not complete. I get the monterey background on my external display and in the console display I see that apple logo with a partially loaded bar. It never completes or fully boots into the OS. Is that another case where I need to edit the Opencore config.plist?
Thank you for your guidance so far.
You shouldn’t need to edit the opencore config to have the NVMe SSD work, show your VM’s config maybe. Sometimes in the installer you need to tick “show all devices” for drives to appear.
Also check “dmesg” for passthrough errors, particularly “BAR” errors.
You need to disable the emulated VGA adapter on the hardware tab (disabling the console) for macOS to boot.
Is that the primary GPU in your machine? There are extra considerations for GPUs which are set as your primary display in your host UEFI settings.
Thank you for the quick reply and guidance! I tried my best to look around the internet for solutions but my searches kept coming back to you. In the macos recovery env with disk utility I did select that drop down to view all devices and didn’t see nvme ssd.
I did a dmesg | grep -iC 3 “BAR on the server but didn’t see any errors. I did find this block of errors when I was looking through dmesg alone
[68005.297036] pcieport 0000:00:1d.0: DPC: containment event, status:0x1f11 source:0x0000
[68005.297040] pcieport 0000:00:1d.0: DPC: unmasked uncorrectable error detected
[68005.297047] pcieport 0000:00:1d.0: PCIe Bus Error: severity=Uncorrected (Non-Fatal), type=Transaction Layer, (Receiver ID)
[68005.297051] pcieport 0000:00:1d.0: device [8086:a330] error status/mask=00200000/00010000
[68005.297053] pcieport 0000:00:1d.0: [21] ACSViol (First)
[68006.558091] vfio-pci 0000:04:00.0: not ready 1023ms after FLR; waiting
[68007.614078] vfio-pci 0000:04:00.0: not ready 2047ms after FLR; waiting
[68009.918088] vfio-pci 0000:04:00.0: not ready 4095ms after FLR; waiting
[68014.270117] vfio-pci 0000:04:00.0: not ready 8191ms after FLR; waiting
[68022.718128] vfio-pci 0000:04:00.0: not ready 16383ms after FLR; waiting
[68040.382201] vfio-pci 0000:04:00.0: not ready 32767ms after FLR; waiting
[68075.198306] vfio-pci 0000:04:00.0: not ready 65535ms after FLR; giving up
When I disable vga: none, there isn’t any output on the display at all so I can’t really tell what is going on. So in my config I still have it on, thought I would keep it on while troubleshooting but I didn’t realize it needed to be set to none in order to boot.
My CPU does have integrated graphics but I did notice that once I installed the GPU when I plug in the HDMI cable into the GPU during proxmox boot I see proxmox booting and its on the display. The motherboard hdmi then doesn’t have any output for proxmox anymore when the GPU is installe din the system. I have a Intel(R) Core(TM) i7-8700K CPU @ 3.70GHz.
this is my 100.conf file
agent: 1
args: -device isa-applesmc,osk=”beepbeep” -smbios type=2 -device usb-kbd,bus=ehci.0,port=2 -global nec-usb-xhci.msi=off -global ICH9-LPC.acpi-pci-hotplug-with-bridge-support=off -cpu host,kvm=on,vendor=GenuineIntel,+kvm_pv_unhalt,+kvm_pv_eoi,+hypervisor,+invtsc
bios: ovmf
boot: order=ide2;ide0;net0;hostpci0
cores: 4
cpu: Penryn
hostpci0: 0000:00:14.3
hostpci1: 0000:04:00,pcie=1
ide0: local:iso/Monterey-recovery.img,cache=unsafe,size=3144712K
ide2: local:iso/OpenCore-v17.iso,backup=0,cache=unsafe,discard=on,size=150M
machine: q35
memory: 12288
meta: creation-qemu=6.2.0,ctime=1664126085
name: nix-macos-monterey
net0: virtio=32:65:A0:A5:CD:26,bridge=vmbr0,firewall=1
numa: 0
ostype: other
scsihw: virtio-scsi-pci
smbios1: uuid=12df11e8-086e-481b-9d8f-b592109ded39
sockets: 1
unused0: Sung850SSD:vm-100-disk-2
unused1: Sung850SSD:vm-100-disk-1
vga: vmware
virtio1: Sung850SSD:vm-100-disk-0,cache=unsafe,discard=on,size=450G
vmgenid: 2014d8d9-5533-48e7-b151-4f925d561720
Thank you!
In your host UEFI settings check if you have an option for selecting integrated or PCIe graphics as primary, selecting integrated will likely fix things for you.
Is 04:00 your GPU? If so those error messages are a failure for the host to reset the card, i.e. the AMD Reset Bug. For cards affected by this bug, and if they’re a secondary GPU, it’s possible for it to be used a single time per host power cycle, if you can avoid the host initializing it at all.
To do better than that you can try adding vendor-reset: https://www.nicksherlock.com/2020/11/working-around-the-amd-gpu-reset-bug-on-proxmox/ . Vendor reset did not fix my RX580, so I can only use it a single time per host power cycle.
Wow, this is super slick! It is truly a beaut! The setting that fixed my setup was going into the host UEFI settings and selecting the integrated graphics as the primary.
This makes the mac so much more usable for me. I don’t think my card has the AMD reset bug. My RX 560 seems to come back after multiple reboots. So maybe i’m in the clear there.
Now I just have to try to get the WD SN 750 passed through.
I think the 04:00 is the WD SN 750 NVMe ssd
It turned out for my specific case with the WD SN750 1TB NVMe drive not showing up in macos that it was the drive. I plugged in a WDSN750 SE 512 GB and it showed up right away, same with a Samsung NVMe 970 pro that I had as well, both showed up with the default open ore config.
Hi Nick,
I must start by taking my hat off. You da Man! Thanks for your dedication to us mere mortals.
This is my first time attempting this, I followed every step and start over multiple times yet I continue to deal with the same issue. When I start the VM for the first time it goes to OpenCore as it should, I click on the macOS Base System Icon, I get the Apple logo and then it just stays there, stuck, with no sign of progress.
This is my hardware:
– ASUS ROG Strix gaming B-450
– Ryzen 3 2200G (will soon upgrade)
-16 GB 3200Hz RAM
– 256 GB SATA SSD (100% dedicated to this project, my main storage is a 500 GB m.2)
This is the VM config:
GNU nano 5.4 /etc/pve/qemu-server/100.conf
args: -device isa-applesmc,osk=”famouswordsby(c)AppleComputerInc” -smbios type=2 -de>
balloon: 0
bios: ovmf
boot: order=virtio0;ide2;net0;ide0
cores: 4
efidisk0: local-lvm:vm-100-disk-0,efitype=4m,size=4M
ide0: local:iso/Monterey-recovery.img,cache=unsafe,size=3144712K
ide2: local:iso/OpenCore-v17.iso,cache=unsafe,size=150M
machine: q35
memory: 12288
meta: creation-qemu=6.2.0,ctime=1665270880
name: Monterey
net0: virtio=A6:EE:3D:7E:BB:A1,bridge=vmbr0,firewall=1
numa: 1
ostype: other
scsihw: virtio-scsi-pci
smbios1: uuid=ec0e035c-fc87-44fa-8a3c-46a3a02c1229
sockets: 1
vga: vmware
virtio0: local-lvm:vm-100-disk-1,size=150G
vmgenid: ee4bc387-ebac-40fe-9ba7-468105c81cc3
I’m really hoping that its some simple solution. Much thanks in advance for your time and attention.
That’s an unusual failure! Config looks correct. Press Cmd/Win+V before selecting the Base System option to enable Verbose Boot, and the log that produces could reveal a cause.
Is there a way to connect the iPad to the macOS through Proxmox?
I tried using the usb passthrough section but it didn’t work.
It seems that for the iDevices you need to PCIe-passthrough an entire USB controller instead of using USB device passthrough.
Is there a way to virtualize the usb controller in Proxmox?
I’m asking because on my Windows PC, I have installed VMWare which uses an USB Controller to hot plug from your host to the VM any USB device.
Proxmox’s USB device passthrough doesn’t work with iDevices, so the best option is to PCIe passthrough the USB controller instead.
If you try and pass in USB iDevices into MacOS VMs through Proxmox’s UI, it won’t work. The device will be seen by MacOS, but will constantly disconnect and reconnect in an infinite loop.
This issue can be fixed by setting the USB device’s guest-reset option to false. Tested and working with an iPhone XR.
Edit the VM configuration file (/etc/pve/qemu-server/[VM-ID].conf) and add the following to the ‘-args’ line.
-device usb-host,vendorid=0x05ac,guest-reset=false
In my example, vendor ID is set to Apple’s ID, but you can specify whatever vendor ID / product ID combo you’d like.
Found the solution here: https://stackoverflow.com/questions/52617634/how-do-i-get-qemu-usb-passthrough-to-work-for-ipad-iphone
Is there a way to increase the graphics memory from 7 MB to 128 MB?
I tried in the hardware section to set it but when I start macOS it still shows 7 MB.
You can, but it doesn’t achieve anything except for allowing the use of higher resolution displays. There is no 2D or 3D acceleration capability so it doesn’t get faster at all. The memory is only used to store the framebuffer.
You need to PCIe-passthrough a compatible GPU to get better graphics performance.
I’m not looking to play games or anything like that.
I only need it to be able to use the command line and Visual Studio.
After a few minutes, it’s very laggy when using the terminal. What I mean is I press the up arrow to get a previous command in the terminal and it’s taking up to one second to react.
Changing the video memory will have no impact at all on that. That sounds more like it’s stalling waiting for disk IO
I tried the whole setting in my Proxmox 7.2-7 or 7.2-11, but without a success. When I boot a VM there is no Install macOS option, only only UEFI shell and reset NVRAM. I tried OpenCore-v17.iso and OpenCore-v18.iso. My Proxmoxes runs on Intel platform. My conf is:
agent: 1
args: -device isa-applesmc,osk=”secret” -smbios type=2 -device usb-kbd,bus=ehci.0,port=2 -global nec-usb-xhci.msi=off -global ICH9-LPC.acpi-pci-hotplug-with-bridge-support=off -cpu host,kvm=on,vendor=GenuineIntel,+kvm_pv_unhalt,+kvm_pv_eoi,+hypervisor,+invtsc
balloon: 0
bios: ovmf
boot: order=ide2
cores: 4
cpu: Penryn
efidisk0: local-zfs:vm-401-disk-0,efitype=4m,size=1M
ide0: local:iso/Monterey-recovery.img,cache=unsafe,size=653763072
ide2: local:iso/OpenCore-v17.iso,cache=unsafe,size=150M
machine: pc-q35-6.0
memory: 4096
meta: creation-qemu=7.0.0,ctime=1665998872
name: macOS
net0: virtio=xxxxxxxxxxx,bridge=vmbr0,firewall=1
numa: 1
ostype: other
scsihw: virtio-scsi-pci
smbios1: uuid=xxxxxxxxxxxxxxxxxxxx
sockets: 1
vga: vmware
virtio0: local-zfs:vm-401-disk-1,cache=unsafe,discard=on,size=64G
vmgenid: xxxxxxxxxxxxxxxxxxxxxxxxxxxxxxx
Your Monterey recovery image is much too small, it should be around 3GB. Recreate that.
Well I make it on linux, but the size seems to fit announced sized:
[root@localhost monterey]# make Monterey-recovery.img
../../fetch-macOS-v2.py –action download –board-id Mac-F60DEB81FF30ACF6 –os latest
Downloading 012-40515…
Saving http://oscdn.apple.com/content/downloads/36/25/012-40515/f7fz3ubbup5g6lr4yj1x36xydr0fuwomkl/RecoveryImage/BaseSystem.dmg to BaseSystem.dmg…
Note: The total download size is 623.48 MB
I found the problem part:
qemu-img convert BaseSystem.dmg -O raw Monterey-recovery.dmg on OracleLinux produced 623MB output
on Ubuntu 3GB output
Thanks
Nick I got something weird. Is this ok?
‘… ‘
Yes, that’s the OSK
Hi.
Such a problem. After shutting down macos , I can’t start it again . Only rebooting the host helps.
Are you doing PCIe passthrough of a GPU?
Yes, that’s right
40 x Intel(R) Xeon(R) CPU E5-2666 v3 @ 2.90GHz (2 Sockets)
Kernel Version Linux 5.15.30-2-pve #1 SMP PVE 5.15.30-3 (Fri, 22 Apr 2022 18:08:27 +0200)
PVE Manager Version pve-manager/7.2-3/c743d6c
GPU: AMD Radeon RX 570 4 Gb.
Most likely your GPU suffers from the AMD Reset Bug, so it can only be used once per host power cycle.
This might fix it for you:
https://www.nicksherlock.com/2020/11/working-around-the-amd-gpu-reset-bug-on-proxmox/
Hi im trying to make the install and when it shows me the language configuration the vm stops
Hi, I followed the guide, and got macOS installed correctly. However, when I try to do the initial setup, the VM crashes after about 60 seconds, barely enough time to set the region.
Any ideas on how to fix this?
That would just about have to be a host TSC fault, run “dmesg | grep -i -e tsc -e clocksource” and see if it’s complaining that the TSC is broken and that it’s abandoning it for HPET instead. I don’t know how to fix that one.
Hey Nick! I am having an issue that I might need somebody’s help with.
So, I had this setup working great on my Proxmox 7 machine before, with no flaws. Unfortunately, my boot drive died on my server and I had to reinstall the OS. No problem I thought, I had the Mac Server all backed up, and it was just a restore away from working again.
It was not… I have not been able to get it to boot ever since. It gets stuck in the starting stage, and I cannot stop it. It gives me nothing log-wise. I have tried reconfiguring everything just to how you had done so in your guide, with no success. I was using PCI-E passthrough on my old machine, so I thought it might be messing something up, but it got me nowhere.
Anyways, I’ve been trying everything for about a week, and I am just stumped. Is there anything I can do?
The VM never completes launching?
Check that you’ve set up the update repo for Proxmox, you might have been using a newer QEMU version before.
If you start the VM from the Proxmox console like “qm start 100” you can sometimes see more warnings that aren’t logged anywhere else.
Hey Nick! Thanks for your quick response. Correct, yeah it does not complete the start command. I already tried “qm start”, and it just seems to hang. I do have my non subscription repo setup, and my system is all up to date, just as it was before. No idea!
I think you already tried removing all the passthrough devices? Anything printed to dmesg?
Share your VM config
Got it. Working great now. PCI-E mix-up. Thanks a ton!
I have followed the guide to build monteray in proxmox and all working fine EXCEPT audio for either HDMI or onboard.
It works fine with monteray without proxmox ( old way with Opencore only ). It’s frustrating because can’t move to using proxmox without audio
I have a gigabyte a320m motherboard, ryzen 7 2700 processor , and and XFX Radeon rd570 graphics card.
Ideally looking for a solution but even if someone can give me some points where I should concentrate my investigation it would be helpful
I know that pass through is happening including audio because if I build a Linux VM inside proxmox all is fine. I haven’t been able to test with windows because haven’t figured out how to correctly insfall graphics driver after installation ( screen goes black). Not sure if certain way this has to be done.
I’ve spent days and days trying to get working and determined not to give up. I’ve tried many combinations of boot arguments, kexts, proxmox options etc but don’t know what I’m missing .
Im passing through the whole pci port which in my case is 07:00
I have made a post but I can’t seem to find it so just typing this again.
Could anyone give me some pointers where I should be concentrating my effort for hdmi audio not working for pass through to Mac OS vm? I also note that the onboard audio doesn’t recognise either in Mac OS however usb audio devices do .
Video and audio work fine for a Linux vm with same settings in terms of mod probe, Vfio, grub etc. the hdmi audio works fine when MacOS is installed bare metal with Opencore only. I have whatever green and lilo kexts. I’ve tried many suggestions on forums but not made a breakthrough yet but to be honest I don’t know what area exactly I should be focusing on . Whether this is to do with ssdt injection or a kext I need to use but don’t etc
My hardware is AMD ryzen 7 2700 cpu, xfx Radeon rx570 gpu. I’m passing through the whole pci card with all functions and pciE unticked. I’ve tried downloading rom file and specifying this .
I’ve created ssdts with ssdttime
Many thanks
What is the actual “hostpci” line from your config file? PCIe and All Functions must be ticked.
Wow! What a journey this OSX/KVM/Proxmox thing has been. But I’m happy to report that I have successfully been able to get GPU Passthrough working – though not on Ventura.
ASUS X570 Gaming Pro
AMD 5600G
2 NVME drives
Asrock RX580 (in the second PCI slot)
A whole bunch of BIOS tweaks but CSM was the thing that finally got things working for me.)
I can boot Monterey with GPU passthrough and get full acceleration (ran Unigine Valley from the VM with Extreme settings and got:
Unigine Valley Benchmark 1.0
FPS: 40.9
Score: 1713
Min FPS: 25.7
Max FPS: 72.4
System
Platform: Darwin 21.6.0 x86_64
CPU model: Intel Core 2 Duo P9xxx (Penryn Class Core 2)(4199MHz) x4
GPU model: AMD Radeon RX 580 (8192MB) x1
Settings
Render: OpenGL
Mode: 1920×1080 8xAA fullscreen
Preset Extreme HD
with no crashes.
Used Nick’s Ventura install method and files but just substituted the Monterey base img.
I have ROM-BAR turned on in BIOS and checked in the PCIe passthrough device. I have romfile set to an ASRock rom from TechPowerUp – not sure if that is necessary.
But no go on Ventura. I did clean install and upgrade Monterey->Ventura. Both hang at shortly after the PCI devices are enumerated. Will play for a few days but this may be able to be my daily driver for work with a W10 VM NVidia3060Ti passthru for play on the same box!
Hey Barry, would you mind sharing the BIOS tweaks? I have a nasty boot loop and enabling CSM does not fix it. Cheers!
Sounds like you figured it out.
@nick – just wanted to report that after re-doing every step for Monterey and then doing an “in VM” upgrade to Ventura, it worked (disabling PCI pass thru, upgrade then reenabling PCI passthru.)
As an odd aside – Geekbench OPENCL Compute consistently crashes the VM. Metal works fine. CPU works fine. Unigine redlines the fans and doesn’t crash. So not sure what Geekbench does extra but I just won’t run it anymore! 😉
Hi, Cheers for the awesome tutorial! I have a problem though: while installing I get the Apple logo and the progress bar and at that point the installation stops. Reboots do not help. I have an AMD Ryzen 5 5600G. Any suggestions? Cheers!
Check the advice for testing your host’s TSC near the start of my Ventura tutorial:
https://www.nicksherlock.com/2022/10/installing-macos-13-ventura-on-proxmox/
HiNick, thanks! Erp Mode was off, also found “Global C-state control” and disabled that. The advice on the Ventura page is for Intel (Haswell etcetera). What do I do for AMD? Cheers!
OK, that did the trick, I just added +tsc_adjust for my AMD, now it boots up till the screen with the Disk Utility and such. Cheers!
Hi, I have in the hardware section of the VM a 4 MB EFI Disk. Do I need to keep that one?
Cheers,
BC
Yep, you need that one. It isn’t really a disk, but rather it’s equivalent to the CMOS chip on a motherboard, and it stores the guest’s UEFI settings.
I think OpenCore’s writes to NVRAM go there too.
I accidently deleted it because it was on the wrong storage. The VM still boots but with a warning. How can I remake it? Cheers!
On the hardware tab you can add a new “EFI disk”, there’s a dedicated option for it
I think I fixed by just adding it again in the Hardware section of the VM and pointing to the new OS disk.
Hi,
hard disk passthrough following https://pve.proxmox.com/wiki/Passthrough_Physical_Disk_to_Virtual_Machine_(VM) does not work with me. The new drive is not available in the VM. Does anything extra need to happen because it’s MaOcS?
Cheers,
BC
You need to choose a compatible disk controller. Virtio-blk aka “virtio” (not scsi) or SATA are good options.
I keep getting stuck when I want to boot.
Instead of booting OpenCore-v18.ISO I get the UEFI Interactive Shell.
This is my config:
agent: 1
args: -device isa-applesmc,osk=”…” -smbios type=2 -device usb-kbd,bus=ehci.0,port=2 -global nec-usb-xhci.msi=off -global ICH9-LPC.acpi-pci-hotplug-with-bridge-support=off -cpu host,kvm=on,vendor=GenuineIntel,+kvm_pv_unhalt,+kvm_pv_eoi,+hypervisor,+invtsc
balloon: 0
bios: ovmf
boot: order=ide2
cores: 4
cpu: Penryn
efidisk0: hdd-img:102/vm-102-disk-0.raw,efitype=4m,size=528K
ide0: local:iso/Monterey-recovery.img,cache=unsafe,size=3144712K
ide2: local:iso/OpenCore-v18.iso,cache=unsafe,size=150M
machine: q35
memory: 4096
meta: creation-qemu=7.0.0,ctime=1673191860
name: MacOS
net0: virtio=36:BA:57:12:DB:E0,bridge=vmbr0,firewall=1
numa: 1
ostype: other
scsihw: virtio-scsi-pci
smbios1: uuid=854f95ce-e2f7-420e-8a02-f485533ae1d2
sockets: 1
vga: vmware
virtio0: hdd-img:102/vm-102-disk-1.raw,cache=unsafe,discard=on,size=64G
vmgenid: beef24e2-30c9-4210-8c02-4bb3a26c1b88
Usually this happens because you have secure boot keys enrolled. On the hardware tab, remove and delete the EFI Disk, and add a new one and un-tick “pre-enroll keys”, then try booting again
That doesn’t work.
I tried making a new VM like 20 times, and still no luck
There’s not much left to try except for redownloading the ISO. Booting OpenCore itself is very undemanding so basically any VM config should achieve it.
I re-downloaded OpenCore and I made a new monterey-recovery.img file and now it’s installing!
Hi Ruben, would you please tell me where did you get your monterey-recovery.img?
Thanks!
So I got all the way to the disk utility, but my Virtio disk is not listed. I did check the ‘show all devices’ but it still only lists “QEMU HARDDISK Media” and “macOS Base System” @ 3.22 GB & 2.88GB. Any thoughts on what I need to change?
How is that disk defined in your VM config? The line needs to start “virtio” and not “scsi” for example.
I figured it out, I use TightVNC so I had added “args: -vnc 0.0.0.0:91” to the end my conf file (after the ‘args:’ line from the instructions above) and it apparently deletes all preceding ‘args:’ lines when you start the VM.
Thanks
I cannot use multiplecore. I have done with 1 cpus and do install its successfully install. If i change to multiple core its bootloop
That sounds like you have a broken TSC on the host.
Hi Nick,
I know this may be a long shot. But I’m trying to get the onboard audio working. I can see that my HD Audio controller has been successfully passed through. But it doesn’t look like the codecs are being loaded. Please see the pasteboard link: https://pasteboard.co/MPB3hGRNxfw0.jpg
Is there a way I can get Apple ALC working so I can use my onboard audio?
Sorry, I don’t know as I haven’t tried this myself. Another option is VoodooHDA for some chipsets. Both will require the kext to be added to your OpenCore.
Hi Nick. Thank you so much for this tutorial! I’m new to this. I’ve been hackintoshing the OpenCore way, got comfortable with it, until i found out Proxmox is way superior, but it looks complicated but im willing to give it try. I’m on i5 10400 and GPU GTX 760. Just a day ago, I built Ventura with this specs and is running fine on Opencore 0.8.8 but to get my GPU working, I’ve to run Opencore Legacy Patcher and got it working just like my previous builds. But I like the Proxmox method. I’ve 3 questions before I jump in; 1) Can I get the OSK from my current Ventura hackintosh? 2) Will MacOS-Proxmox work full-build like I build Ventura on my Opencore hackintosh? 3) Is Ventura-Proxmox available at the moment? Thanks!
Yep, you can get the OSK that way (or you can Google for a copy, since it’s the same on every Mac).
You could import your current installed Ventura disk directly into Proxmox if you liked, and skip the need to install it using Proxmox. You’ll still want to boot from my included OpenCore disk image though, since this has QEMU support configured into it.
I think OCLP ought to work with Proxmox too, but I haven’t tested that.
My Ventura tutorial is here:
https://www.nicksherlock.com/2022/10/installing-macos-13-ventura-on-proxmox/
Hi Nick! I seem to get always stacked in the same point: after the configuration of Proxmox with:
echo “options kvm ignore_msrs=Y” >> /etc/modprobe.d/kvm.conf && update-initramfs -k all -u
I then start my VM, pick the installation icon to boot the “Install macOS Monterey”… and always the apple logo appears there, twithout anything happening… no loading bar, no nothing that shows there is anything happening.
My Proxmox is properly set in my new desktop, and I am accessing it from an old one…
Any help is welcome.
Maybe post the content of your VM config file
Hello Nicholas,
Thank you very much for your detailed guides for a mac os install. I have successfully installed multiple Monterey vms within proxmox. i can get everything working except PCIE pass through. I have tried on 2 different proxmox machines – both have ryzen 7 5700x cpu’s with b550m motherboards, one machine has an amd radeon 6600 and the other has an amd radeon 6800. Im able to pass through the gpu’s and 10gbe nics to any windows or linux vms, however not to monterey. I have tried with opencore V16,17 & 18 from your github to no avail.
VM Config;
agent: 1
args: -device isa-applesmc,osk=………………………. -smbios type=2 -device usb-kbd,bus=ehci.0,port=2 -global nec-usb-xhci.msi=off -global ICH9-LPC.acpi-pci-hotplug-with-bridge-support=of>
bios: ovmf
boot: order=virtio0
cores: 4
cpu: Haswell-noTSX
cpuunits: 1024
efidisk0: local-zfs:vm-100-disk-0,efitype=4m,size=1M
hostpci0: 0000:2f:00,pcie=1,x-vga=1
machine: q35
memory: 50000
meta: creation-qemu=7.1.0,ctime=1675718538
name: macos-monterey
net0: virtio=…………………………..,bridge=vmbr0,firewall=1
numa: 0
ostype: other
scsihw: virtio-scsi-pci
smbios1: uuid=……………………………………..
sockets: 3
usb0: host=5-4.4.1,usb3=1
vga: vmware
virtio0: Storage:vm-100-disk-0,cache=unsafe,discard=on,size=950G
vmgenid: 95b61185-4270-429b-9c71-085ac4b32679
Things i have tried;
tried different gpus – 6600 and 6800
changing hostpci0 x-vga=on
modifying the EFI
reducing the ram of the VM
different cpu’s – haswell, penryn etc.
implementing vendor reset
turning the display to “none” in the vm config
all the different settings when adding the pcie device i.e rombar, primary gpu etc.
When i boot the machine with the pcie passed through the output is black/blank. I installed anydesk and the machine seems to boot and can see the 6800, however won’t display an output. As mentioned previously i can pass throguh both the GPU and a 10gbe nic. When i pass through the 10gbe nic only to the monterey vm it just boot loops until i remove it.
proxmox-ve: 7.3-1
any help would be much appreciated.
Thank you
Proxmox is 7.2
If you don’t even see the Proxmox boot logo on the screen then this is not a macOS problem, the guest UEFI is failing to init the card.
Usually this is because the host already initialised the card during its own boot, which trashes the card’s vBIOS and makes it unsuitable for the guest UEFI to use to init the card. You can solve that by passing through a clean vBIOS using the romfile option on the hostpci line.
You also need to disable resizable BAR
Penryn won’t work as it misses the AVX2 support that the macOS AMD driver requires
Definitely set display: none
Check host dmesg output for BAR errors at VM launch time too
Thanks for your swift response. I have uploaded a vbios rom file from techpower up, changed my CPU to haswell, disabled resizable bar.
the machine now boots to the gpu output, i see the proxmox boot screen & the apple logo, after the machine boots the output turns black. The machine boots as i can still access via any desk.
there are also no more errors at dmesg, the only output for the gpu at dmesg is;
vfio-pci 0000:2f:00.0: vfio_ecap_init: hiding ecap 0x27@0x440
I see this multiple times.
Thank you
If you’re using the 6800 now you may need to add agdpmod=pikera to your boot args in OpenCore’s config.plist
Many CPUs will require “Haswell-noTSX” to be chosen rather than plain Haswell
It worked!!!!!
Thank you very much
Hello, we are struggling to install the MacOs as after creating the VM when we start it it shows the ProxMox logo and then loads after it gives errors and then after it takes us to the UEFI Interactive shell, EDK II where it shows the BLK0&1 with PciRoot(0x0)/Pci(0x1E,0x0)…. of which at the bottom it says press ESC in 5 seconds to skip startup.nsh or any other key to continue and when we do press any key it takes us to the Shell>
and it stops there, nothing else happens.
Could you please assist how to go about it to make it work as we have been trying for days changing settings to different ones but still nothing, still same process over and over again.
You get this if you don’t un-tick “pre-enroll keys” for the EFI disk in Proxmox.
You can remove and delete that from the Hardware tab in Proxmox and then re-add one and un-tick during creation.
The “pre-enroll keys” for the EFI disk was never ticked when creating the VM.
Post your VM config file
Hello, apologies for the delayed reply. See below my VM config file as requested:
args: -device isa-applesmc,osk="..." -smbios type=2 -device usb-kbd,bus=ehci.0,port=2 -cpu host,kvm=on,vendor=GenuineIntel,+kvm_pv_unhalt,+kvm_pv_eoi,+hypervisor,+invtsc -global nec-usb-xhci.msi=off -global ICH9-LPC.acpi-pci-hotplug-with-bridge-support=offagent: 1
balloon: 0
bios: ovmf
boot: order=ide2;virtio0;net0;ide0
cores: 4
cpu: Penryn
efidisk0: ekhaya127Backup1:130/vm-130-disk-0.raw,efitype=4m,size=528K
ide0: ekhaya127Backup1:iso/BaseSystem.img,cache=unsafe,size=3141236K
ide2: ekhaya127Backup1:iso/OpenCore-v16.iso,cache=unsafe,size=10K
machine: q35
memory: 4096
meta: creation-qemu=6.2.0,ctime=1678109804
name: MacOS
net0: virtio=5A:F3:6C:27:EB:42,bridge=vmbr0,firewall=1
numa: 1
ostype: other
scsihw: virtio-scsi-pci
smbios1: uuid=ae10fb74-e641-40d5-96e8-0a987c0e10bf
sockets: 1
vga: vmware
virtio0: ekhaya127Backup1:130/vm-130-disk-1.raw,cache=unsafe,discard=on,size=64G
vmgenid: 8a8ae7c5-4774-40f2-8773-691ca9e7c650
So we have managed to boot the mac properly as we changed our mac version from v16 to v13. But now we get stuck on installing the mac as when we click on install macos, it does not show the main disk or the mac base system it just says “to install macos monterey click continue” and when we do it gives the error “an internet connection is required to install macos”.
Could you please assist on how to go about this as we cannot complete our installation.
I don’t know about the “BaseSystem.img” file you’re using as an installer image, that isn’t created by my instructions.
Inside the installer you have to erase the disk using Disk Utility first before it’ll appear as a disk you can install to (using my instructions).
Your network needs to have a DHCP server available if you’re using a recovery installer, so that macOS can get an IP address and download macOS (otherwise it’ll complain about no internet being available).
so I noticed you mention about the SSE 4.2 requirement, and the issue i’m having is the hardware machine isn’t SSE 4.2 capable (but my CPU is AMD Ryzen 9 3950x so supports all). Is one purpose of OSX-KVM todo a transparent pass-through? I cannot seem to get a VM guest machine with SSE 4.2 and i’m looking for a solution.
What do you mean by “hardware machine”? If your CPU supports SSE 4.2 then you can advertise that feature to the guest no problem, just use the suggested -cpu argument for AMD.
OSX-KVM doesn’t have any additional capabilities here, both Proxmox and OSX-KVM just use a QEMU backend.
Thanks for this epic guide, I’ve successfully setup Monterey with GPU passthrough (a Sapphire Nitro RX580) and it’s working perfectly through NoMachine. I attempted to upgrade to the next major version of OSX but got some error messages, I don’t have a copy of what they were right now, but have you tried to update also, and were you successful? If so, do you have any tips you could share with us?
Thanks again!
I’ve had Software Update upgrades work before, but recently I jump straight into building a new Full Installer image and then use that to upgrade macOS, which seems much more reliable.
On my system I disable my RX580 passthrough and use emulated video for the duration of the upgrade because my card doesn’t reset properly (AMD Reset Bug)
Hi Nick,
awesome tutorial. Thank you!
I just upgraded to Kernel 6 and now the system does not boot up anymore. I see the verbose boot log but before the Apple logo would appear the vm resets… Any idea?
Thanks,
Claas
Maybe your new kernel is missing the ignore_msrs setting? I haven’t tested kernel 6 yet
I ran into an issue at the step where you copy the EFI partition from the OpenCore CD to the EFI partition on the hard disk:
dd: /dev/disk1s1: Resource busy
I believe I have the command correct:
sudo dd if=/dev/disk1s1 of=/dev/disk0s1
/dev/disk0 (internal):
#: TYPE NAME SIZE IDENTIFIER
0: GUID_partition_scheme 137.4 GB disk0
1: EFI EFI 209.7 MB disk0s1
2: Apple_APFS Container disk3 137.2 GB disk0s2
/dev/disk1 (internal, physical):
#: TYPE NAME SIZE IDENTIFIER
0: FDisk_partition_scheme *83.9 MB disk1
1: DOS_FAT_32 EFI-PX-HACK 83.9 MB disk1s1
/dev/disk2 (internal, physical):
#: TYPE NAME SIZE IDENTIFIER
0: GUID_partition_scheme *15.0 GB disk2
1: EFI EFI 209.7 MB disk2s1
2: Apple_HFS Install macOS Monterey 14.7 GB disk2s2
Thanks for any help.
Where did your disk1 image come from? It isn’t my OpenCore image.
You probably need to unmount it first.
That was the problem. I was following another person’s instructions and got the two images mixed up.
One more question. You mentioned change the Mac’s serial number in OpenCore before logging in with my Apple ID, but I don’t see any further instructions on how to accomplish that. What did I miss?
Thanks for the quick reply.
Check out this page:
https://dortania.github.io/OpenCore-Post-Install/universal/iservices.html#using-gensmbios
Legend mate! Was tearing my hair out with trying to get GPU passthrough working on Monterey. The comments section here was just the last bit I needed. Single time per host power cycle plus forgetting to disable the virtual display was all I needed to know about.
Thanks for all the effort put into organising and posting this stuff.
Cheers
Hi Nick,
thank you so much for sharing that content. I really appreciate it.
I am trying to run Proxmox on a Mac Pro 5,1. It’s kind of running but not stable and I have several issues. Since you OC config seems to be a more general configuration for a PC Hackintosh I am wondering if I should make a new OC config suitable for my Mac Pro 5,1 hardware?
Thank you.
The OC config is for QEMU, the guest doesn’t see or care about any of the host’s hardware, only QEMU’s emulated hardware. So it doesn’t need to be customised for the host’s hardware.
Hi Nick,
I really appreciate all your hard work and support for this project! I have followed every step and I get stuck at the apple logo after choosing the macOS Base System to install it. The loading bar never appears and it just stays that way. I’d greatly appreciate any help or advice!
args: -device isa-applesmc,osk=”…” -smbios type=2 -device usb-kb>
balloon: 0
bios: ovmf
boot: order=ide2;virtio0;net0;ide0
cores: 4
cpu: Penryn
cpuunits: 1024
efidisk0: Storage2:vm-111-disk-0,efitype=4m,size=4M
ide0: local:iso/Monterey-recovery.img,cache=unsafe,size=3144712K
ide2: local:iso/OpenCore-v20.iso,cache=unsafe,size=150M
machine: q35
memory: 4096
meta: creation-qemu=8.1.2,ctime=1706084894
name: Monterey
net0: virtio=BC:24:11:22:95:BF,bridge=vmbr0,firewall=1
numa: 1
ostype: other
scsihw: virtio-scsi-pci
smbios1: uuid=962dd945-4a01-48e5-833b-7002ba6c578a
sockets: 1
vga: vmware
virtio0: Storage2:vm-111-disk-1,cache=unsafe,discard=on,iothread=1,size=100G
vmgenid: 3afd4177-6946-4d4e-9712-d1f72dc85c34
CPU(s)
4 x AMD A8-3820 APU with Radeon(tm) HD Graphics (1 Socket)
Kernel Version
Linux 6.5.11-4-pve (2023-11-20T10:19Z)
Boot Mode
Legacy BIOS
Hi Nick,
Thanks a lot for sharing this instructions.
We successfully installed macos monterey on proxmox 8.1.
The system can boot into Mac OS with GPU passthrough…
Everything looks good so far, however, we got an issue with USB keyboard and USB mouse (Using USB passthrough). After few seconds both keyboard and mouse got disconnected from MacOS. Just wondering if you ever had this issue or know the solution.
Thank you.
Hi Nick,
I can get as far as “Install macOS Montery” but it fails with “The recovery server could not be contacted”. Same happens on Vetura.
As far as I can tell, it has internet access (can ping 8.8.8.8 from terminal) but DNS perhaps not (cannot ping google.com). Is this something that happens regularly?
Thanks
Mark
Thank you for this tutorials!
For sme reasons I have to run High Sierra, all works well with ” v21 – OpenCore for Catalina, Big Sur, Monterey, Ventura on Proxmox Latest” only one annoying thing isnt working: the network.
During the Setup-Process, High Sierra asks about the network. If I use DCHP, manually or any other option the VM crashes after a view moments the dialoge is done.
So I have to select “I dont use any network” – the setup now completes.
If I try to setup the network later it doesnt work. Clicking on the “+” in the networkpane result a “There was an error in the Network preferences”. Viewing the “System Report” in the section “Ethernet Cards” displays “This computer does not have any PCI Express cards installed”.
Any ideas how to spend this VM a networkcard?
Heres my HighSierra.conf
agent: 1
args: -device isa-applesmc,osk=”…” -smbios type=2 -device usb-kbd,bus=ehci.0,port=2 -global nec-usb-xhci.msi=off -global ICH9-LPC.acpi-pci-hotplug-with-bridge-support=off -cpu >
bios: ovmf
boot: order=ide2;ide0;virtio0;net0
cores: 4
cpu: Penryn
cpuunits: 124
efidisk0: data2:vm-960-disk-0,efitype=4m,size=4M
ide0: local:iso/HighSierra.img.iso,cache=unsafe,size=5600M
ide2: local:iso/OpenCore-v21.iso,cache=unsafe,size=150M
machine: q35
memory: 4096
meta: creation-qemu=8.1.5,ctime=1715274688
name: HighSierraV2
net0: e1000=BC:24:11:D1:BC:79,bridge=vmbr0,firewall=1
numa: 1
ostype: other
sata0: data2:vm-960-disk-2,cache=unsafe,discard=on,size=64G
scsihw: virtio-scsi-pci
smbios1: uuid=b015453b-7099-4069-a42f-3a11591914b6
sockets: 1
vga: vmware
virtio0: data2:vm-960-disk-1,cache=unsafe,discard=on,iothread=1,size=64G
vmgenid: de6d65ae-49d6-4154-ba49-4f8524913518
Thanks for any hints!
High Sierra requires you to edit the “net0” line to “e1000-82545em”
Hi,
I am stuck either with or without passing the GPU on my Mac Pro 6,1. I have followed this fairly thoroughly, and end up with this error (final boot after installation)
This is with passing the GPU. I can tell it works because the OpenCore boot screen looks different than with VGA or setting it to use VMware
apfs_log_mount.
_unmount: 1889: disk35 unmounting volume SSD, requested by: com.apple. MobileSoftwareUpdate. (pid 230); parent: launchd (pid 1)
apfs_vfsop_unmount :2740: disk35 waiting for purgatory cleaner to finish
authapf s_seal
restore:482: disk355 integrity protection will be re-enabled
apfs_vf sop_unmount :3074: disk3 nx_num_vols_mounted is 5
apfs: total mem allocated: 57479789 (55 mb);
apfs_vf sop_unmount :3087: all done.
going home.
(numMountedAPFSVolumes 5)
AppleKeyStore:7456:267: unexpected
session: 100000 uid: -1 requested by: 267
AppleKeyStore:11114:267: operation failed (sel: 7 ret: e00002c2, -1, 100000)
AppleKeyStore:7456:267: unexpected session: 100000 uid: -1 requested by: 267
AppleKeyStore: 11114:267: operation failed (sel: 7 ret: e00002c2, -1, 100000)
AppleKeyStore: 11114:267: operation failed
(sel: 7 ret: e00002bc, -1, 100000)
AppleKeyStore:7456:271: unexpected session: 100000 id: -1 requested by: 271
AppleKeyStore:11114:271: operation failed (sel: 7 ret: e00002c2, -1, 100000)
AppleKeyStore:7456:271: unexpected session: 100000 uid: -1 requested by: 271
AppleKeyStore:11114:271: operation failed (sel: 7 ret: e00002c2, -1, 100000)
AppleKeyStore:11114:271: operation failed (sel: 7 ret: e00002bc, -1, 100000)
AppleKeyStore:7456:272: unexpected
session: 100000 uid: -1 requested by: 272
AppleKeyStore:11114:272: operation failed (sel: 7 ret: e00002c2, -1, 100000)
AppleKeyStore:7456:272: unexpected session: 100000 uid: -1 requested by: 272
AppleKeyStore:11114:272: operation failed (sel: 7 ret: e00002c2, -1, 100000)
AppleKeyStore: 11114:272: operation failed
(sel: 7 ret: e00002bc, -1, 100000)
Hi,
Thank you for this!! I am using this to get access to FindMy. So my MacOS VM is just running in the background and shouldn’t be doing anything. I only have “Find My” opened along with a small script called “FindMySync”.
Yet it is SO slow and worse, it constantly takes 50%-100% of my host CPU cores. In the activity monitor on macOS, System shows 20-30% and user 10-20%.
My host /proc/cpuinfo is below (1 out of 2 cores). I have `16GB total RAM out of which I give 4GB to MacOS.
Qemu command from ps:
qemu-system-x86_64 -enable-kvm -m 4096 -cpu Penryn,kvm=on,vendor=GenuineIntel,+invtsc,vmware-cpuid-freq=on,+ssse3,+sse4.2,+popcnt,+avx,+aes,+xsave,+xsaveopt,check -machine q35 -device qemu-xhci,id=xhci -device usb-kbd,bus=xhci.0 -device usb-tablet,bus=xhci.0 -smp 4,cores=2,sockets=1 -device usb-ehci,id=ehci -device isa-applesmc,osk=… -drive if=pflash,format=raw,readonly=on,file=././OVMF_CODE.fd -drive if=pflash,format=raw,file=././OVMF_VARS-1920×1080.fd -smbios type=2 -device ich9-intel-hda -device hda-duplex -device ich9-ahci,id=sata -drive id=MacHDD,if=none,file=./mac_hdd_ng.img,format=qcow2 -device ide-hd,bus=sata.4,drive=MacHDD -netdev user,id=net0,hostfwd=tcp::2222-:22 -device virtio-net-pci,netdev=net0,id=net0,mac=00:16:CB:68:A0:BD -device vmware-svga -nographic -vnc :0,password=on -k en-us -monitor telnet:127.0.0.1:55555,server,nowait
Is there any trick to make this faster?
As mentioned, I am only using this VM to run FindMy in the background, nothing more, so I’d expect it to barely use any resources and idling.
processor : 0
vendor_id : GenuineIntel
cpu family : 6
model : 60
model name : Intel(R) Pentium(R) CPU G3260 @ 3.30GHz
stepping : 3
microcode : 0x28
cpu MHz : 3200.261
cache size : 3072 KB
physical id : 0
siblings : 2
core id : 0
cpu cores : 2
apicid : 0
initial apicid : 0
fpu : yes
fpu_exception : yes
cpuid level : 13
wp : yes
flags : fpu vme de pse tsc msr pae mce cx8 apic sep mtrr pge mca cmov pat pse36 clflush dts acpi mmx fxsr sse sse2 ss ht tm pbe syscall nx pdpe1gb rdtscp lm constant_tsc arch_perfmon pebs bts rep_good nopl xtopology nonstop_tsc cpuid aperfmperf pni pclmulqdq dtes64 monitor ds_cpl vmx est tm2 ssse3 sdbg cx16 xtpr pdcm pcid sse4_1 sse4_2 movbe popcnt tsc_deadline_timer xsave rdrand lahf_lm abm cpuid_fault epb invpcid_single pti ssbd ibrs ibpb stibp tpr_shadow vnmi flexpriority ept vpid ept_ad fsgsbase tsc_adjust erms invpcid xsaveopt dtherm arat pln pts md_clear flush_l1d
vmx flags : vnmi preemption_timer invvpid ept_x_only ept_ad ept_1gb flexpriority tsc_offset vtpr mtf vapic ept vpid unrestricted_guest ple
bugs : cpu_meltdown spectre_v1 spectre_v2 spec_store_bypass l1tf mds swapgs itlb_multihit srbds mmio_unknown
bogomips : 6600.51
clflush size : 64
cache_alignment : 64
address sizes : 39 bits physical, 48 bits virtual
power management: