
This tutorial for installing macOS 13 Ventura has been adapted for Proxmox from Kholia’s OSX-KVM project and Leoyzen’s OpenCore configuration for KVM. You can get the full sourcecode of my OpenCore release on my GitHub here.
Requirements
I’ll assume you already have Proxmox 7.2 installed. You also need a real Mac available in order to fetch the OSK key.
Ventura now requires that your CPU has support for AVX2, so for Intel your CPU would have to be at least as new as Haswell. However, I have added the CryptexFixup kext to work around this restriction and allow Ventura to be used even on CPUs that don’t have AVX2 support (and merely support SSE 4.2 and AVX1). Note that the AMD graphics card drivers won’t work in this situation, and other apps that assume AVX2 is present could break too! Please see the CryptexFixup readme for details.
Modern AMD CPUs also support AVX2 and should work with this guide.
Since Monterey, your host must have a working TSC (timestamp counter), because otherwise if you give the VM more than one core, macOS will observe the skew between cores and panic when it sees time ticking backwards. To check this, on Proxmox run:
dmesg | grep -i -e tsc -e clocksource
On a working host you’ll see:
tsc: Refined TSC clocksource calibration: 3399.998 MHz
clocksource: tsc: mask: 0xffffffffffffffff max_cycles: 0x31024cfe468, max_idle_ns: 440795307017 ns
clocksource: Switched to clocksource tsc
On a broken host you’ll see:
TSC synchronization [CPU#0 -> CPU#1]:
Measured 3358870891203288 cycles TSC warp between CPUs, turning off TSC clock.
tsc: Marking TSC unstable due to check_tsc_sync_source failed
clocksource: Switched to clocksource hpet
kvm: SMP vm created on host with unstable TSC; guest TSC will not be reliable
If you have a broken TSC, this is a possible workaround. Sometimes you can simply power-cycle the host to resync the TSCs (especially if your server has a high uptime).
First step: Create an installation ISO
Download my copy of the OSX-KVM repository using the download button, and unzip it:
https://github.com/thenickdude/OSX-KVM
First we need to install some build requirements. If you will be building the installer ISO on macOS, open up the Terminal and run this command to install the commandline tools:
xcode-select --installIf you’re building the ISO on Linux, you instead need to run this command (these are the package names for Ubuntu or similar distributions, they may need adjustment on other distributions):
sudo apt install qemu-utils make
Now in the Terminal, from the root of OSX-KVM, run:
cd scripts/ventura
make Ventura-recovery.img
This will download the Ventura installer from Apple’s software distribution servers and build a Ventura-recovery.img file for you. Upload this file to your Proxmox’s ISO store directory (typically /var/lib/vz/template/iso). Although we’re putting it in the ISO directory so that we can use it with Proxmox’s ISO picker later, this a raw disk image rather than a true ISO.
If you’re building the installer on macOS, you can build a full installer instead of just a recovery, which will mean that macOS won’t have to download Ventura files during installation, and so won’t require an Internet connection. Simply ask it to build Ventura-full.img instead:
cd scripts/ventura
make Ventura-full.img
This option is not available when building the installer on Linux.
Prepare an OpenCore image
Download the OpenCore.iso.gz file from the newest release in my repository (you need v19 or newer), double click it to unpack it, and upload it to Proxmox’s ISO store at /var/lib/vz/template/iso. Although it has a .iso file extension, this is actually a hard disk image.
Fetch the OSK authentication key
macOS checks that it is running on real Mac hardware, and refuses to boot on third-party hardware. You can get around this by reading an authentication key out of your real Mac hardware (the OSK key). Save the first block of C code from this page as smc_read.c. In a command prompt, change into the same directory as that file and run:
xcode-select --install # If you don't already have gcc
gcc -o smc_read smc_read.c -framework IOKit
./smc_read
It’ll print out the 64 character OSK for you. Make a note of it.
Every Mac uses the same OSK, so don’t be surprised that it doesn’t look like a random string!
Create the VM
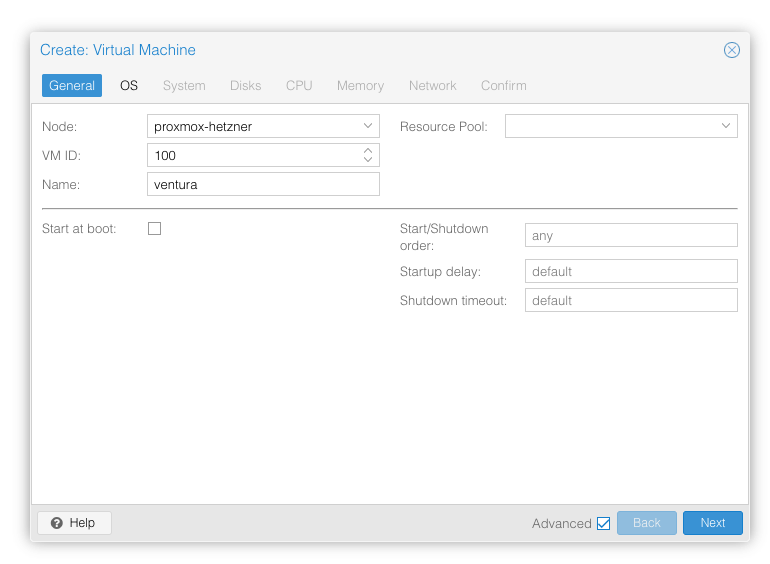
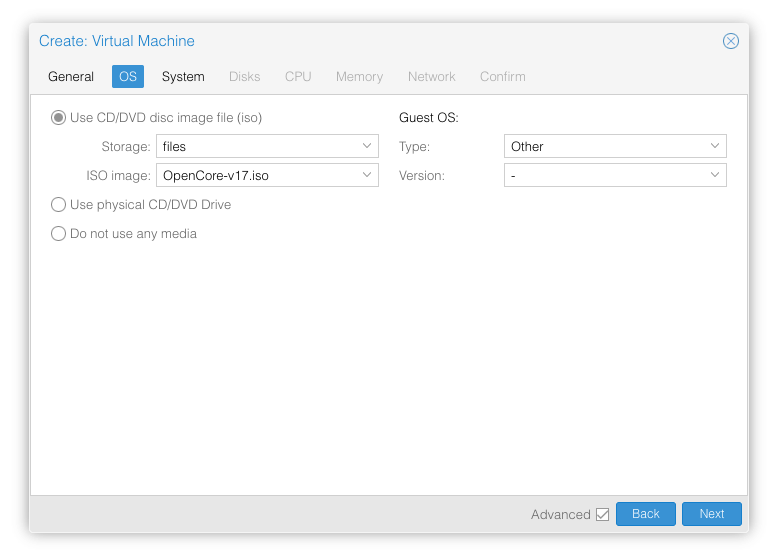
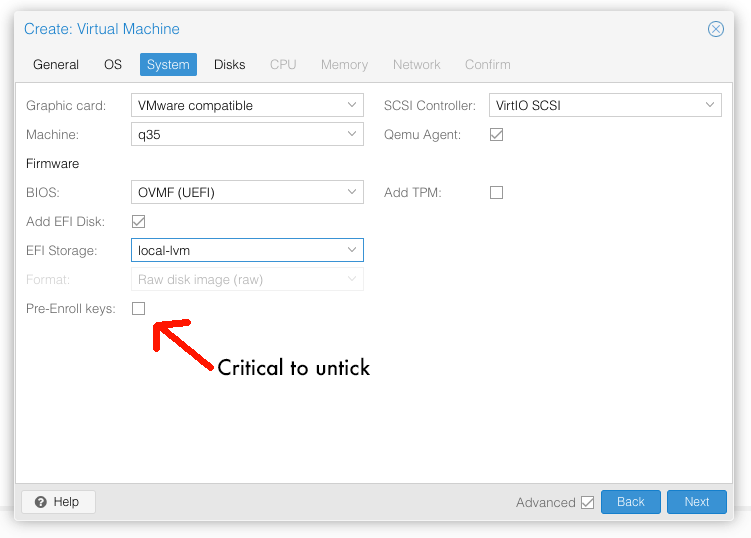
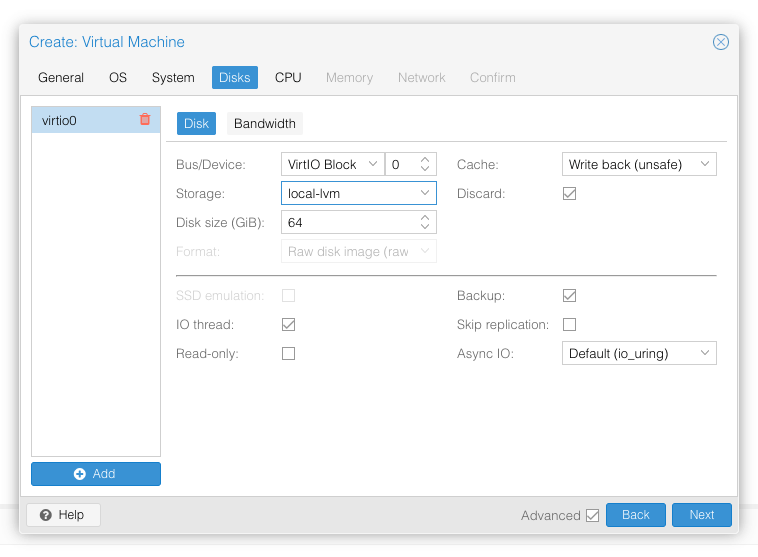
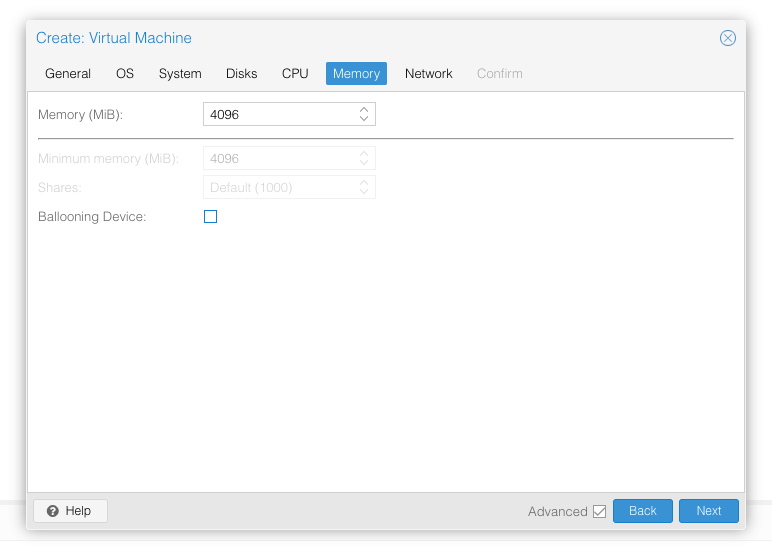
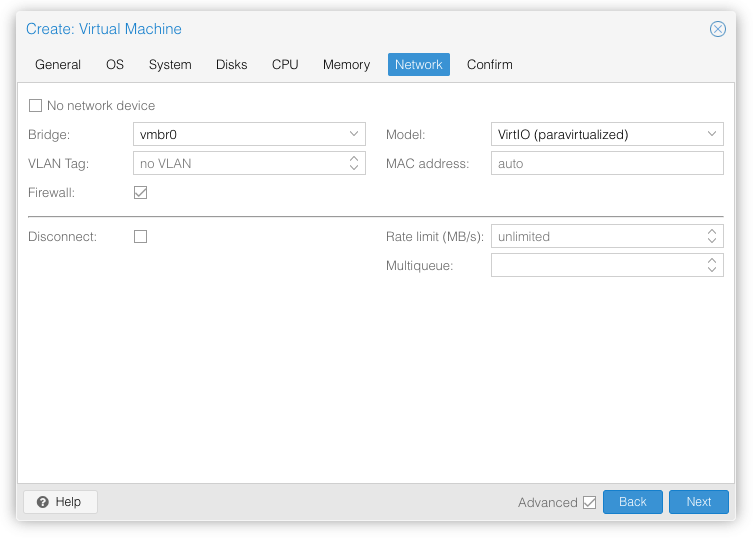
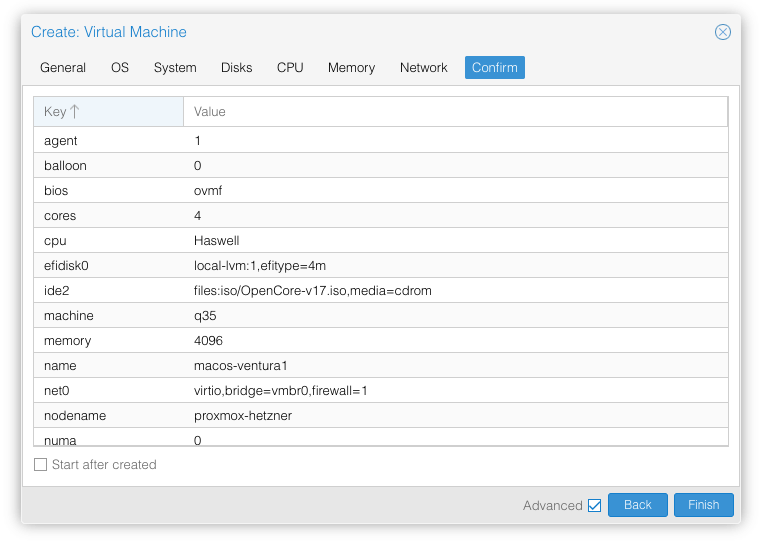
From the Proxmox web UI, create a new virtual machine as shown below.
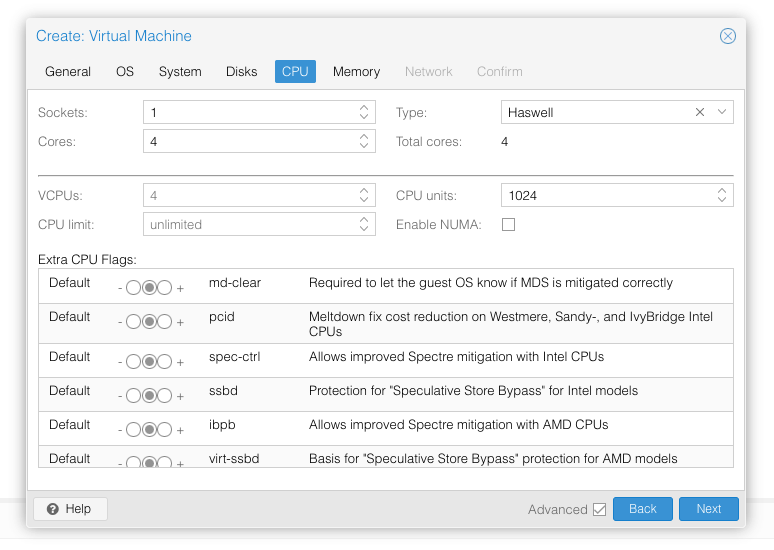
In the Options page for the VM, ensure that “use tablet for pointer” is set to “Yes” (this is the default).
In the Hardware page for the VM, add a second DVD drive at IDE0, set it to use your Ventura-full.img.
Don’t try to start the VM just yet. First, SSH into your Proxmox server so we can make some edits to the configuration files.
Edit /etc/pve/qemu-server/YOUR-VM-ID-HERE.conf (e.g. with nano or vim). Add this line, being sure to substitute the OSK you extracted earlier into the right place:
args: -device isa-applesmc,osk="THE-OSK-YOU-EXTRACTED-GOES-HERE" -smbios type=2 -device usb-kbd,bus=ehci.0,port=2 -global nec-usb-xhci.msi=off -global ICH9-LPC.acpi-pci-hotplug-with-bridge-support=off -cpu host,vendor=GenuineIntel,+invtsc,+hypervisor,kvm=on,vmware-cpuid-freq=on
A USB keyboard is added here because macOS doesn’t support QEMU’s default PS/2 keyboard. MSI has been disabled for the USB controller to fix QEMU panics when USB 3 devices are passed through. ACPI PCIe hotplug support has been disabled to fix VMs with passthrough devices.
Ensure the args are all on a single line!
You can remove the “+invtsc” feature from the -cpu list if your CPU doesn’t support it, or if you want to be able to migrate a running VM between Proxmox nodes.
On AMD you may find that the installer reboots while loading, or the loading bar doesn’t appear, if so replace “-cpu host” with “-cpu Haswell-noTSX” (I had to do this on AMD EPYC 7R13).
Now find the lines that define the two “ISOs” (ide0 and ide2), and remove the “,media=cdrom” part from them. Add “,cache=unsafe” in its place. This will treat these as hard disks rather than DVD drives.
Save your changes, return to the Options tab, and change the boot order to put IDE2 (the OpenCore image) first. Your final VM configuration file should resemble this:
agent: 1
args: -device isa-applesmc,osk="..." -smbios type=2 -device usb-kbd,bus=ehci.0,port=2 -global nec-usb-xhci.msi=off -global ICH9-LPC.acpi-pci-hotplug-with-bridge-support=off -cpu host,vendor=GenuineIntel,+invtsc,+hypervisor,kvm=on,vmware-cpuid-freq=on
balloon: 0
bios: ovmf
boot: order=ide2;virtio0
cores: 4
cpu: Haswell
efidisk0: local-lvm:vm-100-disk-0,efitype=4m,size=4M
ide0: local:iso/Ventura-full.img,cache=unsafe,size=14G
ide2: local:iso/OpenCore-v18.iso,cache=unsafe,size=150M
machine: q35
memory: 4096
meta: creation-qemu=6.2.0,ctime=1655001118
name: macos-ventura
net0: virtio=...,bridge=vmbr0,firewall=1
numa: 0
ostype: other
scsihw: virtio-scsi-single
smbios1: uuid=...
sockets: 1
vga: vmware
virtio0: local-lvm:vm-100-disk-1,cache=unsafe,discard=on,iothread=1,size=64G
vmgenid: ...
Configure Proxmox
On Proxmox, run “echo 1 > /sys/module/kvm/parameters/ignore_msrs” to avoid a bootloop during macOS boot. To make this change persist across Proxmox reboots, run:
echo "options kvm ignore_msrs=Y" >> /etc/modprobe.d/kvm.conf && update-initramfs -k all -u
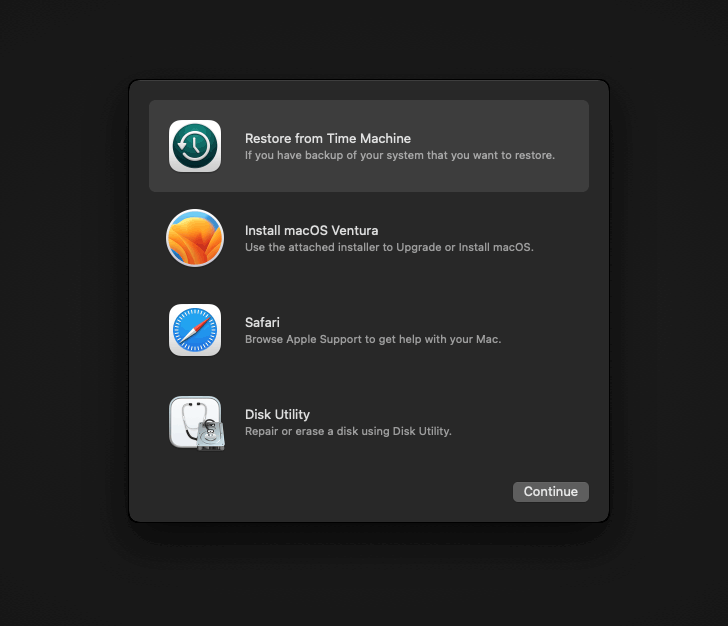
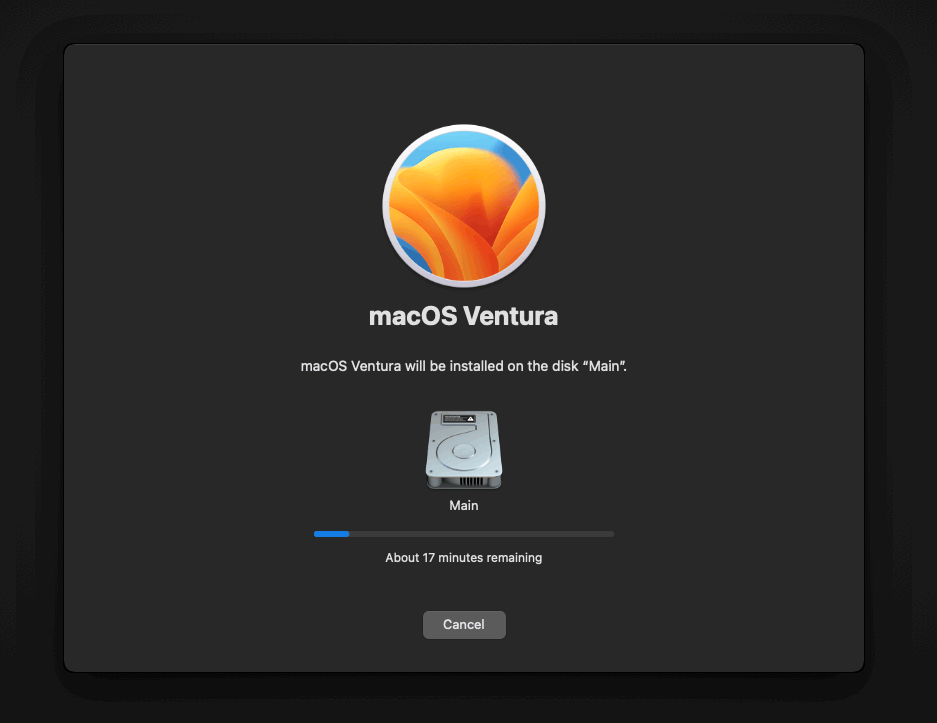
Install Ventura
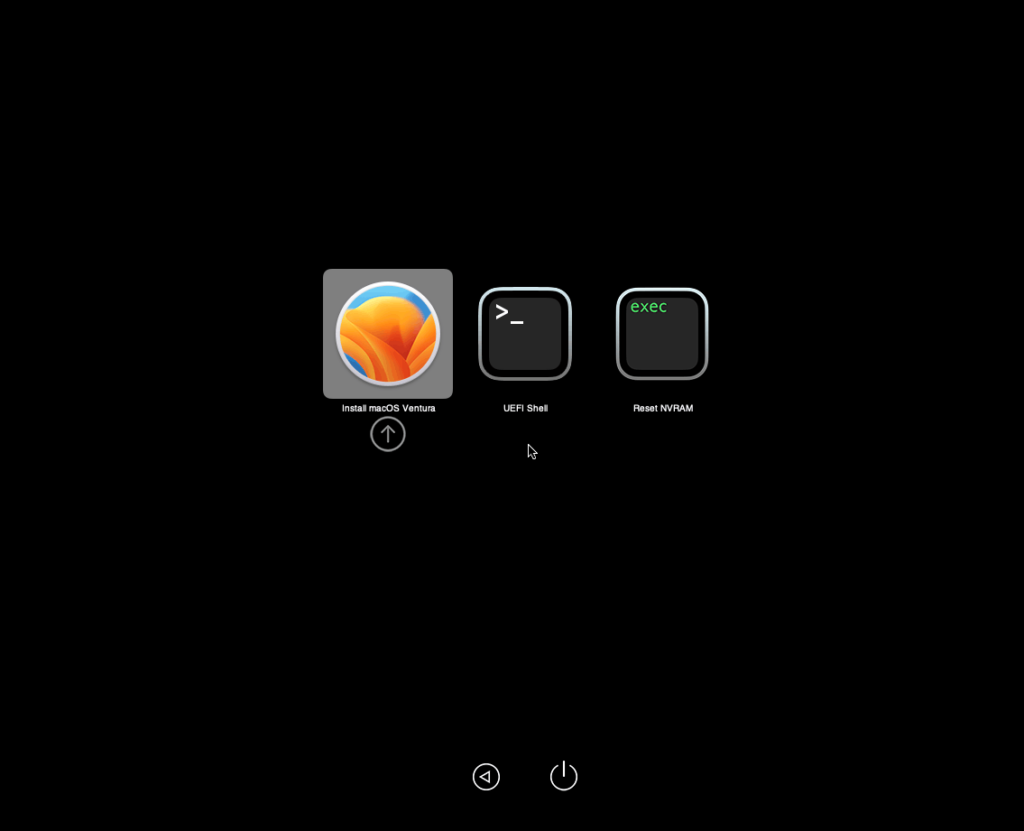
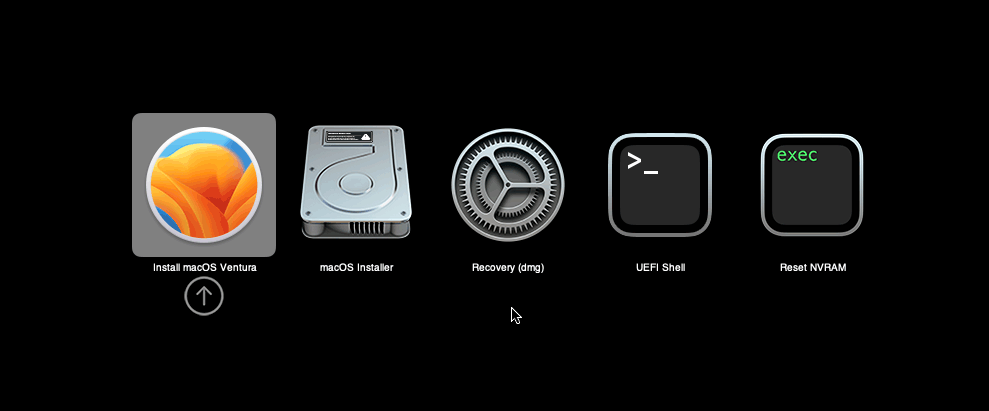
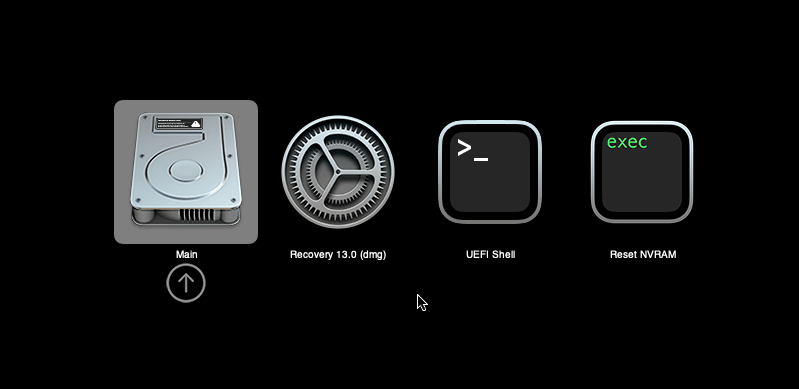
Now start up your VM, it should boot to the OpenCore boot picker:
Press enter to boot the “Install macOS 13 Ventura” entry and the installer should appear. (If your keyboard isn’t working, leave the Proxmox Console page and re-enter it)
Our virtual hard drive needs to be erased/formatted before we can install to it, so select the Disk Utility option. Follow the steps below to format the disk:

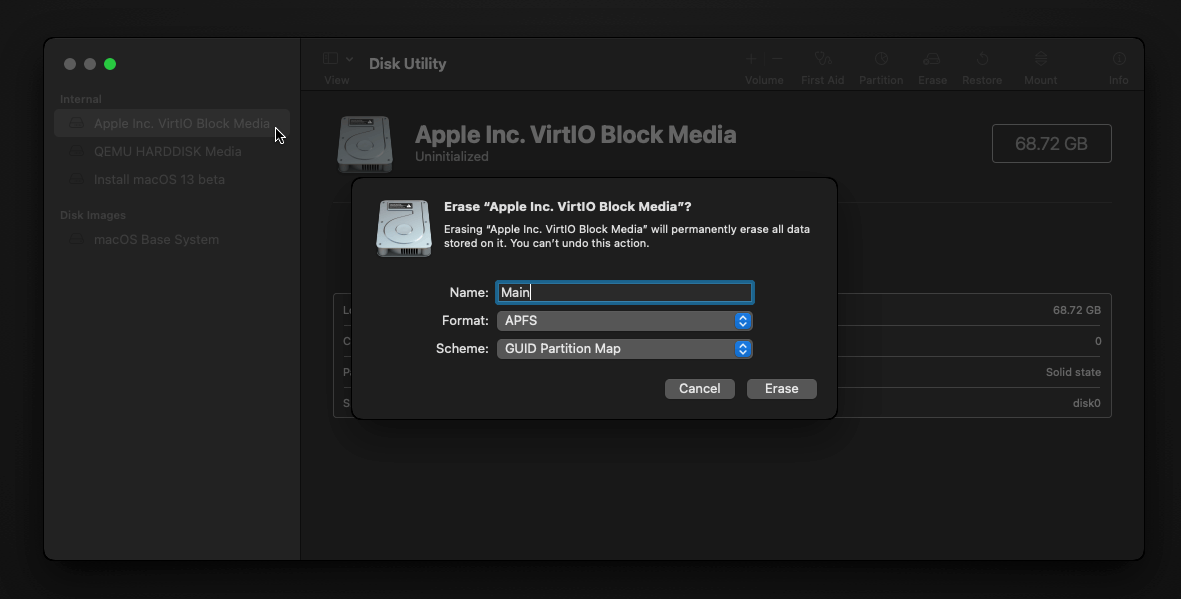
Now you can quit Disk Utility from the top menu (Disk Utility > Quit Disk Utility), and we’re ready to begin installation!
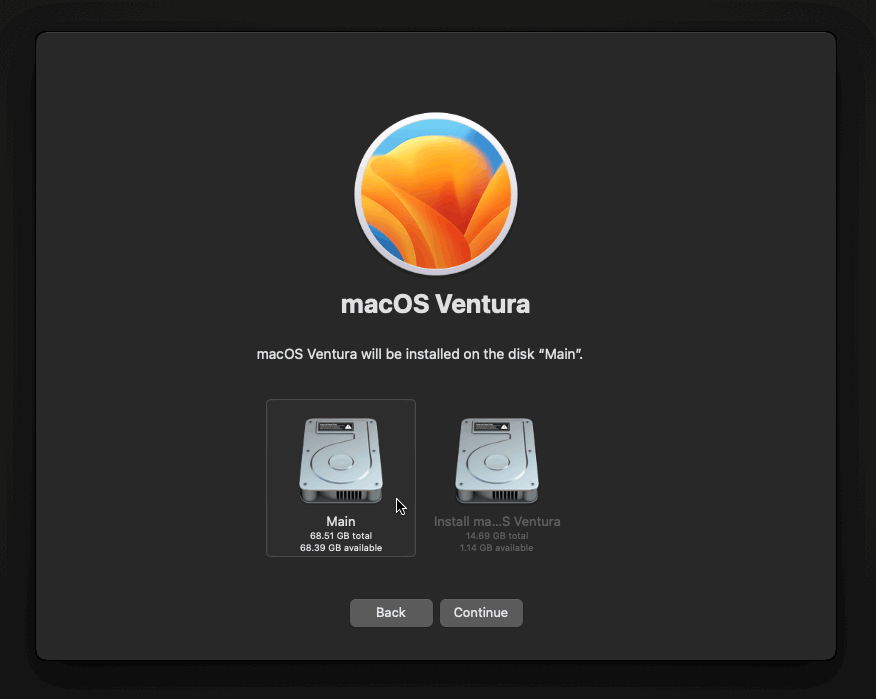
After the first stage of installation, the VM will reboot a couple of times in quick succession, and each time you must manually pick the “macOS Installer” entry (the second one here, with the hard disk icon) to continue installation. It will not be selected for you automatically:
If your keyboard isn’t responding on this screen, exit the Console tab in Proxmox and re-enter it. If you get a “prohibited” sign like this appearing, hit the Reset button on the VM to try again:

Now the installation is nearly complete and the macOS Installer entry disappears, so pick the name of your main disk to boot instead (mine’s called Main).
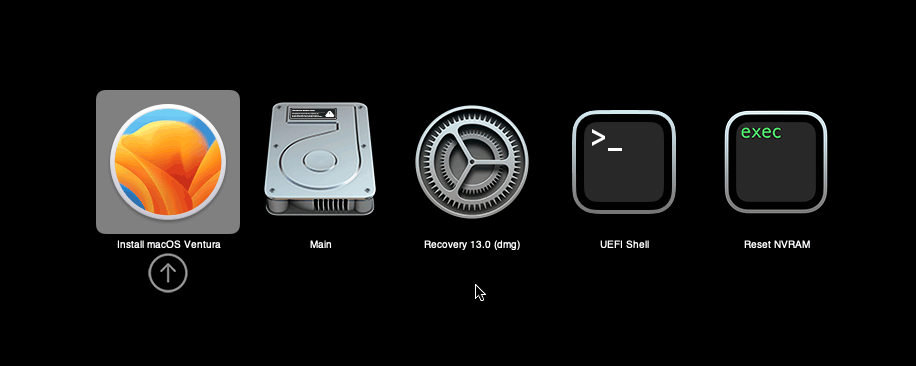
It’ll reboot a couple more times, so just keep picking the “Main” entry until you finally boot into Ventura!
Answer the initial install questions, and you’ll be logged on! Note that you will want to hold off on logging into your Apple ID until you’ve configured your Mac’s serial number in OpenCore (because otherwise a Mac with the default shared serial number in my OpenCore image will be added to your Apple ID).
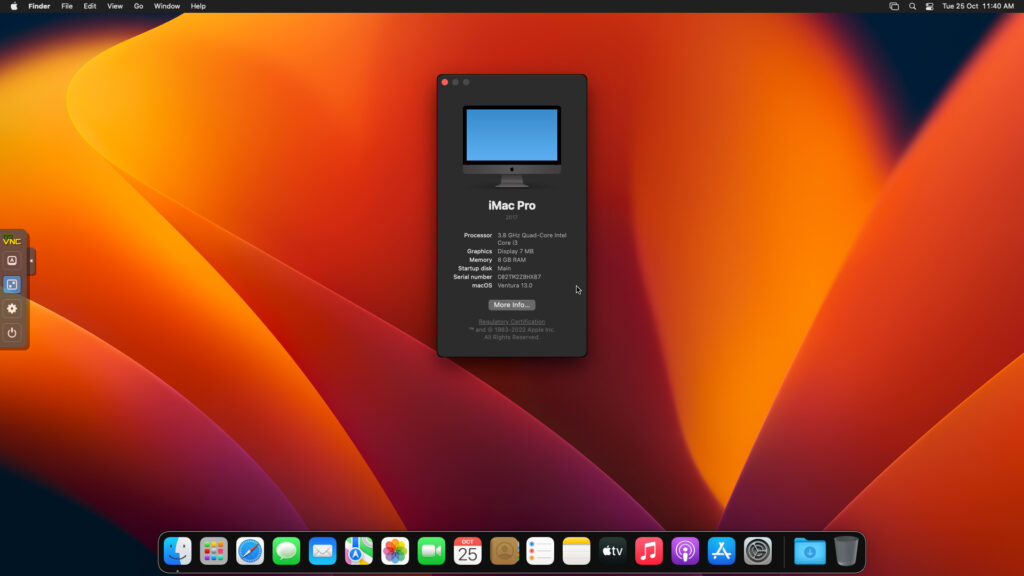
Note that it will be really sluggish for a few minutes after the first boot while the system performs housekeeping tasks.
Make the OpenCore install permanent
We’re currently booting using OpenCore from the attached OpenCore ISO. Let’s install that to the hard drive instead. Pop open Terminal and run “diskutil list” to see what drives we have available.
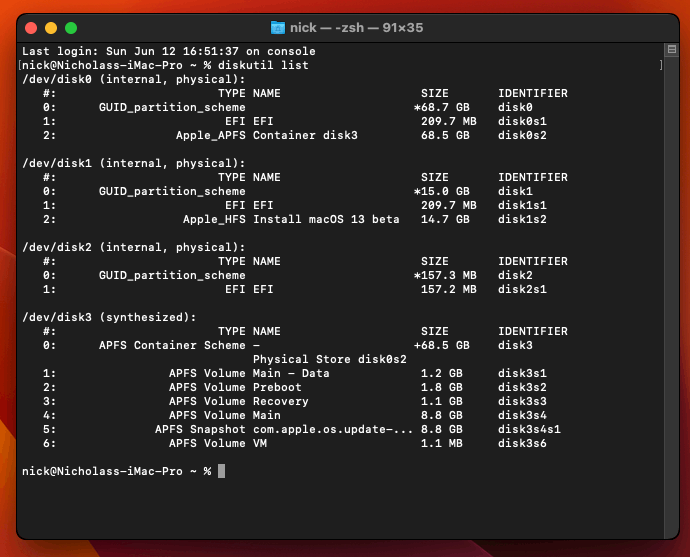
Use “sudo dd if=<source> of=<dest>” to copy the “EFI” partition from the OpenCore CD and overwrite the EFI partition on the hard disk. The OpenCore CD is the small disk (~150MB) that only has an EFI partition on it, and the main hard disk is the one with the large (>30GB) Apple_APFS “Container” partition on it.
In my case these EFI partitions ended up being called disk2s1 and disk0s1 respectively, so I ran “sudo dd if=/dev/disk2s1 of=/dev/disk0s1” (note that if you get these names wrong, you will overwrite the wrong disk and you’ll have to start the installation over again!).
Now shut down the VM, and remove both the OpenCore and the Ventura installer drives from the Hardware tab. On the Options tab, edit the boot order to place your virtio0 disk as the first disk. Boot up. If everything went well, you should see the OpenCore boot menu, and you can select your “Main” disk to boot Ventura:
Sleep management
I found that I was unable to wake Ventura from sleep using my mouse or keyboard. If you encounter the same problem, you can either disable system sleep in Ventura Energy Saver settings to avoid the issue, or you can manually wake the VM up from sleep from Proxmox by running:
qm monitor YOUR-VM-ID-HERE
system_wakeup
quit
Editing your OpenCore/EFI settings
The Configuration.pdf that explains the OpenCore config.plist file can be found along with the OpenCore release on my GitHub.
To mount your EFI partition in macOS so you can edit your config.plist, first check the “identifier” of your EFI partition in the terminal:
~$ diskutil list
/dev/disk0 (external, physical):
   #:                   TYPE NAME              SIZE       IDENTIFIER
   0:  GUID_partition_scheme                  *512.1 GB   disk0
   1:                    EFI EFI               209.7 MB   disk0s1
   2:             Apple_APFS Container disk1   511.9 GB   disk0s2
Then you can mount it like so:
sudo mkdir /Volumes/EFI
sudo mount -t msdos /dev/disk0s1 /Volumes/EFI
Now you can edit /Volumes/EFI/OC/config.plist with your favourite text editor to make your changes. (TextEdit is not a great choice because it likes to insert curly quotes into the file and otherwise break things, there are some dedicated plist editors available such as XCode).
If you’re unable to boot macOS, you can edit the config.plist using the “UEFI Shell” option in the OpenCore boot menu instead.
Enter “FS0:” and press enter to open up the first available filesystem, then run “edit EFI\OC\config.plist” (if the file isn’t found, try switching to another filesystem like fs1:). When you’re done editing, press control+Q to exit, “Y” to save, then run “exit” to return to the OpenCore menu. You need to reboot for your changes to take effect.
If you prefer, you can edit config.plist from the comfort of your Proxmox host instead. If you’re booting from an attached OpenCore.img file, you can mount that file as a disk on the host. If you’re booting from the VM’s disk instead, it must be in raw format in order to be mounted (e.g. typical LVM or ZFS usage) rather than qcow2.
# Mount an OpenCore image:
losetup --partscan /dev/loop0 /var/lib/vz/template/iso/OpenCore-v15.img
# or a VM boot disk:
losetup --partscan /dev/loop0 /dev/zvol/tank/vms/vm-100-disk-1

mount /dev/loop0p1 /mnt
Now the contents of that first partition are available in /mnt, so you can edit /mnt/EFI/OC/config.plist in your favourite editor. When you’re done, do this to unmount the disk:
umount /mnt
losetup --detach /dev/loop0
Automatic boot
In config.plist, you can set Misc/Boot/Timeout to a non-zero value to allow the default boot option be chosen automatically after that delay in seconds. I’ve disabled this by default because it causes the installer ISO to re-enter its main menu instead of continuing the second stage of installation.
You can set the default boot option by pressing control+enter on it.
Verbose boot
To boot macOS in Verbose mode to diagnose boot problems, at the OpenCore boot menu press Cmd+V before pressing enter to boot macOS (you don’t need to hold it down).
If there is a kernel panic during boot and it reboots too quickly to be read, edit config.plist to add “debug=0x100” to the kernel arguments.
Changing screen resolution
To change macOS’ screen resolution, you need to edit the UEFI/Output/Resolution setting in config.plist, the default is 1920×1080@32.
You should be able to change this to any of the modes that the system OVMF menu offers (hit F2 at the start of guest boot and choose “Device Manager/OVMF Platform Configuration” to see which resolutions are available).
Video performance
Because there is no guest video acceleration available for macOS, video performance is poor.
In Google Chrome in the guest you will need to toggle off the setting to “use hardware acceleration when available” to improve issues with elements not being drawn or flickering (especially video). Safari may be a better choice.
macOS’s built in “Screen Sharing” feature offers dramatically better framerates and latency than Proxmox’s browser-based VNC console, so if you have a real Mac to act as a viewing console, you can enable that in the VM’s “Sharing” settings and connect to the VM using the Screen Sharing app from your Mac instead:
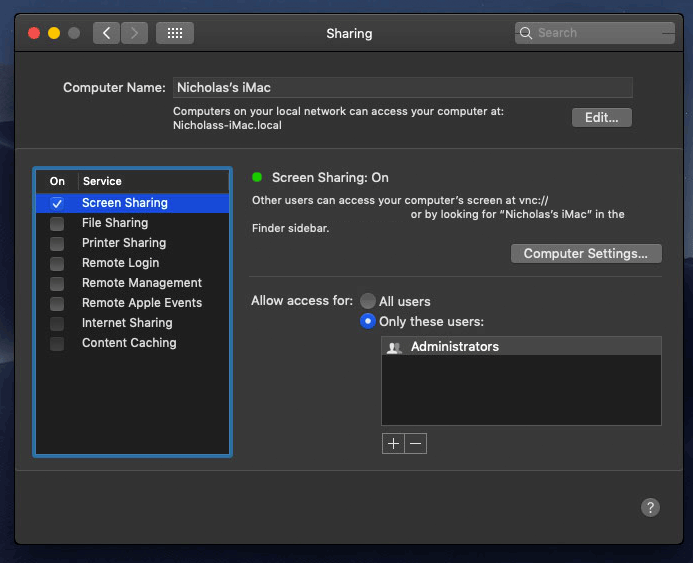
Apparently Screen Sharing is also compatible with VNC clients like RealVNC, so you should be able to connect to it from Linux or Windows consoles using RealVNC.
The real magic bullet for video performance is to pass through a compatible video card using PCIe passthrough (AMD cards only). This offers near-native performance. You can read more about how I’m using PCIe passthrough on my own installation here.
USB passthrough
Since I want to use this as my primary computer, I want to use a USB keyboard and mouse plugged directly into Proxmox, rather than sending my input through the web VNC console.
Proxmox has good documentation for USB passthrough. Basically, run “qm monitor YOUR-VM-ID-HERE”, then “info usbhost” to get a list of the USB devices connected to Proxmox:
qm> info usbhost
 Bus 3, Addr 12, Port 6, Speed 480 Mb/s
 Class 00: USB device 8564:1000, Mass Storage Device
 Bus 3, Addr 11, Port 5.4, Speed 12 Mb/s
 Class 00: USB device 04d9:0141, USB Keyboard
 Bus 3, Addr 10, Port 5.1.2, Speed 12 Mb/s
 Class 00: USB device 046d:c52b, USB Receiver
 Bus 3, Addr 9, Port 14.4, Speed 12 Mb/s
 Class 00: USB device 046d:c227, G15 GamePanel LCD
 Bus 3, Addr 8, Port 14.1, Speed 1.5 Mb/s
 Class 00: USB device 046d:c226, G15 Gaming Keyboard
In this case I can add my keyboard and mouse to USB passthrough by quitting qm, then running:
qm set YOUR-VM-ID-HERE -usb1 host=04d9:0141
qm set YOUR-VM-ID-HERE -usb2 host=046d:c52b
This saves the devices to the VM configuration for you. You need to reboot to have the new settings apply.
You can also pass through USB devices by passing through an entire USB controller using Proxmox’s PCIe passthrough feature, which gives much better compatibility.
Odd core counts
If your host CPU is AMD, you might have a core count which is divisible by 3, like 6 cores. macOS doesn’t like it if the core count isn’t a power of 2 (1, 2, 4, 8), but it doesn’t mind odd socket counts.
So in order to pass 6 total cores, configure the VM for 3 sockets and 2 cores per socket.
Fixing “guest boots to UEFI shell”
If your guest ends up booting to the UEFI shell instead of showing the OpenCore boot menu, especially if you’ve just updated OpenCore to a new version, you’ll need to edit the guest’s UEFI boot entries to fix this.
At the very start of guest boot, hit F2 to enter guest UEFI settings.
First we’ll remove the old entries. Choose the Boot Maintenance option, then Boot Options -> Delete Boot Option. Use the spacebar to tick any old Clover or OpenCore entries (avoid ticking the EFI Internal Shell option, you want to keep that!). Select “Commit Changes and Exit”.
Now we’ll add the correct entry for OpenCore back in. Select Add Boot Option. Navigate through the device tree to EFI/OC/OpenCore.efi and select it, name this new option “OpenCore” or similar. Again Commit Changes and Exit.
Go to the Change Boot Order and move OpenCore to the top. Commit Changes and Exit.
Now back out to the main menu and choose Reset, and you should successfully boot into OpenCore this time.
Fixing iMessage
iCloud and the App Store should already be working for you, but for iMessage support you must follow these steps to mark your network adapter as built-in:
https://dortania.github.io/OpenCore-Post-Install/universal/iservices.html#fixing-en0
Disabling SIP (System Integrity Protection)
You can disable SIP by selecting the Recovery option from the OpenCore boot menu, then use the top menu to open the Terminal and run csrutil disable --no-internal. Then reboot.
This may be needed to run unsigned kexts or perform other hacks.
Upgrading OpenCore
Sometimes you need to update OpenCore to a new release in order to support a new macOS update. I’ll assume you don’t have any customisations to config.plist you want to save.
First take a snapshot! It’s great to be able to roll back if something goes wrong.
If you’re still able to boot macOS, you can update it from within the guest. Follow the instructions in the “Editing your OpenCore/EFI settings” section to mount your EFI partition. Then you can delete the EFI folder in there and replace it with the one from the OpenCoreEFIFolder.zip file from my OpenCore release (you’ll probably need to empty the trash first to make room for the new folder). You’re done!
If you aren’t able to boot macOS, unpack and upload the new OpenCore ISO to Proxmox’s ISO store instead. Add a new CD drive to the VM that uses that ISO. Then in Proxmox’s terminal edit the VM’s config (in /etc/pve/qemu-server) to replace “media=cdrom” with “cache=unsafe” for the OpenCore drive. Now on the “Options” tab, change the boot order to put the new OpenCore drive first.
Start the VM and boot into macOS using the new OpenCore drive. From within macOS you can now follow the instructions from the “Make the OpenCore install permanent” section to install the new OpenCore image to your main macOS disk, after which the OpenCore drive can be detached from the VM.
Upgrading from macOS Monterey
First make a backup or snapshot of your system! Being able to roll back when the upgrade goes wrong is a real lifesaver.
You’ll need to update OpenCore to my v19 release before the upgrade, use the section above to do that. After updating that, reboot to make sure that you can still boot Monterey.
If you’re using any PCIe passthrough devices (particularly video cards) you’ll want to disable those and set “vga: vmware” instead, so you can install using Proxmox’s web console from a different machine during the upgrade. This avoids installer problems triggered by flaky video card passthrough, especially host lockups caused by the AMD Reset Bug.
If your CPU is AMD, replace the “-cpu” argument in your VM args line with the new one:
-cpu Haswell-noTSX,vendor=GenuineIntel,+invtsc,+hypervisor,kvm=on,vmware-cpuid-freq=on
Intel CPUs should work with -cpu host
Now if your CPU supports AVX2 you can upgrade to Ventura using Software Update or from the App Store like you would on a real Mac.
If the update fails to appear, your SIP mode might be set to “Apple Internal”. You can check this by running “csrutil status” in the Terminal.
To fix this, reboot your VM and at the OpenCore menu select Recovery. Open up the Terminal, and in there run “csrutil enable --no-internal” (“csrutil disable --no-internal” is fine too), then reboot back into macOS and try again.
Another way to upgrade is to build a Ventura full or recovery installer and use that to install Ventura (installing over the top of Monterey will upgrade Monterey while keeping your user data intact).
If your CPU doesn’t support AVX2, you’ll have to create a full/recovery installer since I didn’t enable the kernel patch for Monterey/Big Sur that would allow the Ventura App Store app to be run directly from within running macOS.
Proxmox
=============================
agent: 1
args: -device isa-applesmc,osk=”secret” -smbios type=2 -device usb-kbd,bus=ehci.0,port=2 -global nec-usb-xhci.msi=off -global ICH9-LPC.acpi-pci-hotplug-with-bridge-support=off -cpu Haswell,vendor=GenuineIntel,+kvm_pv_eoi,+kvm_pv_unhalt,+hypervisor,+invtsc,kvm=on
balloon: 0
bios: ovmf
boot: order=ide2;virtio0;net0;ide0
cores: 1
cpu: Haswell
efidisk0: data:vm-111-disk-0,efitype=4m,size=4M
ide0: local:iso/ventura-recovery.img,cache=unsafe,size=2481216K
ide2: local:iso/OpenCore-v18.iso,cache=unsafe,size=150M
machine: q35
memory: 4096
meta: creation-qemu=7.0.0,ctime=1666688941
name: MacOS-Ventura
net0: virtio=,bridge=vmbr0,firewall=1
numa: 0
ostype: other
scsihw: virtio-scsi-single
smbios1: uuid=a0966ffb-eb41-4e19-b3fb-b262081825b5
sockets: 1
vga: vmware
virtio0: data:vm-111-disk-1,cache=unsafe,discard=on,iothread=1,size=64G
vmgenid: ec919847-c83a-4849-a3c0-a7e0afd2c471
============================
host details
cpu: amd ryzen 5 5500u
https://www.asus.com/in/displays-desktops/mini-pcs/pn-series/mini-pc-pn51/
=============================
only installs if select 1 socket and 1 cpu
do you have anywork arounds for this issue??
Your host probably has a broken TSC (run “grep -i tsc /var/log/kern.log”), I don’t know of a workaround.
There were some changes to https://github.com/acidanthera/CpuTscSync for Ventura. I wonder if this would help?
Hi Nick!!
Thank you for the contributions you made.
I am now encountering an issue when installing Ventura with the latest OpenCore setup you prepared: it just kernel panics early on. When Verbose is turned on, it gives me “Couldn’t alloc class ‘AppleKeyStoreTest'”. It won’t move from there.
I previously had Big Sur on here (that’s from where I upgraded) and it worked fine. I even tried a Monterey Recovery Image with it, and it boots up just fine.
I rely on PCI passthrough (a RX580, a Micron SSD which is the Boot Drive and an USB Controller). I tried removing those and it didn’t boot either.
I also tried making a new VM with just a VirtIO block device as a Boot Drive but that doesn’t work either
Anyone got any solutions?
What’s your host’s CPU?
Also double check your OSK
Ryzen 7 1700x. Discovered that if I give the vm 1c and 1t it woud boot into installed.
Right now I just installed Monterey (and using Haswell as CPU Type, works fine with multiple cores allocated)
Sounds like your host has a broken TSC, check this comment:
https://www.nicksherlock.com/2022/10/installing-macos-13-ventura-on-proxmox/comment-page-1/#comment-55532
I have a perfectly working Monterey install with CPU “host” passthrough on AMD. I tried to do the same on Ventura using the latest https://github.com/AMD-OSX/AMD_Vanilla patches and v18 ISO, but it gets stuck on this error too. Interestingly the same config works fine on Monterey… something on Ventura is breaking it 🙁
Turns out having either debug=0x100 or -v in the boot-args causes it to get stuck during boot. This happens even without CPU host passthrough.
Thankyou for these comments ! I will give your suggestions a try
args don’t work on AMD platform. I solved using this one:
args: -device isa-applesmc,osk=”the-magic-key” -smbios type=2 -device usb-kbd,bus=ehci.0,port=2 -global nec-usb-xhci.msi=off -global ICH9-LPC.acpi-pci-hotplug-with-bridge-support=off -cpu Cascadelake-Server,vendor=GenuineIntel,+invtsc,kvm=on,vmware-cpuid-freq=on
Plus you need to use Cascadelake-Server as a CPU
What do you mean by “don’t work”, what was the symptom?
On Ryzen 3950x, it would crash and reboot after a few seconds on the Apple loading screen, sometimes it would get as far as the Install screen and crash. Using these settings it is not crashing anymore.
Thanks, the issue was that the CPU model had TSX enabled, I’ve now updated the guide to use Haswell-noTSX
Updated to use Haswell-noTSX but it still panics and reboot. Removed the additional features and using just “-cpu Haswell-noTSX,vendor=GenuineIntel,+invtsc,kvm=on,vmware-cpuid-freq=on” is working.
Thanks! Will it boot with the +hypervisor flag retained?
Yes, it does.
Thanks much for the testing!
Thanks. I am having issues passing more than 1 core. (AMD 5600G). If I uses “2” Cores and “4” threads it doesnt book. Any idea why? **Note I am just running it via QEMU / KVM (not with Proxmox. This is my Opencore-boot.sh file.
CPU_SOCKETS=”1″
CPU_CORES=”1″
CPU_THREADS=”1″
args=(
-enable-kvm -m “$ALLOCATED_RAM” -cpu Haswell-noTSX,kvm=on,vendor=GenuineIntel,+invtsc,vmware-cpuid-freq=on,”$MY_OPTIONS”
-machine q35
-usb -device usb-kbd -device usb-tablet
-smp “$CPU_THREADS”,cores=”$CPU_CORES”,sockets=”$CPU_SOCKETS”
-device usb-ehci,id=ehci
# -device usb-mouse,bus=ehci.0
-device usb-kbd,bus=ehci.0,port=2
-global ICH9-LPC.acpi-pci-hotplug-with-bridge-support=off
#-cpu Cascadelake-Server,vendor=GenuineIntel,+invtsc,kvm=on,vmware-cpuid-freq=on
#-cpu Haswell-noTSX,vendor=GenuineIntel,+kvm_pv_eoi,+kvm_pv_unhalt,+hypervisor,+invtsc,kvm=on
-device nec-usb-xhci,id=xhci
-global nec-usb-xhci.msi=off
# -device usb-host,vendorid=0x8086,productid=0x0808 # 2 USD USB Sound Card
# -device usb-host,vendorid=0x1b3f,productid=0x2008 # Another 2 USD USB Sound Card
-device isa-applesmc,osk=”…”
-drive if=pflash,format=raw,readonly=on,file=”$REPO_PATH/$OVMF_DIR/OVMF_CODE.fd”
-drive if=pflash,format=raw,file=”$REPO_PATH/$OVMF_DIR/OVMF_VARS-1024×768.fd”
-smbios type=2
-device ich9-intel-hda -device hda-duplex
-device ich9-ahci,id=sata
-drive id=OpenCoreBoot,if=none,snapshot=on,format=qcow2,file=”$REPO_PATH/OpenCore/OpenCore.qcow2″
-device ide-hd,bus=sata.2,drive=OpenCoreBoot
-device ide-hd,bus=sata.3,drive=InstallMedia
-drive id=InstallMedia,if=none,file=”$REPO_PATH/Ventura-recovery.img”,format=raw
-drive id=MacHDD,if=none,file=”$REPO_PATH/mac_hdd_ng.img”,format=qcow2
-device ide-hd,bus=sata.4,drive=MacHDD
# -netdev tap,id=net0,ifname=tap0,script=no,downscript=no -device virtio-net-pci,netdev=net0,id=net0,mac=52:54:00:c9:18:27
-netdev user,id=net0 -device virtio-net-pci,netdev=net0,id=net0,mac=52:54:00:c9:18:27
# -netdev user,id=net0 -device vmxnet3,netdev=net0,id=net0,mac=52:54:00:c9:18:27 # Note: Use this line for High Sierra
-monitor stdio
-device VGA,vgamem_mb=128
)
Threads needs to be set to the product of cores and sockets, so threads=4, cores=4, sockets=1 for a standard quad core.
Check if your host has a stable TSC:
dmesg | grep -i -e tsc -e clocksource
Look for an error like “TSC found unstable after boot, most likely due to broken BIOS. Use ‘tsc=unstable’.”
If that’s the issue, sometimes doing a full host poweroff (not a warm reboot) will fix it.
Recent versions of macOS panic if they see the TSC go backwards due to a skewed host TSC, and this only becomes an issue when more than 1 core is attached.
That was it. Thanks for the help. I am getting some wierd errors when starting up the VM but still seems to work fine.
qemu-system-x86_64: warning: host doesn’t support requested feature: CPUID.07H:EBX.hle [bit 4]
qemu-system-x86_64: warning: host doesn’t support requested feature: CPUID.07H:EBX.rtm [bit 11]
qemu-system-x86_64: warning: host doesn’t support requested feature: CPUID.07H:EBX.avx512f [bit 16]
qemu-system-x86_64: warning: host doesn’t support requested feature: CPUID.07H:EBX.avx512dq [bit 17]
qemu-system-x86_64: warning: host doesn’t support requested feature: CPUID.07H:EBX.avx512cd [bit 28]
qemu-system-x86_64: warning: host doesn’t support requested feature: CPUID.07H:EBX.avx512bw [bit 30]
qemu-system-x86_64: warning: host doesn’t support requested feature: CPUID.07H:EBX.avx512vl [bit 31]
qemu-system-x86_64: warning: host doesn’t support requested feature: CPUID.07H:ECX.avx512vnni [bit 11]
qemu-system-x86_64: warning: host doesn’t support requested feature: CPUID.0DH:EAX [bit 5]
qemu-system-x86_64: warning: host doesn’t support requested feature: CPUID.0DH:EAX [bit 6]
qemu-system-x86_64: warning: host doesn’t support requested feature: CPUID.0DH:EAX [bit 7]
That looks like you’re using -cpu cascadelake on a CPU that doesn’t support all those features, use Haswell-noTSX instead.
This command won’t run on my host:
dmesg | grep -i -e tsc -e clocksource
It returns nothing. Any thoughts?
Ryzen 5700G, kernel panics + boot loops. I solved using the args that I proposed
Thanks. Were you able to pass multiple cores this way?
I have it running right now on 8 cores.
Thanks for sharing this, was having issues on my AMD PC when using the Haswell-noTSX as per the guide. I kept getting near instant reboots or kernel panics, using your suggestion at least got me to the stage of being able to install macOS on a VM in Proxmox.
ok after a lot of searching finally found that CPU should support
*MSR_IA32_TSC_ADJUST *
feature for MacOS 12+ to boot, if it is not present, you can only install or boot with only 1 cpu and 1 socket.
That’s only required if your host TSCs are out of sync (i.e. timing on your host is already broken regardless of running QEMU guests). In the args line please try adding “,+tsc_adjust” to the CPU, in theory this could allow the guest to resync the clocks when they’re broken on the host.
“,+tsc_adjust” isn’t helping, keeps rebooting or hangs up.. guess nothing can be done.
You could try combining +tsc_adjust with this kext in the guest:
https://github.com/acidanthera/CpuTscSync
ok finally managed to boot and install without any problems using these settings
check if you have tsc unstable cpu problem
dmesg | grep -i -e tsc -e clocksource
check your cpu flags
cat /proc/cpuinfo
if TSC_ADJUST is not present then you follow these
=================
on host
=================
got to bios
turn off “ErP mode” or any C state power saving modes your bios supports
turn off the system completely, unplug from the power source and boot again
sudo nano /etc/default/grubGRUB_CMDLINE_LINUX_DEFAULT="quiet clocksource=tsc tsc=reliable mitigations=off"
==================
proxmox args
==================
cpu= Haswell-noTSX
socket=1
cores=8
args: -device isa-applesmc,osk="..." -smbios type=2 -device usb-kbd,bus=ehci.0,port=2 -global nec-usb-xhci.msi=off -global ICH9-LPC.acpi-pci-hotplug-with-bridge-support=off -cpu Haswell-noTSX,vendor=GenuineIntel,+hypervisor,kvm=on,vmware-cpuid-freq=on,+tsc_adjustI’ve now updated the -cpu argument and published a new OpenCore version v19 to allow running Ventura on CPUs without AVX2 support!
qemu-img: Could not open ‘BaseSystem.dmg’: Could not locate UDIF trailer in dmg file
Can’t convert DMG to IMG/ISO
Sounds like the download got aborted before it completed, remove the DMG and redownload.
Hi Nick,
to test Ventura I would like to clone my Monterey or BigSur VM and upgrade the clone (with upgrading OpenCore of course).
When I clone in ProxMox (either as qemu image or raw image), the new VM starts with UEFI problems.
Is there a (correct) way to clone? Can I fix the UEFI startup? Or what would be a suggested way to be safe in the upgrade without losing the old working VM?
Thanks.
Peter
Cloning usually works just fine, I’m not sure went wrong there. Check that the boot order on the Options page for the new VM is correct.
Hello!
The installer booted and installed fine, but when attempting to boot into Ventura itself for the first time I will be stuck on the loading screen with a cursor. I made sure I am using the right gfx and played with it a little as well, the only change that happens is on vga it goes to a gray screen instead. Would appreciate any ideas on how to get the graphics in working order
CPU is a E3-1270v6 (kaby lake)
Check your OSK, the installer doesn’t verify it but it causes the OS to stall booting.
That was it! Didn’t realize it was case sensitive 🙂
Hi, Nick
Should we have
scsihw: virtio-scsi-single
or
scsihw: virtio-scsi-pci
Cheers!
It won’t make a difference as no SCSI disks are connected anyway
Thanks for all the help, I got it mostly working on a Ryzen 5600G (passing 4 cores). One strange thing that is happening is when the QEMU window comes up its half black. https://imgur.com/a/dZI1z5Q Screenshot there. I tried to update the resolution in the QEMU bios but doesnt seem to do anyting. If i run the same virtual machine headless and use VNC to login it works fine. Any ideas? Feels like its something to do with resolution in the VM vs the omvf bios.
What resolution are you aiming for? Did it do that right from the start?
Hi. Yes I was aiming for 1280 x 720. It started at the standard resolution but I updated it in the bios then when i do it in the VM (display settings etc) it just blacks out half the screen. I just added a comment below but it seems to work if i use the -vga vmware tag (pulled this from the headless book script) vs -device VGA, vgamem_mb=256.
If I use this tag -vga vmware vs
#-device VGA,vgamem_mb=256 it seems to work. Not exactly sure what the different is and cant seem to find anything online.
Oh yep the VMWare video adapter is the one recommended in my settings here too. The standard vga adapter doesn’t change resolution properly.
appreciate all the help. One more. When I load the VM and get to the picker screen https://imgur.com/a/JRTBv7K It shoes “EFI” and “Ventura” Which is the macHD. Anyway to remove that EFI? I updated the EFI on the “Ventura” hd so it should be booting from that.
Make sure you removed the OpenCore device from your config after copying OpenCore to the hard drive.
Not sure exactly what you mean. Like in the macos VM or somewhere else?
In your QEMU VM config, make sure you don’t still have the OpenCore disk attached
This happens when you change the ScanPolicy.
0 makes it show all drives including EFI.
https://dortania.github.io/OpenCore-Post-Install/universal/security/scanpolicy.html
No luck so far, trying on a Ryzen 7 7500G.
I am getting this panic from MacOs at the first lunch (something about ACPI):
https://kedare-public.s3.fr-par.scw.cloud/videos/proxmox-macos-panic.mov
Any idea of what could be the issue ?
You’re getting a panic for non-monotonic time, meaning that your host has an unstable TSC, you can try this solution:
https://www.nicksherlock.com/2022/10/installing-macos-13-ventura-on-proxmox/comment-page-1/#comment-55532
Hi Nick, running an i7-4790K which was good before upgrade to Ventura using a RX580 ( use it only as pure PCIE Passthrough ) but after I do the upgrade, it only works on VMWare graphics. The initial apple logo comes up and the progress starts to move but then screen gets corrupt ( which is when I used to see it flip resolution into both my monitors ).
Have you seen anything similar to this ( I did update opencore to latest as well but kept my original config.plist ).
I don’t suppose it’s just an AMD Reset Bug issue? Try power-cycling the host and try one more time (with vga set to none).
I tried this and no joy still same issue. The funny thing is all my reset issues went away and have not had these for a long time on the latest version of ProxMox. I am running 0.85 of OpenCore also…. anything else to try to debug? not sure how I get the verbose logging going I have tried to tick AppleDebug on there using openCore but i don’t see it revert to text still?
I do suspect something to do with AMD Reset though as I was not able to restart my Linux VM until after I had rebooted the machine when I had tried to run it.
If you hit cmd/win+V before selecting the boot option it’ll boot in Verbose mode.
Turns out it was because the KEXTS (Lilu etc. ) needed updating as well as my OpenCore version and now it boots fine! Thanks Nick!
Hi Nick!!
Thanks, as always, for the great guide.
Just started playing with Ventura. Trying to figure out my sleep issues some more. Previously I would set the “don’t sleep even when display sleeps” button, but I don’t seen that in Ventura. I’ve not found the right Google search for this either. Any thoughts on how to completely disable computer sleep? Or completely fix it I guess… Right now the monitors come on blank, but that’s it.
Thanks so much!
So apparently the trick is under Displays->Advanced “Prevent automatic sleeping when the display is off” Fun times!
Hi, this time I followed the latest instruction to install Ventura, and it works!
Somehow, I got 2 problems.
1. I tried to pass through RX550 Graphic Card to vm. There are 2 PCIe, 1 for VGA and 1 for Sound. When add 2 PCIe, vm cannot power on, but after remove sound PCIe, it worked…
2. The sound is out of function, even if add sound from hareware page, still no function.
Have any solution?
When you pass through a GPU, in Proxmox you need to select just the GPU device and tick “all functions”. This will pass through both the GPU and the audio device together with one hostpci entry (this is for GPUs where the GPU is at function .0 and the audio at .1, which is typical).
Thanks for your prompt reply!
For GPU, got it!
So, have any idea how to repair sound portion? It’s totally gray, and found no devices in Setting.
Do I need to put any parameter in config.plist (ex., AppleALC…)
If your monitor has a headphone jack you can use that to use native HDMI audio, that’s what I do (DisplayPort also works).
Otherwise, to use an emulated audio device (I don’t recommend this due to latency causing pops and clicks) you would need to configure an audio server on the host or through your remote desktop viewer, and then add support for it in the guest using VoodooHDA: https://www.nicksherlock.com/2020/06/installing-macos-big-sur-on-proxmox/comment-page-3/#comment-55421
Make sure you prevented the audio device from being used by the host, like you did for the GPU itself, using vfio-pci.ids and disabling the snd_hda_intel driver.
Hi Nick,
I have successfully upgraded from Monterey to Ventura. There are a couple of additional steps I had to take.
– Changed the boot args based on your guide. Otherwise, the installer wouldn’t progress. Found this out by booting in verbose mode. This included adding the -cpu Haswell-noTSX to get it working on my Ryzen 7 2700X.
– Changed the CPU to Haswell (originally it was set to Penryn to work with Monterey)
– Updated the EFI to v19 Opencore from your GitHub release
I have been running Ventura for a couple of days and no issues with stability. Seems to me, it is running more efficiently than Monterey. Haven’t got continuity camera to work yet. Might have to fiddle with it a bit.
Thank you heaps for your work!
Thanks for those notes, I’ll beef up that upgrade section description!
Upgrading from Monterey but having problems.
1.) Downloaded new OpenCore, mounted EFI, replaced EFI folder with EFI folder from .ZIP — rebooted into Monterey, no problems
1b.) One thing I do notice is after I boot back into Monterey, I get something along the lines of can’t sign into Apple ID. I verified Apple ID user/pass is correct but it just won’t take after booting back into Monterey after OpenCore EFI folder upgrade
2.) Download and install Ventura from App Store
3.) After a reboot or two, I get the mac screen that shows “…your computer restarted because of a problem…”
Any ideas?
So FYI, after Ventura “installed,” but failed to boot properly, I decided to try the Recovery option on the boot menu. After using this option, which apparently installed a new base Ventura image (and kept all my files/settings), I am now able to boot into Ventura. Then, the same iCloud box came up asking me to authenticate. This time around, it was able to authenticate, asked for my 2FA, and boom! Bob (so far) is my Uncle.
Can’t seem to pass through AMD RX6800XT to my clean Ventura install. Works perfectly fine on Monterey. Doesn’t matter if I set display to none or not, still doesnt load.
The GPU shows up under System Profiler->Displays/Graphics but when you look at the main “About this Mac” it just says “Display 7MB”
I’m fairly sure I followed your instructions to the letter, however, was continuously having trouble with getting my Mac’s Terminal.app to do any Make commands, “make: error: sh -c ‘/Applications/Xcode.app/Contents/Developer/usr/bin/xcodebuild -sdk ” -find make 2> /dev/null’ failed with exit code 34304: (null) (errno=No such file or directory)” kept installing command line developer tools again and again and again, but still wouldn’t do it. Could not even use your smc_read process. I manually downloaded Install Mac OS Ventura and used another YouTube tutorial to make myself installation media as a dmg, and then used hdiutil to convert that into an img and plonked that onto the VM. I added that image as a DVD drive in the VM, then changed the line in the conf file from media=cdrom to cache=unsafe as instructed along with the other iso, and I get the UEFI shell and Reset NVRAM as my only two options. No Install Ventura image mounting. Any ideas as to what I might be doing wrong? Is there some special configuration I need to add to my Mac OS installation image to make it appear in the boot list?
Other tutorials tend to build true ISOs (rather than the hard disk images mine builds) which need media=cdrom to be kept.
Tried that too just now and I still don’t see the OS Install volume in the boot selector.
Use my Linux recovery image build instructions instead then, e.g. in a Linux VM or container.
Fantastic advice. Thank-you. That’s got it. Thanks again!!
Hi Nicholas,
Many thanks for an amazing tutorial. I got Ventura up and running first time with no major slip-ups. A sign of a well-written guide! All is running perfectly on the Proxmox console. How, though, do I get everything to boot and display on the Host monitor with Nvidia GTX980 graphics card? I can’t find anything out there.
You can’t, support for that card ended with High Sierra.
dmesg | grep -i -e tsc -e clocksource
this command doesn’t work unless I run sudo and even then the output is nothing like either of the outputs you show.
[ 29.290678]: IOTimeSyncTimeSyncTimePort(0x6ce5c91165170008): Other 0xe0034150Sandbox apply: ContainerMetadataExtractor[448] Sandbox apply: mediasharingd[485] 1 duplicate report for Sandbox: contextstored(192) deny(1) mach-lookup com.apple.biome.compute.source.userSandbox: softwareupdated(107) deny(1) nvram-get ForceDisplayRotationInEFISandbox: softwareupdated(107) deny(1) nvram-get run-efi-updaterSandbox: softwareupdated(107) deny(1) nvram-get preferred-countSandbox: softwareupdated(107) deny(1) nvram-get GPUROMSandbox: softwareupdated(107) deny(1) nvram-get PSFU_STATUSSandbox: softwareupdated(107) deny(1) nvram-get fm-spstatusSandbox: softwareupdated(107) deny(1) nvram-get fm-activation-lockedSandbox apply: systemstats[94] Sandbox apply: coresymbolicationd[524] Sandbox apply: AssetCacheTetheratorService[519] Sandbox apply: cloudpaird[490] Sandbox: ContainerMetadataExtractor(448) deny(1) user-preference-read kCFPreferencesAnyApplicationSandbox apply: distnoted[525] Sandbox: homed(422) deny(1) mach-lookup com.apple.identityservicesd.idquery.desktop.authSandbox apply: parsec-fbf[425] Sandbox apply: accessoryupdaterd[95] Sandbox: symptomsd-diag(319) deny(1) mach-lookup com.apple.backupd.sandbox.xpcSandbox: symptomsd-diag(319) deny(1) mach-lookup com.apple.metadata.mds1 duplicate report for Sandbox: symptomsd-diag(319) deny(1) mach-lookup com.apple.metadata.mdsSandbox: accessoryupdaterd(95) allow file-issue-extension target:/private/var/db/accessoryupdater/Library/Preferences/com.apple.accessoryupdaterd.plist class:com.apple.cfprefsd.readSandbox: accessoryupdaterd(95) allow file-issue-extension target:/private/var/db/accessoryupdater/Library/Preferences/.GlobalPreferences.plist class:com.apple.cfprefsd.readSandbox: accessoryupdaterd(95) allow file-issue-extension target:/private/var/db/accessoryupdater/Library/Preferences/.GlobalPreferences_m.plist class:com.apple.cfprefsd.readSandbox: parsec-fbf(425) deny(1) file-read-data /Users/andmpel/Library/Caches/GeoServices/DirectReadConfigStore.plistSandbox apply: gamecontrolleragentd[528] Sandbox: parsec-fbf(425) deny(1) mach-lookup com.apple.coreservices.quarantine-resolverSandbox: parsec-fbf(425) deny(1) file-read-data /Users/andmpel/Library/Caches/GeoServicesSandbox: cloudpaird(490) deny(1) system-fsctl (_IO “h” 47)Sandbox: accessoryupdaterd(95) allow file-issue-extension target:/private/var/db/accessoryupdater/Library/Preferences/com.apple.uarp.database.plist class:com.apple.cfprefsd.readSandbox apply: amsengagementd[526] Sandbox: cloudpaird(490) deny(1) mach-lookup com.apple.metadata.mdsSandbox apply: AudioComponentRegistrar[527] 1 duplicate report for Sandbox: cloudpaird(490) deny(1) mach-lookup com.apple.metadata.mdsSandbox: cloudpaird(490) deny(1) mach-lookup com.apple.tccdSandbox: cloudpaird(490) deny(1) file-read-data /Library/Preferences/com.apple.networkd.plist1 duplicate report for Sandbox: cloudpaird(490) deny(1) file-read-data /Library/Preferences/com.apple.networkd.plistSandbox: accessoryupdaterd(95) allow mach-lookup com.apple.commcenter.coretelephony.xpc1 duplicate report for Sandbox: accessoryupdaterd(95) allow mach-lookup com.apple.commcenter.coretelephony.xpcSandbox: amsengagementd(526) deny(1) file-read-data /Library/Preferences/com.apple.networkd.plistSandbox apply: CarbonComponentScannerXPC[530] Sandbox apply: remindd[494] 1 duplicate report for Sandbox: amsengagementd(526) deny(1) file-read-data /Library/Preferences/com.apple.networkd.plistSandbox: amsengagementd(526) deny(1) file-write-unlink /Users/andmpel/Library/Caches/com.apple.amsengagementd/fsCachedDataSandbox: amsengagementd(526) deny(1) file-read-data /Users/andmpel/Library/Caches/com.apple.amsengagementd/Cache.db3 duplicate reports for Sandbox: amsengagementd(526) deny(1) file-read-data /Users/andmpel/Library/Caches/com.apple.amsengagementd/Cache.dbSandbox: amsengagementd(526) deny(1) file-read-data /Users/andmpel/Library/Caches/com.apple.amsengagementd/fsCachedDataSandbox: amsengagementd(526) deny(1) mach-lookup com.apple.metadata.mdsSandbox: amsengagementd(526) deny(1) file-read-data /Users/andmpel/Library/HTTPStorages/com.apple.amsengagementdSandbox: amsengagementd(526) deny(1) file-write-xattr /Users/andmpel/Library/HTTPStorages/com.apple.amsengagementdSandbox: amsengagementd(526) deny(1) file-read-xattr /Users/andmpel/Library/HTTPStorages/com.apple.amsengagementdSandbox: amsengagementd(526) deny(1) file-read-data /Users/andmpel/Library/HTTPStorages/com.apple.amsengagementd/httpstorages.sqlite1 duplicate report for Sandbox: amsengagementd(526) deny(1) file-read-data /Users/andmpel/Library/HTTPStorages/com.apple.amsengagementd/httpstorages.sqliteSandbox: amsengagementd(526) deny(1) file-read-data /private/var/db/nsurlstoraged/dafsaData.binSandbox apply: swcd[531] Sandbox: swcd(531) deny(1) system-fsctl (_IO “h” 47)tx_flush:1241: disk1 xid 65249 tx stats: # 80 finish 80 enter 347 wait 13 41492us close 309us flush 3273us
You need to run it in Proxmox, not in macOS.
My Ventura VM keeps periodically shutting down by itself. And then I can’t seem to start it back up unless I reboot the proxmox host. Can you help me troubleshoot this at all?
Thanks,
Does it happen when the system is idle? Turn off the sleep support in Energy Saver options inside Ventura.
Otherwise check your Proxmox “dmesg” output for events timestamped at the time of the issue.
Finally works on my Ryzen 3700X!
Workaround: Install Proxmax in VMWare(for test purpose)
Always failed at ‘macOS Update Assistant’,it says:a error occurred preparing the software update, then into Recovery menu option after reboot, reinstall macOS form network(very weird), follow the tutorial.
All is fine.
Not sure what’s problem cause this situation, try install without VMWare.
Thanks for the updated guide, finally install Ventura with 5700XT on my pc, there are some tricks for vendor-reset and OC config, you need ”“initcall_blacklist=sysfb_init rootdelay=10“ on GRUB_CMDLINE_LINUX_DEFAULT fully block gpu-driver loaded.
Add boot-arg “agdpmod=pikera” before boot with 5700XT.
Best regards.
My post:https://github.com/0xfeedface1993/Install-macOS-Ventura-On-AMD-3700X-With-5700XT-BY-Proxmox
Hello Nick,
i just upgraded my proxmox to 7.2-11 to create a new VM with Ventura, but since i upgraded, all my VM (Catalina, Big Sur and Mojave) don’t work anymore 🙁
No passtrought to the GPU :
23:00.0 VGA compatible controller: Advanced Micro Devices, Inc. [AMD/ATI] Vega 10 XTX [Radeon Vega Frontier Edition]
23:00.1 Audio device: Advanced Micro Devices, Inc. [AMD/ATI] Vega 10 HDMI Audio [Radeon Vega 56/64]
Can you help me to find a solution please ?
Best regards
If that is your host’s boot GPU then you need to do more config to stop host drivers from binding to it, check dmesg output for evidence, particularly BAR errors indicating that memory regions are still bound to host drivers.
Thank you so much for your quick answer !
I have two GPU’s installed :
01:00.0 VGA compatible controller: NVIDIA Corporation TU104 [GeForce RTX 2070 SUPER] (rev a1)
23:00.0 VGA compatible controller: Advanced Micro Devices, Inc. [AMD/ATI] Vega 10 XTX [Radeon Vega Frontier Edition]
First one is used for windows VM
Second one for MacOS VM
Actually i found a way to boot my MacOS VM but only with pci-express flag unchecked. so very slow graphics and no possibility to connect my second screen…
This is my actual DMESG :
https://pastebin.com/djaw2kBg
>Actually i found a way to boot my MacOS VM but only with pci-express flag unchecked. so very slow graphics and no possibility to connect my second screen…
This means you’re missing “-global ICH9-LPC.acpi-pci-hotplug-with-bridge-support=off” from your VM args, needed for PCIe-passthrough devices to work on macOS on recent q35 model versions.
Hello Nick,
So many thanks for your help 🙂
You make directly your finger on the problem !!
Now everything work fine with my 2 screens
Amazing Great Job… where i can contribute to you ?
Best regards
P.S. next step is to put Ventura 😉
If you mean that you’d like to send me a donation, I have a PayPal account at n.sherlock@gmail.com 🙂
How do I upgrade OpenCore while preserving config.plist changes (for iMessage purposes). Thanks for all the work you do!
You should be able to transfer over anything that looks like a serial/random number from your old config.plist’s PlatformInfo > Generic section, I think that’s enough.
Thanks! I got OpenCore updated, but after updating MacOS with the full installer image, I get this error: “An error occurred preparing the software update.” after the install process completes. Here is my config file if that helps.
agent: 1
args: -device isa-applesmc,osk=”…” -smbios type=2 -device usb-kbd,bus=ehci.0,port=2 -global nec-usb-xhci.msi=off -global ICH9-LPC.acpi-pci-hotplug-with-bridge-support=off -cpu host,kvm=on,vendor=GenuineIntel,+hypervisor,+invtsc,vmware-cpuid-freq=on
balloon: 0
bios: ovmf
boot: order=virtio0;ide0
cores: 16
cpu: Haswell
efidisk0: local-zfs:vm-108-disk-0,efitype=4m,size=1M
ide0: local:iso/Ventura-full.img,cache=unsafe,size=14G
machine: q35
memory: 16384
meta: creation-qemu=6.2.0,ctime=1656145650
name: macos-monterey
net0: virtio=8C:FE:57:33:77:33,bridge=vmbr0,firewall=1
numa: 1
onboot: 1
ostype: other
parent: OpenCore19
scsihw: virtio-scsi-pci
smbios1: uuid=591bcc88-5cb7-4369-8ce0-b407f997cd7d
sockets: 1
vga: vmware
virtio0: local-zfs:vm-108-disk-1,cache=unsafe,discard=on,size=128G
vmgenid: 21c63f26-4d9d-41b9-b68c-a444a4f64a34
It also enters into a bootlooop after installation saying “Your computer restarted because of a problem. Press any key or wait a few seconds to continue starting up.”
Same here – commenting for updates 😉
I was successful in creating Ventura vm, from scratch, and the only thing I can’t get working is taking a snapshot on proxmox 🙁
Seeing the following text on the snapshot page:
“The current guest configuration does not support taking new snapshots”
Thanks to you help I have various macOS vms that I need to testing stuff, and this problem with creating snapshot goes away after moving the EFI but not on Ventura.
I hope you can help 🙂
Make sure you also don’t still have the installer disk attached.
Any idea what would cause super slow GUI movement? Minimize window, Maximize window, moving windows around on the desktop, SUPER SLOW! Any help would be appreciated.
That’s standard because there is zero hardware graphics acceleration available. It’s a little better if you use macOS Screen Sharing instead of WebVNC.
To get good performance you need to PCIe-passthrough a compatible GPU
HI, Thanks for all the help. For some reason my guestVM always boots into the Uefi Shell even if I go in and change the boot order. It does not seem to be saving the settings each time. (if I power off the VM). Any ideas as to why the boot order would not be saved. Thanks
Make sure you have an EFI disk attached. If you already have one attached then detach and delete it, and readd one and be certain to un-tick “pre-enroll keys” since these prevent booting OpenCore
Thanks. Still seems to be doing it. I moved the Opencore EFI folder to the mac_hdd_ng.img EFI folder and removed the original OPencore boot EFI from the startup scrip. Where do you find the “pre-enrool key” check?
Sorry, I forgot you weren’t using Proxmox. That shouldn’t be an issue on other systems because they don’t try to set up Secure Boot for Windows automatically like Proxmox does.
Thanks for the updated guide Nick, now have a perfect running Ventura system on a Ryzen 3900X with RX580 pass through.
One strange issue though is when the server boots up, I can’t get the Ventura VM to boot first time. I always have to start, stop then start again. It then starts fine. Just means I can’t tell it to boot Ventura on server start.
My windows VM does not have a problem and always starts first time and can be auto booted at start. (Has a separate RTX 2080ti GPU passed through)
Have you come across this issue before?
At what point does it get stuck?
Press start, screen goes blank then nothing. Doesn’t get to the Proxmox initial loading screen. VM never gets an IP address so just hanging. Summary shows some CPU activity around 15% and memory is loaded.
Shutdown or reboot will not work, have to use the stop option.
Second start always seems to work fine.
Great guide!
Got it working on my Ryzentosh but I’m now stuck with my Broadcom BCM94360NG which BT does show up as NULL in system prefs.
I have the device in IOResources but it’s not mapped to any USB tree which is what’s needed for my to set the connector to 255. Any guide or idea I should follow? Thanks
Need some help installing Ventura on my Proxmox – Intel Xeon CPU E7- 4870 @ 2.40GHz I have followed all the posts above and tried everything with no success (( dmesg | grep -i -e tsc -e clocksource )) it all looks good no tsc unstable cpu problem i am not sure what I am missing here run the same install using an intel nuc running 7i5BNH proxmox with no problem Ventura worked so it must be my Xeon CPU E7- 4870 can anyone help me getting this thing up and running, please.
Hi, I got a situation.
I tried to get my RX550 for passthrough.
I checked many posts to see how to do it.
Somehow, no matter how I set the parameters, the Ventura cannot be shown on the monitor connected by HDMI, even to get a vga rom file.
Any possible solution?
Thanks
Charlie
To really help – we would need more info….
The IMHO best guide for GPU pass-through on proxmox is this one:
https://blog.quindorian.org/2018/03/building-a-2u-amd-ryzen-server-proxmox-gpu-passthrough.html/
And you might need to look at the boot args – i.e. agdpmod=pikera and try above 4G decoding in BIOS on or off with npci=0x2000…etc.
Hi, I tried to disable SIP (in recovery boot) but it gives an error message:
-bash-3.2# csrutil disable –no-internal
Assertion failed. (range.location + range.length <= dataLength), function __CFDataValidateRange, file CFData.c, line 235. Abort trap: 6
Any ideas on that?
I had this issue I had to run csrutil –reset or something along those lines. Then I was able to run the disable command.
Thank you! csrutil clear was the solution.
I followed some website tutorials and got my NVidia GT710 (PCIx1, 1GB) low cost GPU with hardware acceleration with help of the Opencore legacy patcher supported now.
I really appreciate your work and kholia’s. I’m struggling with setting the default or maybe there’s something wrong with my EFI partition?
I’ve dd’d the partition and this has always worked in the past but now when I set AllowSetDefault=True and ShowPicker=False … I just get a black screen.
The same thing happens if I have ShowPicker=False and select the EFI partition, I get the black screen.
Hi Nick,
I having issues trying to get this to work. I’m in a position where I’m upgrading from 12.6.1, OpenCore is already at 8.6 with the latest drivers and kexts. I’ve gone through your Config.plist and other the couple of bits 8.6 wants, they are all but the same (just the enabled=false removed to tidy things up)
I’m running on an AMD 5900X and so have set the args to -cpu Haswell-noTSX,vendor=GenuineIntel,+invtsc,+hypervisor,kvm=on,vmware-cpuid-freq=on and via the GUI I set the CPU as 1,4 Haswell but get to ‘AppleKeyStoreTest’.
I have no TSC errors (clocksource: Switched to clocksource tsc) or issues reported in kern.log
I’ve tried the other chaps (mod grub) and changed the args to suit, disabled ErP in the BIOS but that didn’t make and differences.
Your comments above seem to suggest the TSC compliance was required for Monterey onwards, as I’ve been on Monterey for some time without issues…I have to assume that’s not the issue. However, changing the socket (my default is 3 Sockets with 8 CPU’s) to 1,4 or 1,8 or 3,8 does change the point it hangs so feel it’s related in someway.
Any other ideas?
I changed the CPU to Haswell and machine to iMacPro1,1.
I used OCAT to upgrade OpenCore, kexts and plist to the latest.
Besides that I changed nothing.
OCAT threw an error on csr-active which i ignored and subsequent upgrade from Montery 12.5.3 to Ventura 13.0.1 worked flawlessly.
To really help – we would need more info….
The IMHO best guide for GPU pass-through on proxmox is this one:
https://blog.quindorian.org/2018/03/building-a-2u-amd-ryzen-server-proxmox-gpu-passthrough.html/
And you might need to look at the boot args – i.e. agdpmod=pikera and try above 4G decoding in BIOS on or off with npci=0x2000…etc.
Hello,
I get everything working, but i cant establish a internet connection to fetch the recovery image from the recovery bootscreen.
https://abload.de/img/screenshot_20221117_1jheey.png
I use vmbr0 with a slave to my actual inet connection and vmbr1 with my private lan.
I opened the terminal in the booted recovery.img in OpenCore. i set all up with ipconfig and the default route gateway. I can ping google dns servers 8.8.8.8 but he cannot resolve hostnames.
https://abload.de/img/screenshot_20221117_1xhc0u.png
I followed this guide but doesnt work either.
https://superuser.com/a/86188
https://abload.de/img/screenshot_20221117_102ey5.png
Anyone a solution or hint?
Set up a DHCP server on Proxmox which gives macOS an IP address and tells it the correct DNS address. e.g. install dnsmasq and use a /etc/dnsmasq.conf config like:
interface=vmbr0dhcp-range=10.10.10.2,10.10.10.254,12h
# Gateway:
dhcp-option=vmbr0,3,10.10.10.1
# DNS:
dhcp-option=vmbr0,6,8.8.8.8
This config is for vmbr0 using the IP address range 10.10.10.1/24, edit as needed
Hi Nick, I have an issue passing through USB mouse/keyboard. Was working just fine in Monterey and all the other MacOS version but after update to Ventura it stops at the login window. It still works when at pick disk-OS stage. At login its dead, both keyboard and mouse.
Where to search after solution ? GPU pass through is working just fine.
MickeM/Nick: I have the same issue. Any pointers would be greatly appreciated. Works fine selecting the boot option, then both don’t work on the login screen (GPS passthrough).
Thanks a lot.
Hi, many thanks for this guide. It’s working really well. There’s one thing, though, I’d like to check if you know how to solve it.
I could not get my physical keyboard or my mouse to work on the OpenCore boot picker menu, I’m passing through the whole USB controller from the host machine to the OSX VM, and they work fine in the mac os, but not in the opencore boot.
The keyboard / mouse from the proxmox console (when using VMWare Compatible Display) works in the opencore boot picker menu though.
So, as workaround, to be able to boot with GPU passthrough (without vmware compatible display on proxmox) I had to set a default timeout on my opencore.
Do you have any idea how to fix this?
AFAIR as I read somewhere you might need to add a “-device usb-mouse” in the boot args of the .conf file.
Hello,
Got the DNS error fixed through ovmf settings. Thanks for your suggestion.
Now i cant complete the intial questions.. The VM stops automatically.
Found this in the syslog
https://notepad.co.il/N9sZA0m6
Thanks again!
The questions after install is done?
I think I’ve only seen QEMU crash like this when passing through USB devices and not including -global nec-usb-xhci.msi=off in the VM args (due to a QEMU bug).
If that’s not your situation you might have to attach a debugger like gdb to the QEMU process so you can get a stack trace when it segfaults.
Just leaving this here, if you need to check clocksource on your host, you can do so by running this command in the host’s shell:
cat /sys/devices/system/clocksource/clocksource0/current_clocksource
If it says anything other than tsc, you may need to do the mentioned workaround.
Hi Nick,
Great tutorial! I followed closely step by step but for some reason the installation stuck right after I chose “Install macOS Ventura”. I tried verbose boot from UEFI shell and took a screenshot when it stuck:
https://i.imgur.com/aBh2sgt.png
CPU is relatively recent, 12700K, it should support all features required.
Below is my VM config:
———————–
# qm config 3002
agent: 1
args: -device isa-applesmc,osk=”<masked>” -smbios type=2 -device usb-kbd,bus=ehci.0,port=2 -global nec-usb-xhci.msi=off -global ICH9-LPC.acpi-pci-hotplug-with-bridge-support=off -cpu host,vendor=GenuineIntel,+invtsc,+hypervisor,kvm=on,vmware-cpuid-freq=on
balloon: 0
bios: ovmf
boot: order=ide2;virtio0
cores: 12
cpu: Haswell
efidisk0: local-zfs:vm-3002-disk-0,efitype=4m,size=1M
ide0: local:iso/Ventura-full.img,cache=unsafe,size=14G
ide2: local:iso/OpenCore-v19.iso,cache=unsafe,size=150M
machine: q35
memory: 16384
meta: creation-qemu=7.1.0,ctime=1669350307
name: macos
net0: virtio=<masked>,bridge=vmbr0,firewall=1
numa: 0
ostype: other
scsihw: virtio-scsi-single
smbios1: uuid=<masked>
sockets: 1
vga: vmware
virtio0: local-zfs:vm-3002-disk-2,backup=0,cache=unsafe,discard=on,iothread=1,size=64G
vmgenid: <masked>
cores: 12 won’t work, set that to cores: 8.
It’s possible to use 12 cores by setting sockets: 3 and cores: 4 instead.
Hello Nick,
Just create My Ventura VM but i can’t make it work with more than 1 core
My TSC give me that :
Nov 25 14:16:57 info kernel: [ 0.000000] tsc: Fast TSC calibration failed
Nov 25 14:16:57 info kernel: [ 0.024000] tsc: PIT calibration matches HPET. 1 loops
Nov 25 14:16:57 info kernel: [ 0.024000] tsc: Detected 3700.249 MHz processor
Nov 25 14:16:57 info kernel: [ 0.000004] clocksource: tsc-early: mask: 0xffffffffffffffff max_cycles: 0x6aac8140ff8, max_idle_ns: 881590632561 ns
Nov 25 14:16:57 info kernel: [ 0.366165] clocksource: Switched to clocksource tsc-early
Nov 25 14:16:57 info kernel: [ 1.444199] tsc: Refined TSC clocksource calibration: 3699.947 MHz
Nov 25 14:16:57 info kernel: [ 1.444223] clocksource: tsc: mask: 0xffffffffffffffff max_cycles: 0x6aaa47c7781, max_idle_ns: 881590908065 ns
Nov 25 14:16:57 info kernel: [ 1.444366] clocksource: Switched to clocksource tsc
Nov 25 14:16:57 info kernel: [ 19.417284] SVM: TSC scaling supported
Nov 25 14:25:06 info kernel: [ 0.000000] tsc: Fast TSC calibration failed
Nov 25 14:25:06 info kernel: [ 0.024000] tsc: PIT calibration matches HPET. 1 loops
Nov 25 14:25:06 info kernel: [ 0.024000] tsc: Detected 3700.246 MHz processor
Nov 25 14:25:06 info kernel: [ 0.000005] clocksource: tsc-early: mask: 0xffffffffffffffff max_cycles: 0x6aac7bb295e, max_idle_ns: 881590805761 ns
Nov 25 14:25:06 info kernel: [ 0.369125] clocksource: Switched to clocksource tsc-early
Nov 25 14:25:06 info kernel: [ 1.444194] tsc: Refined TSC clocksource calibration: 3699.963 MHz
Nov 25 14:25:06 info kernel: [ 1.444225] clocksource: tsc: mask: 0xffffffffffffffff max_cycles: 0x6aaa6655811, max_idle_ns: 881590829346 ns
Nov 25 14:25:06 info kernel: [ 1.444363] clocksource: Switched to clocksource tsc
Nov 25 14:25:06 info kernel: [ 19.550156] SVM: TSC scaling supported
Have you a idea ?
Thank you
Looks like your TSC is working fine, so this problem is unusual.
What’s the model name of your host CPU, and what -cpu argument do you have in the VM config?
AMD Ryzen Threadripper 3970X 32-Core Processor
args: -device isa-applesmc,osk=”…” -smbios type=2 -device usb-kbd,bus=ehci.0,port=2 -global nec-usb-xhci.msi=off -global ICH9-LPC.acpi-pci-hotplug-with-bridge-support=off -cpu Haswell-noTSX,vendor=GenuineIntel,+invtsc,+hypervisor,kvm=on,vmware-cpuid-freq=on,+tsc_adjust
This is my boot in verbose mode :
#[EB.LD.LF|IN] O (“‹null string)”> (“1”>
#[EB.B. SBS|SZ] 719416
#LEBIB:SHA1
#[EB.WL.PWLFNVI!] Err (OxE)
#[EB.LD.OFS|OPEN!1Err(0xE) ‹”boot\\System\\Library\\KernelCollections\\BootKernelExtensions.kc.development”›
#LEB.LD.LKC|R.21<"boot\System\Library\KernelCollections\BootKernelExtensions.kc")
#[EB.LD.LKFS|-?]Ok(0)
#[EB.LD.LKC|-?] Ok (0)
#[EBIBST:REV1]
#[EBICSR:OUT: 0x00000F66
#[EB.BST.FBS|+]
#[EB.BST.FBS|ADSZ] 0
#[EB.BST.FBS|KSSZ] 0
#DEBISB: SBGMFNS] x86 legacyap.im4m
#DEBIRH:PF1 usr\standalone\OS.dmg.root_hash
#LEBIRH:MF]<"0"›
#[EB.LD.LFIIN] 0 ‹"usr\\standalone\\OS.dmg.root_hash.x86legacyap.im4m"› (0"›
#LEB.BST .FBS |RHPSZ] 229
#[EB.BST.FBS|RHMSZ]3658
#DEBILOG:DT1 2022-11-26T08:49:04
#[EB/LOG:EXITBS:START]2022-11-26T08:49:04
Thank you
Are you using +tsc_adjust because you previously had TSC sync failures in the guest and you wanted to try the CpuTscSync kext? If you have this kext added it will be counterproductive since your host TSC appears to be working, try removing +tsc_adjust.
Hello Nick,
just to know if you received my answer to your questions ?
Best regards
Sorry, no, your comment got caught in the spam bin, I’ll approve it and check it out now
Thank you Nick
Hello all,
I am certainly a bad at linux command but I faced an issue for making the image. I am on a MacBook Pro with Ventura to build it:
jcr@FR-LAP10392 ~ % cd /Users/jcr/Downloads/OSX-KVM-master
jcr@FR-LAP10392 OSX-KVM-master % cd scripts/ventura
jcr@FR-LAP10392 ventura % make Ventura-full.img
hdiutil create -o “Ventura-full.dmg” -size 14g -layout GPTSPUD -fs HFS+J
created: /Users/jcr/Downloads/OSX-KVM-master/scripts/ventura/Ventura-full.dmg
hdiutil attach -noverify -mountpoint /Volumes/install_build “Ventura-full.dmg”
/dev/disk6 GUID_partition_scheme
/dev/disk6s1 EFI
/dev/disk6s2 Apple_HFS /Volumes/install_build
sudo “/Applications/Install macOS Ventura.app/Contents/Resources/createinstallmedia” –volume /Volumes/install_build –nointeraction
Password:
Couldn’t mount dmg /Applications/Install macOS Ventura.app/Contents/SharedSupport/SharedSupport.dmg (error code 110)/Applications/Install macOS Ventura.app does not appear to be a valid OS installer application.
make: *** [Ventura-full.dmg] Error 253
jcr@FR-LAP10392 ventura %
Thanks in advance for your help.
It looks like your Install macOS Ventura app is somehow damaged, but I can’t imagine how that came to be. Try removing that from your Applications folder and building it again.
Where can I send donations for your work 🙂
I have a PayPal account at n.sherlock@gmail.com, thanks!
Hey Nick,
I got the OS running, but though I pass through the USB device (iPhone) or the entire port, the connection keeps dropping. I have tried restarting the OS, Proxmox, iPhone (13) and also tried killing usbd on Ventura. Still the same result. How do I get over this?
For iPhone devices you must PCIe-passthrough an entire USB controller, because the phone re-negotiates during connection and this causes it to drop off standard USB passthrough.
Done. Works like a charm!
Thank you!
Thanks a lot Nicholas Sherlock for your prompt reply.
I restarted from scratch and everything goes well, couple of reboot and I think after the last one I got the issue with the Power Button and a note saying my computer restarted, blabla ….
Please find 2 screenshots and also my conf:
agent: 1
args: -device isa-applesmc,osk=”…” -smbios type=2 -device usb-kbd,bus=ehci.0,port=2 -global n>
balloon: 0
bios: ovmf
boot: order=ide2;ide0
cores: 4
cpu: Haswell
efidisk0: local:103/vm-103-disk-0.raw,efitype=4m,size=528K
ide0: local:iso/Ventura-full.img,cache=unsafe,size=14G
ide2: local:iso/OpenCore-v19.iso,cache=unsafe,size=150M
machine: q35
memory: 4096
meta: creation-qemu=6.2.0,ctime=1669468602
name: Ventura
net0: virtio=7E:17:XX:05:4B:27,bridge=vmbr0,firewall=1
numa: 0
ostype: other
scsihw: virtio-scsi-single
smbios1: uuid=xxxxxxx
sockets: 1
vga: vmware
virtio0: local:103/vm-103-disk-1.raw,cache=unsafe,discard=on,iothread=1,size=32G
virtio1: local:103/vm-103-disk-3.qcow2,cache=unsafe,discard=on,iothread=1,size=32G
vmgenid: xxxxx
I noticed that for HDD I have the extension .raw clearly in the conf file whereas I don’t see it following the tuto. As I have a doubt I tried with qcow2, but same result.
https://e1.pcloud.link/publink/show?code=XZ5PJYZOY2B22z07NJpEOivNksTLBrxT3JV
https://e1.pcloud.link/publink/show?code=XZHPJYZAtwrrijWhr0d1gtpoXaz4bLeRpI7
Thanks a lot
What’s your host CPU?
-cpu Haswell in your args will not work, please update that to use one of my two suggestions
The .raw extension is fine, this is just a difference in what kind of storage you’re using to store your VMs on.
Nick,
Thanks a lot for making this post. I was able to upgrade from Monterey to Ventura. I am also using Graphics acceleration using Radeon GPU, and i think only thing i did is remove the -v boot args in openCore and it worked like a charm.
I was trying different options (team viewer, VNC), but nothing worked performant for me to do remote desktop into hackintosh. Do you have any suggestions for that?
Make sure you have either a real monitor or an HDMI dummy plug attached to the ports on the graphics card, or else it probably won’t accelerate the desktop when you’re using remote desktop.
I’ve only tried macOS Screen Sharing so far, which I think is VNC under the hood. “Parsec” is an alternative you can try for intensive applications like video and game streaming.
Many Thanks for your reply.
I made in mistake in copying the args line.
Here below the line:
args: -device isa-applesmc,osk=”…” -smbios type=2 -device usb-kbd,bus=ehci.0,port=2 -global nec-usb-xhci.msi=off -global ICH9-LPC.acpi-pci-hotplug-with-bridge-support=off -cpu host,vendor=GenuineIntel,+hypervisor,kvm=on,vmware-cpuid-freq=on
My NUC, Beelink X45
4 x Intel(R) Celeron(R) J4105 CPU @ 1.50GHz (1 Socket)
Thanks
It looks like your processor doesn’t support AVX, this is required:
https://www.cpu-world.com/CPUs/Celeron/Intel-Celeron%20J4105.html
I think Big Sur was the last version of macOS that didn’t require AVX1 at least.
thanks a lot for replying.
I have to change my nuc so.
Hello, I downloaded your git repo on my real MacBook, and tried running ‘cd OSX-KVM/scripts/Ventura; make Ventura-full.img’, however, the task immediately fails with an error about “env: python3 not found” or some such thing.
I double-checked my system. I have ‘/usr/bin/python’, but no python3 anywhere. It’s an old MacBook. 2010 15″ model, running El Capitan, which is the latest version it can run. I have no other Macs anywhere.
I get a similar error with the makefiles for other MacOS versions.
You can install python3 using Homebrew or MacPorts
I’m not familiar with those, and I don’t know where to find such apps on my system. Going to let it rest, however, as I got Monterey working, and used that to create full install images.