
This tutorial for installing macOS 13 Ventura has been adapted for Proxmox from Kholia’s OSX-KVM project and Leoyzen’s OpenCore configuration for KVM. You can get the full sourcecode of my OpenCore release on my GitHub here.
Requirements
I’ll assume you already have Proxmox 7.2 installed. You also need a real Mac available in order to fetch the OSK key.
Ventura now requires that your CPU has support for AVX2, so for Intel your CPU would have to be at least as new as Haswell. However, I have added the CryptexFixup kext to work around this restriction and allow Ventura to be used even on CPUs that don’t have AVX2 support (and merely support SSE 4.2 and AVX1). Note that the AMD graphics card drivers won’t work in this situation, and other apps that assume AVX2 is present could break too! Please see the CryptexFixup readme for details.
Modern AMD CPUs also support AVX2 and should work with this guide.
Since Monterey, your host must have a working TSC (timestamp counter), because otherwise if you give the VM more than one core, macOS will observe the skew between cores and panic when it sees time ticking backwards. To check this, on Proxmox run:
dmesg | grep -i -e tsc -e clocksource
On a working host you’ll see:
tsc: Refined TSC clocksource calibration: 3399.998 MHz
clocksource: tsc: mask: 0xffffffffffffffff max_cycles: 0x31024cfe468, max_idle_ns: 440795307017 ns
clocksource: Switched to clocksource tsc
On a broken host you’ll see:
TSC synchronization [CPU#0 -> CPU#1]:
Measured 3358870891203288 cycles TSC warp between CPUs, turning off TSC clock.
tsc: Marking TSC unstable due to check_tsc_sync_source failed
clocksource: Switched to clocksource hpet
kvm: SMP vm created on host with unstable TSC; guest TSC will not be reliable
If you have a broken TSC, this is a possible workaround. Sometimes you can simply power-cycle the host to resync the TSCs (especially if your server has a high uptime).
First step: Create an installation ISO
Download my copy of the OSX-KVM repository using the download button, and unzip it:
https://github.com/thenickdude/OSX-KVM
First we need to install some build requirements. If you will be building the installer ISO on macOS, open up the Terminal and run this command to install the commandline tools:
xcode-select --installIf you’re building the ISO on Linux, you instead need to run this command (these are the package names for Ubuntu or similar distributions, they may need adjustment on other distributions):
sudo apt install qemu-utils make
Now in the Terminal, from the root of OSX-KVM, run:
cd scripts/ventura
make Ventura-recovery.img
This will download the Ventura installer from Apple’s software distribution servers and build a Ventura-recovery.img file for you. Upload this file to your Proxmox’s ISO store directory (typically /var/lib/vz/template/iso). Although we’re putting it in the ISO directory so that we can use it with Proxmox’s ISO picker later, this a raw disk image rather than a true ISO.
If you’re building the installer on macOS, you can build a full installer instead of just a recovery, which will mean that macOS won’t have to download Ventura files during installation, and so won’t require an Internet connection. Simply ask it to build Ventura-full.img instead:
cd scripts/ventura
make Ventura-full.img
This option is not available when building the installer on Linux.
Prepare an OpenCore image
Download the OpenCore.iso.gz file from the newest release in my repository (you need v19 or newer), double click it to unpack it, and upload it to Proxmox’s ISO store at /var/lib/vz/template/iso. Although it has a .iso file extension, this is actually a hard disk image.
Fetch the OSK authentication key
macOS checks that it is running on real Mac hardware, and refuses to boot on third-party hardware. You can get around this by reading an authentication key out of your real Mac hardware (the OSK key). Save the first block of C code from this page as smc_read.c. In a command prompt, change into the same directory as that file and run:
xcode-select --install # If you don't already have gcc
gcc -o smc_read smc_read.c -framework IOKit
./smc_read
It’ll print out the 64 character OSK for you. Make a note of it.
Every Mac uses the same OSK, so don’t be surprised that it doesn’t look like a random string!
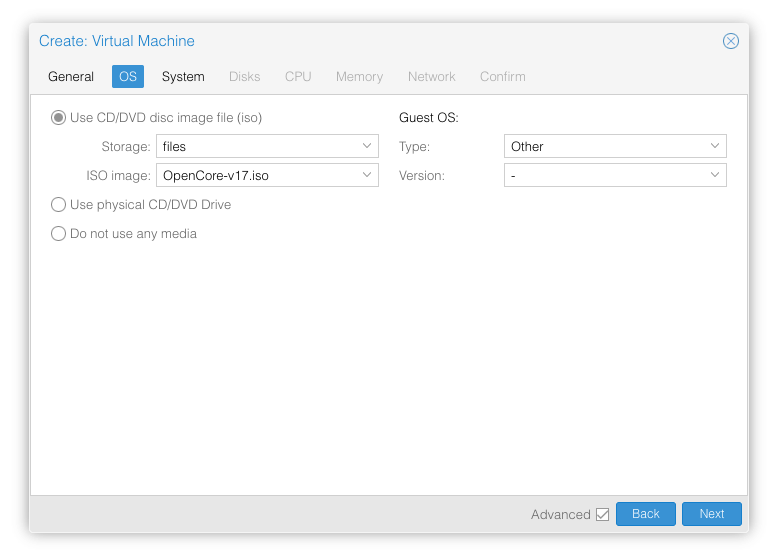
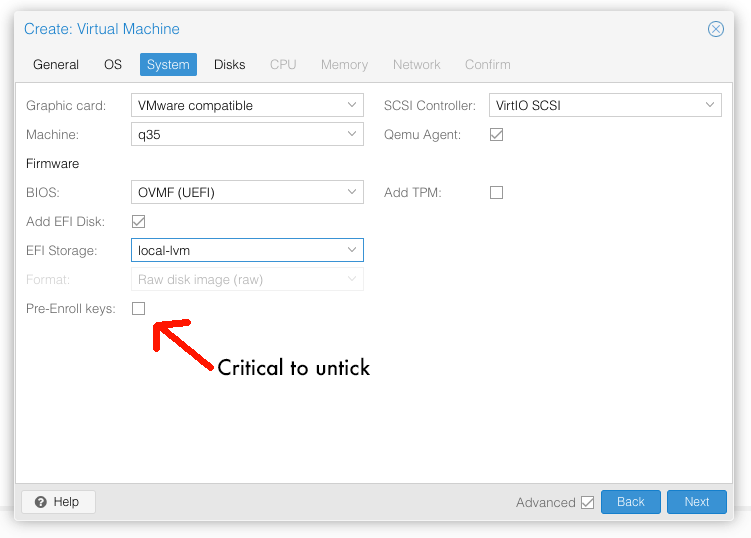
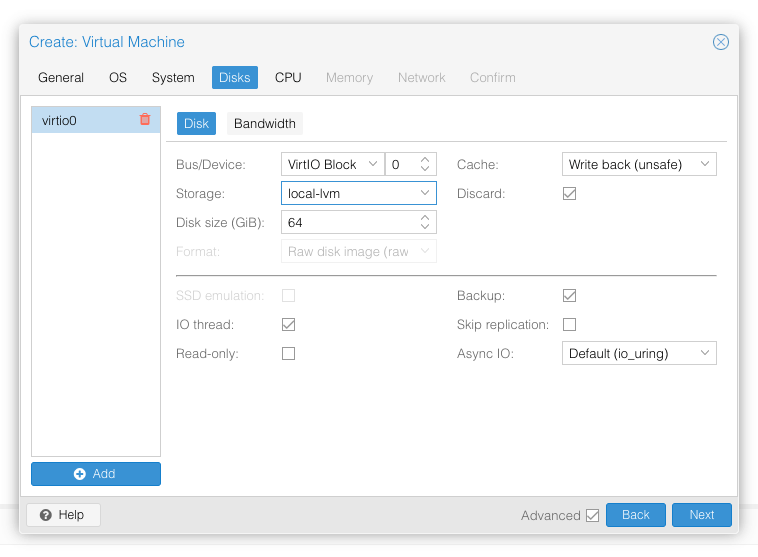
Create the VM
From the Proxmox web UI, create a new virtual machine as shown below.
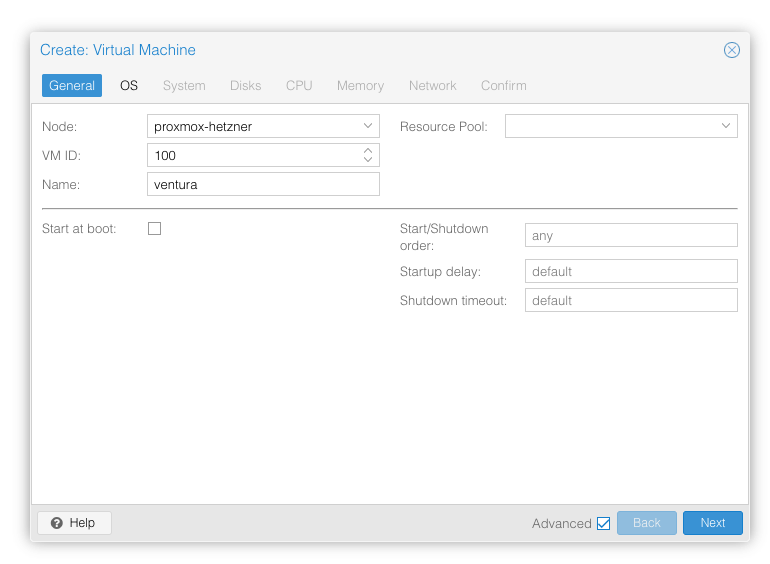
In the Options page for the VM, ensure that “use tablet for pointer” is set to “Yes” (this is the default).
In the Hardware page for the VM, add a second DVD drive at IDE0, set it to use your Ventura-full.img.
Don’t try to start the VM just yet. First, SSH into your Proxmox server so we can make some edits to the configuration files.
Edit /etc/pve/qemu-server/YOUR-VM-ID-HERE.conf (e.g. with nano or vim). Add this line, being sure to substitute the OSK you extracted earlier into the right place:
args: -device isa-applesmc,osk="THE-OSK-YOU-EXTRACTED-GOES-HERE" -smbios type=2 -device usb-kbd,bus=ehci.0,port=2 -global nec-usb-xhci.msi=off -global ICH9-LPC.acpi-pci-hotplug-with-bridge-support=off -cpu host,vendor=GenuineIntel,+invtsc,+hypervisor,kvm=on,vmware-cpuid-freq=on
A USB keyboard is added here because macOS doesn’t support QEMU’s default PS/2 keyboard. MSI has been disabled for the USB controller to fix QEMU panics when USB 3 devices are passed through. ACPI PCIe hotplug support has been disabled to fix VMs with passthrough devices.
Ensure the args are all on a single line!
You can remove the “+invtsc” feature from the -cpu list if your CPU doesn’t support it, or if you want to be able to migrate a running VM between Proxmox nodes.
On AMD you may find that the installer reboots while loading, or the loading bar doesn’t appear, if so replace “-cpu host” with “-cpu Haswell-noTSX” (I had to do this on AMD EPYC 7R13).
Now find the lines that define the two “ISOs” (ide0 and ide2), and remove the “,media=cdrom” part from them. Add “,cache=unsafe” in its place. This will treat these as hard disks rather than DVD drives.
Save your changes, return to the Options tab, and change the boot order to put IDE2 (the OpenCore image) first. Your final VM configuration file should resemble this:
agent: 1
args: -device isa-applesmc,osk="..." -smbios type=2 -device usb-kbd,bus=ehci.0,port=2 -global nec-usb-xhci.msi=off -global ICH9-LPC.acpi-pci-hotplug-with-bridge-support=off -cpu host,vendor=GenuineIntel,+invtsc,+hypervisor,kvm=on,vmware-cpuid-freq=on
balloon: 0
bios: ovmf
boot: order=ide2;virtio0
cores: 4
cpu: Haswell
efidisk0: local-lvm:vm-100-disk-0,efitype=4m,size=4M
ide0: local:iso/Ventura-full.img,cache=unsafe,size=14G
ide2: local:iso/OpenCore-v18.iso,cache=unsafe,size=150M
machine: q35
memory: 4096
meta: creation-qemu=6.2.0,ctime=1655001118
name: macos-ventura
net0: virtio=...,bridge=vmbr0,firewall=1
numa: 0
ostype: other
scsihw: virtio-scsi-single
smbios1: uuid=...
sockets: 1
vga: vmware
virtio0: local-lvm:vm-100-disk-1,cache=unsafe,discard=on,iothread=1,size=64G
vmgenid: ...
Configure Proxmox
On Proxmox, run “echo 1 > /sys/module/kvm/parameters/ignore_msrs” to avoid a bootloop during macOS boot. To make this change persist across Proxmox reboots, run:
echo "options kvm ignore_msrs=Y" >> /etc/modprobe.d/kvm.conf && update-initramfs -k all -u
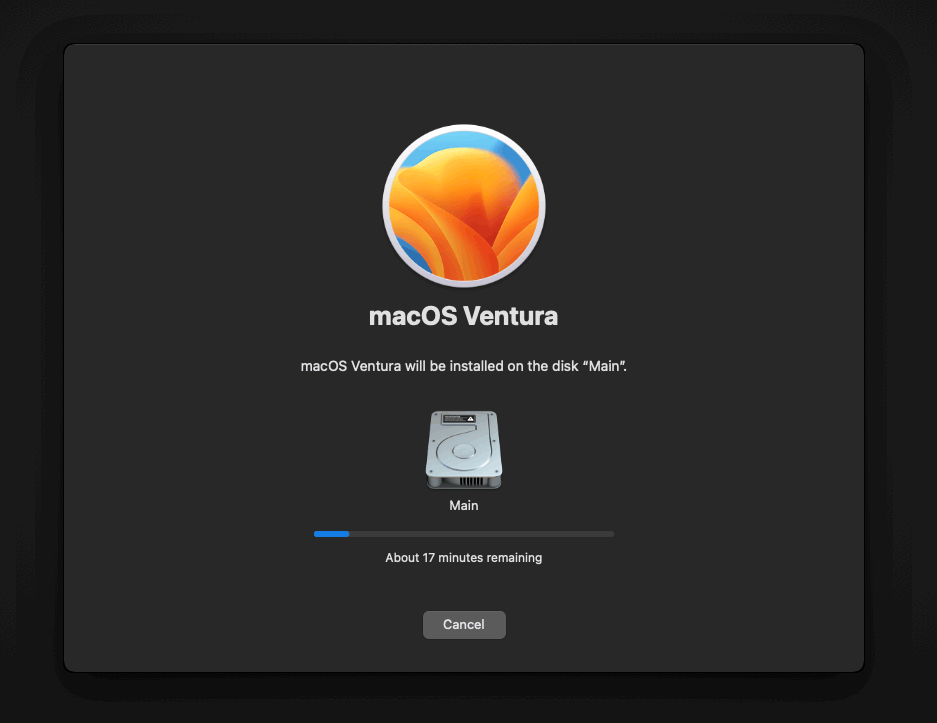
Install Ventura
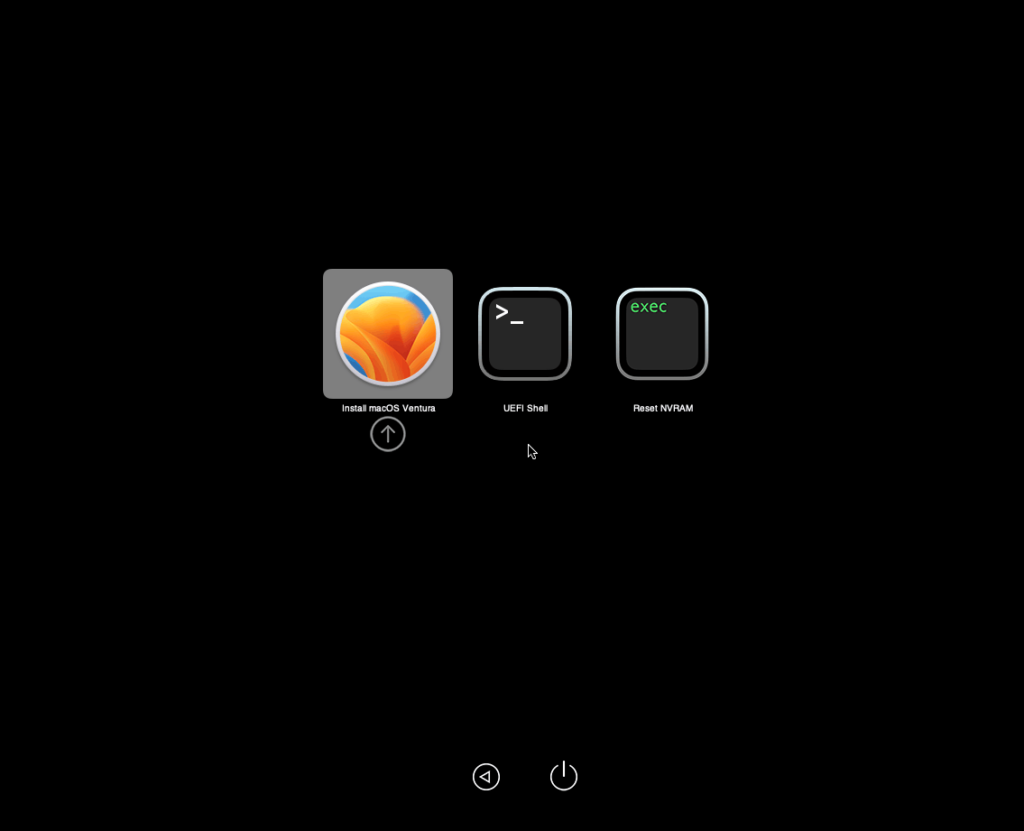
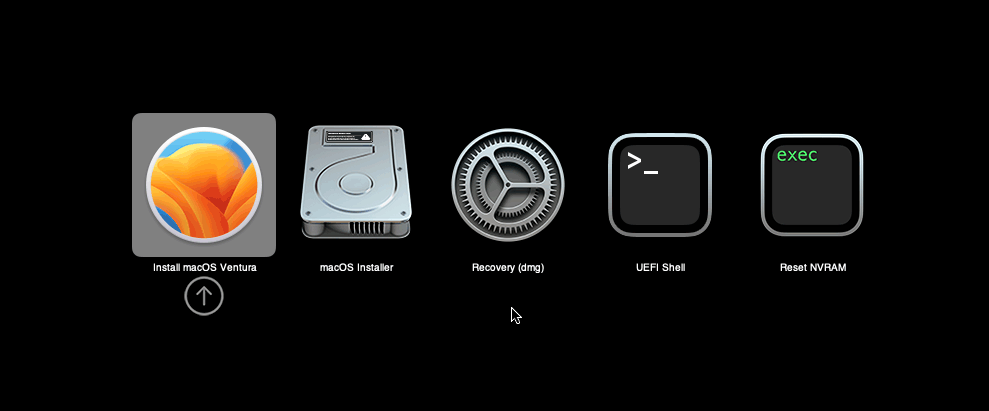
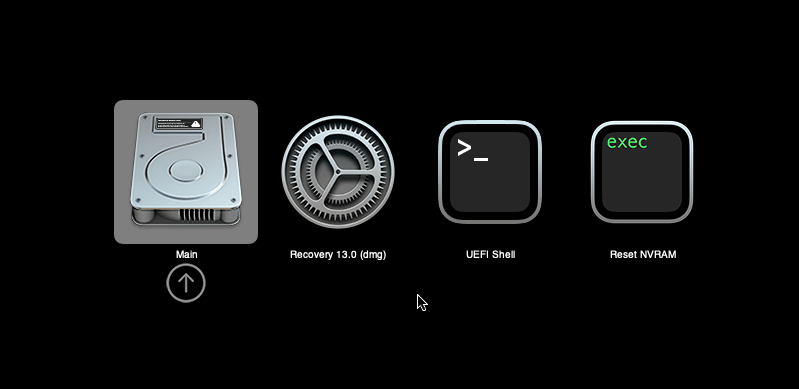
Now start up your VM, it should boot to the OpenCore boot picker:
Press enter to boot the “Install macOS 13 Ventura” entry and the installer should appear. (If your keyboard isn’t working, leave the Proxmox Console page and re-enter it)
Our virtual hard drive needs to be erased/formatted before we can install to it, so select the Disk Utility option. Follow the steps below to format the disk:

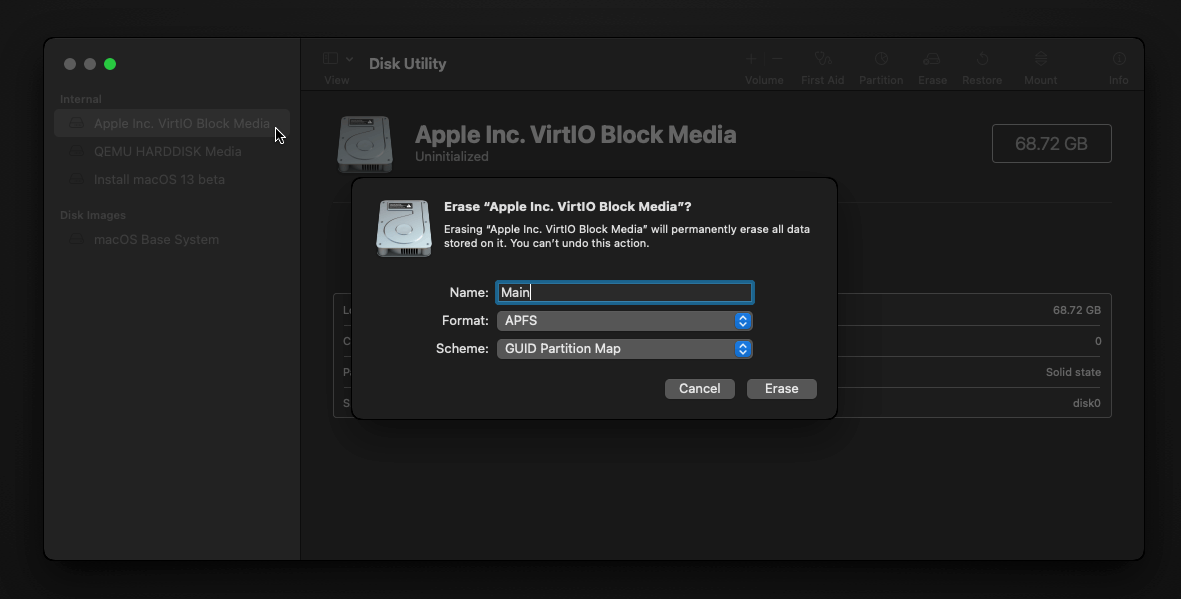
Now you can quit Disk Utility from the top menu (Disk Utility > Quit Disk Utility), and we’re ready to begin installation!
After the first stage of installation, the VM will reboot a couple of times in quick succession, and each time you must manually pick the “macOS Installer” entry (the second one here, with the hard disk icon) to continue installation. It will not be selected for you automatically:
If your keyboard isn’t responding on this screen, exit the Console tab in Proxmox and re-enter it. If you get a “prohibited” sign like this appearing, hit the Reset button on the VM to try again:

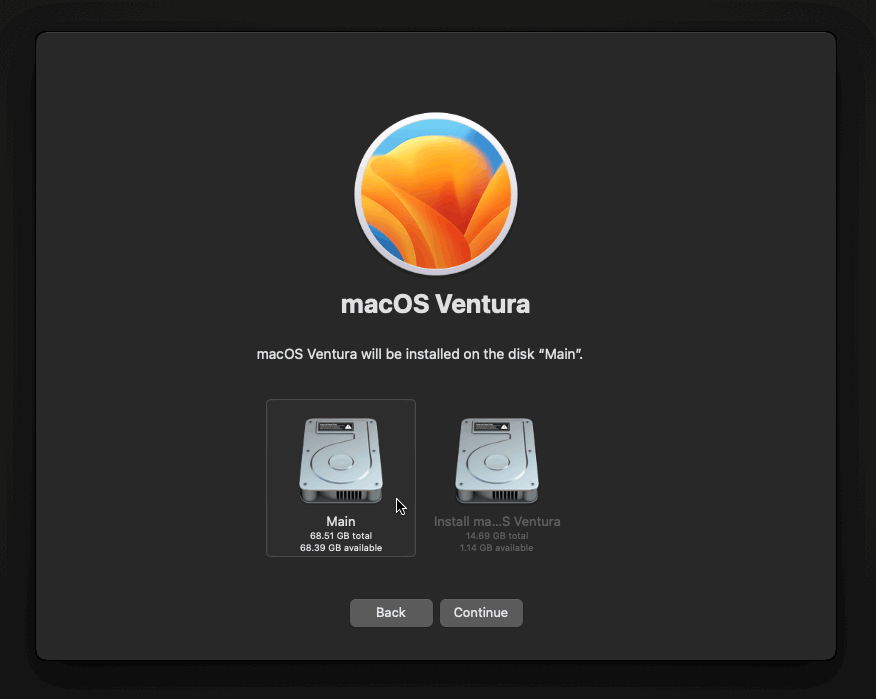
Now the installation is nearly complete and the macOS Installer entry disappears, so pick the name of your main disk to boot instead (mine’s called Main).
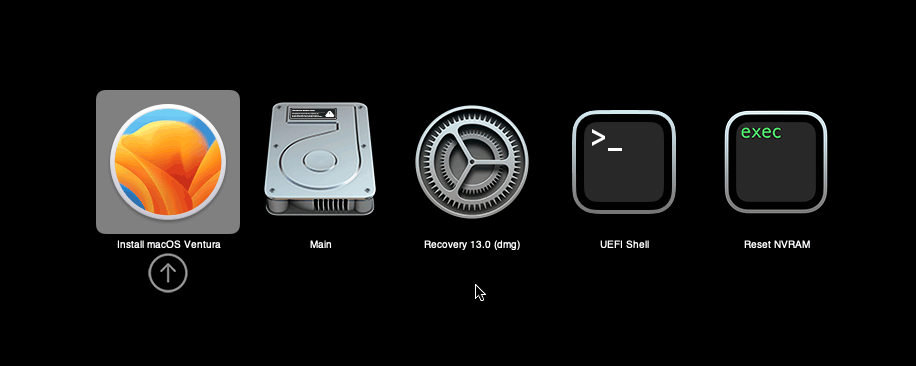
It’ll reboot a couple more times, so just keep picking the “Main” entry until you finally boot into Ventura!
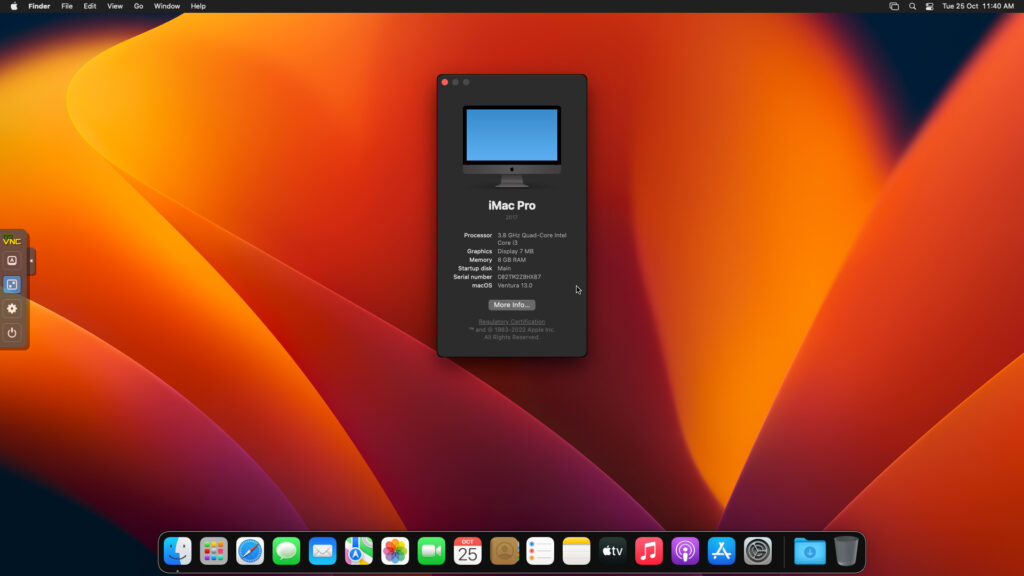
Answer the initial install questions, and you’ll be logged on! Note that you will want to hold off on logging into your Apple ID until you’ve configured your Mac’s serial number in OpenCore (because otherwise a Mac with the default shared serial number in my OpenCore image will be added to your Apple ID).
Note that it will be really sluggish for a few minutes after the first boot while the system performs housekeeping tasks.
Make the OpenCore install permanent
We’re currently booting using OpenCore from the attached OpenCore ISO. Let’s install that to the hard drive instead. Pop open Terminal and run “diskutil list” to see what drives we have available.
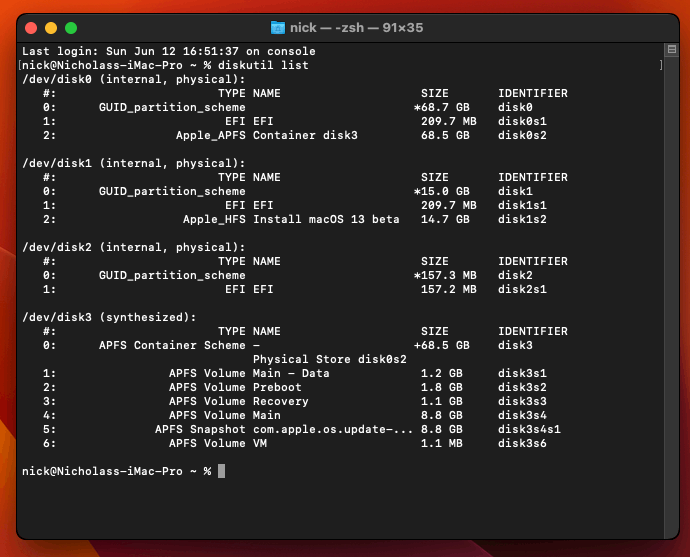
Use “sudo dd if=<source> of=<dest>” to copy the “EFI” partition from the OpenCore CD and overwrite the EFI partition on the hard disk. The OpenCore CD is the small disk (~150MB) that only has an EFI partition on it, and the main hard disk is the one with the large (>30GB) Apple_APFS “Container” partition on it.
In my case these EFI partitions ended up being called disk2s1 and disk0s1 respectively, so I ran “sudo dd if=/dev/disk2s1 of=/dev/disk0s1” (note that if you get these names wrong, you will overwrite the wrong disk and you’ll have to start the installation over again!).
Now shut down the VM, and remove both the OpenCore and the Ventura installer drives from the Hardware tab. On the Options tab, edit the boot order to place your virtio0 disk as the first disk. Boot up. If everything went well, you should see the OpenCore boot menu, and you can select your “Main” disk to boot Ventura:
Sleep management
I found that I was unable to wake Ventura from sleep using my mouse or keyboard. If you encounter the same problem, you can either disable system sleep in Ventura Energy Saver settings to avoid the issue, or you can manually wake the VM up from sleep from Proxmox by running:
qm monitor YOUR-VM-ID-HERE
system_wakeup
quit
Editing your OpenCore/EFI settings
The Configuration.pdf that explains the OpenCore config.plist file can be found along with the OpenCore release on my GitHub.
To mount your EFI partition in macOS so you can edit your config.plist, first check the “identifier” of your EFI partition in the terminal:
~$ diskutil list
/dev/disk0 (external, physical):
   #:                   TYPE NAME              SIZE       IDENTIFIER
   0:  GUID_partition_scheme                  *512.1 GB   disk0
   1:                    EFI EFI               209.7 MB   disk0s1
   2:             Apple_APFS Container disk1   511.9 GB   disk0s2
Then you can mount it like so:
sudo mkdir /Volumes/EFI
sudo mount -t msdos /dev/disk0s1 /Volumes/EFI
Now you can edit /Volumes/EFI/OC/config.plist with your favourite text editor to make your changes. (TextEdit is not a great choice because it likes to insert curly quotes into the file and otherwise break things, there are some dedicated plist editors available such as XCode).
If you’re unable to boot macOS, you can edit the config.plist using the “UEFI Shell” option in the OpenCore boot menu instead.
Enter “FS0:” and press enter to open up the first available filesystem, then run “edit EFI\OC\config.plist” (if the file isn’t found, try switching to another filesystem like fs1:). When you’re done editing, press control+Q to exit, “Y” to save, then run “exit” to return to the OpenCore menu. You need to reboot for your changes to take effect.
If you prefer, you can edit config.plist from the comfort of your Proxmox host instead. If you’re booting from an attached OpenCore.img file, you can mount that file as a disk on the host. If you’re booting from the VM’s disk instead, it must be in raw format in order to be mounted (e.g. typical LVM or ZFS usage) rather than qcow2.
# Mount an OpenCore image:
losetup --partscan /dev/loop0 /var/lib/vz/template/iso/OpenCore-v15.img
# or a VM boot disk:
losetup --partscan /dev/loop0 /dev/zvol/tank/vms/vm-100-disk-1

mount /dev/loop0p1 /mnt
Now the contents of that first partition are available in /mnt, so you can edit /mnt/EFI/OC/config.plist in your favourite editor. When you’re done, do this to unmount the disk:
umount /mnt
losetup --detach /dev/loop0
Automatic boot
In config.plist, you can set Misc/Boot/Timeout to a non-zero value to allow the default boot option be chosen automatically after that delay in seconds. I’ve disabled this by default because it causes the installer ISO to re-enter its main menu instead of continuing the second stage of installation.
You can set the default boot option by pressing control+enter on it.
Verbose boot
To boot macOS in Verbose mode to diagnose boot problems, at the OpenCore boot menu press Cmd+V before pressing enter to boot macOS (you don’t need to hold it down).
If there is a kernel panic during boot and it reboots too quickly to be read, edit config.plist to add “debug=0x100” to the kernel arguments.
Changing screen resolution
To change macOS’ screen resolution, you need to edit the UEFI/Output/Resolution setting in config.plist, the default is 1920×1080@32.
You should be able to change this to any of the modes that the system OVMF menu offers (hit F2 at the start of guest boot and choose “Device Manager/OVMF Platform Configuration” to see which resolutions are available).
Video performance
Because there is no guest video acceleration available for macOS, video performance is poor.
In Google Chrome in the guest you will need to toggle off the setting to “use hardware acceleration when available” to improve issues with elements not being drawn or flickering (especially video). Safari may be a better choice.
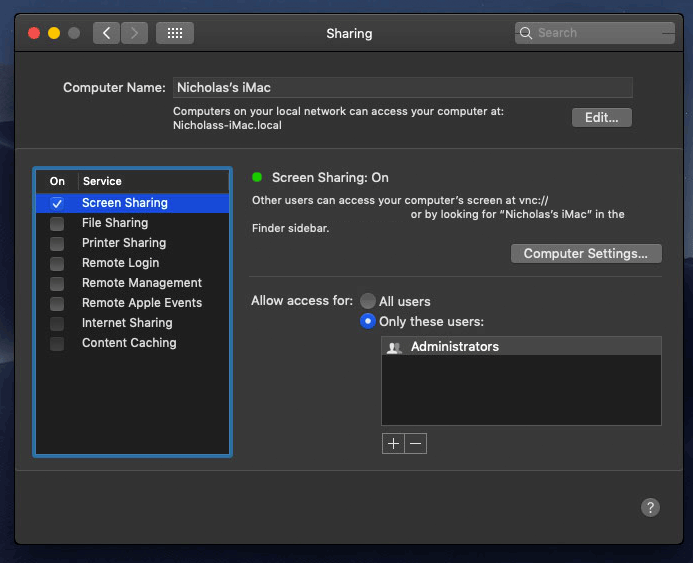
macOS’s built in “Screen Sharing” feature offers dramatically better framerates and latency than Proxmox’s browser-based VNC console, so if you have a real Mac to act as a viewing console, you can enable that in the VM’s “Sharing” settings and connect to the VM using the Screen Sharing app from your Mac instead:
Apparently Screen Sharing is also compatible with VNC clients like RealVNC, so you should be able to connect to it from Linux or Windows consoles using RealVNC.
The real magic bullet for video performance is to pass through a compatible video card using PCIe passthrough (AMD cards only). This offers near-native performance. You can read more about how I’m using PCIe passthrough on my own installation here.
USB passthrough
Since I want to use this as my primary computer, I want to use a USB keyboard and mouse plugged directly into Proxmox, rather than sending my input through the web VNC console.
Proxmox has good documentation for USB passthrough. Basically, run “qm monitor YOUR-VM-ID-HERE”, then “info usbhost” to get a list of the USB devices connected to Proxmox:
qm> info usbhost
 Bus 3, Addr 12, Port 6, Speed 480 Mb/s
 Class 00: USB device 8564:1000, Mass Storage Device
 Bus 3, Addr 11, Port 5.4, Speed 12 Mb/s
 Class 00: USB device 04d9:0141, USB Keyboard
 Bus 3, Addr 10, Port 5.1.2, Speed 12 Mb/s
 Class 00: USB device 046d:c52b, USB Receiver
 Bus 3, Addr 9, Port 14.4, Speed 12 Mb/s
 Class 00: USB device 046d:c227, G15 GamePanel LCD
 Bus 3, Addr 8, Port 14.1, Speed 1.5 Mb/s
 Class 00: USB device 046d:c226, G15 Gaming Keyboard
In this case I can add my keyboard and mouse to USB passthrough by quitting qm, then running:
qm set YOUR-VM-ID-HERE -usb1 host=04d9:0141
qm set YOUR-VM-ID-HERE -usb2 host=046d:c52b
This saves the devices to the VM configuration for you. You need to reboot to have the new settings apply.
You can also pass through USB devices by passing through an entire USB controller using Proxmox’s PCIe passthrough feature, which gives much better compatibility.
Odd core counts
If your host CPU is AMD, you might have a core count which is divisible by 3, like 6 cores. macOS doesn’t like it if the core count isn’t a power of 2 (1, 2, 4, 8), but it doesn’t mind odd socket counts.
So in order to pass 6 total cores, configure the VM for 3 sockets and 2 cores per socket.
Fixing “guest boots to UEFI shell”
If your guest ends up booting to the UEFI shell instead of showing the OpenCore boot menu, especially if you’ve just updated OpenCore to a new version, you’ll need to edit the guest’s UEFI boot entries to fix this.
At the very start of guest boot, hit F2 to enter guest UEFI settings.
First we’ll remove the old entries. Choose the Boot Maintenance option, then Boot Options -> Delete Boot Option. Use the spacebar to tick any old Clover or OpenCore entries (avoid ticking the EFI Internal Shell option, you want to keep that!). Select “Commit Changes and Exit”.
Now we’ll add the correct entry for OpenCore back in. Select Add Boot Option. Navigate through the device tree to EFI/OC/OpenCore.efi and select it, name this new option “OpenCore” or similar. Again Commit Changes and Exit.
Go to the Change Boot Order and move OpenCore to the top. Commit Changes and Exit.
Now back out to the main menu and choose Reset, and you should successfully boot into OpenCore this time.
Fixing iMessage
iCloud and the App Store should already be working for you, but for iMessage support you must follow these steps to mark your network adapter as built-in:
https://dortania.github.io/OpenCore-Post-Install/universal/iservices.html#fixing-en0
Disabling SIP (System Integrity Protection)
You can disable SIP by selecting the Recovery option from the OpenCore boot menu, then use the top menu to open the Terminal and run csrutil disable --no-internal. Then reboot.
This may be needed to run unsigned kexts or perform other hacks.
Upgrading OpenCore
Sometimes you need to update OpenCore to a new release in order to support a new macOS update. I’ll assume you don’t have any customisations to config.plist you want to save.
First take a snapshot! It’s great to be able to roll back if something goes wrong.
If you’re still able to boot macOS, you can update it from within the guest. Follow the instructions in the “Editing your OpenCore/EFI settings” section to mount your EFI partition. Then you can delete the EFI folder in there and replace it with the one from the OpenCoreEFIFolder.zip file from my OpenCore release (you’ll probably need to empty the trash first to make room for the new folder). You’re done!
If you aren’t able to boot macOS, unpack and upload the new OpenCore ISO to Proxmox’s ISO store instead. Add a new CD drive to the VM that uses that ISO. Then in Proxmox’s terminal edit the VM’s config (in /etc/pve/qemu-server) to replace “media=cdrom” with “cache=unsafe” for the OpenCore drive. Now on the “Options” tab, change the boot order to put the new OpenCore drive first.
Start the VM and boot into macOS using the new OpenCore drive. From within macOS you can now follow the instructions from the “Make the OpenCore install permanent” section to install the new OpenCore image to your main macOS disk, after which the OpenCore drive can be detached from the VM.
Upgrading from macOS Monterey
First make a backup or snapshot of your system! Being able to roll back when the upgrade goes wrong is a real lifesaver.
You’ll need to update OpenCore to my v19 release before the upgrade, use the section above to do that. After updating that, reboot to make sure that you can still boot Monterey.
If you’re using any PCIe passthrough devices (particularly video cards) you’ll want to disable those and set “vga: vmware” instead, so you can install using Proxmox’s web console from a different machine during the upgrade. This avoids installer problems triggered by flaky video card passthrough, especially host lockups caused by the AMD Reset Bug.
If your CPU is AMD, replace the “-cpu” argument in your VM args line with the new one:
-cpu Haswell-noTSX,vendor=GenuineIntel,+invtsc,+hypervisor,kvm=on,vmware-cpuid-freq=on
Intel CPUs should work with -cpu host
Now if your CPU supports AVX2 you can upgrade to Ventura using Software Update or from the App Store like you would on a real Mac.
If the update fails to appear, your SIP mode might be set to “Apple Internal”. You can check this by running “csrutil status” in the Terminal.
To fix this, reboot your VM and at the OpenCore menu select Recovery. Open up the Terminal, and in there run “csrutil enable --no-internal” (“csrutil disable --no-internal” is fine too), then reboot back into macOS and try again.
Another way to upgrade is to build a Ventura full or recovery installer and use that to install Ventura (installing over the top of Monterey will upgrade Monterey while keeping your user data intact).
If your CPU doesn’t support AVX2, you’ll have to create a full/recovery installer since I didn’t enable the kernel patch for Monterey/Big Sur that would allow the Ventura App Store app to be run directly from within running macOS.
Can I disable the cryptexfixup kext if my CPU supports AVX2? I’m asking as I have a Radeon 6900 XT so trying to use it for my GPU.
There’s no need to disable it, cryptexfixup will do nothing if your CPU already supports AVX2.
You can disable it anyway by editing OpenCore’s config.plist if you like.
Hi Nick, do you have a specifics of your exact setup for your RX 580 passthrough in Proxmox 7? your link to your main setup page doesn’t indicate what you’ve used. It just references general guides and isn’t specific.
I’m hitting my brain against the wall… it seems my VM keeps defaulting to the common apple renderer even when I parse vBIOS romfile in VM conf. If I remove the romfile arg it completely fails to load the VM at all.
My current proxmox configs work for Windows VM passthrough – no problem, but nothing i’ve tried works for MacOS Ventura.
I have a Haswell cpu. Do I need to make it explicit in the conf?
I use these args:
args: -device isa-applesmc,osk=”…” -smbios type=2 -device usb-kbd,bus=ehci.0,port=2 -device usb-mouse,bus=ehci.0,port=3 -cpu host,kvm=on,vendor=GenuineIntel,+kvm_pv_unhalt,+kvm_pv_eoi,+hypervisor,+invtsc
Help is much appreciated!
Rob.
My config has nothing special in it, just straight old passthrough and it works, I have config file details here:
https://www.nicksherlock.com/2018/11/my-macos-vm-proxmox-setup/
i.e. blacklist AMD drivers on the host, bind the GPU to vfio-pci on host boot, add to the guest with “hostpci0: 03:00,pcie=1,x-vga=on”, set “display: none” to disable the emulated graphics.
If this GPU is your host’s boot GPU then yes, you’ll need to supply a vBIOS or otherwise the guest won’t be able to init it. I don’t need to do this because I have an onboard VGA adapter set as my primary graphics on the host.
Do you see the Proxmox boot logo on the guest screen during boot? If not, the guest UEFI is failing to init the card before it even starts booting OpenCore, so you need to fix this first.
Yeh my host is using the iGPU and I’ve blacklisted my other 2 GPU’s appropriately.
I can’t check the guest boot because my display is set to none. And can’t VNC until agent is up and running. When I have it displayed via vmware compatible it shows the proxmox boot logo and boots into MacOS fine.
I’m unsure if it’s a possible grub issue
I don’t have the flag (which may be my issue)
video=efifb:off
however using just this line works fine with Windows.
GRUB_CMDLINE_LINUX_DEFAULT=”quiet intel_iommu=on”
could that be it?
That flag is only needed if the host’s text console is binding to the GPU (recent Proxmox versions need `initcall_blacklist=sysfb_init` instead). It probably isn’t doing that, because your Windows works fine. You get error messages in “dmesg” about ‘BAR’ at VM start time if this happens.
I doubt you’ll be able to boot macOS with no monitor plugged into the guest GPU, the GPUs refuse to accelerate when no monitor is present. Plug one in, or use an HDMI dummy plug.
heh… I do have a HDMI dummy plugged in. But I might try it with a monitor if that’s not the issue — It has 2 ports though so maybe I need to plug both HDMI ports in just to be sure. May have miscalculated which hdmi port is active. lol
Since the RX580 is affected by the AMD Reset Bug, have you tried power cycling the host and booting macOS immediately after that (before another guest uses it)?
If you get hit by this bug then it hangs forever during macOS boot, at about the 75% progress mark. I have to reboot the host in between uses of my RX 580.
I applied the vendor-reset fix beforehand. I did power cycle (cold boot) and swapped my dummy plugs. They’re either corrupt or I may have a deeper issue.
Even rebooting doesn’t seem to want to hook the RX 580 to a Mac guest. I don’t have any guest that would be running to snag it unless the host is doing something — but then why would it work on Windows and not on Mac? strange!?
Is it possible MacOS is confusing between two display instances?
guest hangs only if I don’t explicitly define the romfile in the hostpci0 line. That’s where I’m stuck at.
vendor-reset doesn’t fix my RX 580 and judging from reports on the bug tracker, it doesn’t fix this model at all.
Card reset is implemented by the guest drivers, and Windows is better at resetting it from a broken state than macOS is. However you’ll probably find that if Windows bluescreens then the next boot of Windows will hang since the AMD GPU didn’t get reset properly for it.
macOS boot hangs when you have display: none, right? That’s consistent with the reset bug. With display: vmware it’ll just be ignoring the failure to init the AMD card and continuing the boot with only the primary vmware adapter available, but this doesn’t fix your problem.
Are you getting any messages in host dmesg output when booting macOS? Particularly a BAR error?
Nope, not getting any BAR errors when booting. when display: none is just hangs if I don’t explicitly define the vbios rom. Otherwise if I do have the rom defined, Ventura just refuses to use the RX 580 as the nominated GPU and instead uses the common renderer.
Could it be an issue with kexts? or dodgy config.plist?
The config.plist doesn’t need any edits for this card (I set it up specifically so I could test it on my hardware and use the card).
I don’t suppose you have one of the RX 580 2048SP variants that China is shipping recently? These are rebadged RX 570s, and I believe these need an RX 570 vBIOS to be loaded for macOS to be able to use them.
nah I’ve got the https://www.techpowerup.com/gpu-specs/sapphire-nitro-rx-580-8-gb.b4436
I guess I’m just stuck in a loop trying to figure this out. It must be my particular system. I do have another nVidia 960gtx on the first pcie lane, but in bios it’s 8x/8x split between the 2 GPUs. I can’t for the life of me figure it out after doing so much. Unless it’s because MacOS doesn’t correctly init UEFI or that my systems CSM or TPM is affecting guests VMs in some way (I have CSM disabled btw as it’s a known issue).
I guess I might chalk this up as a fail and just see what the ARM based M2 (and beyond) stuff holds if it fits my needs in terms of Metal performance.
After all, the intel based stuff is a sinking ship from here on.
wow, I figured it out!
my args were way off and I had to define my CPU architecture correctly in .conf (I didn’t actually need to hide the processor from the host)
args: -device isa-applesmc,osk=”…” -smbios type=2 -device usb-kbd,bus=ehci.0,port=2 -global nec-usb-xhci.msi=off -global ICH9-LPC.acpi-pci-hotplug-with-bridge-support=off -cpu host,vendor=GenuineIntel,+invtsc,+hypervisor,kvm=on,vmware-cpuid-freq=on
cpu: Haswell
also had to pass the xHCI controller as a pcie device ensuring express is checked.
I hope this helps anyone else with an RX 580 on an Intel Haswell platform.
Thanks for the discourse Nick – it helped me think a bit deeper into this. I’m stoked.
I have a working Monterey install, with passthrough working. When I try to do Ventura though everything installs without issue, passthrough works, but once Ventura boots neither my keyboard or mouse are operational.
I have tried both a usb keyboard directly connected to the VM as well as a Logitech Bolt. I have passthrough the USB device in the exact same way as the Monterey, but nothing. Anyone have any ideas?
Did you find a solution, I have the same issue
No not yet.
I was having issues with passed through keyboard and mouse as well.
Turns out that when I pass them through as USB3, they work. Somewhere I had read that you shouldn’t do that, so initially I didn’t but it doesn’t work any other way for me.
Same problem here as well. VM will boot and keyboard functions (usually) at the opencore picker screen, but by the time the Ventura login screen appears, both keyboard and mouse have stopped functioning.
Update:
I was successful getting my logitech keyboard and mouse working by passing the host’s xHCI and EHCI PCI usb controllers through to the VM with all functions, ROM Bar and PCIE options checked. Specific USB device and port pass through entries were removed.
Great Work! That did the trick for me as well. Thanks!
Hello!
I have it already running but I face a problem Processor is detected as an 4.3 GHz Unknown CPU.
I am tying to use XCodeś Instruments tool, but I can not use CPU profiling or count since shows up that feature is not supported by the known processor. Is there a known solution or a workaround for it that you know?
I am using AMD processor.
Have you had any luck passing a thunderbolt card through? I am using the GigaByte Titan Ridge 2.0 and running into a consistent problem. It loads a pci bridge and creates 3 different PCI devices that I can send through VFIO. The USB 3 controller pci device refuses to pass, giving the generic vfio bus error. There’s nothing else in its MMIO group though.
I saw one of your posts about (un)binding in the hookscript and I’ve even tried that. Do you know of a place where proxmox gives more verbose logging? I’ve put the -D in the arguments but the log file doesn’t say what’s failing. dmesg/syslog likewise unhelpful.
kvm: -device vfio-pci,host=0000:0f:00.0,id=hostpci5,bus=ich9-pcie-port-6,addr=0x0: vfio 0000:0f:00.0: error getting device from group 29: Invalid argument
Verify all devices in group 29 are bound to vfio- or pci-stub and not already in use
start failed: QEMU exited with code 1
Oddly enough the thunderbolt 3 functions of the card work in the guest. I just can’t get USB 2 to work. USB 3 kinda works… I think.
Anyway, help with logging to see why I’m getting that error would help.
I’ve successfully created VMs for Mojave, Big Sur and Monterey at my PVE host – powered by your great instructions. Sadly I’m stuck at a boot loop after trying to install Ventura in a new VM. It seems like installation is finished and it fails to boot. There’s no real error visible at verbose boot. The output slightly differs depending on exact VM config. I’ve tried it three times with a clean VM, no luck so far. (Host: ASRock Rack C3558D4I-4L)
Just a short question: Did someone succeed with this tutorial at PVE 7.3/7.4 with macOS 13.2.1?
Your CPU lacks the AVX support needed for Ventura
Hi. I have ryzen 5 1600x and I can’t install system. When i boot (first time) I don’t get colored “install macOS Ventura” but rather gray disk image with “macOS Base System”. I removed problematic cpu extentions, but didn’t help. OSK should be correct since it’s the same. I did walktrough two times. I re-make “Ventura-recovery.img”
Here is my conf:
agent: 1
args: -device isa-applesmc,osk=”…” -smbios type=2 -device usb-kbd,bus=ehci.0,port=2 -global nec-usb-xhci.msi=off -global I>
balloon: 0
bios: ovmf
boot: order=ide2;virtio0;net0;ide0
cores: 4
cpu: Haswell-noTSX
efidisk0: local-zfs:vm-400-disk-0,efitype=4m,size=1M
ide0: dataPoolDir:iso/Ventura-recovery.img,cache=unsafe,size=3143908K
ide2: dataPoolDir:iso/OpenCore-v19.iso,cache=unsafe,size=150M
machine: q35
memory: 4096
meta: creation-qemu=7.0.0,ctime=1680085661
name: OSXtest
net0: virtio=C2:03:47:D6:0F:99,bridge=vmbr0,firewall=1
numa: 0
ostype: other
scsihw: virtio-scsi-single
smbios1: uuid=321a6354-d2a2-4ab4-9615-6ff314db9cf6
sockets: 1
vga: vmware
virtio0: dataPool:vm-400-disk-0,cache=unsafe,discard=on,iothread=1,size=64G
vmgenid: 8ad9493c-96e9-4158-919c-2ee4eec5e3c3
The different icon is fine, that’s just the difference between the recovery installer and the full installer.
Show your CPU argument
You mean lscpu falgs?
~# lscpu
Architecture: x86_64
CPU op-mode(s): 32-bit, 64-bit
Byte Order: Little Endian
Address sizes: 43 bits physical, 48 bits virtual
CPU(s): 12
On-line CPU(s) list: 0-11
Thread(s) per core: 2
Core(s) per socket: 6
Socket(s): 1
NUMA node(s): 1
Vendor ID: AuthenticAMD
CPU family: 23
Model: 1
Model name: AMD Ryzen 5 1600 Six-Core Processor
Stepping: 1
Frequency boost: enabled
CPU MHz: 3200.000
CPU max MHz: 3200.0000
CPU min MHz: 1550.0000
BogoMIPS: 6387.17
Virtualization: AMD-V
L1d cache: 192 KiB
L1i cache: 384 KiB
L2 cache: 3 MiB
L3 cache: 16 MiB
NUMA node0 CPU(s): 0-11
Vulnerability Itlb multihit: Not affected
Vulnerability L1tf: Not affected
Vulnerability Mds: Not affected
Vulnerability Meltdown: Not affected
Vulnerability Mmio stale data: Not affected
Vulnerability Retbleed: Mitigation; untrained return thunk; SMT vulnerable
Vulnerability Spec store bypass: Mitigation; Speculative Store Bypass disabled via prctl and seccomp
Vulnerability Spectre v1: Mitigation; usercopy/swapgs barriers and __user pointer sanitization
Vulnerability Spectre v2: Mitigation; Retpolines, IBPB conditional, STIBP disabled, RSB filling
Vulnerability Srbds: Not affected
Vulnerability Tsx async abort: Not affected
Flags: fpu vme de pse tsc msr pae mce cx8 apic sep mtrr pge mca cmov pat pse36 clflush mmx fxsr sse sse2 ht syscall nx mmxext fxsr_opt pdpe1gb rdtscp lm constan
t_tsc rep_good nopl nonstop_tsc cpuid extd_apicid aperfmperf rapl pni pclmulqdq monitor ssse3 fma cx16 sse4_1 sse4_2 movbe popcnt aes xsave avx f16c rdra
nd lahf_lm cmp_legacy svm extapic cr8_legacy abm sse4a misalignsse 3dnowprefetch osvw skinit wdt tce topoext perfctr_core perfctr_nb bpext perfctr_llc mw
aitx cpb hw_pstate ssbd ibpb vmmcall fsgsbase bmi1 avx2 smep bmi2 rdseed adx smap clflushopt sha_ni xsaveopt xsavec xgetbv1 xsaves clzero irperf xsaveerp
tr arat npt lbrv svm_lock nrip_save tsc_scale vmcb_clean flushbyasid decodeassists pausefilter pfthreshold avic v_vmsave_vmload vgif overflow_recov succo
r smca sme sev
I noticed that image building had some output…
$ make Ventura-recovery.img
../../fetch-macOS-v2.py –action download –board-id Mac-AF89B6D9451A490B –os latest
Downloading 002-75524…
Saving http://oscdn.apple.com/content/downloads/43/33/002-75524/efs0e9aq5czkco7a81ltgr9kfxdkf7dwri/RecoveryImage/BaseSystem.dmg to BaseSystem.dmg…
Note: The total download size is 675.56 MB
Download complete!
Saving http://oscdn.apple.com/content/downloads/43/33/002-75524/efs0e9aq5czkco7a81ltgr9kfxdkf7dwri/RecoveryImage/BaseSystem.chunklist to BaseSystem.chunklist…
Note: The total download size is 2740 bytes
Download complete!
rm -f Ventura-recovery.dmg
qemu-img convert BaseSystem.dmg -O raw Ventura-recovery.dmg
qemu: module block-block-dmg-bz2 not found, do you want to install qemu-block-extra package?
qemu: module block-block-dmg-lzfse not found, do you want to install qemu-block-extra package?
ln Ventura-recovery.dmg Ventura-recovery.img || cp Ventura-recovery.dmg Ventura-recovery.img
You need to install qemu-block-extra and re-run that
It is installed. Ubuntu 22.04.
I also could not do it in proxmox:
# apt install qemu-utils make qemu-block-extra
The following packages will be REMOVED:
proxmox-ve pve-container pve-ha-manager pve-manager pve-qemu-kvm qemu-server spiceterm
Nah, I meant the “-cpu” argument from the “args” line in your VM config, you cropped it out of the config you posted.
args: -device isa-applesmc,osk=… -smbios type=2 -device usb-kbd,bus=ehci.0,port=2 -cpu Penryn,kvm=on,vendor=GenuineIntel,+kvm_pv_unhalt,+kvm_pv_eoi,+hypervisor,+invtsc,+pcid,+ssse3,+sse4.2,+popcnt,+avx,+avx2,+aes,+fma,+fma4,+bmi1,+bmi2,+xsave,+xsaveopt,check
Penryn doesn’t work on Ventura and kvm_pv_eoi causes Ventura to hang, please use the argument suggested in this post:
-cpu Haswell-noTSX,vendor=GenuineIntel,+invtsc,+hypervisor,kvm=on,vmware-cpuid-freq=on
hi, thanks for sharing the tuto.
I followed the post and at the last step, I boot the “main” MacOS system and got a grey screen with a pointer.
what should I do? please help
Tried 20 times. tried re-download the “Install macOS Ventura.app”.
All end at the last step: grey screen with a cursor.
And it turns out that I missed some letters from the OSK key.
I missed “(c)AppleComputerInc”. and after I copied those letters, it works.
Hi, after trying twice the installation process at the end, I have a continuos loop with boot error: Your computer started because of a problem …
Hi Nick, i cant seem to get the GPU passthrough to work
I am on AMD CPU 5600X
GPU: RX 570
Vendor-Reset installed.
PVE- 7.4-1
agent: 1
args: -device isa-applesmc,osk=”correctvalue” -smbios type=2 -device usb-kbd,bus=ehci.0,port=2 -cpu Haswell-noTSX,vendor=GenuineIntel,+hypervisor,kvm=on,vmware-cpuid-freq=on -global nec-usb-xhci.msi=off -global ICH9-LPC.acpi-pci-hotplug-with-bridge-support=off
balloon: 0
bios: ovmf
If i change display to vmware, it loads perfectly fine on console, but when i change display to none and add the gpu passthrough card, nothing shows on the monitor, not even proxmox boot logo. I tried switching gpu to the 2nd slot, same.
Check host dmesg output for errors, there’s probably a BAR error there preventing the vBIOS from being passed through to the guest.
You can look up the memory address range from the BAR error in the output of “cat /proc/iomem” to discover which host driver is causing the problem.
Hi Nick, i managed to get this completely resolved by disabling CSM or turning PCIE mode from legacy to UEFI.
But I do have another question, since I have 12 USB ports on my X570 motherboard, everytime my host reboots the USB passthrough port changes as this deems me to change port everytime on pve. is there a better way to go about this?
PCIe passthrough of a whole controller might be the best option
hey Nicholas, I copied the ACPI folder from iso file provided on your github into my EFI folder. If I turn off gpu passthrough the system boot normally. But when I turn on gpu passthrough the system stuck at “ACPI: sleep state S3 S4 S5” for about 5~10 minutes, then can also boot successfully.
More details and screenshot please click the link: https://www.reddit.com/r/hackintosh/comments/12ifaui/acpi_error_namespace_lookup_failure_ae_not_found/
Oh, my machine does this too but I thought it was pausing for NVMe TRIM, lol. Sorry, I don’t know a solution.
Hi there, I’m having the exact same issue when passing through a GPU. I’m stuck on “ACPI: sleep state S3 S4 S5” for about 3-5 minutes before the login screen shows up. Did you ever happen to find a solution to this?
I was able to fix this issue by installing a Mac compatible PCI USB card and passing the whole card thru to the VM. I then connected the keyboard and mouse to the PCI card and deleting the individual USB devices in the VM hardware.
The smc_read.c file does not compile:
$ gcc -o smc_read smc_read.c -framework IOKit
smc_read.c:25:56: warning: ‘kIOMasterPortDefault’ is deprecated: first deprecated in macOS 12.0 [-Wdeprecated-declarations]
io_service_t service = IOServiceGetMatchingService(kIOMasterPortDefault,
^~~~~~~~~~~~~~~~~~~~
kIOMainPortDefault
/Library/Developer/CommandLineTools/SDKs/MacOSX.sdk/System/Library/Frameworks/IOKit.framework/Headers/IOKitLib.h:133:19: note: ‘kIOMasterPortDefault’ has been explicitly marked deprecated here
const mach_port_t kIOMasterPortDefault
^
1 warning generated.
That’s a warning, not an error, looks like it compiled fine.
Thank you Nicholas Sherlock!!!!!!!
to find tsc for my proxmox i used
cat /sys/devices/system/clocksource/clocksource0/current_clocksource
becouse my proxmox don’t have history of boot log
uptime
13:32:50 up 307 days, 16:22, 1 user, load average: 1.84, 3.84, 6.85
Is there any way to pass the Intel iGPU? I found these and it appears it’s non-functional at this point:
https://forum.proxmox.com/threads/igpu-pasthrough-for-macos-on-laptop.108335/
https://forum.proxmox.com/threads/pve-intel-gpu-passthrough-to-macos-monterey-no-signal.115502/
It requires a custom vBIOS so that OVMF can init the iGPU for macOS:
https://github.com/vivekmiyani/OSX_GVT-D
People report stability problems after install, though
Hi Nick, I’m just wondering if there is a way to improve a netork performance of Ventura. I set up a host-only bridge vmbr4 in proxmox, added virtio adapters to all VMs running on this host and connected these adapters to vmbr4. To measure the speed of the connection I started iperf3 server on the host and run iperf3 client from every guest connceting to host.
From debian guest I have this:
root@FreePBX-debian:~# iperf3 -c 192.168.99.2
Connecting to host 192.168.99.2, port 5201
[ 5] local 192.168.99.21 port 59322 connected to 192.168.99.2 port 5201
[ ID] Interval Transfer Bitrate Retr Cwnd
[ 5] 0.00-1.00 sec 8.10 GBytes 69.6 Gbits/sec 0 3.07 MBytes
[ 5] 1.00-2.00 sec 8.18 GBytes 70.3 Gbits/sec 0 3.07 MBytes
[ 5] 2.00-3.00 sec 8.05 GBytes 69.2 Gbits/sec 0 3.07 MBytes
[ 5] 3.00-4.00 sec 8.11 GBytes 69.7 Gbits/sec 0 3.07 MBytes
[ 5] 4.00-5.00 sec 8.26 GBytes 71.0 Gbits/sec 0 3.07 MBytes
[ 5] 5.00-6.00 sec 7.96 GBytes 68.4 Gbits/sec 0 3.07 MBytes
[ 5] 6.00-7.00 sec 7.90 GBytes 67.9 Gbits/sec 0 3.07 MBytes
[ 5] 7.00-8.00 sec 8.29 GBytes 71.2 Gbits/sec 0 3.07 MBytes
[ 5] 8.00-9.00 sec 8.36 GBytes 71.8 Gbits/sec 0 3.07 MBytes
[ 5] 9.00-10.00 sec 8.20 GBytes 70.4 Gbits/sec 0 3.07 MBytes
– – – – – – – – – – – – – – – – – – – – – – – – –
[ ID] Interval Transfer Bitrate Retr
[ 5] 0.00-10.00 sec 81.4 GBytes 69.9 Gbits/sec 0 sender
[ 5] 0.00-10.04 sec 81.4 GBytes 69.7 Gbits/sec receiver
While on macos I have this:
dima@iMac-Pro ~ % iperf3 -c 192.168.99.2
Connecting to host 192.168.99.2, port 5201
[ 5] local 192.168.99.15 port 49764 connected to 192.168.99.2 port 5201
[ ID] Interval Transfer Bitrate
[ 5] 0.00-1.00 sec 3.24 GBytes 27.8 Gbits/sec
[ 5] 1.00-2.00 sec 3.28 GBytes 28.2 Gbits/sec
[ 5] 2.00-3.00 sec 3.46 GBytes 29.7 Gbits/sec
[ 5] 3.00-4.00 sec 3.09 GBytes 26.5 Gbits/sec
[ 5] 4.00-5.00 sec 3.39 GBytes 29.1 Gbits/sec
[ 5] 5.00-6.00 sec 3.09 GBytes 26.5 Gbits/sec
[ 5] 6.00-7.00 sec 3.17 GBytes 27.3 Gbits/sec
[ 5] 7.00-8.00 sec 3.25 GBytes 27.9 Gbits/sec
[ 5] 8.00-9.00 sec 3.33 GBytes 28.6 Gbits/sec
[ 5] 9.00-10.00 sec 3.56 GBytes 30.6 Gbits/sec
– – – – – – – – – – – – – – – – – – – – – – – – –
[ ID] Interval Transfer Bitrate
[ 5] 0.00-10.00 sec 32.9 GBytes 28.2 Gbits/sec sender
[ 5] 0.00-10.00 sec 32.9 GBytes 28.2 Gbits/sec receiver
More than 2 times less as you can see. virtio adapter parameters are the same in both cases. Anything I can do to improve the speed?
Hi Dmitri, would you mind sharing your config?
I can even get some “decent” performance when running iperf tests on my MacOS VM (Ventura) + Proxmox 7.4.3
Thanks!
args: -device isa-applesmc,osk=”– cut –” -smbios type=2 -device usb-kbd,bus=ehci.0,port=2 -global nec-usb-xhci.msi=off -cpu host,vendor=GenuineIntel,+invtsc,+hypervisor,kvm=on,vmware-cpuid-freq=on
balloon: 0
bios: ovmf
boot: order=sata1
cores: 8
cpu: host
efidisk0: hddlv_b1:vm-41022-disk-0,size=4M
hotplug: disk
kvm: 1
machine: q35
memory: 16392
meta: creation-qemu=6.2.0
name: macbuilder11.vm.corp.local
net0: virtio=DE:67:26:B9:A8:38,bridge=vmbr0
net1: virtio=D2:37:F9:EF:59:54,bridge=vmbr1
numa: 0
onboot: 1
ostype: other
sata1: hddlv_b1:vm-41022-disk-2,cache=unsafe,size=150G
sata2: /dev/disk/by-id/nvme-Samsung_SSD_980_PRO_500GB_S5GYNF0R723274F,backup=0,discard=on,size=500G,ssd=1
scsihw: virtio-scsi-pci
smbios1: uuid=6f6efeb5-b644-4b55-b716-582a1af7faa2
sockets: 1
vga: vmware
vmgenid: 170905f4-feb8-4b00-9bac-3008977f5e6a
Hello!
Are the comments under [Fetch the OSK authentication key] doable in the Proxmox shell, cause nothing I do sees those commands as…doable.
No, those commands are to be run on a Mac
Ahhhh alright, makes sense. Then I suppose this guide is not for me. Ah well, I thank you for your post. Just wanted to try Mac to see if it was an OS / Syatem
I wanted to buy. Thank you!!!
hi, Nick.
I followed this guide and everything works, except the wifi card.
I used a pcie to an Apple Native Card brcm94360 (which works perfectly on my other Hackintosh). I passthrough it to the Ventura and once the wifi attempt to connect, the VM-Ventura just rapidly restart.
I have keep searching for some help but no luck. it’s been one month and the issue still there. I had try using your EFI-ISO and try a new VM with new installing. same.
I used the PVE-7.4-1.
I passthrough an AMD Graphic Card to Ventura which works great.
the entire host works fine with one Ventura and two Ubuntu server on it.
so the only problem now is the wifi-card to the Ventura.
I have the exact problem. I use Fenvi BCM94360NG WIFI Card NGFF M.2 and Ventura macOS reboots right after I enter my WIFI password and click connect.
Proxmox VE 8.0.3
Can’t find any solution in Google yet. Please help.
I have the same problem. My system boots with BCM94360NG pass-through and crashes about 70% through the boot process.
I’m using PVE 8.0.4.
I found that selecting an older kernel during bootup: 5.15.116-1-pve solves the problem. I don’t know if this introduces other issues though.
Any thoughts, anybody?
I tried to setup a new computer today with hackintosh everyday works okay.
Except when i tried to edit the devices/reset_method to device_specific says file lock permission denied ( using root )
tried fresh reboots no luck, any ideas
Did you set up Proxmox updates? If not you might be on an older kernel version.
I am on Kernel 6.2.11
Does the bluetooth work for you I have the same chip USB adapter? What did you need to do in order to make it work, for me the bluetooth can not be turned on in the macos settings.
I tried adding kexts:
– BrcmPatchRAM3.kext
– BlueToolFixup.kext
– BrcmFirmwareData.kext
I have the same BCM20702 broadcom chipset. Any ideas what I could try next?
Hi Nick! Maybe you could tell what I’m doing wrong?
I have two log-errors that stop install process at 12 min remain.
I can’t find whats going wrong for 3 days. Maybe you could help?
full log + lscpu : https://drive.google.com/drive/folders/1vUYDPfY26zEpeotcNqkatvbg44Tt8Edn?usp=sharing
Error strings:
osinstallersetupd[1076]: Could not verify trust (5) using MobileSoftwareUpdate policy. Will try basic X509.
osinstallersetupd[1076]: Ignoring BOMfilesystem mismatches due to security settings.
conf:
root@testnode:~# cat /etc/pve/qemu-server/100.conf
agent: 1
args: -device isa-applesmc,osk=”…” -smbios type=2 -device usb-kbd,bus=ehci.0,port=2 -global nec-usb-xhci.msi=off -global ICH9-LPC.acpi-pci-hotplug-with-bridge-support=off -cpu host,vendor=GenuineIntel,+invtsc,+hypervisor,kvm=on,vmware-cpuid-freq=on
balloon: 0
bios: ovmf
boot: order=ide2;virtio0;ide0
cores: 4
cpu: Haswell
efidisk0: local-lvm:vm-100-disk-0,efitype=4m,size=4M
ide0: local:iso/Ventura-recovery.img,cache=unsafe,size=3142972K
ide2: local:iso/OpenCore-v20.iso,cache=unsafe,size=150M
machine: q35
memory: 4096
meta: creation-qemu=7.2.0,ctime=1683370561
name: testvm-macos
net0: virtio=6E:57:71:D0:13:C0,bridge=vmbr0,firewall=1
numa: 0
ostype: other
scsihw: virtio-scsi-single
smbios1: uuid=…
sockets: 1
vga: vmware
virtio0: local-lvm:vm-100-disk-1,cache=unsafe,discard=on,iothread=1,size=128G
vmgenid: …
Did you find the cause for this? Running into the same issue with exact same errors at 12 min remaining. Tried with both a Ventura and Monterey install (full and recovery image) and different versions of opencore.
Running proxmox 7.4-1 and kernel 6.1.15 on a NUC12
I am running into this problem as well. My first install with Ventura worked, but I deleted it and ran the same step and now I am getting stopped at the same place with the “Error Preparing installation “ with 12 minutes left.
same problem, can solve it?
Same issue here. My CPU being an Intel i7-8665UE
AMD GPU spoofing for macOS Ventura.
Did anyone succeed with spoofing an non native compatible AMD GPU Card in Proxmox`?
I’m working for a long time to get a S7150 (Tonga XT GL Device ID 0x6929) Card working in MacOS inside Server System with Proxmox as Hypervisor. Until now without success. I was where confused that the spoofing just by Proxmox was working fine in Windows and Linux VM’s but not in MacOS VM. If I used native supported AMD RX460 oder RX560 It worked flawless. I read at some source the SSDT way doesn’t work well with Hypervisors like Proxmox only with bare metal Hackintosh.
Infos: https://forum.proxmox.com/threads/amd-radeon-rx6950xt-spoofing-for-macos-vm.125901/
I have been using your setup configuration for almost 2 years now and have Ventura working perfectly with GPU passthrough on a Radeon RX 6600. One thing I have noticed is my GPU and Audio (DisplayPort) show up as ExpressCard under PCI using System Information. Everything works but it shows the Express Card in the upper menu and you can actually power off both video and audio. I have tried using DeviceProperties under config.plist to use built-in=1 to no avail. It’s working fine, I would just like it to show up as an internal device and not be able to turn it off.
Any suggestions on DeviceProperties configuration?
Thanks
Hi mate. Any chance you share your settings? I am trying to get this run with a Radeon RX 6800 but can’t manage to do so. It stuck on the apple logo screen with a zero percent progress bar. I know I am close to succeed but I also know there is some little tweak which I am missing. I guess sharing your main settings, like “grub” or the VM settings etc. should or could help. Thanks mate.
try agdpmod=ignore in the boot-args
I know this is a few months after the fact, but my 6800 XT was showing up as a removable ExpressCard device as well. Unchecking PCI Express in the PCI passthrough config in Proxmox fixed the issue for me. Maybe that will fix it for you.
I do not see a loading bar when attempting to install on a Dell Precision T7290 with dual Xeon Gold 6148s. Here’s the cpuinfo for one core:
processor : 79
vendor_id : GenuineIntel
cpu family : 6
model : 85
model name : Intel(R) Xeon(R) Gold 6148 CPU @ 2.40GHz
stepping : 4
microcode : 0x2000065
cpu MHz : 2400.000
cache size : 28160 KB
physical id : 1
siblings : 40
core id : 28
cpu cores : 20
apicid : 121
initial apicid : 121
fpu : yes
fpu_exception : yes
cpuid level : 22
wp : yes
flags : fpu vme de pse tsc msr pae mce cx8 apic sep mtrr pge mca cmov pat pse36 clflush dts acpi mmx fxsr sse sse2 ss ht tm pbe syscall nx pdpe1gb rdtscp lm constant_tsc art arch_perfmon pebs bts rep_good nopl xtopology nonstop_tsc cpuid aperfmperf pni pclmulqdq dtes64 monitor ds_cpl vmx smx est tm2 ssse3 sdbg fma cx16 xtpr pdcm pcid dca sse4_1 sse4_2 x2apic movbe popcnt tsc_deadline_timer aes xsave avx f16c rdrand lahf_lm abm 3dnowprefetch cpuid_fault epb cat_l3 cdp_l3 invpcid_single pti intel_ppin ssbd mba ibrs ibpb stibp tpr_shadow vnmi flexpriority ept vpid ept_ad fsgsbase tsc_adjust bmi1 hle avx2 smep bmi2 erms invpcid rtm cqm mpx rdt_a avx512f avx512dq rdseed adx smap clflushopt clwb intel_pt avx512cd avx512bw avx512vl xsaveopt xsavec xgetbv1 xsaves cqm_llc cqm_occup_llc cqm_mbm_total cqm_mbm_local dtherm ida arat pln pts hwp hwp_act_window hwp_epp hwp_pkg_req pku ospke md_clear flush_l1d
vmx flags : vnmi preemption_timer posted_intr invvpid ept_x_only ept_ad ept_1gb flexpriority apicv tsc_offset vtpr mtf vapic ept vpid unrestricted_guest vapic_reg vid ple shadow_vmcs pml ept_mode_based_exec tsc_scaling
bugs : cpu_meltdown spectre_v1 spectre_v2 spec_store_bypass l1tf mds swapgs taa itlb_multihit mmio_stale_data retbleed
bogomips : 4802.25
clflush size : 64
cache_alignment : 64
address sizes : 46 bits physical, 48 bits virtual
power management:
Any thoughts what I should set for the -cpu flags? I’m assuming that’s where the issue is. I’ve tried host, Penryn, and Haswell-noTSX with no avail.
What are your core/sockets set to?
If I hit enter on the “dmesg | grep -i -e tsc -e clocksource” it just does nothing. I just get a new row with the root@…:
Am I doing something wrong?
If it’s been a long time since your system booted then those log messages can be gone from the ring buffer. Try checking the log on disk instead:
grep -i -e tsc -e clocksource /var/log/kern.log /var/log/kern.log.1
I have followed the tutorial for Proxmox 7.4.3 and Intel newest CPU.
I have tried 2 different MacOS Ventura images (one from MacOS Archives, other from a friend) and in both cases, the VM starts, UEFI shows up, but I am not presented with Ventura installer option, but only UEFI Shell and Reset NVRAM options.
What might be wrong and how to fix it?
I don’t know how third-parties have built their installer images, if you use an image not built using the instructions in my tutorial you’ll have to ask them.
I have followed your advice and build the full image on my Mac. After it, the option for the installation has appeared and I have been able to complete the process. Thank you.
If this happens again you may need to manually enter the efi and point it in the right direction.
# change to the ventura.iso, the disk number may be different for you
fs0:
# launch the MacOS installer
System\Library\CoreServices\boot.efi
I was having trouble with the full installation, that I created from another mac and it being recognized on boot, even after messing around with boot options, UEFI, etc. I decided to create the recovery image and that was recognized right away
Thank you so much for this brilliant guide! I have Catalina and Ventura vms running now with your instructions. Host is ASRock Z790m-ITX, i3-13100, 64GB DDR5.
One thing I can’t figure out is the Sapphire Pulse RX 580 (single vbios) passthrough. It works fine on a Win X vm. On either Mac OS vm they will almost immediately hang at 16% CPU usage indefinitely with no video output / network activity. If I add the vmware gpu back I can boot and see the card in profiler under GPU, but no monitor connected or ability to utilize.
I’ve tried flashing several different ROMs, including ones that were supposedly known to work with Macs. In the end I went back to the original vbios it came with. My qemu config is pretty much identical to your examples but have tried with/without passing the AMD rom file. I haven’t done anything to the OC plist except add autoboot. Have tried all ports on the card. I’ve spent several days playing with this using every resource I can find and nothing has worked. Any ideas?
You never need to flash anything to the card for passthrough, you supply those vBIOS files to the guest by using the “romfile” option on the hostpci line.
Do you see the Proxmox boot logo at the start of VM boot? If not, your guest UEFI is failing to init the card before macOS even starts loading, and macOS does not tolerate this condition.
This is usually because the host has already trashed the shadow copy of the card’s vBIOS in memory by using it to init the card during its own boot. Suppling a vBIOS using the romfile option fixes that, if you can’t set a different card as primary in host UEFI to avoid initialising it in the first place.
Thanks! The card wasn’t playing with UEFI at all, not showing the BIOS splash of my host, etc. I found one vbios here that at least got that working. It also shows the Proxmox boot at Windows vm boot up where it didn’t before.
https://www.techpowerup.com/vgabios/208710/sapphire-rx580-8192-180719
Now MacOS will boot, I can see the OpenCore, and the Apple logo with progress bar. Then it stops, frozen on the apple with no progress. However the guest is eventually up, I can remote into it just fine. But the rx580 still just shows as a PCIe device with nothing connected. Happens with or without passing that romfile. That’s the best I’ve been able to get with any of the official TPU images. Which did you use?
I don’t have the same gpu, but I did pass a Navi 6800xt. Have you tried agdpmod=ignore in the boot-args?
Hi Matrixx, I have the same GPU as you and the passthrough works correctly. However, it takes an incredibly long time, about 5 minutes, for the login screen to display after booting up. Do you have the same issue? Or do you know how to resolve it? Looking forward to hearing from you.
I’m not passing any vBIOS file for my GPU, because I’ve avoided my host initializing it on boot.
Make sure you’ve set your virtual Display to None in Proxmox.
Otherwise you’re probably being hit by the AMD Reset Bug since your host is initting the card. When this bug is present you can only use the card a single time per host power cycle (because the host can’t reset it to give it to the guest in a clean way), and the host initting the card already uses up that chance.
In theory vendor-reset fixes the AMD Reset Bug, but I’ve never had it work with my RX 580:
https://www.nicksherlock.com/2020/11/working-around-the-amd-gpu-reset-bug-on-proxmox/
I did hear someone say that only passing the GPU device (and not ticking the All Functions box to pass the HDMI audio too) made vendor-reset work for them.
If it possible to emulate M1 or M2 on Proxmox ?
No, this isn’t even possible on ARM hosts at the moment (like a Raspberry Pi). The M1/M2 has too much custom silicon in it that isn’t found in other CPUs, so it would be a monumental effort to reverse engineer it for emulation.
I am running into an issue with the installer receiving the “Error Preparing the Installation” with 12 minutes remaining. I followed your guide before with no problems and had a fully installed Ventura. I since deleted the VM, now I am reinstalling. Has the recovery image been flagged or something or has something changed since Sonoma was released? I can’t seem to get Ventura installed again.
Nick, thank you for putting this guide together. It was a huge help to me. Question, if one was to install using your guide for proxmox in a desktop environment and not use any passthrough for any other pci device but only host cpu (comet lake or later), which files in OC would be the minimum required to function with OVMF? I ask because I tried creating custom ssdt using the dsdt generated in a windows 11 vm but wasn’t successful.
Nick- Thank you for all of the excellent work on this and your earlier macOS Proxmox Hackintosh tutorials. I have an old legacy Nehalem based system with Xeon X3470 and have been trying since this tutorial was first posted on your site to get a Ventura VM working. I had earlier success with this same system on Mojave VM by following your guide. I finally was able today to get my Ventura Proxmox VM installed and to booted successfully into the setup screens.
I had to manually add another kext: NoAVXFSCompressionTypeZlib-AVXpel.kext to your OpenCore v20 EFI image, and compile it in using your excellent KVM-Opencore project on GitHub. Since Nehalem and earlier CPUs lack AVX1, I was getting panics and boot loops on the final reboot after clean install. After adding this new kext above to workaround the Zlib/AVX problem the Ventura VM is running great on this very ancient Xeon cpu.
Many thanks to you, and all of the OpenCore and Proxmox devs for all the great code work!
could lack of AVX1 be the reason I get the loop on my X5690 system?
how would I approach to fix it?
Yeah you need AVX, and set cores to a power of two as well. I’ve heard that adding this kext makes it boot without AVX:
https://github.com/dortania/OpenCore-Legacy-Patcher/blob/main/payloads/Kexts/Misc/NoAVXFSCompressionTypeZlib-AVXpel-v12.6.zip
In that case make sure your -cpu argument doesn’t advertise support for AVX (might have to add -avx to it)
https://www.reddit.com/r/hackintosh/comments/110s2g7/i_know_no_vms_but_this_is_a_success_story_not/
Thank you NIcholas
So the OCLP applies this Kext but I do believe that you use different version of OC.
Do you know how can add this Kext there?
I am not sure what i will be missing. I wonder maybe I should settle for Monterey?
It’s actually the same way as standard OpenCore, mount EFI directory (instructions in this current post) add it to the kexts directory and add an entry for it in config.plist.
I believe Monterey also requires AVX1
Could you share your modified open core? Or help to show how to add NoAVXFSCompressionTypeZlib-AVXpel.kext to your OpenCore v20 EFI image
Has anyone managed to update proxmox to 8.0.3 and keep their system booting? Mine is failing to load, stuck on the apple logo
Sorry, I haven’t attempted this yet. You can try setting an older Machine version in the VM Hardware > Machine setting, I’m currently using pc-q35-7.2. The new QEMU 8 would have introduced a version 8 machine model too.
I’ve restored a VM backup with OC 0.8.6 and this boots fine with the latest q35 v8, passed through hardware etc and all good.
My ‘old’ VM was running OC 0.9.2 so I’m thinking it might be an OC issue. I’ll try booting the machine with a previous OC version and see if it works
I too have this issue but with Ventura 13.3 or 13.4 only, 13.2 is fine. Tried OC 0.9.6 and still stuck on Apple logo. Will try 0.8.6.
So after some extensive playing around with various configurations, I’ve restored my system to Proxmox v7.4-15.
Under v8.0-3 I tried various versions of Opencore but they didn’t seem to be a problem as I could get restored VM that I had previously backed up to work just not the working version I had when I upgraded Proxmox.
The q35 version didn’t seem to have any impact.
The main issue I had was I could no longer pass through the Broadcom WiFi card I had in the system as it just crashed the VM everytime it got an IP address. If I removed the Wifi card from the configuration, the VM worked fine. The Wifi is needed for handoff, Airdrop etc so this was a deal breaker for me.
I’m sure someone much cleverer than me can figure this out but for now I’m back with a fully working Ventura system at OC 0.8.6 and Proxmox 7.4-15
Hi Tim,
here here on Prox V8 and Broadcom wifi! At Prox V7 because of this too.
I use the Broadcom for wireless stereo speakers on two Homepod Mini, all the time. Did you find a solution?
Thanks
Matt
I got the machine to boot under Proxmox 8 with machine type 8.1 – the VM booted by unticking the “PCIE-Express” flag under the GPU entry. Wifi is passed through and working
Hi Nick, I’ve been using Ventura after following your guide successfully for months, thank you again! I have a question about nested virtualization/installing docker in OSX. The reason I would like to do this is for OSX to act as a build runner for Gitea Actions.
I tried to run docker on OSX but am met with an error “Hypervisor check failed” — To try and fix that I appended all of the proxmox args that my windows VM works with: hv_relaxed,hv_vapic,hv_spinlocks=0x1fff,hv_vpindex,hv_runtime,hv_crash,hv_time,hv_synic,hv_stimer,hv_tlbflush,hv_ipi,hv_reset,hv_frequencies,hv_reenlightenment,hv_stimer_direct,hv-no-nonarch-coresharing=auto
The whole args line is: args: -device isa-applesmc,osk=”{osk goes here}” -smbios type=2 -device usb-kbd,bus=ehci.0,port=2 -global nec-usb-xhci.msi=off -global ICH9-LPC.acpi-pci-hotplug-with-bridge-support=off -cpu Haswell,vendor=GenuineIntel,+invtsc,+hypervisor,kvm=on,vmware-cpuid-freq=on,hv_relaxed,hv_vapic,hv_spinlocks=0x1fff,hv_vpindex,hv_runtime,hv_crash,hv_time,hv_synic,hv_stimer,hv_tlbflush,hv_ipi,hv_reset,hv_frequencies,hv_reenlightenment,hv_stimer_direct,hv-no-nonarch-coresharing=auto
Do you have any advice to help get this working? Thanks again
Nested virtualization requires -cpu host:
https://pve.proxmox.com/wiki/Nested_Virtualization
Don’t copy the hv enlightenments from a Windows VM, because some enlightenments make macOS crash.
If your CPU is AMD, you cannot run virtualization software inside macOS, because macOS’ Hypervisor.framework has no support for AMD VM instructions
Thanks for the fast response, unfortunately I have an AMD CPU
You can run your Docker Daemon on a Linux VM instead, and just access that one from macOS
Thanks for the suggestion but unfortunately that won’t produce osx compatible binaries
Hi!
Thank you for an amazing tutorial Nick!
I managed to install but when I reboot in recovery mode and run
csrutil disable –no-internal
it reports
“Assertion failed: […..] file CFData.c line, line 235”
What might that mean?
I know this is an old ask, but to fix this for my bluebubbles server I did:
csrutil clear
csrutil disable
shutdown and start
I get an error message saying “An error occurred preparing the software update.” does anyone know how I can get past this ?
I get this whenever I try to update macOS incrementally. The only workaround I’ve found is to download and install Ventura from the App Store, which grabs the entire ~ 12 gig image rather than the diff between your current version and the update, but it does work. You’ll have to restart a couple times for it to apply, but everything is preserved. I just did this yesterday to get to 13.5.
I was able to get past the “error occurred preparing the software update” error by changing the “-cpu” argument in /etc/pve/qemu-server/YOUR-VM-ID-HERE.conf from “-cpu host” to “-cpu Haswell-noTSX”.
I am trying something a bit crazy
running proxmox on 2009 MacPro 4.1 flashed to 5.1
96G ram, 2xX5690
I followed the tutorial and as soon as Ventura seems installed it goes into a boot-loop with “Your computer restarted because of a problem”
allocates 12CPU and 65G of ram
Hi Nick, and thanks for your work here. I’m almost there (and I know the easy workaround, being to generate the full image on a Mac.) But I am still hoping to do it with the recovery image. The problem is lack of DNS in the installer, with Internet connection otherwise working.
Our proxmox was sold to us by a colo provider. It’s standalone with a /29 for VMs. We can manually assign any of the 5 addresses, and add a default route. Good to go, this works. But I have not yet found a way to give it a nameserver to use. The old trick of resolv.conf is ignored, and I can’t find actual documentation for scutil(8) (the man page lacks the detail of how to set a default nameserver.)
Thanks so much for this awesome guide (and all your previous ones)! They’re really the best ones out there. Do you have any plans to make a guide for MacOS Sonoma, either while it’s in beta or after the full release?
PS: I even managed to get my ‘unsupported’ NVIDIA GTX 780Ti (Kepler) running smoothly with everything working in Ventura! (did this by using the OpenCore Legacy Patcher after disabling SIP and AMFI).
Thank you, it worken for me on Proxmox 7.4 and AMD EPYC CPU.
For the CPU i had to use “-cpu Haswell-noTSX”
Hi there. First of all, thank you for your tutorials. They have helped us a lot. Everything works, but I want to add a third disk to my MacOS VM, but the IDE bus only supports 2 disks, which are already in use. Which bus should I use? SATA, SCSI or VIRTIO? Or is there a workaround for IDE?
virtio works great and is the highest performance, use that. SATA also works fine.
Is USB mapping necesary for macOS VM?
I’ve never had to do it before with any previous version, but I haven’t used Ventura much yet.
Nick, Thanks for the quick response. I guess when you are passing USB ports through, the guest OS (mac) recognizes them by the attributes set when you pass them in proxmox? such as usb 2 or usb 3?
HI! Any idea why v13 always gives me “WindowServer quit unexpectedly” error message when connecting to the macos via anydesk/teamviewer?
I use AMD cpu with -cpu Haswell flag set. On v12 i had it working fine.
On safari i also have visual glitches while rendering page elements
Thanks!
Thanks for taking the time for this write-up! I was successful with your instructions. I even signed in to it and have working iMessage.
If it helps anyone, in order to get signed into iCloud on a working mac and have working iMessage for a bluebubbles server, follow the guide and “Make the OpenCore install permanent” then change four items in the EFI/OC/config.plist: MLB, SystemProductName, SystemSerialNumber, SystemUUID. Follow the link provided above “configured your Mac’s serial number in OpenCore” for instructions, use csrutil disable and this setup works. Using it now.
Thank you for the good instructions and all the work.
Everything still worked fine with Proxmox 7.x.
After the upgrade to Proxmox 8.x, the Mac VMs no longer start.
Only the Apple logo appears and the loading bar stops.
Any idea which parameters to change?
This affects Ventura, Sonoma as well as Monterey.
Try changing the Machine type on the hardware tab to an earlier version. I’m using pc-q35-6.1 but I’m still on Proxmox 7.
that would be a good idea – but not the solution.
Your idea led me to search for a suitable q35 version on Google and I found, among other things, the reference to this “is a possible workaround” to TSC.
https://www.nicksherlock.com/2022/10/installing-macos-13-ventura-on-proxmox/comment-page-1/#comment-55532
I have added the values “quiet clocksource=tsc tsc=reliable mitigations=off” in GRUB.
Now all q35 versions work.
Thanks a lot!
Hi Nick,
Do you know if proxmox macOS Sonoma will happen? Will there be a new guide and update for it?
This is my second year on proxmox macos, so always excited to get the new OS!
Hey Nick. Thanks for your tutorial. I’d like to add a solution for an issue I’ve been struggling with for 3 days.
So Monterey installed fine. GPU passthrough worked.
Ventura installed with the “dummy” VGA monitor but when I configured the GPU for passthrough I got this error during the boot process, which was mentioned by someone a year ago.
no external trust caches found (segment Length is zero)
IOAPIC: Version Ox11 Vectors 64:87
ACPI: Executed 3 blocks of module-level executab le AML code
ACPI: sleep states S3 S4 S5
Couldn’t alloc class “AppleKeyStoreTest”
Couldn’t alloc class “ApplekeyStoreTest”
Moreover I faced it on my both GPU’s: RX560 and RX6600XT. Different vendors, different chips, same issue.
Long story short. Here’s what worked for me.
When I added the GPU it was added to the bus 0x01. And then different functions for actual video and hdmi audio. That was the issue.
When I changed the bus to 0x00 and free slot (0x06 I think was free) it worked for Ventura, the GPU started working. Apparently Ventura only wants GPU on the first bus. Again, in my case that was the issue.
P.S. Nick, did you manage Sonoma to work? For me it fails somewhere already in the graphic mode and reboots.
I tried installing Sonoma, and I got to work okay. An issue I had was the monitor connected via DisplayPort did not work.
Can you share your machine xml (if you’re using virt-manager) or the command line args? I’m quite tired to be honest. It gets to the graphic mode and reboots. I have no idea where the issue is. Doesn’t matter whether it’s passed-through gpu or vmvga/qxl/virtio, USB 3 or 2, Penryn or host(alder lake), Sata or Virtio disk, nic type… I just have no idea where the issue could be
Sonoma, does anybody else experience problems with third party bluetooth USB dongles? These used to work out-of-box on any previous Mac OS version.
The device listed under USB but not Bluetooth in systeminfo.
same here. after upgrading to Sonoma, everything works but the Bluetooth. it is listed under USB but not Bluetooth in systeminfo.
Can you passthrough the iGPU from an intel processor? Will it have any effect inside the macOS VM?
If it’s a pre-11gen igpu – yes. It should work and add acceleration. Starting with 11 gen the 7xx igpu is not supported by macos.
Depends on the cpu generation. MacOS supports iGPU until the 10-th generation included. If you pass that through you’ll get acceleration. If your CPU is 11gen and above – nope.