
With the release of macOS Catalina 10.15, this tutorial is now obsolete! Please check out the new Catalina tutorial here.
This tutorial for installing macOS Mojave has been adapted for Proxmox 5.4 from Kholia’s GitHub project for installing into vanilla KVM. There is more documentation there which will help out with enabling extra features and diagnosing problems!
Requirements
I’ll assume you already have Proxmox 5.4 installed. You also need a real Mac available in order to fetch the OSK key.
Your Proxmox host computer’s CPU must support SSE 4.2, so for Intel your CPU must be at least as new as Nehalem, which was the first CPU generation to bear the “Core” i5/i7 branding. Older CPUs will cause the finder to repeatedly crash after installation completes (with an Illegal Instruction exception in the graphics code).
Apparently modern AMD CPUs also support SSE 4.2 and can be used with this guide without any modification (maybe Bulldozer and certainly Ryzen), but I haven’t tested this myself.
First step: Create an installation ISO
On a Mac machine, download and run fetch-macOS-v2.py in a terminal to download the Mojave recovery image from the Apple software distribution server:
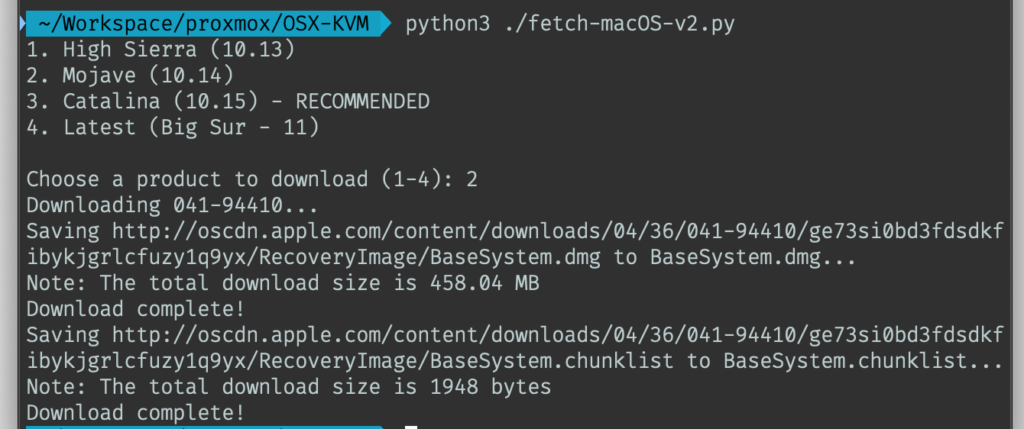
This results in a ~460MB “BaseSystem.dmg” file in the current directory. Convert that dmg into an “iso” like so:
hdiutil convert BaseSystem.dmg -format UDRW -o Mojave-installer.iso
mv Mojave-installer.iso.img Mojave-installer.iso
This is actually a raw disk image, not a true ISO, but Proxmox has better tools for picking and re-using ISO images than disk images. Upload the “ISO” to your Proxmox server’s ISO store (typically /var/lib/vz/template/iso).
It is possible to run this download script on Linux instead. In that case, you need to install the “dmg2img” package on your system, and replace the “hdiutil” command invocation with:
dmg2img BaseSystem.dmg Mojave-installer.iso
Prepare a Clover image
We’ll be using Clover as a bootloader for Mojave.
Download this Clover disk image (that I built using kholia’s build script from Clover r4920), unpack it, and upload it to Proxmox’s ISO store at /var/lib/vz/template/iso. Although it has a .iso file extension, this is actually a hard disk image.
Fetch the OSK authentication key
macOS checks that it is running on real Mac hardware, and refuses to boot on third-party hardware. You can get around this by reading an authentication key out of your real Mac hardware (the OSK key). Run the first bit of C code from this page (you’ll need XCode installed) and it’ll print out the 64 character OSK for you. Make a note of it.
Every Mac uses the same OSK, so don’t be surprised if it doesn’t look like a random string!
Create the VM
From the Proxmox web UI, create a new virtual machine as shown below.
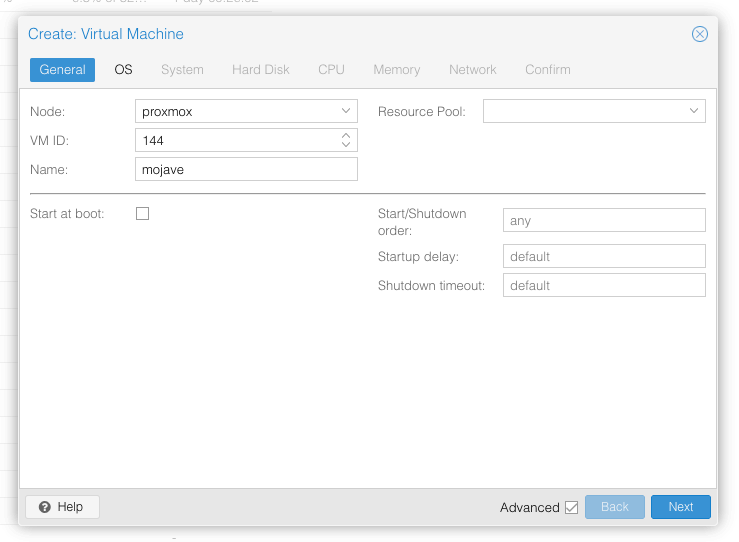
Keep a note of your VM’s ID 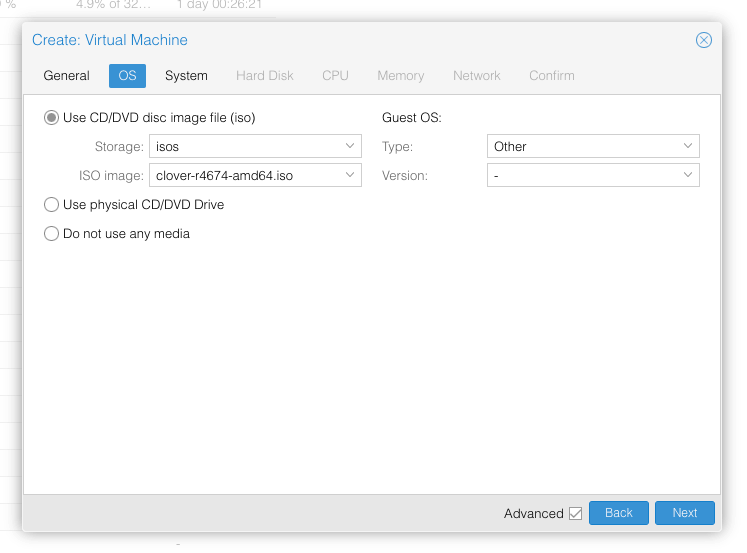
Select the Clover ISO you uploaded and set OS type to “Other” 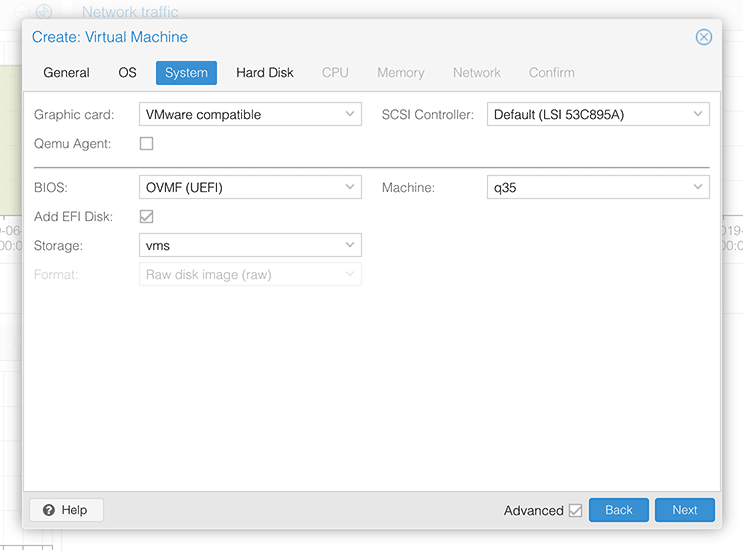
Set graphics to “VMWare Compatible”, set BIOS to OVMF (UEFI), set Machine to Q35, Tick Add EFI Disk, set SCSI to Default 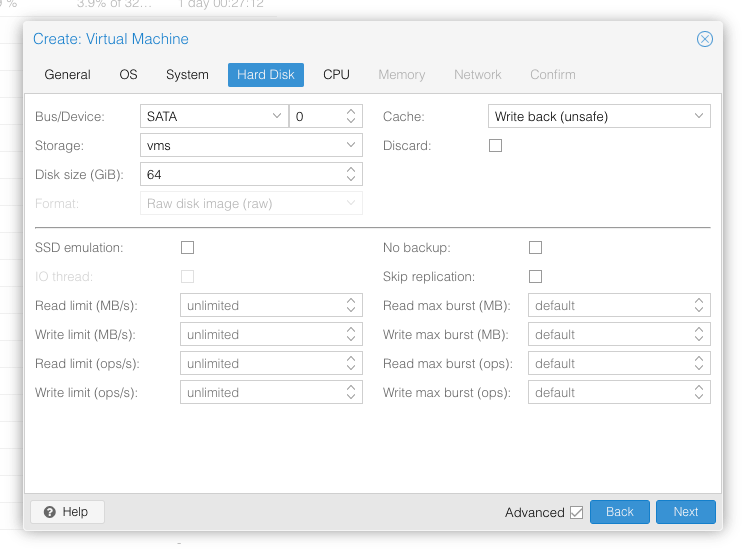
Set the size of the hard disk (I chose 64GB). Attach it to SATA0 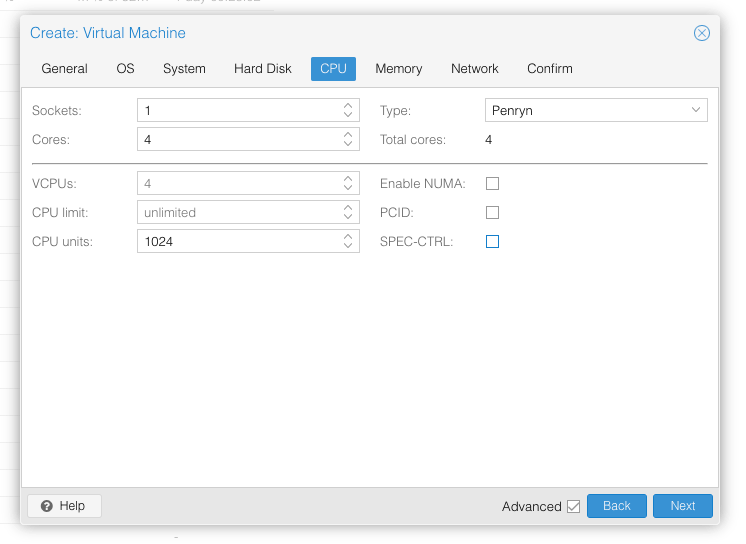
Set the number of cores for the VM, I chose 4 (note that some core counts seem to be troublesome, try 4 first). Set the CPU to Penryn. 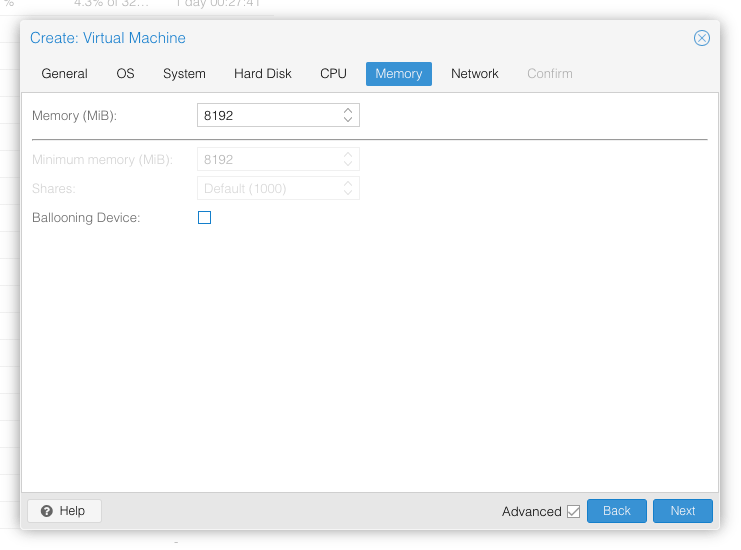
I chose a fixed memory of 8192MB. Disable ballooning because there is no balloon driver available for macOS. 
Choose VMWare vmxnet3 for the network model
In the Options page for the VM, ensure that “use tablet for pointer” is set to “Yes”.
In the Hardware page for the VM, add a second DVD drive at IDE0, set it to use your Mojave-installer.iso.
Don’t try to start the VM just yet. First, SSH into your Proxmox server so we can make some edits to the configuration files.
Edit /etc/pve/qemu-server/YOUR-VM-ID-HERE.conf (with nano or vim). Add this line, being sure to substitute the OSK you extracted earlier into the right place:
args: -device isa-applesmc,osk="THE-OSK-YOU-EXTRACTED-GOES-HERE" -smbios type=2 -cpu Penryn,kvm=on,vendor=GenuineIntel,+invtsc,vmware-cpuid-freq=on,+pcid,+ssse3,+sse4.2,+popcnt,+avx,+aes,+xsave,+xsaveopt,check -device usb-kbd,bus=ehci.0,port=2
We’re telling macOS that the CPU is Penryn (it doesn’t seem to like booting otherwise), but we’re enabling all the new CPU features found in Nehalem which macOS will require, plus some optional features found in later generations (AVX/AES).
Find the line that define the two “ISOs” (ide0 and ide2), and remove the “,media=cdrom” part from them. Add “,cache=unsafe” in its place. This will treat these as hard disks rather than DVD drives.
Save your changes, return to the Options tab, and change the boot order to put IDE2 (the Clover image) first. Your final VM configuration file should resemble this:
args: -device isa-applesmc,osk="..." -smbios type=2 -cpu Penryn,kvm=on,vendor=GenuineIntel,+invtsc,vmware-cpuid-freq=on,+pcid,+ssse3,+sse4.2,+popcnt,+avx,+aes,+xsave,+xsaveopt,check -device usb-kbd,bus=ehci.0,port=2
balloon: 0
bios: ovmf
boot: cdn
bootdisk: ide2
cores: 4
cpu: Penryn
efidisk0: vms:vm-144-disk-1,size=128K
ide0: isos:iso/Mojave.iso,cache=unsafe
ide2: isos:iso/clover-r4920.iso,cache=unsafe
machine: q35
memory: 8192
name: mojave
net0: vmxnet3=xx:xx:xx:xx:xx:xx,bridge=vmbr0,firewall=1
numa: 0
ostype: other
sata0: vms:vm-144-disk-0,cache=unsafe,size=64G
smbios1: uuid=xxxxxx-xxxx-xxxx-xxxx-xxxxxxxxxxx
sockets: 1
vga: vmware
Configure Proxmox
On Proxmox, run “echo 1 > /sys/module/kvm/parameters/ignore_msrs” to avoid a bootloop during macOS boot. To make this change persist across Proxmox reboots, run:
echo "options kvm ignore_msrs=Y" >> /etc/modprobe.d/kvm.conf && update-initramfs -k all -u
You must now install a patched version of Proxmox’s OVMF library in order to be able to boot Mojave.
Install Mojave
Now start up your VM.
Go to the Console tab, quickly hit Escape or F2 at the Proxmox logo to enter the OVMF configuration. If your keyboard doesn’t work, leave the Console tab, stop the VM, start the VM, then re-enter the console tab.
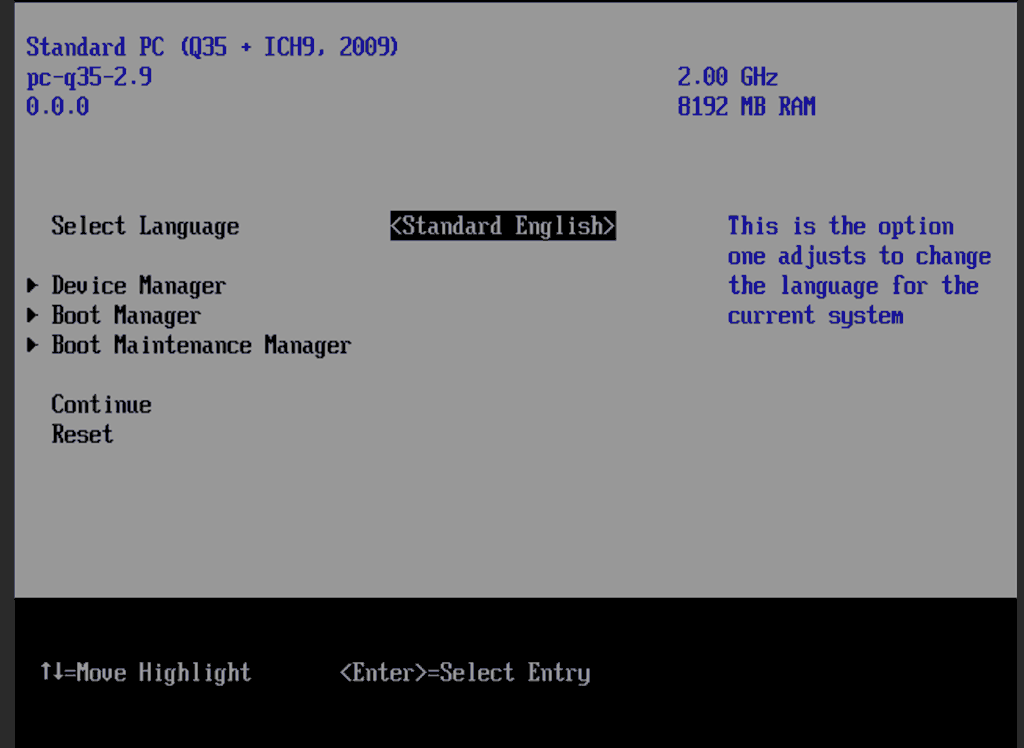
Select Device Manager 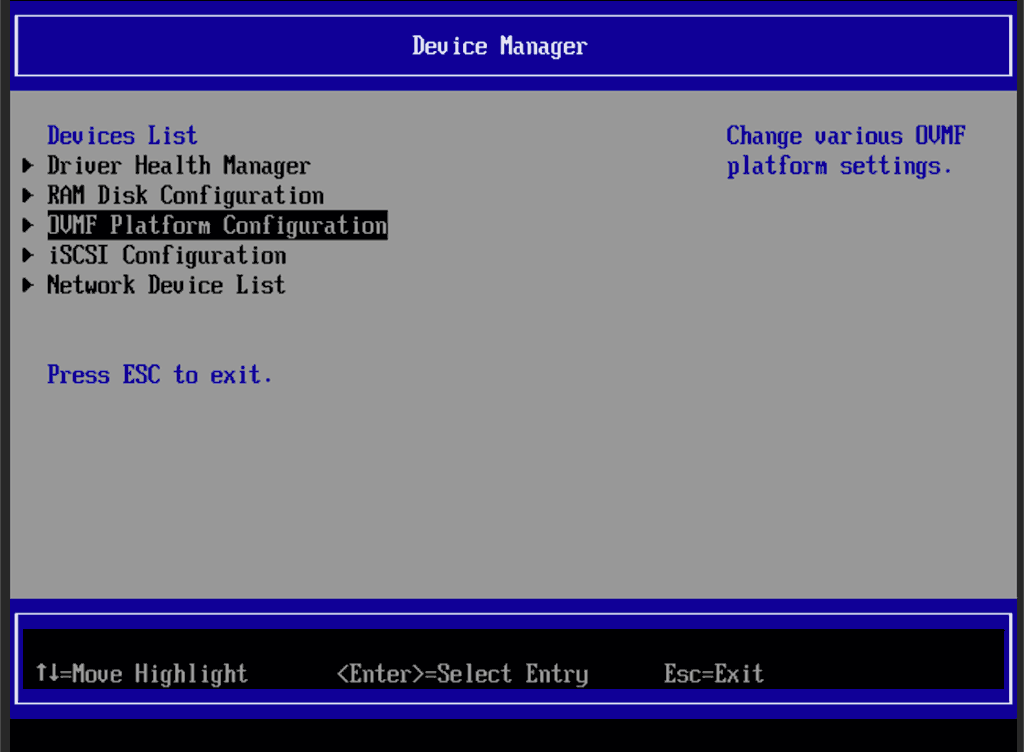
Select OVMF platform configuration 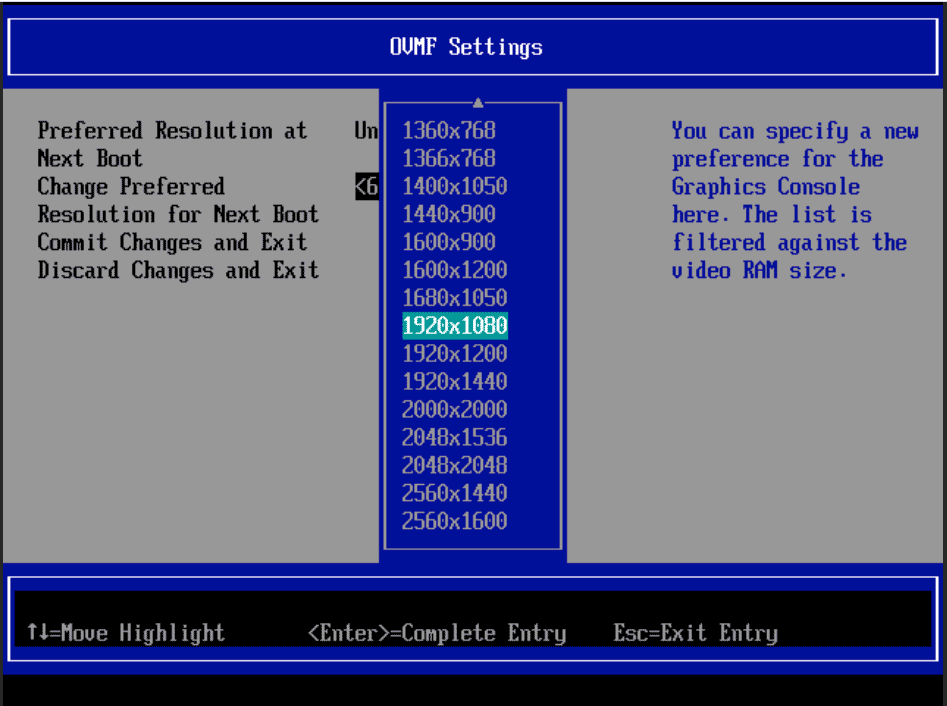
Set the preferred resolution to 1920×1080 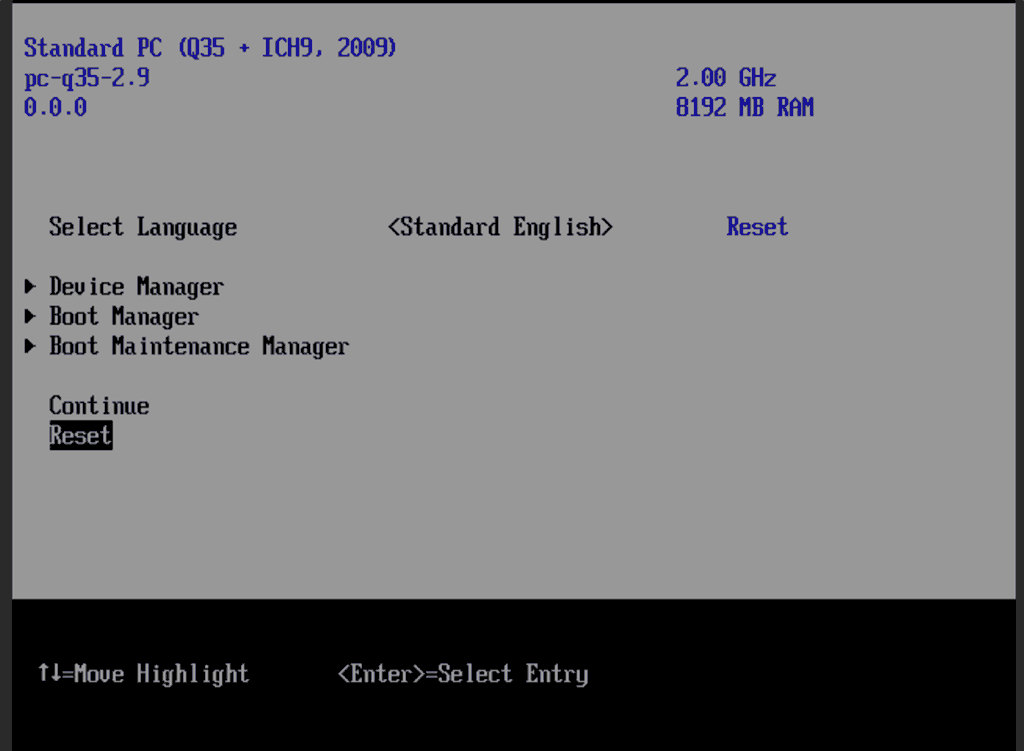
Save changes, then Reset
Follow the steps above to set the screen resolution to 1920×1080 and “reset” to apply the new settings (not “continue”). This step is required to avoid scrambled graphics on boot and a hang (Clover resolution must match OVMF resolution, or else the Apple logo will be off-centre and the progress bar will be smeared across the screen, resulting in a lockup).
Note that in future you may find that when initially started, your VM doesn’t properly apply the the 1920×1080 screen resolution until you hit “Restart Computer” in Clover when the Clover menu appears (or “Reset” on the VM). You’ll notice this happening when the “Proxmox” logo fills a large area of the screen on boot due to the low resolution.
It should now boot into Clover.
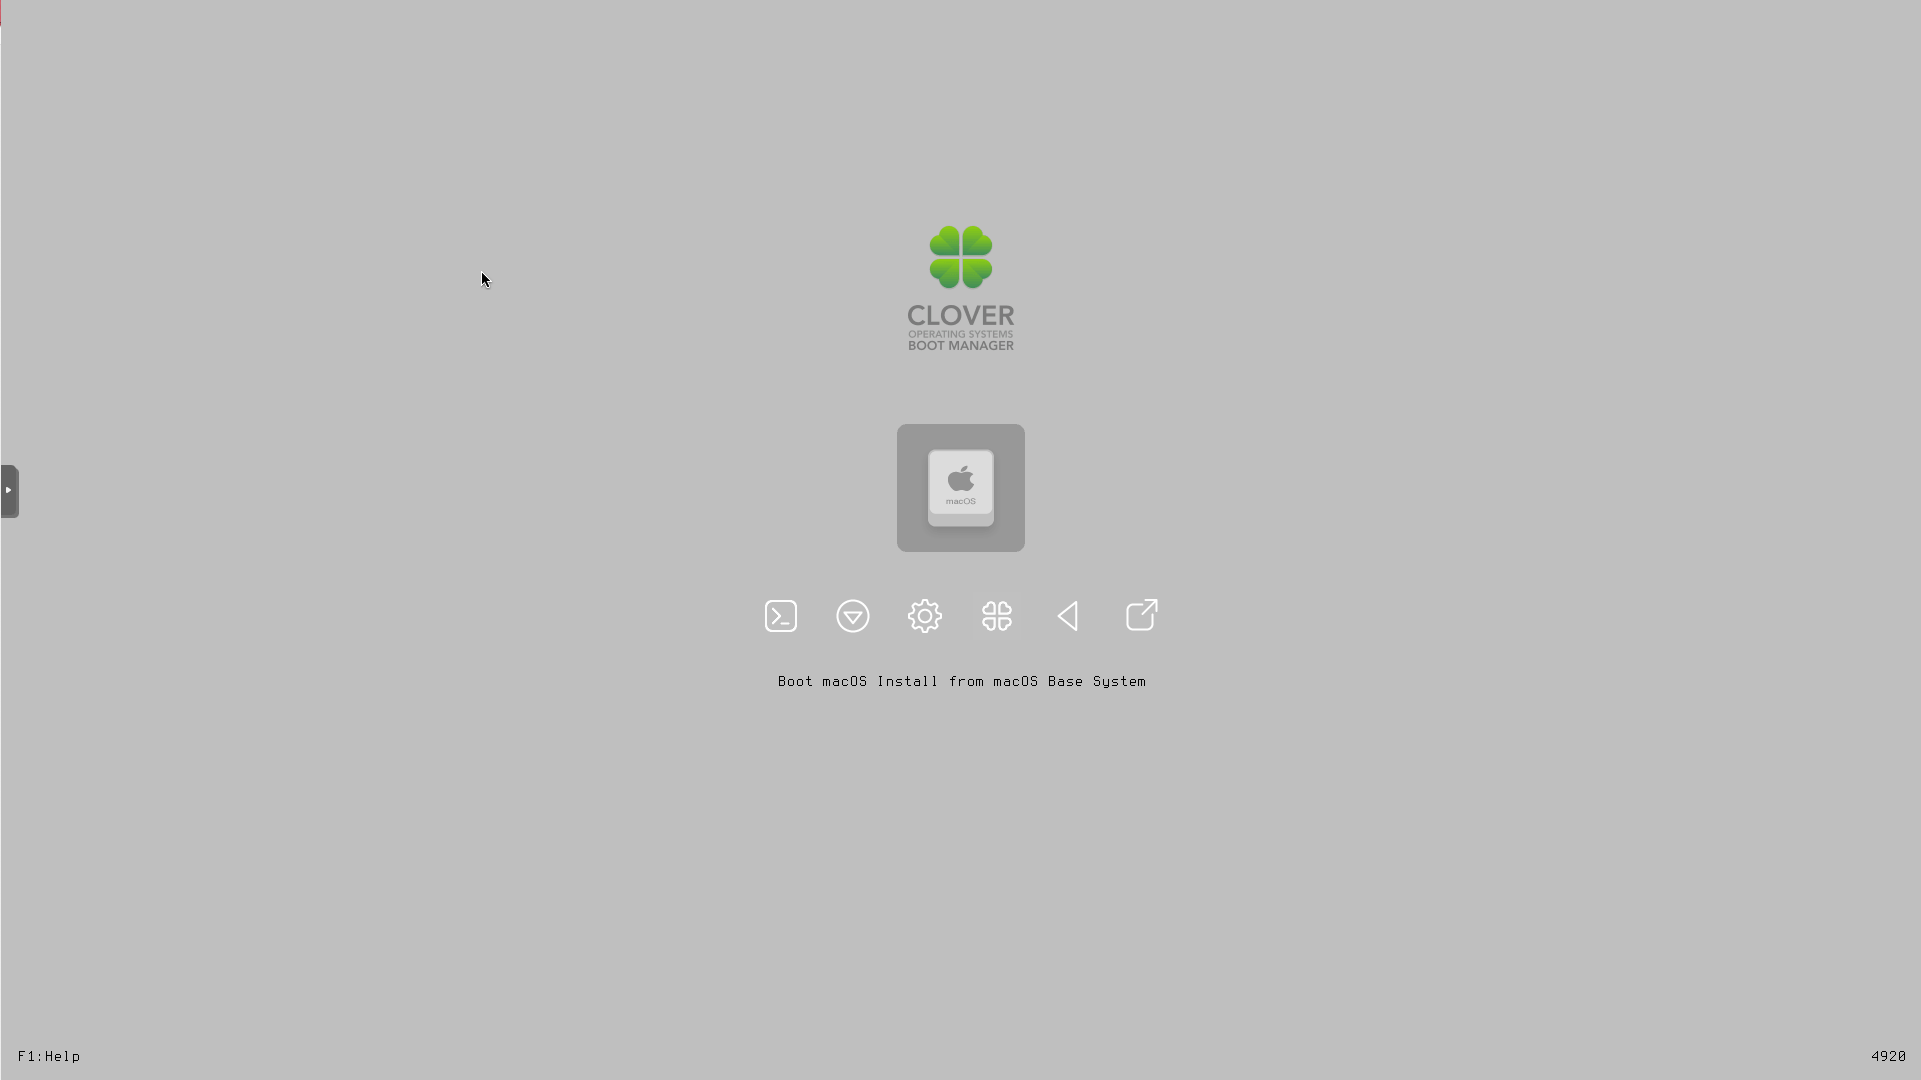
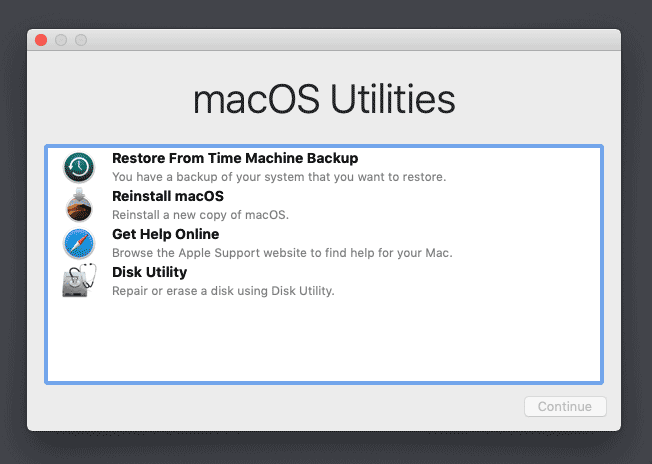
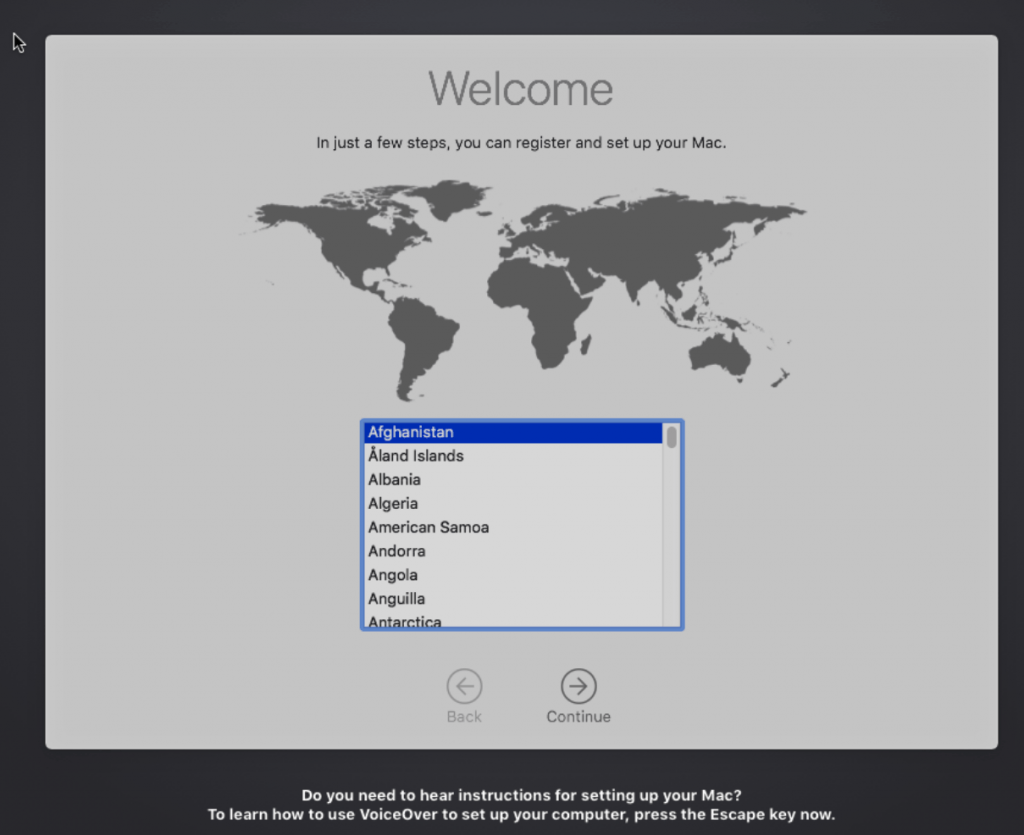
Press enter to boot the “Boot macOS Install from macOS Base System” entry and the installer should appear. Choose your language.
Our virtual hard drive needs to be erased/formatted before we can install to it, so select the Disk Utility option. Follow the steps below to format the disk:

Select Disk Utility 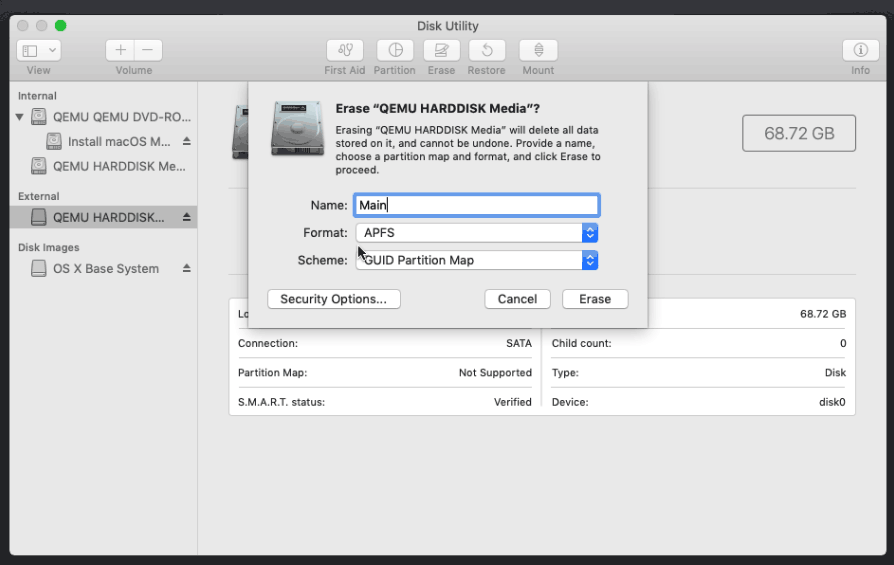
Erase the main disk (it’ll appear as an external drive). Choose APFS. I called mine “Main”. “Encrypted” probably doesn’t work at the moment because special Clover device drivers are required
Now we’re ready to begin installation!
Choose the option to reinstall macOS 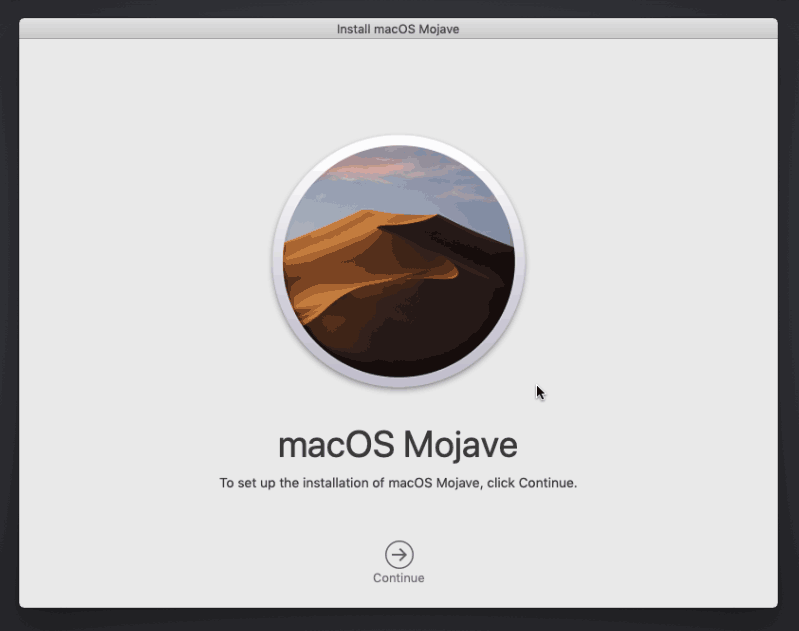
Continue… 
Choose the disk you erased 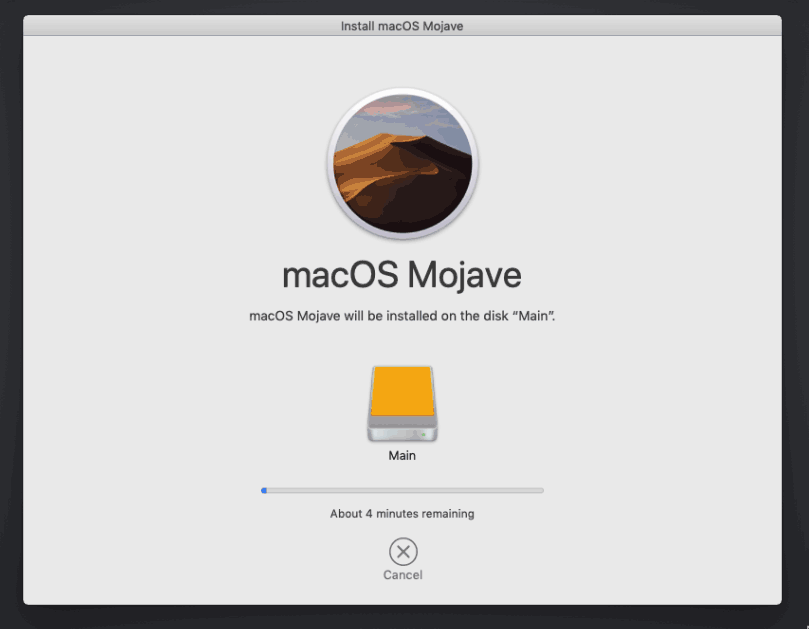
It’s installing!
After the first stage of installation, the VM should reboot itself and automatically continue installation by booting from the hard drive, then reboot itself a second time and automatically boot from “filevault prebooter”. Note that an Internet connection is required during installation, as macOS needs to download Mojave.
Answer the initial install questions, and you’ll be logged on! (Note that you’ll probably want to hold off on logging into your iCloud account until you’ve configured your SMBIOS to your liking in Clover Configurator)
Answer the install questions 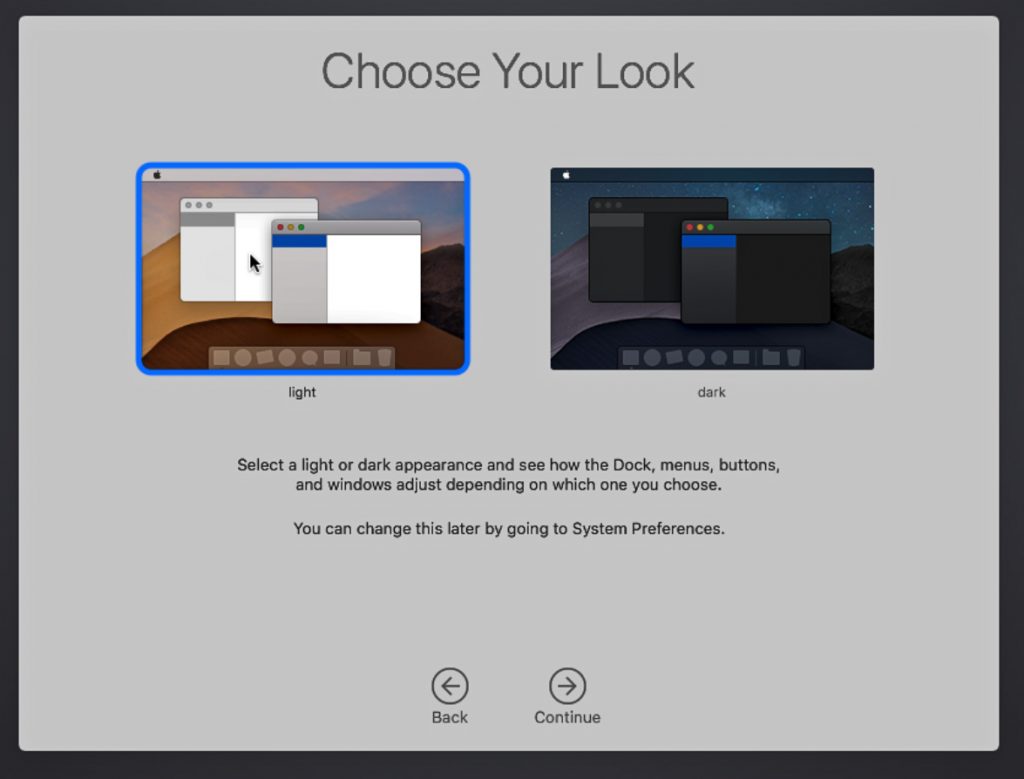
Ooh, new dark theme!
Make the Clover install permanent
We’re currently booting using Clover from the attached Clover ISO. Let’s install that to the hard drive instead. Pop open Terminal and run “diskutil list” to see what drives we have available.
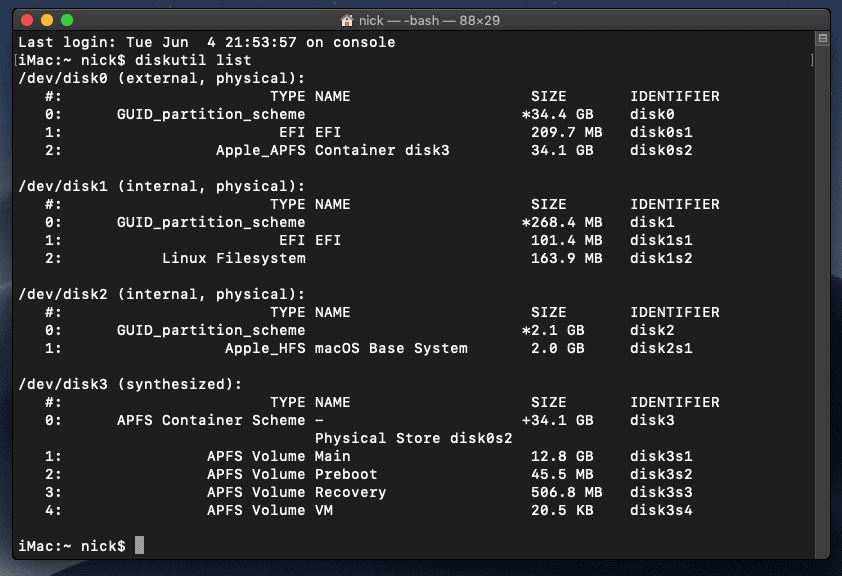
Use “sudo dd if=<source> of=<dest>” to copy the “EFI” partition from the Clover CD and overwrite the EFI partition on the hard disk. The Clover CD is the small disk with the “linux filesystem” on it, and the main hard disk is the one with the large Apple_APFS “Container” partition on it.
In my case these EFI partitions ended up being called disk1s1 and disk0s1 respectively, so I ran “sudo dd if=/dev/disk1s1 of=/dev/disk0s1” (N.B. if you get these names wrong, you will erase the wrong disk and you’ll have to start the installation over again!).
Now shut down the VM, and remove both the Clover and the Mojave installer drives from the Hardware tab. On the Options tab, edit the boot order to place SATA0 as the first disk. Boot up. If everything went well, you should see the Clover boot menu, and you can select “Boot macOS from Main” to boot Mojave.

Sleep management
I found that I was unable to wake Mojave from sleep using my mouse or keyboard. You can either disable system sleep in Mojave’s Energy Saver settings to avoid this, or you can manually wake the VM up from sleep from Proxmox by running:
qm monitor YOUR-VM-ID-HERE
system_wakeup
quit
“Prohibited” sign on boot
On a regular Hackintosh this is typically a sign that the boot drive can’t be read, but that situation is difficult to encounter with this VM setup. Nevertheless, I receive a “prohibited” sign during boot in perhaps 1 out of 20 system boots at random (maybe a timing bug?) If this happens, just hit “reset” for the VM to retry (no need to stop and start).
If you get it persistently, something is going wrong with the boot. You can boot macOS in “verbose” mode by hitting space on the macOS option in Clover and ticking the verbose option. This’ll give you a log during booting that can narrow down when the problem occurs.
Editing your Clover/EFI settings
You can use the Clover Configurator tool (Global Edition) to edit your Clover “config.plist” configuration file, which is stored in the hard drive’s EFI partition. This tool should mount the EFI partition for you. If you want to mount it without using Clover Configurator, first check the device name of the EFI partition in the terminal:
~$ diskutil list
/dev/disk0 (external):
   #:             TYPE   NAME           SIZE       IDENTIFIER
   0: GUID_partition_scheme             512.1 GB   disk0
   1:              EFI   EFI            209.7 MB   disk0s1
   2:        Apple_HFS   Main           511.8 GB   disk0s2
Then you can mount it like so:
sudo mkdir /Volumes/EFI
sudo mount -t msdos /dev/disk0s1 /Volumes/EFI
Video performance
Because there is no guest video acceleration available for macOS, video performance is poor.
In Google Chrome in the guest you will need to toggle off the setting to “use hardware acceleration when available” to improve issues with elements not being drawn or flickering (especially video). Safari may be a better choice.
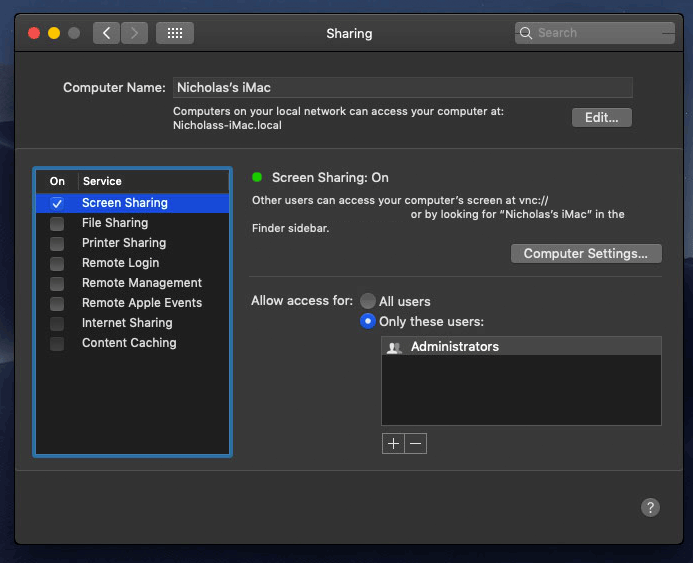
macOS’s built in “Screen Sharing” feature offers dramatically better framerates and latency than Proxmox’s browser-based VNC console, so if you have a real Mac to act as a viewing console, you can enable that in the VM’s “Sharing” settings and connect to the VM using the Screen Sharing app from your Mac instead:
Apparently Screen Sharing is also compatible with VNC clients like RealVNC, so you should be able to connect to it from Linux or Windows consoles using RealVNC.
VMWare Fusion for Mac includes macOS guest drivers that support the VMWare video adapter that QEMU emulates. After installing Fusion, you can find these by right-clicking Fusion, clicking “show package contents”, then browsing to “Contents/Library/isoimages”. Double click “darwin.iso” to open it, then run the “Install VMWare Tools” option to install the driver, and restart. You can check that the driver has loaded by running “kextstat | grep -v com.apple”.
Unfortunately installing these VMWare drivers appears to offer little or no improvement in video performance – they may just be designed to provide basic framebuffer functionality.
The real magic bullet for video performance is to pass through a compatible video card using PCIe passthrough (though presently Mojave does not support most NVidia cards). This offers near-native performance. You can read more about how I’m using PCIe passthrough on my own installation here.
USB passthrough
Since I want to use this as my primary computer, I want to use a USB keyboard and mouse plugged directly into Proxmox, rather than sending my input through the web VNC console.
Proxmox has good documentation for USB passthrough. Basically, run “qm monitor YOUR-VM-ID-HERE”, then “info usbhost” to get a list of the USB devices connected to Proxmox:
qm> info usbhost
 Bus 3, Addr 12, Port 6, Speed 480 Mb/s
 Class 00: USB device 8564:1000, Mass Storage Device
 Bus 3, Addr 11, Port 5.4, Speed 12 Mb/s
 Class 00: USB device 04d9:0141, USB Keyboard
 Bus 3, Addr 10, Port 5.1.2, Speed 12 Mb/s
 Class 00: USB device 046d:c52b, USB Receiver
 Bus 3, Addr 9, Port 14.4, Speed 12 Mb/s
 Class 00: USB device 046d:c227, G15 GamePanel LCD
 Bus 3, Addr 8, Port 14.1, Speed 1.5 Mb/s
 Class 00: USB device 046d:c226, G15 Gaming Keyboard
In this case I can add my keyboard and mouse to USB passthrough by quitting qm, then running:
qm set YOUR-VM-ID-HERE -usb1 host=04d9:0141
qm set YOUR-VM-ID-HERE -usb2 host=046d:c52b
This saves the devices to the VM configuration for you. It’s possible to hot-add USB devices, but I just rebooted my VM to have the new settings apply.
You can also pass through USB devices by passing through an entire USB controller using Proxmox’s PCIe passthrough feature.
Proxmox 5.4-13
Started the VM
Got to Clover, pressed return (on the drive icon)
Got an apple logo and half-way through the progress bar .. reset and back to proxmox
any ideas please?
Press space on the icon and choose verbose mode and boot, this’ll let you see what happens just before the reboot. You can also tick the option for no reboot on panic.
Hi @ll,
hi Nicholas!
I stuck on rebulid the VM. Some *.conf’s were deleted on one of my Proxmox-Hosts.
I rebuilt an conf for my allready running macOS14 VM, machine. I was take the old efi and disk (with clover included) and put them in the new conf. Clover is running fine, i choose the macOS14-vm-disk to run with “-v” (verbose-mode) and the startup hangs at:
“End RandomSeed
+++++++++++++++++++++++++++++++++++++++…”
– pve-version 5.4-13
– RAM is on 4096
– the echo command from above was run
– the patch with a debian 9 LXC was already installed (“make”)
i’ve no more ideas about solving this :/ may anybody else 😉
NICHOLAS, THANK YOU FOR THE COOL TUTORIAL !!
cheers
Andrew
That’s exactly the symptom you get if the patched pve-edk2-firmware package wasn’t installed – double check that you ran “dpkg -i” on that built package on the Proxmox host (and not accidentally inside the LXC container).
DAMN IT!!!
Miss understood “Installing the fixed OVMF” from https://www.nicksherlock.com/2018/04/patch-ovmf-to-support-macos-in-proxmox-5-1/
Now it works again 🙂
thx!
Hi Nick, Thanks for doing these I am a huge fan of Proxmox now because of these. I’m Turning my old MacPro5,1 into a Proxmac system and I would really like to have a Mojave instance to keep my old Aperture library at it’s best. Is there a way to get the package tweak for 7.x systems? I tried compiling it but don’t know what I’m doing. Thanks!
You don’t need any tweaks on modern versions of Proxmox, this was only an issue on the old 5 series
Hi Nicholas
I followed your great tutorial but I wasn’t able to boot in to the installer.
Everything was fine on the first look, but I always got an error during boot of the installer.
Here’s a Screenshot of the last message:
https://postimg.cc/dkJd5ndD
And here you can see the whole boot process:
https://postimg.cc/fVX9Z1fJ
Does you’ve any idea what’s going wrong?
Here’s also an output of my config file:
https://pastebin.com/gH8sxVXE
Thanks in advance for your time!
In your OSK it looks like your editor has converted the “(c)” into a Unicode copyright symbol – you’ll need to switch that back.
That’s it!
Now I’m able to boot in to the installer.
Thank you!
Hm… I’ve installed 10.14.6 (it took approx. 20-25 minutes on my ssd).
After final reboot there’s no “Macintosh HD”. Only the initial installer is visible. What I’m doing wrong?
Try this suggestion to pick a different boot device in the UEFI boot options:
https://www.nicksherlock.com/2018/06/installing-macos-mojave-on-proxmox/#comment-31211
You can make that change permanent using the Boot Maintenance menu. We’re still not sure what triggers this problem.
Thanks! That worked!
You should update your tutorial to use VirtIO block instead of SATA. Latest Mojave version added support for it and it’s MUCH faster.
Did you get a chance to test this yourself?
Does it work?
There were other reports online that it only works in “legacy” mode, whatever that means. (SeaBIOS?)
Yes, it works fine in UEFI mode.
For those who wonder why Nick choose to format the disk where majove will be install in « SATA » rather then VirtIO
the answer is simple
In order to recognise the formatted VirtIO volume
Applications ▸ Installer macOS Mojave ▸ Contents ▸ SharedSupport /Volumes/macOS Base System/System/Library/Extensions have to contain”AppleVirtIO.kext” which is not the case
so if you install majove when we come to the step of choosing the volume where to install the os disk utility wouldn’t see it so you first format it “Sata” and once you completed the install and and you are on the desktop shut down the Vm and convert it to VirtIO
https://www.oreilly.com/library/view/mastering-proxmox/9781788397605/a11be54e-d9c6-480e-9086-49b5ab20188d.xhtml
However from Big Sur it does contain so you can format it VirtIO volume during the creation of the vm and while install the os disk utility will recognise the VirtIO volume and you can format it to apfs
HI
I need to create a audio driver in macOS it will just e a dummy driver ut does anyone know hoe to add this
Hi,
I installed mojave with the mentioned args. Later I tried to set some other args, more depending on my CPU. I can not measure any performance advantages.
Is it necessary to start the mojave installation process again with the new args?
Hi,
been reading through this post and comments…
I’d like to create a High Sierra VM on proxmox 6 with GPU and USB passthrough, BUT I’m a total noob…
Can i just use this guide with no prior knowledge or can you point me to a step-by-step guide for dummies.
I only have one GPU (vega 64), so i guess i need a second one for the host, right ?
Thanks for any help
The host doesn’t need a GPU because Proxmox runs headless anyway.
I don’t have a guide for passthrough on my blog, but you can check out the Proxmox wiki for PCIe passthrough, and my post that shows my passthrough config:
https://www.nicksherlock.com/2018/11/my-macos-vm-proxmox-setup/
Note that Vega GPUs currently have a problem where your host will need to be power-cycled before the GPU can be used a second time. (“Vega reset bug”)
so basically, could i already your your tut here as a copy-paste method to get things rolling and afterwards tweaking it by adding the passthrough method by trial or error or is this wishful thinking ?
PS : how much time takes your tut to implement as such ?
BTW I realised after I posted my last reply that the Vega reset bug is likely to be a problem for you if you only have one GPU – since your system will initialise your Vega during boot, it won’t be able to be reset for the VM to use afterwards. I’m not certain if this is fatal on Vega, it could be that because Proxmox will only be running it in text mode, it’s not an issue. If your motherboard/CPU has inbuilt graphics, you can set your host to use that instead which solves that issue.
This tutorial for installing macOS is complete as far as I know, so all the instructions you need are right here on this page. For passthrough you’ll need other resources.
ok, thanks for clearing up that issue.
From where should I expect a solution for this bug : AMD themselves or the proxmox community ?
In the meantime, would it be safer to get a second ‘cheap’ GPU for the host ? If so, what budget cards would you recommend ?
@nicksherlock I want to send my appreciation for your time and work. I am running Proxmox 6.0-1 on a Dell T620 with dual 2.0ghz Xeon’s for a total of 24 logical cores and as of now only using onboard graphics. I have followed each step of the guide and am able to boot into clover as well as see the OSX installer after changing said disk back to media=cdrom. What I am experiencing is a kernel panic at AppleSMBusPCI::start failed to get acpi path for provider, which then boot loops me. I have applied QEMU patch, first by downloading it and installing, then after many failed attempts to boot as well as reading this error could be a QEMU issue, I also patched by compiling from source. Both times I hardened the patch so it would persist after reboot as your post suggests. I also ran systemctl restart daemon to make sure all settings took effect. To my dismay I am still unable to boot into the installer. Have you any idea what else might cause this type of kernel panic? I have tried to boot with every flag in clover as well as made sure my display was set to the correct aspect ratio. If you have time to reply to this thread I would greatly appreciate it, either way thanks for the work man.
Most likely your OSK in your args is incorrect. Double check it and make sure that the quotes around it haven’t been replaced with curly-quotes by your text editor, and the (c) hasn’t been replaced by a Unicode copyright symbol.
No QEMU patch is required – pve-edk2-firmware is the one to install, which is a patch to the OVMF firmware, not QEMU.
Hello, my configuration file is like this, but it doesn’t load even 50% of the initial load and it goes back to clover.
With verbose enabled returns error ** AppleSMBusPCI :: start failed to get acpi path for provider
{{{
args: -device isa-applesmc,osk=”our…InC” -smbios type=2 -cpu Penryn,kvm=on,vendor=GenuineIntel,+invtsc,vmware-cpuid-freq=on,+pcid,+ssse3,+sse4.2,+popcnt,+avx,+aes,+xsave,+xsaveopt,check -device usb-kbd,bus=ehci.0,port=2
balloon: 0
bios: ovmf
boot: cdn
bootdisk: ide2
cores: 4
cpu: Penryn
ide0: local:iso/Mojave-installer.iso,cache=unsafe
ide2: local:iso/clover-r4920.iso,cache=unsafe
machine: q35
memory: 4096
name: mojave
net0: vmxnet3=0A:EA:A4:6E:B0:5E,bridge=vmbr0,firewall=1
numa: 0
ostype: other
sata0: local-zfs:vm-102-disk-0,cache=unsafe,size=64G
smbios1: uuid=4c6f2641-5629-4199-8a27-a05ef845af5e
sockets: 1
vga: vmware
vmgenid: 79388567-7321-4dde-83da-081460e367f5
}}}
Your osk ends in “C” but it should be “c”. Also in your comment the quotes around the OSK are curly quotes, but they need to be straight ones. This might just be WordPress’s fault though.
it worked, just correcting the osk code. Thanks.
I did the first part of the installation, got to install 6gb on the disk, but on reboot was on the glover screen. Could you tell me what it can be? I didn’t find anything in the comments
I did one again and the settings and it worked. Just look for a good remote access program to use on network.
Hi,
First, thank you,I successfully installed macOS on my Proxmox!
But now I have a problem about GPU passthrough.
I have a vega64 GPU works well with another Windows10 VM in the same host Proxmox.
But when I add it into the macOS VM and try to boot it,it failed and showed status like this:
kvm: warning: host doesn’t support requested feature: CPUID.01H:ECX.pcid [bit 17]
kvm: warning: host doesn’t support requested feature: CPUID.01H:ECX.pcid [bit 17]
kvm: warning: host doesn’t support requested feature: CPUID.01H:ECX.pcid [bit 17]
kvm: warning: host doesn’t support requested feature: CPUID.01H:ECX.pcid [bit 17]
kvm: warning: host doesn’t support requested feature: CPUID.01H:ECX.pcid [bit 17]
kvm: warning: host doesn’t support requested feature: CPUID.01H:ECX.pcid [bit 17]
kvm: warning: host doesn’t support requested feature: CPUID.01H:ECX.pcid [bit 17]
kvm: warning: host doesn’t support requested feature: CPUID.01H:ECX.pcid [bit 17]
kvm: -device vfio-pci,host=46:00.0,id=hostpci1.0,bus=ich9-pcie-port-2,addr=0x0.0,multifunction=on: vfio 0000:46:00.0: device is already attached
TASK ERROR: start failed: command ‘/usr/bin/kvm -id 101 -name macos -chardev ‘socket,id=qmp,path=/var/run/qemu-server/101.qmp,server,nowait’ -mon ‘chardev=qmp,mode=control’ -chardev ‘socket,id=qmp-event,path=/var/run/qmeventd.sock,reconnect=5’ -mon ‘chardev=qmp-event,mode=control’ -pidfile /var/run/qemu-server/101.pid -daemonize -smbios ‘type=1,uuid=3cf7f740-bf7e-4f5e-ab53-d7cf127a64d5’ -drive ‘if=pflash,unit=0,format=raw,readonly,file=/usr/share/pve-edk2-firmware//OVMF_CODE.fd’ -drive ‘if=pflash,unit=1,format=raw,id=drive-efidisk0,file=/dev/zvol/hackintosh/vm-101-disk-1’ -smp ‘8,sockets=1,cores=8,maxcpus=8’ -nodefaults -boot ‘menu=on,strict=on,reboot-timeout=1000,splash=/usr/share/qemu-server/bootsplash.jpg’ -vnc unix:/var/run/qemu-server/101.vnc,password -cpu ‘Penryn,+kvm_pv_unhalt,+kvm_pv_eoi,enforce,kvm=off,vendor=GenuineIntel’ -m 12288 -device ‘vmgenid,guid=d858d21f-340b-4b54-8dd3-873e7d725f44’ -readconfig /usr/share/qemu-server/pve-q35-4.0.cfg -device ‘usb-tablet,id=tablet,bus=ehci.0,port=1’ -device ‘vfio-pci,host=46:00.0,id=hostpci0.0,bus=ich9-pcie-port-1,addr=0x0.0,multifunction=on’ -device ‘vfio-pci,host=46:00.1,id=hostpci0.1,bus=ich9-pcie-port-1,addr=0x0.1’ -device ‘vfio-pci,host=46:00.0,id=hostpci1.0,bus=ich9-pcie-port-2,addr=0x0.0,multifunction=on’ -device ‘vfio-pci,host=46:00.1,id=hostpci1.1,bus=ich9-pcie-port-2,addr=0x0.1’ -device ‘vmware-svga,id=vga,bus=pcie.0,addr=0x1’ -iscsi ‘initiator-name=iqn.1993-08.org.debian:01:e3ec6572e06c’ -device ‘ahci,id=ahci0,multifunction=on,bus=pci.0,addr=0x7’ -drive ‘file=/dev/zvol/hackintosh/vm-101-disk-0,if=none,id=drive-sata0,format=raw,cache=none,aio=native,detect-zeroes=on’ -device ‘ide-hd,bus=ahci0.0,drive=drive-sata0,id=sata0,bootindex=100’ -netdev ‘type=tap,id=net0,ifname=tap101i0,script=/var/lib/qemu-server/pve-bridge,downscript=/var/lib/qemu-server/pve-bridgedown’ -device ‘vmxnet3,mac=AE:09:8F:13:DA:E7,netdev=net0,bus=pci.0,addr=0x12,id=net0,bootindex=200’ -machine ‘type=q35’ -device ‘isa-applesmc’ -smbios ‘type=2’ -cpu ‘Penryn,kvm=on,vendor=GenuineIntel,+invtsc,vmware-cpuid-freq=on,+pcid,+ssse3,+sse4.2,+popcnt,+avx,+aes,+xsave,+xsaveopt,check’ -device ‘usb-kbd,bus=ehci.0,port=2” failed: exit code 1
It looks like it’s trying to attach two copies of the same card, what hostpci lines do you have in your config?
Oh,yes!
My vega64 is 4,6:00.0 ,and 46:00.1 is theVEGA’s HD audio controller. But in the webUI,when I add both them into my windows10 VM,the hardware shows 46:00.0 for GPU and 46:00.1 for AUDIO controller.And it works fine.
However, in the Hardware of macOS VM, both of them shows as 46:00(hotpci1 is “46:00,pcie=1,x-vga=1” , hotpci2 is “46:00,pcie=1”).
I try delete the second one and add it again / delete both of them and add both of them ,all failed.Every time they both 46:00 and unable to boot.
Don’t use the UI, just edit the VM config file in /etc/pve/qemu-server. You only need one entry for the card (46:00), that automatically includes both the sub devices (.0 and .1)
Yes, I try edit vm_id.conf and add line “hostpci0: 46:00,pcie=1,x-vga=1”.
Boot is OK but nothing show in the screen and still
kvm: warning: host doesn’t support requested feature: CPUID.01H:ECX.pcid [bit 17]
kvm: warning: host doesn’t support requested feature: CPUID.01H:ECX.pcid [bit 17]
kvm: warning: host doesn’t support requested feature: CPUID.01H:ECX.pcid [bit 17]
kvm: warning: host doesn’t support requested feature: CPUID.01H:ECX.pcid [bit 17]
kvm: warning: host doesn’t support requested feature: CPUID.01H:ECX.pcid [bit 17]
kvm: warning: host doesn’t support requested feature: CPUID.01H:ECX.pcid [bit 17]
kvm: warning: host doesn’t support requested feature: CPUID.01H:ECX.pcid [bit 17]
kvm: warning: host doesn’t support requested feature: CPUID.01H:ECX.pcid [bit 17]
TASK OK
Did you try resetting the host to avoid the Vega Reset Bug?
Did you set “vga: none” to disable the emulated graphics?
I try only add 46:00.0 to VM but still shows 46:00,pcie=1,x-vga=1
not 46:00.1.
And this time VM can boot,but no signal to screen.Also something wrong:
kvm: warning: host doesn’t support requested feature: CPUID.01H:ECX.pcid [bit 17]
kvm: warning: host doesn’t support requested feature: CPUID.01H:ECX.pcid [bit 17]
kvm: warning: host doesn’t support requested feature: CPUID.01H:ECX.pcid [bit 17]
kvm: warning: host doesn’t support requested feature: CPUID.01H:ECX.pcid [bit 17]
kvm: warning: host doesn’t support requested feature: CPUID.01H:ECX.pcid [bit 17]
kvm: warning: host doesn’t support requested feature: CPUID.01H:ECX.pcid [bit 17]
kvm: warning: host doesn’t support requested feature: CPUID.01H:ECX.pcid [bit 17]
kvm: warning: host doesn’t support requested feature: CPUID.01H:ECX.pcid [bit 17]
TASK OK
“46:00,pcie=1,x-vga=1” is perfect, that’s exactly what you want. That includes both 46:00.0 and 46:00.1.
Vega cards suffer from the Vega Reset Bug, have you tried restarting the host?
Those warnings ending in “pcid” are just telling you that you tried to pass that CPU feature but your CPU doesn’t support it. You can ignore that. That’s a Meltdown bug mitigation feature.
Sorry I miss one of your reply and during that time.
try use UI to add only 46:00.0,its failed
also try edit conf to add 46:00,also failed.
Now I first change setting by edited conf and then reboot the host,
same wrong massage appeared again.
Those warnings aren’t causing a problem and you can ignore them.
“hostpci0: 46:00,pcie=1,x-vga=1” is the correct line and it sounds like you already have that.
Do you see the Proxmox boot logo on the screen at least? Try one of the other connectors on the card too.
Post your VM config.
I have two monitor and they always pluged into the two HDMI port of VEGA64, both them shows nothing.
Then I try only No.1 HDMI port with monitor1,
only No1 hdmi port with monitor2,
No2 with Monitor1,
No2 with Monitor2.
All of them failed, by the way can’t see Proxmox boot logo on the screen.
Since I remember have another GT710 card on board(when I was use ESXI I need it).I tried add it to macOS VM(use UI,with out audio controller),and try boot VM.(with HDMI to monitor1)
Then,it works,still shows those pcid massage ,but can see Proxmox logo and also see the CLOVER BOOT MANAGER.
So,what wrong with the VEGA card?
First, the conf of use GT710
args: -device isa-applesmc,osk=”…” -smbios type=2 -cpu Penryn,kvm=on,vendor=GenuineIntel,+invtsc,vmware-cpuid-freq=on,+pcid,+ssse3,+sse4.2,+popcnt,+avx,+aes,+xsave,+xsaveopt,check -device usb-kbd,bus=ehci.0,port=2
balloon: 0
bios: ovmf
boot: cn
bootdisk: sata0
cores: 8
cpu: Penryn
efidisk0: hackintosh:vm-101-disk-1,size=128K
hostpci0: 43:00,pcie=1,x-vga=1
machine: q35
memory: 12288
name: macos
net0: vmxnet3=AE:09:8F:13:DA:E7,bridge=vmbr0,firewall=1
numa: 0
ostype: other
sata0: hackintosh:vm-101-disk-0,size=195G
smbios1: uuid=3cf7f740-bf7e-4f5e-ab53-d7cf127a64d5
sockets: 1
usb0: host=7-3
usb1: host=7-2
vga: none
vmgenid: d858d21f-340b-4b54-8dd3-873e7d725f44
Second the conf of use VEGA 64
only 43:00 changed to 46:00 other conf is the same.
Fixed the problem by switched the vega64 from PCIEx16_1 to PCIEx
16_3,and plug my gt710 into PCIEx16_1,and now it works fine.I have my vega64 hardtube watecooled,it hard for me to make such a decision,but it worth.Only one thing strange(Before,pcie_1 with vega=41:00,and pcie_3 with gt710=42:00.After,pcie_1 with gt710=41:00,but pcie_3 with vega=0b:00 instead of 42:00).
Thanks for posting the resolution to that!
Hi and thanks for the tutorial. I’m having trouble booting beyond the installer. Clover boots fine, and the installer boots just fine as well. Disk utility sees the disk and I install to it correctly APFS.
After it reboots, clover only has the installer option and not anything on the new drive installed. Thoughts?
Check out the comments above about the UEFI Boot Manager.
Got it! thanks!
Hi,
I just tried to build a new Mojave instance, using the instructions here.
This is on Proxmox 6.0-7.
However, I am getting this weird graphical glitch, where the MacOS desktop appears as a tiny pixelated box, and it’s duplicated many times horizontally:
https://i.imgur.com/fDQgAWY.png
https://i.imgur.com/bs3zMkB.png
Here is my QEMU conf file:
“`
args: -device isa-applesmc,osk=”…” -smbios type=2 -cpu Penryn,kvm=on,vendor=GenuineIntel,+invtsc,vmware-cpuid-freq=on,+pcid,+ssse3,+sse4.2,+popcnt,+avx,+aes,+xsave,+xsaveopt,check -device usb-kbd,bus=ehci.0,port=2
balloon: 0
bios: ovmf
boot: cdn
bootdisk: sata0
cores: 4
cpu: Penryn
efidisk0: fast_vm_storage:vm-504-disk-1,size=128K
machine: q35
memory: 8192
name: mojave-base
net0: vmxnet3=DA:D6:D8:03:B6:2E,bridge=vmbr0,firewall=1
numa: 0
ostype: other
sata0: fast_vm_storage:vm-504-disk-0,cache=unsafe,size=64G
smbios1: uuid=7fd4562e-ab74-4df2-903d-197ece0fa680
sockets: 1
vga: vmware
vmgenid: f1234491-8337-4441-89f9-9fd8a44ab35b
“`
Any idea what’s going on, or how to fix this please?
Thanks,
Victor
That’s the symptom you get if your resolution set in the guest UEFI settings doesn’t match the resolution that Clover is configured for.
Note that you will probably have to hit “reset” the first time you reach the Clover menu for the resolution to actually get applied. You can tell if the resolution has been applied properly by looking at the size of the Proxmox logo on boot – if the higher resolution hasn’t been applied yet, the logo will fill most of the screen.
Hello, and thank you so much for this excellent guide!
I have two different machines running Proxmox. I am running into a stubborn problem that is prevent this from working on the first box (Older hardware, new Proxmox 6.0 install). I went through the guide three or four times on the first box (After getting past user-error), with the same result: on the Proxmox boot screen, it hangs about 2/3 of the way through the progress bar, displays the following message for a minute or two, and then dumps to the UEFI shell:
BdsDxe: failed to load Boot0001 “UEFI qemu harddisk qm00013 ” from PciRoot (0x0)/Pci(0x1E,0x0)/Pci(0x1,0x0)/Pci(0x7,0x0)/Sata(0x0,0xFFFF,0x0): Not Found’
Since I had another box available (Newer hardware, but still on Proxmox 5.4), I went ahead and tried it on there – So far so good, I have a working MacOS Mojave VM. I’m thinking the issue comes down to one of three things:
1. first box has incompatible hardware (my best guess)
2. there is an issue with this on Proxmox 6 (I personally doubt that’s what is going on)
3. I did something wrong (Normally I’d assume this, except for the same process worked on box #2. It’s certainly still possible though).
I saw the requirements at the very beginning (CPU must support SSE 4.2) – From what I can see, this should be good – http://www.cpu-world.com/CPUs/Xeon/Intel-Xeon%20E5-2670.html
I also had a look through Kholia’s guide which you referenced at the beginning – They also had requirements listed, which seemed to mostly check out – They did indicate that AVX2 is required for Mojave, which doesn’t seem to be listed on the cpu-world info for those Xeon E5-2670s, but I got the same behavior out of High Sierra (Which this system did appear to meet all of Kholia’s listed requirements), so I’m not sure that’s what is going on
My hardware is this:
Box #1 (Unable to get working):
Motherboard: Asus Z9PA-D8
CPU: 2x Intel Xeon E5-2670
RAM: 64GB DDR3
Box #2 (This guide worked like a charm):
Motherboard: Supermicro X11SSW-F
CPU: Intel Xeon E3-1240V6
RAM: 16GB DDR4
The availability of RAM, as well as some other conditions such as the location of the boxes makes it preferable for me to host this on box #1
Finally, I just want to thank you again for providing an awesome guide on how to get a working MacOS VM on Proxmox. This is seriously going to be a lifesaver when I have to send my Macbook in for a warranty request, so thanks again!
Avx2 is a bonus, not a requirement. I have the same CPU as you.
Check out the comments above about the boot manager. It seems like the UEFI boot entries don’t get updated properly on some Proxmox 6 and must be manually selected.
It could also relate to CPU flags and CPU topology (threads, cores, SMP, NUMA)… So my settings (same motherboard, but dual E2680V2) I have:
-smp 32,sockets=2,cores=8,threads=2
-cpu Penryn,kvm=on,vendor=GenuineIntel,+invtsc,vmware-cpuid-freq=on,+pcid,+ssse3,,+sse4.2,+popcnt,+avx,+aes,+xsave,+xsaveopt,check
And that is working perfectly side by side with a few containers and a few servers – and a Win10 gaming PC (a GTX 1060 for the Windows machine, and a RX580 for the mac 🙂
So I followed the instructions, including the patch, but when I hit enter on the Clover screen, the Apple logo shows a for a few seconds, then it loops back to the Proxmox screen. Any idea as to why this might be happening?
Double check that your OSK is correct, and your text editor didn’t mangle the (c) or use curly quotes.
Yeah turns out it did get cut off, and part of the -smbios argument was cut off too, but even after fixing it, it still does the exact same thing 🙁
Post your VM config
rgs: -device isa-applesmc,osk=”our…Inc” -smbios type=2 -cp$
balloon: 0
bios: ovmf
boot: cdn
bootdisk: ide2
cores: 3
cpu: Penryn
efidisk0: local:100/vm-100-disk-1.raw,size=128K
ide0: local:iso/Mojave-installer.iso,cache=unsafe,size=2085568K
ide2: local:iso/clover-r4920.iso,cache=unsafe
machine: q35
memory: 8192
name: MacOS-Mojave
net0: vmxnet3=E6:B8:62:26:62:50,bridge=vmbr0,firewall=1
numa: 0
ostype: other
sata0: local:100/vm-100-disk-0.raw,cache=unsafe,size=64G
smbios1: uuid=4a464962-5177-4015-94d1-e0907604aaed
sockets: 1
vga: vmware
vmgenid: b403d8fa-cc1a-42eb-b464-5bb9f9374497
Cores: 3 is very unlikely to work, try 2 or 4 instead. Make sure the osk=”” doesn’t use curly quotes (they were curly in your quote but it may just have been WordPress messing that up for you).
Is it possible to get a working macOS KVM installation from proxmox and back it up then send it to someone else and they restore it? Would seem much easier than all the steps taken by this tutorial.
Yep it sure is, but it’d be even more of a copyright violation than this. Also you should avoid running 10GB of binaries from strangers that you can’t possibly verify…
My attempt to install VMware Tools failed: VNC got flaky until becoming unresponsive, and the machine became unreachable via SSH. Apparently the network stopped working, or so I guess. Uninstalling VMware Tools improved the situation, VNC and general network connectivity is back again. Nonetheless, I am still unable to connect via screen sharing from another Mac (despite enabling it, obviously). Any ideas on that?
MacOS already has built in drivers for all the hardware, installing VMWare tools is neither necessary nor recommended.
Check that you can ping it from your other Mac, and try connecting by IP address rather than hostname.
Considering my experience I’d suggest to explicitly mention in the post that VMware Tools are not recommended — they do more harm than good. I somehow read the text like it may be worth it. My screen sharing issue is probably unrelated, I’ll post here in case I lean otherwise.
BTW, I am blown away how fast you replied. Your work here is totally awesome, many, many thanks!
Hi,
After installation, the machine reboots to Clover but it reproposes to reinstall MacOS.
I formatted the hard disk well as indicated and after installation it has occupied space.
Any ideas?
Thank you 🙂
Hit F2 at the start of boot and use the Boot Manager to pick a different option. The reason why this should make the hard disk appear in Clover is a total mystery.
args: -device isa-applesmc,osk=”[…]” -smbios type=2 -cpu Penryn,kvm=on,vendor=GenuineIntel,+invtsc,vmware-cpuid-fre
bios: ovmf
bootdisk: ide2
cores: 4
cpu: Penryn
efidisk0: local:100/vm-100-disk-1.raw,size=128K
ide0: local:iso/Mojava-installer.iso,cache=unsafe
ide2: local:iso/clover-r4920.iso,cache=unsafe
machine: q35
memory: 8192
name: Mojave
net0: vmxnet3=9E:16:3F:56:5A:20,bridge=vmbr2
numa: 0
ostype: other
sata0: local:100/vm-100-disk-0.raw,cache=unsafe,size=64G
smbios1: uuid=a0d6a3f5-43de-40be-93ec-54de66a1d368
sockets: 1
vga: vmware
vmgenid: 5dd7e530-793c-4611-9f8d-ec9b367aacc8
Nick, thanks a lot!
I’m a bit newbie to Proxmox and can’t find a way how to give internet to this VM in order to complete the setup. So far I reached the installer setup which isn’t allowing me to complete showing an error message “Install Requires Internet Connection”. I tried to give it internet from the BIOS by setting a dedicated IP with Gateway but this didn’t work, also I tried using terminal to use “ifconfig and ipconfig” to give internet access setting also a dedicated IP but also this didn’t work. Any solution how to give internet to this VM so I can continue the Installer Process?
Even if setup the IP address, dns server and gateway on my network, the setup gives “the recovery server could not be contacted”… Any ideas?
Hello,
Can you tell me how you setup the network adding IP, DNS, Gateway, etc..
Hi. Using ifconfig in the builtin terminal, but I realised the OS ignored my edit to resolv.conf (the nameserver line), so I had connection (ping to any IP) but no name resolution. So, I ended up setting up a quick dnsmasq in an LXC container. All good now…
Hi, I’m facing the same issue I can ping an IP however I can’t ping a hostname. When I continue I get “the recovery server could not be contacted”. If you google it they say it’s related time however our case is different related to hostname. Can you explain more about quick dnsmasq in an LXC container? I’m a newbie in that.
Create an LXC container with a static IP from the subnet you will give over DHCP. Install dnsmasq (I use CentOS 7, so “yum install dnsmasq”. Then move /etc/dnsmasq.conf to /etc/dnsmasq.conf.bak and create a new file /etc/dnsmasq.conf with this content (replace 192.168.0.XXX with your subnet) and restart dnsmasq:
# Disable DNS and enable DHCP
port=0
dhcp-range=192.168.0.50,192.168.0.150,255.255.255.0,12h
# Set the gateway for this range
dhcp-option=3,192.168.0.1
# Set resolver
dhcp-option=6,8.8.8.8,8.8.4.4
Note that you’d only have to do this if your network doesn’t already have a DHCP server on it which is handing out a valid DNS configuration, which is unusual.
I found the solution using isc-dhcp-server and this saved my day. Now I care about performance as I’m gonna use the MAC for development purposes thus CPU and RAM matters it’s easy to manage RAM however when I’ve upgrade CPU from Penryn to Haswell from UI and also from .conf file the OS didn’t start, any one had such issue?
You can’t pass a CPU type higher than Penryn, but you can still pass through all of the individual CPU features that exist on newer generations and get the same performance. Just add new +features to the -cpu argument in the args line. You can run “cat /proc/cpuinfo | grep flags” on the host to see what features your CPU supports. e.g. you could add +avx2 for your Haswell CPU.
If your workload is interactive then the absolute sticking point for performance is still the GPU – you need to PCIe passthrough a real GPU to get GUI performance that is remotely acceptable, check out some of the details of my setup https://www.nicksherlock.com/2018/11/my-macos-vm-proxmox-setup/
Does spice console work for macOS as guest on Proxmox? Did anyone tried? Would like to have USB forward to the remote macOS guest.
Do you know of any way to increase the hard disk size? Increasing the size in Proxmox does not change the size that the Mac see’s.
I think you can grow the filesystem to fill the enlarged disk from macOS’s Disk Utility.
I’ve tried while booting into boot recovery mode as well as with Mac OS up and running.
Disk Utility see’s the added space (ie. 200GB (Orig) – 300GB(new)) but resizing has no effect.
Problem with another disk:
Hi, I installed catalina macOS. MacOS shows an orange destination drive while installation process. After the installation, there is still the orange drive on my desktop. The system works great so far.
I tried to add another drive to the vm. The new drive is also an orange one.
On my real mac, I have also 2 drives: one for the main macOS system and one for the users home directories. I tried to do that on the proxmox vm too.
On proxmox I have the 2 orange drives now. Adding a user, and change it’s home directory to the second drive, failed. Sometimes the owner of the second drives directories switches to “_unknown” or the administrator name and I can not change it with “sudo chown” to the user name nor something else!
What can be wrong with that?
This is my current configuration of the 2 drives:
sata0: sandisk:vm-100-disk-0,size=256G,ssd=1
sata1: wdred:vm-100-disk-0,size=500G
I have switched to using virtio instead of sata, now the mentioned problems are solved 🙂
After a few tests there is a lot of screen flickering and sometimes everything goes black for a short moment (GPU pass-through from NVidia GT710). For this I am still looking for a solution…
I have no idea how to get a OSK key. Can anyone help me? I don’t own a mac
You can grab it out of this config file: https://github.com/kholia/OSX-KVM/blob/master/macOS-libvirt-NG.xml
Thanks for sharing this! Worked flawlessly for me. I already had MacOs running natively on this hardware but now I can transition to ProxMox.
One thing was not working for me – nested virtualization (based onApple’s hypervisor.framework). It took me a lot of time to work this out. Since MacOS wouldn’t boot with cpu=host no matter what I’ve tried (even played with tons of Clover settings, incl. fake CPUID) so I had to stay with Penryn. I’ve painstakingly compared CPU flags with what can be enabled and came up with a set that allows to run stuff like Docker for Mac and Parallels without a problem. Additionally the extra CPU instructions provide a performance boost in some workloads what can be clearly seen in geekbench.
I’m on i7-8700 which has 6C/12T but macos won’t boot if I assign more than 8C in ProxMox. Even tried with enabling SMT via `-smp` switch to mirror the topology of the host processor 1:1 and it doesn’t work (works in Ubuntu flawlessly though). Anyway as this are threads anyway the performance difference between bare metal and virt is negligible and seen only in synthetic benchmarks. Difference in Geekbench 4 is 28k vs 24k points – bare metal vs VM.
PS I recommend disabling all CPU bug mitigations using kernel cmdline since cross-vm security is not that important on a workstation setup usually (https://make-linux-fast-again.com/).
For other’s having the same problems, my `-cpu` parameter:
-cpu Penryn,kvm=on,+kvm_pv_unhalt,+kvm_pv_eoi,+invtsc,+pcid,+ssse3,+sse4.1,+sse4.2,+popcnt,+avx,+aes,+xsave,+xsaveopt,+vmx,+msr,+pae,+pdpe1gb,+pse,+pse36,+f16c,+fma,+pclmulqdq,+rdrand,+rdtscp,+ss,+smep,+bmi1,+bmi2,+avx,+avx2,+invpcid,+erms,+clflush,+rtm,+mpx,+adx,+abm,+nx,+movbe,check
BTW I don’t need nested virt in theory, as I’ve even got a second ProxMox “server” and plenty of resources to run any number of VMs I need, however, I am developing various solutions for local MacOs web-dev and I need to be able to test them like they were run on a Mac.
CAVEAT: Of course this will not work on non-Intel CPUs. MacOs native hypervisor features (also Windows Hyper-V I gather) works only Intel VT-d)
Interesting, I thought that required cpu=host, I’ve never seen that done based on passing individual features!
For your core problem, try:
-smp '12,sockets=3,cores=2,threads=2'Apparently macOS is fine with odd socket counts. Another option is:
-smp '12,sockets=1,cores=8,threads=2,maxcpus=16'(4 threads will appear to be hot-unplugged at boot time)
Thanks! The first topology (3 sockets) has worked for me, second one wouldn’t boot. I can see near bare-metal performance in Geekbench now 🙂
Still, one thing that bugs me is the inability to shutdown the machine cleanly from HV. This seems to be a problem with OVMF since I cannot shutdown any UEFI VM without QEMU Guest Agent – neither Ubuntu nor Windows. I will post the info if I happen to find a solution.
Here’s the comparison if anyone’s interested:
https://browser.geekbench.com/v4/cpu/compare/15439336?baseline=12482292
Catalina @ Proxmox / 4S6C12 /16G vs Mojave @ Bare Metal / 6C12T / 32G
Single-Core Score 5700 vs 5965
Multi-Core Score 27296 vs 28276
Some of the differences might be due to slightly different GeekBench version and newer macOS release int he VM (bare metal installation was still Mojave).
Hmm, an interesting thing is that I can see a slight improvement in single core perf with the new topology. Does the system take advantage knowing that some of the cores are threads?
https://browser.geekbench.com/v5/cpu/compare/1947391?baseline=1935537
Hello. First of all, this is an extensive and comprehensible tutorial. Congratulations, and thank you for it!
I can’t manage to boot to OpenCore though. It keeps stuck on a black screen. In some configuration I don’t remember anymore, I managed to load OpenCore, but it didn’t have the “Install Catalina” option, only the three options on the right.
My config is as this:
args: -device isa-applesmc,osk=”…” -smbios type=2 -device usb-kbd,bus=ehci.0,port=2 -cpu Penryn,kvm=on,vendor=GenuineIntel,+kvm_pv_unhalt,+kvm_pv_eoi,+hypervisor,+invtsc,+pcid,+ssse3,+sse4.2,+popcnt,+avx,+avx2,+aes,+fma,+fma4,+bmi1,+bmi2,+xsave,+xsaveopt,check
balloon: 0
bios: ovmf
boot: cdn
bootdisk: ide2
cores: 2
cpu: Penryn
hostpci0: 0d:00,pcie=1,x-vga=1
ide0: local:iso/Catalina_Installer.img,cache=unsafe,size=14664M
ide2: local:iso/OpenCore.iso,cache=unsafe,size=150M
machine: q35
memory: 32768
name: Alfheimr
net0: vmxnet3=CE:BF:81:FD:2E:31,bridge=vmbr0,firewall=1
numa: 0
ostype: other
sata0: local-lvm:vm-101-disk-0,cache=unsafe,discard=on,size=110G,ssd=1
scsihw: virtio-scsi-pci
smbios1: uuid=47ded456-aa9a-4fcc-9147-be74ed1faac2
sockets: 1
vga: vmware
vmgenid: fc70131e-021b-4bb6-8dc6-a472c8bd4855
Using AMD Ryzen processor.
I think this comment was intended for my newer post (https://www.nicksherlock.com/2020/04/installing-macos-catalina-on-proxmox-with-opencore/)
The fact that your Catalina image has a .img extension is suspicious, how did you create it? My instructions include a rename to .iso. Since it is being treated as a hard disk image by my instructions, which is unusual, third-party instructions for creating an installer image probably don’t work and this will cause it not to appear as a bootable option.
Definitely don’t start off by using PCIe passthrough, use just the emulated video to begin with, otherwise you don’t know which issues are being caused by the passthrough and which are being caused by general VM/Catalina issues.
My god, you are right! I’m coming to the conclusion I have a problem with excessive Chrome tabs open, and I hope I didn’t mix things up. I’m unsure now.
I’m on Windows and couldn’t find a tool to convert IMG to ISO, and since Proxmox accepted both file types, I supposed it would treat them according to the extension.
As for the PCIe passthrough, I thought I had removed it. Now I did, and now it shows up the black screen with the last three options. Guess it’s a matter of converting the IMG to ISO now…
Thank you very much; I’ll get back to you soon!
Although in my instructions the file gets renamed to .iso, it actually needs to be a raw hard disk image, so converting it to a real ISO format will definitely break it.
How did you create it? It needs to be a disk image that is partitioned GPT (macOS would call it GPTSPUD) otherwise OpenCore can’t boot it.
Sorry, I only saw this message after sending my last reply. I also tried to rename the IMG to ISO, but the installer doesn’t show up. I’m kinda losing my hopes.
Hello again. So I plugged the pen drive into the server and dd’d it straight into the ISO folder. Updated the config to point to it, but still don’t see the option to install. 🙁
The drive specifically needs to be GPT formatted or it won’t work.
Hello again, sir. So I used MacOS to download and create the installer. All went well, and I masnaged to dd the EFI partition. It still boots into OpenCore partition-selecter all the time, and I seem to be having problems with the GPU pass-through due to some X570 issues. My windows VM also hangs on a kinda random-basis. Maybe it’s related with cold boots, I’m not sure yet. But this time around, VGA was passed through successfully (both to windows and Mac VM), but it’s stuck on the Apple logo boot screen.
Oh, I also updated to 10.15.5 and it went super weird. It created a new entry in OpenCore. I ran it, and it went to some partition recovery – except for the new version. I selected Install. Took like an hour to finish, but it did. And it did boot back into MacOS (except I always have to select the partition to boot in OC), no problems here. But the “Recovery 10.15.5” partition is still there; the system indicates it’s been updated, but System Settings keeps telling me I have updates available to install (the one that’s been already installed). I’m completely new to Hackintosh, but is this normal?
Thank you once again for the great tutorial and all your patience. Really appreciate it.
Found the other tutorial. Can see I still have some stuff to do (like set the timer to 0 for autoboot etc). Also I still have to revise my kexts, although I’m pretty confident I don’t need a lot of stuff since I’m also running on KVM, so it should be pretty similar to your setup I suppose.
The recovery partition always appearing as an option is normal, this is the environment that is booted on real macs if you hold down Command + R during boot.
There were several odd settings I had to set in config.plist in order to get this to boot on Proxmox (and even more from Leoyzen’s KVM-Opencore project), so you might want to use my whole EFI as your starting point and just port your SMBIOS information (serial number etc) from your current install, if you have one. I’m not sure what kexts you have in there.
No current install, fresh start here.
Ok, so here’s how things are: I managed to get into MacOS, dd the EFI partition, and everything is working. Without your tutorial, your files and your help, I wouldn’t be able to do it.
First weird thing: when I updated to 10.15.5, I had to boot into a recovery partition and tell it to install the system. Then after booting back to MacOS, System Settings still says I have a pending update, even though the “About this Mac” shows it’s up to date. Is that normal?
Second weird thing: Proxmox seems to handle the AMD reset bug up to some extent. If I command a shutdown or a reboot cleanly, it handles the card so as to be ready for the next VM boot. If I mess up some setting and need to force stop the VM, the card is trashed and the host needs a reboot (that’s why I was pulling my hair out thinking it was kinda random). First question: do you know if there’s a script I can run in order to reset the VGA without having to reboot the host?
Third weird thing: my IOMMU groups seem ok, I have two USB controllers that are in a group, and a single USB controller alone in it’s own gruop. When I pass the USB controller that’s alone in it’s own group, the whole thing crashes. I can’t even SSH into the host. That shouldn’t happen, right?
And finally the fourth weird thing: I’m using the same monitor for my main PC (sepparate box, Windows on metal), the Windows VM (running on an nVidia card) and the MacOS VM (on the Vega). If I switch my monitor’s input OUT of MacOS, when I come back there’s no signal. But I can still VNC into it. Any ideas?
Bonus: are there any kexts for the Q35 USB controllers so I don’t need to dedicate most of my USB ports to the machine that will use it the least. I would just pass two or three ports.
First thing, when it reboots to install an update you need to choose the boot option “macos installer” (I think it’s called). It looks a little like it is reinstalling the OS but it does just install the update. That pending update will likely fix itself next time macOS checks for updates (I’ve experienced that myself a few times).
Second thing – this is because Proxmox can’t reset the card properly at all, but sometimes the guest leaves the card in a nice state anyway so it doesn’t need to be reset to be reused (as you noted, this is most likely when the guest makes a clean shutdown).
The only way of resetting an unsupported card is for the host to enter a power state where the card is physically turned off – try “systemctl suspend”, then rewake the host. (But for me the host doesn’t successfully wake, it just hard reboots and my session is lost).
Third thing, are you unbinding the USB controller from the xhci driver like I do in my “my Catalina install” article? If not I’d expect the VM to just fail to launch. Passing the wrong device by accident can easily trash the system so doublecheck your IDs (I’ve seen people accidentally pass Proxmox’s SATA controller before).
macOS’ video driver is probably crashing when the monitor goes away. Which video card did you have again?
The Q35 USB controller is already supported, you can use USB passthrough (just don’t enable the USB 3 option on the device). USB port passthrough is horrible to work with because it only attaches devices on guest launch, so they must be already plugged in and never replugged during operation (or they don’t get reattached).
1st: Ok, i’ll leave it be and see if things change with an upcoming update. Does every minor update take as long as installing the whole system?!
2nd: makes sense. There is a sort of patch for Ubuntu, but it only works once and it’s meant for people who use AMD cards as their only VGA, so the host needs it to boot up. It then resets the card, and passes to the guest. But as I said, reports mentioned it only being good for one reset.
3rd: I don’t fully understand the jargon (unbinding? very light experience with virtualization), but I might have found a workaround: passing only one of the couple of controllers in the other group doesn’t allow me to pass the other to Windows (they’re on the same group), but it allows me to keep them attached to the host, and then passing the physical USB ports to Windows. More or less the same functionality, different approach.
4th: It’s a Radeon Vega 64 LC. It’s supposed to be natively supported, but I had some random problems in Windows where the screen would go white, the LEDs on the card (that indicate power state) would go 100%, and I had to force a reboot. That was on a Windows installed on the metal, my actual PC.
5th: VMWare and even VirtualBox seem to be able to pass USB devices to guests dynamically, and I’m pretty sure (as mentioned in 3 I could try to hotplug them in Windows) as you would expect from any USB device. Is this limitation (needing to boot the VM with the devices attached) on KVM/Q35, or MacOS’s side? If it’s on the Mac, aren’t the drivers open source? Isn’t it possible to compile a kext for MacOS so it would behave normally like I imagine Windows and Linux do?
1st: It doesn’t take quite as long as a full reinstall, but it does take 30-40 minutes, even on a real Mac!
2nd: It’s worse than that, on one of the “successful” patches I saw people still reported that it didn’t work for macOS guests (it didn’t reset the card well enough to deal with whatever macOS was doing to the card)
3rd: On Proxmox boot your USB controllers will be bound to Proxmox’s xhci (USB 3) driver, and they normally need to be manually unbound from this driver in order to make them available to vfio-pci instead (you can check which driver a device is using with “lspci -k”). I do this with my VM using a hookscript: https://www.nicksherlock.com/2018/11/my-macos-vm-proxmox-setup/ . It sounds like you’ve got it working anyway though so something different must be happening there.
5th: I believe this is a QEMU problem, you might be able to get it to work with enough fiddling in the qemu monitor (run qemu monitor <your vm id>). No, the macOS USB drivers aren’t open source, as they’re Apple-originals rather than provided by the Hackintosh community.
Alright, so latest updates:
The fix for the display issue is setting it to sleep and waking it back up (I always used bottom left corner as sleep in my Macbook, so this was the easy part – move mouse to bottom left, wait a few seconds, click and display is back).
Now the VFIO part is intriguing me. Specially the USB controllers. I found this script, that was supposed to show me what could be passed through, and what couldn’t.
root@yggdrasil:~# for iommu_group in $(find /sys/kernel/iommu_groups/ -maxdepth 1 -mindepth 1 -type d);do echo “IOMMU group $(basename “$iommu_group”)”; for device in $(\ls -1 “$iommu_group”/devices/); do if [[ -e “$iommu_group”/devices/”$device”/reset ]]; then echo -n “[RESET]”; fi; echo -n $’\t’;lspci -nns “$device”;done; done
It returns this (gonna cut and paste only what’s important):
IOMMU group 22
[RESET] 03:08.0 PCI bridge [0604]
[RESET] 07:00.0 Non-Essential Instrumentation [1300]
07:00.1 USB controller [0c03]
[RESET] 07:00.3 USB controller [0c03]
IOMMU group 36
[RESET] 0f:00.3 USB controller [0c03]
This makes no sense to me, because:
03:09.0 doesn’t even show up in the list to pass.
07:00.X all show up in the list, and apparently, I can pass them without any issues. Even 07:00.1
0f:00.3 hangs the host if I try to pass it.
There are other inconsistencies, like secondary functions from the AMD Vega 64 card (audio) and nVidia’s (audio, USB-C and serial bus controllers) show up as non-passable, but I can pass them through without any issues. Sound even works in both of them!
Would you suggest we continue this discussion somewhere else? Proxmox forum, Reddit or something? It’s getting loooooong. lol
Trying to install Mojave. Already installed Proxmox on my machine with Ryzen 5950x and Asus ROG Crosshair VIII EXTREME X570
I didn’t find any fetch-macOS.py at the address given provided here. Then I googled and found something here: https://github.com/foxlet/macOS-Simple-KVM
Hopefully that’s the same. Sorry, I’m not savvy with terminal. I simply dragged the file fetch-macOS.py into the terminal and pressed Enter, but I get an error message:
myName@Mac-Mini-M1-Dr ~ % /Users/myName/Downloads/macOS-Simple-KVM-master/tools/FetchMacOS/fetch-macos.py
Traceback (most recent call last):
File “/Users/myName/Downloads/macOS-Simple-KVM-master/tools/FetchMacOS/fetch-macos.py”, line 9, in
import click
ImportError: No module named click
What am I doing wrong?
How should I proceed?
Many Thanks.
I’ve updated the link to point to new fetch-macOS-v2.py instead, this does require Python 3 but you may have it already depending on what OS you’re running the script on.
Note that this tutorial was developed for Proxmox 5.4 and there’s little expectation it’ll work smoothly with Proxmox 7.
I managed to install Mojave on Proxmox 7 making use of OpenCore instead of Clover. See “Installing macOS Catalina 10.15 on Proxmox 6.1 or 6.2 using OpenCore”