
With the release of macOS Catalina 10.15, this tutorial is now obsolete! Please check out the new Catalina tutorial here.
This tutorial for installing macOS Mojave has been adapted for Proxmox 5.4 from Kholia’s GitHub project for installing into vanilla KVM. There is more documentation there which will help out with enabling extra features and diagnosing problems!
Requirements
I’ll assume you already have Proxmox 5.4 installed. You also need a real Mac available in order to fetch the OSK key.
Your Proxmox host computer’s CPU must support SSE 4.2, so for Intel your CPU must be at least as new as Nehalem, which was the first CPU generation to bear the “Core” i5/i7 branding. Older CPUs will cause the finder to repeatedly crash after installation completes (with an Illegal Instruction exception in the graphics code).
Apparently modern AMD CPUs also support SSE 4.2 and can be used with this guide without any modification (maybe Bulldozer and certainly Ryzen), but I haven’t tested this myself.
First step: Create an installation ISO
On a Mac machine, download and run fetch-macOS-v2.py in a terminal to download the Mojave recovery image from the Apple software distribution server:
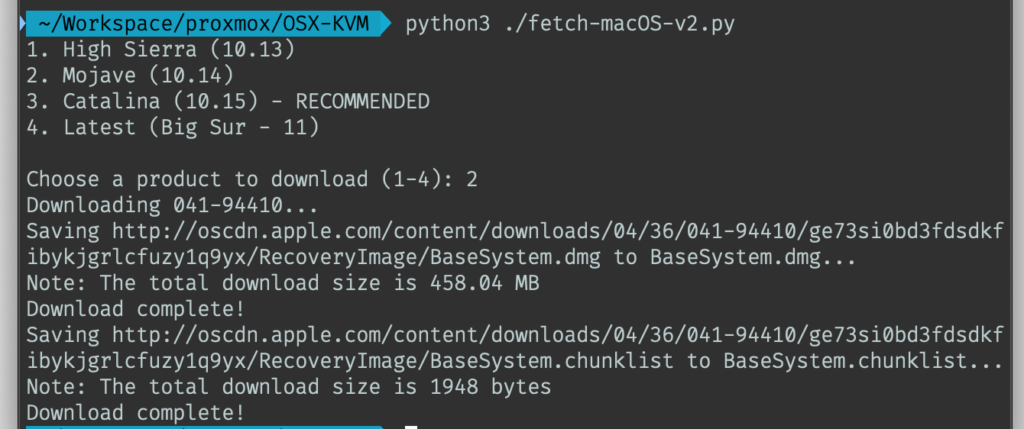
This results in a ~460MB “BaseSystem.dmg” file in the current directory. Convert that dmg into an “iso” like so:
hdiutil convert BaseSystem.dmg -format UDRW -o Mojave-installer.iso
mv Mojave-installer.iso.img Mojave-installer.iso
This is actually a raw disk image, not a true ISO, but Proxmox has better tools for picking and re-using ISO images than disk images. Upload the “ISO” to your Proxmox server’s ISO store (typically /var/lib/vz/template/iso).
It is possible to run this download script on Linux instead. In that case, you need to install the “dmg2img” package on your system, and replace the “hdiutil” command invocation with:
dmg2img BaseSystem.dmg Mojave-installer.iso
Prepare a Clover image
We’ll be using Clover as a bootloader for Mojave.
Download this Clover disk image (that I built using kholia’s build script from Clover r4920), unpack it, and upload it to Proxmox’s ISO store at /var/lib/vz/template/iso. Although it has a .iso file extension, this is actually a hard disk image.
Fetch the OSK authentication key
macOS checks that it is running on real Mac hardware, and refuses to boot on third-party hardware. You can get around this by reading an authentication key out of your real Mac hardware (the OSK key). Run the first bit of C code from this page (you’ll need XCode installed) and it’ll print out the 64 character OSK for you. Make a note of it.
Every Mac uses the same OSK, so don’t be surprised if it doesn’t look like a random string!
Create the VM
From the Proxmox web UI, create a new virtual machine as shown below.
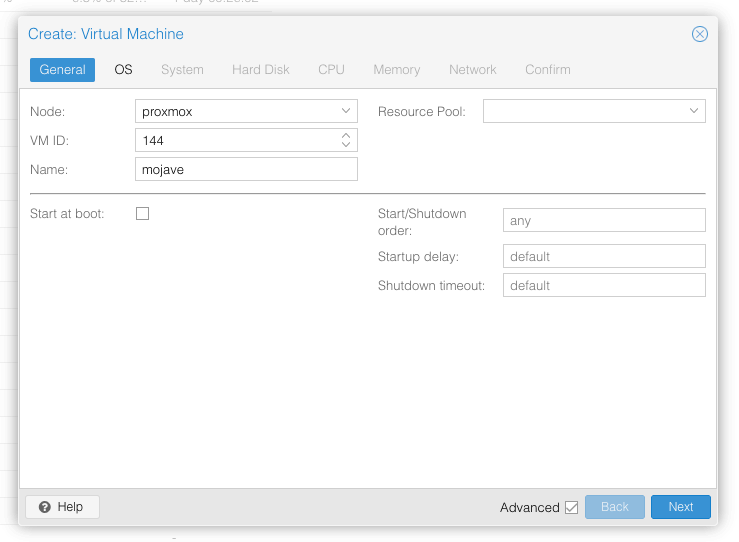
Keep a note of your VM’s ID 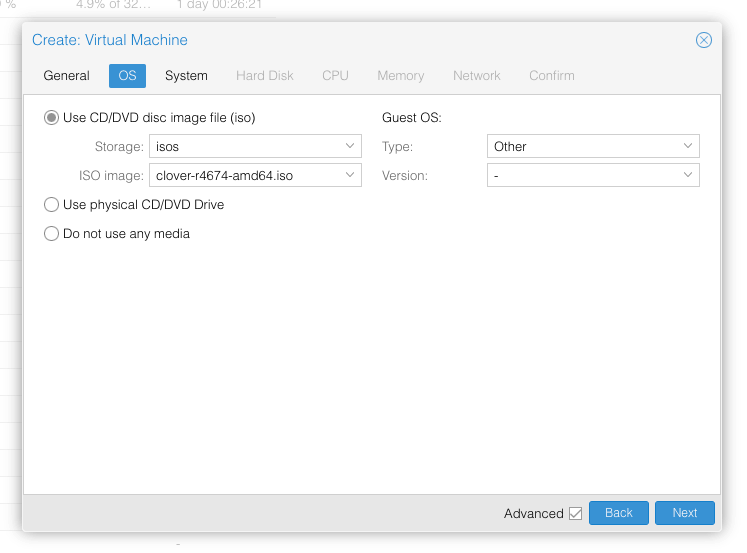
Select the Clover ISO you uploaded and set OS type to “Other” 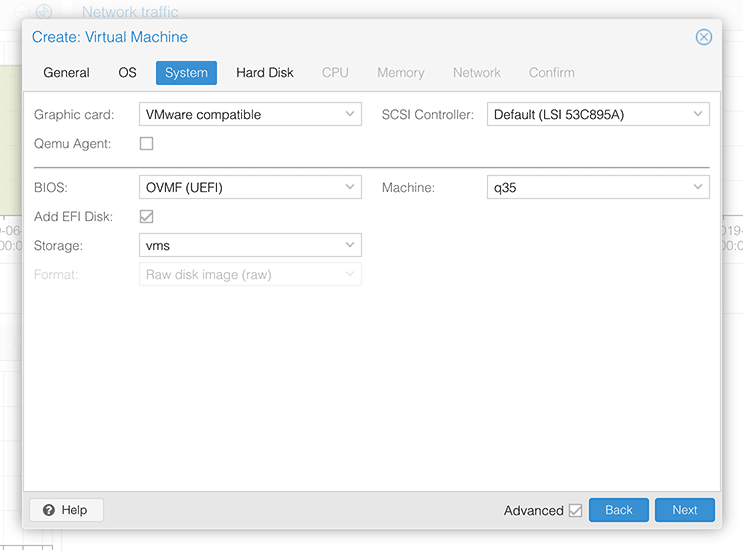
Set graphics to “VMWare Compatible”, set BIOS to OVMF (UEFI), set Machine to Q35, Tick Add EFI Disk, set SCSI to Default 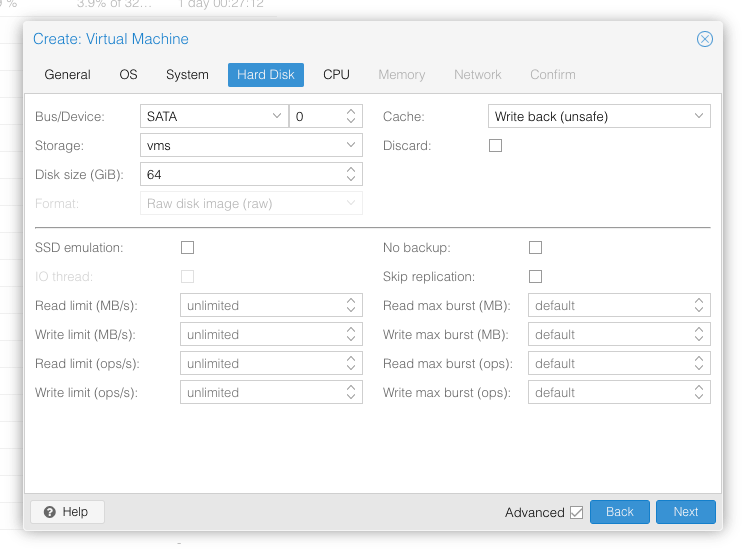
Set the size of the hard disk (I chose 64GB). Attach it to SATA0 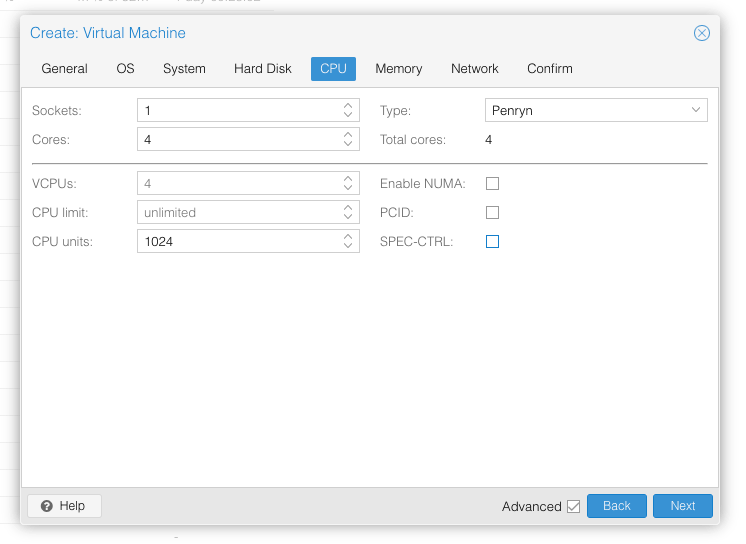
Set the number of cores for the VM, I chose 4 (note that some core counts seem to be troublesome, try 4 first). Set the CPU to Penryn. 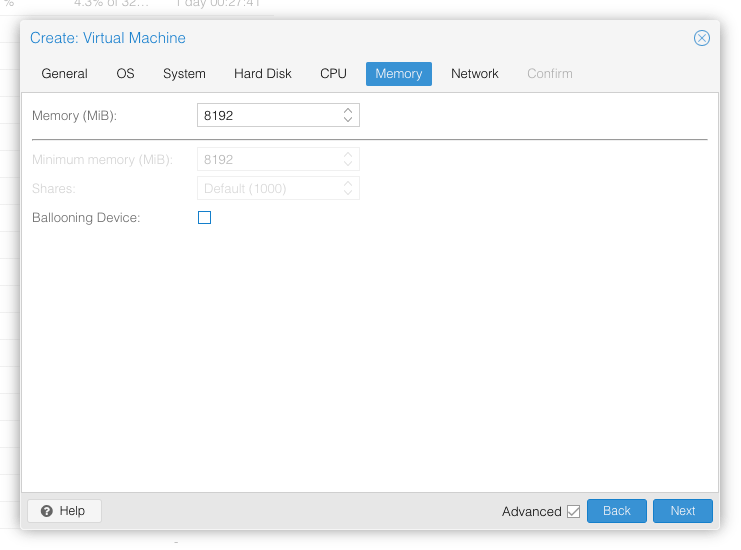
I chose a fixed memory of 8192MB. Disable ballooning because there is no balloon driver available for macOS. 
Choose VMWare vmxnet3 for the network model
In the Options page for the VM, ensure that “use tablet for pointer” is set to “Yes”.
In the Hardware page for the VM, add a second DVD drive at IDE0, set it to use your Mojave-installer.iso.
Don’t try to start the VM just yet. First, SSH into your Proxmox server so we can make some edits to the configuration files.
Edit /etc/pve/qemu-server/YOUR-VM-ID-HERE.conf (with nano or vim). Add this line, being sure to substitute the OSK you extracted earlier into the right place:
args: -device isa-applesmc,osk="THE-OSK-YOU-EXTRACTED-GOES-HERE" -smbios type=2 -cpu Penryn,kvm=on,vendor=GenuineIntel,+invtsc,vmware-cpuid-freq=on,+pcid,+ssse3,+sse4.2,+popcnt,+avx,+aes,+xsave,+xsaveopt,check -device usb-kbd,bus=ehci.0,port=2
We’re telling macOS that the CPU is Penryn (it doesn’t seem to like booting otherwise), but we’re enabling all the new CPU features found in Nehalem which macOS will require, plus some optional features found in later generations (AVX/AES).
Find the line that define the two “ISOs” (ide0 and ide2), and remove the “,media=cdrom” part from them. Add “,cache=unsafe” in its place. This will treat these as hard disks rather than DVD drives.
Save your changes, return to the Options tab, and change the boot order to put IDE2 (the Clover image) first. Your final VM configuration file should resemble this:
args: -device isa-applesmc,osk="..." -smbios type=2 -cpu Penryn,kvm=on,vendor=GenuineIntel,+invtsc,vmware-cpuid-freq=on,+pcid,+ssse3,+sse4.2,+popcnt,+avx,+aes,+xsave,+xsaveopt,check -device usb-kbd,bus=ehci.0,port=2
balloon: 0
bios: ovmf
boot: cdn
bootdisk: ide2
cores: 4
cpu: Penryn
efidisk0: vms:vm-144-disk-1,size=128K
ide0: isos:iso/Mojave.iso,cache=unsafe
ide2: isos:iso/clover-r4920.iso,cache=unsafe
machine: q35
memory: 8192
name: mojave
net0: vmxnet3=xx:xx:xx:xx:xx:xx,bridge=vmbr0,firewall=1
numa: 0
ostype: other
sata0: vms:vm-144-disk-0,cache=unsafe,size=64G
smbios1: uuid=xxxxxx-xxxx-xxxx-xxxx-xxxxxxxxxxx
sockets: 1
vga: vmware
Configure Proxmox
On Proxmox, run “echo 1 > /sys/module/kvm/parameters/ignore_msrs” to avoid a bootloop during macOS boot. To make this change persist across Proxmox reboots, run:
echo "options kvm ignore_msrs=Y" >> /etc/modprobe.d/kvm.conf && update-initramfs -k all -u
You must now install a patched version of Proxmox’s OVMF library in order to be able to boot Mojave.
Install Mojave
Now start up your VM.
Go to the Console tab, quickly hit Escape or F2 at the Proxmox logo to enter the OVMF configuration. If your keyboard doesn’t work, leave the Console tab, stop the VM, start the VM, then re-enter the console tab.
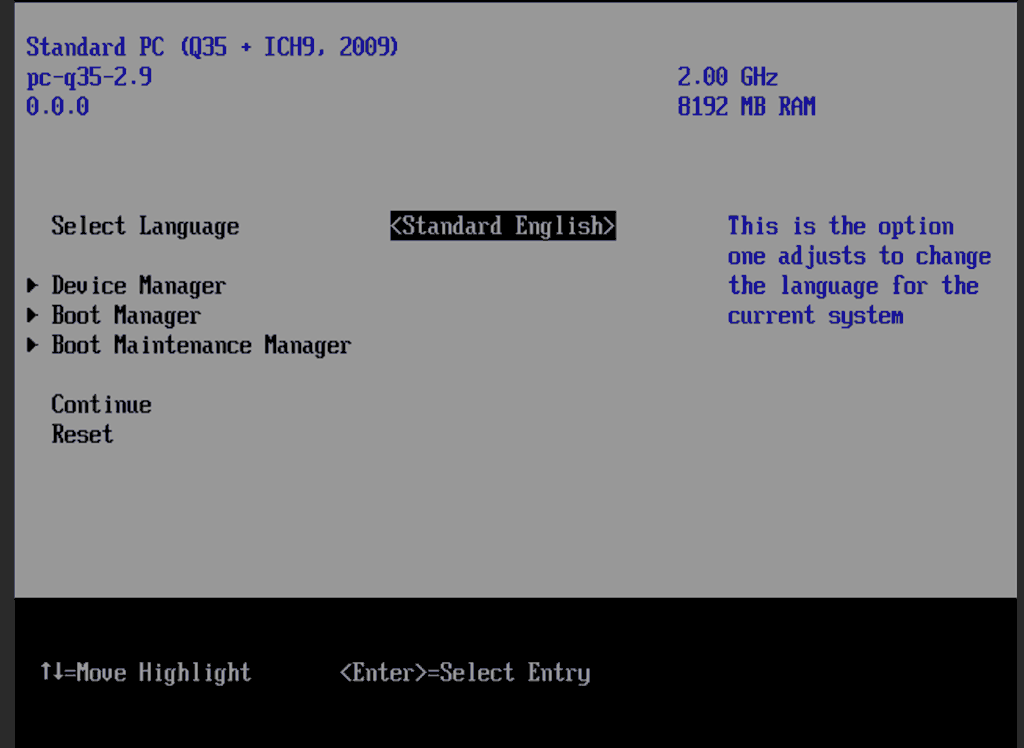
Select Device Manager 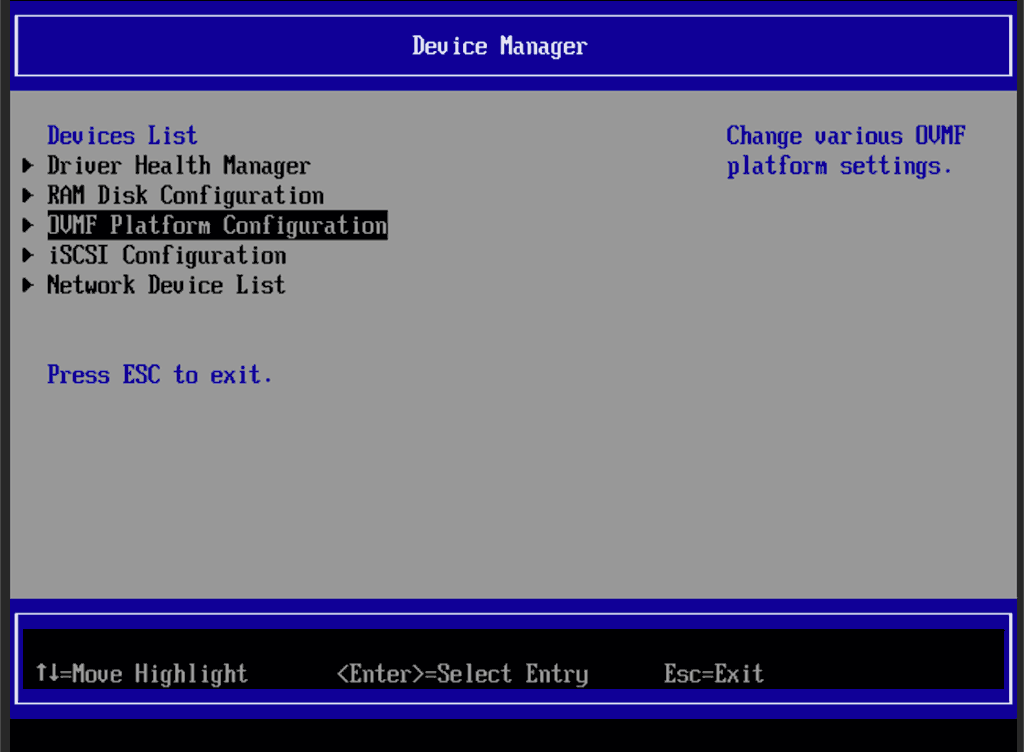
Select OVMF platform configuration 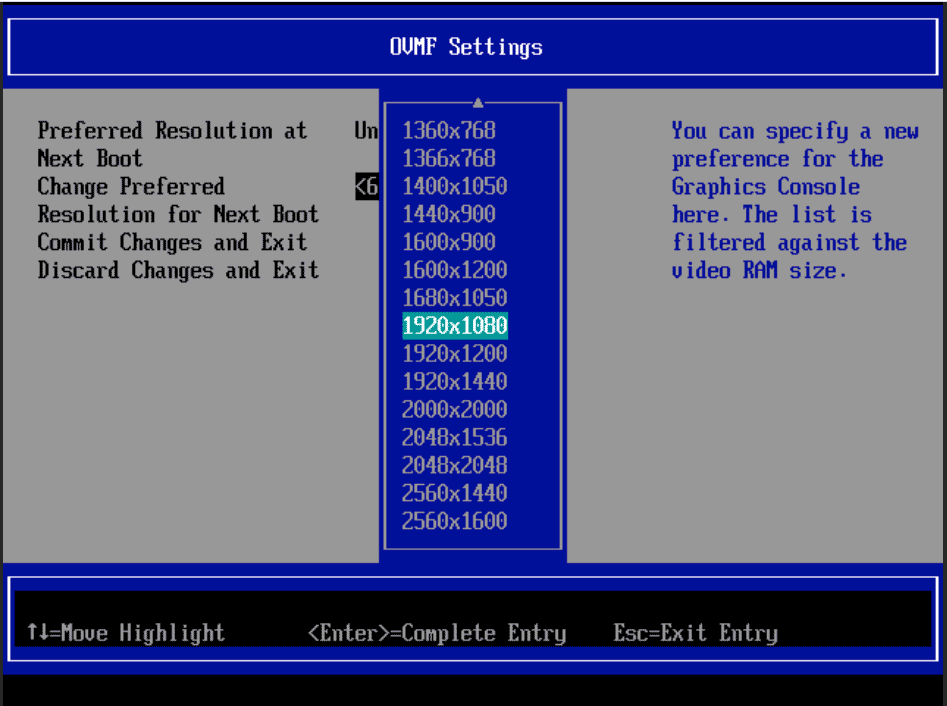
Set the preferred resolution to 1920×1080 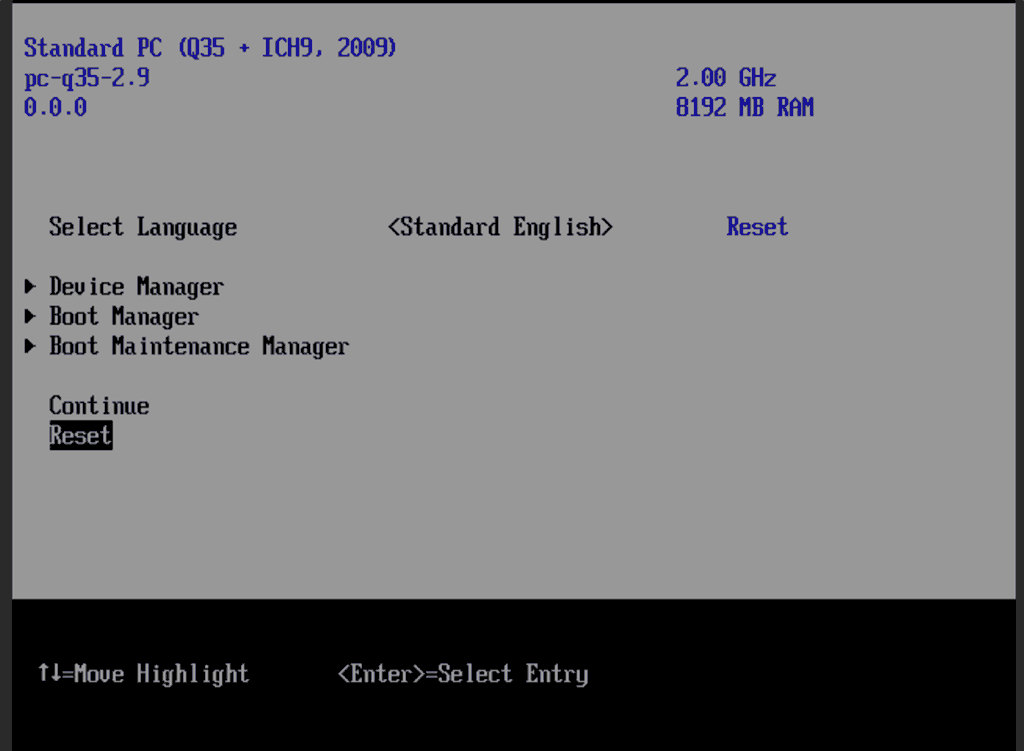
Save changes, then Reset
Follow the steps above to set the screen resolution to 1920×1080 and “reset” to apply the new settings (not “continue”). This step is required to avoid scrambled graphics on boot and a hang (Clover resolution must match OVMF resolution, or else the Apple logo will be off-centre and the progress bar will be smeared across the screen, resulting in a lockup).
Note that in future you may find that when initially started, your VM doesn’t properly apply the the 1920×1080 screen resolution until you hit “Restart Computer” in Clover when the Clover menu appears (or “Reset” on the VM). You’ll notice this happening when the “Proxmox” logo fills a large area of the screen on boot due to the low resolution.
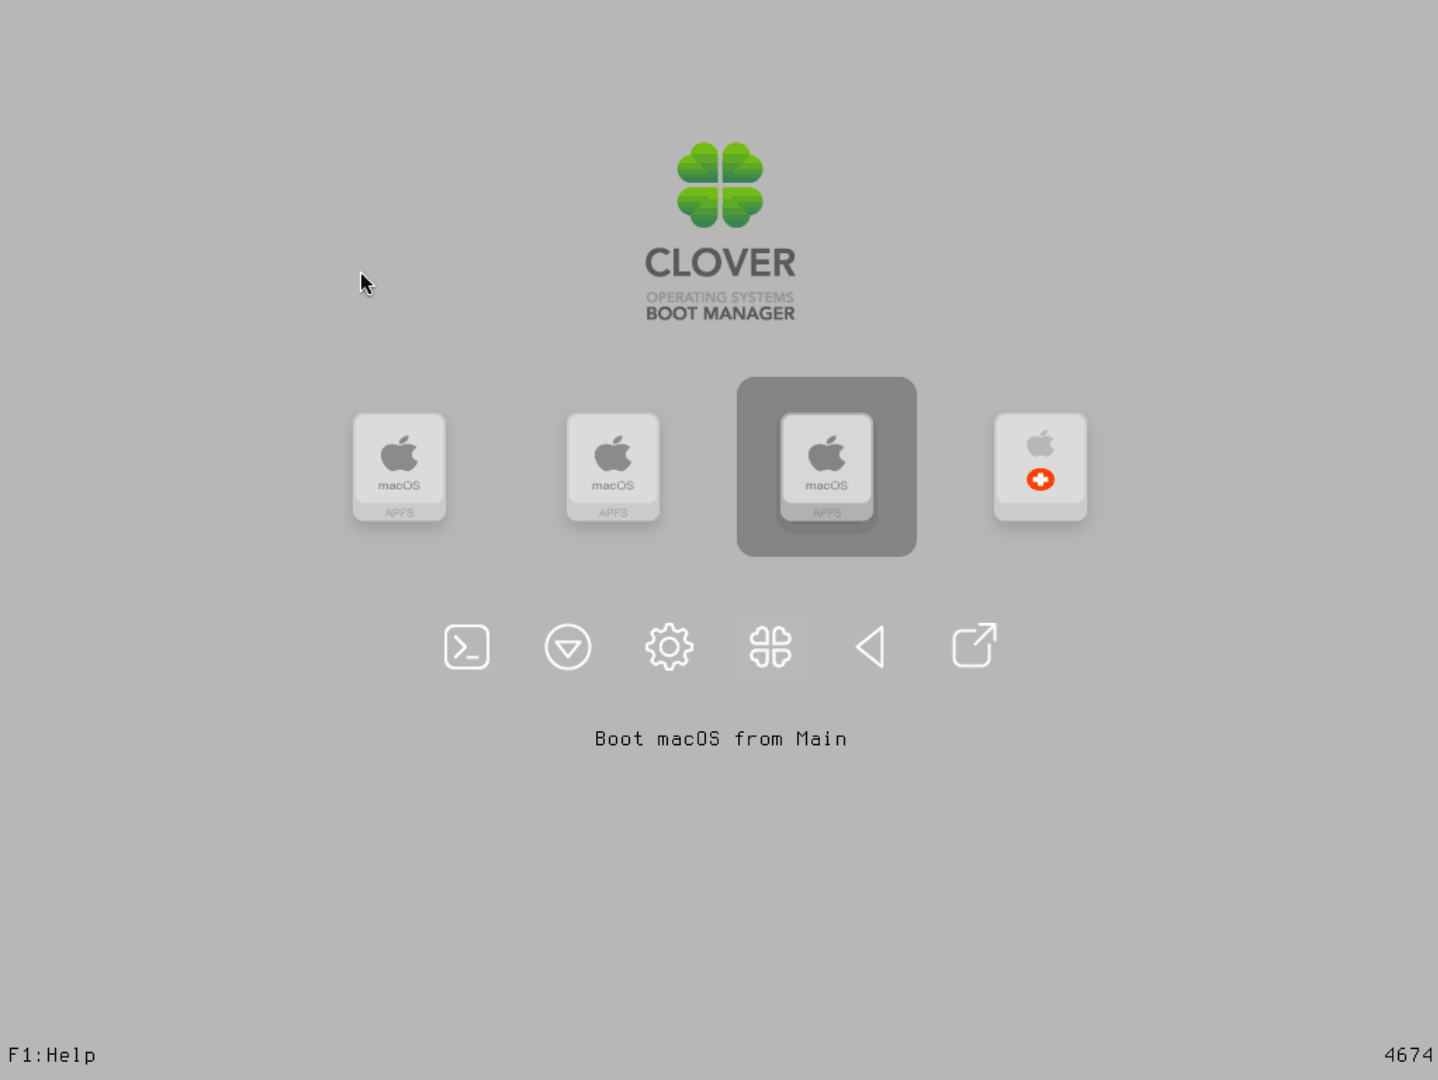
It should now boot into Clover.
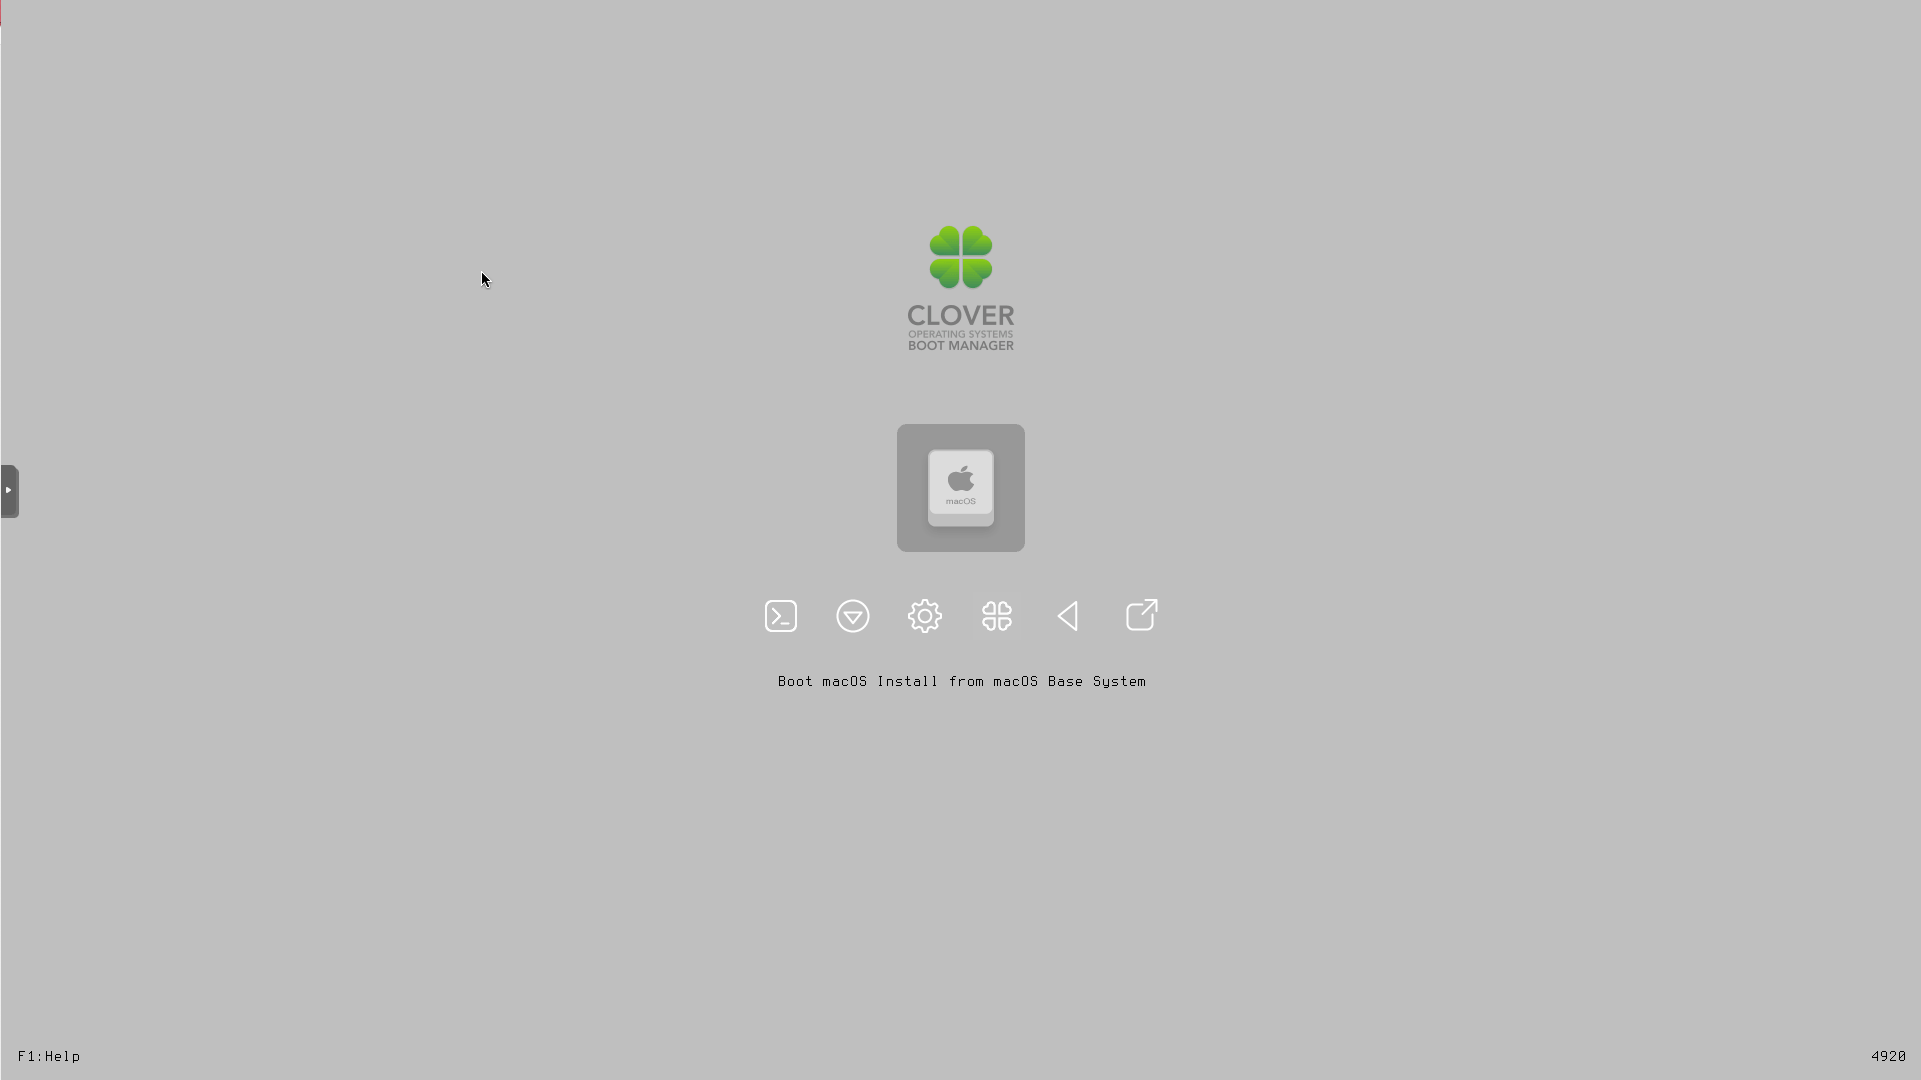
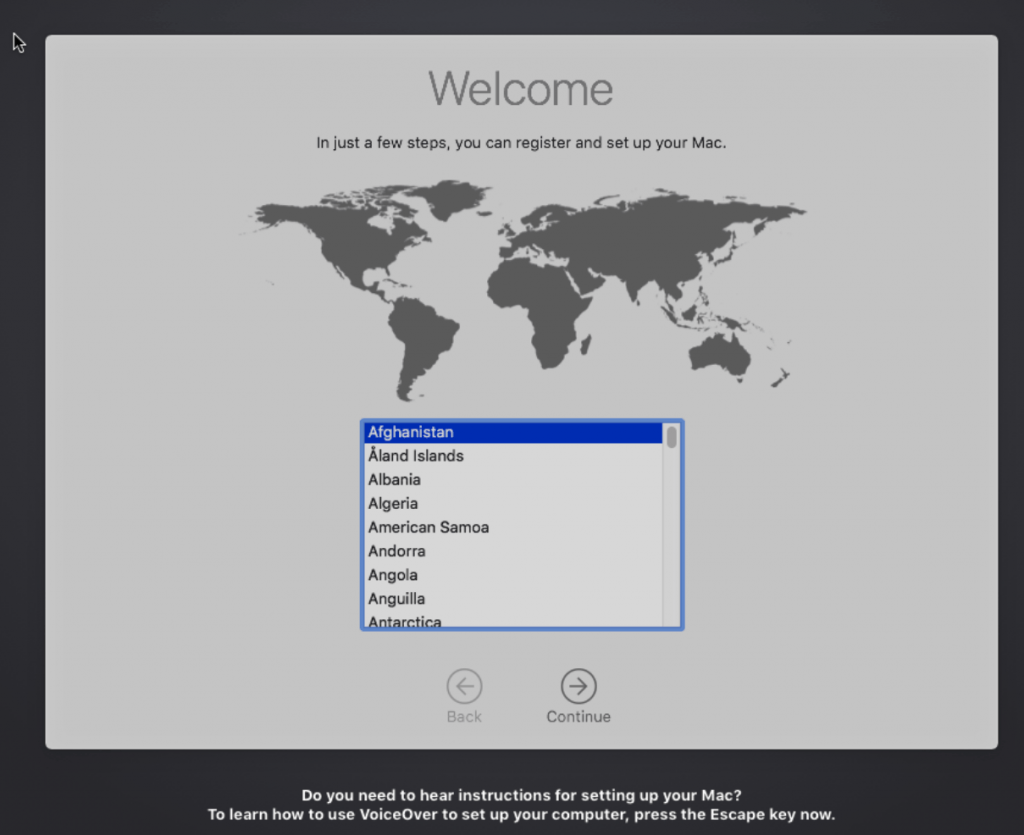
Press enter to boot the “Boot macOS Install from macOS Base System” entry and the installer should appear. Choose your language.
Our virtual hard drive needs to be erased/formatted before we can install to it, so select the Disk Utility option. Follow the steps below to format the disk:

Select Disk Utility 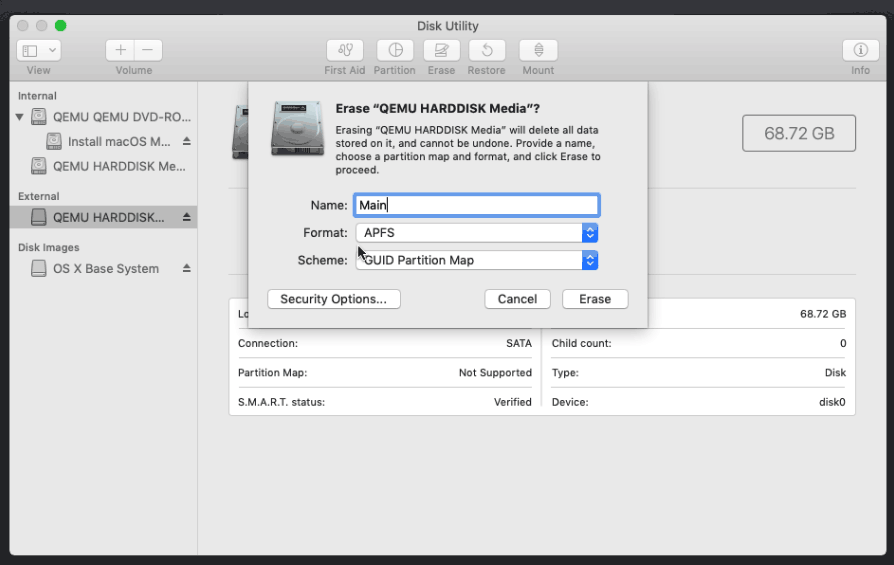
Erase the main disk (it’ll appear as an external drive). Choose APFS. I called mine “Main”. “Encrypted” probably doesn’t work at the moment because special Clover device drivers are required
Now we’re ready to begin installation!
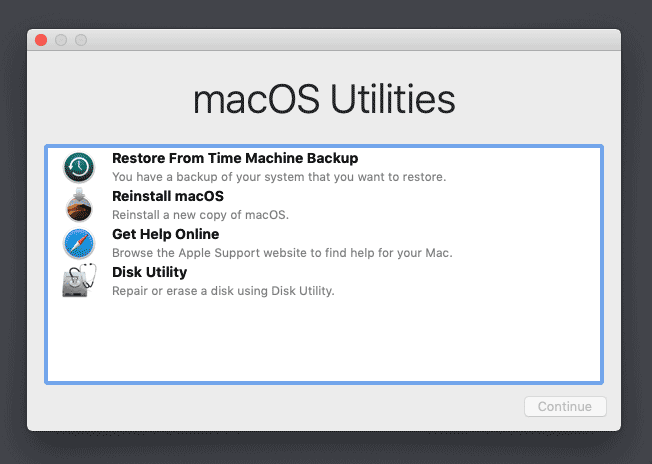
Choose the option to reinstall macOS 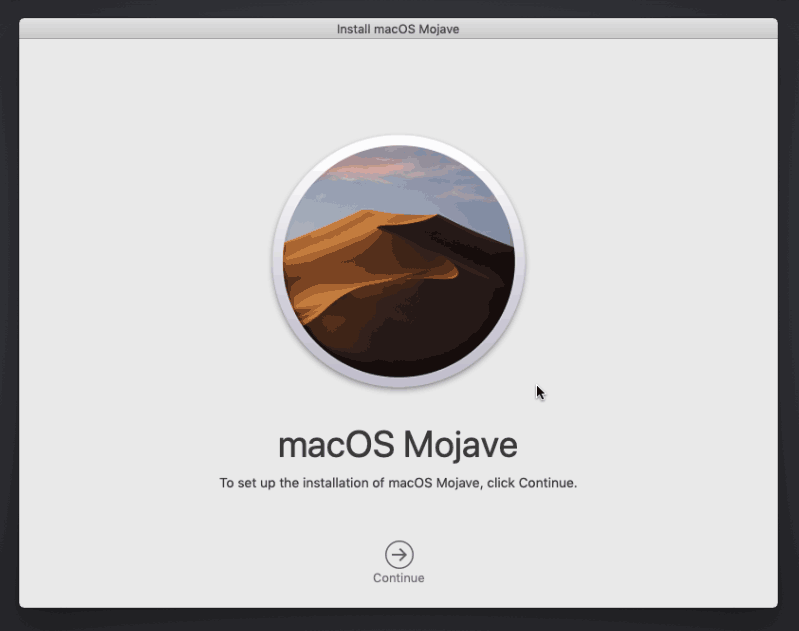
Continue… 
Choose the disk you erased 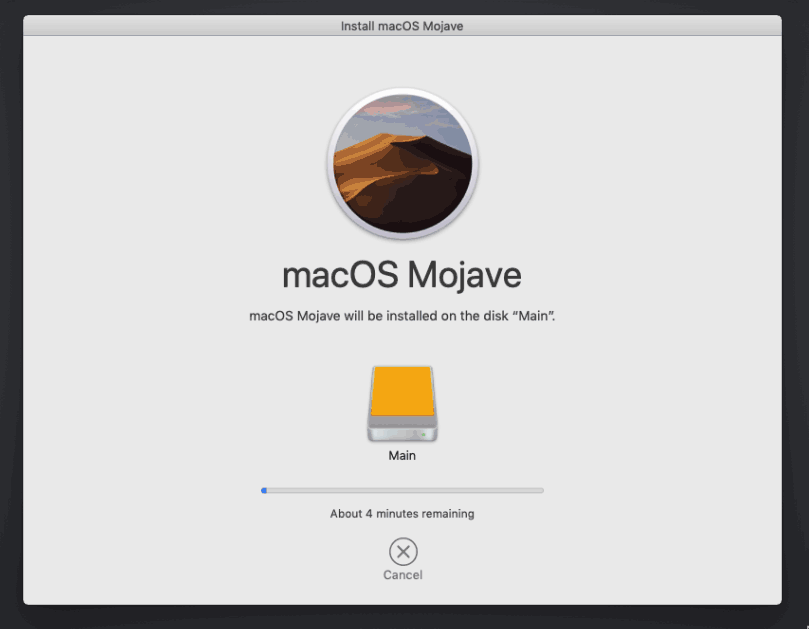
It’s installing!
After the first stage of installation, the VM should reboot itself and automatically continue installation by booting from the hard drive, then reboot itself a second time and automatically boot from “filevault prebooter”. Note that an Internet connection is required during installation, as macOS needs to download Mojave.
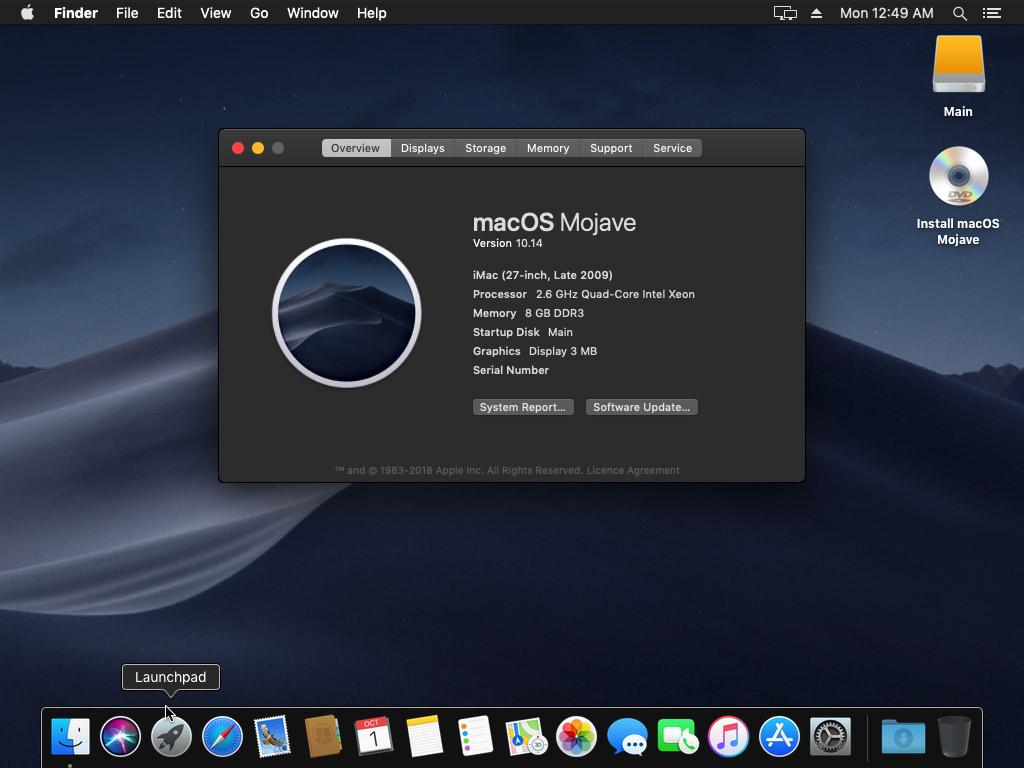
Answer the initial install questions, and you’ll be logged on! (Note that you’ll probably want to hold off on logging into your iCloud account until you’ve configured your SMBIOS to your liking in Clover Configurator)
Answer the install questions 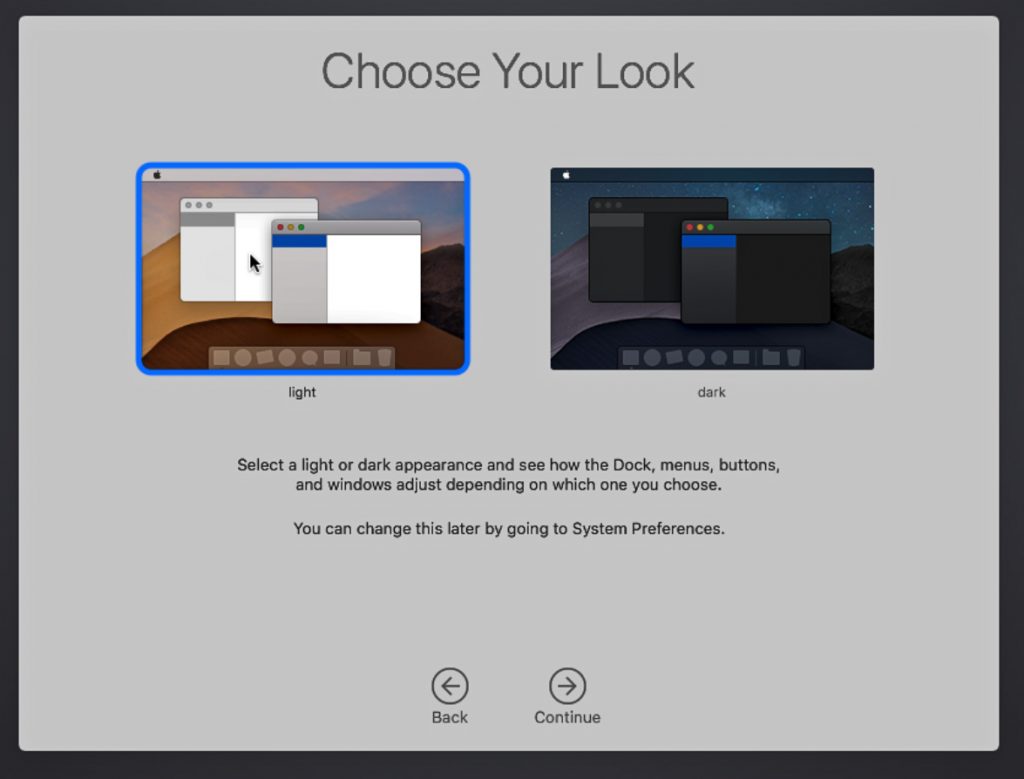
Ooh, new dark theme!
Make the Clover install permanent
We’re currently booting using Clover from the attached Clover ISO. Let’s install that to the hard drive instead. Pop open Terminal and run “diskutil list” to see what drives we have available.
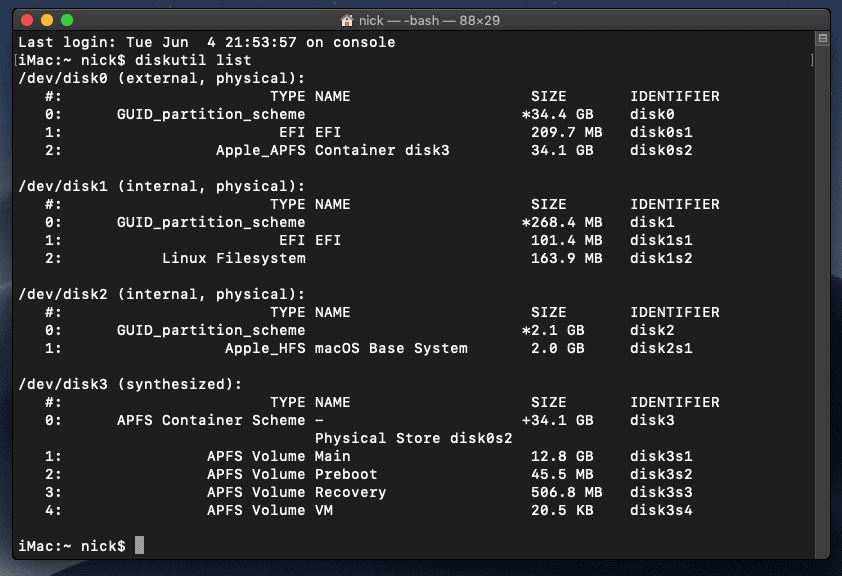
Use “sudo dd if=<source> of=<dest>” to copy the “EFI” partition from the Clover CD and overwrite the EFI partition on the hard disk. The Clover CD is the small disk with the “linux filesystem” on it, and the main hard disk is the one with the large Apple_APFS “Container” partition on it.
In my case these EFI partitions ended up being called disk1s1 and disk0s1 respectively, so I ran “sudo dd if=/dev/disk1s1 of=/dev/disk0s1” (N.B. if you get these names wrong, you will erase the wrong disk and you’ll have to start the installation over again!).
Now shut down the VM, and remove both the Clover and the Mojave installer drives from the Hardware tab. On the Options tab, edit the boot order to place SATA0 as the first disk. Boot up. If everything went well, you should see the Clover boot menu, and you can select “Boot macOS from Main” to boot Mojave.
Sleep management
I found that I was unable to wake Mojave from sleep using my mouse or keyboard. You can either disable system sleep in Mojave’s Energy Saver settings to avoid this, or you can manually wake the VM up from sleep from Proxmox by running:
qm monitor YOUR-VM-ID-HERE
system_wakeup
quit
“Prohibited” sign on boot
On a regular Hackintosh this is typically a sign that the boot drive can’t be read, but that situation is difficult to encounter with this VM setup. Nevertheless, I receive a “prohibited” sign during boot in perhaps 1 out of 20 system boots at random (maybe a timing bug?) If this happens, just hit “reset” for the VM to retry (no need to stop and start).
If you get it persistently, something is going wrong with the boot. You can boot macOS in “verbose” mode by hitting space on the macOS option in Clover and ticking the verbose option. This’ll give you a log during booting that can narrow down when the problem occurs.
Editing your Clover/EFI settings
You can use the Clover Configurator tool (Global Edition) to edit your Clover “config.plist” configuration file, which is stored in the hard drive’s EFI partition. This tool should mount the EFI partition for you. If you want to mount it without using Clover Configurator, first check the device name of the EFI partition in the terminal:
~$ diskutil list
/dev/disk0 (external):
   #:             TYPE   NAME           SIZE       IDENTIFIER
   0: GUID_partition_scheme             512.1 GB   disk0
   1:              EFI   EFI            209.7 MB   disk0s1
   2:        Apple_HFS   Main           511.8 GB   disk0s2
Then you can mount it like so:
sudo mkdir /Volumes/EFI
sudo mount -t msdos /dev/disk0s1 /Volumes/EFI
Video performance
Because there is no guest video acceleration available for macOS, video performance is poor.
In Google Chrome in the guest you will need to toggle off the setting to “use hardware acceleration when available” to improve issues with elements not being drawn or flickering (especially video). Safari may be a better choice.
macOS’s built in “Screen Sharing” feature offers dramatically better framerates and latency than Proxmox’s browser-based VNC console, so if you have a real Mac to act as a viewing console, you can enable that in the VM’s “Sharing” settings and connect to the VM using the Screen Sharing app from your Mac instead:
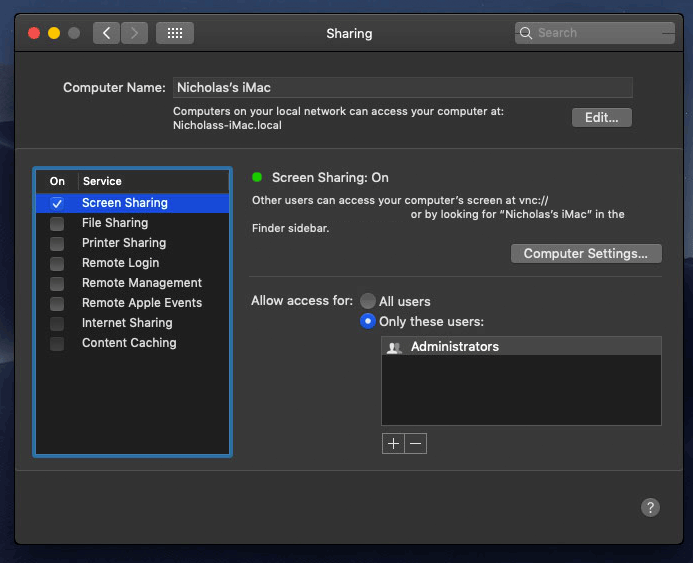
Apparently Screen Sharing is also compatible with VNC clients like RealVNC, so you should be able to connect to it from Linux or Windows consoles using RealVNC.
VMWare Fusion for Mac includes macOS guest drivers that support the VMWare video adapter that QEMU emulates. After installing Fusion, you can find these by right-clicking Fusion, clicking “show package contents”, then browsing to “Contents/Library/isoimages”. Double click “darwin.iso” to open it, then run the “Install VMWare Tools” option to install the driver, and restart. You can check that the driver has loaded by running “kextstat | grep -v com.apple”.
Unfortunately installing these VMWare drivers appears to offer little or no improvement in video performance – they may just be designed to provide basic framebuffer functionality.
The real magic bullet for video performance is to pass through a compatible video card using PCIe passthrough (though presently Mojave does not support most NVidia cards). This offers near-native performance. You can read more about how I’m using PCIe passthrough on my own installation here.
USB passthrough
Since I want to use this as my primary computer, I want to use a USB keyboard and mouse plugged directly into Proxmox, rather than sending my input through the web VNC console.
Proxmox has good documentation for USB passthrough. Basically, run “qm monitor YOUR-VM-ID-HERE”, then “info usbhost” to get a list of the USB devices connected to Proxmox:
qm> info usbhost
 Bus 3, Addr 12, Port 6, Speed 480 Mb/s
 Class 00: USB device 8564:1000, Mass Storage Device
 Bus 3, Addr 11, Port 5.4, Speed 12 Mb/s
 Class 00: USB device 04d9:0141, USB Keyboard
 Bus 3, Addr 10, Port 5.1.2, Speed 12 Mb/s
 Class 00: USB device 046d:c52b, USB Receiver
 Bus 3, Addr 9, Port 14.4, Speed 12 Mb/s
 Class 00: USB device 046d:c227, G15 GamePanel LCD
 Bus 3, Addr 8, Port 14.1, Speed 1.5 Mb/s
 Class 00: USB device 046d:c226, G15 Gaming Keyboard
In this case I can add my keyboard and mouse to USB passthrough by quitting qm, then running:
qm set YOUR-VM-ID-HERE -usb1 host=04d9:0141
qm set YOUR-VM-ID-HERE -usb2 host=046d:c52b
This saves the devices to the VM configuration for you. It’s possible to hot-add USB devices, but I just rebooted my VM to have the new settings apply.
You can also pass through USB devices by passing through an entire USB controller using Proxmox’s PCIe passthrough feature.
Try this link, Im not sure whats going on with https, I use lets encrypt, and the other sites are working, my apologies, i will troubleshoot https later…
https://images.themadcracker.com/proxmox.mojave.boot-error.png
I re-downloaded the image, and re-uploaded it to proxmox, the same error persists, also got https working, so the links should work now
I got it to boot the installer, I had to change my number of shared cores from 12 to 8…
However, now it is not showing any disks to install
https://images.themadcracker.com/proxmox.mojave.no-disk.png
Here is my proxmox config
args: -device isa-applesmc,osk=”…” -smbios type=2 -cpu Penryn,kvm=on,vendor=GenuineIntel,+invtsc,vmware-cpuid-freq=on,+pcid,+ssse3,+sse4.2,+popcnt,+avx,+aes,+xsave,+xsaveopt,check
bios: ovmf
boot: cdn
bootdisk: ide2
cores: 8
efidisk0: vmpool-zfs:vm-100-disk-2,size=128K
sata0: vmpool-zfs:vm-100-disk-0,cache=writeback,size=256G
ide0: storage:iso/Mojave.iso,media=cdrom,size=6G
ide2: storage:iso/clover-r4674-amd64.iso,cache=unsafe
machine: q35
memory: 24000
name: Mojave
net0: e1000-82545em=8A:81:E8:89:0F:84,bridge=vmbr0
numa: 0
ostype: other
scsihw: virtio-scsi-pci
smbios1: uuid=20526b3f-4556-45fe-afd3-50985133d3af
sockets: 1
vmgenid: 45286f92-79d4-413f-9588-98acb92101bd
Any ideas?
I changed sata0 to ide4 (Note: I found that it doesn’t like odd number ide’s) but the no disk error still persists
Did you follow the instructions to format the disk using Disk Utility?
Any tips for how to control the VM resolution? It boots as an iMac with 1920×1440 resolution, which is a little tall on my 5k iMac’s screen. I’ve done some googling, and there are lots of tips for VMware or Vitural Box, not so much for PVE.
That’s a weird resolution. You should be able to change the resolution in the guest’s UEFI settings, although you have to edit the resolution in Clover’s config.plist to match to have it boot correctly.
Yea, it’s weird, I’ve changed the clover settings at boot and in the config.plist, but it’s not having any effect on the Mojave resolution. Clover comes up in that resolution but MacOS stubbornly. I should just need to do the mount /Volumes/EFI and edit /EFI/EFI/Clover/config.plist with the below correct? How do I change the UEFI settings?
GUI
ScreenResolution
1280×1024
You ever figure this out? I have the same issue. Successfully changed the resolution in clover and UEFI settings but it has no affect once the VM actually boots into macOS.
I have a solution – not elegant, but working for me:
I have added to the args statement, at the end, after cpu flags and smp (I am also giving it 2×8 cores x 2 threads out of my 40 threads):
-device VGA,vgamem_mb=256
(I can not get it to give the adapter more than 10mb when seen from the mac side)
And then set in the normal
vga: virtio
I have no idea what it is doing with the last virtual adapter – I can not see it from the mac, and now I can keep the UEFI (and Clover) setting of 1920×1080..
One further note: my investigation leads me to believe, that it is not forcing a specific resolution, rather a specific aspect ratio 4:3 and not the 16:9 specified.. Thus when setting 1920 in UEFI, it is then resulting in 1440 height..
Now everything is working for me (even Store and iMessage) – but performance is not great.. (and I have very fast storage 8 MLC SSD’s on SAS3), not sure if it is the virtual sata or virtual gpu that is killing it the most, but I believe Mojave is more relying on “Metal API” than previous versions – and thus the penalty from virtual GPU is the real problem..
The virtual GPU performance is suuuuuper terrible, I would not consider using the virtual GPU for everyday desktop use.
I do have exactly the same situation. Have you found a solution for that?
In the meantime I’ve just scaled it down, which works OK, but I’m still looking for how to adjust the UEFI boot setting.
Hit F2 when the Proxmox logo appears during guest boot. You may need to edit your q35 config to remove the USB keyboard and start and stop the VM first.
Hmmf. I have the OVMF settings at 1600×1200 (and other lower settings) but it continues to boot to 1920. I probably have something set wrong, but it really wants to open at that resolution.
Nice tutorial , but i cant increase cpu cores more than 4 , as many users here reports . its hang on boot “reboot loop”
any solution for this issue ?
Thanks
You may be able to pass 8 cores. For some reason it doesn’t like strange numbers of cores.
Yeah , 2 sockets . 4 cores each work good .
Another concern , can we simulate cpu as host ? disable hypervisor for cpu to act as physical cpu to enable nested virtualization . my goal to run genymotion “Android virtual machine ” on this mac osx guest .
As i have this args work good on windows 2016 :
args: -cpu ‘host,-hypervisor,+kvm_pv_unhalt,+kvm_pv_eoi,hv_spinlocks=0x1fff,hv_vapic,hv_time,hv_reset,hv_vpindex,hv_runtime,hv_relaxed,kvm=off,hv_vendor_id=intel’
I’ve never had this working, macOS seems to dislike the reported CPU type if I try that. You may be able to get it to work by using Clover’s CPU ID faking tools.
First, very good guide! There seems to be nothing that could go wrong… sadly, when the installation reboots for the first time during the installation process, it stays forever at
Initialized /dev/rdisk5 as a 5MB case-insensitive HFS Plus volume
Don’t know how to avoid it. As I am using my own hackintosh for a long time now, I searched through different forums, but couldn’t find anything helpful. Perhaps I should try it with High Sierra again…
Hey Nick!
thanx again for terrific guide!!!
even I’m still on h.sierra and not figured out how to properly tune nv106 card (distorted dbl apple screen, black screen then, probably drivers issue) but using r9 280x perfectly fine, I’m posting here my completely different question as it’s more future proof version LOL:
what about clustering 2 hosts used as desktop located in 2 different locations over VPN? something similar to this setup: https://medium.com/myatus/poor-mans-proxmox-cluster-d7bea2da550c
even its a heavily outdated tutotial, I belive the concept stsys the same… I explain you my idea: I have 2 hosts, they have very very similar hardware (different revisions of same mobos, different count of cores on same cpus), ONE AT HOME (300mb fiber), ANOTHER AT WORK (50-100mb over wifi), ping suppose to be about 10ms, both used exactly like yours – as desktop machines w swapping VMs back and forth, w smaller ssd for few actual VMs and larger hdd to store unused or rarely used VMs, no external storage, all on zfs, but honestly zfs concept is a bit too much for me for now to diadgest so probably I will remove zfs shortly… anyway – I’m looking for a way to sync those two hosts. Clustering is not a simple concept, and my knowledge barely good to start experementing, but very good to blow up things many times – no good for daily used desktop enviroment LOL.
1.
So did you think about something similar,
2.
do you think this setup works on modern PVE including OSX guests
3.
and what is very important passedtrough videocards, cpu instructions and other hw?
4.
can you suggest other ways of more solid sync, may be a third party service, gdrive, use of a 2 node setup with external shared storage and sync it by night? zfs perks? Or weekly manual syncs will do too… also I do not have fixed ip’s, and I have to investigate if I can obtain it. Also I have a large dogy WD MyCloudeHOME (the keyword HOME, as it is not a true NAS server but some strange WD server, and can be accessed by linux/osx for backup but only locally in public samba share, otherwiseo only as a gdrive over their proprietary software or webinterface). Also a manual sync with phisically attaching a drive would do for me – but how to make it elegantly?
just want to open a conversation w everybody for such a concept of syncing 2+ desktop used PVE hosts!!!
cheers
Live VM migration on Proxmox (true clustering support) is disabled for VMs that have passthrough hardware enabled. However you can probably use the Ceph clustered storage engine to share a VM disk image between two nodes (so that you can shut it down at one location and start it up at the other location with minimal waiting time). I haven’t tried Ceph myself.
The absolute minimum for passthrough is the graphics card, otherwise the performance is godawful. Everything else can be emulated with fair success.
Hi Nicolas,
Followed your instructions and I got this error https://imgur.com/TpBaRxm
Have you met this yet?
Below is my VM’s conf:
args: -device isa-applesmc,osk=”ourhard…” -smbios type=2 -cpu Penryn,kvm=on,vendor=GenuineIntel,+invtsc,vmware-cpuid-freq=on,+pcid,+ssse3,+sse4.2,+popcnt,+avx,+aes,+xsave,+xsaveopt,check
bios: ovmf
boot: dcn
bootdisk: ide2
cores: 4
cpu: Penryn
efidisk0: local:110/vm-110-disk-1.qcow2,size=128K
ide0: local:iso/10.14.3.iso,media=cdrom,size=8000M
ide2: local:iso/clover-r4674-amd64.iso,cache=unsafe
machine: q35
memory: 8196
name: Mac
net0: e1000-82545em=00:15:5D:A7:65:0A,bridge=vmbr0
numa: 0
ostype: other
sata0: local:110/vm-110-disk-0.qcow2,cache=writeback,size=256G
scsihw: virtio-scsi-pci
smbios1: uuid=594faa41-d8f0-4942-ae4c-b9a97adb565a
sockets: 1
vga: std
vmgenid: 20e39f7f-42ea-4f06-8f1f-c927a642581d
And Proxmox version:
root@proxmox:~# pveversion -v
proxmox-ve: 5.3-1 (running kernel: 4.15.18-11-pve)
pve-manager: 5.3-11 (running version: 5.3-11/d4907f84)
pve-kernel-4.15: 5.3-2
pve-kernel-4.15.18-11-pve: 4.15.18-34
pve-kernel-4.15.18-10-pve: 4.15.18-32
pve-kernel-4.15.18-9-pve: 4.15.18-30
pve-kernel-4.15.18-4-pve: 4.15.18-23
ceph: 12.2.11-pve1
corosync: 2.4.4-pve1
criu: 2.11.1-1~bpo90
glusterfs-client: 3.8.8-1
ksm-control-daemon: 1.2-2
libjs-extjs: 6.0.1-2
libpve-access-control: 5.1-3
libpve-apiclient-perl: 2.0-5
libpve-common-perl: 5.0-47
libpve-guest-common-perl: 2.0-20
libpve-http-server-perl: 2.0-12
libpve-storage-perl: 5.0-39
libqb0: 1.0.3-1~bpo9
lvm2: 2.02.168-pve6
lxc-pve: 3.1.0-3
lxcfs: 3.0.3-pve1
novnc-pve: 1.0.0-3
openvswitch-switch: 2.7.0-3
proxmox-widget-toolkit: 1.0-23
pve-cluster: 5.0-33
pve-container: 2.0-35
pve-docs: 5.3-3
pve-edk2-firmware: 1.20181023-1
pve-firewall: 3.0-18
pve-firmware: 2.0-6
pve-ha-manager: 2.0-8
pve-i18n: 1.0-9
pve-libspice-server1: 0.14.1-2
pve-qemu-kvm: 2.12.1-2
pve-xtermjs: 3.10.1-2
qemu-server: 5.0-47
smartmontools: 6.5+svn4324-1
spiceterm: 3.0-5
vncterm: 1.5-3
Sorry I’ve never seen an error like that before. Maybe the macOS system logs have some more clues as to what went wrong.
Hi Nick! Sorry at the first, for my english (not my native) and for my blind (perhaps) eyes – i don’t understand how to work graphic card in mac os? Is there full acceleration? Which hardware is support (whats the better Nvidia or AMD for the best build) and can i use 4k display connected in my graphic card with 4k2k resolution (60hz)? Another one – can i use the iCloud and imessage in MacOs? I’m asking because in this moment just interesting for using Proxmox for MacOs and want try to select hardware (exception Display – already have) for best using. Thanks for answer and advice.
Getting graphics acceleration requires you to pass through a graphics card. There are currently no drivers available for modern Nvidia cards in Mojave (and there may never be), so you should definitely use AMD. I’m not sure what the best choice of AMD card is, you will need to research it in Hackintosh and VFIO (passthrough) communities. 4k 60Hz displays work great through DisplayPort, my monitor is 4k 60Hz. Please check out this post of mine to learn more about how passthrough is set up: https://www.nicksherlock.com/2018/11/my-macos-vm-proxmox-setup/
iCloud and the App Store definitely work. Getting iMessage to work requires a bunch of messing around with setting serial numbers in Clover, and many people never get this to work. There are a lot of tutorials available for this on the ‘net if you search. I tried using iMessage today and it doesn’t work for me (I can log in, but can’t send or receive messages).
Hey man. After many head scratching hours I managed to make it though.
One thing I wanted to point out: my system was not initially outputting video properly after selecting the OSX installer from clover. Turns out it wasn’t handing off the resolution properly, so it was totally scrambled and impossible to read.
I can’t remember verbatim what the menus were called, but I think this is close:
The fix was to go into clover settings, then Graphics, then load Vbios or force vbios. Don’t remember what it was called exactly, but it will have EDID display options above, then the last option will be VBIOS related. Enable it by using the arrow keys to navigate to it, then pressing space on it.
Hi, great guide, helped me install on Proxmox 5.3! However, the instructions seem to be broken on Proxmox 5.4, as the VM cannot find the Clover ISO. Any idea as to why this would happen?
Works perfectly for me on 5.4. Most likely you didn’t follow the instruction correctly about editing the media=cdrom part of the Clover ISO config line. Show the config line you have for that ISO.
Yup, that’s exactly what it was. I had done it, but it didn’t take for a bit after. Now I’m just trying to figure out why my passthrough isn’t working… Great guide though!
I’ve now updated the screenshots and instructions for 5.4’s re-shuffled UI (there are no material changes, the settings are just in different places). I’ve also added an example of what your VM config should end up looking like.
hi,
hope someone can help me.
i have the mojave.iso, the confusing osk key and i modified my 107.conf.
i patched the ovmf library (self compiled) but i always get the bootloop after starting the installer with clover.
i dont know what the problem is.
greats
SOLVED!!! OSK was wrong
So, I have found two dmg installers for High Sierra and Mojave on torrent. People write in the comments that the installer is working.
After downloading I’ve converted dmg to iso through dmg2img tool for linux. As I know uncompressed img is same to iso. Finally , clover do not see mojave or high sierra iso. Could you help to find the reason.
P.S. I have some doubt about Installing the fixed OVMF.
Here is the output of dpkg -l pve-edk2-firmware, is it OK?
Desired=Unknown/Install/Remove/Purge/Hold
| Status=Not/Inst/Conf-files/Unpacked/halF-conf/Half-inst/trig-aWait/Trig-pend
|/ Err?=(none)/Reinst-required (Status,Err: uppercase=bad)
||/ Name Version Architecture Description
+++-=================================-=====================-=====================-=======================================================================
ii pve-edk2-firmware 1.20190312-1 all edk2 based firmware modules for virtual machines
Hi,
Will the above steps for Mojave (10.14) work for older versions of MacOS as well (e.g. High Sierra – 10.13), or do they need to be modified?
Also – curious if you saw the recent commit to the OSX-KVM repo:
https://github.com/kholia/OSX-KVM/commit/dc01ccdc36d3499a439ae6225b791a6a43d232a5
He calls it a more “modern method”, still trying to figure out all the differences
Hi,
I tried proxmox 5.4 with mojave on a Fujitsu Primergy RX300 S8 (2x E5-2650v2, 256 GB Ram) server and I can start the vm and install mojave without problems.
But within the final mojave, after some seconds of mouse movement, the mouse and also the keyboard stop working.
I opened the activity monitor quickly after reboot and I can see everything working as expected. Unfortunately the input devices are gone completely after some seconds.
I already tried the args: -device usb-kbd,bus=ehci.0,port=2
and also to set the
[device “keyboard1”]
driver = “usb-kbd”
bus = “ehci.0”
port = “2”
part. But without luck 🙁
Can you help me with that?
I’m going through your guide, and currently at the MacOS install stage.
It’s rebooted a few times – and is now at the black screen, with the white Apple logo, and says “About a minute remaining”.
However, it’s saying about a minute remaining for nearly 40 minutes.
Is that worrying?
Any idea on how to figure out what’s going on, or kick things along?
I ended up force shutting down the machine, and starting it again – and it seemed to work the second time. I assume I got lucky, but would be good to know why the install seemed to stall there. Weird.
Just as a FYI to all – since I could not find info about it before taking the plunge (but had a ZFS Snapshot to fall back to)…
Upgrading a kvm VM from 10.14.4 to 10.14.5 works without any hiccups or “need to manage kext or whatever”..
(I do have an install with full access to iMessage/iCloud/iWhathaveyou).
Hi, thanks for the instructions. I have a problem with the installation. When I run the installation in a clover, it hangs on the apple logo. Read comments, nothing helped.
Check the passed CPU core count (go with 4) and check that the patched pve firmware package is installed.
If you hit space on the boot option you can toggle Verbose boot mode on which can give more information.
I’ve now updated the guide to download the installer from Apple’s software distribution servers instead of from the App Store, which should make this much easier to get started on (a Mac is no longer required to build the install ISO).
Also updated is the Clover version, and the recommended video card and network card.
hi, i’m new to proxmox
this is my config file
args: -device isa-applesmc,osk=”***” -smbios type=2 -cpu Penryn,kvm=on,vendor=GenuineIntel,+invtsc,vmware-cpuid-freq=on,+pcid,+ssse3,+sse4.2,+popcnt,+avx,+aes,+xsave,+xsaveopt,check -device usb-
bios: ovmf
boot: cdn
bootdisk: ide2
cores: 4
cpu: Penryn
efidisk0: local-lvm:vm-100-disk-1,size=128K
ide0: local:iso/Mojave-installer.iso,cache=unsafe,size=2078428K
ide2: local:iso/clover-r4920.iso,cache=unsafe
kvm: 0
machine: q35
memory: 8192
name: mojave
net0: vmxnet3=66:E9:DB:6E:6E:5E,bridge=vmbr0,firewall=1
numa: 0
ostype: other
sata0: local-lvm:vm-100-disk-0,cache=unsafe,size=64G
smbios1: uuid=f8e77a5f-0df7-46c0-bfce-65b19112f815
sockets: 1
vga: vmware
vmgenid: 6866056b-08ae-4f4f-9557-c948bfc90846
the installation of mac os stops with mach reboot, first this appears error: fault cr2, fault cpu
can you help me, thanks
Your “args” line is truncated halfway through the -device portion, but maybe this is just an artifact of the comment box.
Which CPU model do you have?
You’ve manually disabled “kvm” which will be ridiculously, unusably slow (like “taking 30 minutes just to boot” slow). Is this because your CPU doesn’t have VT-X enabled? Check that your host’s UEFI settings has “Intel Virtualisation Technology (VT-x)” enabled.
it wasn’t trucate it’s my fault, i’d changed that but nothing new happens.
now my config is this:
args: -device isa-applesmc,osk=”***” -smbios type=2 -cpu Penryn,kvm=on,vendor=GenuineIntel,+invtsc,vmware-cpuid-freq=on,+pcid,+ssse3,+sse4.2,+popcnt,+avx,+aes,+xsave,+xsaveopt,check -device usb-kbd,bus=ehci.0,port=2
bios: ovmf
boot: cdn
bootdisk: ide2
cores: 4
cpu: Penryn
efidisk0: local-lvm:vm-100-disk-1,size=128K
ide0: local:iso/Mojave-installer.iso,cache=unsafe,size=2078428K
ide2: local:iso/clover-r4920.iso,cache=unsafe
kvm: 0
machine: q35
memory: 8192
name: mojave
net0: vmxnet3=66:E9:DB:6E:6E:5E,bridge=vmbr0,firewall=1
numa: 0
ostype: other
sata0: local-lvm:vm-100-disk-0,cache=unsafe,size=64G
smbios1: uuid=f8e77a5f-0df7-46c0-bfce-65b19112f815
sockets: 1
vga: vmware
vmgenid: 6866056b-08ae-4f4f-9557-c948bfc90846
i have Intel(R) Core(TM) i5-2400 CPU @ 3.10GHz so vt-x is supported
my problem is that i’ve a foxconn 2ada motherboard, it was created specially for HP and there isn’t (or at least i can’t find it) any option related to vt-x so i disabled from proxbox
There’s no point trying to run macOS without KVM, it will be unusably slow.
Most likely your problem is being caused by QEMU’s emulated CPU not supporting the features macOS needs, or implementing them inaccurately (this is because you have KVM disabled, so QEMU has to emulate a complete CPU from scratch!).
Thanks a lot, I’ll retry in future switching my server with my computer but at the moment I don’t have so much time
Hi there! Thanks so much for your guide, it has proved invaluable. I have had some interesting effects when attempting your Mojave install on my hardware:
Everything works perfectly up untill after the installer restarts for the first time. Then the Apple logo appears with the progress bar below and this continues until there are 14 minutes remaining. Then the PC hangs, the lights on my keyboard go off, and a minute or so later everyone else that is connected to our switch (which is a cheap Asus 4-port wireless router of some sort that’s plugged into our cable modem) loses access to the internet. Well, more like they have no bandwith. Pages don’t load, YouTube video’s freeze, their wifi connections still work however and this “no bandwith effect” immediately ceases when I hit the “reset” switch on my PC case. When the PC restarts I am warned that the bios is corrupt and that it’s being restored from a backup. This happens every single time! In the end I installed High Sierra and this works just fine.
This is my hardware:
Gigabyte X79 UP5-Wifi motherboard with F4 bios
32GB Corsair Vengeance 1666mhz DDR3
Intel Sandy Bridge i7-E 3820
Gigabyte Geforce GTX 670 OC 4GB (I have an AMD RX 570 for passthrough)
Kingston 120gb SSD
Again, thank you for your efforts. This isn’t necessarily something that needs to be investigated, just an amusing tale of X79/C606 ownership. I do wonder if anyone else has experienced something similar?
Wow that’s extreme, lol. Are you passing through your video card already? If so, try removing that since that is the most likely cause.
Lol no I haven’t passed the card through, I’ve just sat down to do that now as it happens with High Sierra. I’m not too sore about this really as I’ve got a few Geforce 6xx cards lying around and I’ll at least be able to use those. My software doesn’t mind if I’m not running Mojave and I’ve been running Sierra on a real Mac Mini for some time, any upgrade will make a huge difference.
Thanks again Nicholas!
Dan.
Hi Nick,
Thanks for the great instructions. I’m using the latest version of ProxMox but seem to be getting stuck with the system failing to boot past:
Initialized /dev/rdisk5 as a 5 MB case-insensitive HFS Plus volume
Further research shows that this is due to the machine being unable to boot off a USB 3.0 drive and requires Clover and the BIOS to be set down to USB 2.0 (initially at least).
Have you any thoughts on this? Could you rebuild the Clover ISO with the latest version for me to test? I was working through your .sh file for it but must admit, I didn’t really know where to start!
Clover isn’t booting from USB so that isn’t the cause. There’s no reason to think that a newer Clover version will help either.
Do you have a longer boot log sample? Are you stuck on booting the installer?
I get through the disk utility and then installer, in first reboot I get the above error.
The only reason I said USB is that all the other virtualisation attempts suggest that as the fix with generally positive response.
I can get you the boot process in verbose Monday when I’m in the office. I screen recorded it.
Thank you!!!!
Thanks for being patient! The video of post is found below:
https://www.dropbox.com/s/b2bg87cfavft8eh/20190613_111039.mp4?dl=0
TJ
Hi Nick,
Thanks for all the time and effort you have put into this tutorial!
I’m having a problem. The installer runs fine until the first reboot. Clover does not detect the virtual hdd only leaving me the option to start the installer again…
Best regards,
Patrick
You’re formatting the harddrive APFS+GUID? Is it attached to SATA0?
Which options are shown on the boot screen after the first stage of installation?
Hello,
I am currently having the exact same problem (it doesn’t show up after the first reboot on clover) and my hard drive is on SATA0 and I formatted it to APFS with GUID partition map.
Thanks for your awesome tutorial.
Thank you so much for this tutorial!
I have the exact same problem, can’t get passed it.
for context :
proxmox 5.4-11
sata0: local:100/vm-100-disk-2.raw,cache=unsafe,size=64G
in disk utility it appears as “external”
formated as APFS+GUID
Also i had to remove media=cdrom from ide0 for the installer image to be found by clover
So i managed to fix it by changing the boot order in UEFI (thanks to comments below)
I re-ordered the boot order in UEFI “Boot Maintenance Manager” to put “UEFI QEMU HARDDISK QM00003” as first item.
Thanks so much for this amazing tutorial
Hi Nicholas 🙂
Thanks for this wonderful tutorial !!
For an unknown reason, macOS doesn’t boot, the system hang up.
Bellow, a screenshot in verbose mod with the problem (system frozen always here).
https://i.ibb.co/F0s14VJ/Capture-d-e-cran-2019-06-18-a-14-43-10.png
I have this problem on the first boot before I trying to setup macOS.
Do you have an idea about this problem?
My conf if it can help you :
args: -device isa-applesmc,osk=”xxxx-xxxx-xxxx” -smbios type=2 -cpu Penryn,kvm=on,vendor=GenuineIntel,+invtsc,vmware-cpuid-freq=on,+pcid,+ssse3,+sse4.2,+popcnt,+avx,+aes,+xsave,+xsaveopt,check -device usb-kbd,bus=ehci.0,port=2
bios: ovmf
bootdisk: ide2
cores: 4
cpu: Penryn
efidisk0: local-lvm:vm-100-disk-1,size=128K
ide0: local:iso/Mojave-installer.iso,cache=unsafe
ide2: local:iso/clover-r4920.iso,cache=unsafe
machine: q35
memory: 8192
name: mojave
net0: vmxnet3=96:7C:B2:BB:59:93,bridge=vmbr0,firewall=1
numa: 0
ostype: other
sata0: local-lvm:vm-100-disk-0,cache=unsafe,size=64G
smbios1: uuid=9ebb4cb4-0eb4-4489-91cd-cfaf419ec119
sockets: 1
vga: vmware
vmgenid: 222ceb28-6936-452c-8233-7d5a499f10ab
Did you install my modified UEFI firmware deb package in Proxmox? It can’t boot without it.
Thanks for your response and your time 🙂
Indeed, like an idiot I have forgotten that…
But after installing this firmware, I have an other problem : kernel panic every time.
If you have the time to help me, you can find the video off the problem here : https://www.dropbox.com/s/e9a6akuh4nji82w/proxmox.mp4?dl=0
I think this is the same problem as “Tom James” on others comment…
Thank again for your precious help.
That error is being triggered by DSMOS (“Don’t Steal macOS”) – it looks like you have your OSK set to “This is a dummy key. Enter the real key using the -osk parameter”! (the uninitialised default for that value in QEMU)
Make sure that it isn’t surrounded by curly quotes – it needs to use straight quotes.
Hi there
thanks for your blog and time is a great database for playing around with OSX on proxmox. I run a High Sierra 10.3.4 and there is an update in the queue to 10.13.4, I tried once, it crashed the VM and macOS disk disappeared, so restored backup. Now I wonder how I can upgrade from High Sierra 10.3.4 to this Mojave, I do not own a real mack, but my VM works, I have a core i5 or i7 (dunno) processor in proxmox and I have a hackintosh (with a q6600)
I actually upgrade proxmox from 5.1-? to 5.4-6 and the OSX VM with 10.3.4 does not start anymore, it seems to kernel panic during starting CLOVER image, then clover appears, and when I load macOS on disk macOS, I just see an Apple and nothing happens and this is a static screen, okay, not much else than a running OSX, but hey, this is about getting an OS and not a backside photo of an iPhone 🙂 Any thoughts, ideas, how to fix my VM or shall I just dump it and install Mojave on 5.4 now? I have no real data there, nothing important.
I think from memory between 5.1 and 5.4 there was a change in patches required – 5.1 required a patched QEMU and 5.4 requires a patched pve-firmware deb instead (link in the article). Make sure the old QEMU isn’t pinned and the new package is installed.
Installing Mojave now on my Proxmox 5.4 because noone reacted on my post before, even not the moderator… so I ran into an issue:
During installation (about 4 Minutes remaining of progress bar, installing ISO to External APFS Drive) I get the error: “a server with the specified hostname is not found. Please try again later, I tried now in 1-2 hours already again, even with new MAC address”. And if I retry to install MacOS without reboot of the VM I get the other error: “can’t install macOS because it requires downloading important content which can’t be downloaded.” Any thoughts/experiences?
I have logs of the issue that are more accurate
That’s macOS trying to contact Apple to download the Mojave install data. Check the network configuration for your VM because it sounds like it isn’t able to contact the Internet or does not have a working DNS server configured.
You can use wget/curl and ping in the installer’s Terminal to check your connection. (e.g. ping swcdn.apple.com)
If I use curl on my system to download the file that your install failed to fetch (http://swcdn.apple.com/content/downloads/12/03/041-64745/huoc25e1x9sx1vdjy9pbnj4sp0jxg7ia96/InstallInfo.plist) it works fine, so it’s definitely a problem with your network.
is it that I route port 80 and 443 to my webserver maybe? because all other things are working
actually I am able to reach that file from the same network with wget, and this machine has the same network setup like the machine where it is working… I really think apple wants to go to port 80 and 443, I found some strange posts about this error, issues with VPNs and so on
“A server with the specified hostname could not be found” means that the failure happens during DNS resolution before ports are even considered. Definitely not a problem with a webserver on your host. Check the DNS configuration in the guest with something simple like “nslookup google.com”
I cannot ping swcdn.apple.com but I can ping google.com so this is about some strange dns issue, before in terminal the ping was working, now after restarting the installer, it is not working again and now in terminal it is also not working anymore
After restarting the installer it’ll have to get a new lease from your DHCP server, so that can trigger an issue if your DHCP server is broken. Make sure your DHCP server’s IP address pool is not full and it is set to give the right DNS server IP address.
Which “Server” (DNS server) does nslookup report that it’s trying to use? Is that a working DNS server?
I changed my DHCP server now to hand out an alternative DNS server, that is NOT my domain server of my own domain running at home. so maybe that’s what is messing up things, the DNS server is the gateway IP now
I am aware that my Domain DNS server running on FreeNAS is not a perfect one, but this is how I have a AD Domain at home, which is quite funky, thanks for redirecting me on the DNS track.
Mojave seems to install successfully now.
check logs also here: https://pastebin.com/0Z39jiD7
more accurate logs https://ibb.co/Jpb99mf
Thanks and Kudos to NickSherlock!
This was a quite easy walkthrough, My IT at home is just not that easy, so I ran into my own issues with my AD domain.
I get an error message, the server cannot be contacted, installing from a mojave USB gives me a stop sing. Any tips?
The installer needs an internet connection to download Mojave, it’ll pick up an IP address and gateway from your DHCP server. Make sure it’s connected to the right network and DHCP is available.
Thank you Nicholas, it turned out the network connection wasn’t working properly! Good tuturial!
Thank you for the guide! Very well written and it appears there was a lot of work done to get there!
One question: After install reboots the first time, Clover pops up again and only shows the install media as a boot option. The format options i was given using the disk utility did not show “Schema” as an option that i could choose. Could this be the problem? If so, how might i correct this?
That’s really weird, it looks like macOS thinks that is a partition, not a drive. Is that drive at the top there which is marked as “internal” actually the full hard disk (rather than the installer’s drive)? If so erase that instead.
Another thing you can try is to tick the option in the menu at the top to show all volumes (I forget what the exact label is called), and then quit and reopen Disk Utility – this can reveal disks that are hidden by default.
Here are the notes on what I have tried and what the disk utility shows:
https://www.evernote.com/l/AAP9RuPtEoZCOo_XWwUmFu0wULIT-w_JPTw/
Thank you for your continued help, and for all the work it took to get here!
Erase that external “QEMU HARDDISK Media” drive – that’s the full drive rather than the APFS partition that seems to be on it already.
Ok, doing that seems to make no difference. After the install reboots, Clover still does not show the disk to allow booting from it.
I am really confused. I THINK I am doing things correctly. I am just not sure what Clover wants.
Please advise.
It looks like you’re doing it correctly to me too. You could try investigating the drive that was installed onto using the installer’s Terminal feature – check its partition layout with fdisk, maybe mount the main partition and see what’s on there.
Are you really only getting one boot menu option after the reboot of the first stage of installation?
Replying at a higher level than intended, as apparently there is a limit to how deeply you can nest replies:
I will have a look at it through the terminal and fdisk options later, but yes, Currently I only see the one option after first stage install reboot. It is really odd.
So I removed the install disk from the VM using ProxMox, then created a new one 65 gig “raw” format, and “Write back (unsafe)” cache as you show in your notes.
That did not seem to help either.
Here is the terminal output examining the state of the system after the first stage install has rebooted.
https://www.screencast.com/t/WPBXxyOtj
Please advise
I get the same output as you with my successful first-reboot-during-install (except mine doesn’t have the OSX_10_14_IncompatibleAppList.pkg which is interesting). What do you get with `diskutil list`?
I get this: https://i.imgur.com/BUO5YKv.png (disk1 is the hard disk, with disk3 being the APFS partitions that are hosted by it).
BTW what is your host CPU?
I have the same issue with only the macOS Base System disk showing in Clover.
However if I open the OVMF boot manager during boot (F2) and choose to boot from the first alternative called UEFI QEMU HARDDISK QM00003, I can see all the other disks in Clover.
What’s weird here is even though this boot option is supposedly the first option during normal boot, it still only shows the Base System disk, unless I specifically open the boot manager and chose this disk.
Not sure whats causing this or how to fix so normal boot works.
Interesting, good find!
First double check that your Options -> Boot Order setting in Proxmox points to the Clover disk and try again.
If that doesn’t work, in Clover, please try navigating to the “Clover Boot Options” menu (second from the left), then select Remove all Clover boot options, then reopen the Clover Boot Option menu and select “Add Clover boot options for all entries”. Then try stopping the guest and re-starting it and see what it boots!
You can also use the guest UEFI “Boot Maintenance Manager” to manually re-order the boot order and delete unwanted entries.
Ok, so after reading the comment by fREAST, i went in to the BIOS and chose that volume told it to continue, and Clover was able to see all the volumes properly now!
I had it complete it’s boot so it could finish intall, and all appears to be ok. It is even using the correct default option on reboot without having to go into the BIOS.
Thank you for your help and Thank you fREAST for your comment!
I meant to include the screenshot of the Disk Utility:
https://www.screencast.com/t/qlCPoifw
“Run the first bit of C code from this page (you’ll need XCode installed) and it’ll print out the 64 character OSK for you. Make a note of it.”
On Mojave 10.14.5, I get 64 character OSK:
“our…”
Any solution?
Yep that’s the correct OSK.
Has anybody tried to see is this will work on the new Proxmox 6.0 beta?
Do you need a new patched version of the OMVF library?
A new patched version is required, which I haven’t built just yet. I’m planning to try out Proxmox 6 Beta soon so I should hopefully have that within a week.
I’ve now released an updated OVMF library, and my existing Mojave VM boots fine on Proxmox 6 Beta. I haven’t migrated my full Proxmox passthrough setup over to 6 just yet though.
Cool, I will spin up a lab box and give it a try.
Also – do you know if MacOS Catalina (beta) will work with your procedure?
Catalina will probably require an updated Clover build.
One of our users was able to update an existing Mojave build to Catalina, and it boots successfully. Anecdotally, they reported it appear to run a bit slower. Could that be related to the Clover build, or would that only affect the boot process?
I’d like to do a clean-install with Catalina as well – I assume that would require the updated Clover build you mentioned?
Clover’ll only affect the boot process, anything after that shouldn’t be affected.
If you can boot Catalina with my current Clover version then it’s very likely that you can install it with that version too. The installer seems to be less demanding than the installed OS.
I installed Mojave and the first post install reboot goes without problems. When its time to boot Mojave all clover show is the Base Image iso and keeps booting a fresh install, not option to boot the just installed Mojave.
Any ideas why Clover is empty? I chose MacOS journaled as file system.
Also; when I add a UEFI disk to the VM I get a black screen and no bootup. Without the UEFI disk image all goes well.
macOS journaled isn’t an option, the installer will have reformatted that to APFS for you at the start of installation.
Please check out the previous few comments about manually picking the boot device from the UEFI menu – we’re not sure why this seems to be required now. Definitely don’t try to move forward without the EFI disk being attached, or you’ll get nowhere.
Did you install the pve firmware deb? It’s required.
Hello,
Thanks for the amazing guide. It worked great for me on Proxmox 5.x but since upgrading to Proxmox 6 I can’t boot OSX or the installer. I get the standard:
End InitBootStruct
Start LoadRAMDisk
End LoadRAMDisk
Start FinalizeBootStruct
Start RandomSeed
End RandomSeed
++++++++++++++++++++++++++++++++++++++++++++++++++++++
Any ideas what could be going on?
Thanks again!
It was me being an idiot… after upgrade I needed to install the patched driver again. Thanks again for the guide.
Haha no problem! I was thinking that apt-marking pve-edk2-firmware as held would have broken the in-place upgrade process to Proxmox 6 entirely, so macOS just not booting is getting off lightly by comparison :).
I got away with in place upgrade and pve-edk2-firmware marked as held, not sure if i was lucky or what but proxmox was fine and macos continued to boot like normal.
Hi,
I have followed your guide and when I boot (with -v) all is well for a few seconds “End Random Seed then +++++++++++++++++++++ then the display goes stupid and all the text is in top 3rd of screen and smeared multiple times (x12) across the screen. It finishes booting but is obviously unusable.
Any thought on how to resolve this?
PS I am using the latest Mojave extracted using Kholia’s script and dmg2img’d.
This is what happens if the screen resolution in your OVMF settings is not set to match the resolution configured in Clover.
You may need to hit “reset” on your VM when you reach the Clover boot screen for the resolution to be applied correctly.
Hi,
I think the phrase to use is Doh!!!
That all works OK and installs.
Hi,
After installing MacOS, it doesn’t appear in Clover. However, oddly enough, when I start the VM and hit escape, then boot menu and select the Clover disk, it appears and boots fine. What could cause this?
Check out the comments above about the boot maintenance manager. The root cause of this problem is still unknown, it seems that it also affects non-Mac VMs on Proxmox 6.
Great writeup. I successfully have this working with proxmox 6, passing through all 24 of my cores. Question: I have a 10gbe interface in proxmox. I tried adding this to a virtual interface and adding to macos, but it only shows up as 1gb. Any clues how I can assign a 10gbe interface to os x? I also tried pcie passthrough but ran into iommu issues so direct hardware passthrough may not be an option.
The emulated networking runs as fast as your CPU will allow, try benchmarking it and you’ll probably find that it exceeds 1Gbit.
The true solution for performance here will definitely be PCIe passthrough though!
Hi first of all thank you!
I have a i5 5820k which has 6 cores 12 threads. I can only get 8 vcores in the config. If I change the cores in the UI greater than 8, clover will boot but OSX boot will reset the VM. Any idea how can I get the full 12 vcores working inside the VM?
So I finally figured out. As said in previous comments, the VM doesn’t like “odd” number of cores. But it seems to do fine with odd number of sockets. To passthroug the 12 cores, I added “-smp 12,cores=4,thread=1,sockets=3” to the args section of the config, and it worked fine.
Thanks for the great guide!
I’m currently running Proxmox 6 and am installing macOS 10.14.
When attempting to passthrough a GPU (Radeon WX4100), the VM crashes at about 70% of the loading bar after a few purple lines appear. The display then goes blank and I have to reboot the system.
The setup works perfectly without gpu passthrough.
Any possible solutions?
Proxmox 6 shipped with QEMU 4.0.0 which introduced a regression in the q35 machine model, and this breaks most passthrough devices. You can add “-machine type=q35,kernel_irqchip=on” to your “args” line to fix this (this returns the IRQ handling to the previous, working, QEMU 3 model).
Another thing to try is to use Clover Configurator to set your SMBIOS to “iMac 14,2”, that’s the version I’m using.
Thanks for the suggestions!
I was already using the kernel_irqchip setting as well as the q35 machine type. I then attempted the iMac 14,2 SMBIOS, but encountered a difficulty with Clover resolutions.
The 1920×1080 OVMF settings now results in the distorted Apple logo/loading bar on boot. I have tried several other settings, but they merely result in the Apple logo shifting to different locations on the screen. What OVMF resolution are you using?
My OVMF resolution setting has no deleterious effect with my passthrough R9 280X video card – even if it doesn’t match Clover, macOS sorts itself out with no crash once it initialises the graphics system (at about the 80% mark on the progress bar).
Check your config.plist in your Clover EFI partition to see what resolution Clover is configured for (you can do this from Clover’s built-in shell), then set OVMF to match. The Clover image I provide here has the resolution set to 1920×1080, but you may have modified this in the course of updating your SMBIOS settings. The setting appears in GUI -> ScreenResolution.
Note that you may need to select Reset when the Clover menu first appears in order to have the resolution you chose in OVMF applied successfully (you can tell that this is going to happen when the “Proxmox” logo appears to be the wrong size [too big] during boot). Since it even affects the Proxmox logo, this appears to be an OVMF/Proxmox bug.
EDIT: Oh I nearly forgot, try adding the Lilu and WhateverGreen kexts to your Clover setup, I can’t remember if my setup worked correctly without these.
I cannot thank you enough for your help.
Checking Clover settings, my resolution was changed to 2048×2048, and changing OVMF settings to match this allowed me to boot successfully.
I then installed Lilu and WhateverGreen, and my VM now boots MacOS successfully with the WX4100 installed.
first of all thanks for the great tutorial!
Now, here is my issue:
Starting the vm I cannot access OVMF configuration fast enough.
Right after the vm starts is shows me ” Guest has not initialized the display (yet)”
Any idea how can I fix this?
thanks
thank you for the tutorial!
really needed something like this..
but I run into a problem i haven’t seen described here:
as soon as I hit install Mojave, I just see the Apple logo, and nothing else.. just stuck there..
I’m on proxmox 6.0-4
got the latest patches as per updated tutorial,
and .conf looks like this:
args: -device isa-applesmc,osk=”greatkey” -smbios type=2 -cpu Penryn,kvm=on,vendor=GenuineIntel,+invtsc,vmware-cpuid-freq=on,+pcid,+ssse3,+sse4.2,+popcnt,+avx,+aes,+xsave,+xsaveopt,check -device usb-kbd,bus=ehci.0,port=2
balloon: 0
bios: ovmf
boot: cdn
bootdisk: ide2
cores: 4
cpu: Penryn
efidisk0: local-lvm:vm-7900-disk-1,size=128K
ide0: local:iso/Mojave-installer.iso,size=2085288K
ide2: local:iso/clover-r4920.iso,cache=unsafe,size=256M
machine: q35
memory: 8192
name: osx-test
net0: vmxnet3=FA:F8:E6:73:EA:08,bridge=vmbr0,firewall=1
numa: 0
ostype: other
sata0: local-lvm:vm-7900-disk-0,cache=unsafe,size=64G
smbios1: uuid=3c8137d2-62b5-4ebf-866a-9ef889681a8a
sockets: 1
vga: vmware
vmgenid: 1d7078b9-bfd9-4ff1-bf03-6da28afce03c
has anything changed? my other guess is that at that point the VM is trying to establish a network connection? then I would have to adjust network setup, although I do doubt that’s the case..
I also tried to chmod 777 clover and mojave images in proxmox server, but again I think it’s just clutching the straws and going out on a limb trying out everything..
appreciate any help and suggestions!
I don’t think it needs the internet until later, but you may as well fix that now because you can’t install without it.
On the Clover boot screen, hit space on the installer option and tick Verbose boot. This’ll give you clues on where it gets stuck.
the all powerful verbose mode. of course.
but even so, the last few lines are:
Start RandomSeed
End RandomSeed
+++++++++++++++++++++++++++++++++++
and that’s it. not sure what it’s supposed to start afterwards.
that being said, I saw quite a few people are having this issue and the answers do vary a little bit, so I will try the solutions offered.
I will post an answer here if I find what works for me
thanks again!
Chances are good that you’re missing the patched pve-edk2-firmware package.
Hello,
First of all thanks for your guide!
I am trying to install macOS Mojave 10.14.6 on Proxmox 5.3-12.
I think that I followed all the steps but the systems hangs before the installer boots.
You can see the verbose output here https://imgur.com/a/LymE6Oy
You can see my conf file here https://pastebin.com/raw/2a3NaR1e
Problem solved!
I forgot to set the “machine: q35” on my conf!
FYI during the installation after the first reboot the Clover didn’t show the new options.
I resolved this issue by running a chmod 777 on clover and mojave image on proxmox server.
Hi,
Thanks for sharing this guide and maintain OVMF patch!
Based on your tests and Qemu regression, do you recommend to stay on Proxmox 5.4 or to upgrade to Proxmox 6 ?
That machine model quirk is the only issue I’ve found, and it was easily worked around. I think that has been fixed in QEMU 4.1 so eventually it will not be a problem at all.
Upgrading to Proxmox 6 is okay. I like the new ZFS 0.8 features!
What technique do you use to avoid the AMD reset bug, may I ask?
I’ve seen mention of at least a half dozen approaches:
– a machine-specific shell script plus a reset program
– restoring the GPU BIOS by copying a ROM BIOS image
– manually detaching the GPU just before stopping the VM
– configure Windows 10 to detach the GPU at shutdown
– don’t pass through the GPU audio (just the video)
My technique: Use a series of AMD video cards that was never affected by the reset bug! R9 280X is Tahiti XTL.
A reset program (https://forum.level1techs.com/t/vega-10-and-12-reset-application/145666) plus a lifecycle script for the VM that calls it is the approach I would take if I owned a Vega GPU.
Ah. That’s the smart approach.
I have a pair of Vega 56 cards and a CPU-internal GPU, and I’m about to install Proxmox 6. Then I’ll stop and restart Mac OS and Windows VMs a few times to see what happens. I’ll try the shell-script-plus-reset-test fix if I have to reach for the power switch more than once.
I also have Red Hat Virtualization to try out. (Perhaps a Red Hat programmer changed the VM start/stop code — plus maybe added some code to virtio-gpu? — to keep RHEL Virtualization customers from running into the reset bug.) (Wishful thinking, I suppose.)
Have you known anyone to successfully run Mac OS within the RHEL Virtualization environment?
Barry
Sorry, I’ve never heard of someone using that platform for Mac OS. If you do go the Red Hat option, you’ll probably need to provide OVMF_CODE.fd from this repository:
https://github.com/kholia/OSX-KVM
That contains my patch to OVMF that marks the pagetables as read-write (Clover can’t boot if OVMF has marked the pagetables readonly).
Excuse me. I am try to install Mojave on PVE6. I try 2 time and can’t find out what I miss. Clover on but cannot detect Mojave boot disk, no any boot option detect. Please advice. Here is my conf. (This PVE run on my MacPro)
args: -device isa-applesmc,osk=”…” -smbios type=2 -cpu Penryn,kvm=on,vendor=GenuineIntel,+invtsc,vmware-cpuid-freq=on,+pcid,+ssse3,+sse4.2,+popcnt,+avx,+aes,+xsave,+xsaveopt,check -device usb-kbd,bus=ehci.0,port=2
bios: ovmf
boot: cdn
bootdisk: ide2
cores: 4
cpu: Penryn
efidisk0: local-zfs:vm-104-disk-1,size=128K
ide0: local:iso/Mojave.iso,media=cdrom,size=2096900K
ide2: local:iso/clover-r4920.iso,cache=unsafe
machine: q35
memory: 8192
name: Mojave
net0: vmxnet3=96:9E:42:BE:D6:BB,bridge=vmbr0,firewall=1
numa: 0
ostype: other
sata0: local-zfs:vm-104-disk-0,cache=unsafe,size=64G
smbios1: uuid=2c369027-3223-44ad-9d37-a863fec90acc
sockets: 1
vga: vmware
vmgenid: 8f72bd93-632b-4dc3-8c99-86c0c74d0ed9
sorry I did not filter out key. and would like to say thank for you tutorial. I hope I can proceed.
On ide0 you need to replace media=cdrom with cache=unsafe.
would like to say thank you for your instruction and your kind review my config. and to let you know that’s after fix, I can follow your step with 6.0-6 successfully. Only if the system stop at 1 mins left for long just force reset it and try again.
My machine is MacPro 2013 and now I will migrate this vm to DELL 630 XEON server.
Hmm I’m not sure what would trigger that. Maybe double check that in the installer, you can use the Terminal feature from the main menu to ping google.com – the installer needs to have access to the internet to download Mojave for installation.
root@proxmox:~# cat /proc/cpuinfo | grep “model name”
model name : Intel(R) Xeon(R) CPU E5430 @ 2.66GHz
model name : Intel(R) Xeon(R) CPU E5405 @ 2.00GHz
x4
root@proxmox:~# cat /proc/cpuinfo | grep flags
flags : fpu vme de pse tsc msr pae mce cx8 apic sep mtrr pge mca cmov pat pse36 clflush dts acpi mmx fxsr sse sse2 ss ht tm pbe syscall nx lm constant_tsc arch_perfmon pebs bts rep_good nopl cpuid aperfmperf pni dtes64 monitor ds_cpl vmx est tm2 ssse3 cx16 xtpr pdcm dca sse4_1 lahf_lm pti tpr_shadow vnmi flexpriority dtherm
I assume this is not good enough for a Hackintosh 🙁 or is it ?
Sorry, it believe it needs SSE4.2 since High Sierra.