
With the release of macOS Catalina 10.15, this tutorial is now obsolete! Please check out the new Catalina tutorial here.
This tutorial for installing macOS Mojave has been adapted for Proxmox 5.4 from Kholia’s GitHub project for installing into vanilla KVM. There is more documentation there which will help out with enabling extra features and diagnosing problems!
Requirements
I’ll assume you already have Proxmox 5.4 installed. You also need a real Mac available in order to fetch the OSK key.
Your Proxmox host computer’s CPU must support SSE 4.2, so for Intel your CPU must be at least as new as Nehalem, which was the first CPU generation to bear the “Core” i5/i7 branding. Older CPUs will cause the finder to repeatedly crash after installation completes (with an Illegal Instruction exception in the graphics code).
Apparently modern AMD CPUs also support SSE 4.2 and can be used with this guide without any modification (maybe Bulldozer and certainly Ryzen), but I haven’t tested this myself.
First step: Create an installation ISO
On a Mac machine, download and run fetch-macOS-v2.py in a terminal to download the Mojave recovery image from the Apple software distribution server:
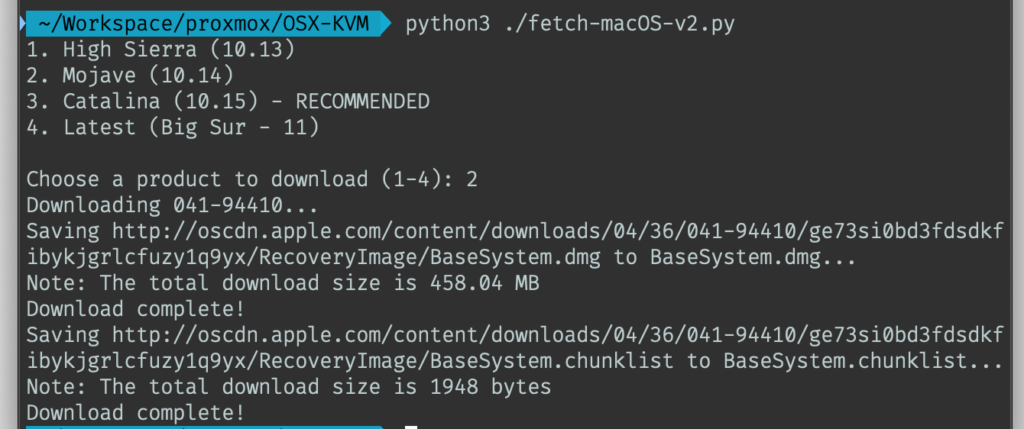
This results in a ~460MB “BaseSystem.dmg” file in the current directory. Convert that dmg into an “iso” like so:
hdiutil convert BaseSystem.dmg -format UDRW -o Mojave-installer.iso
mv Mojave-installer.iso.img Mojave-installer.iso
This is actually a raw disk image, not a true ISO, but Proxmox has better tools for picking and re-using ISO images than disk images. Upload the “ISO” to your Proxmox server’s ISO store (typically /var/lib/vz/template/iso).
It is possible to run this download script on Linux instead. In that case, you need to install the “dmg2img” package on your system, and replace the “hdiutil” command invocation with:
dmg2img BaseSystem.dmg Mojave-installer.iso
Prepare a Clover image
We’ll be using Clover as a bootloader for Mojave.
Download this Clover disk image (that I built using kholia’s build script from Clover r4920), unpack it, and upload it to Proxmox’s ISO store at /var/lib/vz/template/iso. Although it has a .iso file extension, this is actually a hard disk image.
Fetch the OSK authentication key
macOS checks that it is running on real Mac hardware, and refuses to boot on third-party hardware. You can get around this by reading an authentication key out of your real Mac hardware (the OSK key). Run the first bit of C code from this page (you’ll need XCode installed) and it’ll print out the 64 character OSK for you. Make a note of it.
Every Mac uses the same OSK, so don’t be surprised if it doesn’t look like a random string!
Create the VM
From the Proxmox web UI, create a new virtual machine as shown below.
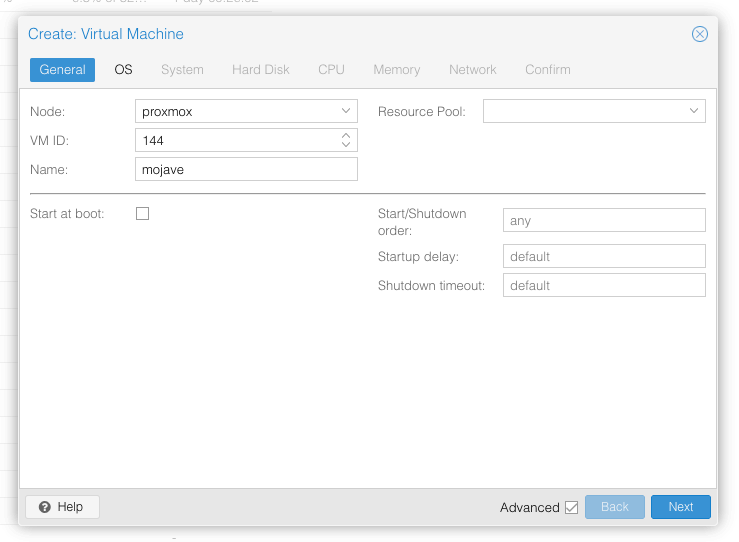
Keep a note of your VM’s ID 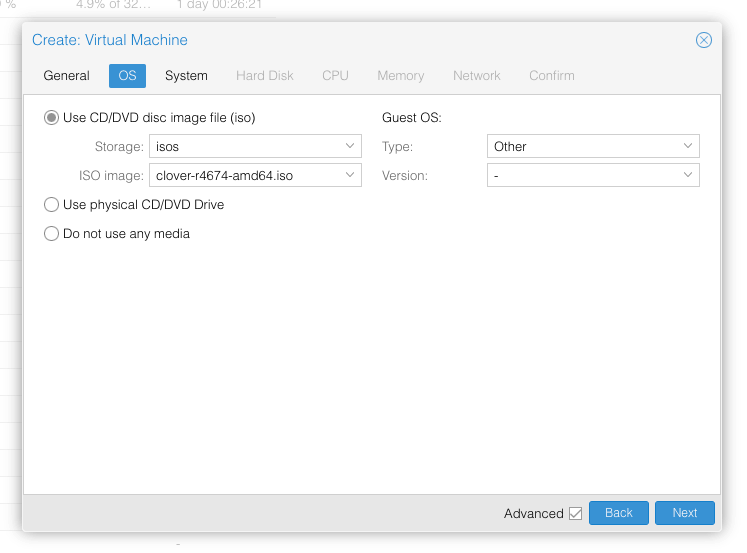
Select the Clover ISO you uploaded and set OS type to “Other” 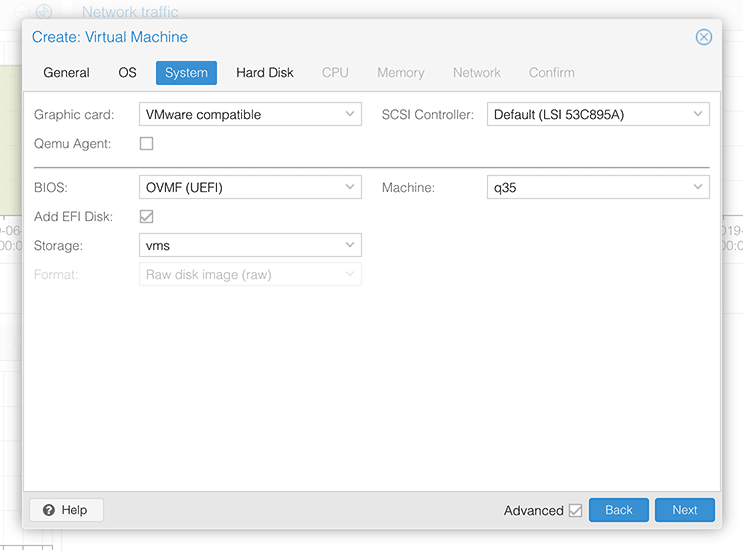
Set graphics to “VMWare Compatible”, set BIOS to OVMF (UEFI), set Machine to Q35, Tick Add EFI Disk, set SCSI to Default 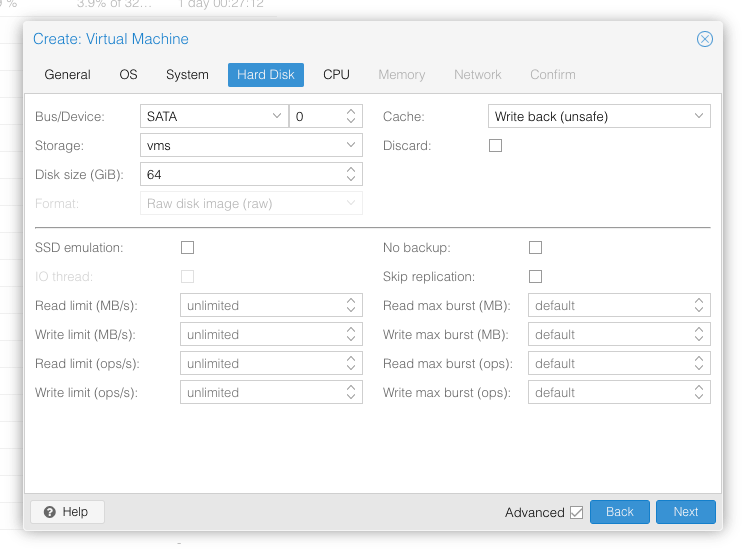
Set the size of the hard disk (I chose 64GB). Attach it to SATA0 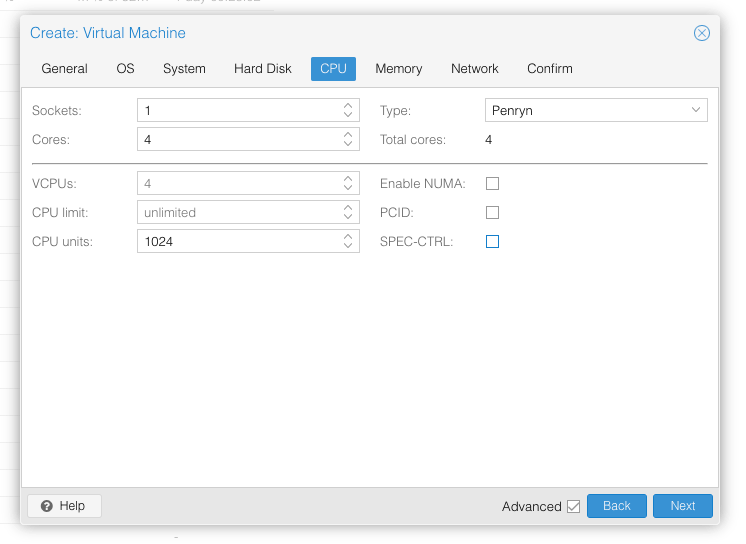
Set the number of cores for the VM, I chose 4 (note that some core counts seem to be troublesome, try 4 first). Set the CPU to Penryn. 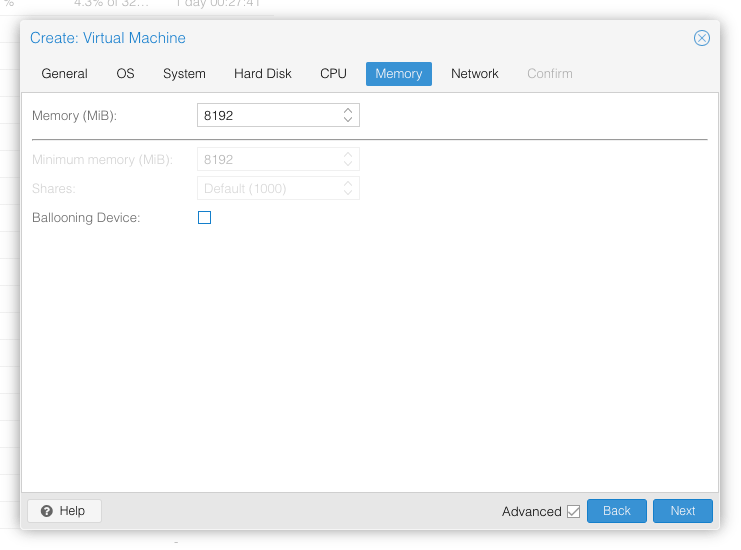
I chose a fixed memory of 8192MB. Disable ballooning because there is no balloon driver available for macOS. 
Choose VMWare vmxnet3 for the network model
In the Options page for the VM, ensure that “use tablet for pointer” is set to “Yes”.
In the Hardware page for the VM, add a second DVD drive at IDE0, set it to use your Mojave-installer.iso.
Don’t try to start the VM just yet. First, SSH into your Proxmox server so we can make some edits to the configuration files.
Edit /etc/pve/qemu-server/YOUR-VM-ID-HERE.conf (with nano or vim). Add this line, being sure to substitute the OSK you extracted earlier into the right place:
args: -device isa-applesmc,osk="THE-OSK-YOU-EXTRACTED-GOES-HERE" -smbios type=2 -cpu Penryn,kvm=on,vendor=GenuineIntel,+invtsc,vmware-cpuid-freq=on,+pcid,+ssse3,+sse4.2,+popcnt,+avx,+aes,+xsave,+xsaveopt,check -device usb-kbd,bus=ehci.0,port=2
We’re telling macOS that the CPU is Penryn (it doesn’t seem to like booting otherwise), but we’re enabling all the new CPU features found in Nehalem which macOS will require, plus some optional features found in later generations (AVX/AES).
Find the line that define the two “ISOs” (ide0 and ide2), and remove the “,media=cdrom” part from them. Add “,cache=unsafe” in its place. This will treat these as hard disks rather than DVD drives.
Save your changes, return to the Options tab, and change the boot order to put IDE2 (the Clover image) first. Your final VM configuration file should resemble this:
args: -device isa-applesmc,osk="..." -smbios type=2 -cpu Penryn,kvm=on,vendor=GenuineIntel,+invtsc,vmware-cpuid-freq=on,+pcid,+ssse3,+sse4.2,+popcnt,+avx,+aes,+xsave,+xsaveopt,check -device usb-kbd,bus=ehci.0,port=2
balloon: 0
bios: ovmf
boot: cdn
bootdisk: ide2
cores: 4
cpu: Penryn
efidisk0: vms:vm-144-disk-1,size=128K
ide0: isos:iso/Mojave.iso,cache=unsafe
ide2: isos:iso/clover-r4920.iso,cache=unsafe
machine: q35
memory: 8192
name: mojave
net0: vmxnet3=xx:xx:xx:xx:xx:xx,bridge=vmbr0,firewall=1
numa: 0
ostype: other
sata0: vms:vm-144-disk-0,cache=unsafe,size=64G
smbios1: uuid=xxxxxx-xxxx-xxxx-xxxx-xxxxxxxxxxx
sockets: 1
vga: vmware
Configure Proxmox
On Proxmox, run “echo 1 > /sys/module/kvm/parameters/ignore_msrs” to avoid a bootloop during macOS boot. To make this change persist across Proxmox reboots, run:
echo "options kvm ignore_msrs=Y" >> /etc/modprobe.d/kvm.conf && update-initramfs -k all -u
You must now install a patched version of Proxmox’s OVMF library in order to be able to boot Mojave.
Install Mojave
Now start up your VM.
Go to the Console tab, quickly hit Escape or F2 at the Proxmox logo to enter the OVMF configuration. If your keyboard doesn’t work, leave the Console tab, stop the VM, start the VM, then re-enter the console tab.
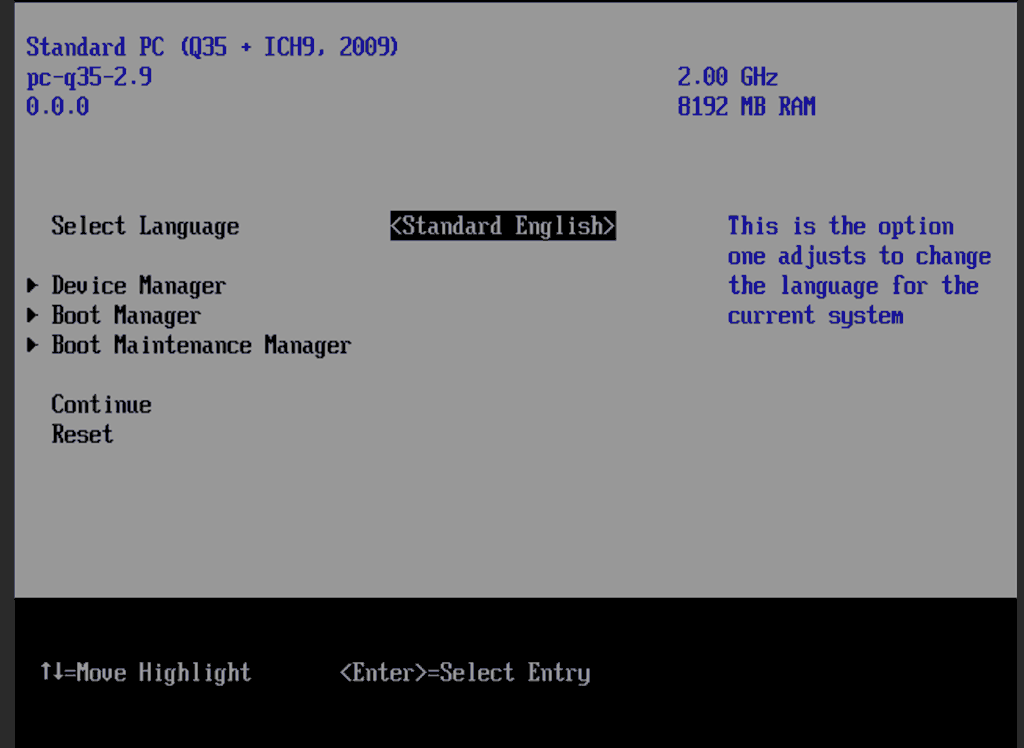
Select Device Manager 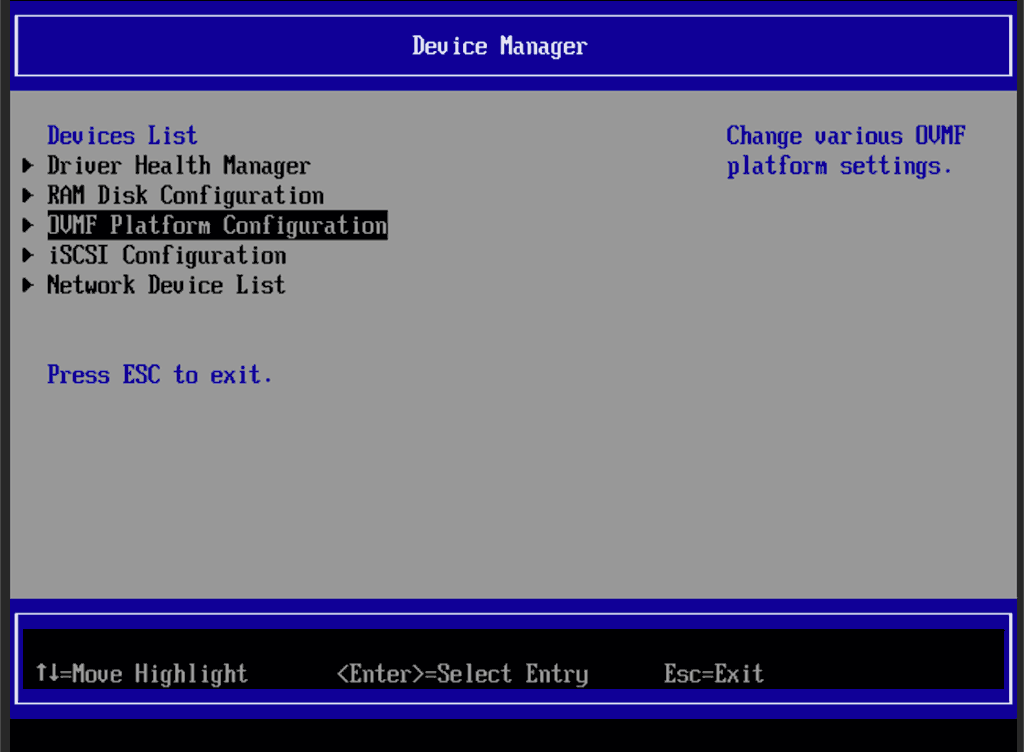
Select OVMF platform configuration 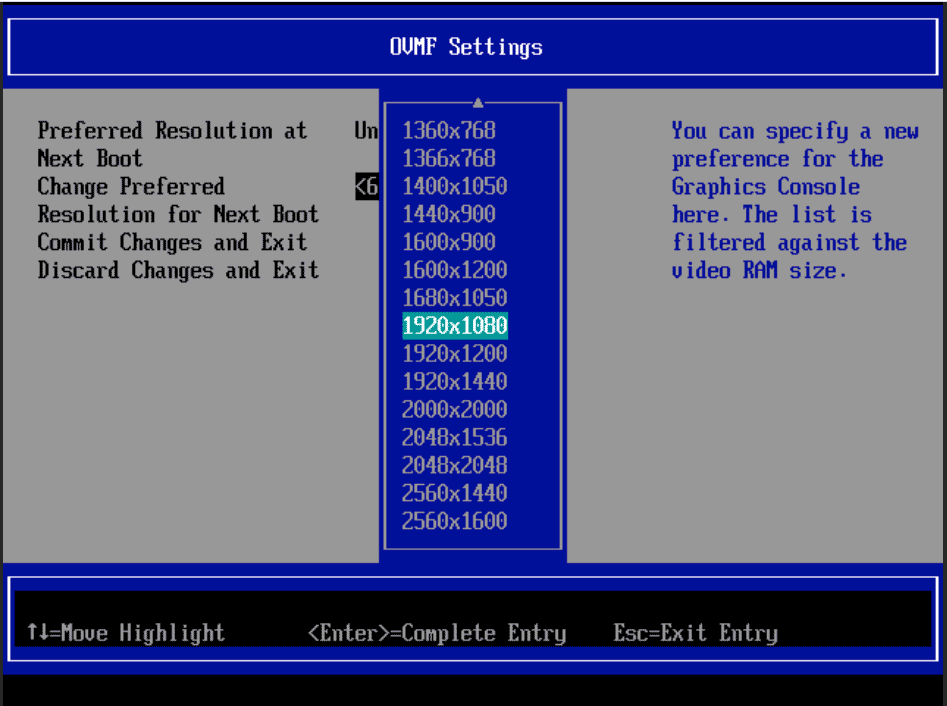
Set the preferred resolution to 1920×1080 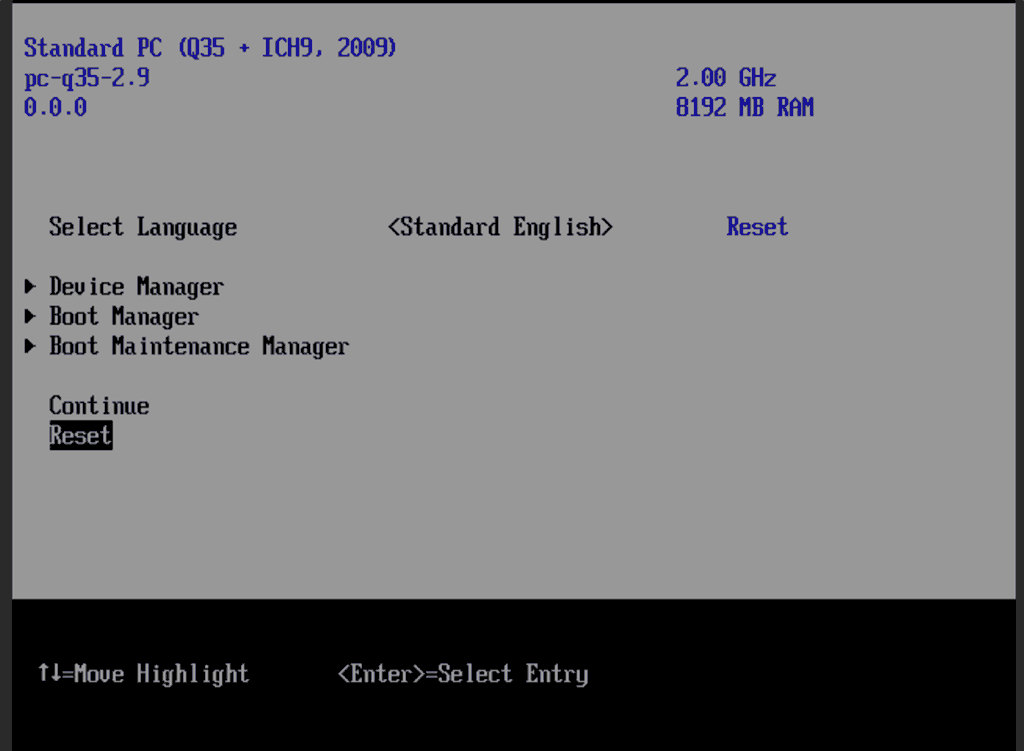
Save changes, then Reset
Follow the steps above to set the screen resolution to 1920×1080 and “reset” to apply the new settings (not “continue”). This step is required to avoid scrambled graphics on boot and a hang (Clover resolution must match OVMF resolution, or else the Apple logo will be off-centre and the progress bar will be smeared across the screen, resulting in a lockup).
Note that in future you may find that when initially started, your VM doesn’t properly apply the the 1920×1080 screen resolution until you hit “Restart Computer” in Clover when the Clover menu appears (or “Reset” on the VM). You’ll notice this happening when the “Proxmox” logo fills a large area of the screen on boot due to the low resolution.
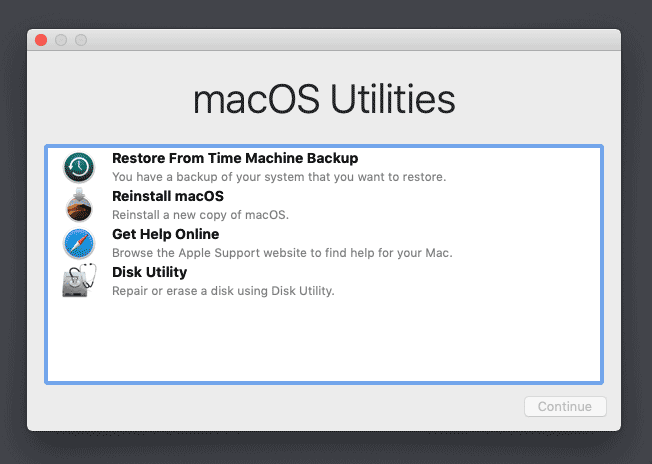
It should now boot into Clover.
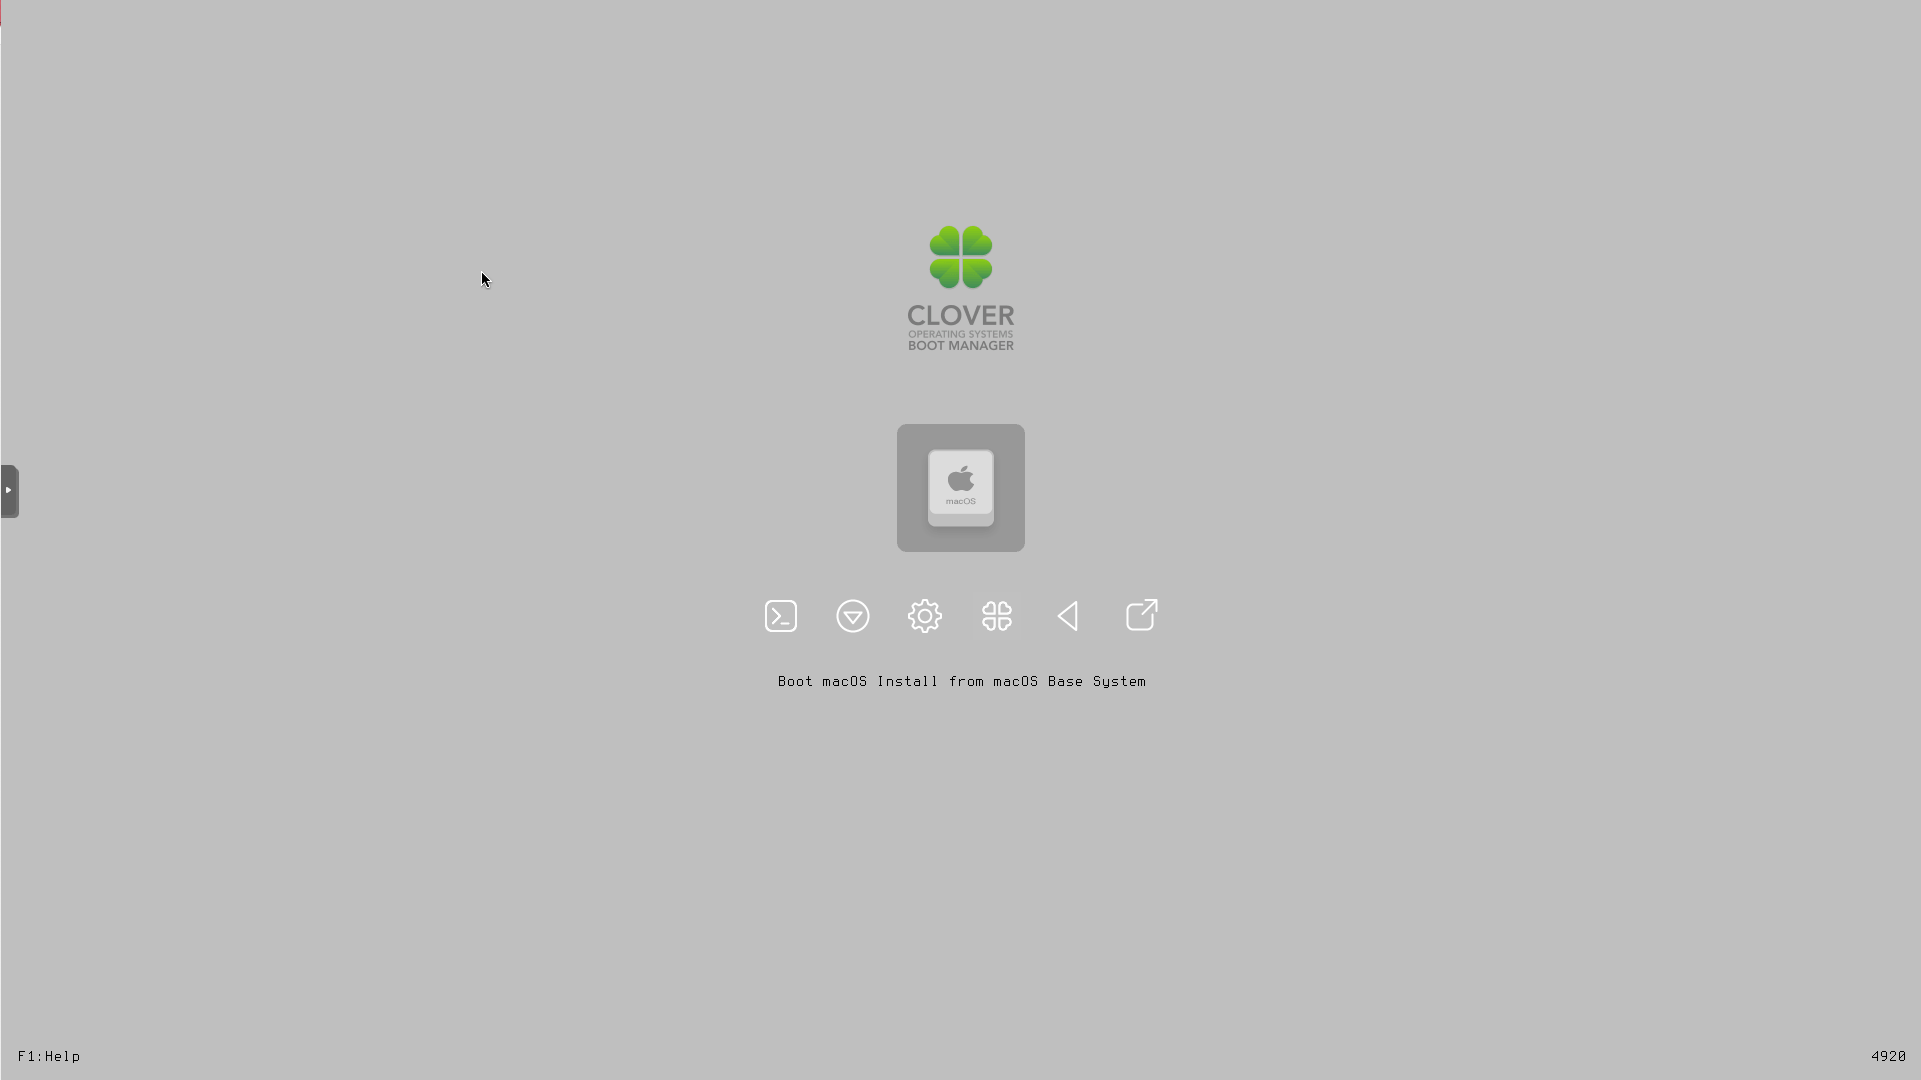
Press enter to boot the “Boot macOS Install from macOS Base System” entry and the installer should appear. Choose your language.
Our virtual hard drive needs to be erased/formatted before we can install to it, so select the Disk Utility option. Follow the steps below to format the disk:

Select Disk Utility 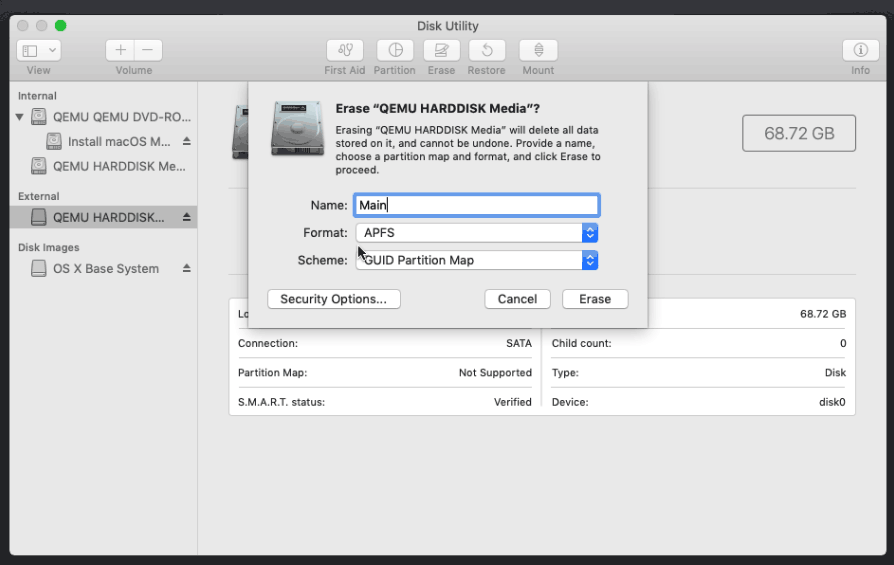
Erase the main disk (it’ll appear as an external drive). Choose APFS. I called mine “Main”. “Encrypted” probably doesn’t work at the moment because special Clover device drivers are required
Now we’re ready to begin installation!
Choose the option to reinstall macOS 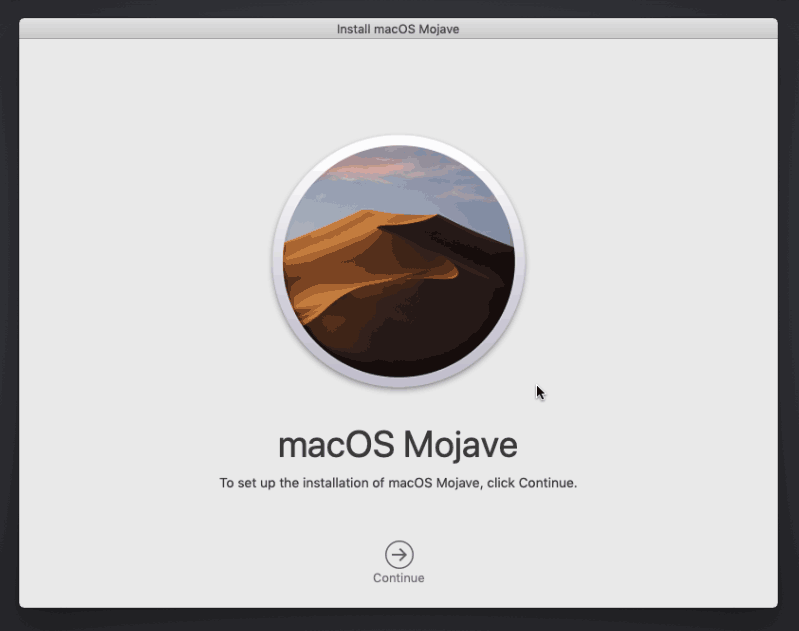
Continue… 
Choose the disk you erased 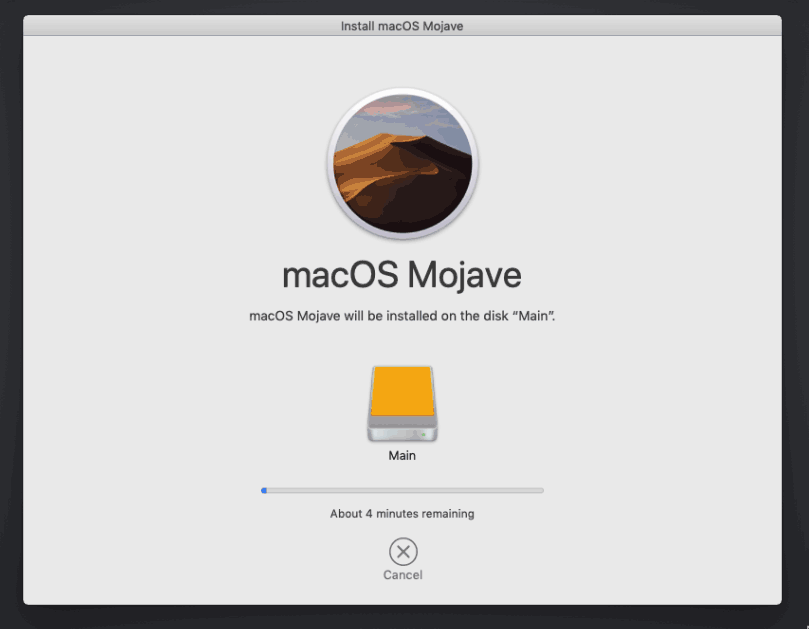
It’s installing!
After the first stage of installation, the VM should reboot itself and automatically continue installation by booting from the hard drive, then reboot itself a second time and automatically boot from “filevault prebooter”. Note that an Internet connection is required during installation, as macOS needs to download Mojave.
Answer the initial install questions, and you’ll be logged on! (Note that you’ll probably want to hold off on logging into your iCloud account until you’ve configured your SMBIOS to your liking in Clover Configurator)
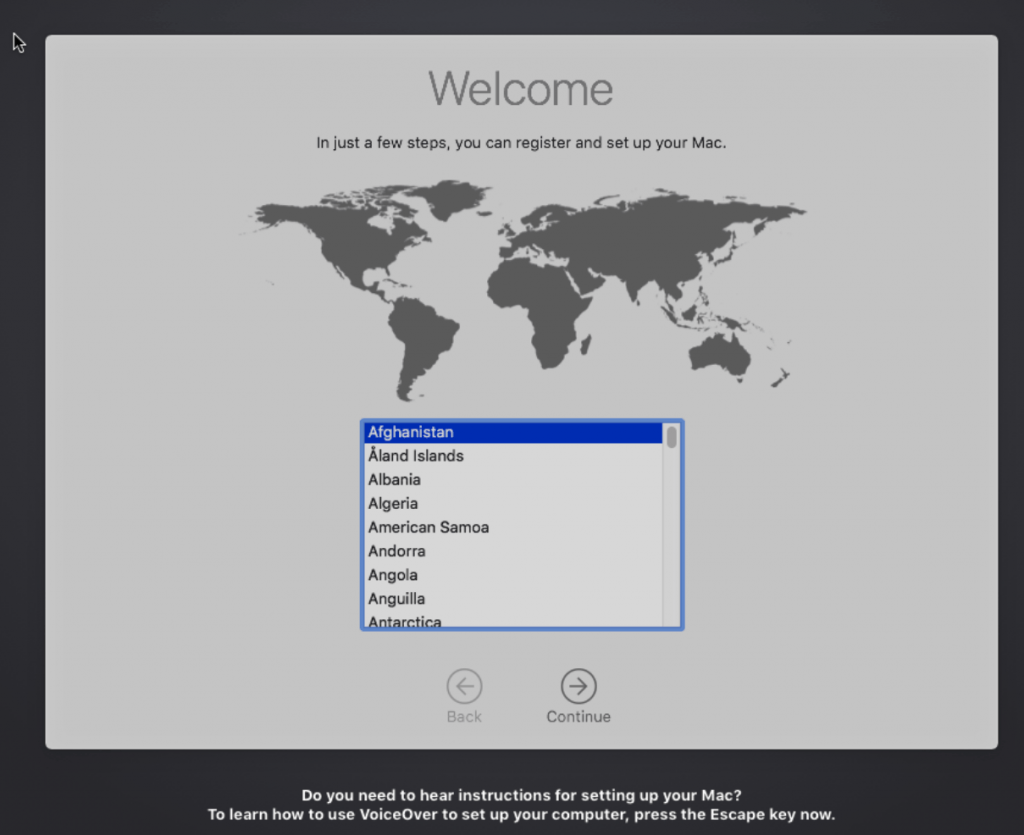
Answer the install questions 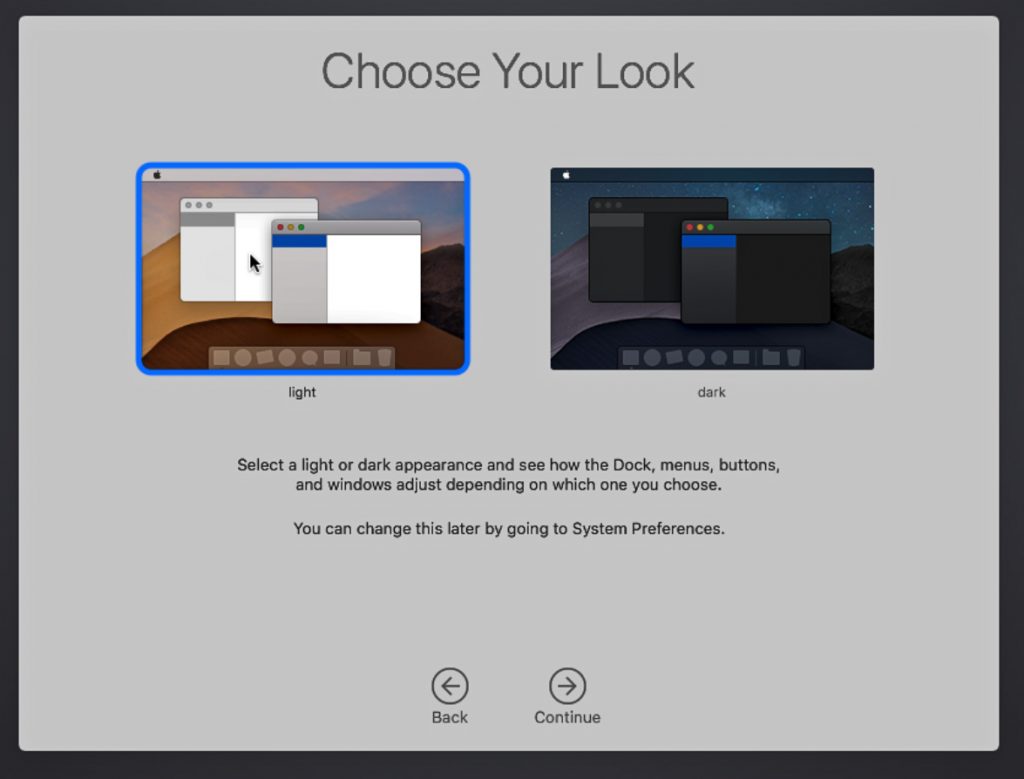
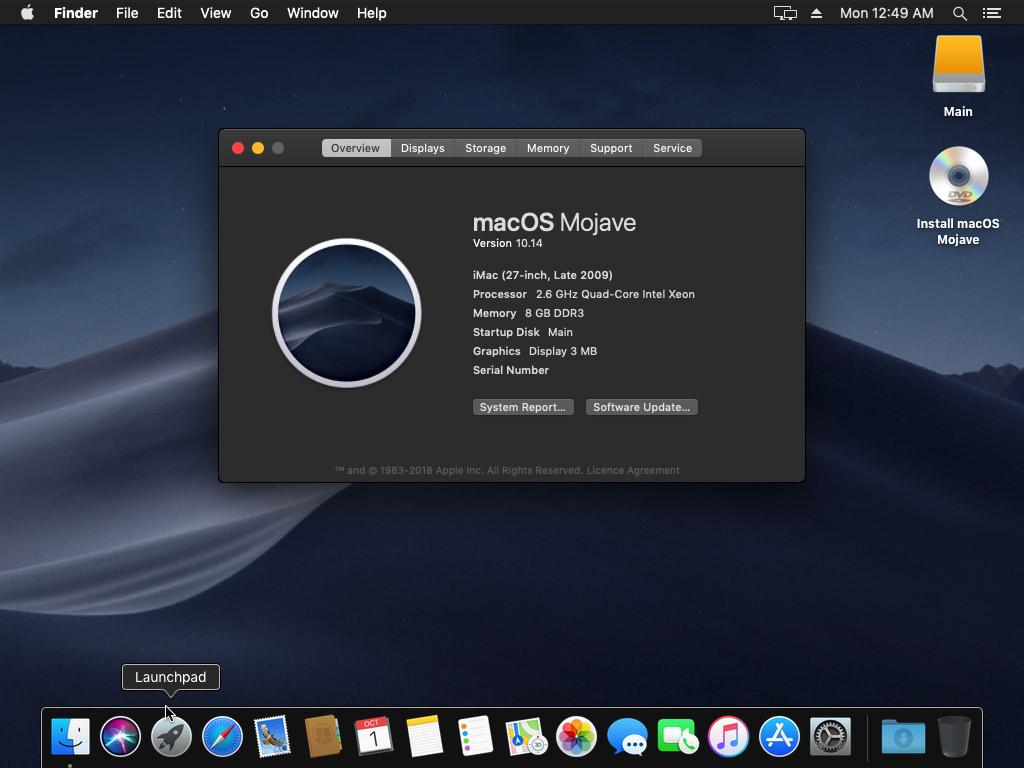
Ooh, new dark theme!
Make the Clover install permanent
We’re currently booting using Clover from the attached Clover ISO. Let’s install that to the hard drive instead. Pop open Terminal and run “diskutil list” to see what drives we have available.
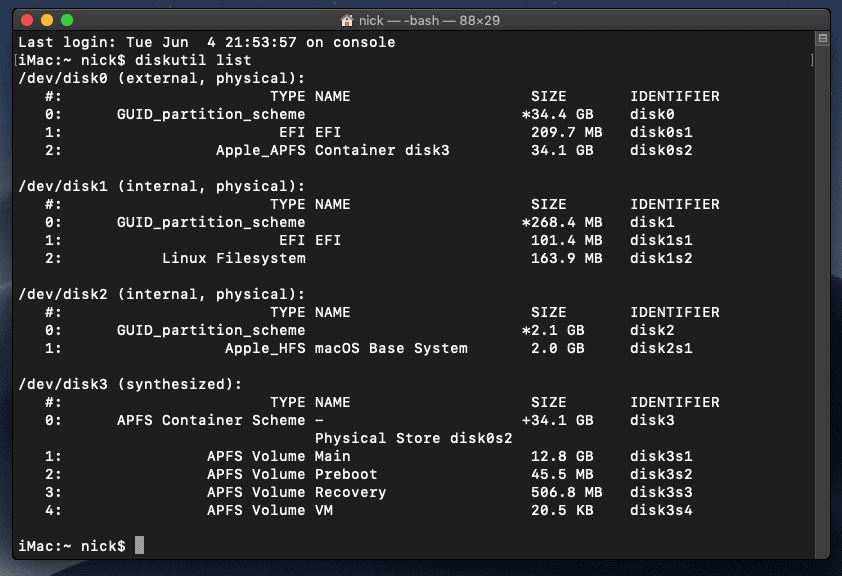
Use “sudo dd if=<source> of=<dest>” to copy the “EFI” partition from the Clover CD and overwrite the EFI partition on the hard disk. The Clover CD is the small disk with the “linux filesystem” on it, and the main hard disk is the one with the large Apple_APFS “Container” partition on it.
In my case these EFI partitions ended up being called disk1s1 and disk0s1 respectively, so I ran “sudo dd if=/dev/disk1s1 of=/dev/disk0s1” (N.B. if you get these names wrong, you will erase the wrong disk and you’ll have to start the installation over again!).
Now shut down the VM, and remove both the Clover and the Mojave installer drives from the Hardware tab. On the Options tab, edit the boot order to place SATA0 as the first disk. Boot up. If everything went well, you should see the Clover boot menu, and you can select “Boot macOS from Main” to boot Mojave.

Sleep management
I found that I was unable to wake Mojave from sleep using my mouse or keyboard. You can either disable system sleep in Mojave’s Energy Saver settings to avoid this, or you can manually wake the VM up from sleep from Proxmox by running:
qm monitor YOUR-VM-ID-HERE
system_wakeup
quit
“Prohibited” sign on boot
On a regular Hackintosh this is typically a sign that the boot drive can’t be read, but that situation is difficult to encounter with this VM setup. Nevertheless, I receive a “prohibited” sign during boot in perhaps 1 out of 20 system boots at random (maybe a timing bug?) If this happens, just hit “reset” for the VM to retry (no need to stop and start).
If you get it persistently, something is going wrong with the boot. You can boot macOS in “verbose” mode by hitting space on the macOS option in Clover and ticking the verbose option. This’ll give you a log during booting that can narrow down when the problem occurs.
Editing your Clover/EFI settings
You can use the Clover Configurator tool (Global Edition) to edit your Clover “config.plist” configuration file, which is stored in the hard drive’s EFI partition. This tool should mount the EFI partition for you. If you want to mount it without using Clover Configurator, first check the device name of the EFI partition in the terminal:
~$ diskutil list
/dev/disk0 (external):
   #:             TYPE   NAME           SIZE       IDENTIFIER
   0: GUID_partition_scheme             512.1 GB   disk0
   1:              EFI   EFI            209.7 MB   disk0s1
   2:        Apple_HFS   Main           511.8 GB   disk0s2
Then you can mount it like so:
sudo mkdir /Volumes/EFI
sudo mount -t msdos /dev/disk0s1 /Volumes/EFI
Video performance
Because there is no guest video acceleration available for macOS, video performance is poor.
In Google Chrome in the guest you will need to toggle off the setting to “use hardware acceleration when available” to improve issues with elements not being drawn or flickering (especially video). Safari may be a better choice.
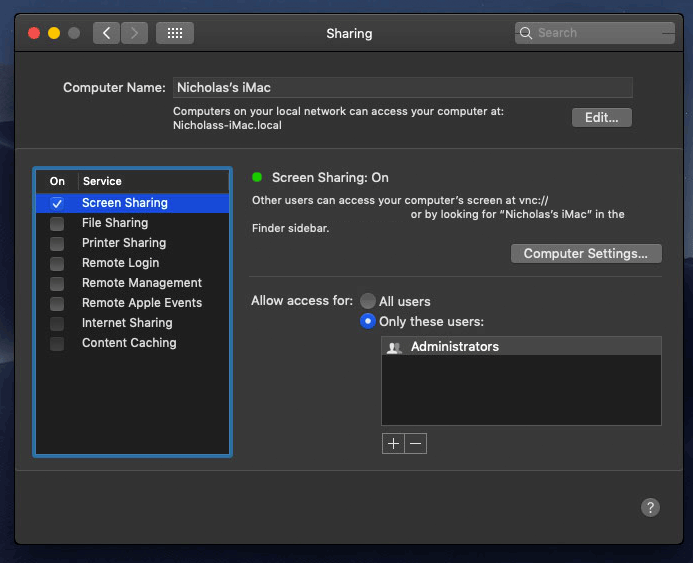
macOS’s built in “Screen Sharing” feature offers dramatically better framerates and latency than Proxmox’s browser-based VNC console, so if you have a real Mac to act as a viewing console, you can enable that in the VM’s “Sharing” settings and connect to the VM using the Screen Sharing app from your Mac instead:
Apparently Screen Sharing is also compatible with VNC clients like RealVNC, so you should be able to connect to it from Linux or Windows consoles using RealVNC.
VMWare Fusion for Mac includes macOS guest drivers that support the VMWare video adapter that QEMU emulates. After installing Fusion, you can find these by right-clicking Fusion, clicking “show package contents”, then browsing to “Contents/Library/isoimages”. Double click “darwin.iso” to open it, then run the “Install VMWare Tools” option to install the driver, and restart. You can check that the driver has loaded by running “kextstat | grep -v com.apple”.
Unfortunately installing these VMWare drivers appears to offer little or no improvement in video performance – they may just be designed to provide basic framebuffer functionality.
The real magic bullet for video performance is to pass through a compatible video card using PCIe passthrough (though presently Mojave does not support most NVidia cards). This offers near-native performance. You can read more about how I’m using PCIe passthrough on my own installation here.
USB passthrough
Since I want to use this as my primary computer, I want to use a USB keyboard and mouse plugged directly into Proxmox, rather than sending my input through the web VNC console.
Proxmox has good documentation for USB passthrough. Basically, run “qm monitor YOUR-VM-ID-HERE”, then “info usbhost” to get a list of the USB devices connected to Proxmox:
qm> info usbhost
 Bus 3, Addr 12, Port 6, Speed 480 Mb/s
 Class 00: USB device 8564:1000, Mass Storage Device
 Bus 3, Addr 11, Port 5.4, Speed 12 Mb/s
 Class 00: USB device 04d9:0141, USB Keyboard
 Bus 3, Addr 10, Port 5.1.2, Speed 12 Mb/s
 Class 00: USB device 046d:c52b, USB Receiver
 Bus 3, Addr 9, Port 14.4, Speed 12 Mb/s
 Class 00: USB device 046d:c227, G15 GamePanel LCD
 Bus 3, Addr 8, Port 14.1, Speed 1.5 Mb/s
 Class 00: USB device 046d:c226, G15 Gaming Keyboard
In this case I can add my keyboard and mouse to USB passthrough by quitting qm, then running:
qm set YOUR-VM-ID-HERE -usb1 host=04d9:0141
qm set YOUR-VM-ID-HERE -usb2 host=046d:c52b
This saves the devices to the VM configuration for you. It’s possible to hot-add USB devices, but I just rebooted my VM to have the new settings apply.
You can also pass through USB devices by passing through an entire USB controller using Proxmox’s PCIe passthrough feature.
Hi Nicholas,
thank you very much, installation runs smooth. Have you tried GPU passthrough?
Michael
I’ve heard that the Nvidia drivers don’t offer acceleration yet (even after hacking them to force installation on the unsupported OS). I think we’ll have to wait for some time after the retail release before we get those.
I have an AMD card I could try, I’ll report back with details.
Hi Nicholas,
At the end of the guide and in some comments, you talk about to use this VM to make it your primary computer.
So on Firefox and Atom I have some strange graphics behavior (you too ?) did you find anything to improve the performances of the VM ?
I have no GPU passthrough (no GPU card on the host).
Without a passthrough GPU you’ll have no graphics acceleration, which as far as I know dooms you to slow glitchy graphics.
Ok i see, you said “I have an AMD card I could try, I’ll report back with details.” can you tell us about that ?
thanks
Yep I’m now running Mojave with an R9 280x, however it has visual glitches and kills the host the second time the VM is booted. I’ve had the same problems with this card in previous macOS versions. I believe there are much better supported cards available now.
I was able to use GPU passthrough – but I haven’t found a solution to the frequently crashing finder – maybe I run proxmox on a Westmere CPU?
Run
cat /proc/cpuinfo | grep "model name"on Proxmox and let me know what CPU you have.Although being root I get a “-bash: /proc/cpuinfo: Permission denied”??
Anyway: I am using an Intel Xeon X5660…
That’s bizarre, I’ve never seen an error like that while trying to access cpuinfo. Are you missing the “cat” on the start of that command?
Your CPU *should* be supported, because it’s a die-shrink of Nehalem and I’d expect it to have the same features.
You might have to
cat /proc/cpuinfo | grep flagsand check if it lists ssse3 (note, three ‘s’s), sse4_2 and popcnt (the new features that Nehalem introduced over Penryn).Shame on me: to dumb for copy/paste!
12x model name : Intel(R) Xeon(R) CPU X5670 @ 2.93GHz
flags: fpu vme de pse tsc msr pae mce cx8 apic sep mtrr pge mca cmov pat pse36 clflush dts acpi mmx fxsr sse sse2 ss ht tm pbe syscall nx pdpe1gb rdtscp lm constant_tsc arch_perfmon pebs bts rep_good nopl xtopology nonstop_tsc cpuid aperfmperf pni pclmulqdq dtes64 monitor ds_cpl vmx smx est tm2 ssse3 cx16 xtpr pdcm pcid dca sse4_1 sse4_2 popcnt aes lahf_lm pti tpr_shadow vnmi flexpriority ept vpid dtherm ida arat
… everything there.
Please ignore my stupid response.
Thank you for the great tutorial!
I’ve followed all steps above but for some bizarre reasons can’t get Clover to recognize the Mojave iso mounted on IDE0. I’m on the latest version of Proxmox (5.2-5) with all updates applied.
Has anything changed recently that could cause this issue?
And of course, right after I posted this comment, I found the solution.
I mistakenly changed “media=cdrom” to “cache=unsafe” for BOTH ide0 and ide2. This is only necessary for ide2 (Clover), not ide0 (Mojave).
Thanks for the great tutorial!
I encrypted my disk when filevault2 appears I cannot enter password. Any ideas?
I haven’t been able to get this working yet. I think there is an EFI driver needed for the keyboard.
You can boot into the recovery mode to unlock the disk I believe (that’s a full copy of the OS so it supports the keyboard properly).
Hi,
i have problem – on booting I get error message. Do you have any idea how to solve it?
kvm: -device ide-hd,bus=ide.0,unit=1,drive=drive-ide1,id=ide1: Can’t create IDE unit 1, bus supports only 1 units
TASK ERROR: start failed: command ‘/usr/bin/kvm -id 101 -name MacOSX …’ failed: exit code 1
From the message it sounds like you might have two ide devices on the same bus (e.g. 0 + 1). The second IDE drive needs to be assigned to number 2 rather than 1. (drive #1 would be the slave of #0, which isn’t supported).
And how to setup it? I have added devices via web?
Edit the config file for the VM using SSH (it’s in /etc/pve/qemu-server) and rename the config line for ide1 to ide2.
Now it looks like this – so what I need to change – because there is already ide2…?
ide0: local:iso/osx.iso,cache=unsafe,size=5600M,media=cdrom
ide1: local-lvm:vm-101-disk-1,cache=unsafe,size=64G
ide2: local:iso/clover-r4428-amd64.iso,cache=unsafe
Thanks in advance!
Change one to sata0
Now it’s:
ide0: local:iso/HighSierra.iso,cache=unsafe,size=5600M,media=cdrom
ide1: local-lvm:vm-101-disk-1,cache=unsafe,size=64G
sata0: local:iso/clover-r4428-amd64.iso,cache=unsafe
and error still appears:
kvm: -device ide-hd,bus=ide.0,unit=1,drive=drive-ide1,id=ide1: Can’t create IDE unit 1, bus supports only 1 units
You need to use ide0 and ide2, avoid ide1.
Great! Now it looks fine – thanks for help!
And there is next problems…
1) Keyboard is ultra sensitive – it works, but single keypress effect 3-4 chars in system,
2) After first step of installation and reboot it freezes on apple logo. I have double checked resolution, I try to setup it just before restart, I try to reboot after change – nothing helps…
Aby suggestions?
It sounds like you have forgotten to add the “cpu” argument to the args, which is required for proper timing, so the clock runs fast and the key repeat is accelerated.
I have (from beginning) setup 1 socket, 4 cores, Penryn. Is there any other option?
Is it connected with boot problem or its different problem?
You are missing this in the “args” in your VM config file:
-cpu Penryn,kvm=on,vendor=GenuineIntel,+invtsc,vmware-cpuid-freq=on,+pcid,+ssse3,+sse4.2,+popcnt,+avx,+aes,+xsave,+xsaveopt,check
Thanks a lot! Now it works perfect!
I installed HighSierra from iso and just having this enoch_rev2898_boot.
I was enable to install Mojave like this from iso, but after the installation the os disk is not available in the boot menu (I can only see the install media)
Do you know how this can be resolved?
PS did not use clover things etc.
Enoch can’t boot APFS as far as I know, use Clover.
Diving straight in as a new Proxmox user I decided to follow this guide and install the now launched Mojave. Having checked my working twice now I can’t find any mistakes but find myself stuck on the apple logo right at the stage of selecting boot macOS install from clover. Seems to sit there indefinitely – longer than I have patience for! with no errors visible. Any suggestions welcomed – even if it’s just to look elsewhere for error logs!
Proxmox syslog shows this (Mojave is VM 103):
Sep 30 15:44:28 pve systemd[1]: Started 103.scope.
Sep 30 15:44:28 pve systemd-udevd[23051]: Could not generate persistent MAC address for tap103i0: No such file or directory
Sep 30 15:44:29 pve kernel: device tap103i0 entered promiscuous mode
Sep 30 15:44:29 pve kernel: vmbr0: port 4(tap103i0) entered blocking state
Sep 30 15:44:29 pve kernel: vmbr0: port 4(tap103i0) entered disabled state
Sep 30 15:44:29 pve kernel: vmbr0: port 4(tap103i0) entered blocking state
Sep 30 15:44:29 pve kernel: vmbr0: port 4(tap103i0) entered forwarding state
Sep 30 15:44:29 pve pvedaemon[14600]: end task UPID:pve:000059FD:0386B2A0:5BB0E14C:qmstart:103:root@pam: OK
Sep 30 15:45:00 pve systemd[1]: Starting Proxmox VE replication runner…
Sep 30 15:45:00 pve systemd[1]: Started Proxmox VE replication runner.
Sep 30 15:45:13 pve pvedaemon[14600]: successful auth for user ‘root@pam’
Sep 30 15:46:00 pve systemd[1]: Starting Proxmox VE replication runner…
Sep 30 15:46:00 pve systemd[1]: Started Proxmox VE replication runner.
Sep 30 15:46:15 pve pvedaemon[14600]: starting task UPID:pve:000064B2:0386DC71:5BB0E1B7:vncproxy:103:root@pam:
Sep 30 15:46:15 pve pvedaemon[25778]: starting vnc proxy UPID:pve:000064B2:0386DC71:5BB0E1B7:vncproxy:103:root@pam:
Sep 30 15:46:23 pve pvedaemon[14600]: end task UPID:pve:000064B2:0386DC71:5BB0E1B7:vncproxy:103:root@pam: OK
Here’s my .conf file (OSK edited):
machine: pc-q35-2.11
bios: ovmf
boot: cdn
bootdisk: ide2
cores: 4
cpu: Penryn
args: -device isa-applesmc,osk=”64proprietarychars” -smbios type=2 -cpu Penryn,kvm=on,vendor=GenuineIntel,+invtsc,vmware-cpuid-freq=on,+pcid,+ssse3,+sse4.2,+popcnt,+avx,+aes,+xsave,+xsaveopt,check
efidisk0: ZFS1:vm-103-disk-1,size=128K
ide0: local:iso/Mojave.iso,media=cdrom,size=7000M
ide2: local:iso/clover-r4542-amd64.iso,cache=unsafe
memory: 8192
name: MacOSMojave
net0: e1000-82545em=52:DE:77:8B:DB:DE,bridge=vmbr0
numa: 0
ostype: other
sata0: ZFS1:vm-103-disk-0,cache=unsafe,size=64G
scsihw: virtio-scsi-pci
smbios1: uuid=9cb82b25-d0be-4e32-8448-fd75b57f7a25
sockets: 1
vga: std
Your config looks good, try pressing space on the installer option in Clover and choosing Verbose Boot, this’ll reveal at what point it locks up.
I’ll probably be rewriting this tutorial soon for the final release of Mojave, so if you get completely stuck, come back here later and see if I have figured everything out :).
I’ve updated the tutorial now for the final release of Mojave, and I didn’t find any surprises (though I am now including a newer release of Clover, try that one).
Make sure that you have installed the patched UEFI package into Proxmox, it causes a hang on Mojave boot if it’s missing.
That’s it – had missed the instruction to patch UEFI, and even on verbose boot I didn’t get any error messages! Once applying the patched file I was up and running in no time at all. Many thanks!
Just wanted to throw a feedback that it is also working with the live version. However I had to use a different strategy to get the .iso.
Thanks mate for the nice howto.
First, thanks take the time writing these up. I’d used your guide to install High Sierra before with great luck before (on a different Proxmox host machine).
I’m having trouble with Mojave, however, running into an issue with a boot loop. This is the error message I’m getting:
Start ProcessOptions
End ProcessOptions
RegisterRestartDataProtocol: called. Ox7dI4ad9O
Restartnata protocol installed successfully.
Start SetConsoleMode
End SetConsoleMode
Start ReadllernelCache
End ReadllernelCache
Start UncompressllernelCache
End UncompressllernelCache
Start CalculateAdler32
End CalculateAdler32
Start LoadllernelFromStream
End LoadllernelFromStream
Start InitBootStruct
root device uuid is ‘ACB39C20-0C7B-3B0C-OB03-79EAOBBE3302.
End InitBootStruct
Start LoadRAMDisk
End LoadRAMDisk
Start FinalizeBootStruct
Start RandomSeed
End RandomSeed
++++++++++++++++++++++++++++++++++++++++++++++++++++++
Some searching seems to suggest it might be a ram issue? I’m really not sure though, or how to fix it. If you had any suggestions, I’d appreciate it.
Yeah, dying so early seems to mean that OsxAptioFix3Drv failed to create a workable memory layout. This is unusual on a VM however since we should all have the same emulated address space layout.
Check that you have the required Proxmox version, your “machine” line is correct, and your CPU has the required features (SSE4.1 is most notable). Redownload my Clover image just in case.
How much RAM are you giving the VM?
Great set of instructions! Thank you for taking the time.
2 questions / problems that I’m having if you can help.
1. Do you need to set the OVMF resolution at boot-up everytime or is there a way to make this configuration permanent?
– I’m able to set it to 1024×768 and press reset to avoid scrambled display but I need to do this every time starting the VM. Can this be set?
– Also is this is the only way to increase resolution beyond 1024×768?
2. I’m experiecning a VM lock-up / hang many times after the VM has been running for a bit. No crash but a complete lock with no mouse/keyboard input possible. Any ideas?
Thanks again!
Make sure you have added the EFI disk to allow it to store the UEFI settings permanently.
Yes, to increase screen resolution further, you need to use Clover Configurator to set your Clover GUI response higher, then set UEFI resolution to match.
Not sure on those lock-ups, sorry, unless it’s dying when it goes into sleep mode (disable sleep in power management settings)
Hi,
I have the same problems, sleep is disabled in Mojave but the VMs lock-up one time per day or more.
I can solve this issue using Pause and resume in Proxmox GUI, maybe its a problem related with Sleep in OSX with my CPU (Intel(R) Xeon(R) CPU E5-2650L 0 @ 1.80GHz).
Any Ideas?
Thanks.
My CPU’s the E5-2670 and I haven’t had any problems. Do you have any passthrough devices? I’d look to those as the source of trouble.
Also double check dmesg when the lockup happens for clues.
Yes, I have 3 VM with pci passthrough in three GPU GT710. This problem affects to all VMs. I will check dmesg looking for info.
Thanks Nicholas.
My GPU Passtrough is a little bit different than yours.
In my grub config, I’m blacklisting drivers and modules and I’m using “igfx_off iommu=pt”:
/etc/default/grub
GRUB_CMDLINE_LINUX_DEFAULT=”quiet intel_iommu=on,igfx_off iommu=pt rd.driver.blacklist=grub.nouveau rcutree.rcu_idle_gp_delay=1 video=efifb:off modprobe.blacklist=nouveau,lbm-nouveau,nvidia,nvidiafb,snd_hda_intel,snd_hda_codec_hdmi,snd_hda_codec,snd_hda_core,radeon,amdgpu,pcspkr”
The vfio modules:
/etc/modules
vfio
vfio_iommu_type1
vfio_pci
vfio_virqfd
In blacklist.conf I have only the pcspkr module (inherited form my default proxmox config):
/etc/modprobe.d/blacklist.conf
blacklist pcspkr
The KVM config I have also the setting “report_ignored_msrs=0”:
/etc/modprobe.d/kvm.conf
options kvm ignore_msrs=1
options kvm report_ignored_msrs=0
The kvm-intel.conf is like yours:
/etc/modprobe.d/kvm-intel.conf
# Nested VM support (not used by macOS)
options kvm-intel nested=Y
And I’m using vfio.conf file instead vfio-pci.conf for enter my pci ids:
/etc/modprobe.d/vfio.conf
options vfio-pci ids=10de:128b,10de:0e0f,8086:1d20 disable_vga=1
I have three GPU NVIDIA GT710 with same ids “10de:128b” for video, and “10de:0e0f” for HDMI audio, and the Sound card with “8086:1d20”.
With lspci I found the ids:
lspci | grep -i “NVIDIA”
03:00.0 VGA compatible controller: NVIDIA Corporation GK208 [GeForce GT 710B] (rev a1)
03:00.1 Audio device: NVIDIA Corporation GK208 HDMI/DP Audio Controller (rev a1)
04:00.0 VGA compatible controller: NVIDIA Corporation GK208 [GeForce GT 710B] (rev a1)
04:00.1 Audio device: NVIDIA Corporation GK208 HDMI/DP Audio Controller (rev a1)
81:00.0 VGA compatible controller: NVIDIA Corporation GK208 [GeForce GT 710B] (rev a1)
81:00.1 Audio device: NVIDIA Corporation GK208 HDMI/DP Audio Controller (rev a1)
And, in the VM config, I’m using:
VM0:
hostpci0: 03:00.0,pcie=1,x-vga=on,romfile=GT710.bin
hostpci1: 03:00.1,pcie=1
VM1:
hostpci0: 04:00.0,pcie=1,x-vga=on,romfile=GT710.bin
hostpci1: 04:00.1,pcie=1
hostpci2: 00:1b.0,pcie=1
VM2:
hostpci0: 81:00.0,pcie=1,x-vga=on,romfile=GT710.bin
hostpci1: 81:00.1,pcie=1
Only Audio for the VM1, and HDMI audio for the others (in VM1 I don’t have a HDMI audio compatible monitor).
Maybe, some config is wrong?
Thanks!
A thing more, I’m not using UEFI BIOS in DELL host, I set BIOS compatibility mode when I installed Proxmox, I’m not sure if not use UEFI could be a problem…
Hi Nicholas,
Any dmesg messages in some days, all is clean.
Any new idea?
I’m having the same issue getting stuck after “End RandomSeed”. I have the most recent version of Clover that you had attached, with a fresh install of Proxmox 5.2. I have it configured for 64G RAM and dual 6 core CPUs (running as sole guest on a dual 6 core xeon machine). I’ve checked and my cpus support SSE4.1. Any ideas? – desperate to get this working!
VM Config:
args: -device isa-applesmc,osk=”redacted:)” -smbios type=2 -cpu Penryn,kvm=on,vendor=GenuineIntel,+invtsc,vmware-cpuid-freq=on,+pcid,+ssse3,+sse4.2,+popcnt,+avx,+aes,+xsave,+xsaveopt,check
balloon: 0
bios: ovmf
boot: cdn
bootdisk: ide2
cores: 6
cpu: Penryn
efidisk0: local-lvm:vm-100-disk-2,size=128K
ide0: local:iso/Mojave.iso,media=cdrom,size=6G
ide2: local:iso/clover-r4674-amd64.iso,cache=unsafe
machine: pc-q35-2.11
memory: 65536
name: macServer
net0: e1000-82545em=42:A0:CB:B1:EA:34,bridge=vmbr0
numa: 0
ostype: other
sata0: local-lvm:vm-100-disk-1,size=250G
scsihw: virtio-scsi-pci
smbios1: uuid=0a1a565e-f14d-4212-8b15-5b2d89b48234
sockets: 2
vga: std
Try passing through a different core count (like 4), it doesn’t seem to like some combinations (probably something that could be fixed by changing the CPU ID that Clover reports).
Make sure you’ve installed the patched firmware deb into Proxmox.
Changing cores from 6 to 4 worked, thank you!
Has anyone noticed that the os x guest doesn’t appear to fully utilize the underlaying hardware? In my case when I look at my guest CPU utilization while performing an intensive task (video encoding for example) the guest appears to be utilizing 100% CPU. During the same time when I look at the host utilization in proxmox it appears to be lower. Its hard to see for certain. This is a single guest on the host.
You’re probably just seeing the difference in the way that CPU usage is reported. macOS calls one core being fully saturated “100%” usage, but with a 4 core guest, Proxmox would call that only 25% usage.
I can happily use “98% of 32 CPUs” as reported by Proxmox when running a CPU benchmark in the guest.
Worked perfectly with Proxmox 5.2 and Mojave. Kudos.
Hi,
Many thanks for this amazing how to ! I was able to have a machine up and running in no time !
I entended to use this VM as a MacOS server cache, and time machine backup. But, I’m not able to activate the cache content (for iCloud and so) in preference/sharing…
Do you have any ideas with is it not working ? I didn’t find any clues on internet
Thomas.
I tried activating it from the command line, and it shows a proper error message:
$ sudo AssetCacheManagerUtil activate
2018-10-25 20:47:39.911 AssetCacheManagerUtil[37766:1427282] Failed to activate content caching: Error Domain=ACSMErrorDomain Code=5 “virtual machine” UserInfo={NSLocalizedDescription=virtual machine}
Looks like it refuses to enable the caching if it detects you’re running under a virtual machine, very curious.
It’s possible that you can avoid having the VM detected by macOS by setting “vmware-cpuid-freq=off” in the args (instead of “on”) and “kvm=off”. However in this case the timing in the guest will be off (you’ll probably notice window animations playing at the wrong speed and the realtime clock will drift etc), so it might only be useful for non-interactive usage.
Hum,
Thanks for the quick reply.
I tried with kvm=off and vmware-cpuid-freq with no success, same error !
Maybe I can do something with Clover ? FakeSMC or something
Hi,
great tutorial!
Are you able to access the VM per Spice instead of VNC?
Hi,
For me, no booting from clover ISO :(.
Proxmox 5.2, Installing the fixed OVMF.
I used my Mojave.iso and Clover.iso to build a VM in virtual box on one iMac and Ubuntu hosts, so I think is not the ISO files. I don’t know where is my mistake. I also tried with this clover, but no boot either.
thanks
The Clover menu doesn’t even appear? Make sure you have removed media=cdrom from the Clover device.
No Clover menu and i test without media=cdrom like this :
ide0: local:iso/10.14_Mojave.iso,size=8000M
ide2: local:iso/Clover.iso,cache=unsafe,size=13050K
But Shell EFI is the only one.
Thanks for the help
You need to add media=cdrom back to the Mojave line.
Still a Shell EFI, how I can check if your fixed OVMF is really installed maybe I have some errors here…
Because when I change the resolution in the bios, and reset. (i try to remake and re install)
When I reboot is the default settings getting back. Anyway, my main problem is no boot from clover…
Is your CD/HDD is IDE or SATA ? and witch numbers ?
Thanks for your help.
On Proxmox, run dpkg -l pve-edk2-firmware. You need to see 1.20180612-1, and not 1.20181023-1, which is a newer version from Proxmox that I haven’t released a patch for yet.
Make sure you’ve added an “EFI Disk” to your virtual machine, because it’s needed to remember your screen resolution settings.
IDE and SATA both work, but use what the tutorial suggests, because that’s had more testing.
Yes is was the right one :
pve-edk2-firmware 1.20180612-1
Args added…
bios: ovmf
boot: cd
bootdisk: ide2
cores: 2
cpu: Penryn
efidisk0: local-lvm:vm-114-disk-1,size=128K
ide0: local:iso/Mojave.iso,size=8000M,media=cdrom
ide2: local:iso/Clover.iso,cache=unsafe,size=13050K
machine: pc-q35-2.11
memory: 4096
name: macOS-Mojave
net0: e1000-82545em=A2:61:00:E7:92:80,bridge=vmbr0
numa: 0
ostype: other
sata0: local-lvm:vm-114-disk-0,cache=unsafe,size=50G
scsihw: virtio-scsi-pci
smbios1 uuid …
sockets: 1
vga: std
Hard to find the mistake.
thanks
It looks like you didn’t unzip the Clover ISO, it should be 256MB.
Yes it’s beacause I use my clover, so i change to use your clover.iso.
from :
ide2: local:iso/clover-r4674-amd64.iso,media=cdrom,size=256M
to:
ide2: local:iso/clover-r4674-amd64.iso,cache=unsafe,size=256M
And after commit save, I used the last menu boot manager to add new value to boot on the disk with clover and after reset it’s a boot !
I dont kown why my clover is not booting but i think the EFI disk is not saving configs for me.
Thanks a lot !
Hi Nicholas,
I was able to set everything up but when I booted the installing from clover it will load the apple symbol and then I will get the crossed circle half way through loading in.
Did I miss something?
regards
Toan
Hit space at the Clover screen and enable the verbose mode so you can see what it’s stuck on. Double check that you installed the required firmware deb package.
Hi Nicholas,
I think its gets stuck when looking for root device, and I think I installed the right .deb files. I used the one from the link you suggested the pve-edk2_1.20180612-1_all.deb.
Other then that I’m out of ideas what it might be.
regards
Toan
I’d suggest rebuilding the Mojave ISO, I can’t imagine what else could trigger that error.
Yep rebuilding the iso worked thanks
Hi,
When i saw the “get the crossed circle half way through loading” i rebuild the iso with an other script in my iMac an the iso works (also check if all the args is in the config) here https://gist.github.com/mddelfino/cc81a7298be12dcfd0ecfb8c9b70c572
The createmedia change in 10.14 i remove line 206 –applicationpath “${MAC_OS_INSTALLER_PATH}” –nointeraction
and my iso works
Do not upgrade to 10.14.X (for me it’s 10.14.1) you will lose the access to the disk with the crossed circle half way through loading on boot after install.
That same upgrade worked fine for me (I use passthrough hardware though, including my storage device).
I found why, it’s the backup I made do this on the VM.
And when I restore it’s was working again, but I have scrambled graphics on boot and session…
Maybe it’s more don’t use backup mode “stop”.
Scrambled graphics on boot is caused by wrong screen resolution in EFI settings
Yes I already try to change it but i have rebuild a fresh one with no backup this time.
Anyway, did you will make a clover build guide?
(Since my clover is only boot in virtualbox… and yours is 256M not like me 13M…)
Thanks a lot for your help this tutorial is very cool ! thanks !
My Clover image is built using this script https://github.com/thenickdude/OSX-KVM/blob/master/Mojave/clover-image.sh on Fedora like:
sudo ./clover-image.sh –iso Clover-v2.4k-4674-X64.iso –cfg clover/config.plist.stripped.qemu –img Clover.qcow2
This command only works on a Fedora (>= 27) host machine. Then I converted the resulting qcow2 to raw format.
I used this one : https://github.com/AlexanderWillner/runMacOSinVirtualBox
The Clover.iso add a script to make Clover permanent when the install is done (to run after the boot). maybe we can use it for the build.
I’m not getting the “Boot macOS Install from Install macOS Mojave” icon in Clover. Nothing shows up when I stop/start after the resolution change it just has the original menu items still.
Post your VM config, you probably accidentally removed media=cdrom from the Mojave ISO.
args: -device isa-applesmc,osk=”…” -smbios type=2 -cpu Penryn,kvm=on,vendor=GenuineIntel,+invtsc,vmware-cpuid-freq=on,+pcid,+ssse3,+sse4.2,+popcnt,+avx,+aes,+xsave,+xsaveopt,check
bios: ovmf
boot: cdn
bootdisk: ide2
cores: 4
cpu: Penryn
efidisk0: local-lvm:vm-108-disk-1,size=128K
ide0: local:iso/Mojave.iso,media=cdrom,size=6G
ide2: local:iso/clover-r4674-amd64.iso,cache=unsafe
keyboard: en-us
machine: pc-q35-2.11
memory: 4096
name: mojave001
net0: e1000-82545em=2A:B3:33:ED:95:F2,bridge=vmbr0
numa: 0
ostype: other
sata0: local-lvm:vm-108-disk-0,cache=unsafe,size=64G
scsihw: virtio-scsi-pci
smbios1: uuid=869fb78e-9f1e-4e62-be96-4ce56eb1db34
sockets: 1
vga: std
vmgenid: ce623c6b-5eb6-489b-9f09-da81d97be6ab
That looks correct, you may need to rebuild the Mojave ISO.
Just tried another ISO and still same result.
The ISO would have to be pretty malformed to not appear as a boot option, what do you get if you run “file Mojave.iso” from Proxmox’s ISO directory.
This was my issue, but i didn’t accidentally remove the media=cdrom, your current guide says to do it.
“Find the line that define the two “ISOs” (ide0 and ide2), and remove the “,media=cdrom” part from them. Add “,cache=unsafe” in its place. This will treat these as hard disks rather than DVD drives.”
That instruction is correct as both of the images are now hard disk images, not real ISOs. In an older version of the tutorial the installer was a real ISO.
root@proxmox:/var/lib/vz/template/iso# file Mojave.iso
Mojave.iso: Apple Driver Map, blocksize 512, blockcount 12582912, devtype 0, devid 0, driver count 0, contains[@0x200]: Apple Partition Map, map block count 3, start block 1, block count 63, name Apple, type Apple_partition_map, valid, allocated, contains[@0x400]: Apple Partition Map, map block count 3, start block 64, block count 262144, type Apple_Free, contains[@0x600]: Apple Partition Map, map block count 3, start block 262208, block count 12320704, name disk image, type Apple_HFS, valid, allocated, readable, writable, mount at startup
How does clover find the Mojave iso?
Very nice post, extremely detailed w/o room for an error.
I am however facing some strange behavior when EFI disk is created on a SSD – I get no console picture. All I get is “Guest has not initialized the display (yet)” and then just black screen. It took me a lot of trial and error until I finally recreated EFI on a regular HDD array, after that everything started to work as it should. No errors from proxmox, nothing in the log file, just black screen. Weird…
That’s curious! Thanks for posting that tidbit because it’ll probably help someone else too.
Hi, thank you for this awesome article. I’m having a problem initially starting the VM. The following error is thrown on startup:
kvm: -device piix3-usb-uhci,id=uhci,bus=pci.0,addr=0x1.0x2: Bus 'pci.0' not foundTASK ERROR: start failed: command '/usr/bin/kvm -id 103 -name mac -chardev 'socket,id=qmp,path=/var/run/qemu-server/103.qmp,server,nowait' -mon 'chardev=qmp,mode=control' -pidfile /var/run/qemu-server/103.pid -daemonize -smbios 'type=1,uuid=ecbe0dc6-c752-4c50-b0b5-10778d5a9fc7' -drive 'if=pflash,unit=0,format=raw,readonly,file=/usr/share/pve-edk2-firmware//OVMF_CODE.fd' -drive 'if=pflash,unit=1,format=raw,id=drive-efidisk0,file=/dev/pve/vm-103-disk-1' -smp '4,sockets=1,cores=4,maxcpus=4' -nodefaults -boot 'menu=on,strict=on,reboot-timeout=1000,splash=/usr/share/qemu-server/bootsplash.jpg' -vnc unix:/var/run/qemu-server/103.vnc,x509,password -cpu 'Penryn,+kvm_pv_unhalt,+kvm_pv_eoi,enforce,vendor=GenuineIntel' -m 24576 -object 'memory-backend-ram,id=ram-node0,size=24576M' -numa 'node,nodeid=0,cpus=0-3,memdev=ram-node0' -device '...' -smbios 'type=2' -cpu 'Penryn,kvm=on,vendor=GenuineIntel,+invtsc,vmware-cpuid-freq=on,+pcid,+ssse3,+sse4.2,+popcnt,+avx,+aes,+xsave,+xsaveopt,check' -device 'vmgenid,guid=0ddd1797-1920-480a-bc20-bc77a703bf65' -device 'piix3-usb-uhci,id=uhci,bus=pci.0,addr=0x1.0x2' -device 'VGA,id=vga,bus=pcie.0,addr=0x1' -device 'virtio-balloon-pci,id=balloon0,bus=pci.0,addr=0x3' -iscsi 'initiator-name=iqn.1993-08.org.debian:01:58cb101a9292' -drive 'file=/var/lib/vz/template/iso/Mojave.iso,if=none,id=drive-ide0,media=cdrom,aio=threads' -device 'ide-cd,bus=ide.0,unit=0,drive=drive-ide0,id=ide0,bootindex=100' -drive 'file=/var/lib/vz/template/iso/clover-r4674-amd64.iso,if=none,id=drive-ide2,cache=unsafe,format=raw,aio=threads,detect-zeroes=on' -device 'ide-hd,bus=ide.1,unit=0,drive=drive-ide2,id=ide2' -device 'ahci,id=ahci0,multifunction=on,bus=pci.0,addr=0x7' -drive 'file=/dev/pve/vm-103-disk-0,if=none,id=drive-sata0,cache=unsafe,format=raw,aio=threads,detect-zeroes=on' -device 'ide-hd,bus=ahci0.0,drive=drive-sata0,id=sata0,bootindex=201' -netdev 'type=tap,id=net0,ifname=tap103i0,script=/var/lib/qemu-server/pve-bridge,downscript=/var/lib/qemu-server/pve-bridgedown' -device 'e1000-82545em,mac=D6:4E:B0:68:64:67,netdev=net0,bus=pci.0,addr=0x12,id=net0,bootindex=300' -machine 'type=pc-q35-2.11'' failed: exit code 1
I suspect this is related to usage of “pc-q35-2.11”. When switching this to plain q35 the vm starts and I can access UEFI via console, but I guess I will have issues later on with osx.
Any ideas what kind of issue this might be? Thanks
That’s weird, it looks like Proxmox is choosing the piix3 chipset instead of ich9. In the VM settings double check that you have the OS type set to “other” and the BIOS set to OMVF (UEFI).
Thanks for getting back to me, @Nick. Yep, OS type is set to “tore” and I’ve selected OMVF (UEFI) as the Bios.
I have a couple of other VMs running (mostly linux and windows) and also preconfigured the system for gpu passthrough. I’m wondering if any of those modifications messed up the system; but I don’t believe so.
Do you have a subscription for Proxmox? Maybe the packages are different when using enterprise vs. non-subscription?
Typo here: Os type is set to “other” 🙂
I do have a Proxmox subscription, but it basically just releases some high priority patches sooner (and my setup has been working for ages, those patches are definitely in the community version).
What’s your QEMU version(dpkg -l pve-qemu-kvm)? Mine’s 2.12.1-1. If your QEMU is old (predating Proxmox 5.2) then it might not know q35-2.11, and fallback to something else.
Maybe post your VM’s configuration file here too so I can check that out. Something is triggering your QEMU to use a whole different architecture.
I have the same QEMU version. When looking at the machine configs for QEMU (qemu-system-x86_64 -machine help) it looks like q35 is just an alias for a later version q35 (pc-q35-2.12). Currently I am just trying going forward with this – at least it books into Clover.
Here’s the config for the VM:
args: -device isa-applesmc,osk=”super secret” -smbios type=2 -cpu Penryn,kvm=on,vendor=GenuineIntel,+invtsc,vmware-cpuid-freq=on,+pcid,+ssse3,+sse4.2,+popcnt,+avx,+aes,+xsave,+xsaveopt,check
bios: ovmf
boot: cdn
bootdisk: ide2
cores: 6
cpu: Penryn
efidisk0: local-lvm:vm-103-disk-1,size=128K
hostpci0: 00:14.0
ide0: local:iso/Mojave.iso,media=cdrom,size=6G
ide2: local:iso/clover-r4674-amd64.iso,cache=unsafe
machine: q35
memory: 16384
name: mac
net0: e1000-82545em=D6:4E:B0:68:64:67,bridge=vmbr0
numa: 0
ostype: other
sata0: local-lvm:vm-103-disk-0,cache=unsafe,size=256G
scsihw: virtio-scsi-pci
smbios1: uuid=ecbe0dc6-c752-4c50-b0b5-10778d5a9fc7
sockets: 1
tablet: 1
vga: std
vmgenid: 0ddd1797-1920-480a-bc20-bc77a703bf65
Thanks, @Nick
Ahh, maybe it was choosing the pc-i440fx machine model (PIIX3 chipset) because you have a passthrough device set to use PCI rather than PCIe. It might have worked with “hostpci0: 00:14.0,pcie=1” instead. The newer pc-q35-2.12 is likely to work fine for you though if that’s what it ends up using (try “qm showcmd VMID” to verify that it mentions “ich9” and not “piix3”).
I don’t think that’s the reason. The same happened without the passthrough device (I initially started without one and was planning to add them later on).
I’ll let you know if I’m successful with q35-2.12 – right now I am stuck on memory issues (comparable to what was mentioned above already – the installer crashes with End RandomSeed and a bunch of +++).
Thanks, @Nick
Fyi, “qm showcmd VMID” shows neither ich9, nor piix3 🙂
/usr/bin/kvm -id 103 -name mac -chardev ‘socket,id=qmp,path=/var/run/qemu-server/103.qmp,server,nowait’ -mon ‘chardev=qmp,mode=control’ -chardev ‘socket,id=qmp-event,path=/var/run/qmeventd.sock,reconnect=5’ -mon ‘chardev=qmp-event,mode=control’ -pidfile /var/run/qemu-server/103.pid -daemonize -smbios ‘type=1,uuid=ecbe0dc6-c752-4c50-b0b5-10778d5a9fc7’ -drive ‘if=pflash,unit=0,format=raw,readonly,file=/usr/share/pve-edk2-firmware//OVMF_CODE.fd’ -drive ‘if=pflash,unit=1,format=raw,id=drive-efidisk0,file=/dev/pve/vm-103-disk-1’ -smp ‘6,sockets=1,cores=6,maxcpus=6’ -nodefaults -boot ‘menu=on,strict=on,reboot-timeout=1000,splash=/usr/share/qemu-server/bootsplash.jpg’ -vnc unix:/var/run/qemu-server/103.vnc,x509,password -cpu ‘Penryn,+kvm_pv_unhalt,+kvm_pv_eoi,enforce,vendor=GenuineIntel’ -m 16384 -device ‘isa-applesmc,osk=stillverysecret’ -smbios ‘type=2’ -cpu ‘Penryn,kvm=on,vendor=GenuineIntel,+invtsc,vmware-cpuid-freq=on,+pcid,+ssse3,+sse4.2,+popcnt,+avx,+aes,+xsave,+xsaveopt,check’ -device ‘vmgenid,guid=0ddd1797-1920-480a-bc20-bc77a703bf65’ -readconfig /usr/share/qemu-server/pve-q35.cfg -device ‘usb-tablet,id=tablet,bus=ehci.0,port=1’ -device ‘vfio-pci,host=00:14.0,id=hostpci0,bus=pci.0,addr=0x10’ -device ‘VGA,id=vga,bus=pcie.0,addr=0x1’ -device ‘virtio-balloon-pci,id=balloon0,bus=pci.0,addr=0x3’ -iscsi ‘initiator-name=iqn.1993-08.org.debian:01:58cb101a9292’ -drive ‘file=/var/lib/vz/template/iso/Mojave.iso,if=none,id=drive-ide0,media=cdrom,aio=threads’ -device ‘ide-cd,bus=ide.0,unit=0,drive=drive-ide0,id=ide0,bootindex=200’ -drive ‘file=/var/lib/vz/template/iso/clover-r4674-amd64.iso,if=none,id=drive-ide2,cache=unsafe,format=raw,aio=threads,detect-zeroes=on’ -device ‘ide-hd,bus=ide.1,unit=0,drive=drive-ide2,id=ide2,bootindex=100’ -device ‘ahci,id=ahci0,multifunction=on,bus=pci.0,addr=0x7’ -drive ‘file=/dev/pve/vm-103-disk-0,if=none,id=drive-sata0,cache=unsafe,format=raw,aio=threads,detect-zeroes=on’ -device ‘ide-hd,bus=ahci0.0,drive=drive-sata0,id=sata0’ -netdev ‘type=tap,id=net0,ifname=tap103i0,script=/var/lib/qemu-server/pve-bridge,downscript=/var/lib/qemu-server/pve-bridgedown’ -device ‘e1000-82545em,mac=D6:4E:B0:68:64:67,netdev=net0,bus=pci.0,addr=0x12,id=net0,bootindex=300’ -machine ‘type=q35’
Ah that’s fine, I think that chipset only ends up appearing in the launch command once you start passing hostpci devices through.
I was able to boot a Mojave VM using 2.12, so it should be compatible for you (I didn’t test the installer though).
One of the other commenters here, Tony, also had that memory issue, which was triggered by passing a core count of 6, same as your config (I’ve also had trouble passing “exotic” core counts). Try 4 instead.
Damn, I saw that, but reverted it earlier. Setting my #cpus to 4 fixed that. Looks like the installer is now booting.
To summarize:
* even cpu count
* q35 pointing to q35-2.12
* CloverISO-4769.tar.lzma (probably not necessary, but updated during debugging)
fixed it for me.
Thanks, @Nick
Fresh install of proxmox 5.2 today, updated with the no-subscription repo. Can confirm that pc-q35-2.11 causes problems. Setting to q35 works fine.
After install, I passed my radeon 7850 using the recommended pci ovmf (needed to specify romfile). Seems to be working out of box, with it reporting metal as supported.
However, it seems DRM videos aren’t playing in Safari. Monitor supports HDCP. Do I need to figure out Shiki/WhateverGreen kext for this?
Thanks!
Interesting, I guess I’ll update the guide to use that instead now. EDIT: Yep, I just updated Proxmox to the latest version and I’m seeing this problem now too, updating to “q35” or “pc-q35-2.12” is required.
I’ve never seen any DRM content on the web, is there a free URL that I can try that out with?
Sorry, I’ve never really used a mac before. I believe I read that movie trailers in the itunes store are drm protected?
Been researching this all day, and so far I’ve found a few things.
-It’s been reported that the 10.14.1 breaks something and people have had success downgrading AppleGVA to the 10.14 version.
-Lilu/WhateverGreen is likely required. I’ve simply put them in /efi/clover/kexts/other but I believe they may require additional setup to work with mojave.
-I’ve used Clover Configurator to try a few different smbios settings, and MacPro6,1 seems the most promising. With the downgraded AppleGVA, I’m able to get an error (Netflix in Safari) instead of being immediately redirected to the unsupported page (MacPro5,1 and the default unconfigured smbios).
-I’ve read that working imessages etc is a prerequisite to getting working drm, so I’m looking into that now.
Otherwise, the vm seems to be working reasonably well. Metal is shown as supported. I can switch back and forth between macos and windows vms without any issues (had to switch to the 2nd dvi port for macos to reliably display on boot).
Took a snapshot before I started monkeying around so I can go back easily 🙂
Thanks again for the guide.
Hm, the iTunes trailers play for me, and so does this DRM test video (it chooses FairPlay DRM for Safari):
https://bitmovin.com/demos/drm
No extra steps are required for Lilu/WhateverGreen as far as I know, I have both of those in kexts/other too.
Ah, I tried signing up for a trial of Netflix and yeah, it’s not working for me currently in Safari (just redirects me to the System Requirements page).
I tried it out and I am able to sign in to iMessages, but I don’t use that app so I’m not sure if that’s enough to confirm that my Apple ID works fully.
EDIT: Oh, Netflix works for me in Chrome! Shame that only Windows supports 4K Netflix playback.
Wow thanks for trying all that!
I completely forgot about the bitmovin demo. Alas, it does not work for me either.
I saw Conrad’s post here: https://www.nicksherlock.com/2017/10/installing-macos-high-sierra-on-proxmox-5/#comment-29530
which worked to mark en0 as builtin. With that and MacPro6,1 smbios, I get the cannot sign in to imessages on this mac at this time / contact support message. That’s a good sign as far as I understand it (assuming I don’t care about imessages..).
I tested all the macpro smbioses 3,1 and up, and 6,1 is the only one that doesn’t redirect netflix to the requirements page. The imacpro smbios works as well. I haven’t tried any other configurations. I suspect this would fix safari netflix for you since the bitmovin demo is working.
Unfortunately, my only goal for setting up a hackintosh is to have a testbed for fairplay drm. It’s pretty remarkable how well everything else is working.
Your 280x is the same generation gcn as my 7850, so I suspect our results should/could be similar. I’m going to try your iMac 14,2 setting now.
Are you on 10.14.1 as well? And without swapping in the older 10.14 AppleGVA? “inject ati” unticked as well?
Thanks so much your testing.
Hmm, looks like iMac 14,2 isn’t redirecting to the netflix supported platforms page either.
Yeah, I’m on 10.14.1, AppleGVA is completely untouched, and InjectATI isn’t ticked.
About Macs, Netflix says “Supported on all 2012 or later models and select 2011 models”, which should include the Late 2013 iMac 14,2, but I’m guessing they’re doing VM-detection. Kholia reverse-engineered some VM detection in the macOS standard libraries the other day:
https://github.com/kholia/OSX-KVM/blob/master/reversing-notes.md
There are a ton of ways of detecting VMs, so Fairplay may or may not be using this method.
The Bitmovin demo does work for me, and chooses Fairplay in Safari. In Chrome it chooses Widevine which also works.
Doing some more testing today. Going to give Mojave 10.14 a shot.
I saw from this thread (https://www.insanelymac.com/forum/topic/336278-mojave-10141-breaks-radeon-hardware-decoding-no-igpu/) to use videoproc to check hw accel. Surprise, surprise, mine shows as unavailable.
In other news, I saw here (https://forums.unraid.net/topic/54641-increase-os-x-networking-performance-by-80-or-your-money-back/) that el capitan and up support vmxnet3, a paravirtualized nic. Seems to work well 🙂
Been looking into the external sata issue and found this: https://www.reddit.com/r/hackintosh/comments/8a8zxy/internal_hard_drive_recognized_as_external_which/
Tried removing disk from hotplug in vm options, but it doesn’t seem to have any effect. Not seeing any options in ovmf either. Would like to avoid a kext route, but it’s there for anyone interested.
Also disabled network hotplug to see if it gets registered as builtin (probably not)
Interesting tests. Oh I nearly forgot to mention before, in Clover’s config.plist make sure it isn’t set to InjectKexts: false, or it’ll be ignoring your WhateverGreen kext completely.
Oof you’re a mind reader. It’s now showing the 7850 as an r9 270. VideoProc still shows no hw acceleration and safari fairplay is still failing. This is on an otherwise fresh install of 11.14.0 with smbios set to imacpro1,1 or macpro6,1.
Might have to break out the 7970 later tonight since that gpu is working for you.
Ha this issue has me tearing my hair out. Gave High Sierra a try with the same results.
Meanwhile, it looks like setting the hard drive to IDE is the best solution (assuming there’s no performance penalty, although I haven’t tested) to having it be internal. It’s still shown as a SATA device in macos.
Also, looking at the cpu flags:
smbios type=2 -cpu Penryn,kvm=on,vendor=GenuineIntel,+invtsc,vmware-cpuid-freq=on,+pcid,+ssse3,+sse4.2,+popcnt,+avx,+aes,+xsave,+xsaveopt,check
I don’t believe vendor and +ssse3 are necessary (they should be included by the Penryn setting).
Jeez, it’s working. I had a theory a few days ago that videos weren’t playing because I had no audio device. Figured it was a pretty ridiculous idea so I didn’t explore it.
Now that I have inject kexts enabled, I added applealc and tried a TV via HDMI again. Lo and behold, itunes/netflix/bitmovin fairplay demo all work. Don’t even need WhateverGreen.
Time to figure out how to get applealc to work with the default q35 intel hda. Just needs to be a dummy device really.
Thanks again for all your help. Going for a netflix trial was really aboveboard and is truly appreciated.
Now I have the failed start problem too after switching to a home computer mainboard (GA-Z77-DS3H with XEON 1230V2):
qm start 100
kvm: -device piix3-usb-uhci,id=uhci,bus=pci.0,addr=0x1.0x2: Bus ‘pci.0’ not found
start failed …
qm showcmd 100
/usr/bin/kvm -id 100 -name mojave -chardev ‘socket,id=qmp,path=/var/run/qemu-server/100.qmp,server,nowait’ -mon ‘chardev=qmp,mode=control’ -pidfile /var/run/qemu-server/100.pid -daemonize -smbios ‘type=1,uuid=c391bdbb-b3aa-46f7-a906-d8ac0bfe22b2’ -drive ‘if=pflash,unit=0,format=raw,readonly,file=/usr/share/pve-edk2-firmware//OVMF_CODE.fd’ -drive ‘if=pflash,unit=1,format=raw,id=drive-efidisk0,file=/dev/pve/vm-100-disk-1’ -smp ‘4,sockets=1,cores=4,maxcpus=4’ -nodefaults -boot ‘menu=on,strict=on,reboot-timeout=1000,splash=/usr/share/qemu-server/bootsplash.jpg’ -vnc unix:/var/run/qemu-server/100.vnc,x509,password -cpu ‘Penryn,+kvm_pv_unhalt,+kvm_pv_eoi,enforce,vendor=GenuineIntel’ -m 8192 -device ‘vmgenid,guid=c5c7a0c2-27e9-47c1-b2ba-cac218cc9d52’ -device ‘piix3-usb-uhci,id=uhci,bus=pci.0,addr=0x1.0x2’ -device ‘usb-tablet,id=tablet,bus=ehci.0,port=1’ -device ‘VGA,id=vga,bus=pcie.0,addr=0x1’ -device ‘virtio-balloon-pci,id=balloon0,bus=pci.0,addr=0x3’ -iscsi ‘initiator-name=iqn.1993-08.org.debian:01:378c246f51f0’ -drive ‘file=/var/lib/vz/template/iso/Mojave.iso,if=none,id=drive-ide0,media=cdrom,aio=threads’ -device ‘ide-cd,bus=ide.0,unit=0,drive=drive-ide0,id=ide0’ -drive ‘file=/var/lib/vz/template/iso/clover-r4674-amd64.iso,if=none,id=drive-ide2,cache=unsafe,format=raw,aio=threads,detect-zeroes=on’ -device ‘ide-hd,bus=ide.1,unit=0,drive=drive-ide2,id=ide2,bootindex=100’ -device ‘ahci,id=ahci0,multifunction=on,bus=pci.0,addr=0x7’ -drive ‘file=/dev/pve/vm-100-disk-0,if=none,id=drive-sata0,cache=unsafe,format=raw,aio=threads,detect-zeroes=on’ -device ‘ide-hd,bus=ahci0.0,drive=drive-sata0,id=sata0’ -netdev ‘type=tap,id=net0,ifname=tap100i0,script=/var/lib/qemu-server/pve-bridge,downscript=/var/lib/qemu-server/pve-bridgedown’ -device ‘e1000-82545em,mac=86:42:83:FA:8D:3C,netdev=net0,bus=pci.0,addr=0x12,id=net0’ -machine ‘type=pc-q35-2.11’
I can not find a solution nor identify the problem!
Can you help me?
Replace “machine: pc-q35-2.11” in the VM config with “machine: q35”. It appears that the newest Proxmox version requires this change now.
Thank you very much!
I’ve changed the configuration so many times that I overlooked it. Now it starts without problems 🙂
Just as a note, this works like a charm on an AMD Ryzen CPU. QEMU does the translation between Intel and AMD instructions, so you don’t need a custom kernel. GPU Passthrough works perfectly with AMD RX card.
Did you follow what he did to the letter, or make your own modifications along the way? I have a Ryzen build and will be following in your footsteps.
Take a look at this, Nicholas really should update this article:
https://www.tzeejay.com/blog/2018/07/macos-on-amd-epyc/
I cannot get OSK code with smc_read:
./smc_read
ourhardwor…
That IS the OSK
Any one passthrough iphone to this vm with success ?
I need to passthrough my iphone to vm machine and connect it to itunes for make backups.
Since I upgraded to Proxmox 5.3, I can no longer use the VM. The problem is the keyboard doesn’t work, which doesn’t allow me to interact or boot Clover. I installed the latest patched pve-edk2 packge, and re-added the USB Keyboard to pve-q35.cfg.
Anyone else have this problem ?
I upgraded to 5.3 and cannot reproduce this problem. Are you using “machine: q35” in your VM config? That’s the one that works for me since late in the 5.2 release cycle.
You can also try rebooting the host just in case it’s somehow caching the old pve-q35.cfg file in memory.
Thx a lot for this, worked flawlessly.
One issue, here, do you have any idea why I can’t enable content caching ? I’m logged in iCloud and globally everything works.
https://imgur.com/ieOzqSp
Yes, when trying to enable that using the command line, the error is revealed: macOS refuses to enable it because they have detected that they’re running in a virtual machine. Probably their binary would have to be patched to bridge out this detection.
Thx for your input.
Led me here, will dig from there.
https://github.com/kholia/OSX-KVM/blob/master/reversing-notes.md
Thank you for a great write-up! I’m new to Proxmox, relative novice w/ VM’s (last played w/ Xen @5 yrs ago), but I have built Hackintosh’s for the last several releases. Learned a lot following your guide. Everything worked as described for Proxmox 5.3-6 on i4770k/z87-pro. Even did the Mojave OS update to 10.14.2, though that required manually restarting the update installer from Clover. Easy to fix.
Only minor issue atm is msr warnings in syslog specific to the Mojave VM:
[ 8028.414375] kvm_get_msr_common: 26 callbacks suppressed
[ 8028.414377] kvm [6752]: vcpu1, guest rIP: 0xffffff8004b5ad75 ignored rdmsr: 0x60d
… (9 more lines from 2 rIP addrs for rdmsr’s 0x3f8,9,a, 0x630,1,2, 0x619,d, 0x621 every 480s)
root@pve:~# cat /etc/modprobe.d/kvm.conf
options kvm ignore_msrs=Y
root@pve:~# cat /sys/module/kvm/parameters/ignore_msrs
Y
root@pve:~# pveversion
pve-manager/5.3-6/37b3c8df (running kernel: 4.15.18-9-pve)
It boots, so only question is whether these syslog messages are expected or not? I’m guessing the “ignored” warning is actually correct behavior?
I have lots of rereading/learning, testing, adding disks and passthrough devices and whatnot to go, but thank you for the tremendous head start!
Yes, I think these ignored warnings are correct behaviour. The guest is just probing for features that the QEMU virtual CPU does not support. (I get the same). This is why the ignore_msrs setting is set to Y, because otherwise these would be fatal errors.
Really awesome guide, very much appreciated works flawlessly! Like someone above i’m also unable to get my iphone to pass through to the vm, really not sure why. Passing through a thumb drive worked just fine, and attempting to pass through an entire usb controller (i have a pcie add-in card specifically for this) doesn’t work either. Pretty stumped..
Do we need to do any changes for Proxmox 5.3?
Or does the patch need to be updated, to re-base against 5.3 for other bugfixes?
The line numbers have changed for 5.3, but the actual content of the patch doesn’t need to change.
The mojave iso doesn’t show up in clover for me. Did anyone got a solution for this problem? Is my Iso corrupt? As to my knowledge I did everything according to this tutorial. Im usingthe latest proxmox 5.3
Make sure you didn’t remove media=cdrom from the Mojave ISO line.
i.imgur.com/PbFqeX4.png
i.imgur.com/i0VBWfy.png
I did every single step according to the tutorial. Flashed a new proxmox and redid everything. I have no clue, where I might have missed something
Rebuild the Mojave ISO, this has fixed that problem for several people in the past. (keep an eye out for errors during generation that warn that the destination disk is full)
After a few days of the vm working perfectly, now I’m having boot errors:
crashed: opendirectoryd. Too many corpses being created.
Do you have any hint?
Regards
Hi Nicholas!
Thank you for your tutorial, I really appreciate posts like these…
I am having some trouble getting to the Mojave install screen, I get to the Clover screen, push space to enable verbose, then enter on the install icon, and the boot goes as far as https://images.themadcracker.com/proxmox.mojave.boot-error.png and then the VM resets to the Proxmox screen and starts over, any ideas what I am doing wrong?
Visiting the link you supplied fails with “ERR_TOO_MANY_REDIRECTS”.
Hey guys, I’m running Proxmox 5.3 with latest updates and trying to install Mojave but hitting a kernel panic when trying to boot the installer. I just did this some weeks ago on another system and it went swimmingly, so I’m fairly confident I’m following instructions correctly. However I’m afraid it was PVE 5.1 or 5.2 I used then, so perhaps that’s the difference?
I’ve done my best to try and capture what’s triggering the panic but it goes by too fast even when doing local screen recording to capture.
Here are the last few boot messages before the kernel panic page, captured with Clover’s verbose mode and a screen recorder:
Sun Mar 24 20:57:32 2019 localhost com.apple.xpc.launchd[1] (com.apple.xpc.launchd.domain.user.0) : Could not read path: path = /Library/LaunchAgents, error = 2: No such file or directory

Sun Mar 24 20:57:32 2019 localhost com.apple.xpc.launchd[1] (com.apple.xpc.launchd.domain.user.0) : Failed to bootstrap path: path = /Library/ALaunchAgents, error = 2: No such file or directory

Forcing CS_RUNTIME for entitlement: com.apple.rootless.installNotice - new kext com.apple.driver.KextExcludeList, v14.0.3 matches prelinked kext but can't determine if executables are the same (no UUIDs).

Sun Mar 24 20:57:36 2019 iMac.local com.apple.xpc.launchd[1] (com.apple.CoreRAID.170) : Endpoint has been activated through legacy launch(3) APIs. Please switch to XPC or bootstrap_check_in(): com.apple.CoreRAID

IOG flags 0x3 (0x51)

** AppleSMBusPCI::start failed to get acpi path for provider

HID: Legacy shim 2

ACPI_SMC_PlatformPlugin::start - waitForService(resourceMatching(AppleIntelCPUPowerManagement) timed out
Here’s my conf:
root@bonsai:~# cat /etc/pve/qemu-server/101.conf

args: -device isa-applesmc,osk="ourha..." -smbios type=2 -cpu Penryn,kvm=on,vendor=GenuineIntel,+invtsc,vmware-cpuid-freq=on,+pcid,+ssse3,+sse4.2,+popcnt,+avx,+aes,+xsave,+xsaveopt,check

bios: ovmf

boot: c

bootdisk: ide2

cores: 4

cpu: Penryn

efidisk0: bontank:vm-101-disk-1,size=128K

ide0: pira-proxmox-content:iso/Mojave.iso,media=cdrom,size=6G

ide2: pira-proxmox-content:iso/clover-r4674-amd64.iso,cache=unsafe,size=256M

machine: q35

memory: 3512

name: macos

net0: e1000-82545em=3A:31:AA:27:10:09,bridge=vmbr0

numa: 0

ostype: other

sata0: bontank:vm-101-disk-0,size=200G

scsihw: virtio-scsi-pci

smbios1: uuid=d661d5a1-ebd8-4e42-a0fb-bbca29e0dc9a

sockets: 1

vga: std

vmgenid: 7fbcb7dd-abce-4eb4-8823-28a235d9d951
Any suggestions welcome.
Thanks,
~Micah
Does your OSK really have the “©” symbol in it, or was that just inserted by WordPress? That should be “(c)”