
I thought it might be helpful for people following my guide for installing macOS 12 Monterey on Proxmox if I described my setup and how I’m using macOS.
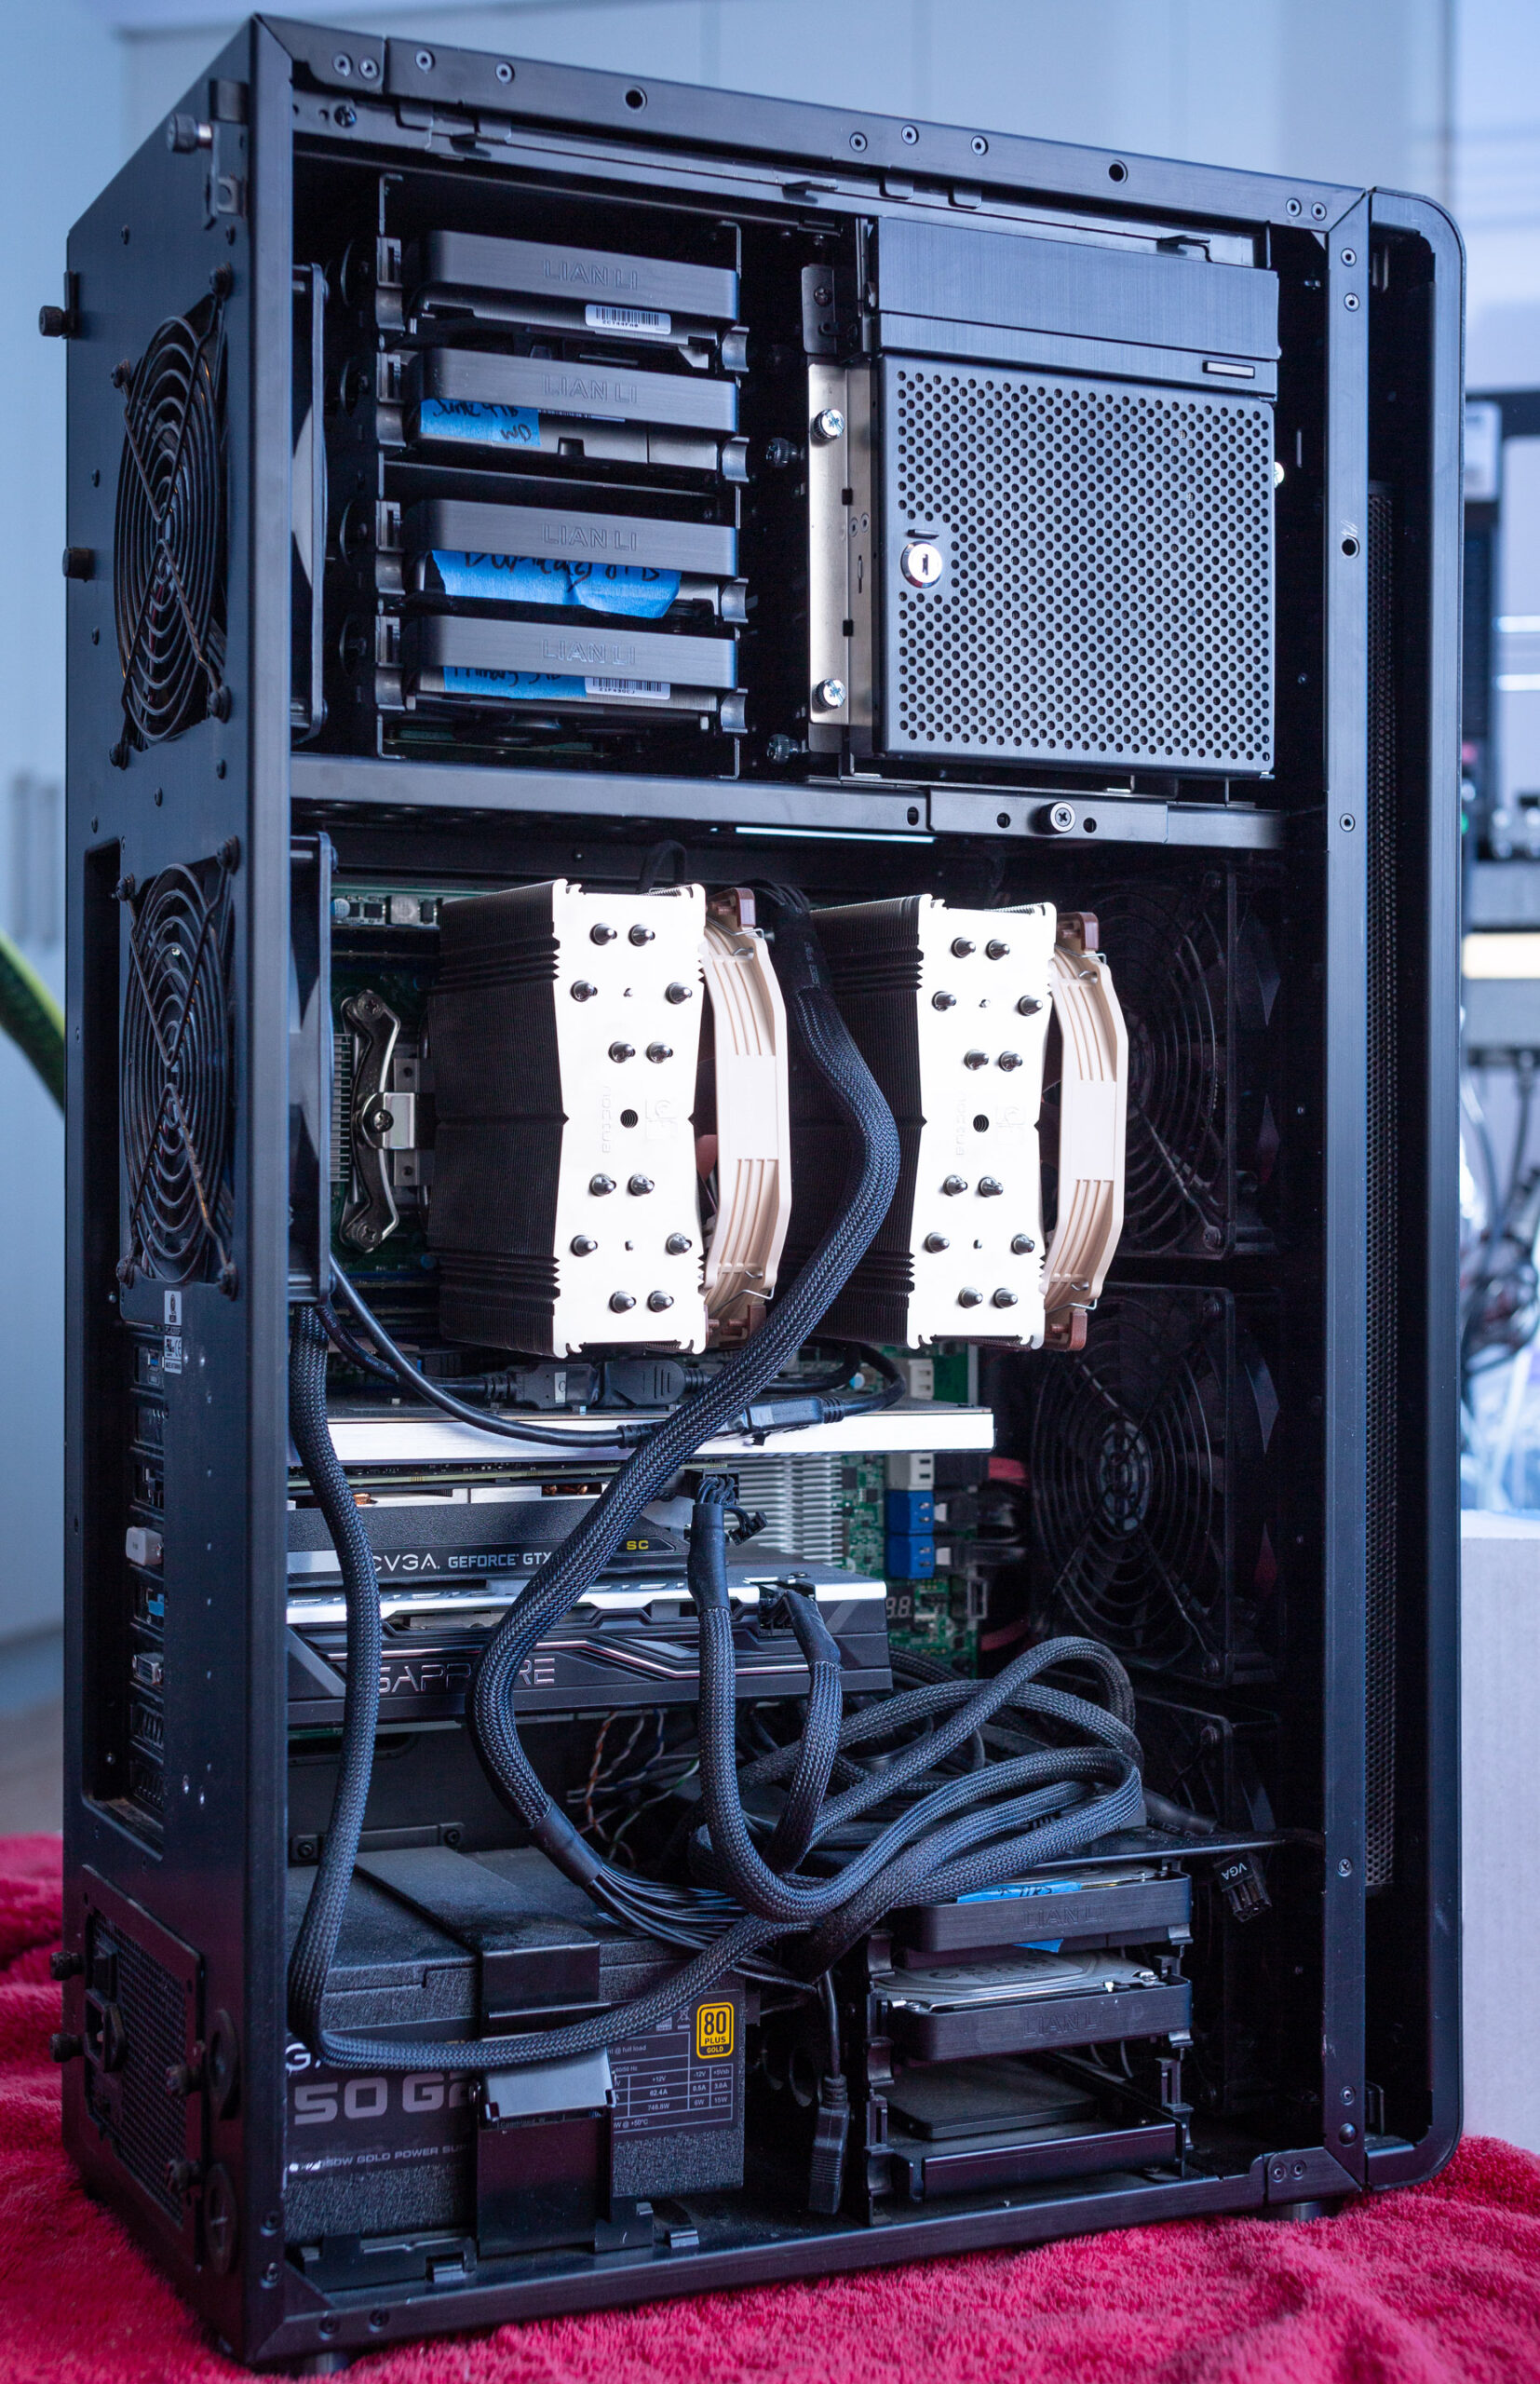
Proxmox hardware specs
- Motherboard: Asrock EP2C602
- RAM: 64GB
- CPU: 2 x Intel E5-2687W v2 for a total of 16 cores / 32 threads
- Storage
- ASUS Hyper M.2 X16 PCIe 4.0 X4 Expansion Card
- Samsung 970 Evo 1TB NVMe SSD for macOS
- Samsung 950 Pro 512GB NVMe SSD
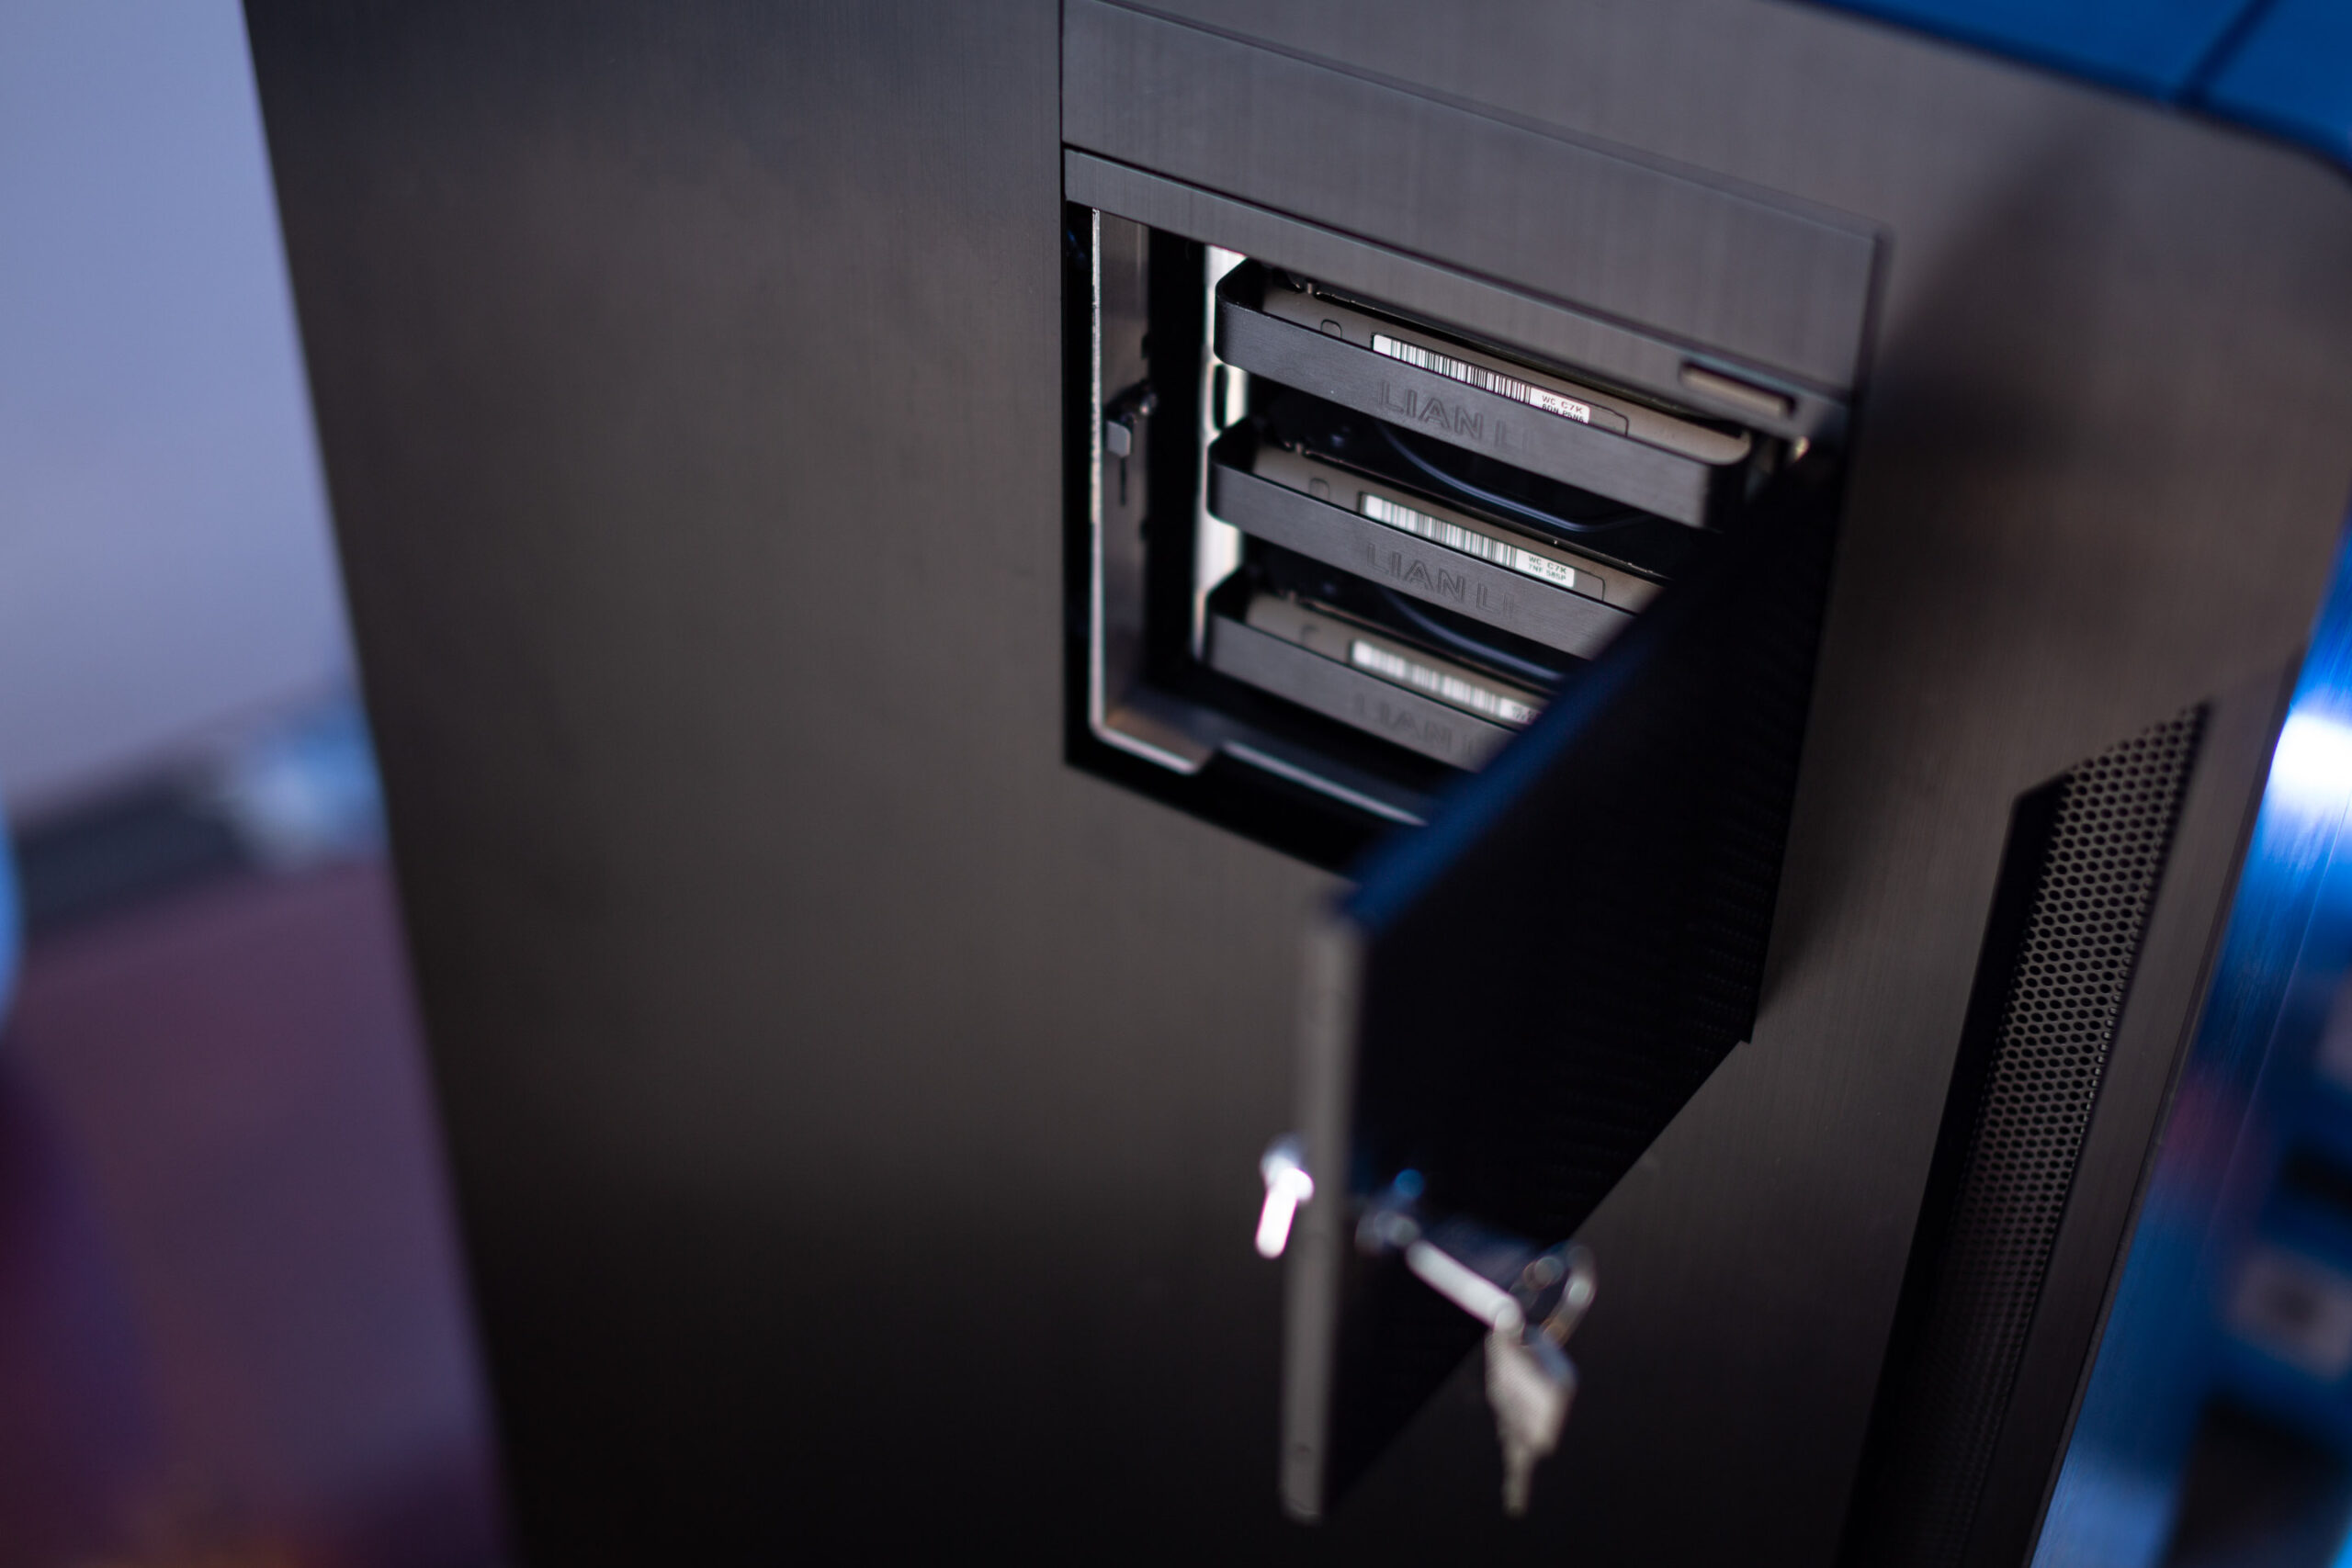
- 38TB of spinning disks in various ZFS configurations
- 1TB SATA SSD for Proxmox’s root device
- ASUS Hyper M.2 X16 PCIe 4.0 X4 Expansion Card
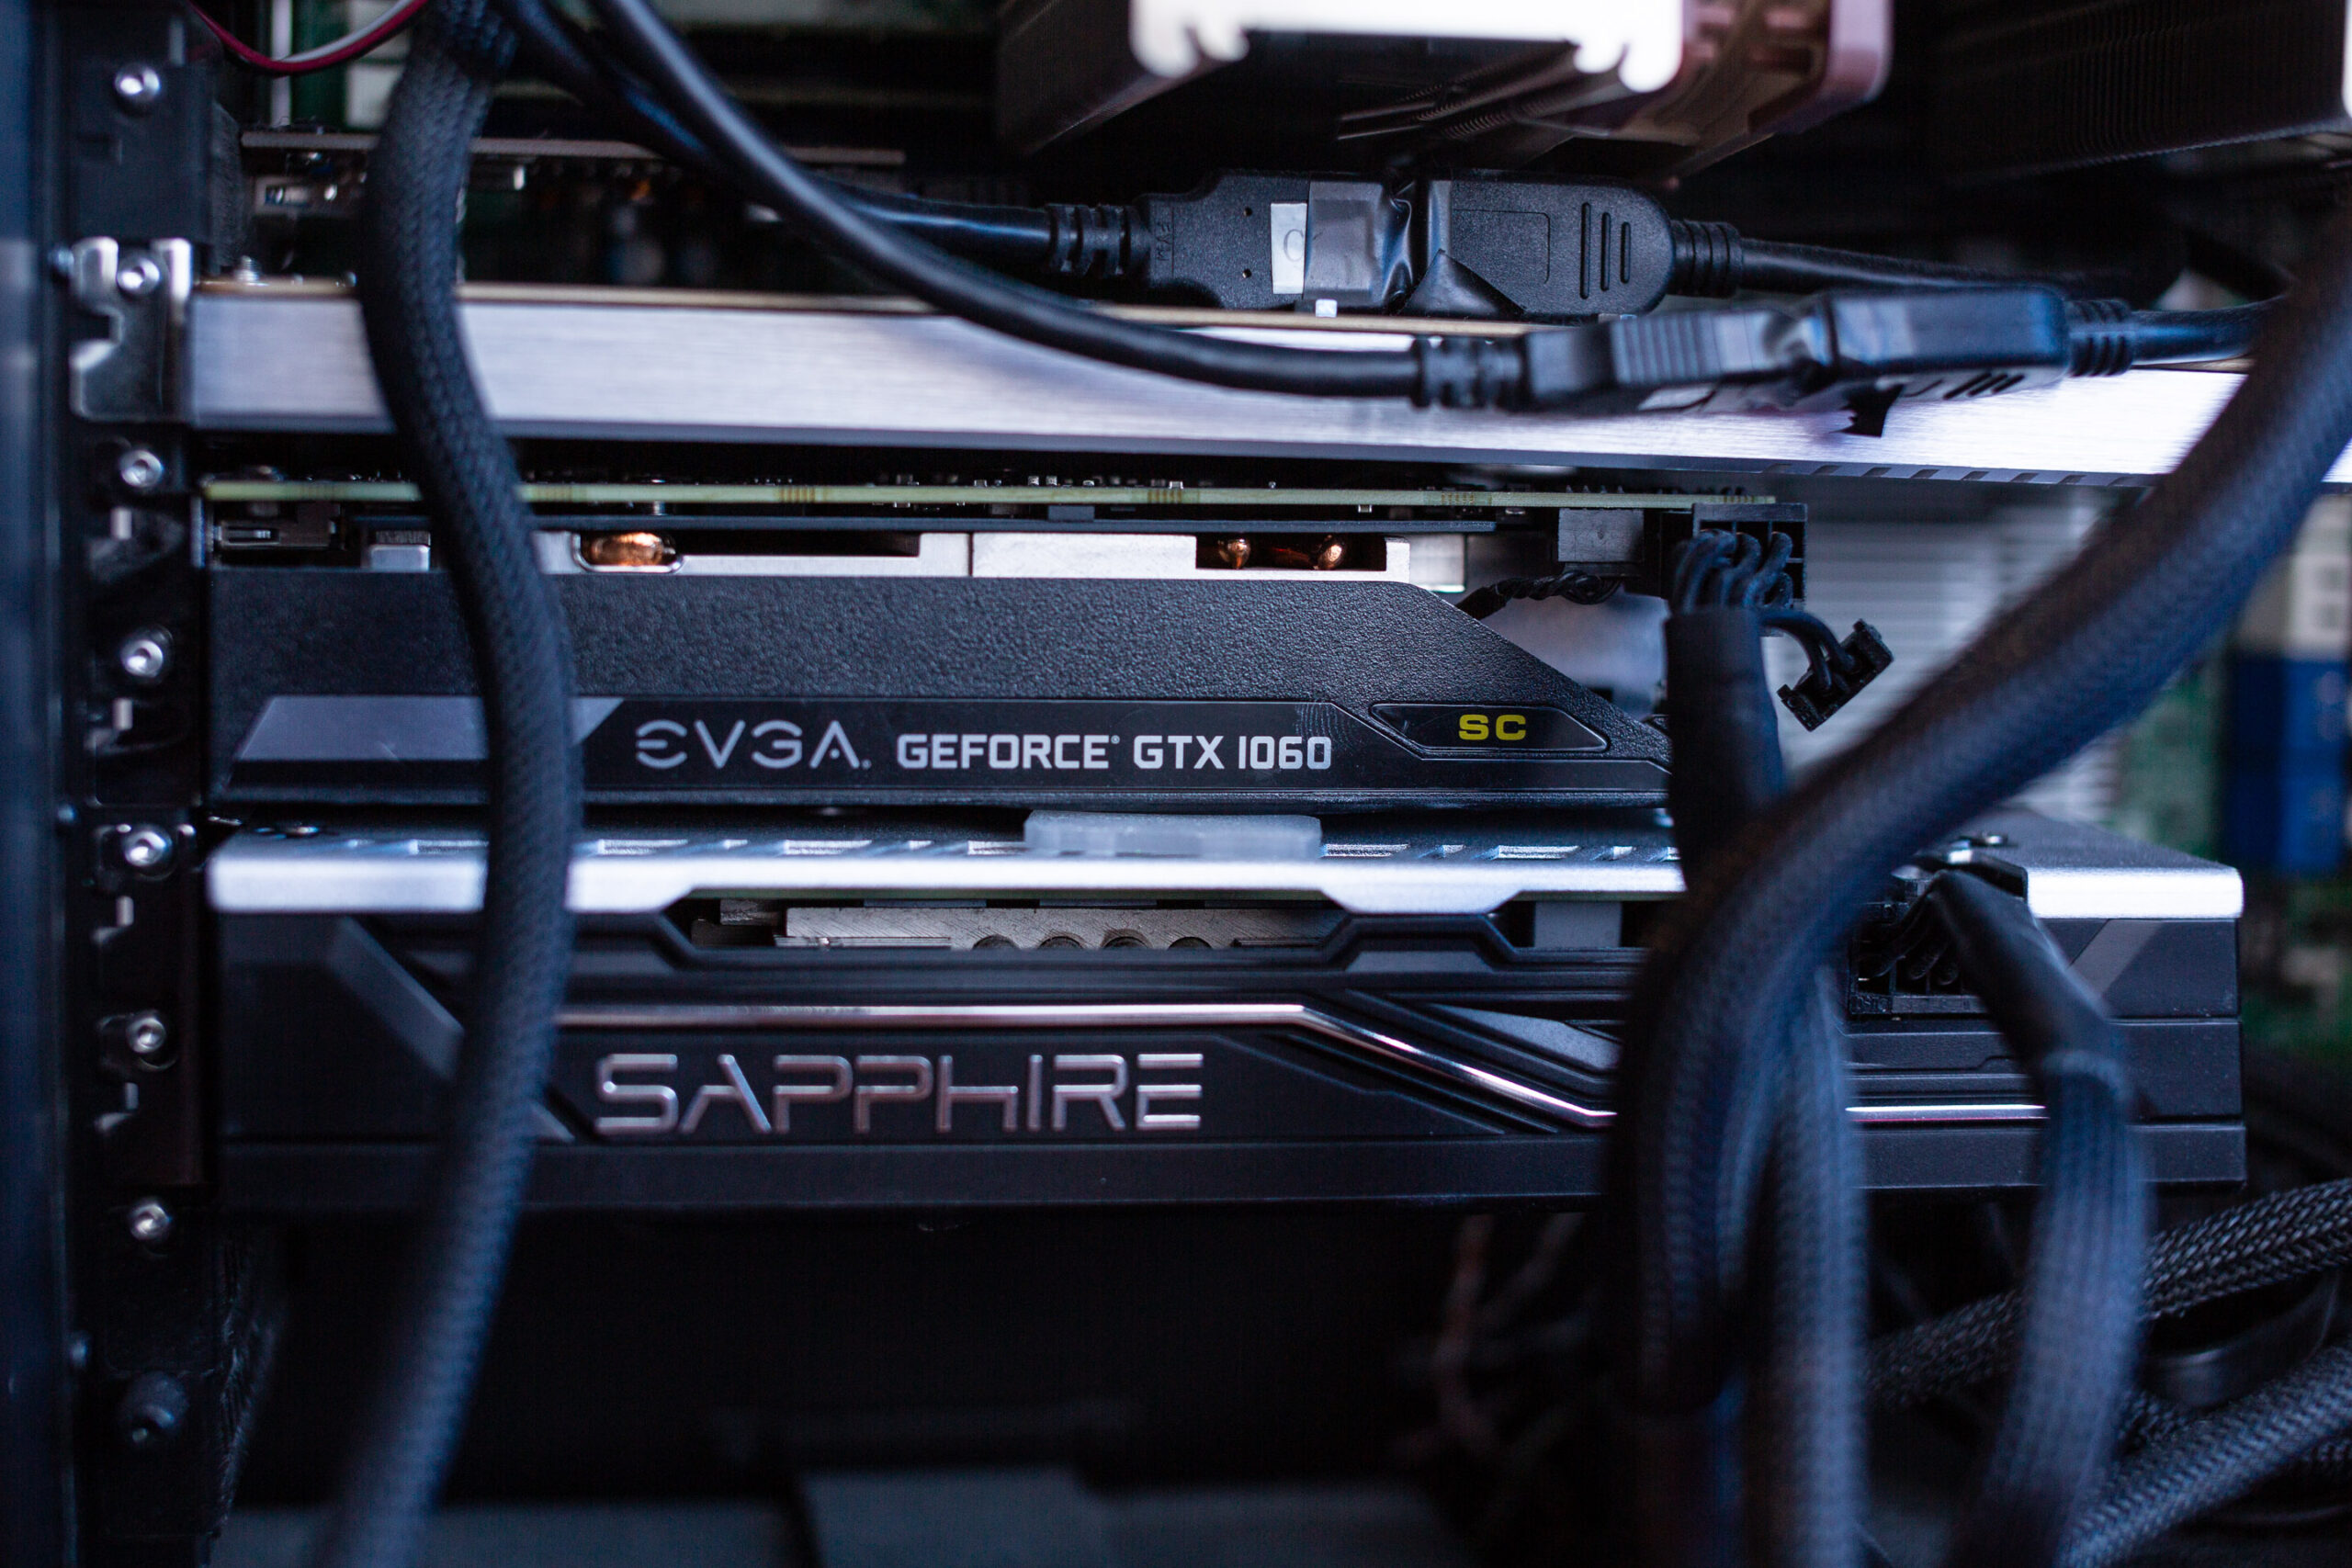
- Graphics
- EVGA GeForce GTX 1060 6GB
- AMD Radeon R9 280X (HD 7970 / Tahiti XTL) (not currently installed)
- AMD Sapphire Radeon RX 580 Pulse 8GB (11265-05-20G)
- IO
- 2x onboard Intel C600 USB 2 controllers
- Inateck USB 3 PCIe card (Fresco Logic FL1100 chipset)
- 2x onboard Intel 82574L gigabit network ports
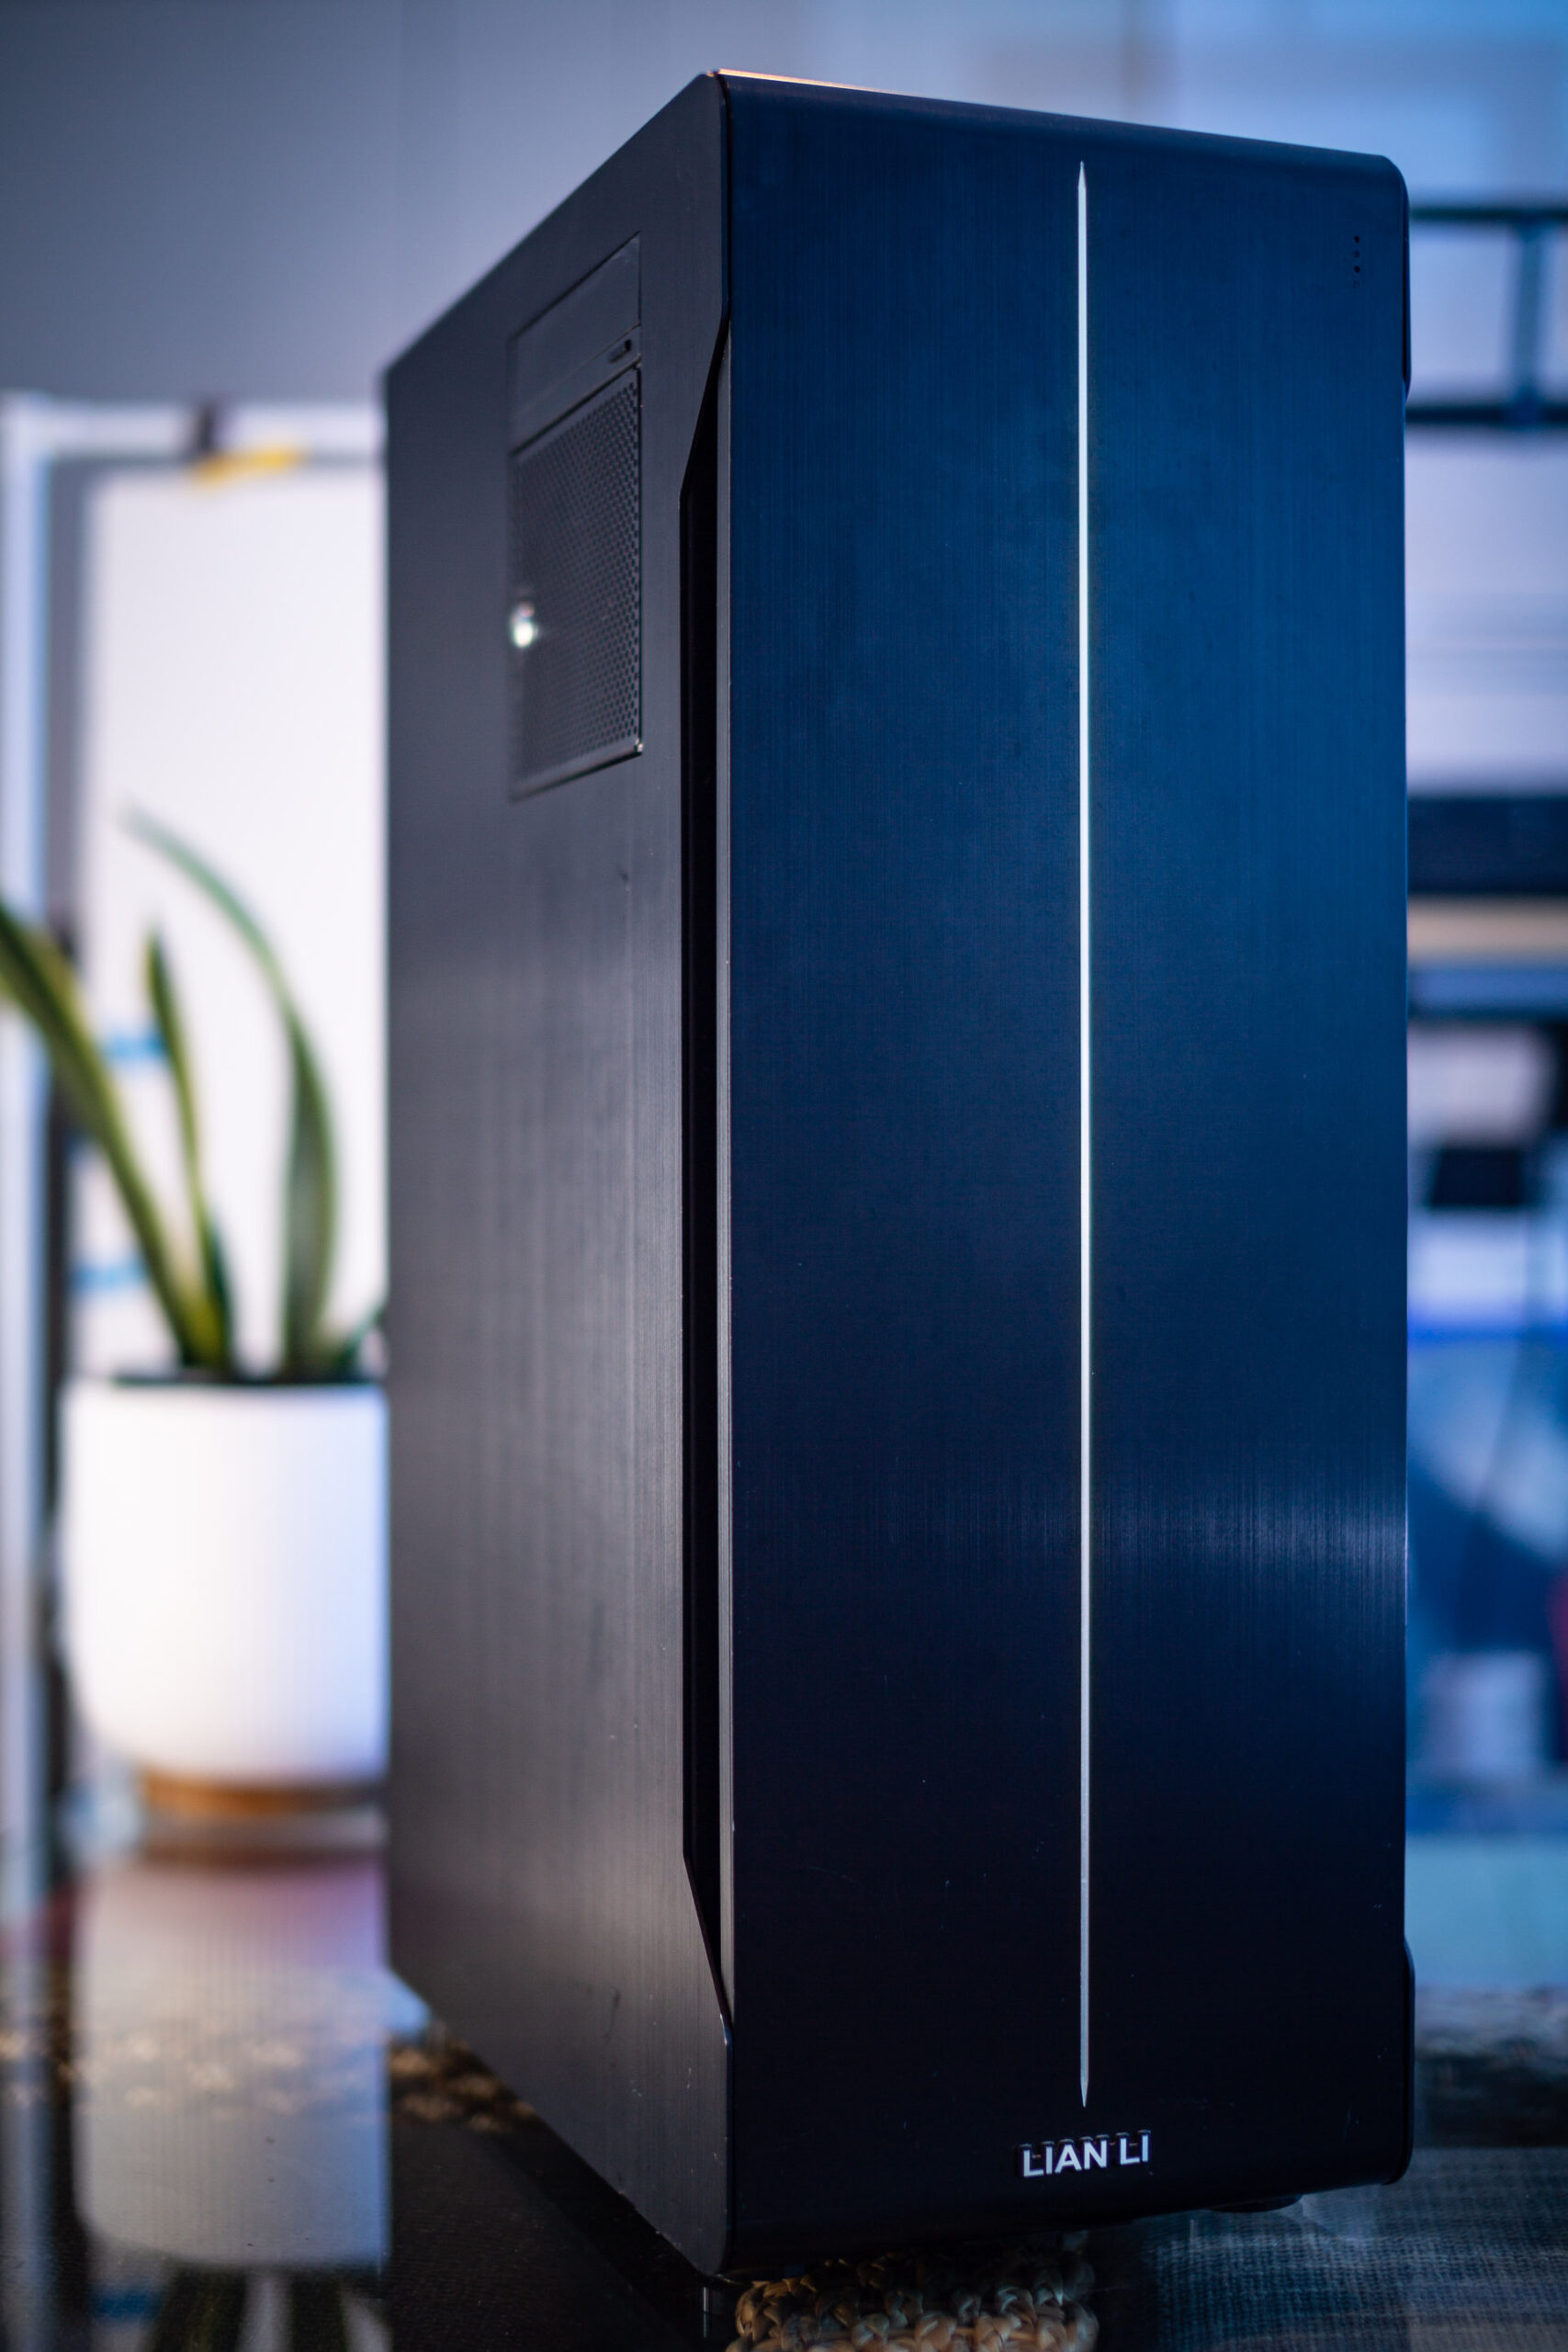
- Case
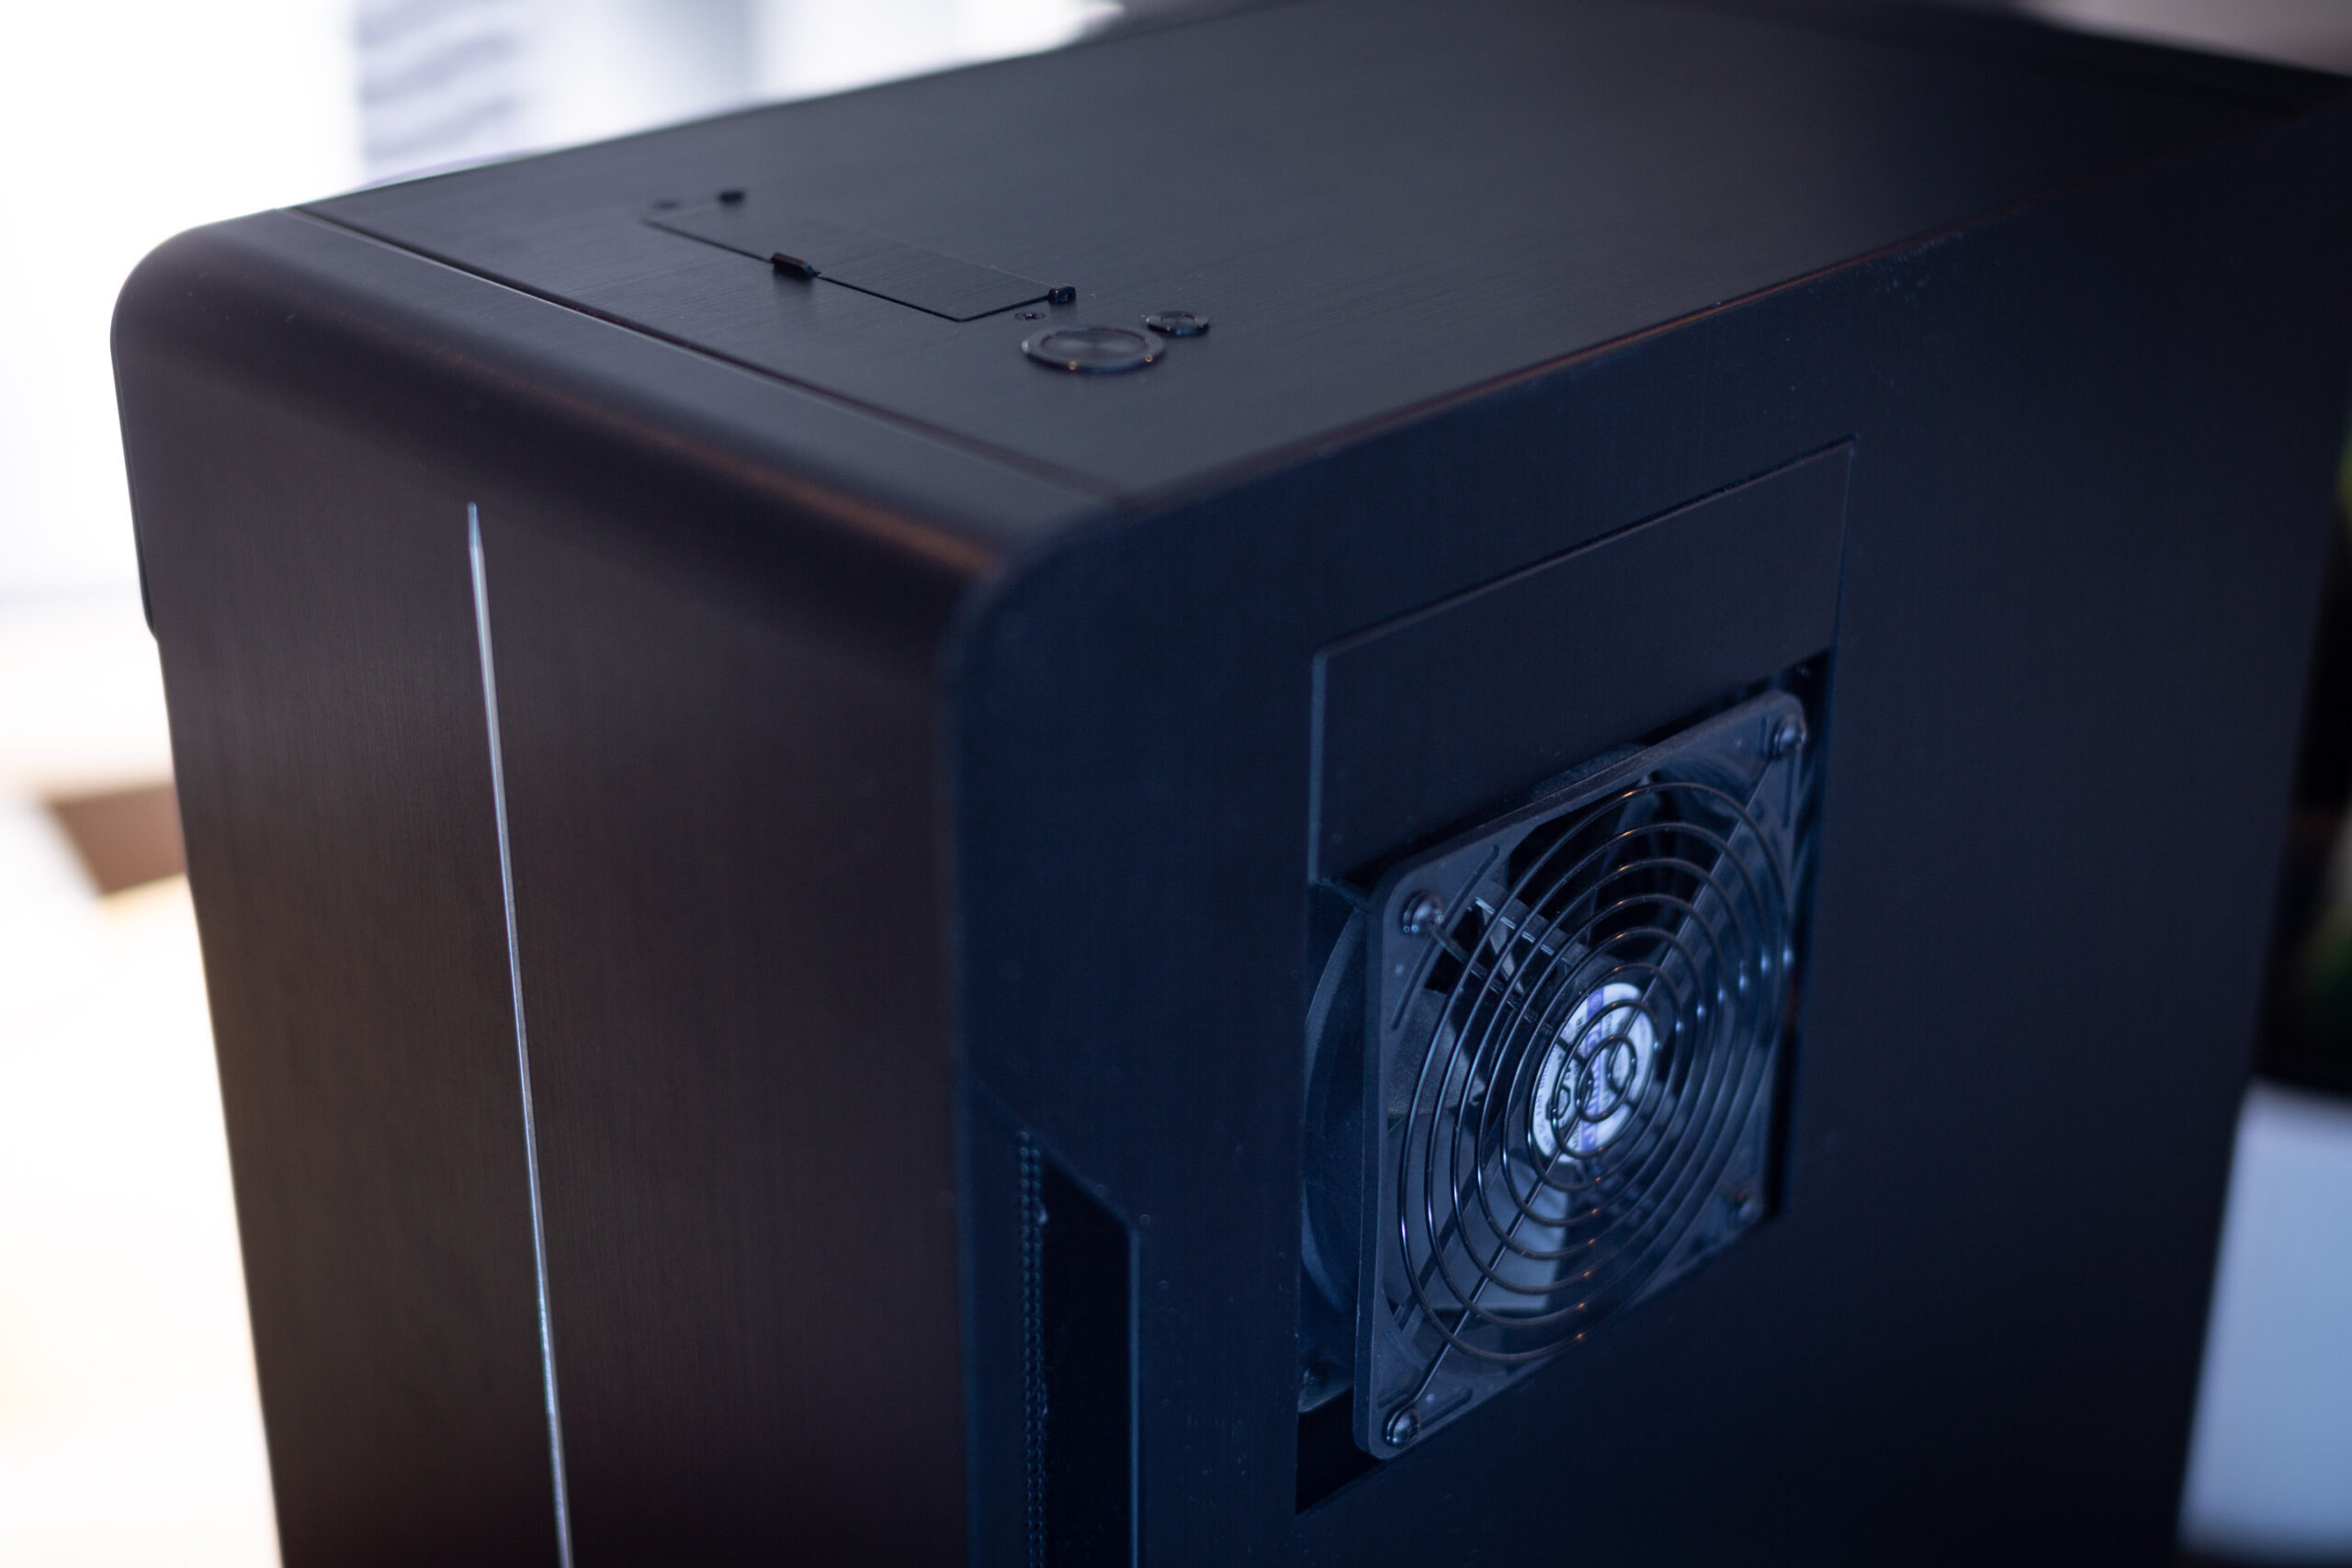
- Lian Li PC-X2000F full tower (sadly, long discontinued!)
- Lian Li EX-H35 HDD Hot Swap Module (to add 3 x 3.5″ drive bays into 3 of the 4 x 5.25″ drive mounts), with Lian Li BZ-503B filter door, and Lian Li BP3SATA hot swap backplane. Note that because of the sideways-mounted 5.25″ design on this case, the door will fit flush with the left side of the case, while the unfiltered exhaust fan sits some 5-10mm proud of the right side of the case.
- CPU cooler
- 2 x Noctua NH-U14S coolers
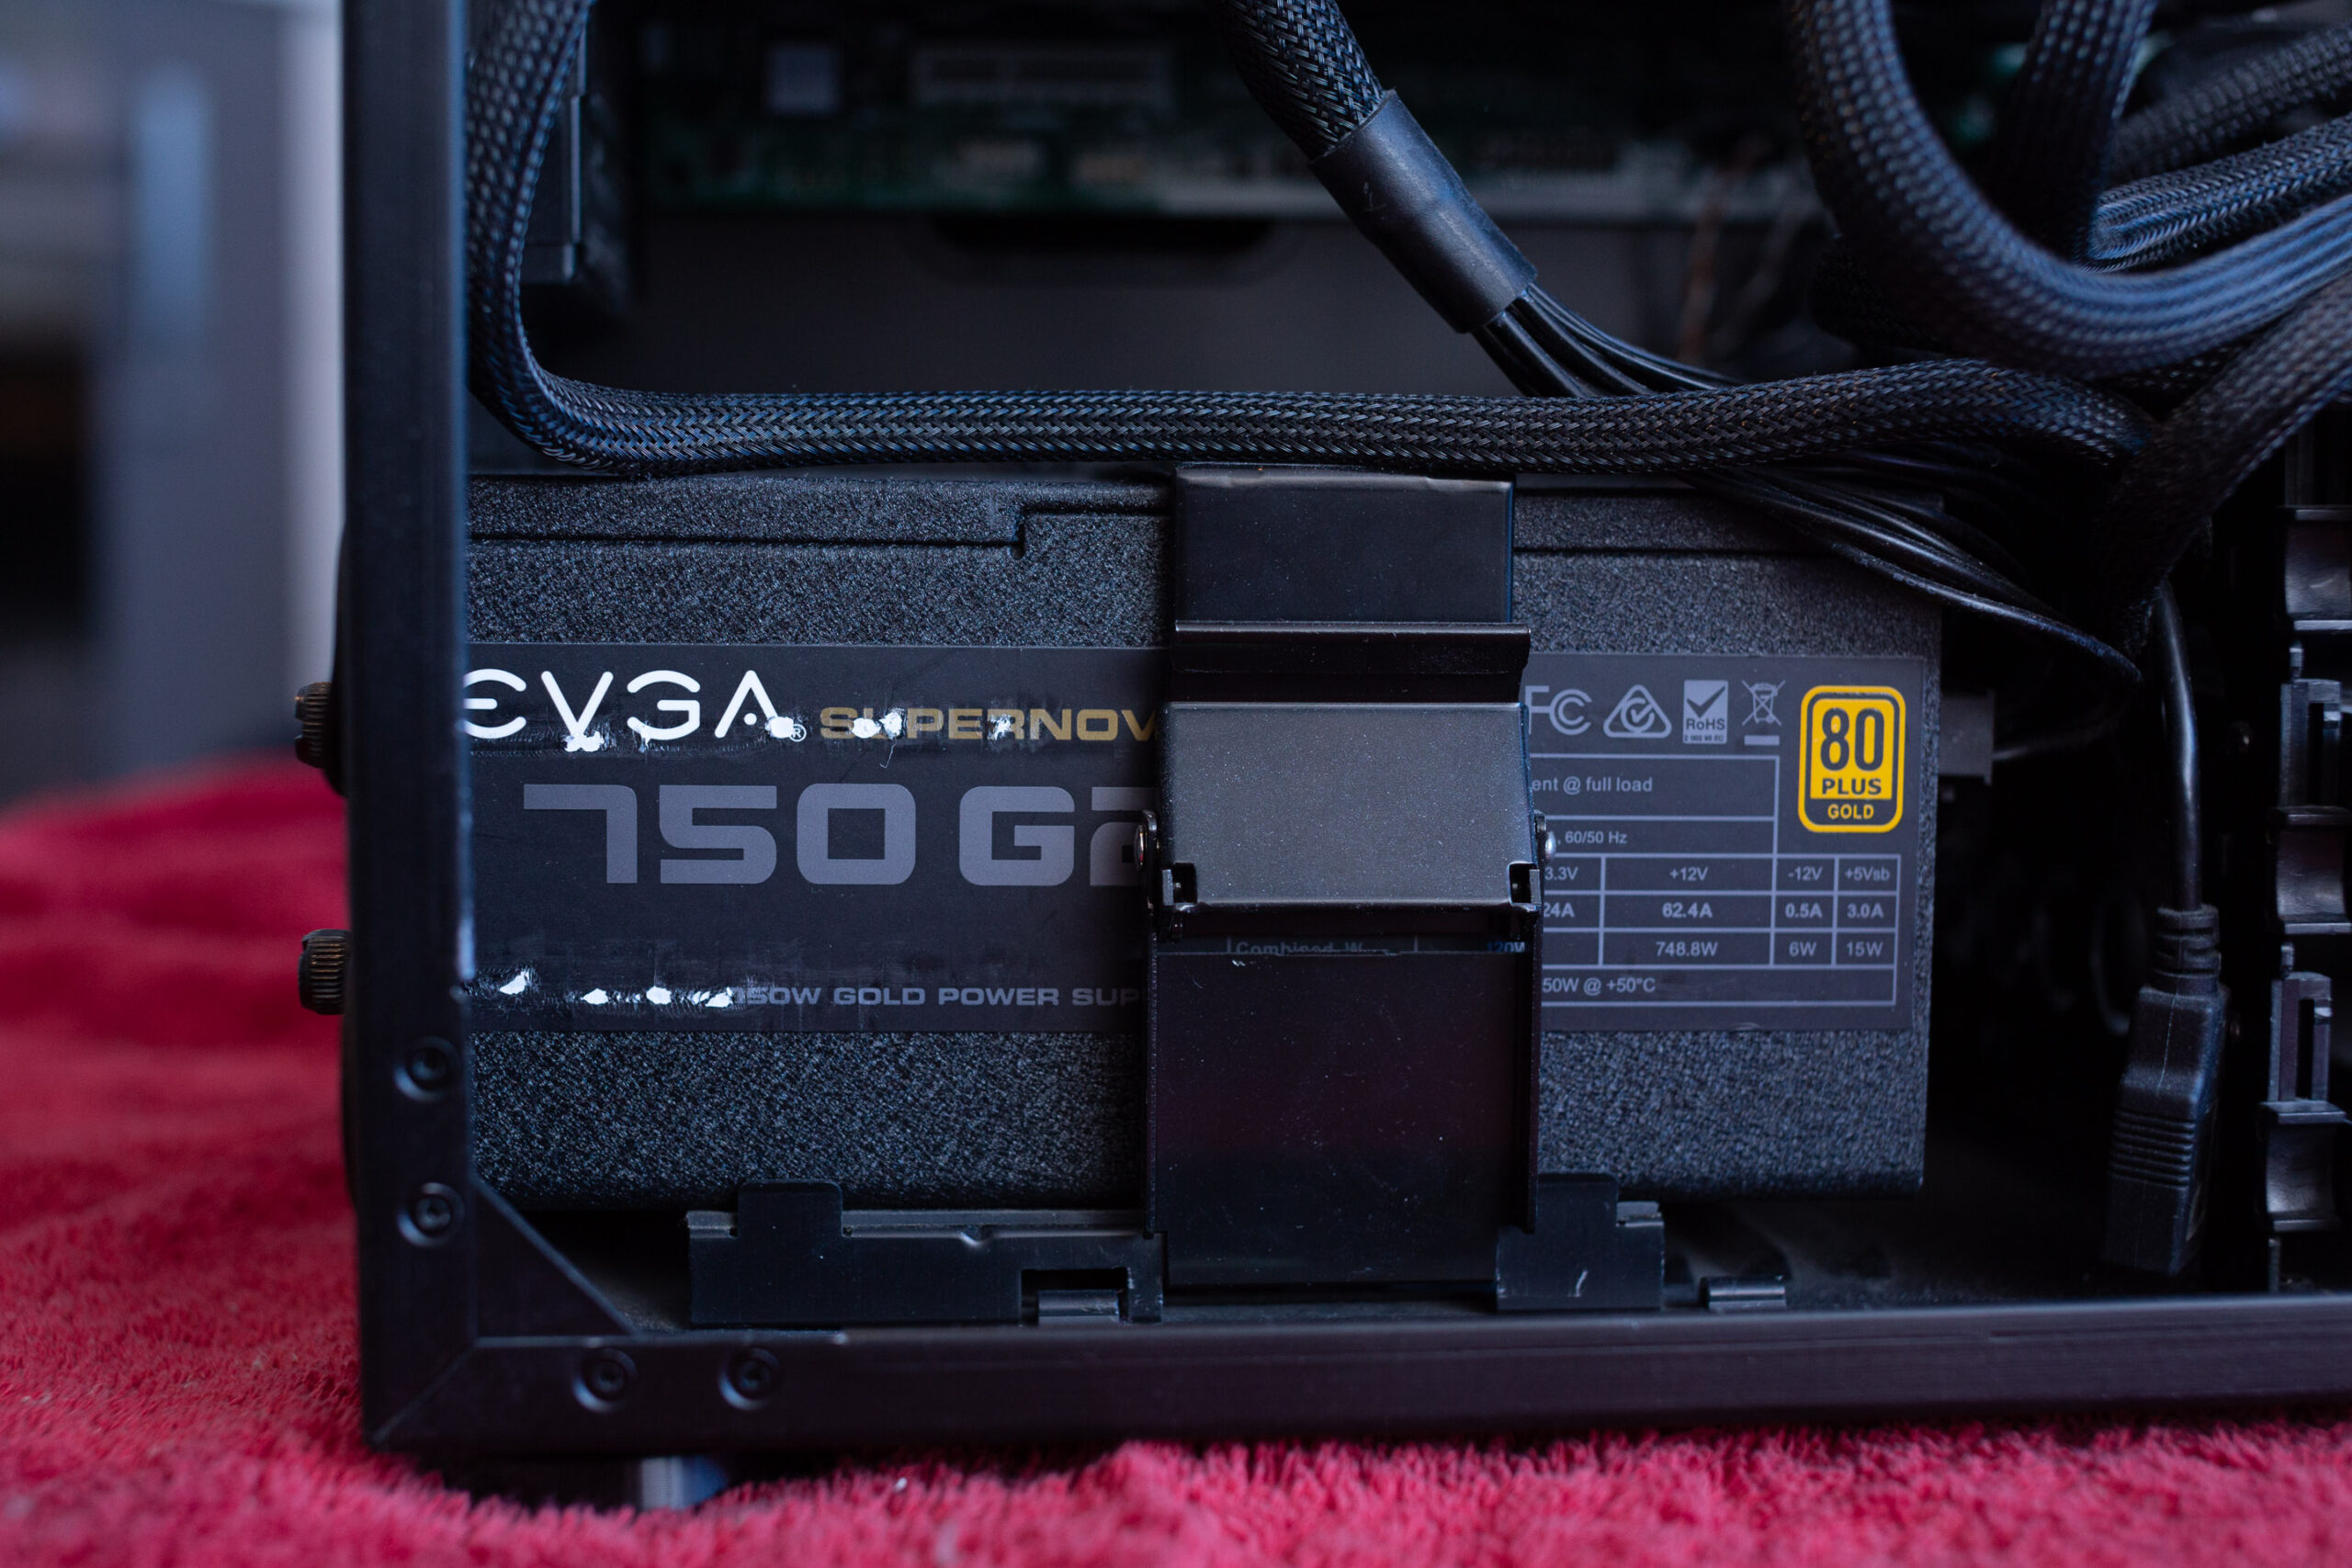
- Power
- EVGA SuperNOVA 750 G2 750W
My Proxmox machine is my desktop computer, so I pass most of this hardware straight through to the macOS Monterey VM that I use as my daily-driver machine. I pass through both USB 2 controllers, the USB 3 controller, an NVMe SSD, and one of the gigabit network ports, plus the RX 580 graphics card.
Attached to the USB controllers I pass through to macOS are a Bluetooth adapter, keyboard, Logitech trackball dongle, and sometimes a DragonFly Black USB DAC for audio (my host motherboard has no audio onboard).
Once macOS boots, this leaves no USB ports dedicated to the host, so no keyboard for the host! I normally manage my Proxmox host from a guest, or if all of my guests are down I use SSH from a laptop or smartphone instead (JuiceSSH on Android works nicely for running qm start 100 to boot up my macOS VM if I accidentally shut it down).
On High Sierra, I used to use the GTX 750 Ti, then later the GTX 1060, to drive two displays (one of them 4k@60Hz over DisplayPort) which both worked flawlessly. However NVIDIA drivers are not available for Monterey, so now I’m back with AMD.
My old AMD R9 280X had some support in Catalina, but I got flashing video corruption on parts of the screen intermittently, and it wasn’t stable on the host either, triggering DMAR warnings that suggest that it tries to read memory it doesn’t own. This all came to a head after upgrading 10.15.4, it just went to a black screen 75% of the way through boot and the system log shows the GPU driver crashed and didn’t return.
Now I’m using the Sapphire Radeon Pulse RX 580 8GB as suggested by Passthrough Post. This one is well supported by macOS, Apple even recommends it on their website. Newer GPUs than this, and siblings of this GPU, suffer from the AMD reset bug that makes them a pain in the ass to pass through. You can now use the vendor-reset module to fix some of these.
Despite good experiences reported by other users, I’m still getting reset-bug-like behaviour on some guest boots, which causes a hang at the 75% mark on the progress bar just as the graphics would be initialised (screen does not go to black). At the same time this is printed to dmesg:
pcieport 0000:00:02.0: AER: Uncorrected (Non-Fatal) error received: 0000:00:02.0
pcieport 0000:00:02.0: AER: PCIe Bus Error: severity=Uncorrected (Non-Fatal), type=Transaction Layer, (Requester ID)
pcieport 0000:00:02.0: AER: device [8086:3c04] error status/mask=00004000/00000000
pcieport 0000:00:02.0: AER: [14] CmpltTO (First)
pcieport 0000:00:02.0: AER: Device recovery successful
This eventually hangs the host. It looks like the host needs to be power-cycled between guest boots for the RX 580 to be fully reset.
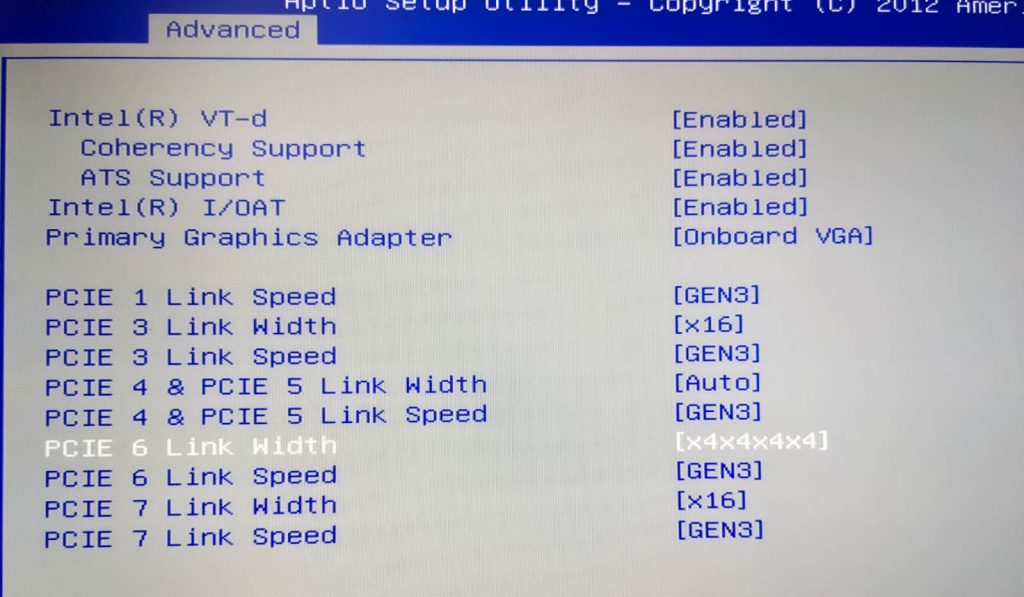
On this motherboard is a third SATA controller, a Marvell SE9230, but enabling this in the ASRock UEFI setup causes it to throw a ton of DMAR errors and kill the host, so avoid using it.
My ASUS Hyper M.2 X16 PCIe 4.0 X4 Expansion Card allows motherboards that support PCIe-slot bifurcation to add up to 4 NVMe SSDs to a single x16 slot, which is wonderful for expanding storage. Note that bifurcation support is an absolute requirement with this card, if your system doesn’t support it you need to use one that has a PCIe switch chip onboard instead.
What I use it for
I’m using my Monterey VM for developing software (IntelliJ / XCode), watching videos (YouTube / mpv), playing music, editing photos with Photoshop and Lightroom, editing video with DaVinci Resolve, buying apps on the App Store, syncing data with iCloud, and more. That all works trouble-free. I don’t use any of the Apple apps that are known to be troublesome on Hackintosh (iMessage etc), so I’m not sure if those are working or not.
VM configuration
Here’s my VM’s Proxmox configuration, with discussion to follow:
agent: 1
args: -device isa-applesmc,osk="..." -smbios type=2 cpu host,kvm=on,vendor=GenuineIntel,+kvm_pv_unhalt,+kvm_pv_eoi,+hypervisor,+invtsc,+pdpe1gb,check -smp 32,sockets=2,cores=8,threads=2 -device 'pcie-root-port,id=ich9-pcie-port-6,addr=10.1,x-speed=16,x-width=32,multifunction=on,bus=pcie.0,port=6,chassis=6' -device 'vfio-pci,host=0000:0a:00.0,id=hostpci5,bus=ich9-pcie-port-6,addr=0x0,x-pci-device-id=0x10f6,x-pci-sub-vendor-id=0x0000,x-pci-sub-device-id=0x0000' -global ICH9-LPC.acpi-pci-hotplug-with-bridge-support=off
balloon: 0
bios: ovmf
boot: order=hostpci4
cores: 16
cpu: Penryn
efidisk0: vms:vm-100-disk-1,size=128K
hostpci0: 03:00,pcie=1,x-vga=on
hostpci1: 00:1a.0,pcie=1
hostpci2: 00:1d.0,pcie=1
hostpci3: 82:00.0,pcie=1
hostpci4: 81:00.0,pcie=1
# hostpci5: 0a:00.0,pcie=1
hugepages: 1024
machine: pc-q35-6.1
memory: 40960
name: Monterey
net0: vmxnet3=2B:F9:52:54:FE:8A,bridge=vmbr0
numa: 1
onboot: 1
ostype: other
scsihw: virtio-scsi-pci
smbios1: uuid=42c28f01-4b4e-4ef8-97ac-80dea43c0bcb
sockets: 2
tablet: 0
vga: none
hookscript: local:snippets/hackintosh.sh
- agent
- Enabling the agent enables Proxmox’s “shutdown” button to ask macOS to perform an orderly shutdown.
- args
- OpenCore now allows “cpu” to be set to “host” to pass through all supported CPU features automatically. The OC config causes the CPU to masquerade as Penryn to macOS to keep macOS happy.
- I’m passing through all 32 of my host threads to macOS. Proxmox’s configuration format doesn’t natively support setting a thread count, so I had to add my topology manually here by adding “-smp 32,sockets=2,cores=8,threads=2”.
- For an explanation of all that “-device” stuff on the end, read the “net0” section below.
- hostpci0-5
- I’m passing through 6 PCIe devices, which is now natively supported by the latest version of Proxmox 6. From first to last I have my graphics card, two USB 2 controllers, my NVMe storage, a USB 3 controller, and one gigabit network card.
- hugepages
- I’ve enabled 1GB hugepages on Proxmox, so I’m asking for 1024MB hugepages here. More details on that further down.
- memory
- 40 gigabytes, baby!
- net0
- I usually have this emulated network card disabled in Monterey’s network settings, and use my passthrough Intel 82574L instead.
- Although Monterey has a driver for the Intel 82574L, the driver doesn’t match the exact PCI ID of the card I have, so the driver doesn’t load and the card remains inactive. Luckily we can edit the network card’s PCI ID to match what macOS is expecting. Here’s the card I’m using
-
# lspci -nn | grep 82574L

0b:00.0 Ethernet controller [0200]: Intel Corporation 82574L Gigabit Network Connection [8086:10d3]
My PCI ID here is 8086:10d3. If you check the file /System/Library/Extensions/IONetworkingFamily.kext/Contents/PlugIns/Intel82574L.kext/Contents/Info.plist, you can see the device IDs that macOS supports with this driver:
<key>IOPCIPrimaryMatch</key>
<string>0x104b8086 0x10f68086</string>
<key>IOPCISecondaryMatch</key>
<string>0x00008086 0x00000000</string>
Let’s make the card pretend to be that 8086:10f6 (primary ID) 0000:0000 (sub ID) card. To do this we need to edit some hostpci device properties that Proxmox doesn’t support, so we need to move the hostpci device’s definition into the “args” where we can edit it.
First make sure the hostpci entry for the network card in the VM’s config is the one with the highest index, then run
qm showcmd <your VM ID> --pretty. Find the two lines that define that card:...
-device 'pcie-root-port,id=ich9-pcie-port-6,addr=10.1,x-speed=16,x-width=32,multifunction=on,bus=pcie.0,port=6,chassis=6' \
-device 'vfio-pci,host=0000:0a:00.0,id=hostpci5,bus=ich9-pcie-port-6,addr=0x0' \
...Copy those two lines, remove the trailing backslashes and combine them into one line, and add them to the end of your “args” line. Now we can edit the second -device to add the fake PCI IDs (new text in bold):
-device 'pcie-root-port,id=ich9-pcie-port-6,addr=10.1,x-speed=16,x-width=32,multifunction=on,bus=pcie.0,port=6,chassis=6' -device 'vfio-pci,host=0000:0a:00.0,id=hostpci5,bus=ich9-pcie-port-6,addr=0x0,x-pci-device-id=0x10f6,x-pci-sub-vendor-id=0x0000,x-pci-sub-device-id=0x0000'
Now comment out the “hostpci5” line for the network card, since we’re manually defining it through the args instead. Now macOS should see this card’s ID as if it was one of the supported cards, and everything works!
- vga
- I need to set this to “none”, since otherwise the crappy emulated video card would become the primary video adapter, and I only want my passthrough card to be active.
-
- hookscript
- This is a new feature in Proxmox 5.4 that allows a script to be run at various points in the VM lifecycle.
- In recent kernel versions, some devices like my USB controllers are grabbed by the host kernel very early during boot, before vfio can claim them. This means that I need to manually release those devices in order to start the VM. I created /var/lib/vz/snippets/hackintosh.sh with this content (and marked it executable with chmod +x):
-
#!/usr/bin/env bash

if [ "$2" == "pre-start" ]
then
# First release devices from their current driver (by their PCI bus IDs)
echo 0000:00:1d.0 > /sys/bus/pci/devices/0000:00:1d.0/driver/unbind
echo 0000:00:1a.0 > /sys/bus/pci/devices/0000:00:1a.0/driver/unbind
echo 0000:81:00.0 > /sys/bus/pci/devices/0000:81:00.0/driver/unbind
echo 0000:82:00.0 > /sys/bus/pci/devices/0000:82:00.0/driver/unbind
echo 0000:0a:00.0 > /sys/bus/pci/devices/0000:0a:00.0/driver/unbind

# Then attach them by ID to VFIO
echo 8086 1d2d > /sys/bus/pci/drivers/vfio-pci/new_id
echo 8086 1d26 > /sys/bus/pci/drivers/vfio-pci/new_id
echo 1b73 1100 > /sys/bus/pci/drivers/vfio-pci/new_id
echo 144d a802 > /sys/bus/pci/drivers/vfio-pci/new_id
echo vfio-pci > /sys/bus/pci/devices/0000:0a:00.0/driver_override
echo 0000:0a:00.0 > /sys/bus/pci/drivers_probe
fi
Guest file storage
The macOS VM’s primary storage is the passthrough Samsung 970 Evo 1TB NVMe SSD, which can be installed onto and used in Monterey. However since Monterey TRIM is broken, and SetApfsTrimTimeout needs to be set in my config.plist to disable it so it doesn’t slow down boot.
For secondary storage, my Proxmox host exports a number of directories over the AFP network protocol using netatalk.
Proxmox 5
Debian Stretch’s version of the netatalk package is seriously out of date (and I’ve had file corruption issues with old versions), so I installed netatalk onto Proxmox from source instead following these directions:
http://netatalk.sourceforge.net/wiki/index.php/Install_Netatalk_3.1.11_on_Debian_9_Stretch
My configure command ended up being:
./configure --with-init-style=debian-systemd --without-libevent --without-tdb --with-cracklib --enable-krbV-uam --with-pam-confdir=/etc/pam.d --with-dbus-daemon=/usr/bin/dbus-daemon --with-dbus-sysconf-dir=/etc/dbus-1/system.d --with-tracker-pkgconfig-version=1.0
Netatalk is configured in /usr/local/etc/afp.conf like so:
; Netatalk 3.x configuration file

[Global]

[Downloads]
path = /tank/downloads
rwlist = nick ; List of usernames with rw permissions on this share

[LinuxISOs]
path = /tank/isos
rwlist = nick
When connecting to the fileshare from macOS, you connect with a URL like “afp://proxmox”, then specify the name and password of the unix user you’re authenticating as (here, “nick”), and that user’s account will be used for all file permissions checks.
Proxmox 7
Proxmox 7’s prebuilt version of Netatalk is good now, so I backed up my afp.conf, removed my old version that was installed from source (with “make uninstall”, note that this erases afp.conf!), and apt-installed the netatalk package instead. The configuration is now found at /etc/netatalk/afp.conf.
Proxmox configuration
Passthrough of PCIe devices requires a bit of configuration on Proxmox’s side, much of which is described in their manual. Here’s what I ended up with:
/etc/default/grub
...
GRUB_CMDLINE_LINUX_DEFAULT="quiet intel_iommu=on rootdelay=10"
...
Note that Proxmox 7 will be booted using systemd-boot rather than GRUB if you are using a ZFS root volume and booting using UEFI. If you’re using systemd-boot you need to create this file instead:
/etc/kernel/cmdline (Proxmox 7 when using systemd-boot)
root=ZFS=rpool/ROOT/pve-1 boot=zfs intel_iommu=on rootdelay=10
/etc/modules
vfio
vfio_iommu_type1
vfio_pci
vfio_virqfd
/etc/modprobe.d/blacklist.conf
blacklist nouveau
blacklist nvidia
blacklist nvidiafb
blacklist snd_hda_codec_hdmi
blacklist snd_hda_intel
blacklist snd_hda_codec
blacklist snd_hda_core
blacklist radeon
blacklist amdgpu
/etc/modprobe.d/kvm.conf
options kvm ignore_msrs=Y
/etc/modprobe.d/kvm-intel.conf
# Nested VM support
options kvm-intel nested=Y
/etc/modprobe.d/vfio-pci.conf
options vfio-pci ids=144d:a802,8086:1d2d,8086:1d26,10de:1c03,10de:10f1,10de:1380,1b73:1100,1002:6798,1002:aaa0 disable_vga=1
# Note that adding disable_vga here will probably prevent guests from booting in SeaBIOS mode
After editing those files you typically need to run update-grub (or pve-efiboot-tool refresh if you are using systemd-boot on Proxmox 7), update-initramfs -k all -u, then reboot Proxmox.
Host configuration
In the UEFI settings of my host system I had to set my onboard video card as my primary video adapter. Otherwise, the VBIOS of my discrete video cards would get molested by the host during boot, rendering them unusable for guests (this is especially a problem if your host boots in BIOS compatibility mode instead of UEFI mode).
One way to avoid needing to change this setting (e.g. if you only have one video card in your system!) is to dump the unmolested VBIOS of the card while it is attached to the host as a secondary card, then store a copy of the VBIOS as a file in Proxmox’s /usr/share/kvm directory, and provide it to the VM by using a “romfile” option like so:
hostpci0: 01:00,x-vga=on,romfile=my-vbios.bin
Or if you don’t have a spare discrete GPU of your own to achieve this, you can find somebody else who has done this online. However, I have never tried this approach myself.
Guest configuration
In Catalina, I have system sleep turned off in the power saving options (because I had too many instances where it went to sleep and never woke up again).
Launching the VM
I found that when I assign obscene amounts of RAM to the VM, it takes a long time for Proxmox to allocate the memory for it, causing a timeout during VM launch:
start failed: command '/usr/bin/kvm -id 100 ...'' failed: got timeout
You can instead avoid Proxmox’s timeout system entirely by running the VM like:
qm showcmd 100 | bash
Another RAM problem comes if my host has done a ton of disk IO. This causes ZFS’s ARC (disk cache) to grow in size, and it seems like the ARC is not automatically released when that memory is needed to start a VM (maybe this is an interaction with the hugepages feature). So the VM will complain that it’s out of memory on launch even though there is plenty of memory marked as “cache” available.
You can clear this read-cache and make the RAM available again by running:
echo 3 > /proc/sys/vm/drop_caches
1GB hugepages
My host supports 1GB hugepages:
# grep pdpe1gb /proc/cpuinfo

... nx pdpe1gb rdtsc ...
So I added this to the end of my /etc/kernel/cmdline to statically allocate 40GB of 1GB hugepages on boot:
default_hugepagesz=1G hugepagesz=1G hugepages=40
After running update-initramfs -u and rebooting, I can see that those pages have been successfully allocated:
# grep Huge /proc/meminfo

HugePages_Total: 40
HugePages_Free: 40
HugePages_Rsvd: 0
HugePages_Surp: 0
Hugepagesize: 1048576 kB
Hugetlb: 41943040 kB
It turns out that those hugepages are evenly split between my two NUMA nodes (20GB per CPU socket), so I have to set “numa: 1” in the VM config.
The final step is to add “hugepages: 1024” to the VM’s config file so it will use those 1024MB hugepages. Otherwise it’ll ignore them completely and continue to allocate from the general RAM pool, which will immediately run me out of RAM and cause the VM launch to fail. Other VMs won’t be able to use that memory, even if macOS isn’t running, unless they’re also configured to use 1GB hugepages.
You can also add “+pdpe1gb” to the list of the VM’s CPU features so that the guest kernel can use 1GB pages internally for its own allocations, but I doubt that MacOS takes advantage of this feature.
Notes
2019-12-19
Upgraded to 1GB hugepages. Proxmox 6.1 and macOS 10.15.2.
2019-03-29
My VM was configured with a passthrough video card, and the config file also had “vga: std” in it. Normally if there is a passthrough card enabled, Proxmox disables the emulated VGA adapter, so this was equivalent to “vga: none”. However after upgrading pve-manager to 5.3-12, I found that the emulated vga adapter was re-enabled, so OpenCore ended up displaying on the emulated console, and both of my hardware monitors became “secondary” monitors in macOS. To fix this I needed to explicitly set “vga: none” in the VM configuration.
2019-04-12
Added “hookscript” to take advantage of new Proxmox 5.4 features
2019-07-18
Did an in-place upgrade to Proxmox 6 today!
Proxmox 6 now includes an up-to-date version of the netatalk package, so I use the prebuilt version instead of building it from source. Don’t forget to install my new patched pve-edk2-firmware package.
2020-03-27
I upgraded to macOS 10.15.4, but even after updating Clover, Lilu and WhateverGreen, my R9 280X only gives me a black screen, although the system does boot and I can access it using SSH. Looking at the boot log I can see a GPU restart is attempted, but fails. Will update with a solution if I find one.
EDIT: For the moment I built an offline installer ISO using a Catalina 10.15.3 installer I had lying around, and used that to reinstall macOS. Now I’m back on 10.15.3 and all my data is exactly where I left it, very painless. After the COVID lockdown I will probably try to replace my R9 280X with a better-supported RX 570 and try again.
2020-04-27
Updated to OpenCore instead of Clover. Still running 10.15.3. pve-edk2-firmware no longer needs to be patched when using OpenCore!
2020-06-05
Replaced my graphics card with an RX 580 to get 10.15.5 compatibility, and I’m back up and running now. Using a new method for fixing my passthrough network adapter’s driver which avoids patching Catalina’s drivers.
2020-12-03
Added second NVMe SSD and 4x SSD carrier card
2021-07-07
Upgraded from 2x E5-2670 to 2x E5-2687W v2. Fusion 360 is now 30% faster! Added photos of my rig
2021-07-10
Updated to Proxmox 7, and Hackintosh is running fine without any tweaks
2021-12-23
For some reason by network adapter no longer wants to bind to vfio-pci using “new_id”, I had to use the “driver_override” approach instead in my hookscript snippet (updated above).
Until proxmox builds new .deb files with edited perls for exposing fake ssd virtual disks to the osx vm (needed for restoring a time machine backup to a disk) here is how I done it.
important part is rotation_rate and has to be added to args: in vmid.conf
-drive file=”/dev/path-to-volumegroup/logicalvolume,if=none”,id=drive-ide0,cache=unsafe,format=raw,aio=threads,detect-zeroes=on -device ‘ide-hd,bus=ide.0,unit=0,drive=drive-ide0,id=ide0,rotation_rate=1’
Not sure if it’s a new update but I’m seeing the option for “SSD emulation” (check advanced for the drive). MacOS then shows it as Solid State.
Hi,
I don’t understand why my gpu dont show any signals …
in : /etc/default/grub
GRUB_CMDLINE_LINUX_DEFAULT=”quiet amd_iommu=on”
in : /etc/modules
vfio
vfio_iommu_type1
vfio_pci
vfio_virqfd
run : lspci -n -s 01:00
01:00.0 0300: 10de:0fc6 (rev a1)
01:00.1 0403: 10de:0e1b (rev a1)
in : /etc/modprobe.d/vfio.conf
options vfio-pci ids=10de:0fc6,10de:0e1b disable_vga=1
run : dmesg | grep ecap
[ 0.004000] DMAR: dmar0: reg_base_addr fed90000 ver 1:0 cap 1c0000c40660462 ecap 7e3ff0505e
[ 0.004000] DMAR: dmar1: reg_base_addr fed91000 ver 1:0 cap d2008c40660462 ecap f050da
[ 84.780920] vfio_ecap_init: 0000:01:00.0 hiding ecap 0x19@0x900
run : find /sys/kernel/iommu_groups/ -type l
[…]
/sys/kernel/iommu_groups/1/devices/0000:00:01.0
/sys/kernel/iommu_groups/1/devices/0000:01:00.0
/sys/kernel/iommu_groups/1/devices/0000:01:00.1
[…]
in VM config file :
hostpci0: 01:00,pcie=1,x-vga=on
“blacklist nvidia” >> /etc/modprobe.d/blacklist.conf
What did i miss ?
What’s that “00:01.0” device that’s also in the same group as your card?
Does your card have a UEFI BIOS? I think that’s required since the guest boots in UEFI mode. Sometimes there are patched BIOS images available on the internet that you can supply with the “romfile” argument to “hostpci0” to use.
You can try creating a new VM in SeaBIOS mode and see if the card turns on there.
Hi,
“00:01.0”, just one part form the result of the command i don’t know
to test efi on gpu :
run : cat rom > /tmp/image.rom
get : cat: rom: Input/output error
I have found this https://www.techpowerup.com/vgabios/153654/gigabyte-gtx650-2048-131211
And use ./rom-fixer ../Gigabyte.GTX650.2048.131211.rom
When start win10 with SeaBIOS :
kvm: -device vfio-pci,host=01:00.0,id=hostpci0.0,bus=ich9-pcie-port-1,addr=0x0.0,x-vga=on,multifunction=on: vfio error: 0000:01:00.0: failed getting region info for VGA region index 8: Invalid argument
device does not support requested feature x-vga
This is because proxmox still using it ? if yes, why ?
thanks
Because you have “disable_vga=1” in your vfio-pci options, your passthrough card will no longer be available for use in SeaBIOS systems (these require VGA support).
You can remove this setting to make the card compatible with both BIOS and UEFI guests, but you will have a greater chance of booting a guest locking up the host due to VGA arbitration conflicts. It’s better to install windows using UEFI.
Run “lspci -s 00:01.0” to see what that device is, I guess it’s a PCIe root port or something.
You may need to explicitly pass it through to the guest by adding another hostpci line, since everything in the same iommu group has to be passed through at once.edit: apparently it doesn’t need to be explicitly passed through: https://wiki.archlinux.org/index.php/PCI_passthrough_via_OVMFlspci -s 00:01.0
00:01.0 PCI bridge: Intel Corporation Skylake PCIe Controller (x16) (rev 07)
I removed “disable_vga=1” still not start.
I will try to install windows using UEFI (so put “disable_vga=1” in vfio-pci options ?).
I don’t know what I’m doing exactly so it’s hard to follow you 🙁
This is too hard for me, I don’t see the problem and understand this. I will stay with the bad graphics on the macOS Mojave VM, and control it under the web gui of proxmox 🙁
Thanks a lot for your time and help.
What error do you get when booting the Windows installer with UEFI? Yeah, you want “disable_vga=1” if all your guests will be UEFI.
You can have Proxmox use your patched VBIOS like so:
hostpci0: 01:00,x-vga=on,romfile=/tmp/Gigabyte.GTX650.2048.131211.rom
Hi,
So installed Win10 with UEFI, use “disable_vga=1”, in VM conf : “hostpci0: 01:00,x-vga=on,romfile=Gigabyte.GTX650.2048.131211.rom” (Copied the rom in /usr/share/kvm/)
and finally run “update-grub”, “update-initramfs -k all -u”.
Start with no errors in the logs (TASK OK).
But no output signals.
Somthing is strange here (http://vfio.blogspot.com/2014/08/does-my-graphics-card-rom-support-efi.html) we can see if our card is valid for the EFI boot right ?
When I run
# cd /sys/bus/pci/devices/0000:01:00.0/
# echo 1 > rom
# cat rom > /tmp/image.rom
I got >>> cat: rom: Input/output error
# echo 0 > rom
(I have enable the internal graphics to see the boot of proxmox)
My card should be the second card and not be used by proxmox right ?
(I will try to move the card in an other PCI slot this evening)
thanks
So, I change the card to an other PCI slot :
lspci -n -s 02:00
02:00.0 0300: 10de:0fc6 (rev a1)
02:00.1 0403: 10de:0e1b (rev a1)
and change vm config :
hostpci0: 02:00,pcie=1,x-vga=on,romfile=Gigabyte.GTX650.2048.131211.rom
> No signal output either
Can you try a different monitor connector? It might only be showing on one output.
Yes I have test with 2 HDMI Câbles and monitors.
In your case when you make a gpu passthrough you can see the console output of your VM in the web gui of proxmox ?
No, adding passthrough video disables the console view entirely.
Can you double check that vfio-pci is getting the card correctly? `lspci -nn -k | grep -i -A 2 nvidia` should say “Kernel driver in use: vfio-pci”.
lspci -nn -k | grep -i -A 2 nvidia
02:00.0 VGA compatible controller [0300]: NVIDIA Corporation GK107 [GeForce GTX 650] [10de:0fc6] (rev a1)
Subsystem: Gigabyte Technology Co., Ltd GK107 [GeForce GTX 650] [1458:3555]
Kernel driver in use: vfio-pci
Kernel modules: nvidiafb, nouveau
02:00.1 Audio device [0403]: NVIDIA Corporation GK107 HDMI Audio Controller [10de:0e1b] (rev a1)
Subsystem: Gigabyte Technology Co., Ltd GK107 HDMI Audio Controller [1458:3555]
Kernel driver in use: vfio-pci
That looks good, but it shows that there are Nvidia drivers available that you aren’t blacklisting, and these could be wrecking your GPU during host boot. Update your /etc/modprobe.d/blacklist.conf to be:
blacklist nvidia
blacklist nvidiafb
blacklist nouveau
Then `update-initramfs -k all -u` and reboot the host.
You may also need to blacklist the driver for the video card’s audio controller (one of snd_hda_codec_hdmi, snd_hda_intel, snd_hda_codec, snd_hda_core probably, look at the full output of “lspci -nn -k” to check).
Content of “/etc/modprobe.d/blacklist.conf” :
blacklist nouveau
blacklist nvidia
blacklist nvidiafb
blacklist snd_hda_codec_hdmi
blacklist snd_hda_intel
blacklist snd_hda_codec
blacklist snd_hda_core
blacklist radeon
blacklist amdgpu
What I can see from “lspci -nn -k” :
02:00.0 VGA compatible controller [0300]: NVIDIA Corporation GK107 [GeForce GTX 650] [10de:0fc6] (rev a1)
Subsystem: Gigabyte Technology Co., Ltd GK107 [GeForce GTX 650] [1458:3555]
Kernel driver in use: vfio-pci
Kernel modules: nvidiafb, nouveau
02:00.1 Audio device [0403]: NVIDIA Corporation GK107 HDMI Audio Controller [10de:0e1b] (rev a1)
Subsystem: Gigabyte Technology Co., Ltd GK107 HDMI Audio Controller [1458:3555]
Kernel driver in use: vfio-pci
Kernel modules: snd_hda_intel
I’m not home so as you said “adding passthrough video disables the console view entirely”…
I will check it this evening thanks.
No signal…
Thanks a lot for your help but i think it’s over 🙁
thanks again !
Oh I forgot one more thing, make sure that your host UEFI/BIOS is set to make your onboard video primary instead of the card you want to pass through.
If that still doesn’t work then I’d expect it to be due to the card’s BIOS not supporting UEFI properly.
Hi, yes I used the onboard video for proxmox boot. I also tested with the gpu card to boot (Seen proxmox boot) and start the VM (Immediate black screen), So I imagine, proxmox dedicate the card to the VM but there are no signals from it.
As you said, maybe my gpu can not use UEFI.
Hi little update,
I bought a GT 710 and it’s working with it 🙂
Awesome!
Hi do you know this project ? https://looking-glass.hostfission.com/ maybe I can see what is going on…
Yes, but only Windows guests are supported.
Great tutorial(s)!
How much is your systems power consumption?
My Dell T20 setup (Exxon with 16 GB Ram) consumes < 45W with 4 x SSDs, 4 x 2.5" 1TB HDDs, 1 USB 3.0 PCI-E Card, 1 Nvidia GT710 (works great with passthrough) and 1 PERC H310.
But I need a better performance and more processor cores, so I am looking for a good replacement with low power consumption at all.
Good idea, I’ll do some current measurements with a clamp meter, let’s see…
When my host is completely idle (no VMs), it sits at 180W. Adding an idle macOS VM brings that up to 220W.
Running a Prime95 stress test on the host brings it to 500W peak.
I’ve got 9×3.5″ hard drives, 2 SSDs, and 8 sticks of DDR3, so they probably account for a lot of the idle power consumption. It certainly keeps my desk toasty warm at all times!
I suspect if you want something power efficient then you should stay away from multiple-socket systems like mine.
Hi, it’s me again 😉
You said you are using a “DragonFly Black USB DAC for audio”. In the future, I want a KVM to switch my mouse and keyboard and HDMI output between Windows VM and MacOS VM.
So, I pass through the USB keyboard and mouse (and with your help a GPU thanks a lot) and all is working great. But I need some sound, so I pass through my USB headset (Logitech G35) and the sound output is very strange, it’s likes someone clicks pause and play very fast (crackles) did you know how to solve this?. (Google not very helpful, or not, find something useful).
See something about “args: -device AC97, addr=0x18” but it’s not helping (Maybe it’s for “jack” sound card of the mother board but it’s not my goal). If you think it’s just the driver is missing (because I cannot find a MacOS driver for the G35) I will make me sad :(.
Thanks again for all your help
I’m passing through an entire USB controller using PCIe passthrough, I think you’ll end up with timing issues if you use the emulated soundcard like you’re showing instead.
USB audio devices should work without a specialised driver, there’s a USB audio standard that they conform to (similar to USB Mass Storage for USB drives).
Another option, if your video card driver is cooperative and your monitor supports it, is to send your audio out over HDMI and have your monitor decode it to a headphone jack on the monitor. I had some trouble doing that in the past but it helped out to add Lilu and Whatevergreen to my Clover kexts/other directory (and edit config.plist to enable kext injection): https://github.com/acidanthera/WhateverGreen
Hi !
Your help is awesome… passing through an entire USB controller using PCIe passthrough is the answer.
Thanks a lot again !
If i want some SSD and HDD in the VM too, did you know if one like this https://www.amazon.fr/Calistouk-double-Interne-Pci-expess-Controller/dp/B079HW3FGL/ref=pd_sbs_147_1
can works ?
You might get enough performance by just passing through your physical drives as virtual disks instead:
https://pve.proxmox.com/wiki/Physical_disk_to_kvm
Instead of “virtio2” suggested there, you’ll want to use SATA instead like “sata1”.
You can indeed use PCIe passthrough to pass through a SATA controller like the one you linked, but I haven’t tried that particular model out myself.
Ok (I need a RAID 1), but I will make a pass through real drives like you, thanks for the advice and your time !
After hours of tinkering to get GPU pass through working on Mojave/Proxmox 5.3 (new to the VE). Finally got vfio-pci to show as the kernel driver. Sadly Mojave won’t load my R7-265 driver. This is what I get in info pci in the monitor with the guest running. So guessing something is awry 🙂 Thx for the guide though, might try High Sierra since it has proper GTX – 1xxx support.
# info pci
Bus 0, device 0, function 0:
Host bridge: PCI device 8086:29c0
id “”
Bus 0, device 1, function 0:
VGA controller: PCI device 1234:1111
BAR0: 32 bit prefetchable memory at 0x90000000 [0x97ffffff].
BAR2: 32 bit memory at 0x99207000 [0x99207fff].
BAR6: 32 bit memory at 0xffffffffffffffff [0x0000fffe].
id “vga”
I know there’s no guarantee as it’s a Hackintosh lol. Hopefully Nvidia/Apple will at some point release drivers for Mojave though I doubt it’ll be any time soon.
Hi something is strange with my nvme, in /dev there is no /dev/nvme*. When i make a PCI through with it, no start of the VM : […] vfio error failed to add PCI capability […]. I change the GRUB_CMDLINE_LINUX_DEFAULT=”quiet intel_iommu=on rootdelay=10″ like you. did you have some ideas ? thanks
Which NVMe drive are you trying to pass through?
It’s a Intel SSD 760P Series, 512 Go, M.2 (Type 2280).
If you’re using an NVMe slot on your motherboard, check your motherboard manual to see if it needs to be enabled in UEFI settings, or if it shares PCIe lanes with one of your other cards (so that card needs to be moved to a different slot).
Hi, I finally use the “Physical disk to kvm” method (sata0: /dev/disk/by-id/nvme-INTEL[blabla…] and sata1: /dev/disk/by-id/ata-KINGSTON_[blabla…]). But in the VM the disk is a “type : rotation” so I search in the proxmox doc https://pve.proxmox.com/wiki/Manual:_qm.conf and tow option seem to be perfect the “ssd=1” and “discard=on”. The thing is when i added theses parameters, the disk disappeared in the hardware tab and obviously, no boot. How do you define a SSD (best way, beacause it’s work by default but not futur proof for my SSD I think) ?
Maybe your syntax was wrong? Here’s what one of my disks looks like that uses those flags:
scsi0: vms-ssd:vm-141-disk-0,cache=unsafe,discard=on,size=128G,ssd=1
I think that the “discard” option is probably not meaningful when passing through a disk like that, so I’d leave it off.
PCIe passthrough will give you much better performance, and TRIM support. When you tried your NVMe passthrough, did you remember to update your vfio config to add the PCIe ID of your NVMe drive?
Yes,
I Search the ID with : lspci
03:00.0 Non-Volatile memory controller: Intel Corporation Device f1a6 (rev 03)
and with : lspci -n -s 03:00
03:00.0 0108: 8086:f1a6 (rev 03)
to add it in the config file here :
/etc/modprobe.d/vfio.conf
(In your guide is : /etc/modprobe.d/vfio-pci.conf not in https://pve.proxmox.com/wiki/Pci_passthrough)
options vfio-pci ids=10de:13c2,10de:0fbb,10de:128b,10de:0e0f,8086:f1a6,1b73:1100 disable_vga=1
And finally use :
update-grub
update-initramfs -k all -u
And reboot
In the VM config file :
hostpci0: 03:00.0,pcie=1
(Yes this is a M.2 slot in the motherboard)
For classic SATA SSD, mabye i think, adding ssd=1 can only work with virtual disk (like you vm-141-disk-0 no) ?
Maybe. Telling macOS that it’s an SSD doesn’t really do anything anymore anyway (since even spinning hard disks are now auto-converted to APFS).
It looks like somebody else had the same PCIe passthrough problem that you did with this SSD, and it sounds like a hardware bug:
https://www.mail-archive.com/qemu-devel@nongnu.org/msg577799.html
Thanks for your help once again ;)I will keep the working configuration, the performances are good enough for me.
But for the ssd=1 it’s strange…
Anyway, maybe some update will fix it (I have a proxmox 5.2-1 on the top and maybe your patch will not work with a newer version)
Hi i just (take the risk) make a dist-upgrade to PVE 5.3-6 and ssd=1 works fine TRIM enabled.
So simple…
Hi,
Is your EVGA GeForce GTX 1060 6GB working now or you still with the AMD Radeon R9 280X ?
I tested with KFA2 GTX 970 EXOC but the screen is not used entirely not like the GT 710 working great. So I wonder if is the hackintosh compatibility or this is the “no NVIDIA Mojave driver” problem.
Anyway, I will probably buy an RX 560 later.
It’s not working on Mojave as there are no drivers available for it yet (it worked great on High Sierra). If I remember correctly I did get an image on the screen, but with no hardware acceleration, so it was pointless.
https://devtalk.nvidia.com/default/topic/1043070/announcements/faq-about-macos-10-14-mojave-nvidia-drivers/
It sounds like NVIDIA drivers will soon be available!
https://devtalk.nvidia.com/default/topic/1042520/driver/-when-will-the-nvidia-web-drivers-be-released-for-macos-mojave-10-14-/57
Nice things to know 😉 thanks.
Maybe it’s for the 10.14.3 release, the beta is here now I think.
Funny one: https://www.change.org/p/tim-cook-apple-publicly-commit-to-work-with-nvidia-on-drivers-for-mac-os-10-14
Hi, a little thing you can add in your “Proxmox hardware specs” is the case because “9×3.5″ HDD and 2 SSDs” is not easy to install in most desktop cases 🙂
Haha, very true! I’m lucky to have a desk that’s tall enough to fit this thing underneath it. I’ve updated the post with the details of the case now.
Nice, thanks for this 😉
What is the “global configuration” of the “30TB of spinning disks in various ZFS configurations” because with the “Lian Li EX-H35 HDD Hot Swap Module” I can imagine you use it like a NAS (only 3 of 9) and the others is some zfs pool (like a RAID 1) ?
I am thinking to build a custom NAS with a VM and pass through the disks and create a VM with FreeNAS for example (bad performance ? I think so…).
But for you, how did you use your 9 disks? (in the VM too, performances?).
I have 3 + 4 + 4 TB of non-redundant storage (used for “Linux ISOs” and backups), then 3 x 3TB in RAIDZ1 and 3 x 4TB as another RAIDZ1.
FreeNAS is what I upgraded from. But I can’t see a reason to use it anymore now that ZoL (ZFS-on-Linux) is so mature on Proxmox.
I had been some running VMs from the RAIDZ1 arrays, but the performance of spinning disks in this config is just way too slow. I now try to run all of my common VMs from my 1TB SATA SSD using SCSI emulation (my macOS VM has its own 512GB NVMe SSD using PCIe passthrough).
“I had been some running VMs from the RAIDZ1 arrays” Is it a virtual disk file like VMID.row in the storage mount as RAIDZ1 (Classic use, file on disk is the virtual disk) or the RAIDZ1 (entire zpool) is a complete virtual disk and the VM see it like a normal disk ?
In fact, this is what I try to do, create a zpool (RAIDZ1 for example) and use use the entire zpool like a virtual disk for the VM.
With that, we can encrypt, change disk and it will be “transparent” like a normal disk for the VM.
The disk images are ZFS “zvols”. This gives you all the management abilities of ZFS on the host and the VMs just see a regular disk.
Ok thanks for the tip 😉
I’m thinking about this : passthrough the NVMe in the VM. How did you migrate, restore, or if you change it for a new one like for the samsung 960 pro 1To.
Is The only way like you explain here ? https://www.nicksherlock.com/2017/02/accelerate-io-for-macos-sierra-proxmox-guests-by-passing-through-an-nvme-ssd/
With something like : dd if=/path/to/the/disk/image/backup of=/dev/disk/id
Or there is something now in proxmox to do that ? So what is your plan if something happened on your NVMe (if failed) ?
(I searched for restore vm disk in assigned disk, but nothing interesting)
Yes, I just used DD as described there. If the source disk image is smaller than the SSD you’re copying it to, it becomes pretty straightforward and you just need to grow the partition to fill the disk in Disk Utility after you’ve booted up your new copy from the SSD.
My VM has backup software installed which sends file backups to a separate drive on the host over ssh (Duplicacy). You could also use dd from the host to make an image of the SSD as backup, before the SSD is detached from the host for the guest’s use.
Hi Nicholas,
My macOS VM Catalina has itsown 512GB NVMe SSD drive. I used PCIe passthrough. Before passthrough I had 120GB virtual drive which I copied (dd) to my 512GB NVMe SSD. The VM works very well but I can not extend (from 120GB to 512GB) my NVMe from the Disk Utility. I have 129GB Harddisk partition and 371GB FreeSpace partition. I tried the Partition function for the disk and for the container but the result comes with error.
What do you think?
You should be able to find help for this problem on regular Mac or Hackintosh forums such as https://www.reddit.com/r/hackintosh/ , since it sounds like the issue isn’t caused by being a VM.
I would try booting from the Catalina installer and using the Disk Utility from that to try to resize it (it might not like resizing it while the operating system is running from that same disk)
ha, this is so cool. thanks for sharing.
Hello, the 10.14.3 final is here… but no Nvidia drivers support for now 🙁 https://support.apple.com/en-us/HT209149#macos10143
Really awesome guides, thank you! Would you post some picturesicture of what your machine looks like? I’d like to see how all of your components fit together, especially with 3 graphics cards.
Hi, thank you for sharing your Mojave installation Guide and this setup details, I basically follow your guide and have my Proxmox machine running Mojave now. Really appreciate it!
I do have a problem with PCI passthrough a Broadcom wifi/bluetooth card to Mojave-VM though. I am hoping you can take a look and help me.
I have posted the details in this reddit link:
https://www.reddit.com/r/hackintosh/comments/c38u1l/problem_with_pci_passthrough_broadcom_wifi_card/
The most simplified version of my problem is, I can PCI passthrough the GPU, one USB controller and one NVMe card to the VM already, but somehow the Broadcom card can’t be passed through. The Device ID of the Broadcom card, which is 04:00.0 does show up in the result of a “lspci -nn” command, but when I tried to start the VM for the first time after a reboot of the Proxmox computer, the start will fail, with a VFIO error message saying no 04:00.0 device. Then I run “lspci -nn” command again, the line of device 04:00.0 really disappeared.
I have described my problem in details at the reddit link above, hope you don’t mind taking a look there. Many many thanks!
I’m running proxmox/PCIe pass throught with Sapphire RX-580 nitro+ like you do. Are you facing problems with the AMD GPU reset bug?
I don’t think my R9 280X (Tahiti XTL / Radeon HD 7970) suffers from the reset bug (when the wind is blowing right, I can start a guest multiple times). However macOS doesn’t seem to like my card anyway and I get some screen corruption, I wouldn’t recommend my card.
The reset bug only applies to specific AMD GPU series. The RX-580 is Polaris architecture and I don’t think that one had a series-wide reset bug.
I got everything working with a HD 7770, although the VM freezes after a few hours. Would you know why?
Any clues in the host’s dmesg / kernel.log?
I’ve rebooted the host and it won’t boot at all now. It reboots after “End randomseed”. I’ve updated Mojave to its latest version, but it booted after, so I doubt it’s that.
Did you upgrade your host packages at the same time? You may have accidentally upgraded away from my patched OVMF package: https://www.nicksherlock.com/2018/04/patch-ovmf-to-support-macos-in-proxmox-5-1/
Sorry, the only Proxmox trick I know for getting macOS to boot using weird numbers of cores is to manually set threads=2 using a custom -smp commmand in “args” (mentioned in this post). There are numbers of cores that won’t boot for me either.
The args line disapeared somehow. That’s why it wasn’t booting. I’m not sure yet, but the VM seems to have stopped freezing when I stopped using Synergy.
It just crashed again. Nothing in dmesg. The image just freezes and VM must be reset. It also does it with a Windows VM. Maybe my GPU is dying? On Windows, when it crashes, the screen turns off, but it’s still responding on the console.
Nvm, I’ve found this in demsg before the crash
sctp: Hash tables configured (bind 1024/1024)
Thank you so much for sharing your setup and your knowledge! I have been able to use your guides to learn a TON and get multiple versions of macOS VM’s working – including ones with GPU passthrough.
Before looking at your guides, I already had a working stand-alone hackintosh (non-VM) and I was hoping to be able to use the same serial numbers from by config.plist for that system but every time I try to modify parameters in the SMBIOS section the VM stops part-way during the boot process. In otherwords, the Apple logo is displayed and the progress bar proceeds part-way and then stops. For my stand-alone hackintosh I had setup a system that was using the iMac-Pro 1,1 machine type. If I try to replace all of my SMBIOS parameters that appear to relate to this machine type, that’s when I have problems.
I was wondering if you’d be willing to also share your Clover config.plist? You could feel free to delete various unique serial numbers if you like.
I’m using iMac14,2 as my machine type, here’s my config.plist with serials replaced with “xxx”: https://www.nicksherlock.com/config.plist
Note that if you’re booting using a reinstalled Clover, be sure to delete Clover’s “drivers64UEFI/AudioDxe-64.efi” (it causes a hang).
Thanks again for sharing! I was able to use your config.plist after re-generating the serial numbers and everything works fine. I was never able to get the machine type set to iMac-Pro 1,1 so I just gave up on trying to keep my old serial numbers.
I’m not really sure if there’s much of an advantage to setting the machine type to iMac-Pro vs. iMac anyway. I’m getting similar Geekbench scores with my iMac VM as I was getting with my stand-alone system when it was set to iMac-Pro.
If there’s ever anything about my system that you’d like me to share just let me know.
Thanks again!!
Can you update this link?
thanks
Hello Nicholas Thank you for the amazing tutorial I have successfully installed Mojave 10.14.6 in with your guide and I was able to pass through my Vega FE , the tricky part that I have dual E5-2690 v4 CPUs with a total of 28 core and 56 Threads.
Using this smp 32,cores=16,threads=2,sockets=1 \ I was able to boot with 16 cores and 32 threads as you.
but Is there anything I can do to pass through all my cores and Threads?
Edit 1: l already tried -smp 56,cores=14,threads=2,sockets=2 but clover bootloader won’t boot with this flag.
I also wondering how I can make my main node go to s3 suspend because if you know some of the AMD cards have the rest bug and putting the system in sleep mode and resume it will make the card available for the guest again without restarting the whole machine.
Waiting patiently for your suggestions 🙂
Try -smp 48,cores=8,threads=2,sockets=3 or -smp 56,cores=4,threads=2,sockets=7 (thanks to mango for figuring out that sockets>2 is possible! https://www.nicksherlock.com/2018/06/installing-macos-mojave-on-proxmox/#comment-31773)
Hi Nick,
Most clear guide ever! However, I did everything in the guide installed macOS its working in noVNC. I configured the machine for passthrough. The vm starts without errors cpu and memory is used. I guess it sits on the clover menu but I do not get screen any output. There is a TASK Viewer out put that says
/var/lib/vz/snippets/hackintosh.sh: line 6: /sys/bus/pci/devices/0000:01:00:0/driver/unbind: No such file or directory
I checked the directory and it is linked as
0000:01:00.0 -> ../../../devices/pci0000:00/0000:00:01.0/0000:01:00.0
Could you give me any pointers?
What do you have in snippets? What hardware are you passing through? What hostpci config lines did you end up with?
Are you looking at your physical monitor connected to the guest’s video card, or on VNC? You want to disable the emulated vga and just use your monitor. VNC will not show the graphic card’s output.
Thanks for the help.
I have a AMD RX 560D gpu.
My snippet file:
#!/usr/bin/env bash
if [ “$2” == “pre-start” ]
then
echo 0000:01:00.0 > /sys/bus/pci/devices/0000:01:00.0/driver/unbind
echo 0000:01:00.1 > /sys/bus/pci/devices/0000:01:00.1/driver/unbind
echo 1002 67ef > /sys/bus/pci/drivers/vfio-pci/new_id
echo 1002 aae0 > /sys/bus/pci/drivers/vfio-pci/new_id
fi
first one is gpu second one is hdmi audio
hostpci line in 100.conf
hostpci0: 01:00,x-vga=on,romfile=vbios.bin
in proxmox config all functions is selected
I downloaded the firmware from techpowerup an put it in /usr/share/kvm/
The reason for this is that my gpu card is on pci bridge and I think OS wont let it go during boot.
I have pci-stub ids in grub too.
I installed Mojave using vcn.
Then I configured passthrough
100.conf has
vga = none
line.
I am looking to my physical monitor connected to my AMD gpu card.
I am booting into proxmox using my integrated Intel igpu
That warning you got:
var/lib/vz/snippets/hackintosh.sh: line 6: /sys/bus/pci/devices/0000:01:00:0/driver/unbind: No such file or directory
That last colon in the ID should be a dot instead, but it looks like you already fixed it in your script?
Did you apply the irqchip fix in args?
Are you seeing the Proxmox logo appear on the monitor at the start of guest boot, or is it completely blank?
I had fixed the dot the warning went a way.
Stil no joy.
Monitor is completely blank
Try the other connectors on your card because the display might be being sent to one of those instead.
Try not passing the vbios.bin in the config.
Can you try vfio-pci instead of pci-stub again and show the config you end up using? It seems like that should have worked. You can diagnose vfio problems by grepping for “vfio” in dmesg or /var/log/kernel.log. If vfio manages to claim the device (lspci -nn -k will show which driver is in use) then you can remove your snippet script.
Both gpu and audio are cliamed by vfio-pci driver
I tried the DP port instead the HDMI. No go.
Tried w/ and w/o the rom file. No go
There are no error messages and no image output to monitor and I am out of options.
You mean you got vfio-pci to successfully claim them during boot? If you are still using pci-stub then I really doubt the video card will enjoy being handed over from pci-stub to vfio-pci. It would be much cleaner for vfio to claim it during boot and it to stay that way.
Are there any major differences between your custom clover build (4920) and the latest clover builds?
I’m going through the tutorial again building everything myself and i’ve noticed that clover is now v2.5 and the builds are in the 5000’s. When I run kholia’s script with a newer build of clover I get the following error: https://i.imgur.com/JfB8kcV.png
Anything i’m doing wrong? Or should I just stick with r4920?
There isn’t normally anything to gain by upgrading Clover. Since we’re all running the same (emulated) hardware, once it works at all, its job is done.
The main difference is that AudioDxe-64.efi must be removed to avoid a hang.
I think newer Clover versions have shuffled around their directory structure, so that build script will not work without being updated to match. Just upgrade Clover after your guest boots macOS by running the Clover installer instead.
Nickolas THANK YOU HATS OFF FOR YOUR GUIDE; it is almost working!!!..
One lingering killer glitch is that I can’t get any audio from either GPU 1080 passthrough or Realtek on board I have tried the latest kexts from whatevergreen, Lilu and AppleAlC.
I am using a rearranged 5070 clover as they have now stripped the 64 folder entirely to migrate it to the old 32 bit folder. So for some reason this and the network is not able to establish an IP after resume. Everything else seems glorious! I am able to run machine q35 (4.0) with proxmox 6 and all updates as well!
How is this possible!? Is it maybe that your setup and guide need to be updated as the latest builds have incorporated fixes ? I am not sure just thought I would try and be helpful.
Love your work, so happy for your publishing the guide. THANK YOU
I never managed to get HDMI or DisplayPort audio working properly on my system, but I think this trouble is common to all Hackintoshes and not QEMU-specific. There are a wide range of different configuration tools and kexts that promise to solve this (I just never managed to get them to work!)
My computer doesn’t have onboard audio, so I’ve never tested that with PCIe passthrough either. Instead I’m using a USB DAC on a PCIe-passthrough USB controller, which is working fine.
I haven’t tried pausing and resuming the VM before so I haven’t had that network issue – maybe you need to explicitly hit the Renew DHCP Lease button in the macOS Network settings to kick it into life?
Alas the network ip cannot be renewed until the entire VM is reset. I feel like I should mention this is actually High Sierra, I just realized I posted here (sorry). None the less since passthrough graphics works how come there is no audio from anything on the system.
Does the network start working again if you set it to “disconnected” in the VM settings and then reconnect it? Are you using vmxnet3 for your network? If so, try “e1000-82545em” instead (you have to enter this by editing your VM config because the Proxmox GUI only offers “e1000” as an option).
What happened when you passed through your Realtek chip, did macOS detect it at all?
This seems to have fixed my resume issues. Have you any ideas why the passthrough nic stays as disconnected all the time? Also my processor is 2.3 GHz unknown. I have tried fakeid’s which resulted in a crash.
Also I am very curious if you would now recommend people use machine : q35 as it seems that all can be done now with QEMU 4 and none of the other tweaks are needed any londer in the latest updates… OR am I overlooking something… :
None the less : Thank you for you work 🙂
What passthrough NIC are you using?
Adding CPU fakeids doesn’t seem to serve a functional purpose. You may need to switch to a different SMBIOS using Clover Configurator to have that work (one for a Mac that actually shipped with your CPU).
Some passthrough devices always worked on the new pc-q35-4.0 model. There haven’t been any fixes deployed to this even on the latest Proxmox release though, so if you want to use q35 with troublesome devices you still need to add “-machine type=q35,kernel_irqchip=on” to “args” to get them to work (this brings this setting back to the default value from QEMU 3’s machine model). I’ve updated this post now with the machine I’m using (pc-q35-4.0), that line of my example config was out of date.
I am going to try the network advice you have made here ASAP. Regarding which network VMware vmxnet3 seemed the best as network throughput was quite good and wherever possible I wanted to make use of Proxmox. Though bare metal may be a better option. Either way I am not sure why I can’t get ANY audio to work when I pass through the Realtek chip or the working web driver’d 1080 passthrough… Any ideas; thanks again. 🙂
FYI WordPress kicks me into a new thread every comment I make after 2 reply’s.
I have been using your advised NIC as edited into the vm’s conf file all is well : THANKS NICK …
But now I sort of have a bigger issue on my hands.
It seems either with the mods I made for my PCIE passthrough or USB configs have made my windows boot unable to see anything available on the vfio bus for proxmox … Ie no usb unless I passthrough a controller or reboot. Do I need a hookscript for windows? Can I add more PCIE passthroughs to windows boot options? Thanks again. Sean
I’m not sure what you mean about Windows being unable to see devices, are you saying that your Windows VM can’t start? Are you talking about PCIe passthrough or passing individual USB devices? Is that the same USB controller that you had passed to macOS since the last power cycle?
Yes, it seems that since I added the hookscript and a made alterations vfio has my usb devices available only for a breif time. Now the menu is red (in gui) so I assume I can pass through a controller. Which I do but the system fails to see my usb devices most of the time. In general (and in other words) . the modding seems to have caused me some issues with my other vm’s.
🙂 Thanks for helping me 🙂
Hi everybody,
I’m using Virtio Block HDD in Proxmox 6, from Mojave (I’m not sure which version, but I’m testing with 10.14.6), we can use the AppleVirtIO.kext and we have better performance than SATA HDD.
Only we need to copy this kext to Clover kexts folder in order to can use the Virtio Block HDD in the Mojave Installer (Mojave load the kernel by default, but the Mojave installer not).
I’m use Dell T5600 and T7610 towers in order to virtualize 2 and 3 VM with GPU NVIDIA GT 710 (HDMI Audio included) and USB (Keyboard and Mouse) passthrough for workstations and it’s working really well.
I have a custom DSDT for best compatibility: SMBUS, HDEF, HDAU, LPC, UHCI, GFX0 y ETH0 (I can share it if anybody is interested).
I have only one problem using 16 GB RAM per VM, (I’m using Hugepages: 2). Sometimes the Host hangs.
Maybe somebody using 16 GB RAM or more per VM can explain how set Proxmox config for this scenario?
Thanks very much Nicholas for your excelent guide.
Finally, I solved the RAM issue with Proxmox 6 (in 5.4 I must use Hugepages, but in 6.0 all is not necesary).
Hello, I tried with Proxmox 5.4 with success with an i7 9700k with an Sapphire AMD RX 580… after a lot of research I also could add the iGPU as headless for getting hardware acceleration in Mojave, sometimes it won’t boot (black screen) and after trying again it just works…
but the thing is that I added another disk to try on Proxmox 6, I installed it in another hard drive and I have no problem with Windows guests, but with my Mojave VM I just can’t get the GPU to work, I tried by adding the -machine type=q35,kernel_irqchip=on as seen in your post, any clues of how to get this done in Proxmox 6, my config:
args: -device isa-applesmc,osk=”our..” -smbios type=2 -cpu Penryn,kvm=on,vendor=GenuineIntel,+invtsc,vmware-cpuid-freq=on,+pcid,+ssse3,+sse4.2,+popcnt,+avx,+aes,+xsave,+xsaveopt,check -device vfio-pci,host=00:02.0,addr=0x02,x-igd-opregion=on -machine type=q35,kernel_irqchip=on
balloon: 0
bios: ovmf
boot: cdn
bootdisk: sata0
cores: 8
cpu: Penryn
cpuunits: 2048
efidisk0: MacStg:400/vm-400-disk-1.qcow2,size=128K
hookscript: MacStg:snippets/HackGX.sh
hostpci0: 01:00,pcie=1,x-vga=on,romfile=RX580-OR.rom
hostpci1: 05:00,pcie=1
machine: q35
memory: 32768
name: MacOS-GX
net0: vmxnet3=E2:28:35:66:61:4B,bridge=vmbr0,firewall=1
numa: 0
ostype: other
sata0: MacStg:400/vm-400-disk-0.qcow2,cache=unsafe,size=1T
smbios1: uuid=c9201489-3e97-4400-92eb-5e7bb0b4d97c
sockets: 1
startup: order=1,up=15
vga: none
vmgenid: e1866375-847b-4520-a286-d9d7dd5284fb
I also tried to change the cores down to 4 and no success, any help will be greatly appreciated!
Nick
Have you attempted to install Catalina on Proxmox yet?
Not yet! I’ve heard that it doesn’t require anything special to work (maybe just an updated Clover version).
I’ll be making a tutorial post here once I have it installed on my machine.
Has anyone gotten nested virtualization to work? I’d like to be able to run VMWare Fusion 11.5 inside a VM. When I try to create a VM, I get the following error:
“This host doesn’t support ‘Intel EPT’ hardware assisted MMU virtualization. Module ‘CPUIDEarly’ power on failed.”
My ARGS are currently set at:
args: -device isa-applesmc,osk=”” -smbios type=2 -cpu Penryn,kvm=on,vendor=GenuineIntel,+invtsc,vmware-cpuid-freq=on,+pcid,+ssse3,+sse4.2,+popcnt,+avx,+aes,+xsave,+xsaveopt,check -device usb-kbd,bus=ehci.0,port=2
Regardless of args, or if I use a physical host with an AMD or Intel processor, my VM is seen as an iMac 27 inch, Late 2009, Intel Core 2 Duo, which doesn’t meet the minimum system requirements for VMWare Fusion 11.5.
I tried to run VirtualBox as an experiment, and it would only let me create 32 bit guests.
Does anybody have any suggestions on how I can get VMWare Fusion 11.5 running correctly?
Thanks
AFAIK nested virtualisation requires CPU=host, but macOS doesn’t seem to boot with that, at least on my CPU.
Thanks Nick! Followed your post and have macOS running on Proxmox 6 as a VM today. It’s really helpful running macOS
in VM for control my dev environment change. Appreciate for your sharing! I’d really make a donation to buy you a coffee if you’d put a donation button in your post!
Thanks a ton again!
You can send donations via PayPal to n.sherlock@gmail.com if you like! Cheers!
Just sent. Hope you enjoy the coffee!
Thanks!
Thanks Nick, you post has been most helpful.
One question: is there a reason why you stick with AFP as opposed to SMB? Apple has made the switch, TimeMachine over network is now only available over SMB and it is a bit faster, see the analysis in this blogpost: https://photographylife.com/afp-vs-nfs-vs-smb-performance
Thanks again!
SMB is probably a good choice now, but AFP was still popular way back when I set this up.
Hi there thank you very much for this tut!
I am new to this hackintosh thing, but i managed to install HighSierra on my proxmox VE with clover and passed trough a 980ti with Inject NVIDIA in Clover.
I tried to passtrough a AMD 7770 but after the Apple logo the screen is shows only red pixels and is bad.
Now if i decide to stuck with the 980ti on HighSierra there is only one problem and that is sound
Is it possible to enable HDMI Sound in macOs with my GPU or do i need a USB Soundcard?
LG thx for help
In theory there are patches for HDMI sound but I never got them to work for me.
You may be able to get your AMD card to work by adding the WhateverGreen kext.
ok what a bummer…i will try it maybe with something like this
https://hackintosher.com/blog/hackintosh-nvidia-hdmi-audio-high-sierra-10-13-4-solution/
how can i insert the whatevergreen.kext in clover?
thanks
*Update*
I managed to get my amd7770 working with HDMI Sound!
With Verde.kext and HDMIaudio.kext in clover!
However it works great on HighSierra but on Catalina i can’t get sound to work yet…..
thank you again brother
Re: Large Amounts of RAM.
Enabling “hugepages: 2” solved this for me. No longer need to use “qm showcmd”.
Got the idea from this thread:
https://forum.proxmox.com/threads/vm-start-timeout-pci-pass-through-related.28876/
Interesting, thanks for the tip, I’ve enabled 1GB hugepages for my VM now and updated this post with details. It might be a little better for performance.
Hi Nick,
Great tutorial! Thank you very much for sharing your knowledge and experience.
I have one question. Did you manage to get hardware acceleration (H264, HEVC) for your Radeon?
I found out reading other forums that changing SmBIOS from iMAC14,2 to iMacPro1,1 can help to get HW acceleration. I did it but it resulted only with H264 enbabled. I used VideoProc app to check it.
What is you experience in this subject?
Merry Christmas! Thank you a lot for the detailed guide. I finally got my macOS guest working with gpu passthrough! Everything works fine, but with a little issue here:
I find my guest glitch from time to time (say, system running slow, randomly ignoring keyboard inputs, cursor jumps from place to place instead of moving smoothly). The glitch usually happens when a new task is started (process started), for example: when I click on an app is loading (icon jumping on the dock) or when I just started compiling and run java programs or open chrome tabs.
I tried to analyze but I can not decide what causes this problem since the CPU usage is low (idle > 50%, load is 3.8 with 4 cores), memory is also fine (13 ~ 14 GB out of 16 GB). Have you ever encountered similar problem? Any input will be appreciated.
Host Spec:
cpu: 8700k
mb: asus prime b360-plus
mem: 32GB
hdd: 3T
Guest Spec:
cpu: 4vcpus
mem: 16GB
ssd: 250GB 860EVO (passthroughed)
hdd: 250GB sata0 (emulated)
GPU: RX580 (passthroughed)
USB: mouse / keyboard (device passthroughed)
kexts: Lilu, whatevergreen, VitualSMC
Finally, thanks again for the awesome guide!
It feels like when the host is servicing guest IO from emulated disks, it ends up stealing a bunch of CPU time from the guest and causes hiccups and stalls. There are a bunch of guides available that benchmark the benefits and drawbacks of separating the QEMU disk IO threads from the guest’s threads (so they never compete for the same cores) and I suspect this will help out the issue. Another option is isolcpus ( https://null-src.com/posts/qemu-optimization/post.php#cpu-isolation ) to completely ringfence the guest’s cores so the host can’t use them, which should be the best-case for consistent latency. But I haven’t investigated that myself because I largely eliminated the problem on my VM by only using an NVMe PCIe passthrough disk for Catalina (avoiding host-emulated IO entirely).
Thanks a lot! By removing emulated disk and work on only passthrough ssd solve the problem! Now the system works like charm! I will then move on try getting audio work (which is not quite necessary). Thank again and happy new year!
I successfully installed the MACOS Catalina using the “guide for installing macOS Catalina on Proxmox” and the emulated VMWARE video. Next adding the PCIE passtrought GPU the video appears to start on 640×480 resolution, even resetting the VM as the note: “Note that in future you’ll find that when initially started, your VM doesn’t properly apply the the 1920×1080 screen resolution until you hit “Restart Computer” in Clover when the Clover menu appears (or “Reset” on the VM). You’ll notice this happening when the “Proxmox” logo fills a large area of the screen on boot due to the low resolution.”
What’s going on?
I’ve deleted the video link you posted because https://www.reddit.com/r/Proxmox/comments/bwbq6y/fairly_popular_hackintosh_youtuber_uses_proxmox/
If you have a GPU that macOS supports, try setting “vga: none” to remove the emulated video.
Nice tutorial. I am able to install MacOS Catalina virtually with my Proxmox setup but when I try a GPU passthrough all I get is the scrambled display where the Apple is somewhere on the left top.
I created a Windows 10 VM to be sure that it is not a problem with my AMD Sapphire Nitro+ Radeon RX5700XT and it installed just fine and recognized my dual monitor setup.
I also had the scrambled display option when using the emulated video card where I had to set the proper resolution in the bios but with GPU passthrough this should not be necessary.
Note that I did download a rom for my card which I use successfully for Windows but for Mac it doesn’t matter what I do…it will not work.
Without this issue everything else is working perfectly.
Any other things I can try?
Thanks
I get the scrambled boot display too with my R9 280X but it sorts itself out at the 3/4 loading mark (where the video card is initialised and the GUI starts).
You could try setting the resolution in UEFI to match Clover anyway and see if it improves.
Hoping to get some help and guidance. With you guide, I can run catalina in vm with display as vmware.
When I assign a RX580 for passthrough with hostpci0: 01:00,pcie=1,x-vga=on and with vga: none, I get the clover menu and then apple logo in the top left corner, and no progress.
Passthrough works fine for windows. Any ideas?
with -v turned on in clover I get:
OsxAptioFix3Drv: Starting overrides for \System\Library\CoreServices\boot.efi
Using reloc block: no, hibernate wake: no
++++++++++++++++++++++++++++++++++++++++++++++++++++
I started from scratch and found success with GPU passthrough working on catalina. The VM only boots successfully around half the time, otherwise hanging at apple progress screen.
I have also added hostpci1: 00:1f.3 for audio, but the audio device only appears in macos every second reboot.
Any ideas?
Hi Nick, Rakali,
I too have this setup/problem. I have a Sapphire Pulse RX580 in my Proxmox server and have successfully passed it through to a Windows 10 VM. The monitor attached to the RX580 displays properly and I can connect remotely to it using ‘Parsec’.
I have followed you brilliant guide and got a working Catalina VM which can be controlled over the Proxmox web interface using the VMware driver. The RX580 seems to be passed through as it is listed under the Mac ‘System Information’, ‘Graphics/Displays’. The problem is that I get a blank screen on the monitor attached to the RX580. I have tried setting VGA:none & RX580 as primary GPU.
Any ideas would be greatly appreciated.
Ok I’ve done everything as mentioned and so far so good it’s running perfectly however 1 concern is about the resolution that’s set for 1920×1080 which after testing multiple resolution turns to be the best but my laptop’s screen doesn’t support this resolution as it’s maxRes is 1366×768 which makes the Mac Graphics goes scrambled. I wanna find a solution to run on 1366×768 or less to avoid scroll right or left or top or bottom reach a certain point of the Mac Screen. Also I’m looking for a way to access Mac Remotely like RDP of windows which allows me to jump from my local PC to Mac without Proxmox Console
You need to edit the Clover configuration to set that resolution, Clover Configurator can do it for you.
For remote desktop just enable Screen Sharing in macOS sharing settings, it’s VNC compatible.
I edited Clove Configuration to set the resolution according to my screen max resolution which is 1366×768 while in BIOS remains 1920×1080. However once set and rebooted the device I got a scrambled Graphics thank God I have a backup of the VM to restore. This didn’t solve my problem to get a fit window without the need to scroll right or left, top or bottom. How’s it possible to resolve this issue?
And what are the benefits of mounting EFI ??
I wanna use the MAC like your usage base for Programming and Development using Xcode, Android Studio etc. Thus I wanna make sure the device is ready and can start installing the required apps on it.
One other thing I’m facing is the slowness of response between my order and the MAC’s response I don’t think it’s an internet issue while it might be configuration issue.
Hi , just to be sure .. Can i get sound output from HDMI “GPU PCI PASS” ?
Or its not compatible yet ?
Thanks
In theory, yes, that should work fine. In practice I’ve never had it work for me.
Its not work also for me . so should attach sound card or usb headset right ?
Yeah, I’m using a USB one with a PCIe-passthrough’d USB controller.
Running Catalina on Proxmox 6.1 with RX580 passthrough. All running fine and stable. Only thing i can’t get to work is having a virtualised NIC be recognized as builtin. So no iMessage.
I tried e1000-82545 as you have in your config above. Tried also vmxnet3 with no luck. After resets (.plist delete e.t.c.) i get them all to be shown as en0. No problem. And network works. But no luck getting one of these recognised as builtin …
No change with the FixLan_2000 patch.
Is your’s recognised as builtin ? If yes, any hint how to achieve this ?
Thanks for all your documentation efforts. Really helpful ….
Unfortunately, beyond finding out that iMessage doesn’t work for me, I haven’t investigated fixing it at all on my VM as I don’t use iMessage myself. The App Store does work perfectly for me though, how about you?
The app store does work. Only iMessage / Facetime does not. I have some real iMac’s / iPhones / iPads so i heavily use iMessage. It’s sad that it’s the only thing that does not work on VM.
I is most probably because en0 not being recognised as builtin from all that i found out by parsing the internet. Sadly i did not yet find a solution. What i will try now is removing all NIC’s and install NulEthernet kext. If that works i will add vmxnet3 and wifi again but as en1 and en2 …. As soon as i have time testing i will report back here. Maybe it will be helpful to someone later on ….
I confirm it working 🙂 🙂 🙂
Removed all virtual NIC’s. Removed all NIC’s from inside MacOS. Cleared .plists. Rebooted. Injected NullEthernet kext. Rebooted. Verify that NullEthernet is en0 and builtin. Added vmxnet3 as second NIC. Rebooted. Activated icloud, imessages, i*. Added passthrough for my ABWB 802,11 AC WI-FI + Bluetooth 4.0 PCI-Express. Everything working except Bluetooth for now. But WiFi and Ethernet work like a charm.
Nice one! Thanks for the steps
can i passthrough intelUHD630 IGPU for macOS?
I tried to use pci-passthrough option in pve. that doesn’t work
You should be able to get that GPU to work. After setting up passthrough there may be some work needed with Clover, but this will be the same as for any Hackintosh so you can google for generic Hackintosh advice.
You’re going to have to give a lot more detail than “doesn’t work” to get any help. Did you configure Proxmox as the Wiki suggests? https://pve.proxmox.com/wiki/Pci_passthrough
yes, I can pass through that igpu for windows with no problem.
about configure clover…actually I have absolutely no clue. after some search, I found out that to pass through this igpu for macOS your motherboard better has a DP port. otherwise, it will be stuck in a black screen.
I tried to boot the system with VMware vGPU to config clover, but it just keeps restarting then I add “-v” to config.
the last few lines it shows before the restart
https://i.loli.net/2020/03/15/Dk7LIzJ4sr1hnf9.jpg
Hi Nicholas,
I am getting ready to start a Proxmox 6.1 build shortly, but I am having trouble finding out what recommended BIOS settings I should use. I plan on building a Hackingtosh, Ubuntu, and Windows VM’s. I am using a Z390 Gigabyte board. Should I follow the recommended steps on the Proxmox site?
Sure. Normally you’re just looking to turn on VT-x (Intel Extensions for Virtualixation) and VT-d (Virtualization Technology for Directed I/O), then boot the Proxmox installer in UEFI mode for best compatibility with PCIe passthrough. I can’t think of any other settings that have an impact on Proxmox.
Thanks for the quick reply.
Nick,
For your “Samsung 950 Pro 512GB NVMe SSD for macOS” disk set-up, did you create a SIngle Disk config using ZFS for MacOS or did you use another file format in Proxmox?
It’s passed through directly to macOS, so Proxmox can’t touch it at all and it can’t run ZFS. macOS formats it APFS like it would any other drive, it’s completely raw.
Since the drive is completely inaccessible to Proxmox, there is no host-based snapshot support.
I’m having issues passing through a Broadcom PCI-e card, When booting the VM, the host throws these errors at me.
[ 41.734524] pcieport 0000:00:1c.5: DPC: containment event, status:0x1f01 source:0x0000
[ 41.734525] pcieport 0000:00:1c.5: DPC: unmasked uncorrectable error detected
[ 41.734554] pcieport 0000:00:1c.5: AER: PCIe Bus Error: severity=Uncorrected (Non-Fatal), type=Transaction Layer, (Requester ID)
[ 41.734577] pcieport 0000:00:1c.5: AER: device [8086:a33d] error status/mask=00100000/00010000
[ 41.734605] pcieport 0000:00:1c.5: AER: [20] UnsupReq (First)
[ 41.734634] pcieport 0000:00:1c.5: AER: TLP Header: 34000000 04000010 00000000 883c883c
[ 41.934410] pcieport 0000:00:1c.5: AER: Device recovery successful
I think that’s probably just a quirk during device reset and won’t cause it to fail to operate.
It’s detected in Windows and macOS as a device, but they can’t initialize it
uh oh. Very slow boot in Catalina….I keep getting no space left error 500. Cant ssh in, cant Get sudo or anything else. How can a 64gb space be filled up so quick? ! How to clear out temp folders when u cant get in!?
You should be able to access the contents of the disk from the Recovery mode (either the built-in one or you can add the Catalina installer ISO back (remembering to replace media=cdrom)).
No its the Proxmox LVM drive which is full up not the VM/Catalina install… didnt do backups, so when its full (god knows what with… probably a million tmp files) you can’t console/shell without access. Actually looking online theres not many answers…. you cant install anything to help file explore and remove, cus theres no space!
Looks like a total startover required. Saved all the info in my confs so it shouldnt take long. 250gb drive full up with something…
The good thing is the Mac OS is installed on the NVME so I shouldnt have to do that again.I am totally perplexed. 0% available
f /dev/mapper/pve-root
Filesystem 1K-blocks Used Available Use% Mounted on
/dev/mapper/pve-root 57278576 57139408 0 100% /
You can boot from the Proxmox installer ISO/USB drive and choose the “Install Proxmox VE (Debug Mode)” option, this drops you into a shell which you can use to mount and explore your LVM volumes. (I don’t use LVM myself so it’s difficult for me to help out here)
Nick, with a second vga card (another radeon VII) how do count up the PCI hosts? if the first is PCI0, is the second radon to be assigned to hostpci1 (0-5 you say?) And, isnt Proxmox 6.2 now supporting more than 6 PCI devices?
Just wondering how to add the second vga card to my vm.conf etc… I only need it for increased processing of metal etc and not really bothered about putting monitors on it.
Best regards
Yes hostpci1. Proxmox 6 supports 16 passthrough devices already.
Hi Nick, awesome guide. Got my Asrock TRX40 creator running with TR3970, Radeon VII, MP600. I have been trying to get around the GPU reset bug but in the end settled for a start hook, not elegant but effective:
(I tried to run it “post-stop” but it somehow doesn’t trigger when MacOS is shut down.)
root@ryzen:/var/lib/vz/snippets# more reset-gpu.pl
#!/usr/bin/perl
# Hook script for PVE guests to reset AMD GPU before VM start
# qm set 100 -hookscript local:snippets/reset-gpu.pl
use strict;
use warnings;
print “HOOK: ” . join(‘ ‘, @ARGV). “\n”;
# First argument is the vmid
my $vmid = shift;
# Second argument is the phase
my $phase = shift;
if ($phase eq ‘pre-start’) {
print “HOOK: $vmid is stopped.\n”;
system(“rtcwake -m mem -s 3”);
} else {
print “HOOK: got unknown phase ‘$phase’\n”;
}
exit(0);