
I’ve now created a new tutorial that uses OpenCore instead of Clover, and it fixes a lot of problems. I recommend using the new tutorial for all new builds
This tutorial for installing macOS Catalina has been adapted for Proxmox 6 from Kholia’s GitHub project for installing into vanilla KVM. There is more documentation there which will help out with enabling extra features and diagnosing problems!
If you run into trouble, also check out the comment section of my previous tutorial on Mojave – these two versions are very similar so the problems and solutions are likely to be the same.
Requirements
I’ll assume you already have Proxmox 6 installed. You also need a real Mac available in order to fetch the OSK key.
Your Proxmox host computer’s CPU must support SSE 4.2, so for Intel your CPU must be at least as new as Nehalem, which was the first CPU generation to bear the “Core” i5/i7 branding. Older CPUs will cause the finder to repeatedly crash after installation completes (with an Illegal Instruction exception in the graphics code).
Apparently modern AMD CPUs also support SSE 4.2 and can be used with this guide without any modification (maybe Bulldozer and certainly Ryzen), but I haven’t tested this myself.
First step: Create an installation ISO
Download and run fetch-macOS.py in a terminal to download the Catalina recovery image from the Apple software distribution server (this can be run on Linux, Proxmox, or on a Mac):
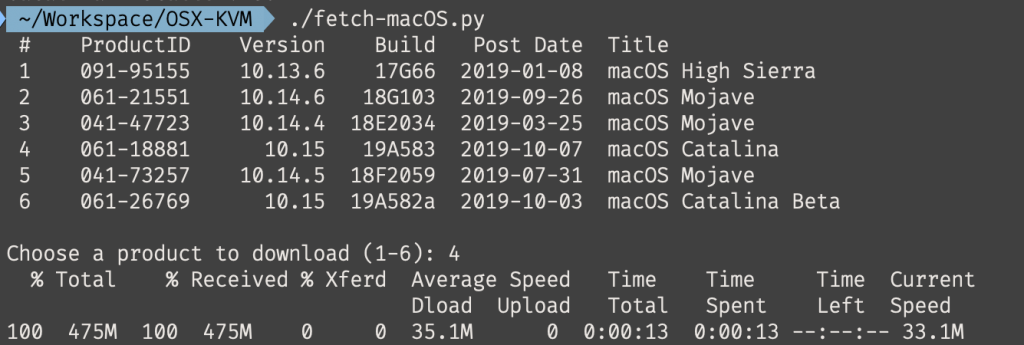
This results in a ~500MB “BaseSystem.dmg” file in the current directory. Convert that dmg into an “iso” like so if you’re building this on macOS:
hdiutil convert BaseSystem.dmg -format UDRW -o Catalina-installer.iso
mv Catalina-installer.iso.img Catalina-installer.iso
Or like so if you’re building this on Linux:
# Install the dmg2img package and...
dmg2img BaseSystem.dmg Catalina-installer.iso

# Or use qemu-img from the qemu-utils package to do it instead:
qemu-img convert BaseSystem.dmg -O raw Catalina-installer.iso
The result is actually a raw disk image, not a true ISO, but Proxmox has better tools for picking and re-using ISO images than disk images. Upload the “ISO” to your Proxmox server’s ISO store (typically /var/lib/vz/template/iso).
If you don’t have an Internet connection available to Catalina during installation you’ll need to build an offline installer instead. Building the offline installer requires you to have a Mac, here are the instructions.
Prepare a Clover image
We’ll be using Clover as a bootloader for Catalina.
Download this Clover disk image (that I built using kholia’s build script from Clover r5107 on Fedora 27), unpack it, and upload it to Proxmox’s ISO store at /var/lib/vz/template/iso. Although it has a .iso file extension, this is actually a hard disk image.
Fetch the OSK authentication key
macOS checks that it is running on real Mac hardware, and refuses to boot on third-party hardware. You can get around this by reading an authentication key out of your real Mac hardware (the OSK key). Save the first block of C code from this page as smc_read.c. In a command prompt, change into the same directory as that file and run:
xcode-select --install # If you don't already have gcc
gcc -o smc_read smc_read.c -framework IOKit
./smc_read
It’ll print out the 64 character OSK for you. Make a note of it.
Every Mac uses the same OSK, so don’t be surprised that it doesn’t look like a random string!
Create the VM
From the Proxmox web UI, create a new virtual machine as shown below.

Keep a note of your VM’s ID 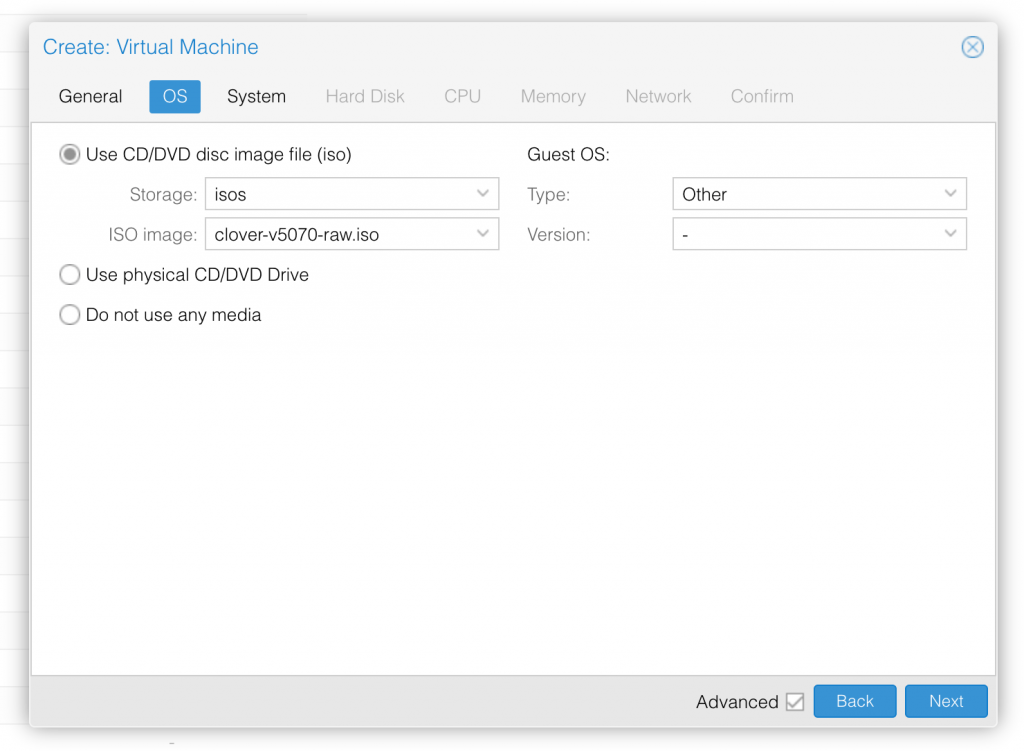
Select the Clover ISO you uploaded and set OS type to “Other” 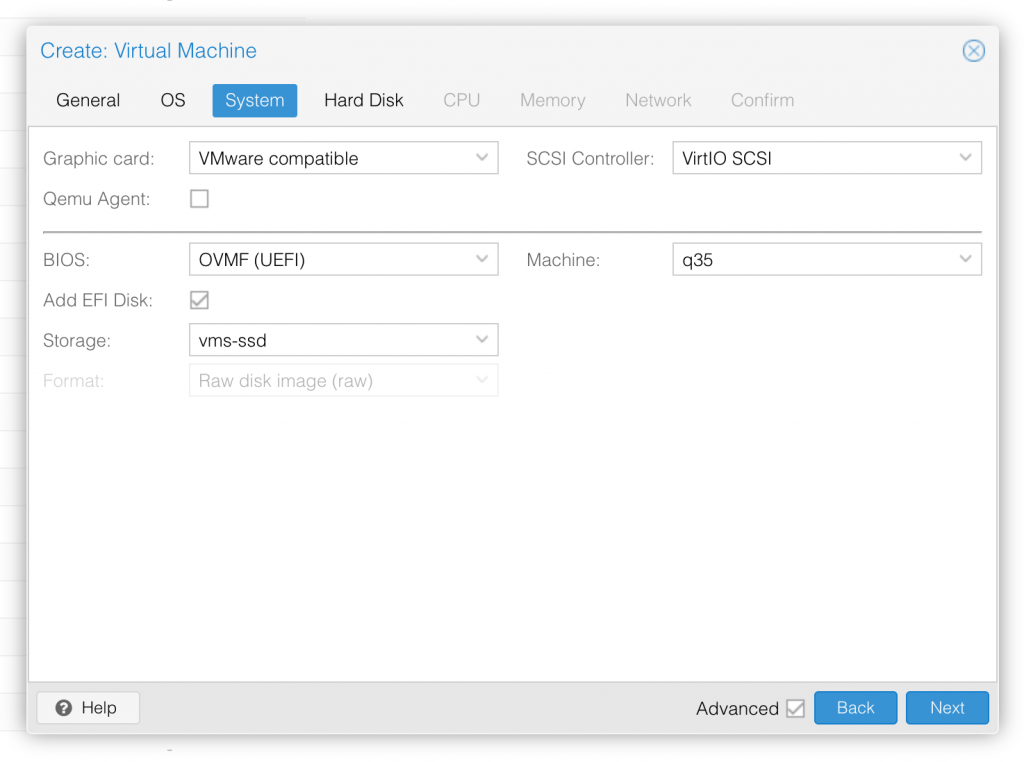
Set graphics to “VMWare Compatible”, set BIOS to OVMF (UEFI), set Machine to Q35, Tick Add EFI Disk and pick storage for it 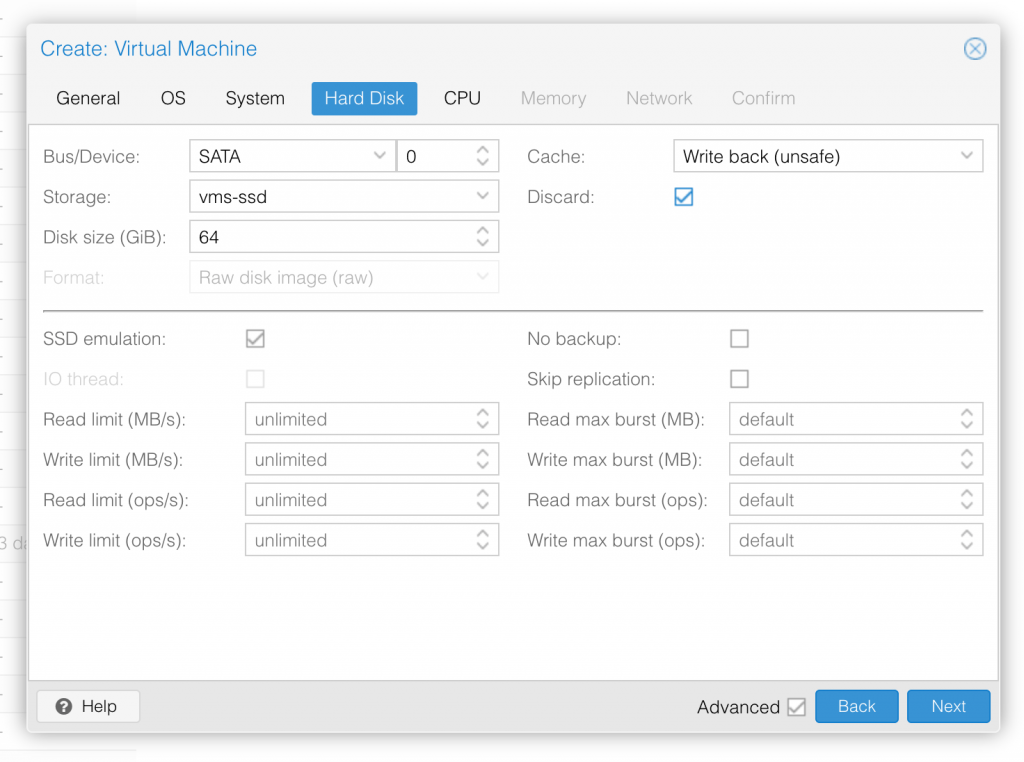
Set the size of the hard disk (I chose 64GB). Attach it to SATA0. Enable discard and SSD emulation to support TRIM. 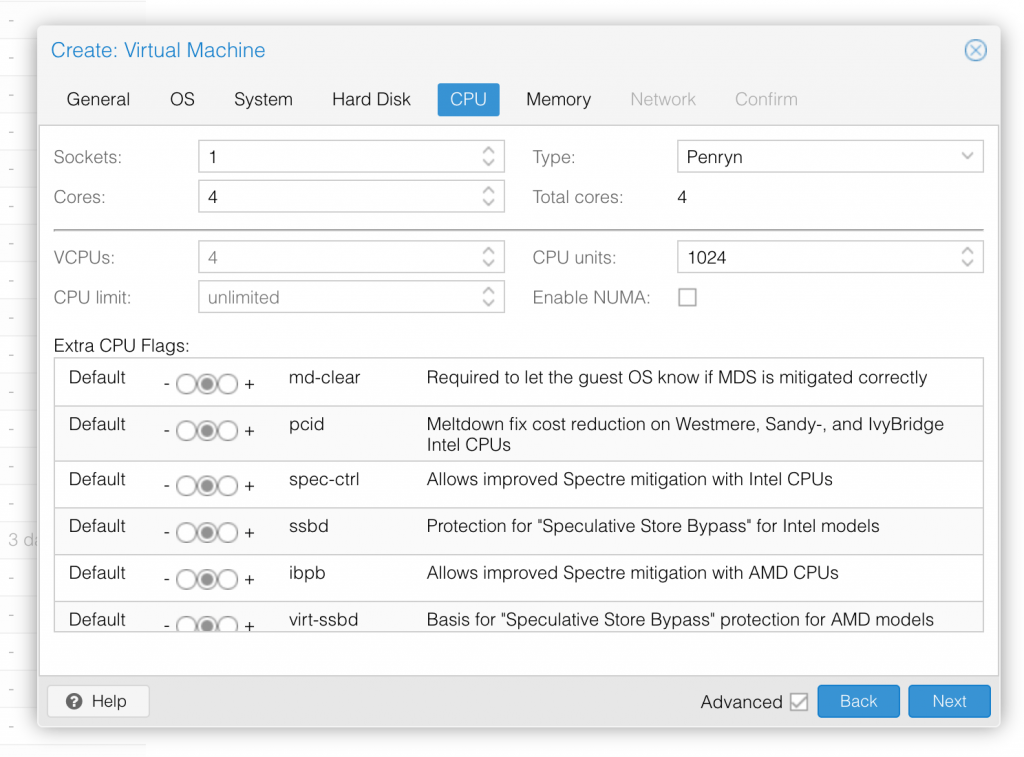
Set the number of cores for the VM, I chose 4 (note that some core counts are troublesome, try 4 first). Set the CPU to Penryn. 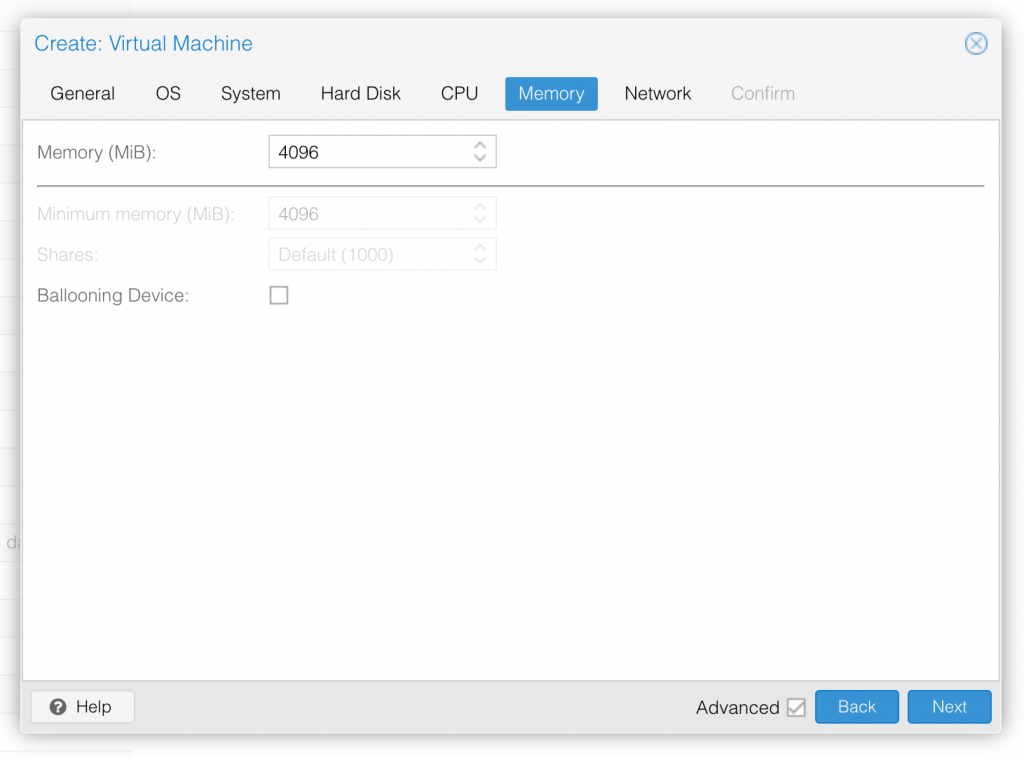
I chose a fixed memory of 4096MB. Disable ballooning because there is no balloon driver available for macOS. 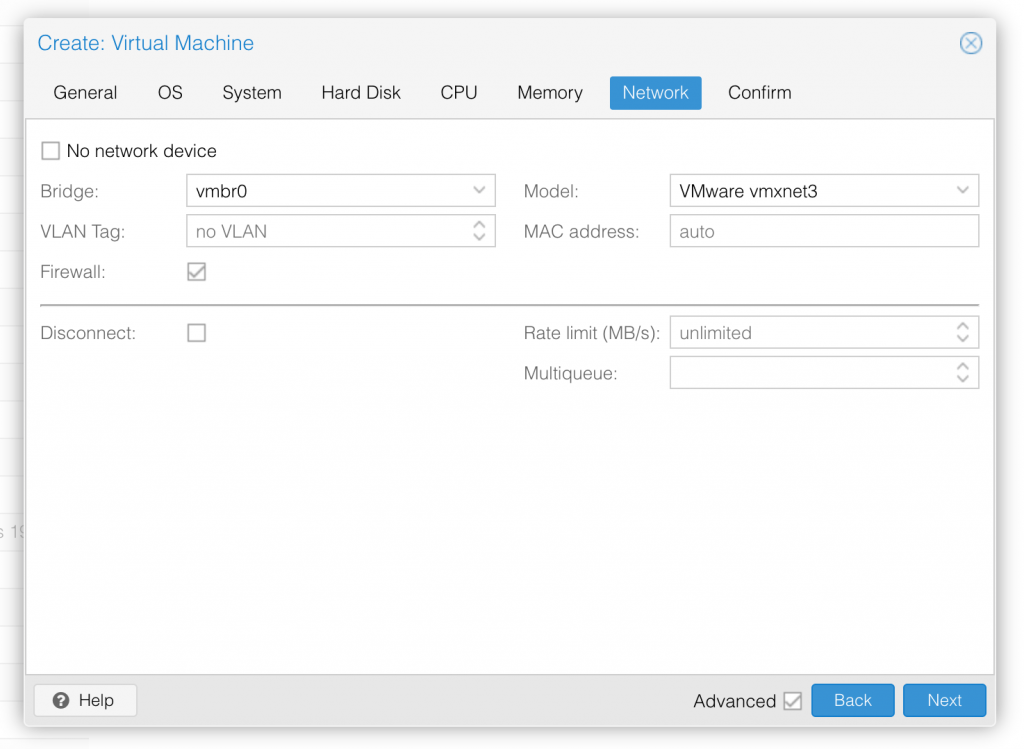
Choose VMWare vmxnet3 for the network model 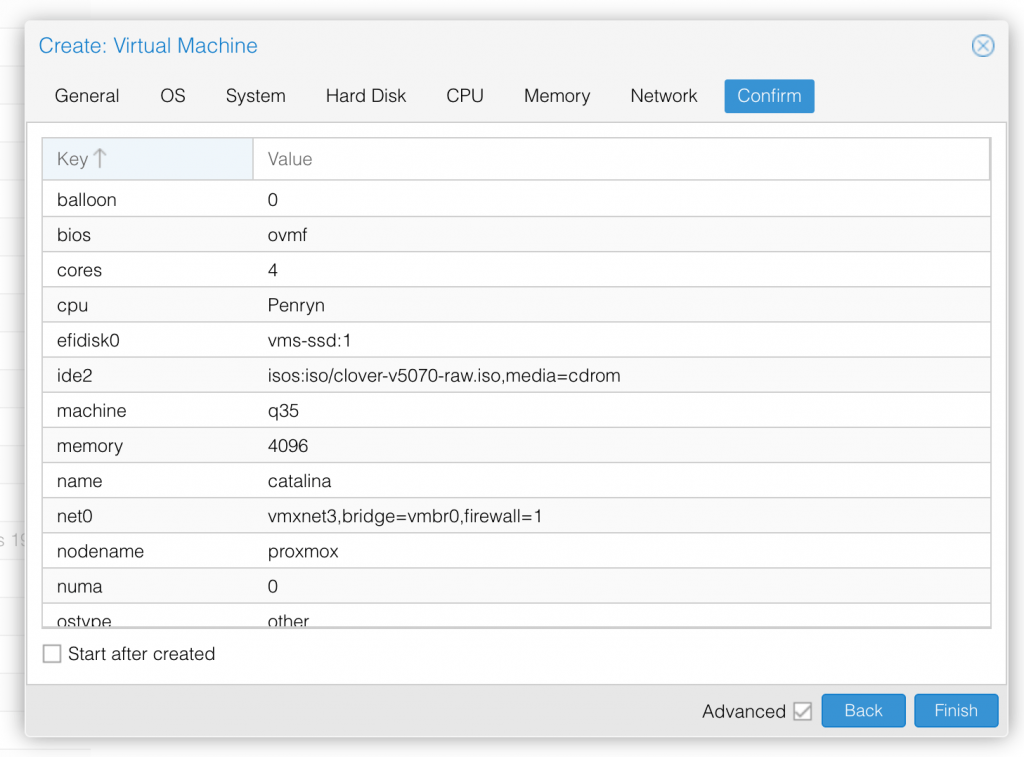
In the Options page for the VM, ensure that “use tablet for pointer” is set to “Yes”.
In the Hardware page for the VM, add a second DVD drive at IDE0, set it to use your Catalina-installer.iso.
Don’t try to start the VM just yet. First, SSH into your Proxmox server so we can make some edits to the configuration files.
Edit /etc/pve/qemu-server/YOUR-VM-ID-HERE.conf (with nano or vim). Add this line, being sure to substitute the OSK you extracted earlier into the right place:
args: -device isa-applesmc,osk="THE-OSK-YOU-EXTRACTED-GOES-HERE" -smbios type=2 -cpu Penryn,kvm=on,vendor=GenuineIntel,+kvm_pv_unhalt,+kvm_pv_eoi,+invtsc,vmware-cpuid-freq=on,+pcid,+ssse3,+sse4.2,+popcnt,+avx,+aes,+xsave,+xsaveopt,check -device usb-kbd,bus=ehci.0,port=2
We’re telling macOS that the CPU is Penryn (it doesn’t seem to like booting otherwise), but we’re enabling all the new CPU features found in Nehalem which macOS will require, plus some optional features found in later generations (AVX/AES). A USB keyboard is added here because macOS doesn’t support QEMU’s default PS/2 keyboard.
Find the line that define the two “ISOs” (ide0 and ide2), and remove the “,media=cdrom” part from them. Add “,cache=unsafe” in its place. This will treat these as hard disks rather than DVD drives.
Save your changes, return to the Options tab, and change the boot order to put IDE2 (the Clover image) first. Your final VM configuration file should resemble this:
args: -device isa-applesmc,osk="..." -smbios type=2 -cpu Penryn,kvm=on,vendor=GenuineIntel,+kvm_pv_unhalt,+kvm_pv_eoi,+invtsc,vmware-cpuid-freq=on,+pcid,+ssse3,+sse4.2,+popcnt,+avx,+aes,+xsave,+xsaveopt,check -device usb-kbd,bus=ehci.0,port=2
balloon: 0
bios: ovmf
boot: cdn
bootdisk: ide2
cores: 4
cpu: Penryn
efidisk0: vms:vm-144-disk-1,size=128K
ide0: isos:iso/Catalina-installer.iso,cache=unsafe
ide2: isos:iso/clover-r5107.iso,cache=unsafe
machine: q35
memory: 4096
name: catalina
net0: vmxnet3=xx:xx:xx:xx:xx:xx,bridge=vmbr0,firewall=1
numa: 0
ostype: other
sata0: vms:vm-144-disk-0,cache=unsafe,size=64G
smbios1: uuid=xxxxxx-xxxx-xxxx-xxxx-xxxxxxxxxxx
sockets: 1
vga: vmware
Configure Proxmox
On Proxmox, run “echo 1 > /sys/module/kvm/parameters/ignore_msrs” to avoid a bootloop during macOS boot. To make this change persist across Proxmox reboots, run:
echo "options kvm ignore_msrs=Y" >> /etc/modprobe.d/kvm.conf && update-initramfs -k all -u
You must now install a patched version of Proxmox’s OVMF library in order to be able to boot Catalina.
Install Catalina
Now start up your VM.
Go to the Console tab, quickly hit Escape or F2 at the Proxmox logo to enter the OVMF configuration. If your keyboard doesn’t work, leave the Console tab, stop the VM, start the VM, then re-enter the console tab.
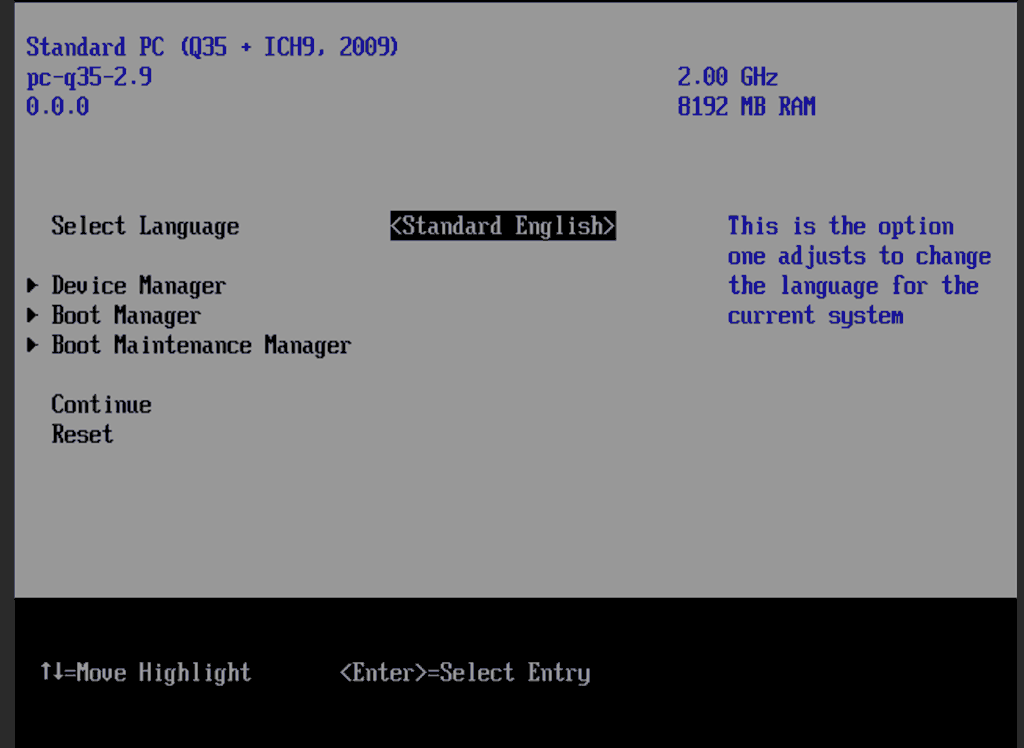
Select Device Manager 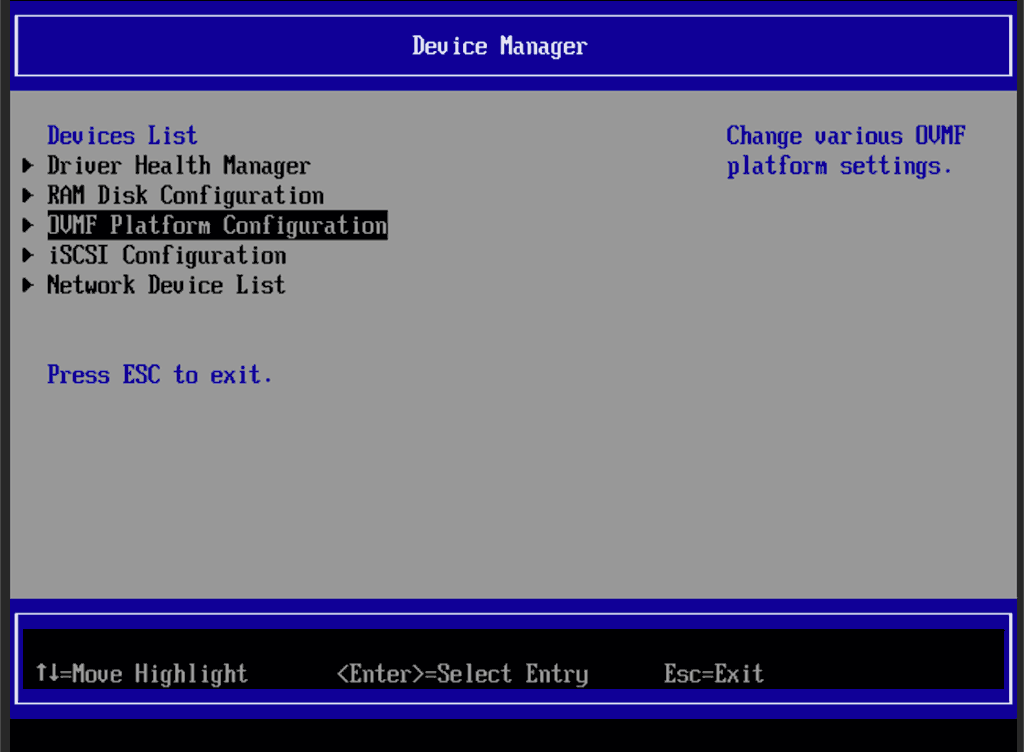
Select OVMF platform configuration 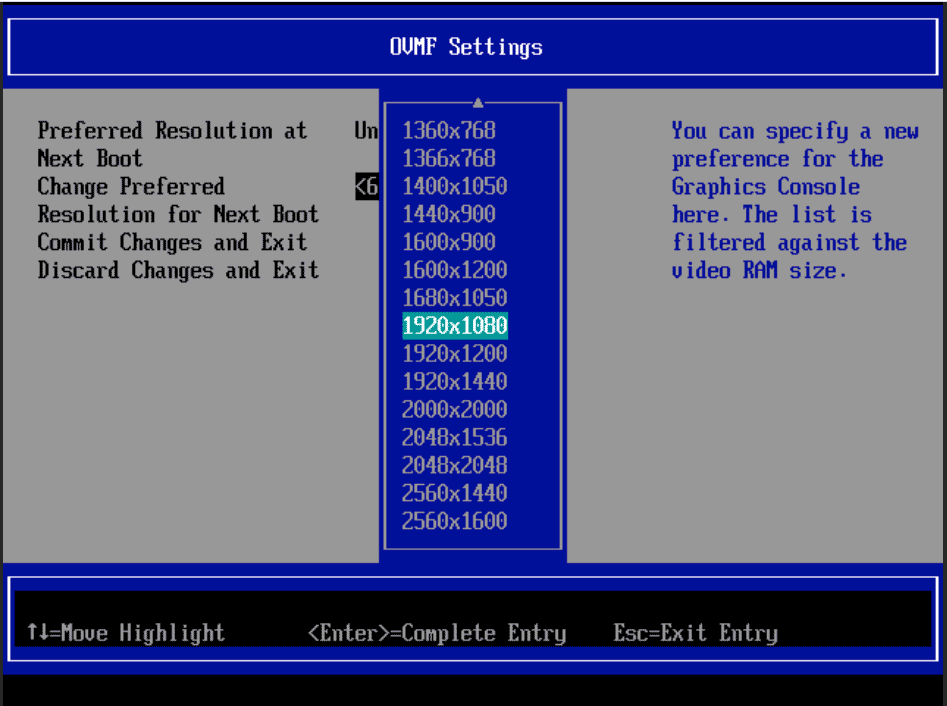
Set the preferred resolution to 1920×1080 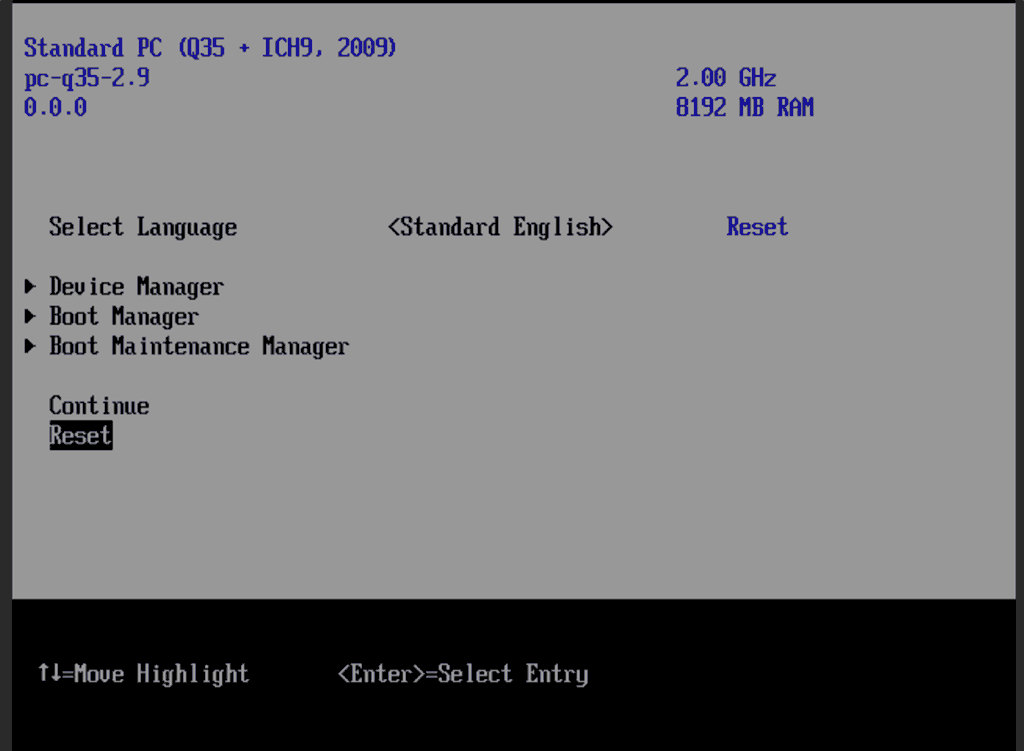
Save changes, then Reset
Follow the steps above to set the screen resolution to 1920×1080, press F10 to save your changes, and “reset” to apply the new settings (not “continue”). This step is required to avoid scrambled graphics on boot and a hang (Clover resolution must match OVMF resolution, or else the Apple logo will be off-centre and the progress bar will be smeared across the screen, resulting in a lockup).
Note that in future you’ll find that when initially started, your VM doesn’t properly apply the the 1920×1080 screen resolution until you hit “Restart Computer” in Clover when the Clover menu appears (or “Reset” on the VM). You’ll notice this happening when the “Proxmox” logo fills a large area of the screen on boot due to the low resolution.
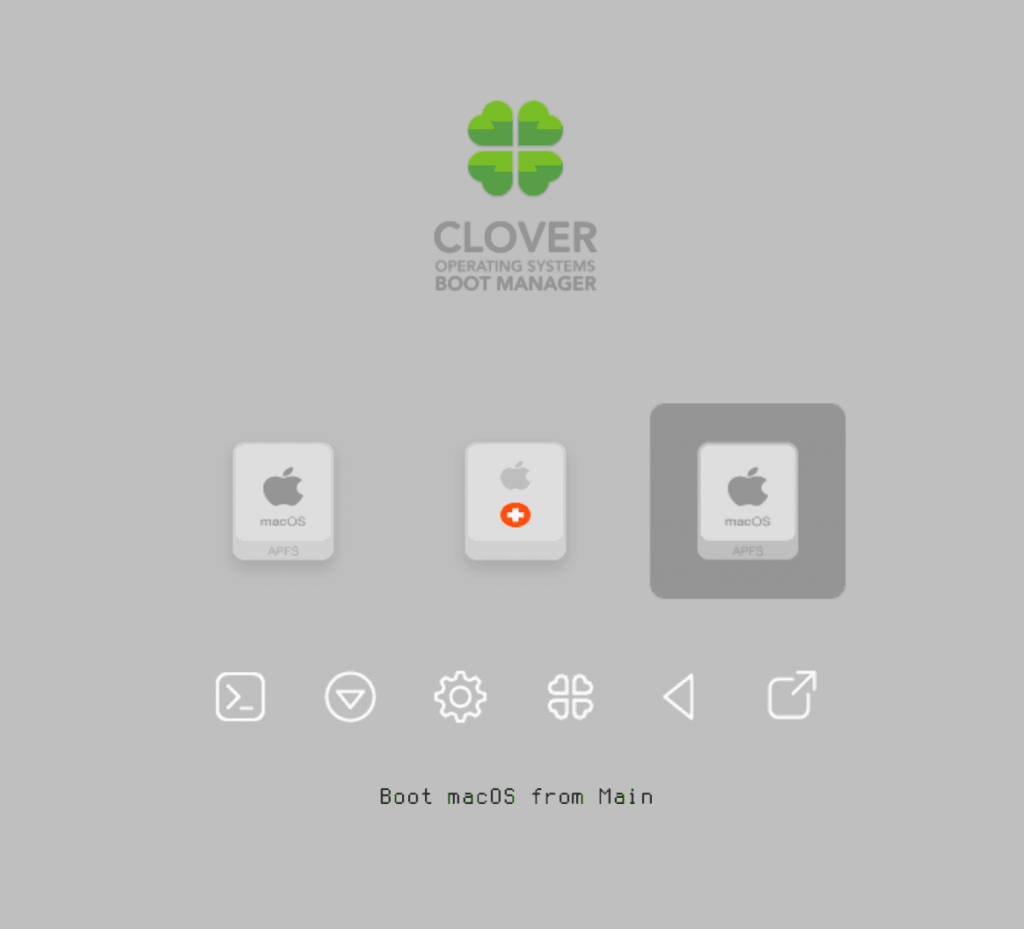
It should now boot into Clover.
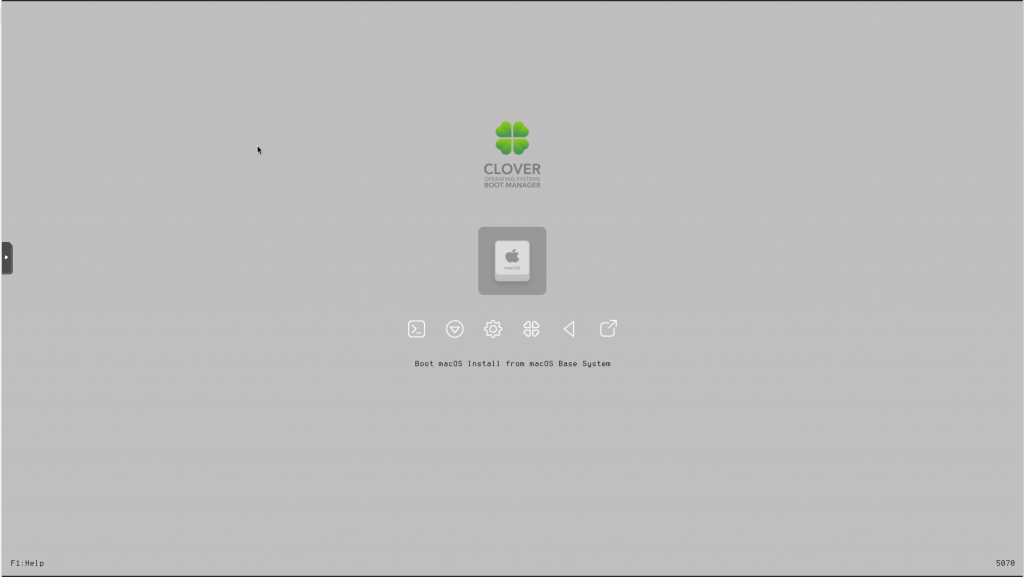
Press enter to boot the “Boot macOS Install from macOS Base System” entry and the installer should appear. Choose your language.
Our virtual hard drive needs to be erased/formatted before we can install to it, so select the Disk Utility option. Follow the steps below to format the disk:
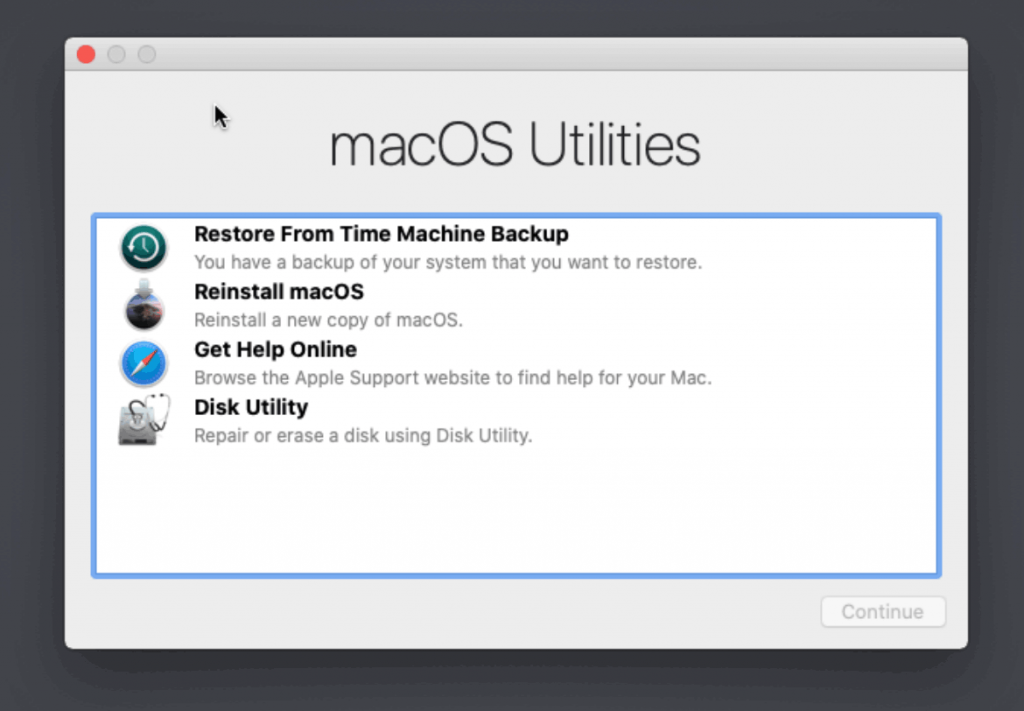
Select Disk Utility 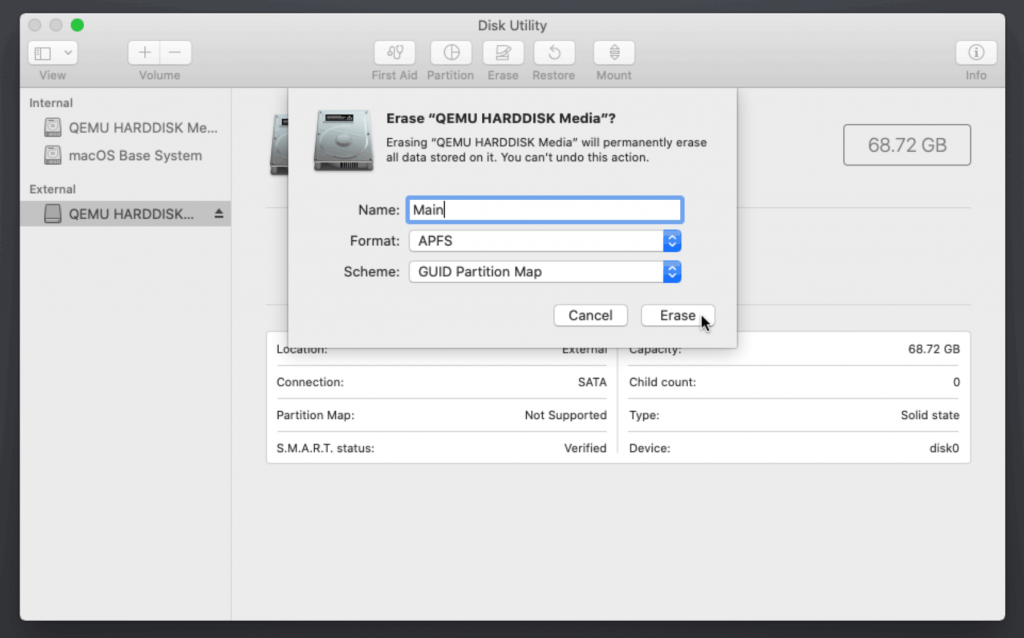
Erase the main disk (it’ll appear as an external drive). Choose APFS. I called mine “Main”. Avoid “Encrypted” at this stage
Now we’re ready to begin installation!
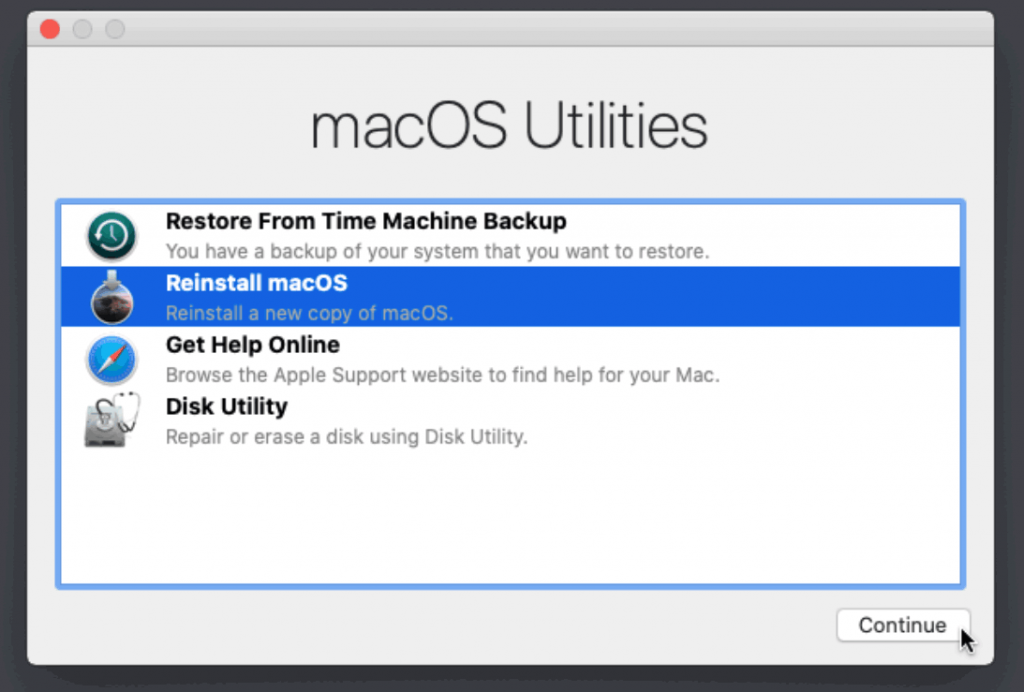
Reinstall macOS 
Continue… 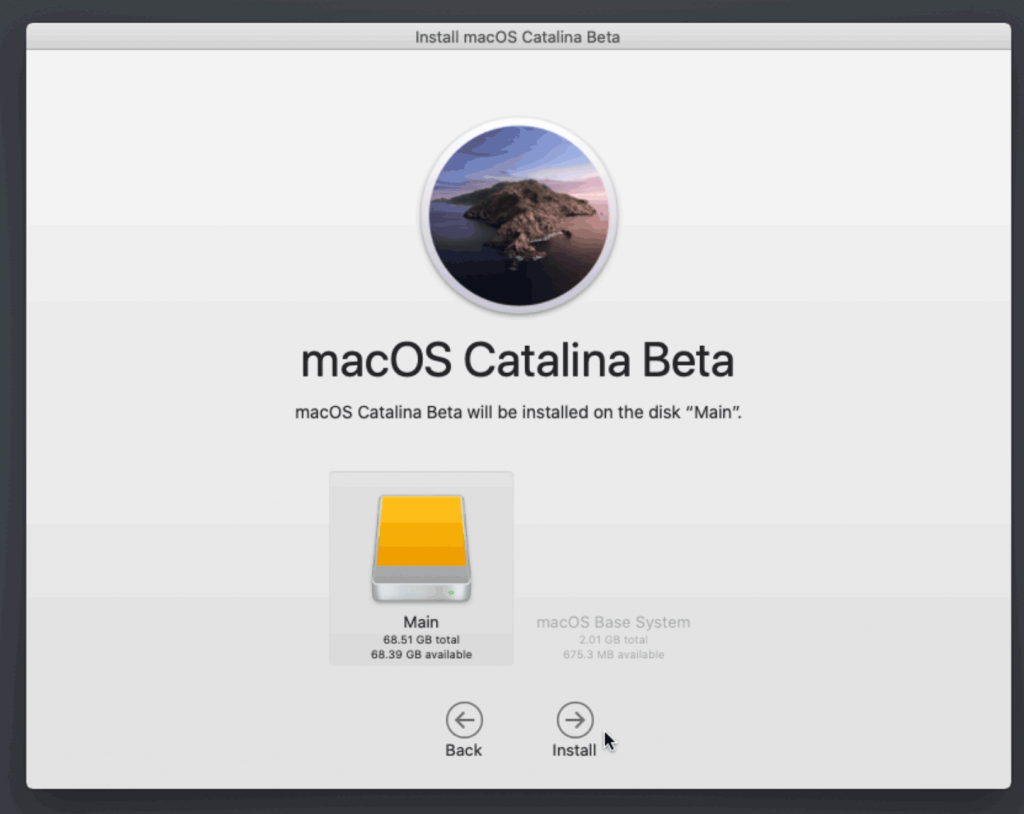
Choose the drive you erased 
It’s installing!
After the first stage of installation, the VM should reboot itself and automatically continue installation by booting from the hard drive, then reboot itself a second time and automatically boot from “filevault prebooter”. Note that an Internet connection is required during installation, as the installer needs to download Catalina.
Answer the initial install questions, and you’ll be logged on! (Note that you’ll probably want to hold off on logging into your iCloud account until you’ve configured your SMBIOS to your liking in Clover Configurator)
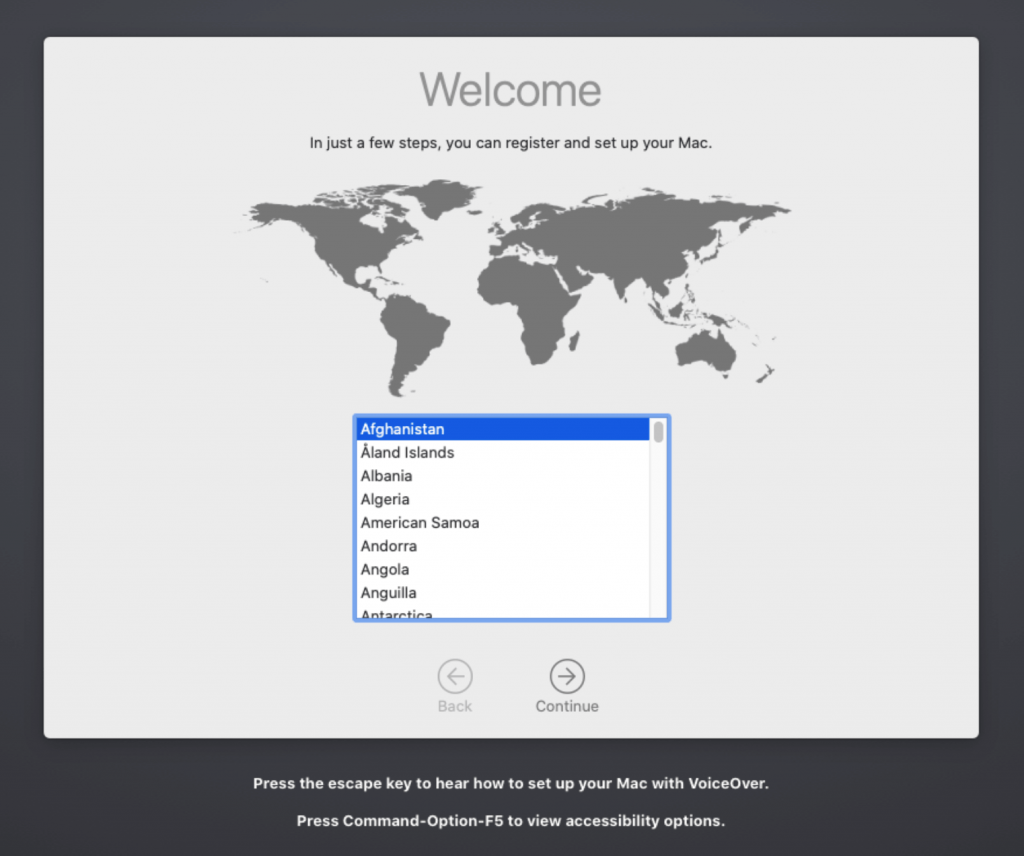
Answer the install questions 
New features! 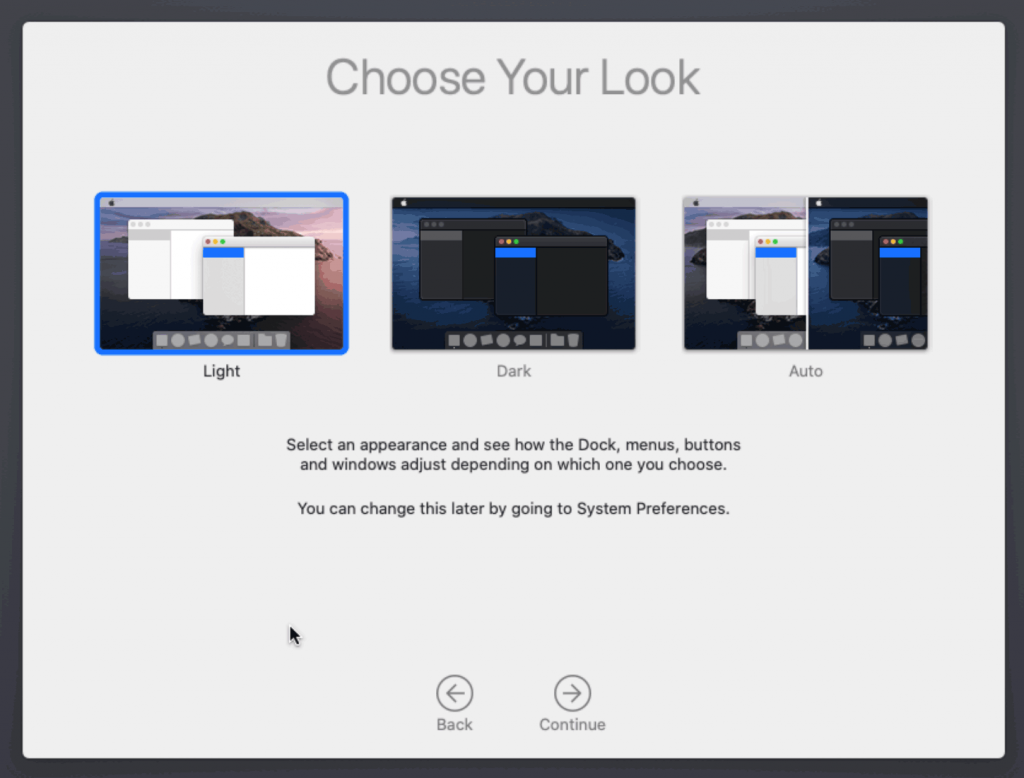
New automatic theme switching!
Make the Clover install permanent
We’re currently booting using Clover from the attached Clover ISO. Let’s install that to the hard drive instead. Pop open Terminal and run “diskutil list” to see what drives we have available.
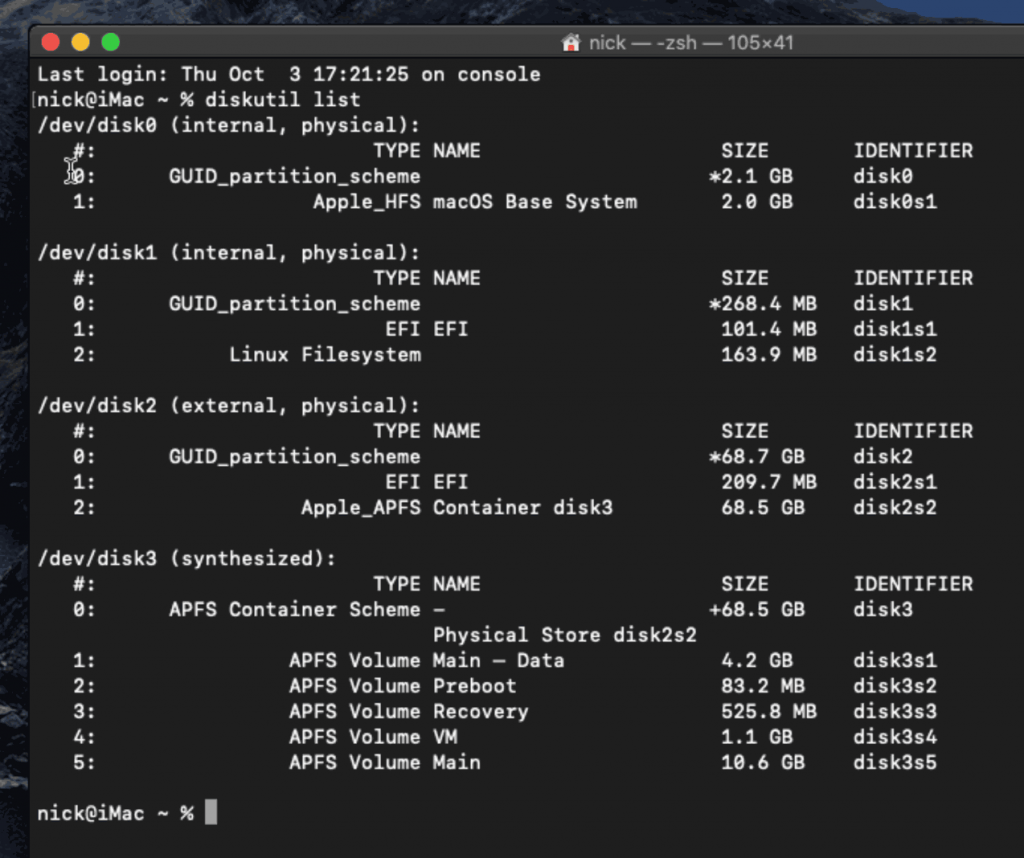
Use “sudo dd if=<source> of=<dest>” to copy the “EFI” partition from the Clover CD and overwrite the EFI partition on the hard disk. The Clover CD is the small disk with the “linux filesystem” on it, and the main hard disk is the one with the large Apple_APFS “Container” partition on it.
In my case these EFI partitions ended up being called disk1s1 and disk2s1 respectively, so I ran “sudo dd if=/dev/disk1s1 of=/dev/disk2s1” (N.B. if you get these names wrong, you will overwrite the wrong disk and you’ll have to start the installation over again!).
Now shut down the VM, and remove both the Clover and the Catalina installer drives from the Hardware tab. On the Options tab, edit the boot order to place SATA0 as the first disk. Boot up. If everything went well, you should see the Clover boot menu, and you can select “Boot macOS from Main” to boot Catalina.
Sleep management
I found that I was unable to wake Catalina from sleep using my mouse or keyboard. You can either disable system sleep in Catalina’s Energy Saver settings to avoid this, or you can manually wake the VM up from sleep from Proxmox by running:
qm monitor YOUR-VM-ID-HERE
system_wakeup
quit
“Prohibited” sign on boot
On a regular Hackintosh this is typically a sign that the boot drive can’t be read, but that situation is difficult to encounter with this VM setup. Nevertheless, I receive a “prohibited” sign during boot in perhaps 1 out of 20 system boots at random (maybe a timing bug?) If this happens, just hit “reset” for the VM to retry (no need to stop and start).
If you get it persistently, something is going wrong with the boot. You can boot macOS in “verbose” mode by hitting space on the macOS option in Clover and ticking the verbose option. This’ll give you a log during booting that can narrow down when the problem occurs.
Editing your Clover/EFI settings
You can use the Clover Configurator tool (Global Edition) to edit your Clover “config.plist” configuration file, which is stored in the hard drive’s EFI partition. This tool should mount the EFI partition for you. If you want to mount it without using Clover Configurator, first check the device name of the EFI partition in the terminal:
~$ diskutil list
/dev/disk0 (external):
   #:             TYPE   NAME           SIZE       IDENTIFIER
   0: GUID_partition_scheme             512.1 GB   disk0
   1:              EFI   EFI            209.7 MB   disk0s1
   2:        Apple_HFS   Main           511.8 GB   disk0s2
Then you can mount it like so:
sudo mkdir /Volumes/EFI
sudo mount -t msdos /dev/disk0s1 /Volumes/EFI
Note that if you upgrade Clover in the future, you must untick the “AudioDxe” driver during installation, because this causes Clover to hang.
Video performance
Because there is no guest video acceleration available for macOS, video performance is poor.
In Google Chrome in the guest you will need to toggle off the setting to “use hardware acceleration when available” to improve issues with elements not being drawn or flickering (especially video). Safari may be a better choice.
macOS’s built in “Screen Sharing” feature offers dramatically better framerates and latency than Proxmox’s browser-based VNC console, so if you have a real Mac to act as a viewing console, you can enable that in the VM’s “Sharing” settings and connect to the VM using the Screen Sharing app from your Mac instead:
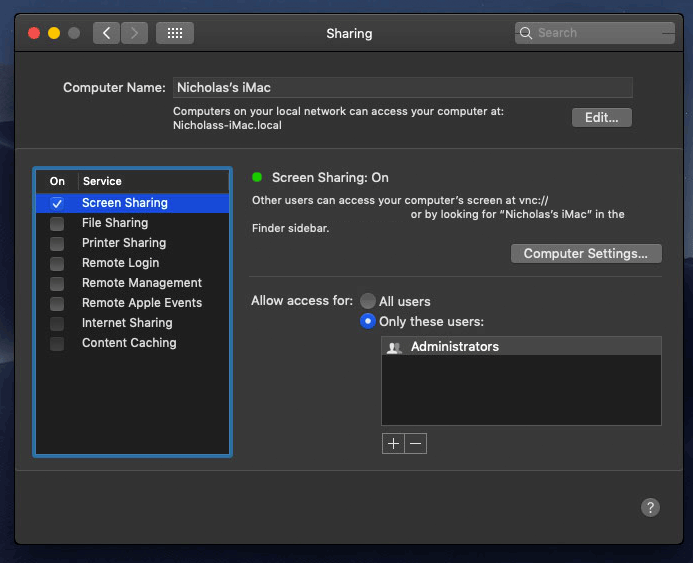
Apparently Screen Sharing is also compatible with VNC clients like RealVNC, so you should be able to connect to it from Linux or Windows consoles using RealVNC.
The real magic bullet for video performance is to pass through a compatible video card using PCIe passthrough (though note that Catalina does not support most NVidia cards). This offers near-native performance. You can read more about how I’m using PCIe passthrough on my own installation here.
USB passthrough
Since I want to use this as my primary computer, I want to use a USB keyboard and mouse plugged directly into Proxmox, rather than sending my input through the web VNC console.
Proxmox has good documentation for USB passthrough. Basically, run “qm monitor YOUR-VM-ID-HERE”, then “info usbhost” to get a list of the USB devices connected to Proxmox:
qm> info usbhost
 Bus 3, Addr 12, Port 6, Speed 480 Mb/s
 Class 00: USB device 8564:1000, Mass Storage Device
 Bus 3, Addr 11, Port 5.4, Speed 12 Mb/s
 Class 00: USB device 04d9:0141, USB Keyboard
 Bus 3, Addr 10, Port 5.1.2, Speed 12 Mb/s
 Class 00: USB device 046d:c52b, USB Receiver
 Bus 3, Addr 9, Port 14.4, Speed 12 Mb/s
 Class 00: USB device 046d:c227, G15 GamePanel LCD
 Bus 3, Addr 8, Port 14.1, Speed 1.5 Mb/s
 Class 00: USB device 046d:c226, G15 Gaming Keyboard
In this case I can add my keyboard and mouse to USB passthrough by quitting qm, then running:
qm set YOUR-VM-ID-HERE -usb1 host=04d9:0141
qm set YOUR-VM-ID-HERE -usb2 host=046d:c52b
This saves the devices to the VM configuration for you. It’s possible to hot-add USB devices, but I just rebooted my VM to have the new settings apply.
You can also pass through USB devices by passing through an entire USB controller using Proxmox’s PCIe passthrough feature.
FileVault 2

FileVault disk encryption is a little janky at the moment. It takes a long time (a couple of minutes) for the password prompt to appear on boot, and then the graphics are scrambled so you have to enter your password blind.
If you really want to use it, be certain to keep a copy of your recovery key and keep your backups up to date!
Upgrading from Mojave
First make a backup or snapshot of your system! Catalina has a new disk layout that separates user data from the system partition, so there’s a higher than normal chance of the installer destroying everything.
Update Clover to r5107 by running the Clover installer. Choose the Customise option. Choose:
- Install for UEFI booting only
- UEFI drivers section:
- Recommended Drivers: Tick all, except untick AudioDxe (it causes Clover to hang)
- Filesystem drivers: Tick ApfsDriverLoader
- Memory fix drivers: Tick OsxAptioFix3Drv
- FileVault 2 drivers: Tick all
- Additional drivers: Tick PartitionDxe
Update any kexts you have installed (Lilu, WhateverGreen, etc). Now reboot to check that Mojave still boots properly using this updated Clover install.
If you’re using any PCIe passthrough devices (particularly video cards) you’ll probably want to disable those and set “vga: vmware” instead, so you can install using Proxmox’s web console. This avoids installer problems triggered by flaky video card passthrough.
Now you can upgrade to Catalina by adding the Catalina-intaller.iso as a DVD drive, editing the VM config to replace “media=cdrom” with “cache=unsafe” and booting from that. You can probably also just install Catalina from the Mac App Store, but I haven’t tested that approach myself.
After upgrading, you may find that on boot you are dropped into the UEFI shell instead of booting Clover. If so, you can manually find and run Clover (e.g. by running “fs0:” “cd EFI\CLOVER “CLOVERX64.efi”), then use Clover’s “Boot Menu Options” menu to remove the Clover UEFI entries and re-add them.
Hi, a 1000 thanks for this updated tutorial ! I’d like to give it a try. Now, being a total novice in this, I already need to ask advice as to the first step…
How do I download the python script from the website? There’s no download option and if a copy paste all the lines in a terminal window, nothing happens… Thanks for your indulgence, I really want to make this work.
Right click the page and Save As.
Any success on Mac Os Catalina, pcie passtrought FX 5700?
怎么在Proxmox6上运行PYTHON脚本?我在Win10系统中执行fetch-macOS.py出错,为什么不分享Cojave-installer.iso、Cojave-installer.iso文件?
I try to express my confusion in English.How to run Python script on proxmox6?I have an error executing fetch-macos.py in win10 system.Why not share BaseSystem.dmg and cojave-installer.iso files?
Just “python fetch-macos.py” or “python2.7 fetch-macos.py”.
Sharing those would be copyright infringement. Also people would have to trust that I didn’t add malware to the binary. This way you don’t need to trust me because the file is downloaded straight from Apple.
run”python /var/lib/vz/template/iso/fetch-macOS.py” on Proxmox6.0-9
Error reading content/catalogs/others/index-10.15seed-10.15-10.14-10.13-10.12-10.11-10.10-10.9-mountainlion-lion-snowleopard-leopard.merged-1.sucatalog: not well-formed (invalid token): line 66646, column 218
Delete the “content” directory and try again.
root@pve1:~# python /var/lib/vz/template/iso/fetch-macOS.py
Could not replicate https://swscan.apple.com/catalogs/others/index-10.15seed-10.15-10.14-10.13-10.12-10.11-10.10-10.9-mountainlion-lion-snowleopard-leopard.merged-1.sucatalog: Command ‘[‘/usr/bin/wget’, ‘-c’, ‘–quiet’, ‘-x’, ‘-nH’, ‘https://swscan.apple.com/catalogs/others/index-10.15seed-10.15-10.14-10.13-10.12-10.11-10.10-10.9-mountainlion-lion-snowleopard-leopard.merged-1.sucatalog’]’ returned non-zero exit status 8
root@pve1:~# ping baidu.com
PING baidu.com (39.156.69.79) 56(84) bytes of data.
64 bytes from 39.156.69.79 (39.156.69.79): icmp_seq=1 ttl=48 time=40.8 ms
Could not replicate https://swscan.apple.com/catalogs/others/index-10.15seed-10.15-10.14-10.13-10.12-10.11-10.10-10.9-mountainlion-lion-snowleopard-leopard.merged-1.sucatalog: Command ‘[‘/usr/bin/wget’, ‘-c’, ‘–quiet’, ‘https://swscan.apple.com/catalogs/others/index-10.15seed-10.15-10.14-10.13-10.12-10.11-10.10-10.9-mountainlion-lion-snowleopard-leopard.merged-1.sucatalog’]’ returned non-zero exit status 8
从https://github.com/foxlet/macOS-Simple-KVM和https://github.com/smtcrms/macOS-Simple-KVM可知需要执行jumpstart.sh文件,我试着在PVE6中运行foxlet和smtcrms的jumpstart.sh、fetch-macos.py并根据反馈修改文件,但是我没有语法基础,看不懂程序脚本,不能正确修改以使程序脚本正确运行得到MACOS系统文件。
Hi again thanks. It actually worked when doing save as from your link here provided, not when doing so when being on the GitHub page.
Does this script download the image on a specific place ? I’m unable to find it in my downloads folder, nor from the external volume from which i launched the script.
This is what i have in terminal :
Choose a product to download (1-6): 1
% Total % Received % Xferd Average Speed Time Time Time Current
Dload Upload Total Spent Left Speed
100 463M 100 463M 0 0 639k 0 0:12:22 0:12:22 –:–:– 669k
It says 100% downloaded but still giving current speed ?
found it. It’s actually a file called BaseSystem.dmg and downloads directly to one’s home folder.
I’ve followed this guide on my proxmox node i run at work for fun, proxmox 6.0-5. I can get the VM to boot up and it appears to boot fine and make it to the hard drive format/selection screen, but there is something wrong with the display. It only occupies the top third of the screen and is striped across the NoVNC console window like there’s a bad VGA cable connected to a monitor. Not sure how to describe it. The first picture in this article is fairly similar to what i see: https://ccm.net/faq/6495-monitor-issue-flickering-or-waves
I’ve tried changing the display option under Hardware and changed the resolution in the OVMF bios but still no luck. Any ideas what could be going on?
You need to select “restart computer” the first time that Clover appears per cold-boot in order to have the resolution applied.
Worked like a charm, can’t believe i overlooked that one little step. Thank you so much, fantastic walk-through!
According to your instructions: “After the first stage of installation, the VM should reboot itself and automatically continue installation by booting from the hard drive, then reboot itself a second time and automatically boot from “filevault prebooter”. ”
….I’m trying for the n-th time to install OSX on Proxmox (tried multiple times following the Mojave tutorial)! Each and every time I’m facing the same issue: once the machine reboots after the first stage of the installation completes, it simply boots again into Clover where I am seeing the same option as before (“Boot macOS Install from macOS Base System”).
No matter what I change, I keep facing the same issue…and obviously changing the boot order breaks things even more.
Not sure at this point how to proceed! Any help is appreciated, and of course THANK YOU for the very elaborate tutorial.
You can solve this issue by hitting F2 to enter the UEFI setup, and picking one of the other options on the Boot Manager to boot from. I don’t know why this happens for some people and not others (it doesn’t happen for me).
Embarassed to say that I didn’t try this obvious option :). Works like a charm now. Thank you again!
Hmm, I had the same issue. Clover wasn’t recognizing my boot drive after installation. I used the build of Clover here: https://github.com/foxlet/macOS-Simple-KVM and it worked however.
Have to say I don’t understand why though, the version of Clover here as well as the one in kholia’s repo is not working for me – doesn’t detect my disk after installation. I have used the instructions in kholia’s repo before with success, but ran into this issue for the first time with the new Clover version.
From what I can see the Clover in the Simple KVM repo is also 5070, so strange. Also I’m using Ubuntu so that might make a difference. Just thought I’d mention this here in case others run into the same problem.
Can you check Disk Utility and see what partition type you ended up with? GPT?
You can fix this one by editing the boot menu in the UEFI settings, but the reason why this helps out is a mystery.
Yeah, it’s GPT.
I’ll try that. Also I compared the contents of qcow2 image from the repo with yours and the main difference is that they have an apfs.efi file in there. I tried creating a new Clover image, which still wasn’t able to detect the drives on boot, but after adding apfs.efi it could.
I think that apfs.efi used to be added in older Clover versions but it’s not in the newer one, there’s just ApfsDriverLoader.efi now. So whoever built that image must have left the old files there. Don’t know why it can’t automatically detect the disk with just ApfsDriverLoader.efi though.
Interesting…
I just came back to the old tutorial to start building my Catalina VM and saw the link to this new one. Thank you!
Awesome stuff – can’t wait to try this for Catalina!
According to this checkin:
https://github.com/kholia/OSX-KVM/commit/72783d8d4c0d6a6ff1b1f711b0b407f0226effa4
Mojave+ now support the QEMU VirtIO drivers:
“`
### Using virtio-blk-pci with macOS
Newer macOS (namely Mojave+) have support for some virtio drivers.
This can be enabled by applying the following change to `boot-macOS-NG.sh` to
get some performance gain.
diff
– -device ide-hd,bus=sata.4,drive=MacHDD \
+ -device virtio-blk-pci,drive=MacHDD \
“`
Is this something you could add to your guide? Have you tried with this?
Also – is there any risk or danger from using this method on older MacOS versions? (e.g. Mojave, High Sierra, Sierra, Yosemite etc.)? Will Clover 5070 work?
I’ve heard that virtio doesn’t work in the installer so it doesn’t seem worth the trouble. You’d have to toggle it back off again to install system updates.
Clover 5070 should be backwards compatible (it certainly boots Mojave).
From what I’ve read, the virtio disk driver is meant to have *significant* performance gains.
I’m fine to turn it on after the installer is run.
How should I go about doing that? Is it simply a case of changing the hardware configuration in the Proxmox GUI? Or I assume there’s something else I need to do on the config/Apple side?
Edit the VM config file to replace sata1 with virtio0, it’ll be applied on the next launch. You shouldn’t have to do anything in macOS. Run a benchmark in the guest before and after.
Curious – have you (or anybody else) tried using this guide under Redhat oVirt?
It’s another KVM-based distro – so I guess it’s similar in some ways to Proxmox.
However, would you need to make a separate OVMF patch for it? And how about things like ignore_msrs?
Could you take a machine created on Proxmox and transfer it over, or are things too different?
Use the vanilla QEMU source that my tutorial is based on:
https://github.com/kholia/OSX-KVM
They use my patched OVMF binary. You can use either my or their Clover builds freely (mine is set to 1920×1080 resolution and theirs enables Verbose boot mode by default, no other differences). You should be able to share your installed VM freely across those platforms.
Hi,
I’m having some issues with retrieving the OSK key from my mac. I have saved the first block of code from the linked website into TextEdit, and have tried to run that file from Terminal using : gcc -o smc_read.c -framework IOKit./smc_read
– and I get error flags:
ld: framework not found IOKit./smc_read
clang: error: linker command failed with exit code 1 (use -v to see invocation)
Can anyone please help for what I might be doing wrong?
Thanks
That “./smc_read” bit should be on a separate line.
Thanks ! I following your guide and all worked fine. I have trouble using imessage on this vm. I tried to look at tutorials online and i could not figure out why ? Did you get it to work on yours ?
Thanks!
Yeah getting iMessage to work requires playing around with serial numbers etc. I haven’t tried to get that working myself.
Hi,
Thank you for your reply. Sorry, I still seem to be getting an error.
My terminal input: gcc -o smc_read.c -framework IOKit
Terminal returns:
Undefined symbols for architecture x86_64:
“_main”, referenced from:
implicit entry/start for main executable
ld: symbol(s) not found for architecture x86_64
clang: error: linker command failed with exit code 1 (use -v to see invocation)
Thank you very much for your time and sorry if i’m being daft. – thank you for the guide.
Thanks
Wrong command, you need:
gcc -o smc_read smc_read.c -framework IOKit
You may need to delete smc_read.c and recreate it because it could have been overwritten.
Hi,
I’m currently trying to run Docker in a macos vm with an AMD Ryzen 5 3600, but I cannot enable nested virtualization. Following this guide (https://pve.proxmox.com/wiki/Nested_Virtualization), to enable nested virtualization it is required to add ‘host,+svm’ to the ‘-cpu’ param, instead of ‘Penryn’. But with it macos won’t boot.
Can anyone please help for what I might be doing wrong?
Thanks
Unfortunately I have not seen anybody achieve a boot with a CPU other than Penryn selected. I think the issue lies with Clover.
Maybe you can test out the new bootloader OpenCore and see if that avoids the problem?
Thank you for the reply.
Is there a way to inject nested virtualization with Penryn, but using AMD parameters?
Not as far as I know. I tried enabling this myself and got nowhere.
Can I use my real mac apple id to logon to the system? Or will I become banned then?
There’s no problem logging on to iCloud, but you will want to set up your SMBIOS to your liking first in Clover Configurator, because Apple doesn’t like it when your serial number changes around later on.
I’m logged in on my Apple ID.
Thank you!! Can you recommend a tutorial for that?
Sorry, I don’t know of one. In my case I basically just went Clover Configurator -> “Mount EFI” tab -> Mount the EFI partition of the hard disk -> Open the EFI/CLOVER/clover.plist file from the mounted EFI partition -> On SMBIOS tab, choose iMac 14,2 on the dropdown at the right side -> Save Changes -> Reboot.
My vm wont start, I ran the updates in the container and it built.
Getting this error
TASK ERROR: start failed: command ‘/usr/bin/kvm -id 104 -name catalina -chardev ‘socket,id=qmp,path=/var/run/qemu-server/104.qmp,server,nowait’ -mon ‘chardev=qmp,mode=control’ -pidfile /var/run/qemu-server/104.pid -daemonize -smbios ‘type=1,uuid=f10ed6af-22cb-47bc-8be5-4e72387da295’ -smp ‘4,sockets=1,cores=4,maxcpus=4’ -nodefaults -boot ‘menu=on,strict=on,reboot-timeout=1000,splash=/usr/share/qemu-server/bootsplash.jpg’ -vga std -vnc unix:/var/run/qemu-server/104.vnc,x509,password -cpu ‘Penryn,+kvm_pv_unhalt,+kvm_pv_eoi,enforce,vendor=GenuineIntel’ -m 8192 -device ‘isa-applesmc,osk=’ -smbios ‘type=2’ -cpu ‘Penryn,kvm=on,vendor=GenuineIntel,+kvm_pv_unhalt,+kvm_pv_eoi,+invtsc,vmware-cpuid-freq=on,+pcid,+ssse3,+sse4.2,+popcnt,+avx,+aes,+xsave,+xsaveopt,check’ -device ‘usb-kbd,bus=ehci.0,port=2’ -device ‘pci-bridge,id=pci.1,chassis_nr=1,bus=pci.0,addr=0x1e’ -device ‘pci-bridge,id=pci.2,chassis_nr=2,bus=pci.0,addr=0x1f’ -device ‘piix3-usb-uhci,id=uhci,bus=pci.0,addr=0x1.0x2’ -device ‘usb-tablet,id=tablet,bus=uhci.0,port=1’ -iscsi ‘initiator-name=iqn.1993-08.org.debian:01:79ed8a47b443’ -drive ‘file=/var/lib/vz/template/iso/Catalina-installer.iso,if=none,id=drive-ide0,cache=unsafe,format=raw,aio=threads,detect-zeroes=on’ -device ‘ide-hd,bus=ide.0,unit=0,drive=drive-ide0,id=ide0’ -drive ‘file=/var/lib/vz/template/iso/clover-r5070.iso,if=none,id=drive-ide2,cache=unsafe,format=raw,aio=threads,detect-zeroes=on’ -device ‘ide-hd,bus=ide.1,unit=0,drive=drive-ide2,id=ide2’ -device ‘ahci,id=ahci0,multifunction=on,bus=pci.0,addr=0x7’ -drive ‘file=/dev/pve/vm-104-disk-1,if=none,id=drive-sata0,format=raw,cache=none,aio=native,detect-zeroes=on’ -device ‘ide-drive,bus=ahci0.0,drive=drive-sata0,id=sata0,bootindex=102’ -netdev ‘type=tap,id=net0,ifname=tap104i0,script=/var/lib/qemu-server/pve-bridge,downscript=/var/lib/qemu-server/pve-bridgedown’ -device ‘e1000,mac=,netdev=net0,bus=pci.0,addr=0x12,id=net0,bootindex=300” failed: exit code 1
My config file looks like this:
args: -device isa-applesmc,osk=”” -smbios type=2 -cpu Penryn,kvm=on,vendor=GenuineIntel,+kvm_pv_unhalt,+k$
balloon: 0
bootdisk: sata0
cores: 4
cpu: Penryn
cpuunits: 1000
ide0: local:iso/Catalina-installer.iso,cache=unsafe
ide2: local:iso/clover-r5070.iso,cache=unsafe
memory: 8192
name: catalina
net0: e1000=,bridge=vmbr0
numa: 0
ostype: other
sata0: local-lvm:vm-104-disk-1,size=100G
scsihw: virtio-scsi-pci
smbios1: uuid=
sockets: 1
I have removed the UUID text, MAC text and the OSK
Exit code 1 with no error message? Weird. Try running this to bypass Proxmox’s launch wrapper, it may show the real error message:
qm showcmd 104 | bash
Turns out I forgot to add efi disk since I am using 5.2.1, I had to do it manually.
Okay now I am able to start my vm. I changed the graphics settings and I am getting stuck on the apple logo with no progress bar. Centered apple logo. What to do from here?
https://imgur.com/a/wcwsliy
Running with -v option gets this result.
That’s caused by not installing the patched OVMF package properly, check that process again.
I reinstalled OVMF but this time using the prebuilt package. Install seemed successful, is there a way to test? I am getting the prohibitted sign after being stuck on this https://imgur.com/a/VCQcVql .
check out if you have the following in your vm config.
my generated vm config missed “boot: cdn”
and therefore i had the same error.
Best
Max
Made it even further, updated to proxmox 6 and on the reboot after making the disk in disk utility I am getting stuck on prebooter. However on the install screen my keyboard does not work, even when I pass in a hardware keyboard.
Boot with Verbose mode. If it’s hanging on waiting for DSMOS, your OSK is wrong.
Are you connecting through SPICE, or the default web VNC?
Your posted config is missing vga:vmware and has the wrong network adapter. You need to add machine:q35 too.
Thanks for the reply,
So I am using proxmox 6 now, and the config files look the same and I am able to follow the steps exactly. I am using vga:vmware aswell. Does this not work with No VNC?
Post your new config.
Works fine with no vnc.
Is it normal for the configuration file to change after going through the installation. The config file looks really different now, missing a few lines at the beggining. I am going to restart the process and if it does not work ill post the cfg.
Alright, so I got to the point where I was into macOS, ran dd.. to copy the efi partition which it did without error but when I go to reboot after removing the clover and catalina iso, it gets hung on this screen. https://imgur.com/a/JhXf9ti
I am unable to get into clover even after readding the clover drive and booting to that, get the same error as above.
Did you edit the boot order in the VM settings?
Hit F2 during guest boot and try picking another boot drive.
Nick,
FYI: I am running Proxmox on a 2013 Mac Pro. While it did install Catalina following your instructions, I later changed the processor to “host”, assuming that a real Mac ought to work.
It did.
Nice one! That’s good to know. It should definitely be possible to do some Clover magic to get my CPU working as “host” I reckon…
Is there a way to install this without owning a mac? Im a hackintosher and wanting to try this out especially pci and usb passthrough. Im currently stuck on the OSK authentication key
Yes, Kholia’s OSX-KVM project on GitHub has the OSK written into the VM config files so you can nab it out of there.
Oops! Never noticed that. Will try it out. Thank you. And thanks for the guide! I’ve been searching for one for proxmox and so far yours is the only one. Very good for first timers to such setup.
Hi, a friend of mine is trying to get proxmox 6 installed in order to host a Cataline VM. He used the following tutorial (in French) : https://community.capensis.org/t/nouveautes-installation-et-configuration-de-proxmox-5-2/133
He said installation went ok and managed to update to proxmox to latest version.
Problem begins when he tries to connect to the proxmox server. He tried to do so from his Windows 10 M.2 drive (proxmox is installed on SATA SSD) but is unable to connect to the address the tutorial provided :
https://:8006/
note : this time he didn’t use 192.168.0.253:8006 but his own internal ip address on our network. Could that be the issue ? Is 192.168.0.253:8006 the default address for any proxmox installation?
Thanks for any help before we proceed with Catalina VM…
Thank you for sharing details about your experience with installing Mojave/Catalina on Proxmox. The world needs more people like you.
The reason I am contacting you is because I am debating building a hackintosh or trying to setup Proxmox. I have fair knowledge of PC/Mac software/hardware but not a programmer or know much about hackintosh or virtualization. Frightening I know considering I will be building a hackintosh or VM machine and want to go Proxmox for a simple Mac OS and Win 10 VM parallelization with RAID 1 setup.
I am in windows most of the day working with hardcore real time trading software and later working in Mac OS doing 4k FCPX editing. I want virtualization to run both OSs in parallel. I tried software VM but it just doesn’t cut it for my needs.
Would you recommend someone like me and what I want to do with VM go Proxmox or VM at all? For a VM beginner is this a sound idea or am I asking for constant problems because of my little knowledge of VMs and little programming skills?
Thanks for sharing, I look forward to your reply.
You’ll need a system that supports passthrough of two video cards simultaneously to pull that off, and one of those needs to be a compatible AMD card for macOS to use. What are you planning to use?
Finally managed to figure it out, by connecting to the proxmox server from another physical computer (not from another HD on the same tower). But now I’m getting stuck at the clover image upload :
and upload it to Proxmox’s ISO store at /var/lib/vz/template/iso
how do I do this? Is it done from the proxmox server GUI or from the proxmox terminal window ? Thanks for a step-by-step tut…
You can download the file from Proxmox’s terminal using wget or upload it to Proxmox from another machine using SSH/SFTP.
Also having trouble with fetching my Mac authentication key. When pasting the code in Terminal, it started downloading Xcode, but then what ? I pasted it again and am getting error :
smc_read.c:1:1: error: expected identifier or ‘(‘
{\rtf1\ansi\ansicpg1252\cocoartf2511
That looks like it copied as rich text (coloured/styled). You need to save it as plain text.
thanks. Just did that with Word, saving as .txt.
When launching command in terminal getting another error :
ld: can’t open output file for writing: smc_read, errno=21 for architecture x86_64
clang: error: linker command failed with exit code 1 (use -v to see invocation)
Sounds like you’re in a directory you don’t have permission to write to. Change into your home directory or something.
But I did so. The file is in my home directory and I repaired permissions, of no avail…
What command are you running exactly?
First the total commande :
xcode-select –install # If you don’t already have gcc
gcc -o smc_read smc_read.c -framework IOKit
./smc_read
yielding me error. Then retried with just
gcc -o smc_read smc_read.c -framework IOKit
./smc_read
also yielding me error.
But I found a workaround here :
https://www.youtube.com/watch?v=uqspKdSieSY
where I could DL a terminal script for fetching the OSK key :
https://www.youtube.com/redirect?q=https%3A%2F%2Fwww.dropbox.com%2Fs%2Ftyakzgtn6h0hdd8%2Fsmc_read.zip%3Fdl%3D0&redir_token=bolPUYczSoQOv5_h1USj3oVlExd8MTU3NDE4MDEwMkAxNTc0MDkzNzAy&v=uqspKdSieSY&event=video_description
https://www.youtube.com/redirect?q=https%3A%2F%2Fmega.nz%2F%23%21fl1ywBYA%21ZGqx4JSU6XDrvg0ZAwQ8fYnzpTJT75Myv3xOsRGj-Bk&redir_token=bolPUYczSoQOv5_h1USj3oVlExd8MTU3NDE4MDEwMkAxNTc0MDkzNzAy&v=uqspKdSieSY&event=video_description
This time it worked. Maybe you could integrate this in your tutorial for noob-dummies as me ?
Are you able to use iMessage at all? I’m successfully signed on to iCloud, but couldn’t not get iMessage to activate.
Last time I tried it, it didn’t work for me. However, there are a lot of Hackintosh guides out there for fixing iMessage. I haven’t tried to fix it myself because I don’t use iMessage.
Situation is this : I would like to have proxmox on my 120Go SSD (done), but all VMs and their storage on a separate NVME SSD, but how should I proceed for this before trying to install the VM?
Also, I can only connect to my proxmox server from a different physical computer. After installation, will I be able to boot into proxmox just from the PC where I installed it ?
Let’s imagine you want to format the new drive ZFS. Select your node in the tree on the left, and go to Disks -> ZFS, click Create: ZFS. Give it a name, select the disk you want to erase, and click Create.
>After installation, will I be able to boot into proxmox just from the PC where I installed it ?
I mean, not exactly, as Proxmox is designed to run as a headless server. You have two options for achieving that. You could try installing a Desktop Environment into Proxmox:
https://pve.proxmox.com/wiki/Developer_Workstations_with_Proxmox_VE_and_X11
Note that anything there that mentions Debian Jessie is out of date, Proxmox 6 is now based on Debian Buster.
Or if your hardware supports device passthrough (e.g. Intel VT-d) you can do what I do and pass through your host’s video card and USB controller directly to macOS. This is the highest performance option if your video card is actually supported by macOS:
https://pve.proxmox.com/wiki/Pci_passthrough
https://www.nicksherlock.com/2018/11/my-macos-vm-proxmox-setup/
hi and thanks for the reply. I’m not there yet… will try to link 2 screenshots.
Basically, when selecting the node (installed on my 120Go ssd) and doing what you say, I’m getting an empty device window (no unused disk).
When going to the disk list, I can see my 2 NVME’s :/dev/nvme0n1 : on this one I have my windows 10 OS installed (not VM)
/dev/nvme1n1 : here I would like to install my proxmox VM’s
https://screenshot.net/5x5vza6
https://screenshot.net/w20eytg
Hi, in the meantime I found another tutorial to make my NVME disk recognized in the disks menu in the node. I’m stuck in the stage for patching the OVMF file. Followed your tut and managed to edit with Bbedit, but then I don’t know how to execute the command.
I put the.deb file here :
/var/lib/vz/template/iso
Then, when going to the shell window on the now, how do I execute your commands?
Sorry, correction : I had put it through FileZilla in /dev
but then I’m lost + have the impression that when navigating on proxmox server through Filezilla and coming back to /dev directory, the file is gone…
Don’t store files in /dev, that’s for special devices. /root is a handy spot since that’s the home directory for the root user.
Ok, got a step further.
Managed to set the screen resolution to 1920×1080 and booted into clover but then getting error msg. See screenshot.
https://screenshot.net/z26rwcw
ok, put the .conf file in /root, but still stuck in booting up VM for first time.
Wondering whether it’s some error in the .conf file ?
In first try, final result was a bit different than in your screenshot (using Bbedit) :
args: -device isa-applesmc,osk=… -smbios type=2 -cpu Penryn,kvm=on,vendor=GenuineIntel,+kvm_pv_unhalt,+kvm_pv_eoi,+invtsc,vmware-cpuid-freq=on,+pcid,+ssse3,+sse4.2,+popcnt,+avx,+aes,+xsave,+xsaveopt,check -device usb-kbd,bus=ehci.0,port=2
bios: ovmf
boot: cdn
bootdisk: ide2
cores: 5
cpu: Penryn
efidisk0: SSD:vm-153-disk-1,size=128K
ide0: local:iso/Catalina-installer.iso,cache=unsafe,size=2096996K
ide2: local:iso/clover-r5070.iso,cache=unsafe
machine: q35
memory: 8000
name: Catalina
net0: vmxnet3=1A:53:24:B0:93:99,bridge=vmbr0,firewall=1
numa: 0
ostype: other
sata0: SSD:vm-153-disk-0,cache=unsafe,discard=on,size=400G,ssd=1
scsihw: virtio-scsi-pci
smbios1: uuid=212d39ad-6e3b-4d5d-85af-5070225140d9
sockets: 1
vga: vmware
vmgenid: f2bed214-b7f4-441f-9b45-7777bf40188c
as you can see, there’s a few differences:
– no balloon:0 argument
– vmgenid argument
(I didn’t add the quotes for the OSK…)
i edited the resolution, and then started VM again :
this resulted in getting into the clover boot screen, but failed to show me boot up disk (see screenshot previous post).
Then I edited the file again to match exactly your example (adding balloon, quote marks for OSK and deleting vmgenid) :
args: -device isa-applesmc,osk=”…” -smbios type=2 -cpu Penryn,kvm=on,vendor=GenuineIntel,+kvm_pv_unhalt,+kvm_pv_eoi,+invtsc,vmware-cpuid-freq=on,+pcid,+ssse3,+sse4.2,+popcnt,+avx,+aes,+xsave,+xsaveopt,check -device usb-kbd,bus=ehci.0,port=2
balloon: 0
bios: ovmf
boot: cdn
bootdisk: ide2
cores: 5
cpu: Penryn
efidisk0: SSD:vm-153-disk-1,size=128K
ide0: local:iso/Catalina-installer.iso,cache=unsafe,size=2096996K
ide2: local:iso/clover-r5070.iso,cache=unsafe
machine: q35
memory: 8000
name: Catalina
net0: vmxnet3=1A:53:24:B0:93:99,bridge=vmbr0,firewall=1
numa: 0
ostype: other
sata0: SSD:vm-153-disk-0,cache=unsafe,discard=on,size=400G,ssd=1
smbios1: uuid=212d39ad-6e3b-4d5d-85af-5070225140d9
sockets: 1
vga: vmware
So, that’s as far as I can take it alone. Thanks for any help !
also deleted this scsihw argument, absent in your example
ok, have been doing some more homework in the meantime. Followed comments on your proxmox 5 tutorial where you suggested to launch VM from command line with command qm start xxx
I’m getting the following :
root@pve:~# qm start 153
kvm: -device isa-applesmc,osk=…: warning: Using AppleSMC with invalid key
so stg seems wrong with my OSK key. Any thoughts? Can you check whether the script I found is a valid one? Do I need to add the quotation marks?
When lanch clover, I don’t see the hard disk and can’t select the disk.
Do you know reason?
Can you see the installer? If not you probably forgot to remove “media=cdrom”.
Thx 4 any feedback on this, coz I’m really stuck. Did try to boot with clover but with original Catalina disk converted in iso, it got me a bit further (did have to add media=cd) : got halfway the progress bar after booting (first got the progress bar stretching over the screen bug, but this was solved after booting several times)…
What OSK did you end up with. Make sure your text editor didn’t convert straight quotes to curly quotes or (c) to a copyright symbol.
Also you have cores:5, that will probably never boot, use 4 instead.
osk=”… ”
secundo : i pasted your code
args: -device isa-applesmc,osk=”THE-OSK-YOU-EXTRACTED-GOES-HERE” -smbios type=2 -cpu Penryn,kvm=on,vendor=GenuineIntel,+kvm_pv_unhalt,+kvm_pv_eoi,+invtsc,vmware-cpuid-freq=on,+pcid,+ssse3,+sse4.2,+popcnt,+avx,+aes,+xsave,+xsaveopt,check -device usb-kbd,bus=ehci.0,port=2
in a single line while editing the .conf file. Was that the correct thing to do? Set cores to 4. Thx 4 ur feedback…
That looks okay but try retyping the OSK from scratch just in case it contains a hidden soft linebreak character.
Try removing the quotes too.
Finally discovered why I never managed to complete the conversion from .img to .iso :
hdiutil convert BaseSystem.dmg -format RdWr -o Catalina-installer.iso
mv Cojave-installer.iso.img Cojave-installer.iso
there’s an error in the command you provided : Cojave is a non-existant Os yet … : ). It did work with :
mv Catalina-installer.iso.img Catalina-installer.iso
Questions :
– any incompatibility with Asus PRIME Z390-P mobos ? I did activate the Intel (VMX) Virtualization Technology in the UEFI BIOS, this was necessary, right ?
– you suggested elsewhere to activate the -v verbose option in the clover boot screen. Where can I find the log of the failed boot in order to share it so you can see where it’s going wrong?
Host UEFI is effectively irrelevant for this because the virtualised environment doesn’t interact with it.
The verbose log is only printed to the screen as far as I know, you can capture a video. But there’s no point trying to boot if you’re still getting the invalid OSK warning.
Any way you could make the screen resolution 3840 x 1080? The ONVF does not allow selecting a resolution like that That way when I VNC from my windows machine it could scale across two of my monitors natively using RealVNC.
IIRC I have seen people patch OVMF to add additional resolutions, but I haven’t tried that myself.
Hi, I followed the steps and now I can boot the vm, but it shows the logo of apple and won’t keep going.
my .conf file
args: -device isa-applesmc,osk=”…” -smbios type=2 -cpu Penryn,kvm=on,vendor=GenuineIntel,+kvm_pv_unhalt,+kvm_pv_eoi,+invtsc,vmware-cpuid-freq=on,+pcid,+ssse3,+sse4.2,+popcnt,+avx,+aes,+xsave,+xsaveopt,check -device usb-kbd,bus=ehci.0,port=2
bios: ovmf
bootdisk: sata0
cores: 6
cpu: Penryn
efidisk0: local-lvm:vm-100-disk-1,size=128K
ide0: local:iso/Catalina-installer.iso,cache=unsafe,size=2093532K
ide2: local:iso/clover-r5070.iso,cache=unsafe
machine: q35
memory: 8192
name: Catalina
net0: vmxnet3=36:4E:2B:D0:8A:71,bridge=vmbr0,firewall=1
numa: 0
ostype: other
sata0: local-lvm:vm-100-disk-0,cache=unsafe,discard=on,size=100G,ssd=1
scsihw: virtio-scsi-pci
smbios1: uuid=…
sockets: 1
vga: vmware
vmgenid: …
Try setting cores to 4
Hey Nick,
Proxmox 6.1 is available.
Do you know already if it comes with updated pve-edk2-firmware?
If not, can we let it stay on “hold” and update Proxmox to v6.1?
Thx. alot.
Yes, pve-edk2-firmware has been updated by Proxmox to 2.20191002-1. I haven’t tested out Proxmox 6.1 yet so I’m not sure if you can just keep the hold on my older version. In the past, the OVMF version was not critical and you could use an older version without causing issues.
I’ll probably upgrade to 6.1 in the coming weeks and update this package to match.
Thx. for checking and replying.
v6.1 has a lot of goodness, so hopefully you sonn find the time to do it 😉
Nick , did you check proxmox 6.1 ? cause i think latest edk not working with this version 🙁
I’m currently running proxmox-ve 6.1-2 and pve-edk2-firmware 2.20191127-1 with no issues. You’re going to have to give more detail about what’s not working.
Sorry My bad ! I have used wrong installer iso .
I set the resolution via the OVMF resolution, as per the howto.
However, I find that the setting isn’t preserved across shutdowns/reboots.
That is, if I start the MacOS VM again – the resolution is garbled, unless I go into the OVMF menu again, and hit “Reset” through that.
I then saw your paragraph, which mentions needing to hit “Restart Computer” in the Clover menu. Do you mean that we need to do this once *every* time we boot up the VM?
Or is there any way to apply the resolution fix and have it just work?
Yes, you need to do that every time. I haven’t investigated a solution for this yet because I use a PCIe passthrough video card instead where this bug isn’t an issue.
Aha, it would be so great if there was a fix for this bug.
To provide context on use-cases, we have a test environment with multiple MacOS machines for reproducing bugs etc. The VMs are ephemeral and short-lived.
Hence, it’s not feasible to have a separate passthrough video card for each one.
Is this a bug in Clover?
No, my bet is that it is a bug in OVMF, or at least Proxmox’s version of it, because you can see that the “Proxmox” boot logo doesn’t even use the set resolution until the guest is reset one time.
Do you know who we could talk to about fixing this bug?
From what you said – it sounds like the Proxmox folks are the right ones?
Have you mentioned it to them before, or was there any earlier emails about it? Any context I can provide them that would help them?
I haven’t reported it because I haven’t narrowed down if the problem exists in OVMF (the upstream) or Proxmox’s patches to it.
Apparently you can work around the bug by patching OVMF to remove all supported resolutions except the one you need:
https://github.com/thenickdude/pve-edk2-firmware/issues/1
Hi Nicholas,
I actually asked about this on the ed2k-discuss mailing list (OVMF):
https://edk2.groups.io/g/discuss/topic/72517245
> Please talk to the Proxmox developers and/or the author of the guide you linked above. There is no bug in OVMF in the area you mention — it works just fine on QEMU, using pflash for backing the UEFI variable store. I don’t know why the 1920×1080 screen resolution doesn’t “stick” for you, using proxmox; the resolution certainly sticks when non-volatile UEFI variables are actually non-volatile.
They say it’s not an issue in the OVMF firmware? (I’m not technically qualified enough to determine if correct or not):
I also asked on the pve-devel list:
https://pve.proxmox.com/pipermail/pve-devel/2020-January/041119.html
and they’re not sure it’s an issue in their end.
But then I saw this:
https://pve.proxmox.com/pipermail/pve-devel/2020-February/041713.html
Is that related to the issue?
Anyhow – is there any chance you could jump in the above threads, or potentially give me some pointers on what to say, to try to get to the root cause of this issue?
Thanks,
Victor
I’ve replied on the edk2 list now. That Proxmox patch you linked is quite interesting, although I don’t think it applies when the EFI disk is stored on ZFS, as mine as.
Have you resolved this issue, that without gpu passthrough every time I boot I need to enter ovmf bios and hit reset to get a proper resolution.
I also use a RX 580 passthrough card… My only issue is, that this card is not activating the output until late in to the boot… So I can not access clover…
Not a problem on daily usage – I just wait for it to auto-boot in clover.. But I can not get it to update to Catalina…. And booting without the passthrough activated now fails…
(kernel freezing etc.)
Any pointers???
So you can’t boot if you disable your passthrough and set “vga: vmware” instead? Did you recently upgrade to Proxmox 6.1? If so you probably need to reinstall my patched OVMF firmware.
True – it fails to boot when using vga or std or vmware… And no, haven’t updated for ages… Actually still on 5.4.something…
Double check that the pve-edk2-firmware package is still my patched version, or it’ll hang during boot.
Maybe your macOS installation is just broken? Either that or you’ve turned on some “inject graphics” option in Clover that needs to be disabled.
Does anybody know how to send the Command key (⌘) from a Linux machine, via the NoVNC client?
I haven’t used that client myself, but normally the ⌘ key is mapped to the “Windows” key on the keyboard.
I can’t Shutdown my macos from Proxmox WebUI,
but reboot/stop function is fine.
Seems like macos doesnt response to the ACPI shutdown.
Does qemu-agent support macos?
Yep you’re right, macOS ignores ACPI shutdown. There’s no agent support for macOS either.
Not working on new proxmox 6.1!
What version of pve-edk2-firmware do you have installed? The update could have overwritten my patched version because I haven’t updated the patch for 6.1 yet. You may be able to install my old version.
I have a 6.1 lab environment and your steps have worked fine. I tried it first without the firmware change but it appears 6.1 doesn’t have that change implemented in OVMF. Reverting the OVMF firmware the one you’ve linked here worked totally fine.
Thanks for the test!
Hi there!
After installing the new prebuilt for pve v6.1, i can start up the installation of macos15.
I got the error:
** AppleSMBusPCI::start failed to get acpi path for provider
ACPI_SMB_PlatformPlugin::start – waitForService(resourceMatching(AppleIntelCPUPowerManagement) timed out
and the VM will restart to Clover.
Anybody have a idea?
conf:
args: -device isa-applesmc,osk=”…” -smbios type=2 -cpu Penryn,kvm=on,vendor=GenuineIntel,+kvm_pv_unhalt,+kvm_pv_eoi,+invtsc,vmware-cpuid-freq=on,+pcid,+ssse3,+sse4.2,+popcnt,+avx,+aes,+xsave,+xsaveopt,check -device usb-kbd,bus=ehci.0,port=2
balloon: 0
bios: ovmf
boot: cdn
bootdisk: ide2
cores: 4
cpu: Penryn
efidisk0: KVM:vm-201-disk-0,size=1M
ide0: local:iso/catalina-installer.iso,cache=unsafe
ide2: local:iso/clover-r5070.iso,cache=unsafe
machine: q35
memory: 4096
name: macos15
net0: vmxnet3=–:–…,bridge=vmbr0,firewall=1
numa: 0
ostype: other
sata0: local-zfs:vm-201-disk-0,cache=unsafe,discard=on,size=32G,ssd=1
#scsihw: virtio-scsi-pci
smbios1: uuid=…
sockets: 1
vga: vmware
vmgenid: …
I have the same problem. Who can help us?
I’ve now updated the pve-edk2-firmware deb for Proxmox 6.1:
https://github.com/thenickdude/pve-edk2-firmware/releases
Hi, I followed your steps to set the resolution to 1920×1080 in bios and reset, it works, but if I shutdown the VM and start again in WebUI, the screen resolution drop down to 1024×768 or somewhat again, I checked in bios, the resolution had been saved to 1920×1080 but the VM just don’t run properly, Apple logo be off-centre…
Yep that’s right, you need to hit “restart computer” the first time that Clover appears after a cold boot in order for the resolution to actually be applied. That’s for every cold boot.
Thanks for the reply. So, no way to avoid a restart?
Another question, how to make a physical USB port always assigned to VM, from the document, only connected devices can be assigned to VM. I tried to add PCI USB controller to VM, but it seems the macOS can not recognize the hardware.
This user created a fork of the EFI firmware which deletes support for every resolution except the one you want to use, which “fixes” this screen resolution issue:
https://github.com/thenickdude/pve-edk2-firmware/issues/1
As for passing specific ports, there doesn’t seem to be a good way to do this with QEMU’s USB passthrough. You can pass ports by their bus identifier, but these identifiers change as hubs come and go which renders them nearly worthless (e.g. plugging in a keyboard with an integrated hub can cause them to be renumbered).
Buy a supported PCIe USB card instead, I’m using a specific Inatek card with a Fresco Logic FL1100 chipset that is supported by macOS out of the box:
https://www.nicksherlock.com/2018/11/my-macos-vm-proxmox-setup/
Thanks for your help!
I have one thing for sharing: I had succeed passing through a RX580 to VM, today I replace RX580 with a RX550 without any configuration modified, and I can successfully boot into macOS and RX550 also works! It seems like I don’t have to add verdor/device ids to /etc/modprobe.d/vfio-pci.conf files, Proxmox would bind the vfio drivers automatically when the VM need it. (of course amdgpu driver is in the blacklist)
In my install Clover boots fine. When I press Enter it starts to load the Mac OS but the progress bar only gets about 2 thirds of the way and then the VM resets itself and boots back to Clover. Any thoughts on what I can check? Running ProxMox 6.0-4.
Make sure you have the correct OSK specified. If you start your VM from Proxmox’s command line like “qm start 1xx” you may see a warning about a bad OSK, which is triggered if the OSK is not the exact right length, which indicates that there’s some bad character in there.
Also I’m assuming that the progress bar displayed fine and was not smeared across the screen – if it was smeared you missed the bit about setting the UEFI screen resolution (once in total for the VM) and selecting Restart Computer from Clover’s menu (once per VM cold boot).
start failed: command ‘/usr/bin/kvm -id 102 -name Catalina -chardev ‘socket,id=qmp,path=/var/run/qemu-server/102.qmp,server,nowait’ -mon ‘chardev=qmp,mode=control’ -chardev ‘socket,id=qmp-event,path=/var/run/qmeventd.sock,reconnect=5’ -mon ‘chardev=qmp-event,mode=control’ -pidfile /var/run/qemu-server/102.pid -daemonize -smbios ‘type=1,uuid=7f9b690a-50b7-4bd7-a8bf-b46e07ce5c66’ -drive ‘if=pflash,unit=0,format=raw,readonly,file=/usr/share/pve-edk2-firmware//OVMF_CODE.fd’ -drive ‘if=pflash,unit=1,format=raw,id=drive-efidisk0,file=/dev/pve/vm-102-disk-1’ -smp ‘8,sockets=2,cores=4,maxcpus=8’ -nodefaults -boot ‘menu=on,strict=on,reboot-timeout=1000,splash=/usr/share/qemu-server/bootsplash.jpg’ -vga none -nographic -cpu ‘Penryn,+kvm_pv_unhalt,+kvm_pv_eoi,enforce,vendor=GenuineIntel’ -m 8192 -device ‘vmgenid,guid=c5ab6ab0-b0fe-4a8b-a66b-8b73930c4452’ -readconfig /usr/share/qemu-server/pve-q35-4.0.cfg -device ‘usb-tablet,id=tablet,bus=ehci.0,port=1’ -iscsi ‘initiator-name=iqn.1993-08.org.debian:01:6bb599d525ae’ -drive ‘file=/var/lib/vz/template/iso/Catalina-installer.iso,if=none,id=drive-ide0,cache=unsafe,format=raw,aio=threads,detect-zeroes=on’ -device ‘ide-hd,bus=ide.0,unit=0,drive=drive-ide0,id=ide0’ -drive ‘file=/var/lib/vz/template/iso/clover-r5070.iso,if=none,id=drive-ide2,cache=unsafe,format=raw,aio=threads,detect-zeroes=on’ -device ‘ide-hd,bus=ide.1,unit=0,drive=drive-ide2,id=ide2’ -device ‘ahci,id=ahci0,multifunction=on,bus=pci.0,addr=0x7’ -drive ‘file=/dev/pve/vm-102-disk-0,if=none,id=drive-sata0,cache=unsafe,discard=on,format=raw,aio=threads,detect-zeroes=unmap’ -device ‘ide-hd,bus=ahci0.0,drive=drive-sata0,id=sata0,rotation_rate=1’ -netdev ‘type=tap,id=net0,ifname=tap102i0,script=/var/lib/qemu-server/pve-bridge,downscript=/var/lib/qemu-server/pve-bridgedown’ -device ‘vmxnet3,mac=3A:7E:2D:FE:E5:EC,netdev=net0,bus=pci.0,addr=0x12,id=net0’ -machine ‘type=pc-q35-4.0.1’ -device ‘isa-applesmc,osk=…’ -smbios ‘type=2’ -cpu ‘Penryn,kvm=on,vendor=GenuineIntel,+invtsc,vmware-cpuid-freq=on,+pcid,+ssse3,+sse4.2,+popcnt,+avx,+aes,+xsave,+xsaveopt,check’ -smp 32, ‘sockets=2,cores=8,threads=2” failed: exit code 1
There’s supposed to be no “s” in Apple Computer Inc.
Also vga needs to be set to vmware.
lol – it was the extra S – thanks for pointing that out! I’m going through the installation of the OS now.
Hey Nick, have you had any issues after upgrading to 6.1? I’m currently on 6.1-5 with the 5.3 kernel, and I can no longer boot my OS X VM. I’ve tried creating a new one from scratch, but after the initial install, after the first reboot, Clover cannot find my drive. It will only give me the option to boot the installer. From googling, it seems that this may be an issue with Proxmox in general and an issue with OVMF? Any thoughts? I’m desperate to get my VM up and running again!
Actually no, I’ve had no problems with 6.1, kernel version 5.3.10-1-pve.
For that missing drive problem, that is a problem that some people had even before the kernel update, and I don’t know what causes it. You can apparently fix that by picking a different boot disk in the UEFI settings menu’s boot options (though why this should fix anything is a mystery!).
Ok so super odd…I wasn’t exactly sure where to go to access those UEFI settings….so I booted my VM, hit escape right away….didn’t do anything but just scrolled to ‘continue’…it booted clover and showed all my drives?! Continuing on with the install now and we’ll see how it goes.
Hm in that case maybe the secret is just delaying the boot long enough that the disk is “ready” for Clover to read…
Excellent guide thank you very much! I am experiencing how it currently looks to me slow disc performance. Do you have any idea how to handle this? I have installed Catalina sucessfully, but when I copy/paste , or mount unmount devices read/write speeds are slow. I am having fast boot tho, and system is installed on SSD drive, which should perform well.
Maybe there is some kext driver which could improve things? 🙂
Thanks!
Catalina now supports virtio-blk to some extent, so you can try replacing “sata0” with “virtio0” in your VM config. In theory it should be slightly more efficient.
What storage type are you using for the VM disk, are you using qcow2 or one of the raw options like ZFS zvols?
Is it OK that I dont see virtio drive in Hardware under proxmox web admin? I think there should be one entry?
I have edited my vm.conf file as you stated, speficically those 2 rows:
bootdisk: virtio0
virtio0: local-lvm:vm-103-disk-0,backup=0,cache=unsafe,discard=on,size=40G,ssd=1
VM installed disk (SATA0 SSD emulated is lvmthin). I think this was default one when I initially installed proxmox 4.X.X few years ago. Would you consider changing storage type to LVM or some other?
On LVM-thin, disk operations that need to grow the volume will be slower than with a pre-allocated disk, but probably not by a huge amount.
Does the virtio disk work? If so I’d just ignore the Proxmox web interface.
Have you tried any disk benchmarks in the guest to quantify how slow it is? Or is the problem just that the UI responsiveness drops when IO operations are in progress?
I have managed to enable virtio disk (,ssd=1 entry must be removed at the end). Results are not in favour of virtio
sata0, ssd enabled:
Read: ~ 220 MB/s
Write: ~2500 MB/s
virtio
Read: ~200 MB/s
Write: ~2000 MB/s
I can actually see Apple indexing Application file sizes in finder 😀 one by one, it displays application file size. I am sure this is disc issue, Blackmagic speed test application cold starts for about 10 seconds… Which storage file type you would recommend in general? LVM?
Okay I imagine those write speeds are actually just writing to the host’s disk cache.
I personally like ZFS but I doubt it outperforms LVM. LVM should be better than LVM-thin.