
This tutorial for installing macOS 13 Ventura has been adapted for Proxmox from Kholia’s OSX-KVM project and Leoyzen’s OpenCore configuration for KVM. You can get the full sourcecode of my OpenCore release on my GitHub here.
Requirements
I’ll assume you already have Proxmox 7.2 installed. You also need a real Mac available in order to fetch the OSK key.
Ventura now requires that your CPU has support for AVX2, so for Intel your CPU would have to be at least as new as Haswell. However, I have added the CryptexFixup kext to work around this restriction and allow Ventura to be used even on CPUs that don’t have AVX2 support (and merely support SSE 4.2 and AVX1). Note that the AMD graphics card drivers won’t work in this situation, and other apps that assume AVX2 is present could break too! Please see the CryptexFixup readme for details.
Modern AMD CPUs also support AVX2 and should work with this guide.
Since Monterey, your host must have a working TSC (timestamp counter), because otherwise if you give the VM more than one core, macOS will observe the skew between cores and panic when it sees time ticking backwards. To check this, on Proxmox run:
dmesg | grep -i -e tsc -e clocksource
On a working host you’ll see:
tsc: Refined TSC clocksource calibration: 3399.998 MHz
clocksource: tsc: mask: 0xffffffffffffffff max_cycles: 0x31024cfe468, max_idle_ns: 440795307017 ns
clocksource: Switched to clocksource tsc
On a broken host you’ll see:
TSC synchronization [CPU#0 -> CPU#1]:
Measured 3358870891203288 cycles TSC warp between CPUs, turning off TSC clock.
tsc: Marking TSC unstable due to check_tsc_sync_source failed
clocksource: Switched to clocksource hpet
kvm: SMP vm created on host with unstable TSC; guest TSC will not be reliable
If you have a broken TSC, this is a possible workaround. Sometimes you can simply power-cycle the host to resync the TSCs (especially if your server has a high uptime).
First step: Create an installation ISO
Download my copy of the OSX-KVM repository using the download button, and unzip it:
https://github.com/thenickdude/OSX-KVM
First we need to install some build requirements. If you will be building the installer ISO on macOS, open up the Terminal and run this command to install the commandline tools:
xcode-select --installIf you’re building the ISO on Linux, you instead need to run this command (these are the package names for Ubuntu or similar distributions, they may need adjustment on other distributions):
sudo apt install qemu-utils make
Now in the Terminal, from the root of OSX-KVM, run:
cd scripts/ventura
make Ventura-recovery.img
This will download the Ventura installer from Apple’s software distribution servers and build a Ventura-recovery.img file for you. Upload this file to your Proxmox’s ISO store directory (typically /var/lib/vz/template/iso). Although we’re putting it in the ISO directory so that we can use it with Proxmox’s ISO picker later, this a raw disk image rather than a true ISO.
If you’re building the installer on macOS, you can build a full installer instead of just a recovery, which will mean that macOS won’t have to download Ventura files during installation, and so won’t require an Internet connection. Simply ask it to build Ventura-full.img instead:
cd scripts/ventura
make Ventura-full.img
This option is not available when building the installer on Linux.
Prepare an OpenCore image
Download the OpenCore.iso.gz file from the newest release in my repository (you need v19 or newer), double click it to unpack it, and upload it to Proxmox’s ISO store at /var/lib/vz/template/iso. Although it has a .iso file extension, this is actually a hard disk image.
Fetch the OSK authentication key
macOS checks that it is running on real Mac hardware, and refuses to boot on third-party hardware. You can get around this by reading an authentication key out of your real Mac hardware (the OSK key). Save the first block of C code from this page as smc_read.c. In a command prompt, change into the same directory as that file and run:
xcode-select --install # If you don't already have gcc
gcc -o smc_read smc_read.c -framework IOKit
./smc_read
It’ll print out the 64 character OSK for you. Make a note of it.
Every Mac uses the same OSK, so don’t be surprised that it doesn’t look like a random string!
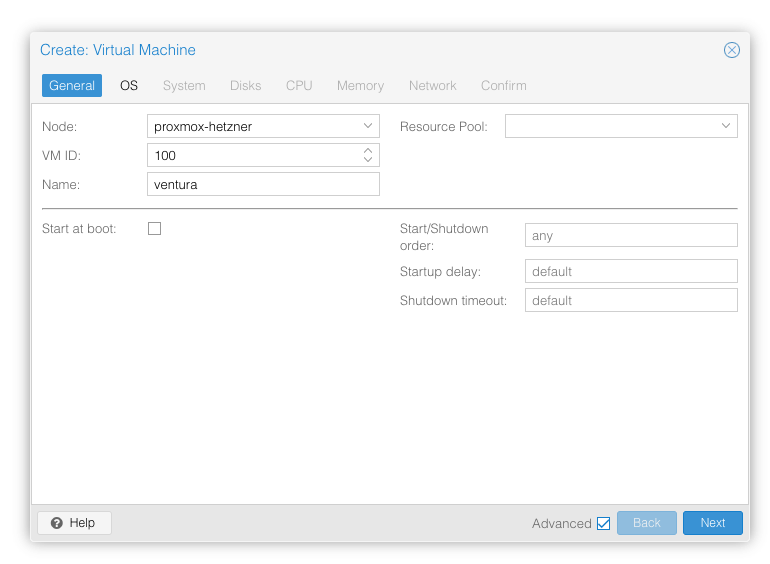
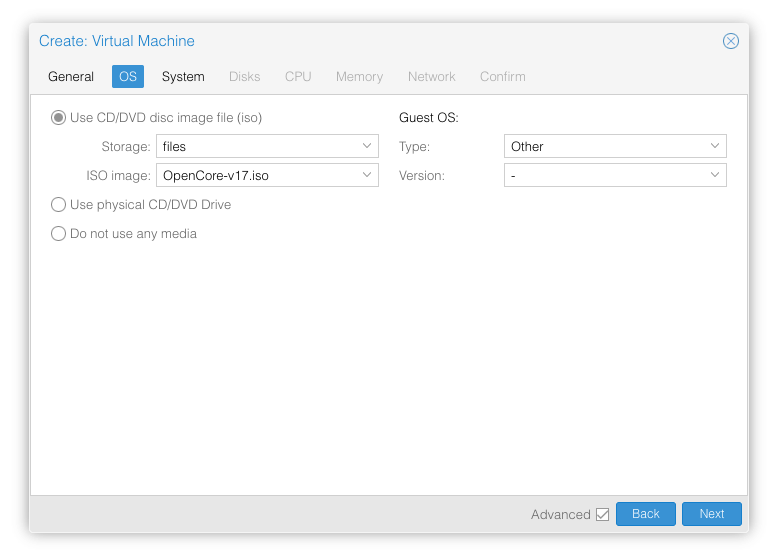
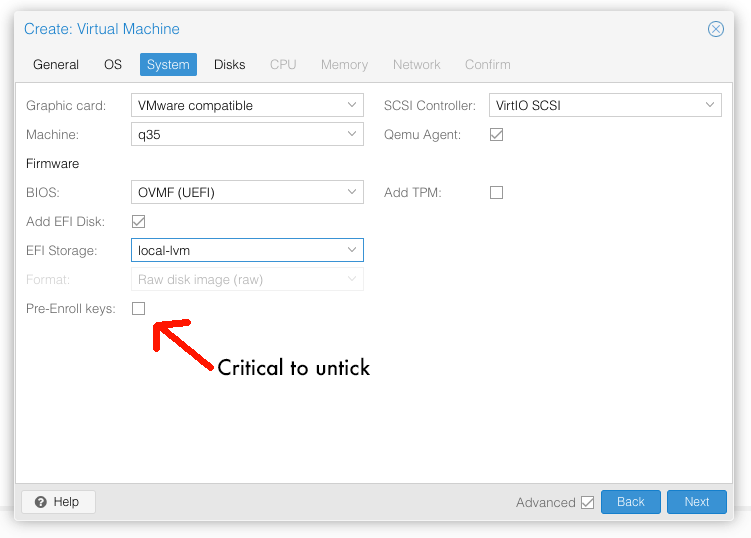
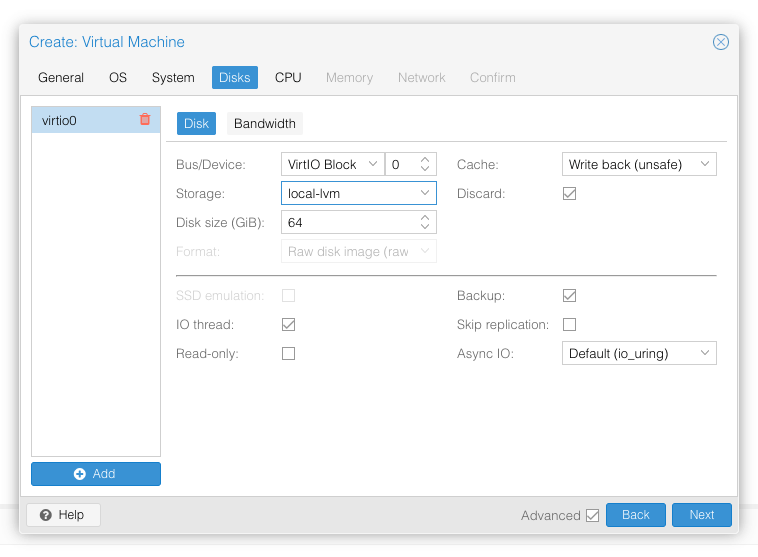
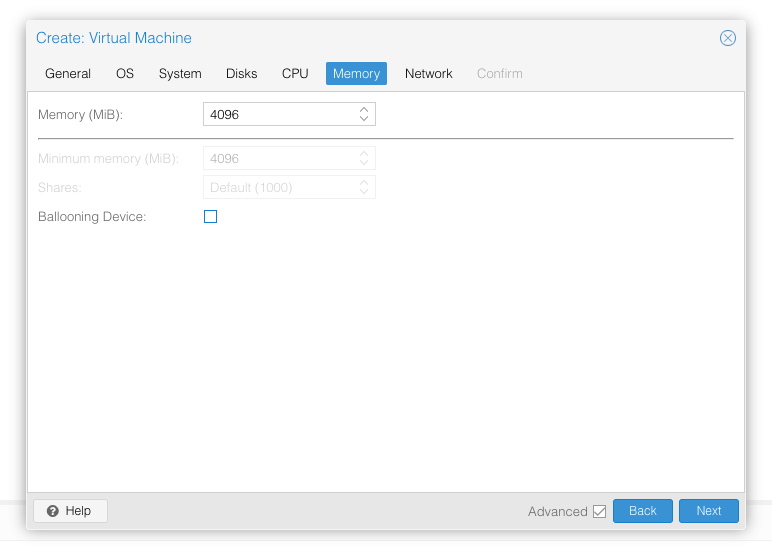
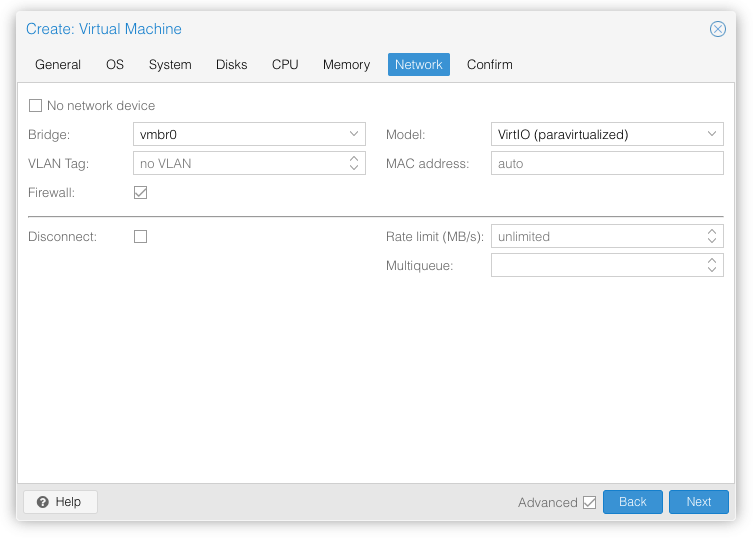
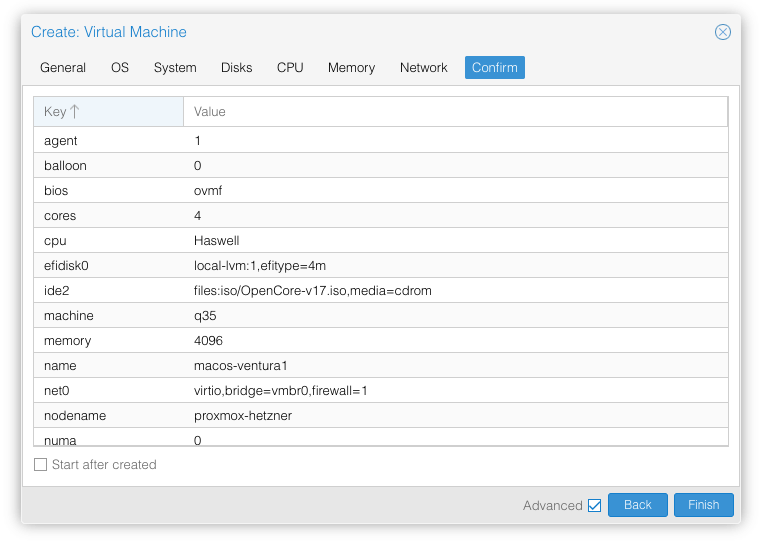
Create the VM
From the Proxmox web UI, create a new virtual machine as shown below.
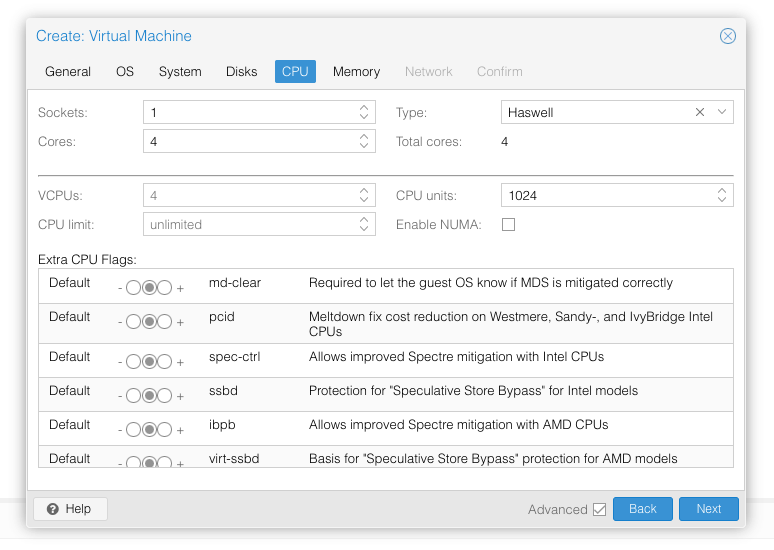
In the Options page for the VM, ensure that “use tablet for pointer” is set to “Yes” (this is the default).
In the Hardware page for the VM, add a second DVD drive at IDE0, set it to use your Ventura-full.img.
Don’t try to start the VM just yet. First, SSH into your Proxmox server so we can make some edits to the configuration files.
Edit /etc/pve/qemu-server/YOUR-VM-ID-HERE.conf (e.g. with nano or vim). Add this line, being sure to substitute the OSK you extracted earlier into the right place:
args: -device isa-applesmc,osk="THE-OSK-YOU-EXTRACTED-GOES-HERE" -smbios type=2 -device usb-kbd,bus=ehci.0,port=2 -global nec-usb-xhci.msi=off -global ICH9-LPC.acpi-pci-hotplug-with-bridge-support=off -cpu host,vendor=GenuineIntel,+invtsc,+hypervisor,kvm=on,vmware-cpuid-freq=on
A USB keyboard is added here because macOS doesn’t support QEMU’s default PS/2 keyboard. MSI has been disabled for the USB controller to fix QEMU panics when USB 3 devices are passed through. ACPI PCIe hotplug support has been disabled to fix VMs with passthrough devices.
Ensure the args are all on a single line!
You can remove the “+invtsc” feature from the -cpu list if your CPU doesn’t support it, or if you want to be able to migrate a running VM between Proxmox nodes.
On AMD you may find that the installer reboots while loading, or the loading bar doesn’t appear, if so replace “-cpu host” with “-cpu Haswell-noTSX” (I had to do this on AMD EPYC 7R13).
Now find the lines that define the two “ISOs” (ide0 and ide2), and remove the “,media=cdrom” part from them. Add “,cache=unsafe” in its place. This will treat these as hard disks rather than DVD drives.
Save your changes, return to the Options tab, and change the boot order to put IDE2 (the OpenCore image) first. Your final VM configuration file should resemble this:
agent: 1
args: -device isa-applesmc,osk="..." -smbios type=2 -device usb-kbd,bus=ehci.0,port=2 -global nec-usb-xhci.msi=off -global ICH9-LPC.acpi-pci-hotplug-with-bridge-support=off -cpu host,vendor=GenuineIntel,+invtsc,+hypervisor,kvm=on,vmware-cpuid-freq=on
balloon: 0
bios: ovmf
boot: order=ide2;virtio0
cores: 4
cpu: Haswell
efidisk0: local-lvm:vm-100-disk-0,efitype=4m,size=4M
ide0: local:iso/Ventura-full.img,cache=unsafe,size=14G
ide2: local:iso/OpenCore-v18.iso,cache=unsafe,size=150M
machine: q35
memory: 4096
meta: creation-qemu=6.2.0,ctime=1655001118
name: macos-ventura
net0: virtio=...,bridge=vmbr0,firewall=1
numa: 0
ostype: other
scsihw: virtio-scsi-single
smbios1: uuid=...
sockets: 1
vga: vmware
virtio0: local-lvm:vm-100-disk-1,cache=unsafe,discard=on,iothread=1,size=64G
vmgenid: ...
Configure Proxmox
On Proxmox, run “echo 1 > /sys/module/kvm/parameters/ignore_msrs” to avoid a bootloop during macOS boot. To make this change persist across Proxmox reboots, run:
echo "options kvm ignore_msrs=Y" >> /etc/modprobe.d/kvm.conf && update-initramfs -k all -u
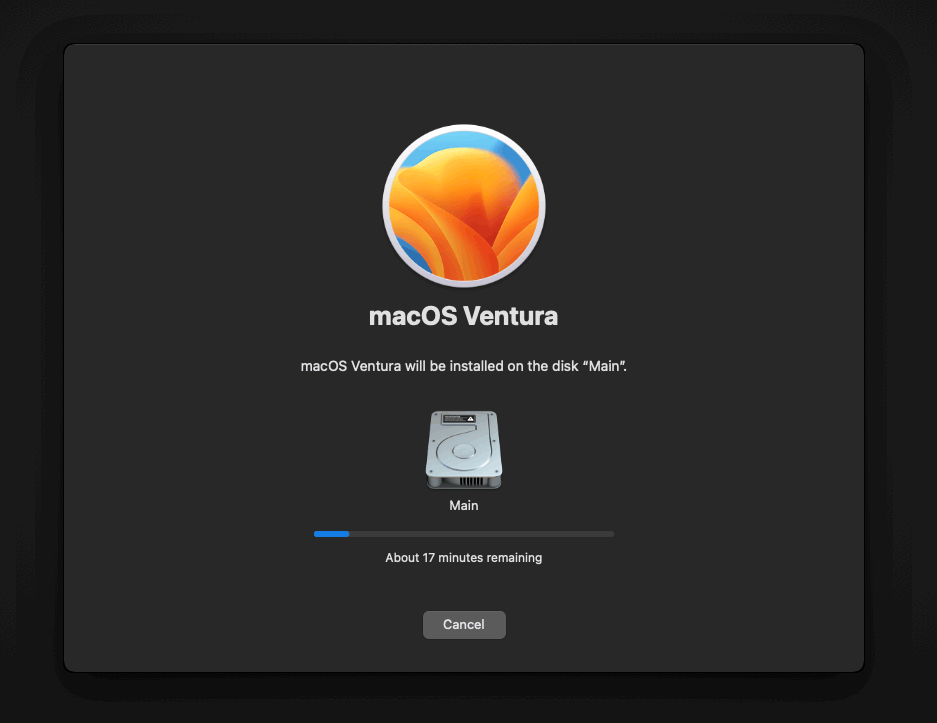
Install Ventura
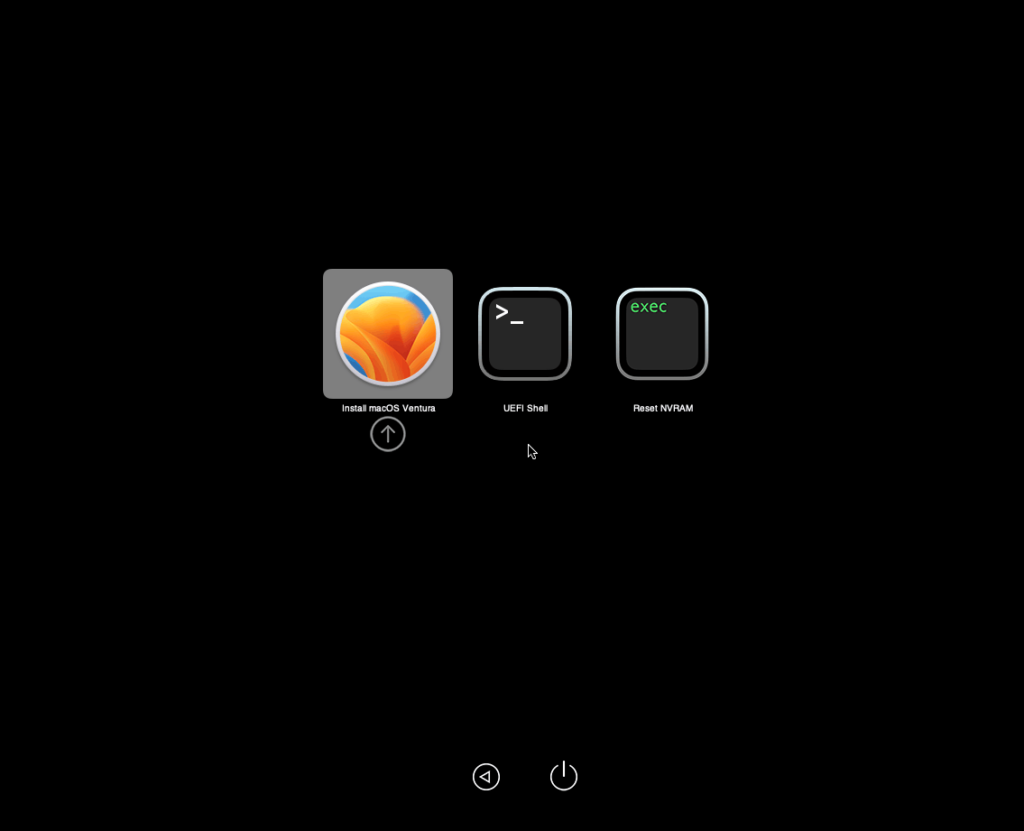
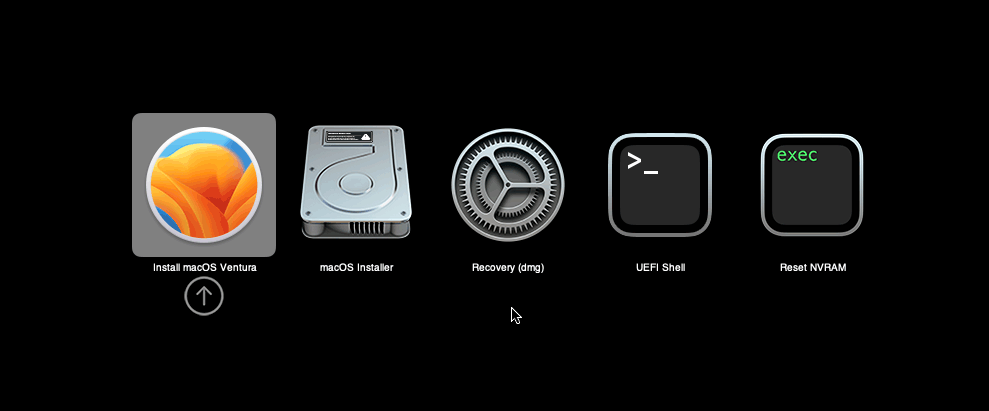
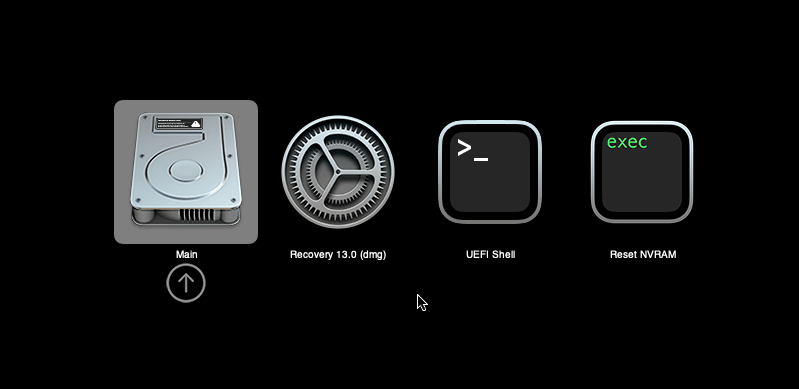
Now start up your VM, it should boot to the OpenCore boot picker:
Press enter to boot the “Install macOS 13 Ventura” entry and the installer should appear. (If your keyboard isn’t working, leave the Proxmox Console page and re-enter it)
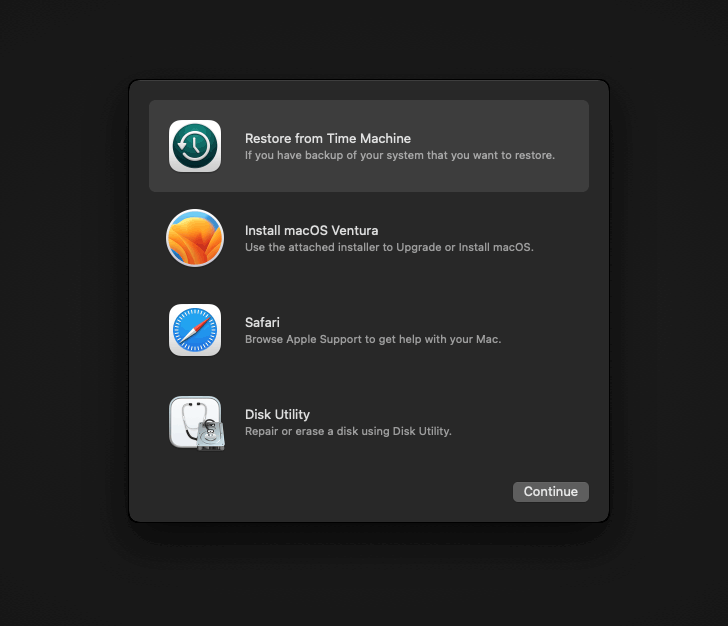
Our virtual hard drive needs to be erased/formatted before we can install to it, so select the Disk Utility option. Follow the steps below to format the disk:

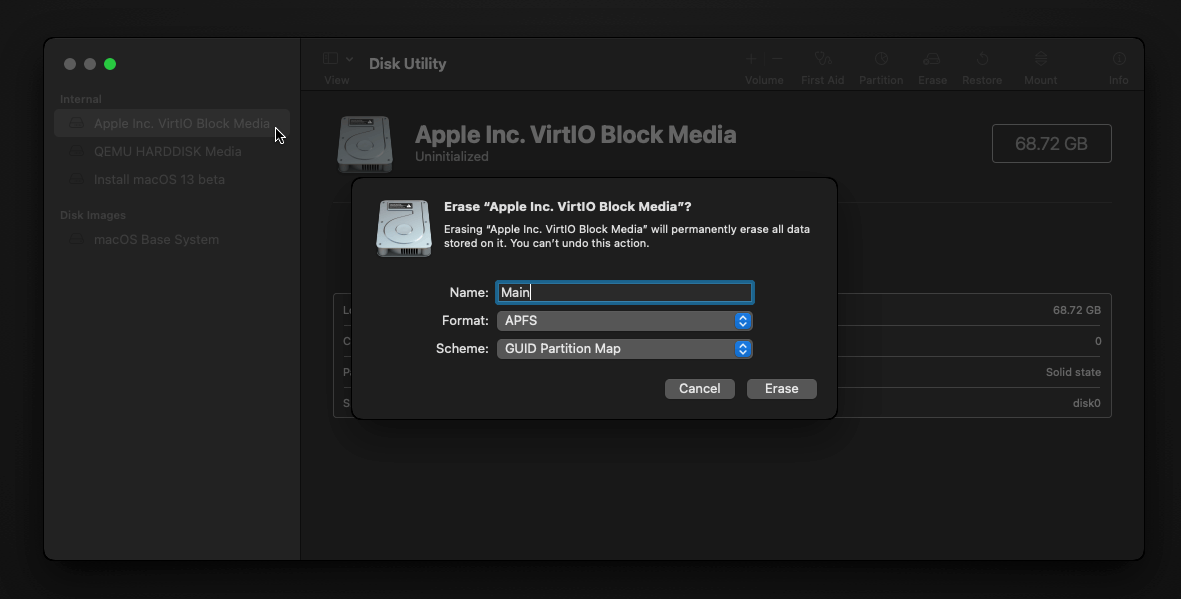
Now you can quit Disk Utility from the top menu (Disk Utility > Quit Disk Utility), and we’re ready to begin installation!
After the first stage of installation, the VM will reboot a couple of times in quick succession, and each time you must manually pick the “macOS Installer” entry (the second one here, with the hard disk icon) to continue installation. It will not be selected for you automatically:
If your keyboard isn’t responding on this screen, exit the Console tab in Proxmox and re-enter it. If you get a “prohibited” sign like this appearing, hit the Reset button on the VM to try again:

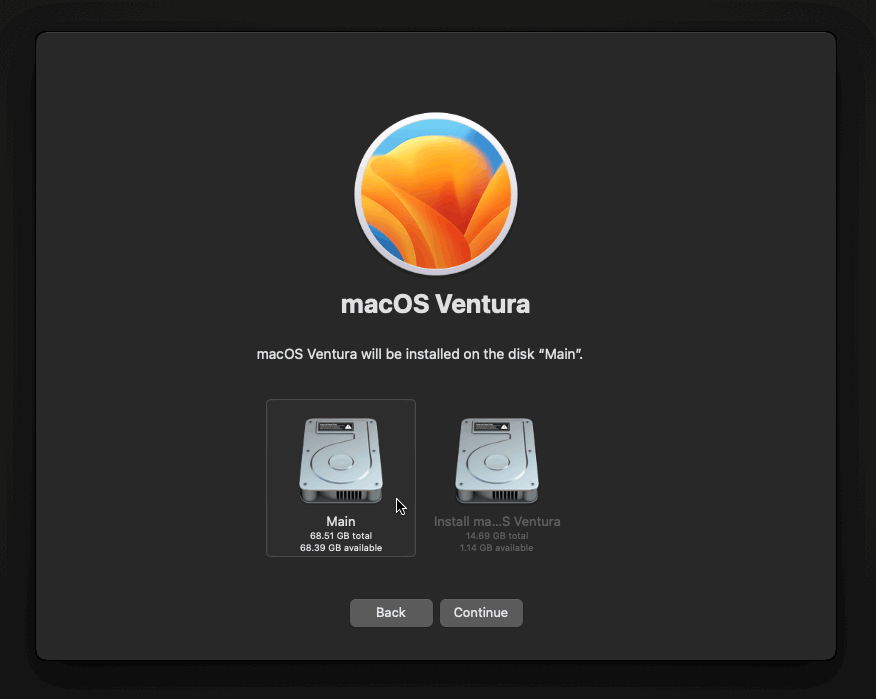
Now the installation is nearly complete and the macOS Installer entry disappears, so pick the name of your main disk to boot instead (mine’s called Main).
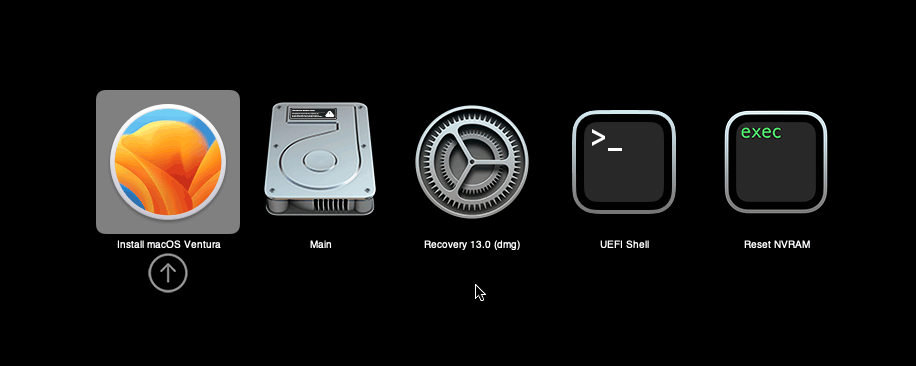
It’ll reboot a couple more times, so just keep picking the “Main” entry until you finally boot into Ventura!
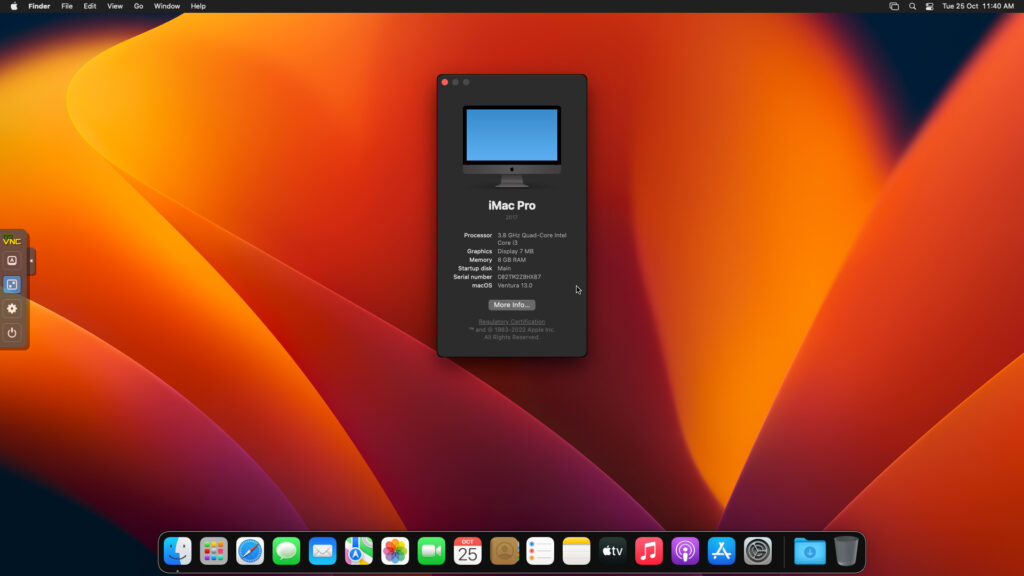
Answer the initial install questions, and you’ll be logged on! Note that you will want to hold off on logging into your Apple ID until you’ve configured your Mac’s serial number in OpenCore (because otherwise a Mac with the default shared serial number in my OpenCore image will be added to your Apple ID).
Note that it will be really sluggish for a few minutes after the first boot while the system performs housekeeping tasks.
Make the OpenCore install permanent
We’re currently booting using OpenCore from the attached OpenCore ISO. Let’s install that to the hard drive instead. Pop open Terminal and run “diskutil list” to see what drives we have available.
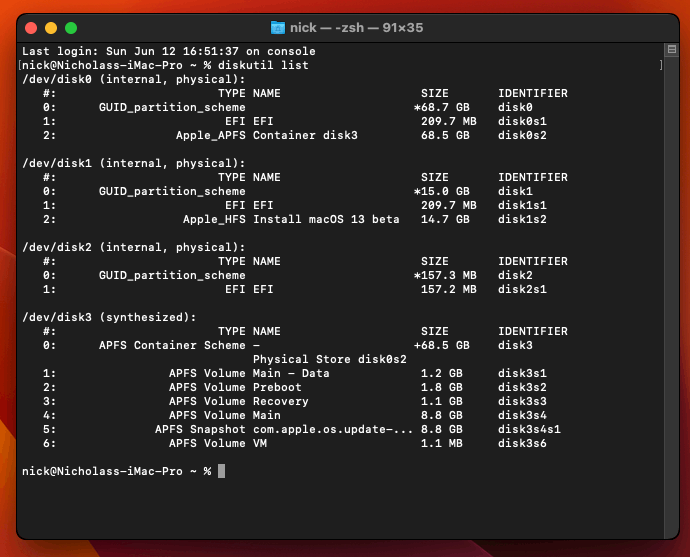
Use “sudo dd if=<source> of=<dest>” to copy the “EFI” partition from the OpenCore CD and overwrite the EFI partition on the hard disk. The OpenCore CD is the small disk (~150MB) that only has an EFI partition on it, and the main hard disk is the one with the large (>30GB) Apple_APFS “Container” partition on it.
In my case these EFI partitions ended up being called disk2s1 and disk0s1 respectively, so I ran “sudo dd if=/dev/disk2s1 of=/dev/disk0s1” (note that if you get these names wrong, you will overwrite the wrong disk and you’ll have to start the installation over again!).
Now shut down the VM, and remove both the OpenCore and the Ventura installer drives from the Hardware tab. On the Options tab, edit the boot order to place your virtio0 disk as the first disk. Boot up. If everything went well, you should see the OpenCore boot menu, and you can select your “Main” disk to boot Ventura:
Sleep management
I found that I was unable to wake Ventura from sleep using my mouse or keyboard. If you encounter the same problem, you can either disable system sleep in Ventura Energy Saver settings to avoid the issue, or you can manually wake the VM up from sleep from Proxmox by running:
qm monitor YOUR-VM-ID-HERE
system_wakeup
quit
Editing your OpenCore/EFI settings
The Configuration.pdf that explains the OpenCore config.plist file can be found along with the OpenCore release on my GitHub.
To mount your EFI partition in macOS so you can edit your config.plist, first check the “identifier” of your EFI partition in the terminal:
~$ diskutil list
/dev/disk0 (external, physical):
   #:                   TYPE NAME              SIZE       IDENTIFIER
   0:  GUID_partition_scheme                  *512.1 GB   disk0
   1:                    EFI EFI               209.7 MB   disk0s1
   2:             Apple_APFS Container disk1   511.9 GB   disk0s2
Then you can mount it like so:
sudo mkdir /Volumes/EFI
sudo mount -t msdos /dev/disk0s1 /Volumes/EFI
Now you can edit /Volumes/EFI/OC/config.plist with your favourite text editor to make your changes. (TextEdit is not a great choice because it likes to insert curly quotes into the file and otherwise break things, there are some dedicated plist editors available such as XCode).
If you’re unable to boot macOS, you can edit the config.plist using the “UEFI Shell” option in the OpenCore boot menu instead.
Enter “FS0:” and press enter to open up the first available filesystem, then run “edit EFI\OC\config.plist” (if the file isn’t found, try switching to another filesystem like fs1:). When you’re done editing, press control+Q to exit, “Y” to save, then run “exit” to return to the OpenCore menu. You need to reboot for your changes to take effect.
If you prefer, you can edit config.plist from the comfort of your Proxmox host instead. If you’re booting from an attached OpenCore.img file, you can mount that file as a disk on the host. If you’re booting from the VM’s disk instead, it must be in raw format in order to be mounted (e.g. typical LVM or ZFS usage) rather than qcow2.
# Mount an OpenCore image:
losetup --partscan /dev/loop0 /var/lib/vz/template/iso/OpenCore-v15.img
# or a VM boot disk:
losetup --partscan /dev/loop0 /dev/zvol/tank/vms/vm-100-disk-1

mount /dev/loop0p1 /mnt
Now the contents of that first partition are available in /mnt, so you can edit /mnt/EFI/OC/config.plist in your favourite editor. When you’re done, do this to unmount the disk:
umount /mnt
losetup --detach /dev/loop0
Automatic boot
In config.plist, you can set Misc/Boot/Timeout to a non-zero value to allow the default boot option be chosen automatically after that delay in seconds. I’ve disabled this by default because it causes the installer ISO to re-enter its main menu instead of continuing the second stage of installation.
You can set the default boot option by pressing control+enter on it.
Verbose boot
To boot macOS in Verbose mode to diagnose boot problems, at the OpenCore boot menu press Cmd+V before pressing enter to boot macOS (you don’t need to hold it down).
If there is a kernel panic during boot and it reboots too quickly to be read, edit config.plist to add “debug=0x100” to the kernel arguments.
Changing screen resolution
To change macOS’ screen resolution, you need to edit the UEFI/Output/Resolution setting in config.plist, the default is 1920×1080@32.
You should be able to change this to any of the modes that the system OVMF menu offers (hit F2 at the start of guest boot and choose “Device Manager/OVMF Platform Configuration” to see which resolutions are available).
Video performance
Because there is no guest video acceleration available for macOS, video performance is poor.
In Google Chrome in the guest you will need to toggle off the setting to “use hardware acceleration when available” to improve issues with elements not being drawn or flickering (especially video). Safari may be a better choice.
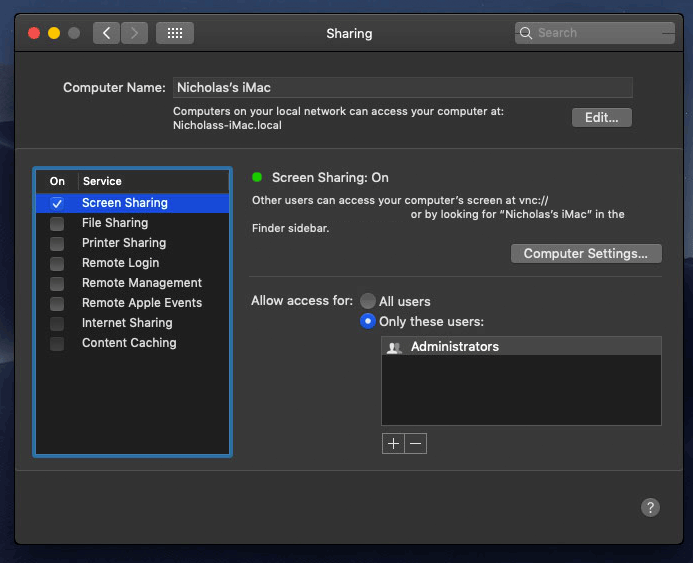
macOS’s built in “Screen Sharing” feature offers dramatically better framerates and latency than Proxmox’s browser-based VNC console, so if you have a real Mac to act as a viewing console, you can enable that in the VM’s “Sharing” settings and connect to the VM using the Screen Sharing app from your Mac instead:
Apparently Screen Sharing is also compatible with VNC clients like RealVNC, so you should be able to connect to it from Linux or Windows consoles using RealVNC.
The real magic bullet for video performance is to pass through a compatible video card using PCIe passthrough (AMD cards only). This offers near-native performance. You can read more about how I’m using PCIe passthrough on my own installation here.
USB passthrough
Since I want to use this as my primary computer, I want to use a USB keyboard and mouse plugged directly into Proxmox, rather than sending my input through the web VNC console.
Proxmox has good documentation for USB passthrough. Basically, run “qm monitor YOUR-VM-ID-HERE”, then “info usbhost” to get a list of the USB devices connected to Proxmox:
qm> info usbhost
 Bus 3, Addr 12, Port 6, Speed 480 Mb/s
 Class 00: USB device 8564:1000, Mass Storage Device
 Bus 3, Addr 11, Port 5.4, Speed 12 Mb/s
 Class 00: USB device 04d9:0141, USB Keyboard
 Bus 3, Addr 10, Port 5.1.2, Speed 12 Mb/s
 Class 00: USB device 046d:c52b, USB Receiver
 Bus 3, Addr 9, Port 14.4, Speed 12 Mb/s
 Class 00: USB device 046d:c227, G15 GamePanel LCD
 Bus 3, Addr 8, Port 14.1, Speed 1.5 Mb/s
 Class 00: USB device 046d:c226, G15 Gaming Keyboard
In this case I can add my keyboard and mouse to USB passthrough by quitting qm, then running:
qm set YOUR-VM-ID-HERE -usb1 host=04d9:0141
qm set YOUR-VM-ID-HERE -usb2 host=046d:c52b
This saves the devices to the VM configuration for you. You need to reboot to have the new settings apply.
You can also pass through USB devices by passing through an entire USB controller using Proxmox’s PCIe passthrough feature, which gives much better compatibility.
Odd core counts
If your host CPU is AMD, you might have a core count which is divisible by 3, like 6 cores. macOS doesn’t like it if the core count isn’t a power of 2 (1, 2, 4, 8), but it doesn’t mind odd socket counts.
So in order to pass 6 total cores, configure the VM for 3 sockets and 2 cores per socket.
Fixing “guest boots to UEFI shell”
If your guest ends up booting to the UEFI shell instead of showing the OpenCore boot menu, especially if you’ve just updated OpenCore to a new version, you’ll need to edit the guest’s UEFI boot entries to fix this.
At the very start of guest boot, hit F2 to enter guest UEFI settings.
First we’ll remove the old entries. Choose the Boot Maintenance option, then Boot Options -> Delete Boot Option. Use the spacebar to tick any old Clover or OpenCore entries (avoid ticking the EFI Internal Shell option, you want to keep that!). Select “Commit Changes and Exit”.
Now we’ll add the correct entry for OpenCore back in. Select Add Boot Option. Navigate through the device tree to EFI/OC/OpenCore.efi and select it, name this new option “OpenCore” or similar. Again Commit Changes and Exit.
Go to the Change Boot Order and move OpenCore to the top. Commit Changes and Exit.
Now back out to the main menu and choose Reset, and you should successfully boot into OpenCore this time.
Fixing iMessage
iCloud and the App Store should already be working for you, but for iMessage support you must follow these steps to mark your network adapter as built-in:
https://dortania.github.io/OpenCore-Post-Install/universal/iservices.html#fixing-en0
Disabling SIP (System Integrity Protection)
You can disable SIP by selecting the Recovery option from the OpenCore boot menu, then use the top menu to open the Terminal and run csrutil disable --no-internal. Then reboot.
This may be needed to run unsigned kexts or perform other hacks.
Upgrading OpenCore
Sometimes you need to update OpenCore to a new release in order to support a new macOS update. I’ll assume you don’t have any customisations to config.plist you want to save.
First take a snapshot! It’s great to be able to roll back if something goes wrong.
If you’re still able to boot macOS, you can update it from within the guest. Follow the instructions in the “Editing your OpenCore/EFI settings” section to mount your EFI partition. Then you can delete the EFI folder in there and replace it with the one from the OpenCoreEFIFolder.zip file from my OpenCore release (you’ll probably need to empty the trash first to make room for the new folder). You’re done!
If you aren’t able to boot macOS, unpack and upload the new OpenCore ISO to Proxmox’s ISO store instead. Add a new CD drive to the VM that uses that ISO. Then in Proxmox’s terminal edit the VM’s config (in /etc/pve/qemu-server) to replace “media=cdrom” with “cache=unsafe” for the OpenCore drive. Now on the “Options” tab, change the boot order to put the new OpenCore drive first.
Start the VM and boot into macOS using the new OpenCore drive. From within macOS you can now follow the instructions from the “Make the OpenCore install permanent” section to install the new OpenCore image to your main macOS disk, after which the OpenCore drive can be detached from the VM.
Upgrading from macOS Monterey
First make a backup or snapshot of your system! Being able to roll back when the upgrade goes wrong is a real lifesaver.
You’ll need to update OpenCore to my v19 release before the upgrade, use the section above to do that. After updating that, reboot to make sure that you can still boot Monterey.
If you’re using any PCIe passthrough devices (particularly video cards) you’ll want to disable those and set “vga: vmware” instead, so you can install using Proxmox’s web console from a different machine during the upgrade. This avoids installer problems triggered by flaky video card passthrough, especially host lockups caused by the AMD Reset Bug.
If your CPU is AMD, replace the “-cpu” argument in your VM args line with the new one:
-cpu Haswell-noTSX,vendor=GenuineIntel,+invtsc,+hypervisor,kvm=on,vmware-cpuid-freq=on
Intel CPUs should work with -cpu host
Now if your CPU supports AVX2 you can upgrade to Ventura using Software Update or from the App Store like you would on a real Mac.
If the update fails to appear, your SIP mode might be set to “Apple Internal”. You can check this by running “csrutil status” in the Terminal.
To fix this, reboot your VM and at the OpenCore menu select Recovery. Open up the Terminal, and in there run “csrutil enable --no-internal” (“csrutil disable --no-internal” is fine too), then reboot back into macOS and try again.
Another way to upgrade is to build a Ventura full or recovery installer and use that to install Ventura (installing over the top of Monterey will upgrade Monterey while keeping your user data intact).
If your CPU doesn’t support AVX2, you’ll have to create a full/recovery installer since I didn’t enable the kernel patch for Monterey/Big Sur that would allow the Ventura App Store app to be run directly from within running macOS.
So, I have Catalina through Monterey Installed and working.
Having issues with the Ventura Installer though.
Kernel Panic 3 seconds into booting either the install or recovery image.
Conf file:
agent: 1
args: -device isa-applesmc,osk=”” -smbios type=2 -device usb-kbd,bus=ehci.0,port=2 -global nec-usb-xhci.msi=off -global ICH9-LPC.acpi-pci-hotplug-with-bridge-support=off -cpu host,vendor=GenuineIntel,+invtsc,+hypervisor,kvm=on,vmware-cpuid-freq=on
balloon: 0
bios: ovmf
boot: order=ide2
cores: 2
cpu: Haswell
efidisk0: local:101/vm-101-disk-0.qcow2,efitype=4m,size=528K
ide0: GoFlex1:iso/Ventura.iso,cache=unsafe
ide2: GoFlex1:iso/OpenCore-v19.iso,cache=unsafe,size=150M
localtime: 0
machine: q35
memory: 8192
meta: creation-qemu=7.1.0,ctime=1670221416
name: Ventura
net0: virtio=6A:7F:A9:C7:E9:76,bridge=vmbr0,firewall=1
numa: 0
ostype: other
scsihw: virtio-scsi-pci
smbios1: uuid=
sockets: 1
vga: vmware
virtio0: local-lvm:vm-101-disk-0,discard=on,iothread=1,size=128G
vmgenid:
After checking other comments, I also was able to boot by setting 1 core, 1 socket. Haven’t yet tried setting cascade-lake-server CPU, as the installation is currently running.
Will probably try that later.
If you’re on an AMD CPU then -cpu host doesn’t work, use Haswell-noTSX
Any idea why cpu- host doesn’t work through proxmox for amd cpu and anyway can get working .
I thought the amd vanilla patches should fix this globally.
I use cpu host for my amd system which is installed bare metal with just open core
Thanks
Same problem here. Followed the guide step-by-step. Apple logo on boot and then VM restarts forever (no progress bar).
Using AMD Ryzen 7 5700G.
Any ideas? Thanks.
Tried with -cpu Haswell-noTSX
Tried without +invtsc
No success
agent: 1
args: -device isa-applesmc,osk=”…” -smbios type=2 -device usb-kbd,bus=ehci.0,port=2 -global nec-usb-xhci.msi=off -global ICH9-LPC.acpi-pci-hotplug-with-bridge-support=off -cpu host,vendor=GenuineIntel,+invtsc,+hypervisor,kvm=on,vmware-cpuid-freq=on
balloon: 0
bios: ovmf
boot: order=ide2;virtio0
cores: 8
cpu: Haswell
efidisk0: local-lvm:vm-100-disk-0,efitype=4m,size=4M
ide0: local:iso/Ventura-full.img,cache=unsafe,size=14G
ide2: local:iso/OpenCore-v19.iso,cache=unsafe,size=150M
machine: q35
memory: 16384
meta: creation-qemu=6.2.0,ctime=1672443976
name: macOS
net0: virtio=…:EC,bridge=vmbr0,firewall=1
numa: 0
ostype: other
scsihw: virtio-scsi-single
smbios1: uuid=…
sockets: 1
vga: vmware
virtio0: local-lvm:vm-100-disk-1,cache=unsafe,discard=on,iothread=1,size=120G
vmgenid: …
I am having the exact issue but with a Ryzen 5600G CPU.
Tried every suggestion in the guide but Ventura installer refuses to boot.
I feel like you can try using the poweroff command to completely shut down the PVE host before starting the host.
hey Nicholas — thanks so much for another amazing guide. I’m on the latest Monterey but couldn’t update to Ventura without upgrading opencore. Followed your steps. Got the iso in there. Booted into Monterey but the machine didn’t know it was me so I couldn’t log into apple id. Do I need to alter the EFI I get from the new open core? Thanks again..
If you had previously edited the serial number etc in your old OpenCore you’ll need to transfer that config over to the new config.plist
Otherwise, in macOS run “ifconfig” and verify that you have an Ethernet adapter called “en0”. iCloud requires that this exists so that it can read the MAC address from it, and sometimes it can end up being renamed to en1.
Thank you. I did get it to install.. see my latest comment. I’m taking a snapshot of where it is now on Ventura.. but going back to Monterey so I can use it.
Thank you so much!
I did check that. I have two. One is en0 the other is en1. Should I delete the en1? Also, any help on the GPU passthrough is appreciated. Back up on Monterey – and it’s working perfectly. I do have the snapshot of the Ventura install, however. 😉
thanks again, my man
Did you by any chance find a long term fix for this? I built my setup using 1 Socket and 4 Cores. Everything installed fine and was working, until I did a reboot. Now I can’t get the VM to startup unless I configure it for 1 Socket and 1 Core. Would love to get this back working with 4 Cores.
My physical CPU is the AMD Ryzen 9 5900HX (Mini Forums EliteMini HX90) running ProxMox VE 7.3-4.
Here is the QEMU config:
agent: 1
args: -device isa-applesmc,osk=”…” -smbios type=2 -device usb-kbd,bus=ehci.0,port=2 -global nec-usb-xhci.msi=off -global ICH9-LPC.acpi-pci-hotplug-with-bridge-support=off -cpu Haswell-noTSX,vendor=GenuineIntel,+invtsc,+hypervisor,kvm=on,vmware-cpuid-freq=on
balloon: 0
bios: ovmf
boot: order=virtio0;net0
cores: 1
cpu: Haswell
cpuunits: 1024
efidisk0: local-lvm:vm-105-disk-0,efitype=4m,size=4M
machine: q35
memory: 8192
meta: creation-qemu=7.1.0,ctime=1673012135
name: ventura
net0: virtio=”…”,bridge=vmbr0,firewall=1
numa: 0
ostype: other
scsihw: virtio-scsi-single
smbios1: uuid=”…”
sockets: 1
vga: vmware
virtio0: local-lvm:vm-105-disk-1,cache=unsafe,discard=on,iothread=1,size=64G
vmgenid: “…”
That’s likely to be caused by a broken TSC.
You can try doing a full host poweroff and poweron (rather than a hot reboot), which could re-sync the TSC. Otherwise check out this workaround:
https://www.nicksherlock.com/2022/10/installing-macos-13-ventura-on-proxmox/comment-page-1/#comment-55532
Interesting I see “tsc” when running:
“cat /sys/devices/system/clocksource/clocksource0/current_clocksource”
and I also see: [ 1.420240] clocksource: Switched to clocksource tsc
when I run “dmesg | grep -i -e tsc -e clocksource”
However, if I power off the host machine it does appear to allow me to run the guest VM with whatever core count I want to use (4, 8, etc…). So I have to assume it must be something with the tsc clock not being in synch. I’m going to continue to dig on this.
Do you believe I would see any benefit with my host machine (cpu: AMD Ryzen 9 5900HX) by using the AMD Vanilla OpenCore patches??
It might be that your clocks start off in sync but then drift afterwards, and Linux doesn’t detect it and report it in dmesg. In that case I’d be looking to turn off CPU power saving states in the BIOS since sometimes CPU “naps” cause the clock to drift.
No, I don’t think the AMD patches will change anything.
Thank you so much!!! I’ll dig in to the BIOS options…
I’ve been having similar problems with an EPYC 7302P. Machine freezing/stuttering on high CPU usage, having to upgrade with only 1 core enabled, etc.
I recently upgraded to Proxmox 7.4 and installed the 6.2 kernel and it’s all gone. No stuttering and I just upgraded to 13.3 with all 16 cores enabled.
Proxmox
TASK ERROR: KVM virtualisation configured, but not available. Either disable in VM configuration or enable in BIOS.
(I checked the BIOS and it is enabled…)
Do you know of a solution to this error?
What precisely is the enabled option called in the BIOS?
Smashing my head against the wall on this one. I’ve tried both the full and recovery images from a working MacOS system and I keep getting this error during the install from “macOS Update Assistant”:
“An error occurred preparing the software update.”
I have a 64GB disk so I don’t believe space is the culprit.
Any idea if the Ventura installer has been updated or changed in any way recently?
Disregard. Used another macbook to download the image and it appears to be working. /shrug
Hi Nick,
I’ve gotten as far as installing, however, the installer gets stuck at 12 minutes remaining now matter what I do or how many times I reboot. Always 12 minutes.
The installer log gives some errors. Screenshot of that at https://ibb.co/wNNcy6y.
My config is:
agent: 1
args: -device isa-applesmc,osk=”o…c” -smbios type=2 -device usb-kbd,bus=ehci.0,port=2 -global nec-usb-xhci.>
balloon: 0
bios: ovmf
boot: order=ide2;virtio0;net0
cores: 4
cpu: Haswell
cpuunits: 1024
efidisk0: local-lvm:vm-100-disk-0,efitype=4m,size=4M
ide0: local:iso/Ventura-full.img,cache=unsafe,size=14G
ide2: local:iso/OpenCore-v19.iso,cache=unsafe,size=150M
machine: q35
memory: 12000
meta: creation-qemu=7.1.0,ctime=1670696109
name: macos-ventura
net0: virtio=7E:0F:B3:D4:68:9E,bridge=vmbr0,firewall=1
numa: 0
ostype: other
scsihw: virtio-scsi-single
smbios1: uuid=32c05178-34fb-43a5-b993-5a7fabb8b4ed
sockets: 1
vga: vmware
virtio0: local-lvm:vm-100-disk-1,cache=unsafe,discard=on,iothread=1,size=256G
vmgenid: 1d34147e-f100-4ee6-95a4-263a2998d88b
Ah, the last time this happened it was because Apple released a new OS version for ARM, and because it was the newest version available the recovery installer picked it even though the architecture was incompatible.
When that happened the only solution I found was to use a Monterey VM to build a Full Installer for Ventura, so the recovery installer’s bad choice could be avoided.
Hi,
I’m having exactly the same issues as Rusty. The installer gets stuck at 12 minutes remaining…
I did build an Ventura-full-image on my Mac with Ventura 13.0.1.
@Rusty, did you have any luck in your setup (see also your post at December 11, 2022 at 11:14 pm)?
I’m not sure if I understand the comments correctly. Do I need to try to build a Monterey full image and not use the Ventura full image?
And then install Monterey instead of Ventura?
Hello, have you solved your issue?
I ran into this problem and was able to solved it by removing “+invtsc” from the args
I made an earlier post but tried a different route.
My problem is I keep getting stuck at 12 minutes remaining. This time I used the recovery image and just let it run overnight.
Installer log still says, “Ignoring BOMfilesystem mismatches due to security error”
Here’s my config now:
agent: 1
args: -device isa-applesmc,osk=”…” -smbios type=2 -device usb-kbd,bus=ehci.0,port=2 -global nec-usb-xhci.>
balloon: 0
bios: ovmf
boot: order=ide2;virtio0;net0
cores: 4
cpu: Haswell
cpuunits: 1024
efidisk0: local-lvm:vm-100-disk-0,efitype=4m,size=4M
ide0: local:iso/Ventura-recovery.img,cache=unsafe,size=14G
ide2: local:iso/OpenCore-v19.iso,cache=unsafe,size=150M
machine: q35
memory: 12000
meta: creation-qemu=7.1.0,ctime=1670696109
name: macos-ventura
net0: virtio=7E:0F:B3:D4:68:9E,bridge=vmbr0,firewall=1
numa: 0
ostype: other
scsihw: virtio-scsi-single
smbios1: uuid=32c05178-34fb-43a5-b993-5a7fabb8b4ed
sockets: 1
vga: vmware
virtio0: local-lvm:vm-100-disk-1,cache=unsafe,discard=on,iothread=1,size=256G
vmgenid: 1d34147e-f100-4ee6-95a4-263a2998d88b
Thanks.
I just finally saw the reply to my first post so ignore the second I suppose. I’ll update my kid’s macbook pro to Monterey and try to build it from there.
Forgot to mention the first installer I tried (a full one) was built on macos Catalina (2013 MBP) but the second one, the recovery, was on Linux.
You can build the full installer from any version I think, Catalina ought to work. I just mention Monterey because it’s the newest VM tutorial I have.
Thanks, I might try Catalina again once it’s done with this security update.
Hi, Has anyone had any luck updating the Ventura VM? Looks like 13.0.1 is available. Curious if I can just go through the regular updating process.
No problem at all updating to 13.0.1, but I am having some trouble with today’s 13.1 release. I get an error preparing the update. I am not sure if it’s related to my VM config or some other issue yet. I may end up creating a new installer and updating that way.
Thanks. I just did it on mine and it seemed to work fine although the first time it didn’t seem to work. I ran it again and it worked so not sure what that is about.
13.0.1 or 13.1?
Just wanted to throw in here I upgraded from the App Store and it worked fine, now sitting pretty at 13.1.
Lets say I screwed up my config.plist file on my recently upgraded 13.0.1 vm, by trying to add kexts for bluetooth for a passthrough AX220 controller, and my vm no longer boots (kernel panic on boot). What is the best way to recover the config.plist from the PVE host? Is there an easy way to mount the EFI partition from the host and replace the files?
Thanks
The easiest way would be to attach a fresh downloaded OpenCore image and set the VM to boot from that. Then once you get in you can fix up your EFI partition and set the boot order back over to the hard disk.
Hey! Your guides are amazing and I’m using them for long time.
I hit a roadblock with Ventura however. It was working properly, I rebooted it a few times and now out of a sudden, no matter what I do, it crashes with the following error: https://i.imgur.com/NT73L2n.png
I tried recreating EFI disk in PVE, as well as doing Reset NVRAM in OpenCore. I also tried searching but the google search brings up only some unrelated iGPU thread and this blog 🙁 I disabled some kexts originally, as this VM is only for CLI access really, so I don’t need anything but network, but it’s probably irrelevant as it now does not boot from the OpenCore iso file even.
Do you have any idea what is it complaining about?
=========
Below is my config:
agent: 1
args: -device isa-applesmc,osk=”***” -smbios type=2 -device usb-kbd,bus=ehci.0,port=2 -global nec-usb-xhci.msi=off -global ICH9-LPC.acpi-pci-hotplug-with-bridge-support=off -cpu Haswell-noTSX,vendor=GenuineIntel,+invtsc,+hypervisor,kvm=on,vmware-cpuid-freq=on
balloon: 0
bios: ovmf
boot: order=ide2
cores: 4
cpu: Haswell
efidisk0: local-zfs:vm-102-disk-0,efitype=4m,size=1M
ide2: local:iso/OpenCore-v19.iso,cache=unsafe
machine: q35
memory: 8192
meta: creation-qemu=7.1.0,ctime=1670834125
name: backmac
net0: virtio=****,bridge=vmbr1,firewall=1,link_down=1,tag=30
numa: 0
ostype: other
scsi0: ****
scsihw: virtio-scsi-single
smbios1: uuid=***
sockets: 1
startup: order=100
vga: vmware
vmgenid: ****
macOS doesn’t support the scsi controller as far as I know, replace scsi0 with virtio0
Thank you as always for this incredible guide!
I had an issue disabling SIP and was getting an “assertion failed” error. Running “csrutil clear” before “csrutil disable” fixed it for me.
Just wanted to share!
Gonna go back to my snapshot because I need the rig.. but got Ventura to install as an upgrade from Monterey after putting the new EFI in that you gave. I was able to boot from the proxmox console. Pretty nice. Could not start imessage.. just didn’t like my Apple id. What I did was plugged in my smbios into the new plist in the updated EFI. Won’t apple see it as the same rig? Or do I need to use an all new smbios after the install. The real reason I’m going back to Monterey is because I simply cannot boot to my external monitors with my RX6600XT. Works great in Monterey.. all of the settings are correct. Proxmox comes on.. I click to boot the hard drive.. The Apple logo appears.. the progress line gets to about 30% screen shuts off and that’s that. So strange.
Let me know what I should try .. because it’s unusable like this. Thank you so much for the great guide.. ALMOST worked for me.
Did you try clearing the nvram? Also make sure to have the agdmod=pikera boot argument present:
https://dortania.github.io/GPU-Buyers-Guide/misc/bootflag.html
I had the same symptoms in monterey, and this boot argument fixed it for me 🙂
thought I had that arg.. will try. I cleared vram at the OC menu.
thanks so much
pikera fixed the display. Thanks so much. Clearing NVRAM didn’t help the apple id sign in issue. Going to compare old and new config.plists and see if there’s a difference
Thanks again!
j
Has anyone had success upgrading to Ventura from Monterey using an RX6600XT gpu? I have upgraded successfully but can only use the vmware graphics. Booting to the 6600 just locks up. Let know! Thank you.
I’m trying to upgrade from Monterey to Ventura, I do everything as in the instructions, after a reboot I select ‘main’ and nothing has been updated, opencore crashes after a reboot.
Please help, you can more detailed instructions for updating
After updating from Monterey with the full installer image, MacOS enters into a bootlooop after installation saying “Your computer restarted because of a problem. Press any key or wait a few seconds to continue starting up.” Is there a way to fix this?
Does the bluetooth work for you I have the same chip USB adapter? What did you need to do in order to make it work, for me the bluetooth can not be turned on in the macos settings.
I tried adding kexts:
– BrcmPatchRAM3.kext
– BlueToolFixup.kext
– BrcmFirmwareData.kext
I have the same BCM20702 broadcom chipset. Am I missing the USB mappings? I haven’t done that yet.
Have iMessage fixed as well. It was the en0 thing. All good now. Thanks again, Nicholas.
Great tutorial!
Thank You.
Only problem is that I can not set or specify my time zone for automatic NTP update.
The system is fixed on Pacific time and uses Cupertino, CA for apple timekeeping.
(I’m in Nova Scotia).
Nowhere in the setup did it try to identify my correct timezone.
I need to disable automatic timekeeping and manually advance the clock by four hours, which leads to drift and issues with tome-critical apps.
Any help or tips appreciated!
Cheers, and Happy 2023.
now maybe a more nuanced question. I have Ventura up and running after an update from Monterey. Everything appears to be working great.. except for continuity camera. Has anyone gotten it to work? Ventura sees my iphone 14. It indicates on the phone that it’s connected to the computer.. but it’s just a black screen on Facetime and photobooth. Let me know if you have this working and what you had to do to make it so. Thaks for a great forum!
j
I am unable to get the VM to login to iMessage and I have no idea why, I tried all new Serial etc… but no luck, does anyone have any ideas? I contacted support to remove the block but I still have had no luck, I don’t understand
Hey Nick and other guys,
thank you so much vor your detailed work and sharing it with us!
I have Proxmox 7.3.3 and for now Big Sur successfully installed.
Big Sur because my GPU (an old NVIDIA GTX680 – which for me definitely is good enough for an Audio-Workstation) only is natively supported until Big Sur.
I have read ( https://elitemacx86.com/threads/nvidia-gpu-compatibility-list-for-macos.614/ ), that it’s possible in Monterey or Ventura to modify the OpenCore with the OCLP ( https://github.com/dortania/OpenCore-Legacy-Patcher ) to get GPUs like the GTX 680 to work.
Has anyone done that and can give me a short instruction which does not destroy my Proxmox OC EFI (which I have done several times now ;)… )?
As I understand – to use OLCP you need to boot into safe mode and this isn’t possible with OVMF BIOS used by Proxmox right now.
Correct me if I am wrong…
With pve,backup your macos_vm, you can try safely. Oclp works with mac_os 12 and 13. but may have some bugs.
Hi everyone,
I set up my VM now and it works great so far. GPU passed trough, USB controller passtrough. But the USB ports are only running with 2.0 speed and USBMap.kext or USBToolBox.kext/UTBMap.kext do not work because it do not get loaded even when integrated in config.plist. It just completely ignores these files… Any idea how to map my USB ports in macOS when running via Proxmox?
Best,
Kevin
Great guide, and thank you for all the work….
I wanted to ask your thoughts on trying to pass through the internal GPU on my AMD Ryzen 9 5900HX. This GPU uses Radeon graphics engine, but I have no idea if a driver for this would be available for Ventura. Also my primary reason for wanting to do this would be to be able to use an HDMI dummy plug, and see if the VNC/Screen Sharing can be accelerated. Mainly looking to address things like window minimize/resume animation stuttering and other unaccelerated graphics issues.
Well I doubt it will work – but you could try this:
https://github.com/NootInc/WhateverRed
Hello there,
I’m experiencing the 12 minutes remaing issue, the install is stuck at this point (restarted several time host/guest and re-checked the config but no luck).
Last logs available:
https://i.imgur.com/lu6uv9T.png
My current config on i5-1240p Intel NUC (redacted OSK):
agent: 1
args: -device isa-applesmc,osk=”#######” -smbios type=2 -device usb-kbd,bus=ehci.0,port=2 -global nec-usb-xhci.msi=off -global ICH9-LPC.acpi-pci-hotplug-with-bridge-support=off -cpu host,vendor=GenuineIntel,+invtsc,+hypervisor,kvm=on,vmware-cpuid-freq=on
balloon: 0
bios: ovmf
boot: order=ide2;virtio0
cores: 4
cpu: Haswell
efidisk0: samsung:vm-108-disk-0,efitype=4m,size=1M
ide0: hd_usb:iso/Ventura-full.img,cache=unsafe,size=14G
ide2: hd_usb:iso/OpenCore-v19.iso,cache=unsafe,size=150M
machine: q35
memory: 6144
meta: creation-qemu=7.1.0,ctime=1673274986
name: Mac
net0: virtio=0A:00:A3:AB:00:24,bridge=vmbr0,firewall=1
numa: 0
ostype: other
scsihw: virtio-scsi-single
smbios1: uuid=fdf38bb6-5817-4c1e-b7b2-dabeadaf20ed
sockets: 1
usb0: host=046d:c52b,usb3=1
vga: vmware
virtio0: samsung:vm-108-disk-1,cache=unsafe,discard=on,iothread=1,size=64G
vmgenid: 9c592329-cb1e-415f-b855-6927cd276029
Any hint please? Thank you!
For sake of completeness, I’ve tried both Ventura-recovery, Ventura-full and also Monterey-recovery with no luck.
I also re-created the VM from scratch and all are stuck at 12 minutes with the same error!
I was using the current kernel (5.x), tested 6.0-edge and now the newer kernel 6.1 but still nothing.
My setup is a Intel NUC 12 Pro with i5-1240p and latest PVE with ZFS filesystem.
Did you succeed in solving the 12-minute-issue?
I’m stuck in the same way…
I found that to get iMessage working if it keeps logging you out a few seconds after logging in, you need to login to a legitimate MacBook or Mac computer on the same Apple ID then wait a few days and you should be able to then get iMessage working inside the VM. I believe it might have something to do with the Network device showing as Redhat VirtIO device but since I got it working I don’t want to mess things up again
Do you know if this will work on any cheaper van hosts like Amazon ec2 etc ?
Most hosts give you a virtual machine and do not support “nested virtualisation” which is needed for running the macOS VM inside the VM they give you.
You can do this on EC2 using EC2 Metal Instances, but the cost is about $4/hour:
https://github.com/thenickdude/proxmox-on-ec2
You can use their native mac2.metal option instead which runs on a real mac, with a cost of $0.65/hour and a minimum commitment of 24 hours.
mba:ventura administrator$ gcc -o smc_read ~/Desktop/smc_read.c -framework IOKit
mba:ventura administrator$ ./smc_read
…
Modified 1 line in smc_read.c, and use kIOMainPortDefault because the original version will give me deprecated warning :
io_service_t service = IOServiceGetMatchingService(kIOMainPortDefault,
IOServiceMatching(“AppleSMC”));
I’m getting this after gcc.
Anyone got this?
Ya, that’s the correct OSK
Hello
Many thanks for your comprehensive tutorial. We were able to migrate flawlessly some MacOSX 10.14, 11 and 12 vmdk based VMs from esxi 6.5 hosts to proxmox 7.3 -3 and to start and run them along with the configuration steps and settings from this tutorial.
Now there are left two MacOSX Server 10.6.8 vmdk based VMs to get them run. For legacy reasons we can not upgrade the system to a newer MacOSX system. Under esxi 6.5 they ran with no issues. Under proxmox with with OpenCore v19 we are not able to start them. Therefore we would be grateful for any hint that could help to start and run those vm on proxmox installation. At the moment the follwing is working:
– OpenCore v19 boot picker shows the MacOSX Server 10.6.8 system disk.
– Apple diskutil on the Montery-recovery.img(iso) booted in with OpenCore can mount and check the MacOSX Server 10.6.8 disk. Is reported as bootable MacOSX 10.6.8 system without any errors.
– starting booting to the MacOSX Server 10.6.8 disk/volume selected by the OpenCore boot picker starts for about 1 minute by showing grey screen with white apple logo. Thereafter booting is stopped by replacing the apple logo with a “prohibition sign” and a top left message “OCB: Start Image failed – Aborted”. Thereafter the OpenCore boot picker is shown again with a little delay.
– in an other attempt we tried to mount along with OpenCore existing “Apple MacOSX 10.6.8” and “Apple MacOSX Server 10.6.8” iso images, that we used successfully on esxi 4 to 6.5 for installing and to rescue. Unfortunately they are not shown by the OpenCore boot picker (?).
– We tried different kvm vm “args” but were not able to resolve the issue. Our actual settings are:
args: -device isa-applesmc,osk=”…” -smbios type=2 -device usb-kbd,bus=ehci.0,port=2 -global nec-usb-xhci.msi=off -global ICH9-LPC.acpi-pci-hotplug-with-bridge-support=off -cpu Penryn,vendor=GenuineIntel,+hypervisor,kvm=on,vmware-cpuid-freq=on
balloon: 0
bios: ovmf
boot: order=ide0;sata0;ide2
cores: 4
cpu: Penryn
cpuunits: 1024
efidisk0: local-lvm:vm-30100-disk-0,efitype=4m,pre-enrolled-keys=1,size=4M
ide0: local:iso/Apple_MacOSX_Install_10.6.iso,media=cdrom,size=7589352K
ide2: local:iso/OpenCore-v19.iso,cache=unsafe,size=150M
machine: q35
memory: 8192
meta: creation-qemu=7.1.0,ctime=1674135708
name: hermes-10.6
net0: e1000=AA:BB:CC:DD:EE:FF,bridge=vmbr000
numa: 0
ostype: other
scsihw: virtio-scsi-single
smbios1: uuid=37844390-6a3f-481b-aa75-42911acf7529
sockets: 1
vga: vmware
sata0: local-lvm:vm-30100-disk-1,size=80G
vmgenid: f38322fb-f7ce-450c-9ba1-4e195975873b
Many thanks in advance for an hint, best regards
André
Hello
Booting in verbos mode from OpenCore to the migrated esxi vmdk MacOSX Server 10.6.8 volume I get the following message:
“OC : 64-bit kernel architecture is not available, aborting.”
“Loading kernel cache file ‘System\Library\Caches\com.apple.kext.caches\Startup\kernelcache'”
“Loading ‘mach kernel’ … ”
” …. Error allocation 0xc7 pages …. alloc type 2″
“…”
I checked on the orginal esxi VM that MacOSX Server 10.6.8 is running the 64bit Kernel (I set again the command ‘ sudo systemsetup -setkernelbootarchitecture x86_64 ‘ and checked again after rebooting the esxi VM (setting the kernel version by ‘ sudo nvram boot-args=”arch=x86_64″ ‘ will not help on proxmox as the esxi nvram file is not migrated). So this should be ok. Are there other settings to “force” OpenCore v19 to find/boot the 64bit Kernel on the MacOS Server 10.6.8 volume?
Many thanks in advance for any hint, best regards
André
Sorry, I have no experience with Snow Leopard
Dear Nicholas,
in my Proxmox-macOS-virtual Machine the update from Ventura 13.1 to 13.2 went through smoothly without any problems.
Very good job 🙂
Best regards
Jörg from Germany
Guest Boot- If I try to start the VM it tries to boot from the wrong qemu drivr. I followed the instruction above (changing boot order, commiting changes etc) which works for one time but then if I turn the VM off again it goes back to not working. It doesnt seem like updating the boot order is saving correcting. If I reboot form in the mac it works fine., its only when I turn it off and then back on.
Any ideas?
You need to edit the boot order in Proxmox’s Options page, I’m pretty sure this overrides changes made in the guest’s UEFI settings.
Thanks. I am just running khoila osx/kvm script from command line. I think I need to update the OVMF stuff. Would that do anything?
If you were missing the OVMF_VARS file it would cause it to not remember any changes saved in OVMF.
Otherwise try adding bootindex properties to your drives like so:
https://www.qemu.org/docs/master/system/bootindex.html
Thanks will check it out. Would it be the OVMF_VARS-1024×768.fd file? (looks like its there). This is the command I am running.
args=(
-enable-kvm -m “$ALLOCATED_RAM” -cpu host,kvm=on,vendor=GenuineIntel,+invtsc,+hypervisor,vmware-cpuid-freq=on,”$MY_OPTIONS”
-machine q35
-usb -device usb-kbd -device usb-tablet
-smp “$CPU_THREADS”,cores=”$CPU_CORES”,sockets=”$CPU_SOCKETS”
#-device usb-kbd,bus=ehci.0,port=2
#-global ICH9-LPC.acpi-pci-hotplug-with-bridge-support=off
-device nec-usb-xhci,id=xhci
-global nec-usb-xhci.msi=off
-device isa-applesmc,osk=”…”
-drive if=pflash,format=raw,snapshot=off,file=”$REPO_PATH/$OVMF_DIR/OVMF_CODE.fd”
-drive if=pflash,format=raw,snapshot=on,file=”$REPO_PATH/$OVMF_DIR/OVMF_VARS-1024×768.fd”
-smbios type=2
-device ich9-ahci,id=sata
#-drive id=OpenCoreBoot,if=none,snapshot=on,format=qcow2,file=”$REPO_PATH/OpenCore/OpenCore.qcow2″
#-device ide-hd,bus=sata.2,drive=OpenCoreBoot
#-device ide-hd,bus=sata.3,drive=InstallMedia
#-drive id=InstallMedia,if=none,file=”$REPO_PATH/Ventura-recovery.img”,format=raw
# -drive id=MacHDD,if=none,snapshot=on,file=”$REPO_PATH/mac_hdd_ng.img”,format=qcow2
-drive id=MacHDD,if=none,snapshot=off,file=”$REPO_PATH/mac_hdd_ng.img”,format=qcow2
-device ide-hd,bus=sata.1,drive=MacHDD
-netdev user,id=net0,hostfwd=tcp::2020-:22,hostfwd=tcp::1234-:1234 -device vmxnet3,netdev=net0,id=net0,mac=5x:5x:xx:c8:18:27
#-boot c
-monitor stdio
-vga vmware
-display none
-vnc 0.0.0.0:2, -k en-us
)
qemu-system-x86_64 “${args[@]}”
Hi Nick
I read your mention of not being able to wake guest with mouse/keyboard but could wake using qm start 10x.
This works for me but then Ventura is frozen. The VM does “come back” but the screen is blank with a cursor (which doesn’t move.) I see the CPU usage going up and down in Proxmox but the guest is unusable.
Ventura is my daily driver and works great but the RX580 is a power hog at idle. My machine pulls about 130w when screens are off and guest is mostly idle. I’ve messed with my governors but that doesn’t really help.
AMD Ryzen with EPYC / Haswell emulation in QEMU.
When I sleep the machine or pause it in Proxmox the power draw drops to just slightly more than what I see with the guest off before I use it the first time. The annoying part is that if I just power off the guest, the unattached RX580 pulls a lot more idle power than it does on first boot before it is “awakened” by the guest boot.
Wanted this to be a 24/7 on demand machine but sort of bothers me to be burning a 120w office heater for the half of the day I’m not there.
Just as a test – I pulled both GPUS (I have a 3060 TI for Windows guest) and booted the box with Proxmox running but no guests. 38w. So those “unused” GPUs each pull 15-20W doing nothing.
Probably nothing to be done about the overall power – so just wondering if you have any reports of successful wake from sleep with an AMD CPU & GPU.
Thanks for the great work. I love having my “hackintosh” desktop without all the pain of doing a true hackintosh and the flexibility to game on a 10core Win10 guest with a modern GPU. Just nitpickin’ now!
Nick, first off, thank you so much for all of this – it just helped me get the proxmox hackintosh of my dreams with my 6900xt, and 7900x CPU, and broadcom card all working perfectly and without issues.
However, I am trying to backup this configuration in proxmox and whenever I do so it fails:
“kvm: warning: host doesn’t support requested feature: CPUID.01H:ECX.pcid [bit 17]
kvm: ../hw/pci/pci.c:1562: pci_irq_handler: Assertion `0 <= irq_num && irq_num < PCI_NUM_PINS' failed.
ERROR: Backup of VM 100 failed – start failed: QEMU exited with code 1
INFO: Failed at 2023-02-03 16:14:21
INFO: Backup job finished with errors
TASK ERROR: job errors"
So, I am confident this is happening because I am using an AMD CPU and passing through CPU type Haswell-TSX. However, I still want to backup this configuration and not have to change CPU type to backup and then remember to change back when restoring – any thoughts on how to address?
I followed the instructions. But, I only see two options in the boot screen. See screen shot here: https://ibb.co/ngFfjjn
I don’t see an option to actually install the Ventura. Please help.
Most likely your installer image didn’t build properly or you forgot to remove media=cdrom from the installer’s line in the VM config file.
I am getting the following error after I shutdown and removed the opencore and ventura images:
https://i.ibb.co/qNyMwSm/Screen-Shot-2023-02-11-at-7-54-38-PM.png
This is after installing macOS successfully and using DD to copy OpenCore to the hard drive? Make sure you edited the boot order in the Options tab in Proxmox to boot from the hard drive first.
Yes, it’s after using dd copy. Then, I shutdown the mac vm as per the instructions. And then, when I start the vm again I get that error.
What’s even worse is now I am unable to start/reboot any vm. Even if I try installing a new mac vm, they all give me the same error. The only option I am left with is re-install proxmox from scratch.
Here’s the vm config, after I removed the opencore and ventura “hard disks”:
agent: 1
balloon: 0
bios: ovmf
boot: order=virtio0;net0
cores: 4
cpu: Haswell-noTSX
cpuunits: 1024
efidisk0: local-zfs:vm-100-disk-0,efitype=4m,size=1M
machine: q35
memory: 16384
meta: creation-qemu=7.1.0,ctime=1676155322
name: hypmac
net0: virtio=CE:4E:D2:6C:30:59,bridge=vmbr0,firewall=1
numa: 0
ostype: other
scsihw: virtio-scsi-single
smbios1: uuid=21d808e8-7ff8-4c2d-91c2-ad369acdebf8
sockets: 1
vga: vmware
virtio0: local-zfs:vm-100-disk-1,cache=unsafe,discard=on,iothread=1,size=200G
vmgenid: 9c478fce-9542-443f-ac9c-f96525a7fe04
args: -device isa-applesmc,osk=”applekeyhere” -smbios type=2 -device usb-kbd,bus=ehci.0,port=2 -global nec-usb-xhci.msi=off -global ICH9-LPC.acpi-pci-hotplug-with-bridge-support=off -cpu host,vendor=GenuineIntel,+invtsc,+hypervisor,kvm=on,vmware-cpuid-freq=on
audio0: device=AC97,driver=spice
The boot order looks fine. Also fyi, I unchecked the pre-enroll keys option as well. I don’t want to re-install my entire proxmox again. Is there something I am missing here that I can fix?
It boots with the following screen:
https://i.imgur.com/w48ysr8.png
And then, eventually it goes into UEFI shell
use this tutos to upgrade from BigSur to Ventura, followed the previous way
had installed bigsur with opencore10, just upgrade to opencore19 from EFIdisk technics, then roll the osx upgrade…
Thanks to everyone in the community that make it works
Your guides are so thorough and easy to follow. I’ve followed your guide to install Ventura. I also followed your tips regarding gpu passthrough. I just can’t get the macOS to recognize the gpu. I can see it under PCI from system report, but it says type unknown. I have tried with and without the respective vbios rom file. I can confirm gpu passthrough work as I have had success in Windows and Linux vm. I’ve looked at multiple websites and can’t seem to fix it. I’ve disabled resizable bar in the MB bios which fixed the windows gpu passthrough
Any thoughts what I might be missing?
Thanks
What’s your GPU model?
Make sure display is set to none in your VM config.
Do you see the Proxmox boot logo on the screen at VM start? If not the guest UEFI is failing to init the card even before macOS gets involved.
Thanks for getting back to me
My card is Sapphire RX6800XT.
I made sure the display is set to none.
So I followed your guides exactly as you have written them. The strange thing is the Monterey VM is showing and using the gpu. I’m comparing the conf files and setup to see if I’ve done anything different accidentally. I’m going to try Ventura install from scratch again and give you an update. Thanks again for responding
Ah for the 6800 you need to add “agdpmod=pikera” to your boot args in OpenCore’s config.plist, that’s probably the difference between the config for your two VMs.
Found that difference too when I was comparing config files. Thanks again
Thanks for the excellent guide! I’ve gotten it running on a Dell R710II.
Would appreciate any pointers regarding getting audio output to a remote client/spice.
Since there is no audio hardware on servers, MacOS shows no device at all for sound. I’ve tried installing NoMachine and can’t even get it’s virtual audio device to appear.
Forgot to answer the question about seeing the proxmox logo. For all my vm I access them remotely. I have a dummy plug in the hdmi port of the gpu. Windows 11, Ubuntu and Monterey all recognize and use the gpu
I think I found the solution. I loaded the opencore config.plist file for Monterey and compared it with Ventura. For some reason some of the default aml files were missing. They were in the ACPI folder but not showing in the config.plist. Corrected the .plist and we have passthrough!
Thanks again for your hard work putting together these guides. Very appreciated!!!
Just tried Ventura and Monterey on my AMD 5600G and they only boot to disk util if I set the cpu cores to 1
Anything greater than that, it point blak refuses to boot. Why is this?
Did you do the testing of your host TSC described in the start of this post?
Yeah, I turned off global c-state and erp in the BIOS (Gigabyte x570s mobo)
Args:
args: -device isa-applesmc,osk=x -smbios type=2 -device usb-kbd,bus=ehci.0,port=2 -global nec-usb-xhci.msi=off -global ICH9-LPC.acpi-pci-hotplug-with-bridge-support=off -cpu Penryn,kvm=on,vendor=GenuineIntel,+kvm_pv_unhalt,+kvm_pv_eoi,+hypervisor,+invtsc,+pcid,+ssse3,+sse4.2,+popcnt,+avx,+avx2,+aes,+fma,+fma4,+bmi1,+bmi2,+xsave,+xsaveopt,+rdrand,check,+tsc_adjust
I still get thisthough…. Any ideas on what to try next?
[ 0.000000] tsc: Fast TSC calibration using PIT
[ 0.000000] tsc: Detected 3892.585 MHz processor
[ 0.073786] clocksource: refined-jiffies: mask: 0xffffffff max_cycles: 0xffffffff, max_idle_ns: 7645519600211568 ns
[ 0.172984] clocksource: hpet: mask: 0xffffffff max_cycles: 0xffffffff, max_idle_ns: 133484873504 ns
[ 0.193006] clocksource: tsc-early: mask: 0xffffffffffffffff max_cycles: 0x7037fd4f586, max_idle_ns: 881590752094 ns
[ 0.341797] clocksource: jiffies: mask: 0xffffffff max_cycles: 0xffffffff, max_idle_ns: 7645041785100000 ns
[ 0.393337] clocksource: Switched to clocksource tsc-early
[ 0.404357] clocksource: acpi_pm: mask: 0xffffff max_cycles: 0xffffff, max_idle_ns: 2085701024 ns
[ 1.737035] tsc: Refined TSC clocksource calibration: 3919.783 MHz
[ 1.737041] clocksource: tsc: mask: 0xffffffffffffffff max_cycles: 0x7100b7f5eb7, max_idle_ns: 881590896301 ns
[ 1.737061] clocksource: Switched to clocksource tsc
[ 2.697014] clocksource: timekeeping watchdog on CPU4: Marking clocksource ‘tsc’ as unstable because the skew is too large:
[ 2.697020] clocksource: ‘hpet’ wd_nsec: 483185362 wd_now: 227b742 wd_last: 1be2683 mask: ffffffff
[ 2.697022] clocksource: ‘tsc’ cs_nsec: 479844945 cs_now: 156da58393 cs_last: 14fd896ee9 mask: ffffffffffffffff
[ 2.697024] clocksource: ‘tsc’ is current clocksource.
[ 2.697027] tsc: Marking TSC unstable due to clocksource watchdog
[ 2.697035] TSC found unstable after boot, most likely due to broken BIOS. Use ‘tsc=unstable’.
[ 2.697124] clocksource: Checking clocksource tsc synchronization from CPU 9 to CPUs 0,7,10.
[ 3.073021] clocksource: Switched to clocksource hpet
[ 72.426795] kvm: SMP vm created on host with unstable TSC; guest TSC will not be reliable
Nevermind, turns out I hadn’t fully disabled c-states in the BIOS. Ventura installed and happy (for now).
Hey,
Thank you; you’re doing the lords work here.
This must have taken quite a lot of effort and time; I see you doing a lot of work to make it possible for us plebs to virtualize MacOS — The community owes you a debt of gratitude.
Current version of PVE is 7.3. Any issues with that?
I didn’t retest the installation process, but my existing Ventura VM boots just fine on Proxmox 7.3
I ran installer on 7.3.6, no problems!
I am having some weird issues trying to upgrade my VM past 13.1 under PVE 7.3-6 and kernel 5.13.19-6-pve x86_64. The update process fails trying to prepare the update to 13.2, 13.2.1, or even the 13.3 beta. The only way around it is to do a full download and install from the App Store or with softwareupdate –fetch-full-installer. Even though that upgrade method does work ultimately, I have network issues (network share used as Time Machine backup target doesn’t work, snmp traps, etc.) on anything past 13.1. Anyone else experiencing this? This is using the VirtIO network adapter.
Thanks for the great guide and resource!
Thank you for your amazing job. would you lilke to help me. After several boot before entering the set up my screen stuck at apple logo than reboot. Here is the problem.
https://unparacid-my.sharepoint.com/:i:/g/personal/hendrasa_unpar_ac_id/EeO6q27g6JVGv1H3Gi4xZz8Bvdg18dX6Bg2EjBNWenzg9w?e=wlfpLP
thanks a lot.
What’s your host CPU? Make sure it supports AVX (1)
root@pve:~# cat /proc/cpuinfo
processor : 0
vendor_id : GenuineIntel
cpu family : 6
model : 158
model name : Intel(R) Pentium(R) Gold G5400 CPU @ 3.70GHz
stepping : 10
microcode : 0xea
cpu MHz : 3700.001
cache size : 4096 KB
physical id : 0
siblings : 4
core id : 0
cpu cores : 2
apicid : 0
initial apicid : 0
fpu : yes
fpu_exception : yes
cpuid level : 22
wp : yes
flags : fpu vme de pse tsc msr pae mce cx8 apic sep mtrr pge mca cmov pat pse36 clflush dts acpi mmx fxsr sse sse2 ss ht tm pbe syscall nx pdpe1gb rdtscp lm constant_tsc art arch_perfmon pebs bts rep_good nopl xtopology nonstop_tsc cpuid aperfmperf pni pclmulqdq dtes64 monitor ds_cpl vmx est tm2 ssse3 sdbg cx16 xtpr pdcm pcid sse4_1 sse4_2 x2apic movbe popcnt tsc_deadline_timer aes xsave rdrand lahf_lm abm 3dnowprefetch cpuid_fault invpcid_single pti ssbd ibrs ibpb stibp tpr_shadow vnmi flexpriority ept vpid ept_ad fsgsbase tsc_adjust sgx smep erms invpcid mpx rdseed smap clflushopt intel_pt xsaveopt xsavec xgetbv1 xsaves dtherm arat pln pts hwp hwp_notify hwp_act_window hwp_epp md_clear flush_l1d
vmx flags : vnmi preemption_timer invvpid ept_x_only ept_ad ept_1gb flexpriority tsc_offset vtpr mtf vapic ept vpid unrestricted_guest ple pml ept_mode_based_exec
bugs : cpu_meltdown spectre_v1 spectre_v2 spec_store_bypass l1tf mds swapgs itlb_multihit srbds
bogomips : 7399.70
clflush size : 64
cache_alignment : 64
address sizes : 39 bits physical, 48 bits virtual
power management:
You can’t use this CPU as it misses support for AVX. I think Big Sur is the newest macOS that can be used with this.
ok big thanks… I will go for Big Sur.
If you experience “An error occurred preparing the software update.” during install.. It is most likely caused by the ““TSC synchronization” issue at the top of the post. In my case, when i ran “dmesg | grep -i -e tsc -e clocksource” on my proxmox (in the CLI via SSH), it came back with the “Working TLC “message. But, i still had the error occur. So, I just ran the installer with 1 core and 1 socket, and it got through the installer without problems. I just added more cores after installation. Not sure why this wasn’t answered in the comments. It wasn’t exactly easy to figure out, since my tsc seemed to be working fine.
Perfect – thanks
Hi, Nick
For iMacPro1,1 – should we not use a Skylake Server processor type? All iMac Pro came with Skylake W CPUs.
I have configured a VM with
-cpu Skylake-Server-noTSX-IBRS,vendor=GenuineIntel,+invtsc,+hypervisor,kvm=on,vmware-cpuid-freq=on
and it works perfectly.
Regards,
It really doesn’t matter what the CPU model is set to as long as it has sufficient features enabled (AVX)
The OpenCore config enables DummyPowerManagement, so macOS barely has to do anything CPU-specific
For SCSH Hardware, you have “VirtIO SCSI” in the screenshots, and “VirtIO SCSI Single” in the example. What is the difference, or is there any benefit to one? i googled it and found things i didn’t understand
It doesn’t matter in this case, as the VM config doesn’t use any SCSI drives, so the model of SCSI controller configured makes no difference.
Thank you!!
Thank you Soooooooo much for your tutorial. All other Proxmox OSX VM tuts i tried i was unsuccessful with, and yours worked!! The comments here also helped.
My question, now that i got mac on vm working, If i bought the “RX 6900 XT”, & i was looking for a fast CPU & MB that is also compatible with full passthrough, does anyone have suggestions? The passthroughpost article was from 2019, and kinda outdated. Thanks!!
Basically every motherboard these days can pass through one device, which is the GPU that will be connected directly to the CPU lanes. Beyond that (like if you want to pass through onboard USB controllers) is where individual motherboard features come into play, and it’s best to search for the model you’re interested in plus “IOMMU groups” and see how the devices are organised for passthrough. Devices you want to pass through need to be in a group on their own, since everything in the group needs to be passed through together.
My other question, When i’m installing apps on the Ventura VM, such as Microsoft office, and Parallels desktop, the VM crashes/restarts before the installation is done. Although the cpu is maxed out when installing, It also happens even when the cpu isn’t maxed out.
I gave the osx vm 8gb of ram, and 4 sockets & 2 cores.. Is that a good amount, or maybe too much for my cpu? The CPU i’m using: 8 x Intel(R) Core(TM) i7-3770K CPU @ 3.50GHz (1 Socket) Thanks!!!
Also 4 VCPU’s. The socket / core thing is somewhat confusing to me :/
For that CPU you’d want to set 1 socket and 8 cores, or maybe if that doesn’t boot set 2 sockets and 4 cores, but it shouldn’t crash regardless of the CPU config.
On the host after a crash, run “dmesg” and check if the OOM-killer (Out of Memory Killer) is killing your VM because your host is running out of memory.
You can try setting the “cache” setting on the VM’s disk (on the Hardware tab) to “default (no cache)” just in case the issue is being caused by the host’s disk write cache ballooning up to an unmanageable size.
Even increasing the Ram from 8-16 there still was crashes. But, making the “Disk Default (no cache)” seemed to fix it!!
Is there any downsides to that compared to “Write Back (unsafe), that you know?
I still use laptops for mac hacks: (Latitude E7450 & Precision 5510 from Jake Lo on OSXLatitude), but will switch to VM’s as my daily driver now!!
Have you tried running OSX in Docker yet? I haven’t yet, but I plan to. Do you know of any downsides to doing it that way compared to VM’s? I’m really interested, but haven’t found much insight into differences.
I also just really want to see OSX Ventura as a unofficial container streamed on Kasm Workspace. I think that would be neat!
Increasing the guest RAM allocation does the opposite of what you want, because it puts more memory pressure on the host and makes it closer to running out of RAM, leading to the OOM killer nuking high-memory processes (like VM guests) to recover memory.
“no cache” shouldn’t have any real downsides compared to write back.
OSX in Docker still runs macOS in a QEMU VM in the backend, so the main advantage is the ability to spin up a fresh new VM quickly and easily, great for CI/CD.
I see!!
I see someone updated to 13.2 without issues, has anyone updated to 13.3? Thanks
I gave it a shot. Got 13.3 working. After about 5 restart, and another mystery crash after first time logging into 13.3.. Seems to be working as fine as before the update 🙂
hello Nick,
I am in China, and I thought somebody has already finished PVE real passthrough vga.
the way they use is to modify vm’s bios and vbios.
I don’t know what they modified in vm’s bios and vbios, however the bios and vbios is expensive(about 30 us dollar), I didn’t buy them.
Video link as bellow
https://www.bilibili.com/video/BV1kX4y1X7XS/?spm_id_from=333.999.0.0&vd_source=5fd3439a6db10c999fdf724356ed2077
I didn’t watch the video, but passthrough of a real GPU is straightforward and doesn’t require any special BIOS. I pass through my RX 580.
For passthrough of an Intel iGPU you do need a custom vBIOS:
https://github.com/patmagauran/i915ovmfPkg
noVNC Issue – It only displays about 25% of the screen, just the top portion.
I can connect via VNC Viewer and see the entire screen, I am olny having this issue when running with Proxmox noVNC.
It does display the entire screen when booting, once the VM starts up it changes to the top 25%. although the screen is all active, I can use the mouse and move it around while viewing with VNC viewer.