
macOS 11 Big Sur has now been released! If you’d like that version instead then please use my new Big Sur installation guide!
This tutorial for installing macOS Catalina using OpenCore has been adapted for Proxmox from Kholia’s OSX-KVM project and Leoyzen’s OpenCore configuration for KVM. You can get the full sourcecode on my GitHub here.
If you’d like to use Clover instead, use my older tutorial, but OpenCore works better!
Requirements
I’ll assume you already have Proxmox 6.1 or 6.2 installed. You also need a real Mac available in order to fetch the OSK key.
Your Proxmox host computer’s CPU must support SSE 4.2, so for Intel your CPU must be at least as new as Nehalem, which was the first CPU generation to bear the “Core” i5/i7 branding. Older CPUs will cause the finder to repeatedly crash after installation completes (with an Illegal Instruction exception in the graphics code).
Modern AMD CPUs also support SSE 4.2 and will work with this guide.
First step: Create an installation ISO
The easiest installer to build is a recovery image, which will download Catalina during installation. Download and run fetch-macOS.py in a terminal to download the Catalina recovery image from the Apple software distribution server (this can be run on Linux, Proxmox, or on a Mac):
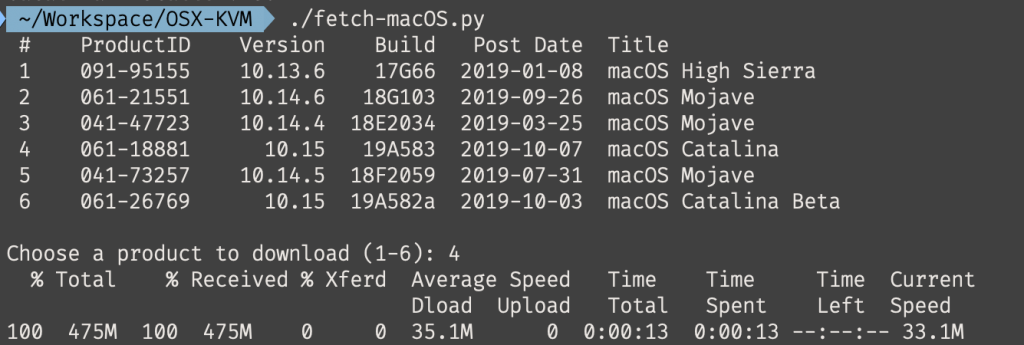
This results in a ~500MB “BaseSystem.dmg” file in the current directory. Convert that dmg into an “iso” like so if you’re building this on macOS:
hdiutil convert BaseSystem.dmg -format UDRW -o Catalina-installer.iso
mv Catalina-installer.iso.img Catalina-installer.iso
Or like so if you’re building this on Linux:
# Install the dmg2img package and...
dmg2img BaseSystem.dmg Catalina-installer.iso

# Or use qemu-img from the qemu-utils package to do it instead:
qemu-img convert BaseSystem.dmg -O raw Catalina-installer.iso
The result is actually a raw disk image, not a true ISO, but Proxmox has better tools for picking and re-using ISO images than disk images. Upload the “ISO” to your Proxmox server’s ISO store (typically /var/lib/vz/template/iso).
If you won’t have an Internet connection available to Catalina during installation, or your network can’t provide an IP address by DHCP you’ll need to build an offline installer instead. Building the offline installer requires you to have a Mac, here are the instructions.
Prepare an OpenCore image
We’ll be using OpenCore as a bootloader for Catalina. This has several improvements over my old Clover-based tutorial, like fixes to screen resolution problems, better CPU feature support, and better FileVault compatibility, and is recommended for all future builds.
Download the latest OpenCore.iso.gz release from my repository, unpack it, and upload it to Proxmox’s ISO store at /var/lib/vz/template/iso. Although it has a .iso file extension, this is actually a hard disk image.
Fetch the OSK authentication key
macOS checks that it is running on real Mac hardware, and refuses to boot on third-party hardware. You can get around this by reading an authentication key out of your real Mac hardware (the OSK key). Save the first block of C code from this page as smc_read.c. In a command prompt, change into the same directory as that file and run:
xcode-select --install # If you don't already have gcc
gcc -o smc_read smc_read.c -framework IOKit
./smc_read
It’ll print out the 64 character OSK for you. Make a note of it.
Every Mac uses the same OSK, so don’t be surprised that it doesn’t look like a random string!
Create the VM
From the Proxmox web UI, create a new virtual machine as shown below.
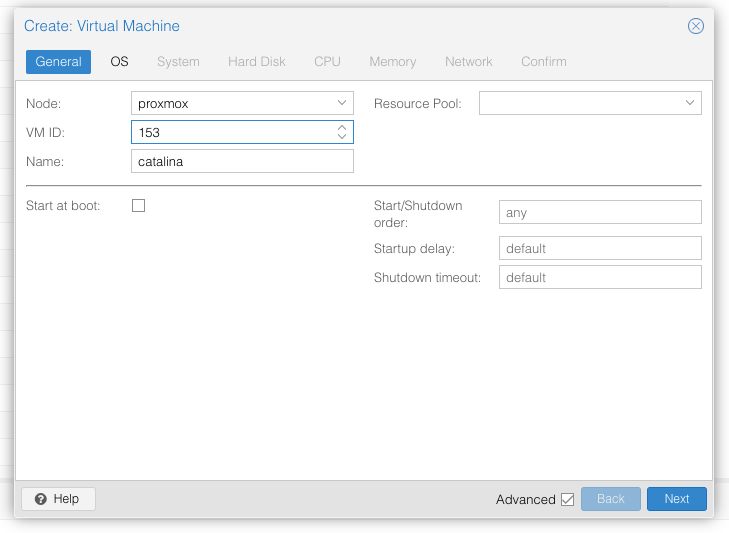
Keep a note of your VM’s ID 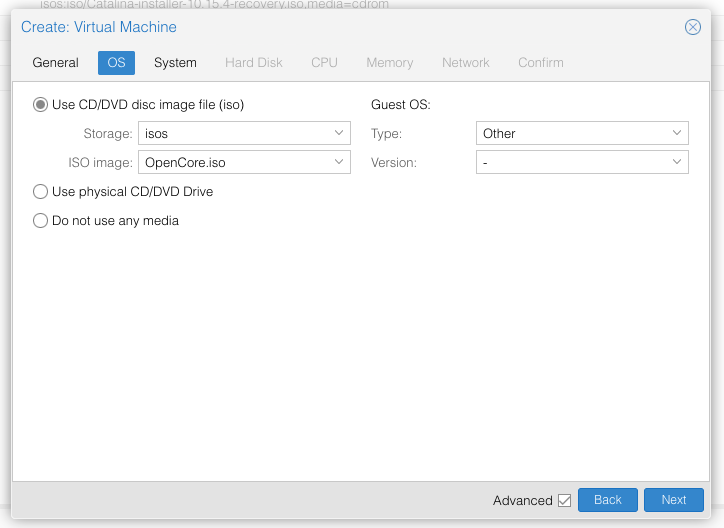
Select the OpenCore ISO you uploaded and set OS type to “Other” 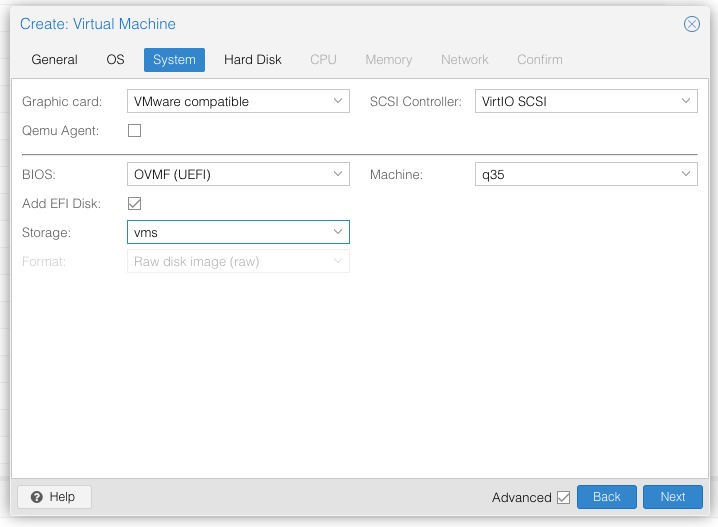
Set graphics to “VMWare Compatible”, set BIOS to OVMF (UEFI), set Machine to Q35, Tick Add EFI Disk and pick storage for it. On Proxmox 7 you must untick “pre-enroll keys” 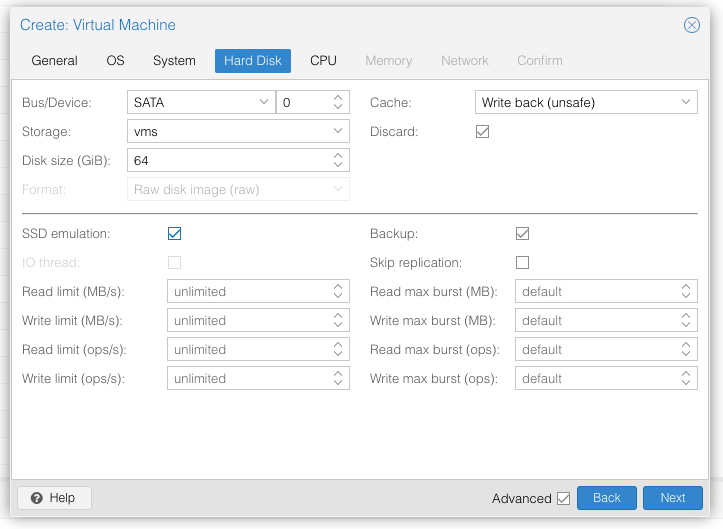
Set the size of the hard disk (I chose 64GB). Attach it to SATA0. Enable discard and SSD emulation to support TRIM. 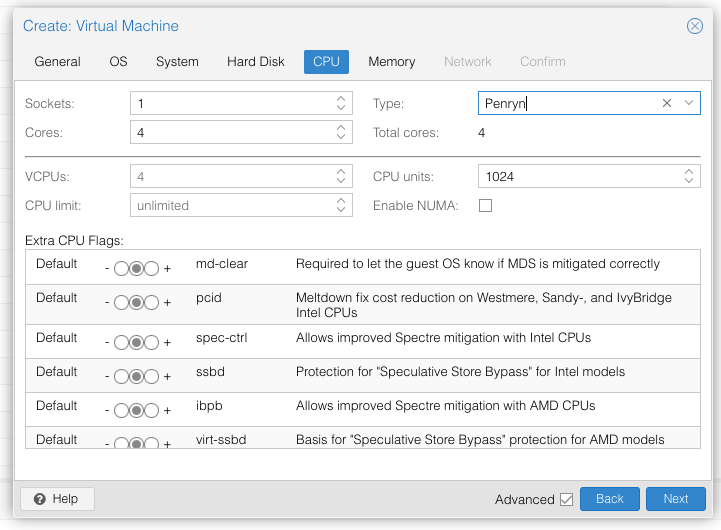
Set the number of cores for the VM, use a power of two (e.g. 1, 2, 4, 8, see note later). Set the CPU to Penryn. 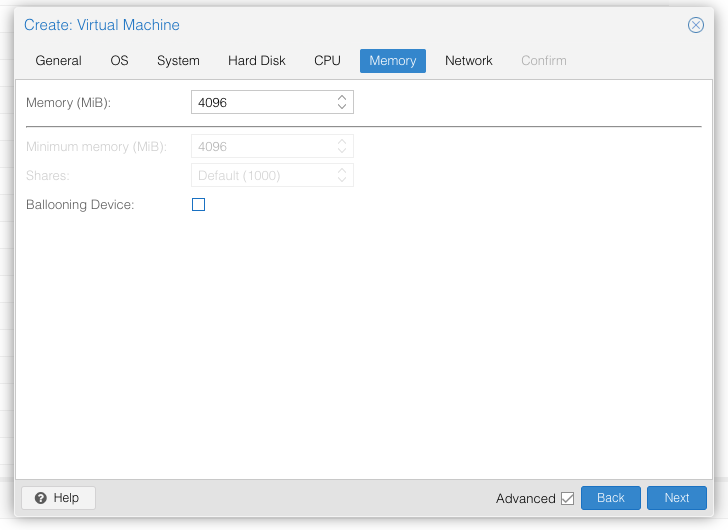
I chose a memory size of 4096MB. Disable ballooning because there is no balloon driver available for macOS. 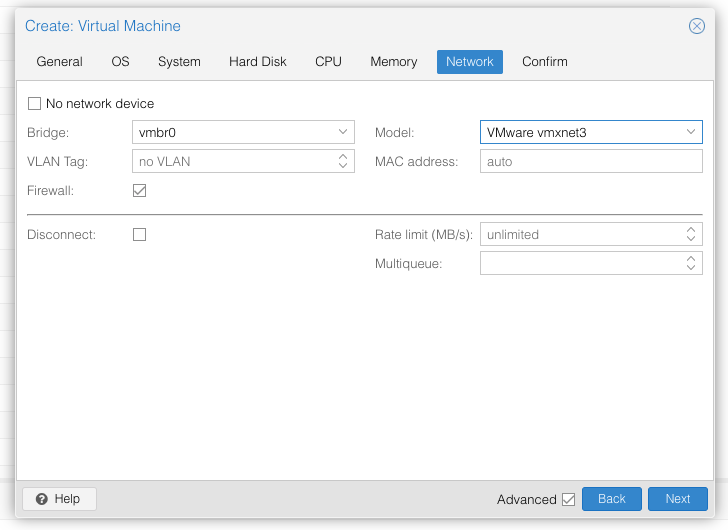
Choose VMWare vmxnet3 for the network model
In the Options page for the VM, ensure that “use tablet for pointer” is set to “Yes”.
In the Hardware page for the VM, add a second DVD drive at IDE0, set it to use your Catalina-installer.iso.
Don’t try to start the VM just yet. First, SSH into your Proxmox server so we can make some edits to the configuration files.
Edit /etc/pve/qemu-server/YOUR-VM-ID-HERE.conf (with nano or vim). Add this line, being sure to substitute the OSK you extracted earlier into the right place:
args: -device isa-applesmc,osk="THE-OSK-YOU-EXTRACTED-GOES-HERE" -smbios type=2 -device usb-kbd,bus=ehci.0,port=2
(A USB keyboard is added here because macOS doesn’t support QEMU’s default PS/2 keyboard.) Ensure the args are all on a single line!
We also need to add a -cpu argument. If your host CPU is Intel, add this to the end of the “args” line:
-cpu host,kvm=on,vendor=GenuineIntel,+kvm_pv_unhalt,+kvm_pv_eoi,+hypervisor,+invtsc
This will pass through all of the features that your CPU supports. OpenCore’s config will pretend to macOS that the CPU’s model name is Penryn for compatibility.
If your host CPU is AMD, or the above argument doesn’t work for you, use this more-compatible alternative:
-cpu Penryn,kvm=on,vendor=GenuineIntel,+kvm_pv_unhalt,+kvm_pv_eoi,+hypervisor,+invtsc,+pcid,+ssse3,+sse4.2,+popcnt,+avx,+avx2,+aes,+fma,+fma4,+bmi1,+bmi2,+xsave,+xsaveopt,check
This pretends that your CPU is Penryn, which will keep macOS happy even if your host CPU is AMD, and adds a bunch of newer required and optional CPU features on top. Features that your host CPU doesn’t support will be ignored (a warning will be printed to the console during launch with qm start 1xx), but note that macOS won’t work without SSE4.2 support.
Now find the lines that define the two “ISOs” (ide0 and ide2), and remove the “,media=cdrom” part from them. Add “,cache=unsafe” in its place. This will treat these as hard disks rather than DVD drives.
Save your changes, return to the Options tab, and change the boot order to put IDE2 (the OpenCore image) first. Your final VM configuration file should resemble this:
args: -device isa-applesmc,osk="..." -smbios type=2 -device usb-kbd,bus=ehci.0,port=2 -cpu host,kvm=on,vendor=GenuineIntel,+kvm_pv_unhalt,+kvm_pv_eoi,+hypervisor,+invtsc
balloon: 0
bios: ovmf
bootdisk: ide2
cores: 4
cpu: Penryn
efidisk0: vms:vm-100-disk-1,size=1M
ide0: isos:iso/Catalina-installer.iso,cache=unsafe,size=2094688K
ide2: isos:iso/OpenCore.iso,cache=unsafe,size=150M
machine: q35
memory: 4096
name: catalina
net0: vmxnet3=...,bridge=vmbr0,firewall=1
numa: 0
ostype: other
sata0: vms:vm-100-disk-0,cache=unsafe,discard=on,size=64G,ssd=1
scsihw: virtio-scsi-pci
smbios1: uuid=...
sockets: 1
vga: vmware
Configure Proxmox
On Proxmox, run “echo 1 > /sys/module/kvm/parameters/ignore_msrs” to avoid a bootloop during macOS boot. To make this change persist across Proxmox reboots, run:
echo "options kvm ignore_msrs=Y" >> /etc/modprobe.d/kvm.conf && update-initramfs -k all -u
Unlike Clover, OpenCore doesn’t require Proxmox’s OVMF package to be patched, so if you had previously installed my pve-edk2-firmware package, and you don’t have any Clover VMs left, you can revert to the vanilla Proxmox package by running “apt-mark unhold pve-edk2-firmware; apt install pve-edk2-firmware”. If you still have Clover VMs that need it, you can continue to use my patched package, it’ll work too.
Install Catalina
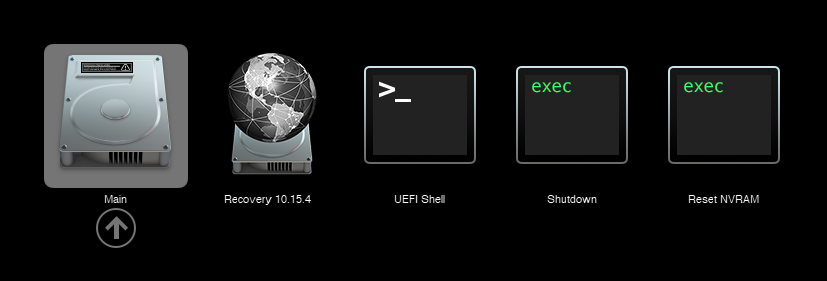
Now start up your VM, it should boot to the OpenCore boot picker:
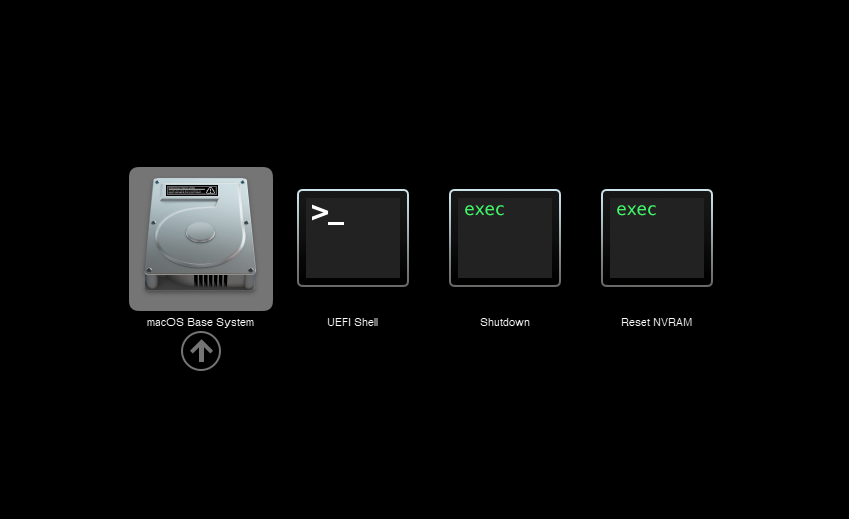
Press enter to boot the “macOS Base System” entry and the installer should appear.
Our virtual hard drive needs to be erased/formatted before we can install to it, so select the Disk Utility option. Follow the steps below to format the disk:
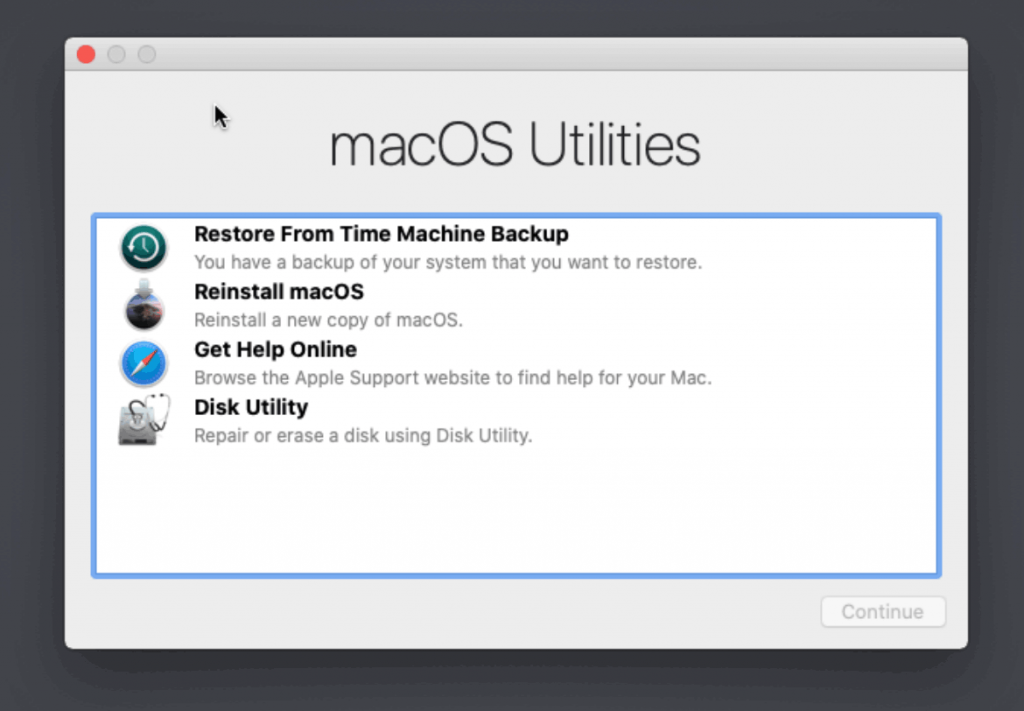
Select Disk Utility 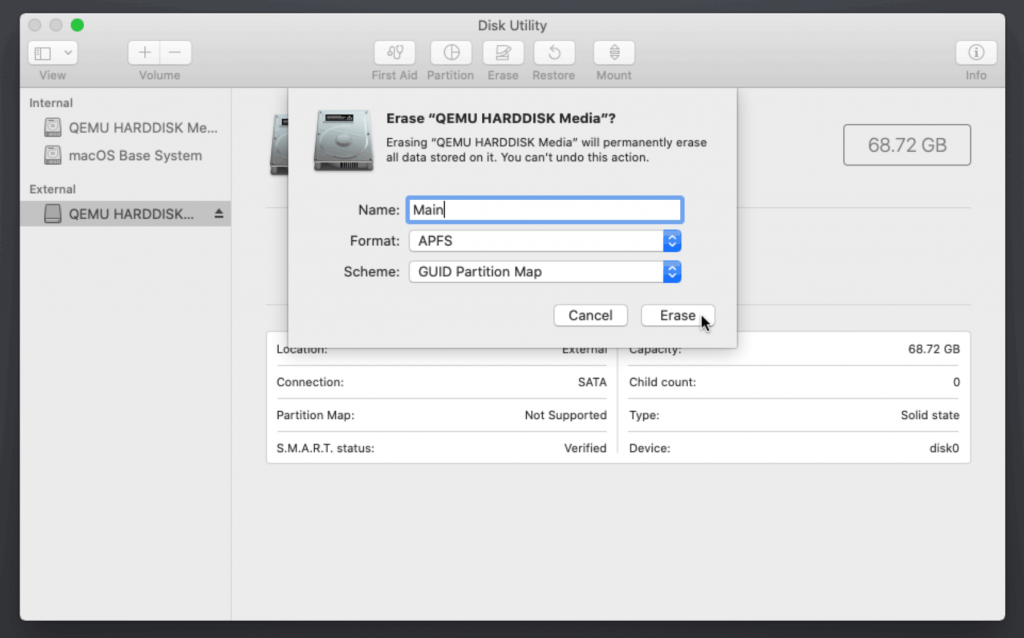
Erase the main disk (it’ll appear as an external drive). Choose APFS. I called mine “Main”. Avoid “Encrypted” at this stage
Now we’re ready to begin installation!
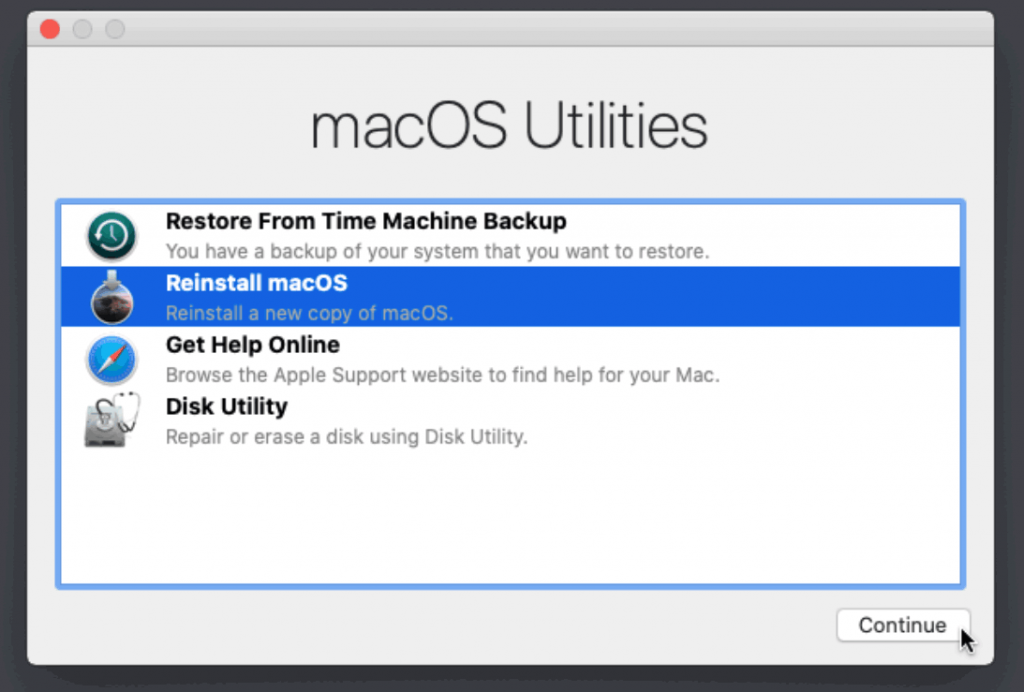
Reinstall macOS 
Continue… 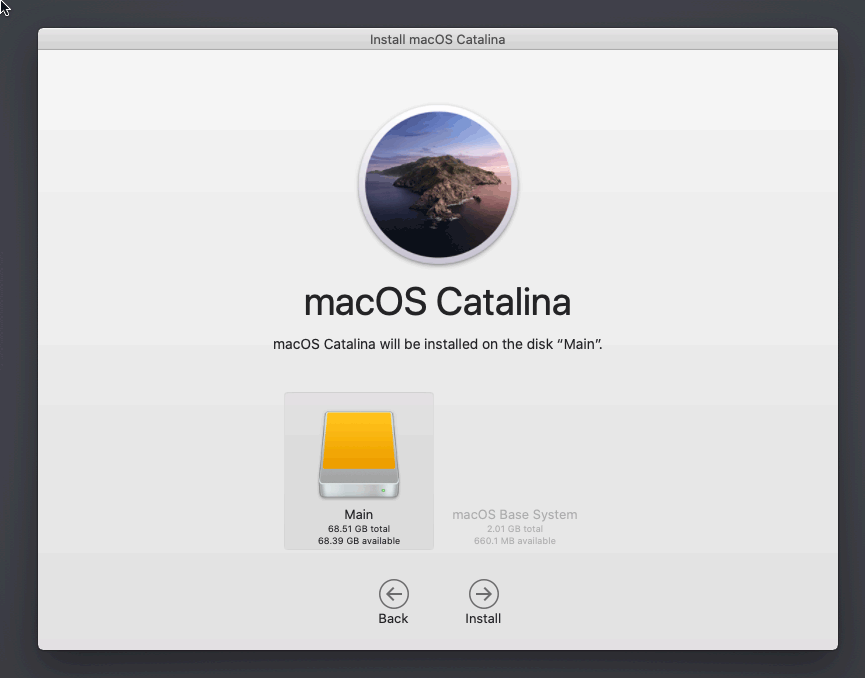
Choose the disk you erased 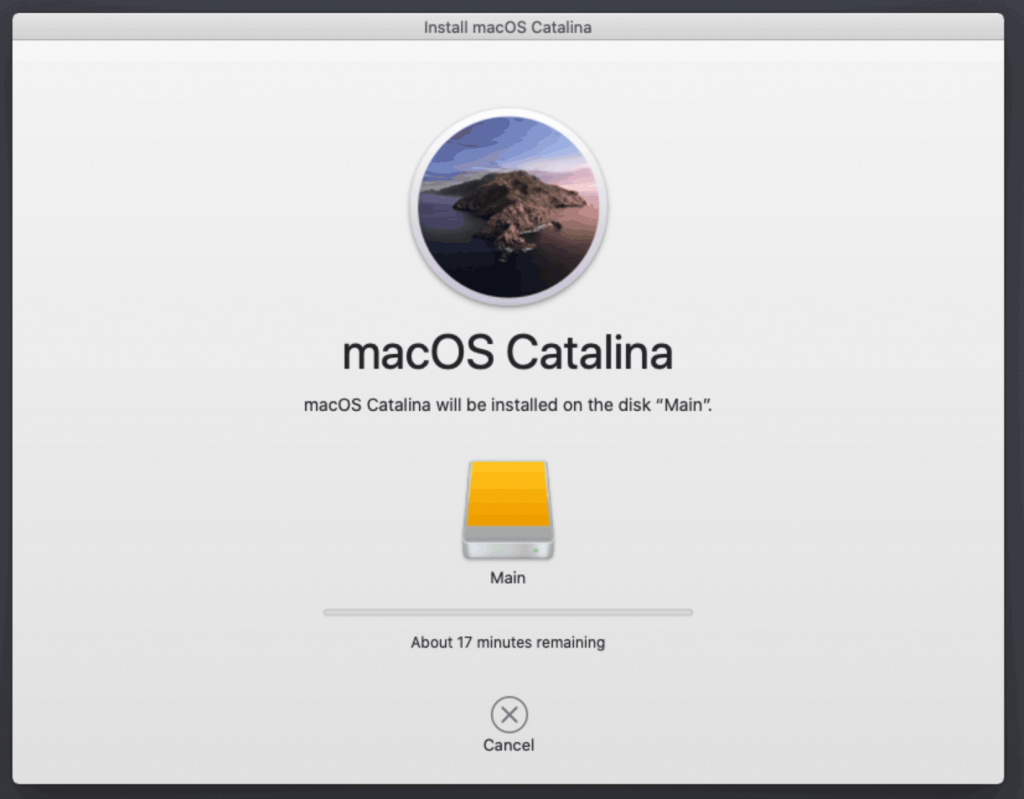
It’s installing!
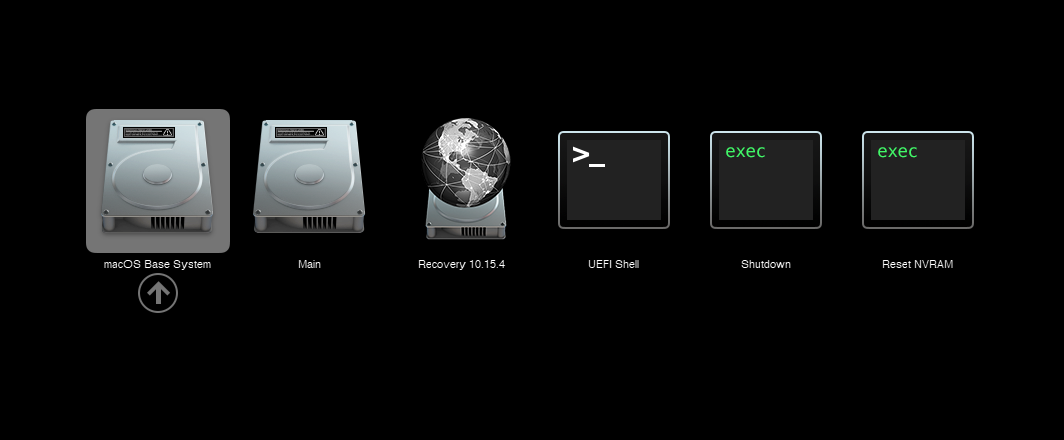
After the first stage of installation, the VM will reboot. Pick the “macOS Installer” entry to continue installation:

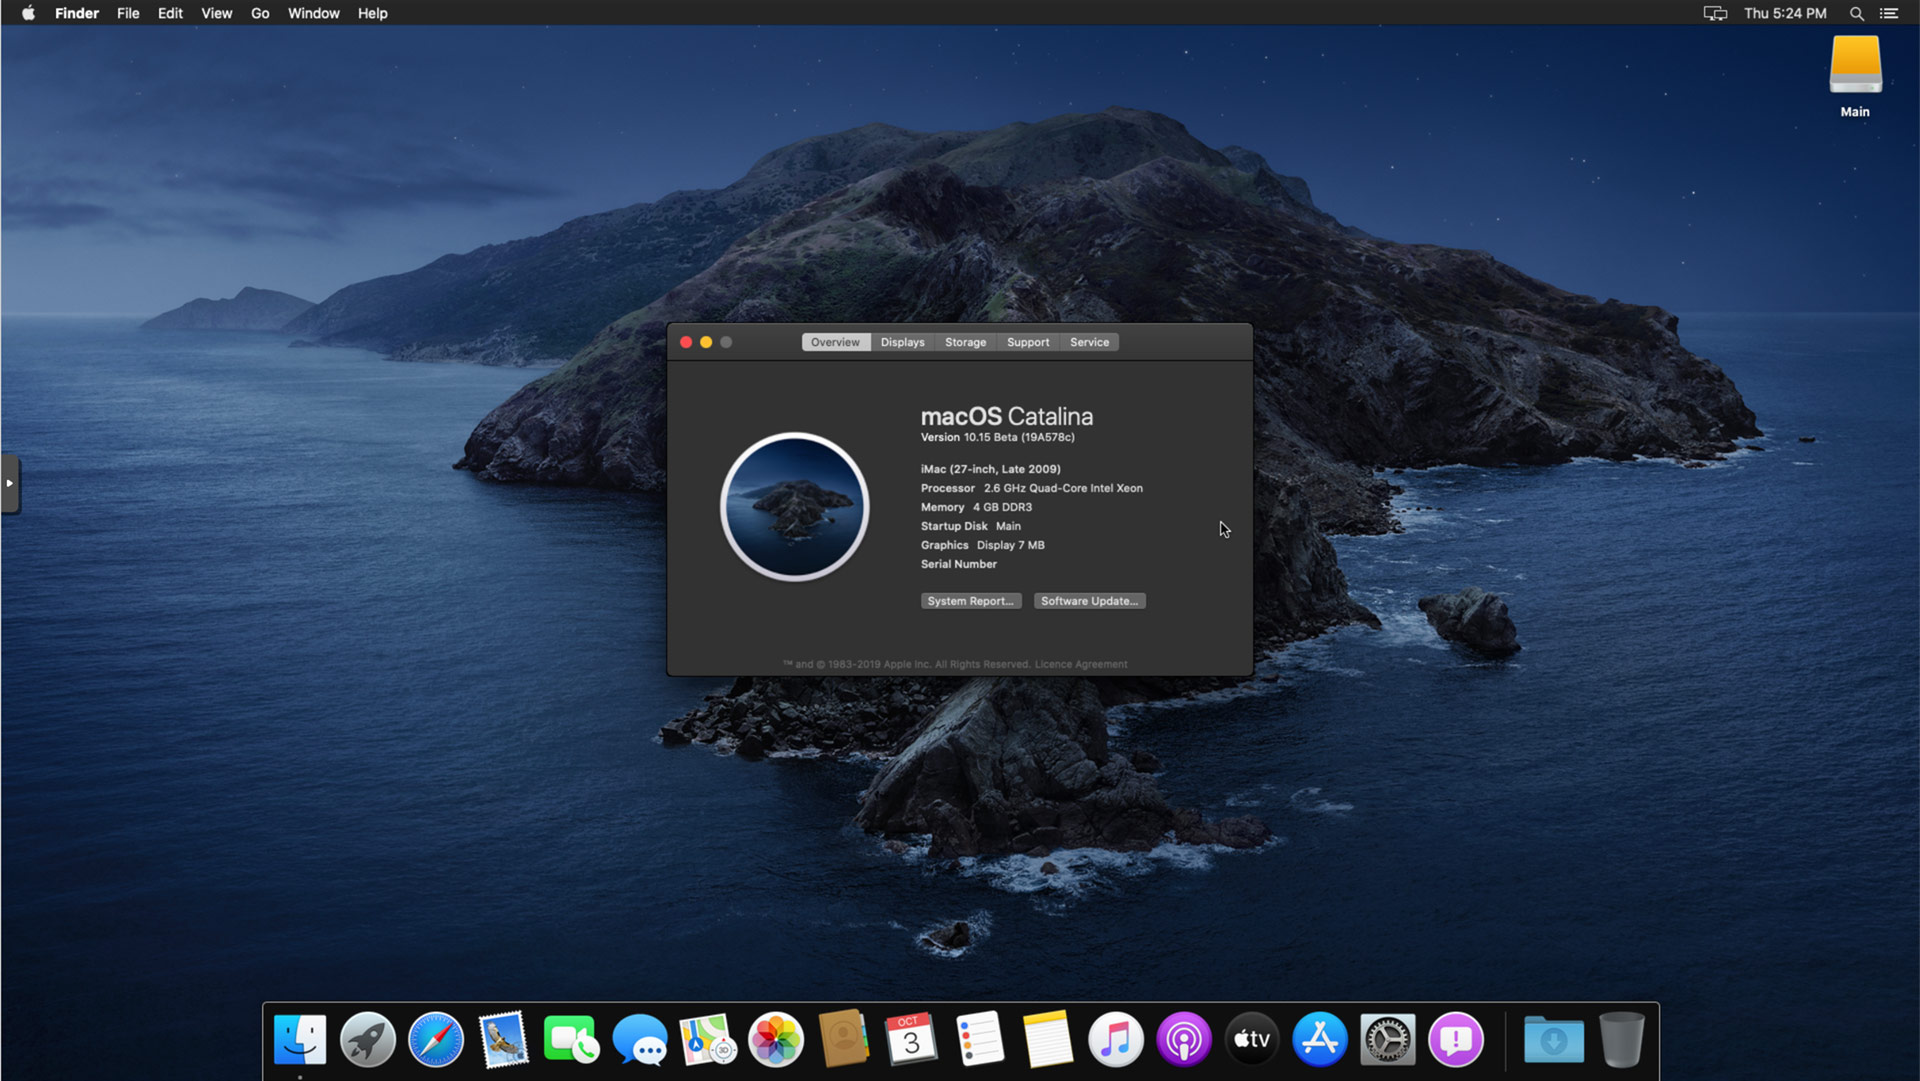
The VM will finish installation and reboot itself a second time. Now the installation is complete, so choose the name of your main disk to boot (mine’s called Main):
Answer the initial install questions, and you’ll be logged on! (Note that you’ll want to hold off on logging into your iCloud account until you’ve configured your SMBIOS to your liking)
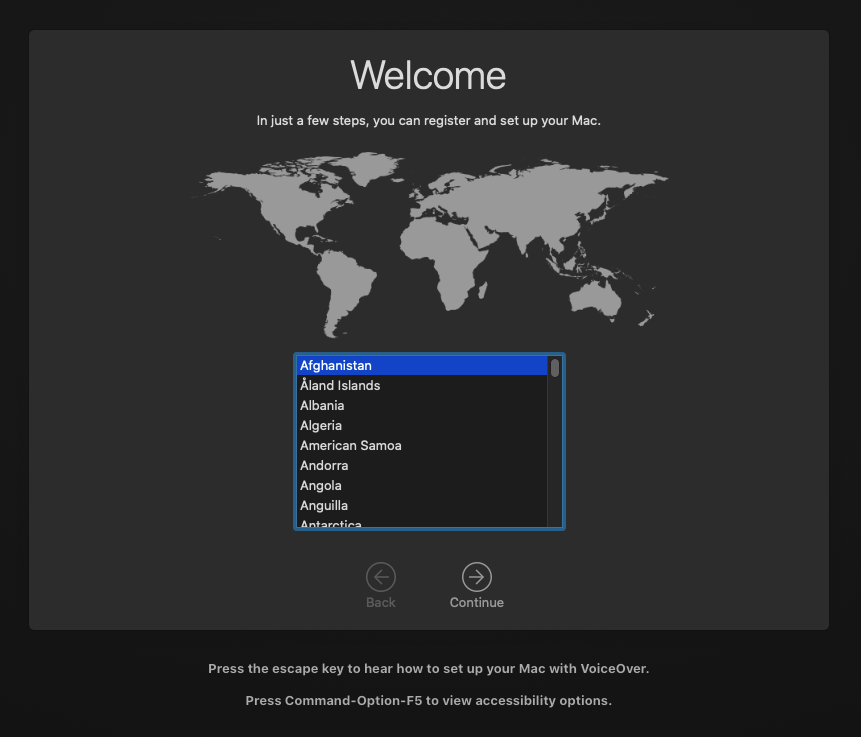
Answer the install questions 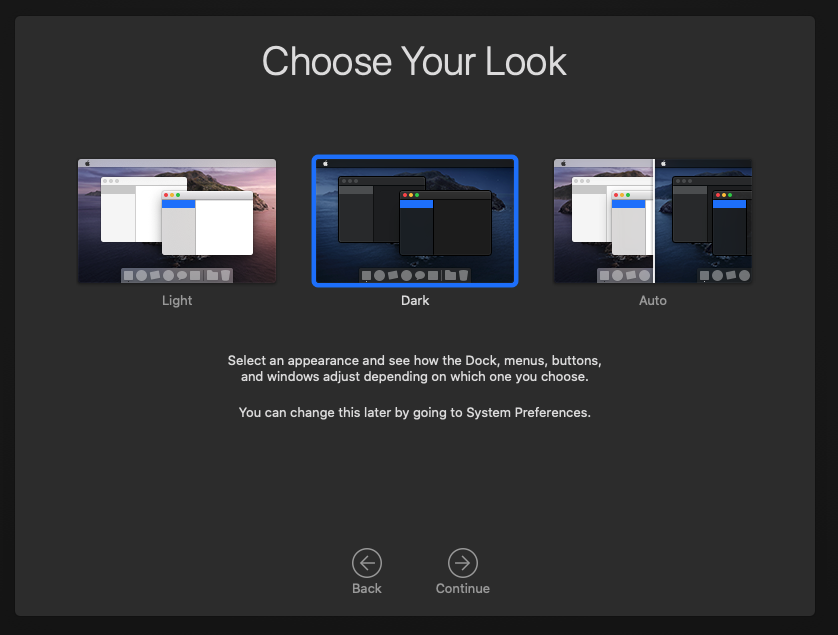
New automatic theme switching! 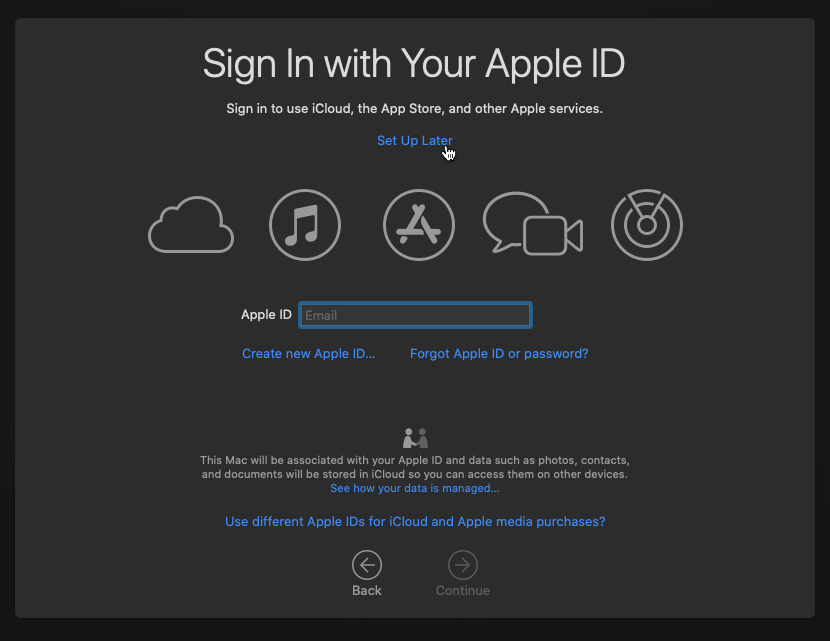
Avoid logging into iCloud just yet
Make the OpenCore install permanent
We’re currently booting using OpenCore from the attached OpenCore ISO. Let’s install that to the hard drive instead. Pop open Terminal and run “diskutil list” to see what drives we have available.
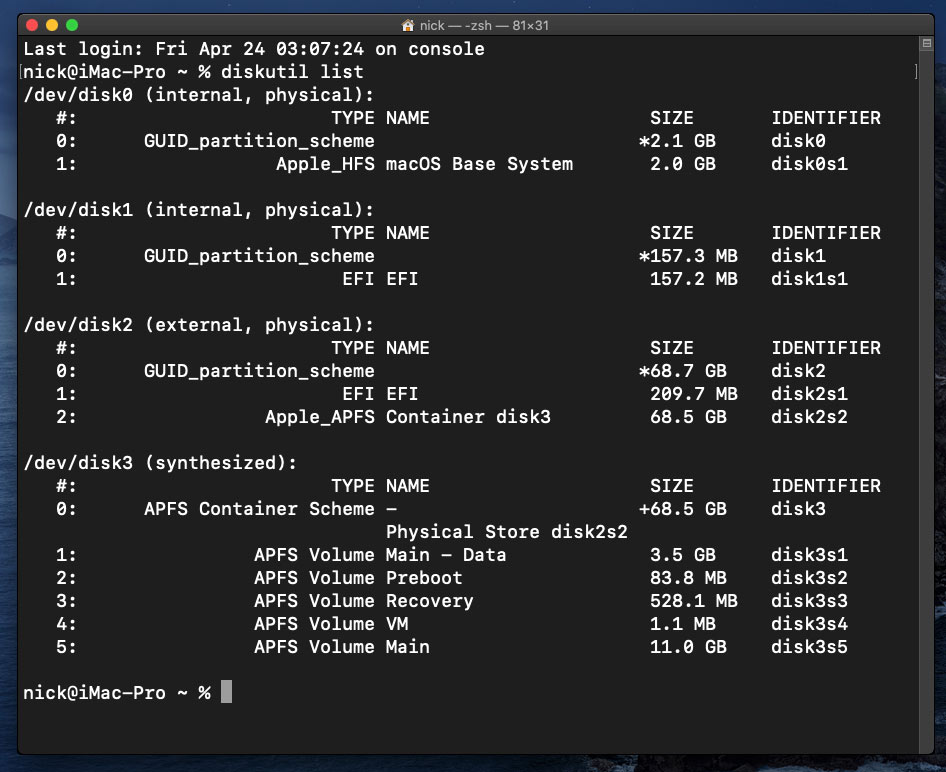
Use “sudo dd if=<source> of=<dest>” to copy the “EFI” partition from the OpenCore CD and overwrite the EFI partition on the hard disk. The OpenCore CD is the small disk (~150MB) that only has an EFI partition on it, and the main hard disk is the one with the large Apple_APFS “Container” partition on it.
In my case these EFI partitions ended up being called disk1s1 and disk2s1 respectively, so I ran “sudo dd if=/dev/disk1s1 of=/dev/disk2s1” (note that if you get these names wrong, you will overwrite the wrong disk and you’ll have to start the installation over again!).
Now shut down the VM, and remove both the OpenCore and the Catalina installer drives from the Hardware tab. On the Options tab, edit the boot order to place your SATA disk as the first disk. Boot up. If everything went well, you should see the OpenCore boot menu, and you can select your “Main” disk to boot Catalina:
Sleep management
I found that I was unable to wake Catalina from sleep using my mouse or keyboard. If you encounter the same problem, you can either disable system sleep in Catalina’s Energy Saver settings to avoid the issue, or you can manually wake the VM up from sleep from Proxmox by running:
qm monitor YOUR-VM-ID-HERE
system_wakeup
quit
Editing your OpenCore/EFI settings
The Configuration.pdf that explains the OpenCore config.plist file can be found along with the OpenCore release on my GitHub.
To mount your EFI partition in macOS so you can edit config.plist, first check the “identifier” of your EFI partition in the terminal:
~$ diskutil list
/dev/disk0 (external, physical):
   #:                   TYPE NAME              SIZE       IDENTIFIER
   0:  GUID_partition_scheme                  *512.1 GB   disk0
   1:                    EFI EFI               209.7 MB   disk0s1
   2:             Apple_APFS Container disk1   511.9 GB   disk0s2
Then you can mount it like so:
sudo mkdir /Volumes/EFI
sudo mount -t msdos /dev/disk0s1 /Volumes/EFI
Now you can edit /Volumes/EFI/OC/config.plist with your favourite text editor to make your changes. (TextEdit is not a great choice because it likes to insert curly quotes into the file and otherwise break things, there are some dedicated plist editors available such as XCode).
If you’re unable to boot macOS, you can edit the config.plist using the “UEFI Shell” option in the OpenCore boot menu instead.
Enter “FS0:” and press enter to open up the first available filesystem, then run “edit EFI\OC\config.plist” (if the file isn’t found, try switching to another filesystem like fs1:). When you’re done editing, press control+Q to exit, “Y” to save, then run “exit” to return to the OpenCore menu. You need to reboot for your changes to take effect.
Automatic boot
In config.plist, set Misc/Boot/Timeout to a non-zero value to allow the default boot option be chosen automatically after that delay in seconds. I’ve disabled this by default because it causes the installer ISO to re-enter its main menu instead of continuing the second stage of installation.
Verbose boot
To boot macOS in Verbose mode to diagnose boot problems, edit config.plist to change the “bootargs” in the NVRam section from “keepsyms=1” to “keepsyms=1 -v”.
Changing screen resolution
To change macOS’ screen resolution, you need to edit the UEFI/Output/Resolution setting in config.plist, the default is 1920×1080@32.
You should be able to change this to any of the modes that the system OVMF menu offers (hit F2 at the start of guest boot and choose “Device Manager/OVMF Platform Configuration” to see which resolutions are available).
Video performance
Because there is no guest video acceleration available for macOS, video performance is poor.
In Google Chrome in the guest you will need to toggle off the setting to “use hardware acceleration when available” to improve issues with elements not being drawn or flickering (especially video). Safari may be a better choice.
macOS’s built in “Screen Sharing” feature offers dramatically better framerates and latency than Proxmox’s browser-based VNC console, so if you have a real Mac to act as a viewing console, you can enable that in the VM’s “Sharing” settings and connect to the VM using the Screen Sharing app from your Mac instead:
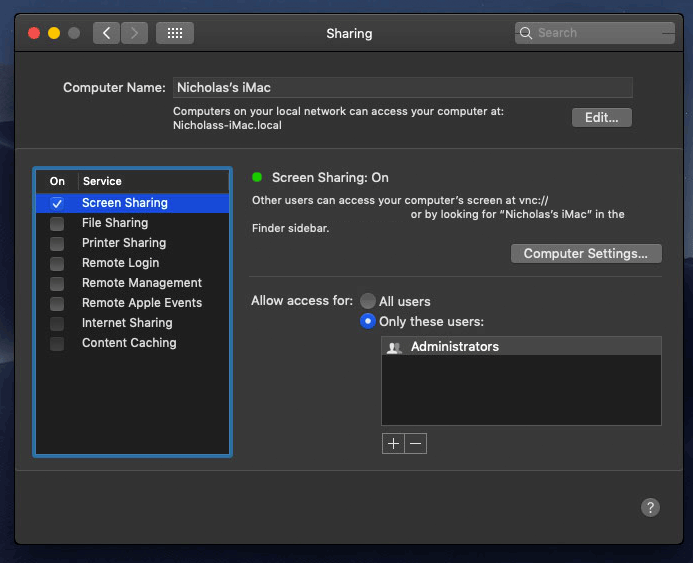
Apparently Screen Sharing is also compatible with VNC clients like RealVNC, so you should be able to connect to it from Linux or Windows consoles using RealVNC.
The real magic bullet for video performance is to pass through a compatible video card using PCIe passthrough (though note that Catalina does not support most NVidia cards). This offers near-native performance. You can read more about how I’m using PCIe passthrough on my own installation here.
USB passthrough
Since I want to use this as my primary computer, I want to use a USB keyboard and mouse plugged directly into Proxmox, rather than sending my input through the web VNC console.
Proxmox has good documentation for USB passthrough. Basically, run “qm monitor YOUR-VM-ID-HERE”, then “info usbhost” to get a list of the USB devices connected to Proxmox:
qm> info usbhost
 Bus 3, Addr 12, Port 6, Speed 480 Mb/s
 Class 00: USB device 8564:1000, Mass Storage Device
 Bus 3, Addr 11, Port 5.4, Speed 12 Mb/s
 Class 00: USB device 04d9:0141, USB Keyboard
 Bus 3, Addr 10, Port 5.1.2, Speed 12 Mb/s
 Class 00: USB device 046d:c52b, USB Receiver
 Bus 3, Addr 9, Port 14.4, Speed 12 Mb/s
 Class 00: USB device 046d:c227, G15 GamePanel LCD
 Bus 3, Addr 8, Port 14.1, Speed 1.5 Mb/s
 Class 00: USB device 046d:c226, G15 Gaming Keyboard
In this case I can add my keyboard and mouse to USB passthrough by quitting qm, then running:
qm set YOUR-VM-ID-HERE -usb1 host=04d9:0141
qm set YOUR-VM-ID-HERE -usb2 host=046d:c52b
This saves the devices to the VM configuration for you. You need to reboot to have the new settings apply. Note that the emulated USB3 device doesn’t work with macOS, so don’t set “usb3=1”.
You can also pass through USB devices by passing through an entire USB controller using Proxmox’s PCIe passthrough feature, which gives much better compatibility.
FileVault

FileVault now works with OpenCore, so you can encrypt your boot disk by using the option in macOS’ system security preferences. But be certain to keep a copy of your recovery key and keep your backups up to date.
Using an odd number of CPU cores
macOS doesn’t like it if your CPU has a weird number of cores, like 3 or 6. You can fix this on the Hardware tab. Edit the Processors settings, and tick the Advanced box. Round up the number of cores you want (e.g. 3) to a nice power of two (4, 8, 16, etc) and use that for the “Cores” setting, but set the “VCPUs” setting to the number of cores you actually want to be used (3), like so:
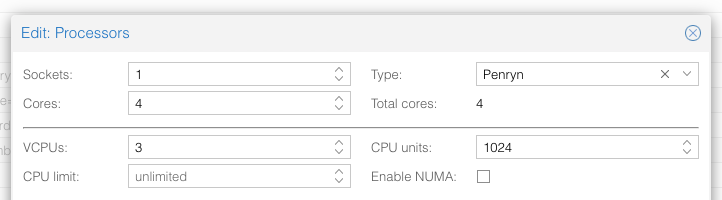
This will cause macOS to see that system supports a maximum of 4 cores, but that one core is absent since it hasn’t been hotplugged yet, so macOS will only use 3 cores.
Another approach is to use an odd number of sockets in order to make the core count a power of two. e.g. to pass 6 cores, set Sockets to 3, and Cores to 2 (or 4 to pass both threads per core).
Proxmox doesn’t let us set the number of threads per core in the VM config, so if you want to pass every thread of a hyperthreaded 6-core CPU, and have them reported to the guest as hyperthreads, add -smp 12,sockets=3,cores=2,threads=2 to your “args”, or for a 56-core hyperthreaded CPU, -smp 112,sockets=7,cores=8,threads=2.
Nested emulation
If your host CPU is Intel, and you used “-cpu host” in your VM config file (explained above), you can use Nested Virtualisation in macOS. This allows you to run VirtualBox VMs, the Android emulator, or Docker inside your macOS guest. You just need to tweak your Proxmox system config to enable this as explained in the Wiki:
https://pve.proxmox.com/wiki/Nested_Virtualization
macOS’s Hypervisor framework doesn’t support nested virtualisation on AMD host CPUs, but apparently VirtualBox uses their own virtual machine driver which does work (I haven’t tried this myself). I imagine this will stop working in the next version of macOS, since they’re planning to add a bunch of restrictions on third-party kexts and might force VirtualBox to use Hypervisor.framework.
Getting iMessage and FaceTime to work
Unlike the App Store and iCloud, these Apple services actually pay attention to your Mac’s serial number.
Following this guide should get these working for you:
https://dortania.github.io/OpenCore-Post-Install/universal/iservices.html#generate-a-new-serial
I had already generated a serial number for my Mac (when I check the Support Status for it, it says “We’re sorry, but this serial number isn’t valid. Please check your information and try again”) and added it to my OpenCore config, so all I had to do on top of that was use Hackintool to help me mark my Ethernet adapter en0 as built-in. FaceTime then worked immediately. I didn’t need to follow the rest of the guide.
Fixing “guest boots to UEFI shell”
If your guest ends up booting to the UEFI shell instead of showing the OpenCore boot menu, especially if you’ve just updated OpenCore to a new version, you’ll need to edit the guest’s UEFI boot entries to fix this.
At the very start of guest boot, hit F2 to enter guest UEFI settings.
First we’ll remove the old entries. Choose the Boot Maintenance option, then Boot Options -> Delete Boot Option. Use the spacebar to tick any old Clover or OpenCore entries (avoid ticking the EFI Internal Shell option, you want to keep that!). Select “Commit Changes and Exit”.
Now we’ll add the correct entry for OpenCore back in. Select Add Boot Option. Navigate through the device tree to EFI/BOOT/BOOTx64.efi and select it, name this new option “OpenCore” or similar. Again Commit Changes and Exit.
Go to the Change Boot Order and move OpenCore to the top. Commit Changes and Exit.
Now back out to the main menu and choose Reset, and you should successfully boot into OpenCore this time.
Hi Nick,
Thanks so much for putting this togethers, and especially for the git repo with an easily reproducible build. I just submitted a quick pull request there to fix up a few issues I ran in to.
I was able to do an in-place upgrade from Clover to OpenCore with almost no issues. I just had to copy over the relevant PlatformInfo from my Clover config to the OC config, but even then, iCloud services wasn’t quite happy, but a quick sign out and sign in took care of that.
Finally, for anyone running or wanting to run their macOS disk as a VirtIO block device, the trick is to set the ScanPolicy in the OC config to 0, as whatever device sub-type that the VirtIO device presents itself as isn’t one of the ones it’s possible to whitelist.
Hi Nicks..
maybe a thanks to people have pointed you in this?
Hi! Thanks for the guide! I tried following it on a Ryzen 3600 server and I managed to install OSX, however I am not able to boot into the newly installed system.
After choosing the boot disk, it shows the Apple logo and a loading bar, the loading bar reaches 100% but it never moves forward.
Do you have any idea what I should be looking at?
Did you choose the -cpu Penyrn version of the args line? You need that one.
https://www.nicksherlock.com/2019/10/installing-macos-catalina-10-15-on-proxmox-6/#comment-34562
I mean this..
Thank you for a great installation manual. Worked well for me incl. GPU passthrough, but I cannot get the keyboard and mouse working on the host. I want to use the monitor connected to the host gpu and keyboard and mouse as well. The monitor works but I cannot do anything with the keyboard and mouse. My feeling is that the Proxmox host locks them when it boots and never releases them. Anybody know how to solve this?
Interesting is that in my W10 VM it works…
My config: ASRock TRX40 Creator, 3970X, Radeon 5700XT
Thank you for any help!
Since you’re using a passthrough GPU rather than using the console, in order to to send keyboard and mouse to the guest you need to pass those through too using USB passthrough, or PCIe passthrough of an entire USB controller. I do the latter on my build:
https://www.nicksherlock.com/2018/11/my-macos-vm-proxmox-setup/
Thank you Nick. I have tried virtually everything I have found on your site, Proxmox and other sites to no avail. I might have messed up some things together. Tried to start fresh but still no result.
What I don’t get is that my W10 VM runs fine with the keyboard and mouse.
Show your VM config for the keyboard and mouse passthrough. (you need to manually configure this since you won’t be using the visual console to send them to the VM)
This is my current config. I also did the hostpcix: … for all USB controllers to no avail.
args: -device isa-applesmc,osk=”” -smbios type=2 -cpu host,kvm=on,vendor=GenuineIntel,+kvm_pv_unhalt,+kvm_pv_eoi,+hypervisor,+invtsc,+pdpe1gb
balloon: 0
bios: ovmf
boot: cdn
bootdisk: sata0
cores: 64
cpu: Penryn
efidisk0: local-lvm:vm-110-disk-1,size=4M
hookscript: local:snippets/hackintosh.sh
hostpci0: 23:00,pcie=1,x-vga=1
machine: q35
memory: 40960
name: MacCatalinaTest
net0: vmxnet3=36:D4:AB:D3:C1:27,bridge=vmbr0,firewall=1
numa: 0
ostype: other
sata0: local-lvm:vm-110-disk-0,cache=unsafe,discard=on,size=128G,ssd=1
scsihw: virtio-scsi-pci
smbios1: uuid=2182fb14-1e55-4d8d-bd74-2035aa63b318
sockets: 1
usb0: host=5-1,usb3=1
usb1: host=9-2,usb3=1
vmgenid: be37f8a8-8cb2-4870-b154-07eb79cdde4f
usb3=1 does not work on Catalina, remove that from the USB config lines.
Thank you Nick for your prompt responses. I really appreciate all your help. I did this before and now again and still it boots into the picker and nothing works, not keyboard and no mouse.
I also did the adjustments to take the USB controllers away from the host. Either way again no result.
If you have run a script like that snippets script I have for my system then your USB controller is probably still bound to vfio-pci. In that case it won’t be available for your usb0 and usb1 lines to access.
You can rebind it to your host’s USB driver with something like (update PCI address as appropriate):
echo 0000:82:00.0 > /sys/bus/pci/drivers/xhci/bind
Use lspci -k to see if you were successful.
Note that your USB device numbers could change as the USB bus might get renumbered, you should check those again.
Maybe we are getting to the bottom of this… I don’t have xhci but only xhci_hcd. There is a bind but with no access even as root.
What I don’t understand is that I am at best stuck with this:
qm> info usb
Device 1.1, Port 1, Speed 12 Mb/s, Product Corsair Gaming K95 RGB PLATINUM, ID: usb0
Device 1.2, Port 2, Speed 12 Mb/s, Product Corsair Gaming M65 Pro RGB Mous, ID: usb1
qm> info usbhost
Bus 11, Addr 2, Port 5, Speed 480 Mb/s
Class ef: USB device 26ce:0a01, USB Audio
Bus 9, Addr 4, Port 6, Speed 12 Mb/s
Class e0: USB device 8087:0029
Bus 9, Addr 3, Port 5, Speed 12 Mb/s
Class 00: USB device 26ce:01a2, LED Controller
Bus 9, Addr 2, Port 2, Speed 12 Mb/s
Class 00: USB device 1b1c:1b2e, Corsair Gaming M65 Pro RGB Mouse
Bus 3, Addr 2, Port 2, Speed 12 Mb/s
Class 00: USB device 1b1c:1b2d, Corsair Gaming K95 RGB PLATINUM Keyboard
qm>
Any chance you could post your configs/passthroughs for mobo and CPU? As I have same mobo and cpu
Hi Nick,
I have noticed a strange problem, if I pass through a USB 3 device to the VM I lose it and all other passed through USB devices. I have to declare all devices as not USB 3 (uncheck the USB3 checkbox) for any USB to work at all.
Is this normal? Is there something I am missing?
Thanks,
Leoyzen notes that macOS doesn’t work with the emulated XHCI (USB 3) controller:
https://github.com/Leoyzen/KVM-Opencore/blob/master/README.md#usb
macOS does support specific USB controller chipsets by PCIe passthrough though, I’m passing a USB 3 PCIe card to my VM.
I guess I will have to do the same myself. I think I will buy a USB3 card.
Thanks for the help.
If your motherboard’s IOMMU groups are nice then you can pass through one of your onboard controllers.
They are nice but they are affected by another bug. If I pass either the USB controllers or built in Audio, proxmox will crash. Something related to flr. Another thing to patch in the kernel I guess.
Nick – firstly thanks for an amazing guide, performance on my Nuc10 i7 is surprisingly good, using VNC no different to my regular Mac HW.
I have a 8TB APFS external drive that i wanted to passthrough to the VM over USB3, for the reason you’ve given it didn’t work.
Surprisingly passing it through from host to VM as a Virtio drive works perfectly.
Find drive using : ls /dev/disk/by-id/
Passthrough using : qm set -virtio2 /dev/disk/by-id/usb-WD_Elements_25A3_3142343225444555A-0:0
Means the drive remains portable to use on other Macs and might help someone!
Thanks – Paul
Yep, this is the way to pass through a disk from the host. When using this method, take special care never to mount the disk on any other VM (or on the host system) at the same time – there is no system in place to prevent you from accidentally doing this, and it will cause massive filesystem corruption as two operating systems unknowingly attempt to write to the same drive.
Can someone expand on this warning please? What exactly needs to be further configured regarding SMBIOS, can that noe be changed later on and are there any risks like being banned from iCloud?
hold off on logging into your iCloud account until you’ve configured your SMBIOS to your liking
Everything can be changed later on, but this will change the Mac’s reported serial number and other identifiers. This signals blatant funny-business if anyone (staff or automated system) ever glances at your iCloud account, since you’ll have two Macs appearing these that share half their unique identifiers, which never happens with real hardware. Now I’ve done a lot of messing around and have probably had 15 “iMacs” on my account over my account’s lifetime, and personally never had an issue, but it’s worth avoiding this just so we don’t need to find out what happens when Apple takes notice.
Setting up the SMBIOS is picking a Mac model name (if you want to change it from the “iMacPro1,1” for compatibility with some passthrough hardware) and setting serial numbers.
Hey, I’ve missed this fresh post. Did the host CPU passthrough work for you with OpenCore?
I could not debug the issue and my manual CPU feature passthrough seems to be imperfect. I think I’m missing some CPU flags, because I’ve got kernel panics in linux guests when running (nested under macOS / qemu with hvf) them with host cpu. Docker for Mac works fine though, but it uses xhyve/hyperkit, not qemu.
I can’t even get the crash log using verbose boot in Clover as the display is corrupted during boot (works perfect from login screen onwards).
PS I’m using passed-through discrete Radeon RX480
Yes, -cpu=host works wonderfully in OpenCore for Intel CPUs so it’ll probably be the solution to that problem, VMWare Workstation runs fine in macOS for example. OpenCore fakes the model name as “Penryn” to maintain compatibility.
For AMD systems (e.g. I have a EPYC I’m keen to test this on) – as Nicholas mentioned the “Penryn” emulation should work.
Or better yet – you can passthrough an AMD CPU, and use the AMD_Vanilla (https://github.com/AMD-OSX/AMD_Vanilla) patches to the OpenCore ISO image.
(The original KVM-OpenCore repo talks a bit more about this as well – https://github.com/thenickdude/KVM-Opencore).
For modern AMD CPUs, you would use the 17h folder (Ryzen, Threadripper, Athlon 2xxGE etc.).
Nick – is there any chance you’d offer a second ISO image, with the 17h patch integrated? Happy to be your guinea pig (sorry I was a bit quiet last week).
I don’t see that the macOS patch approach offers any benefits over -cpu=penryn and just adding the features that your CPU supports. The disadvantage of the patches is that they must be updated as the macOS kernel changes, which introduces a maintenance problem. For that reason I’m not going to be building such an ISO.
Hi Victor,
many AMD users have confirmed to have better performances in a Proxmox /OSX environment against a “vanilla OSX method”.In particular way in passed GPU performances.
So it is better if you have enough resources in your rig Proxmox solution
Evaluate well If you need to patch deb file, because this produce different problem (not explained in this guide)
Pn trx40 system is possible to boot without it with clover and opencore boot loader…
Hi Nick,
Thank you very much for your blog, that’s really helfpul. I just want to add one comment for Proxmox newbies like me – I thought that I can set the cores to 6 on my Ryzen 3600, because Proxmox will not alllow all cores for the guest. However, that setting will end in a black apple boot screen. After setting it to 4 it runs fine. I assume this will be clear to most others, but someone may find this helpful when seraching for errors.
@Markus
Proxmox do not allows all cores is not exact.
I have passed all my 64 cores of my 3970x
If proxmox had this limit it shouldn’t be a valid solution for me and for many people 🙂
By the way, the only limit you can have it is about about memory you can assign and this also in relationship with your core number.
see below:
bios: ovmf
boot: d
cores: 64
cpu: host
efidisk0: local-lvm:vm-100-disk-1,size=128K
hostpci0: 21:00,pcie=1,x-vga=1
hostpci1: 02:00.0
hostpci2: 44:00
hostpci3: 46:00.1
hostpci4: 46:00.3
hostpci5: 47:00
hostpci6: 48:00
hostpci7: 01:00.0
hostpci8: 45:00
machine: q35
memory: 119808
Hi Fabio,
thanks for clarifying. Than I was right in the frist place 🙂 However, MacOs did not install wenn assigned 6 of 6 cores, but it worked flawlessly when I assigned 4 cores only.
Hi Nicholas,
I have a problem to pick right option from the OpenCore boot picker – keyboard issue. Before the first stage of installation, I was able to click “Enter” only on my keyboard (enter was active) to pick “MacOS Base System” option. I was not able to change the other options when I was using right arrow on my keyboard – it looked like “arrows” ware inactive. As I was able to clik “enter” for default “MacOS Base System” option I stared the installation. But now I want to pick “MacOS Installer” option from the OC boot picker but when I use “right arrow” the icons are disappearing and it looks like arrows on my keyboard are not active.
I checked the setup and configuration and are the same as your recommendation. I am connected to the proxmox host with my Lenovo laptop. What do you think?
What’s the name of your keyboard layout, is it the US layout or something else?
Try switching to a different page (like the Hardware page) and then back to the Console page, this fixes the keyboard not responding for me.
Sir,Please help.
My Graphics: MSI AMD R7 360.
Opencore cannot drive this graphics card.
I searched for a solution.
1、install ATIx8000controller.kext, AMDRadeonx4000.kext
2、and add FakeID=0x665C1002, FixDisplay=True, InjectAti=True, FBName=Random.
now use Opencore How should I operate ?
Thank you.
Please ask in a general Hackintoshing forum like this, I’m not an expert on that:
https://www.reddit.com/r/hackintosh/
Thanks for this!
Leaving this for anyone else who might have this issue. I had copied the iso files to my regular network ISO repository, but when I tried to start the VM I kept getting this error message:
kvm: -device ide-hd,bus=ide.0,unit=0,drive=drive-ide0,id=ide0: Could not reopen file: Permission denied
It must be some issue with how they’re really hard disk images, not true ISO files. I copied the ISOs to the local repository and tried again and this time it booted fine.
It does have to open the file in read-write mode (since it’s a hard disk image) which could cause problems, but normally this error is triggered by not adding the “,cache=unsafe” parameter.
aha, that makes sense. My ISO repository is read-only, so a permission denied would make sense if it’s trying to open those images read-write.
Hi Nick,
Thank you again for your tutorial. After a bit of testing I got it also running with gpu passthrough, also I am not finished (no USB3 yet, and Sound is missing). However, your tutorials are excellent and made it very easy for me, in fact installing Catalina was much easier than getting Windows 10 to work with passthrough. Next I will try to install Sierra, because I have CS5 and Aperture which I want to keep.
One thing – I have seen the proxmox manual, and I assume it should work similar to Linux, but have you ever tried to enlarge your HDD? Now after the testing I would like to use my build as my main machine, but I only installed it with 64GB.
Thank you very much again.
Markus
USB 3 isn’t supported when using USB port passthrough. PCIe passthrough of an entire USB controller can work though if it is compatible with macOS.
I think I have expanded my APFS drive before but I can’t quite remember. You can increase the size of the disk in Proxmox, and then you should be able to use Disk Manager in macOS to grow the APFS container partition to fill the new space. This post mentions some commandline commands that achieve the same:
https://www.reddit.com/r/MacOS/comments/bucxy8/extend_apfs_container_and_add_space_to_apfs_volume
Thank you for your quick reply. For USB, passing through the controller is what I will try next, for now I am fine with usb2.
And many thanks fo the link. I will try that first, otherwise I will do a fresh start, as I know now what to do.
Thanks,
Markus
Just for the record: While expanding a windows drive was easy, I was unable to manage resizing the apfs drive, (diskutil apfs resizeContainer disk[ID] 0 didn’t work). I assume this may have to do with were the space is allocated, because I read that apfs will only allocate free space after the partition in question, but I concluded that it is easier and faster for to do a reinstall with a larger partition, so I did not dig deeper.
Ah that’s interesting to note because that was my plan for upgrading my drive lol, maybe I’ll have to rethink.
I just had this same issue, and found a workaround using gparted (off a linux boot cd). gparted reported an error on the drive, and I accepted the proposed fix. Next, I created a fat32 partition with the new space, applied the changes, and rebooted back into MacOS. Using the Disk Utility, I then deleted the new fat32 partition and it reclaimed the space onto the existing APFS drive.
Hi, Nick
Thanks for all the info you have compiled, it has helped me a lot in the last couple of months.
Do you know If we can map memory channels in OpenCore just like we can do with Clover?
Is there a benefit to set the PlatformInfo to a MacPro instead of the default iMacPro?
Cheers!
Sorry, I’m not sure how to do those things with OpenCore or what the benefits might be… everything seems to be running fine for me without messing with them.
Hello .. Nick ! As usual your tutorials is amazing ! i just followed them for each installation .. As i see you talk about Nested emulation . if you remember i ask about that in previous tutorials LOL . Finally we achieve that ? So we dont need that : kvm=on,vendor=GenuineIntel,+kvm_pv_unhalt,+kvm_pv_eoi,+hypervisor,+invtsc ? only “-cpu host” ? from my experience with windows as vm with nested virtualization .. you need to hide KVM hypervisor .. something like “-hypervisor” As i have full cpu config somewhere .. Currently i’m installing Catalina , I will back with results .
Any news about NVIDIA drivers ? 🙁
This is my windows cpu arg : “args: -cpu host,+kvm_pv_unhalt,+kvm_pv_eoi,hv_spinlocks=0x1fff,hv_vapic,hv_time,hv_reset,hv_vpindex,hv_runtime,hv_relaxed,hv_synic,hv_stimer,-hypervisor”
NVIDIA drivers aren’t supported and the news is that they’re never coming back. Buy AMD.
You don’t need to hide anything, use the -cpu line suggested in my tutorial (-cpu host,kvm=on,vendor=GenuineIntel,+kvm_pv_unhalt,+kvm_pv_eoi,+hypervisor,+invtsc). macOS needs to be aware that it’s running in a VM in order for it to use the vmware-style clocksource, otherwise the guest’s clock runs like 5 times as fast as it should.
Hmmm , did you tried this setting with android emulator ? is it smooth ?
My current installation still loading files from Apple servers :S They push low bandwidth from their servers even i have good connection .
Another Q , we dont need patched pve-edk2-firmware with opencore right? While writing this , I see your notes there 😀 I will follow your recommendation for RX 570 .. Thanks
I just installed Android Emulator for the first time and it just hung on startup… but VirtualBox can run nested VMs on macOS fine. Not sure what the deal is with AE, it could be an unrelated problem.
I have the same issue with an incredibly slow internet install, I feel like with the pandemic and so many new laptops and desktops being provisioned for home use, Apple may have had to throttle their updates.
Do you know any usb3 chipset that will work other than fl1100 ?
Hi Nick,
I ran into similar problems as Khalid wrote a few days before. But I do not use passthrough for any device at the moment. Up to now I used a win10 and a linux vm in proxmox. For test purposes I want to run a macOS machine. I used your catalina guide for OpenCore but with a proxmox 5.4 installation. I tested several usb cable mouses and logitech wireless devices. But the last thing I can do is to select the macOS disk utilities with the TAB of my keyboard. The RETURN key does not work then and no mouse action.
My vm conf:
args: -device isa-args: -device isa-applesmc,osk=”… ” -smbios type=2 -device usb-kbd,bus=ehci.0,port=2 -cpu host,kvm=on,vendor=GenuineIntel,+kvm_pv_unhalt,+kvm_pv_eoi,+hypervisor,+invtsc
balloon: 0
bios: ovmf
boot: cdn
bootdisk: ide2
cores: 4
cpu: Penryn
efidisk0: local-lvm:vm-104-disk-1,size=128K
ide0: local:iso/Catalina-installer.iso,cache=unsafe,size=2096496K
ide2: local:iso/OpenCore.iso,cache=unsafe
machine: q35
memory: 8192
name: Catalina
net0: vmxnet3=0A:38:86:53:93:8B,bridge=vmbr0,firewall=1
numa: 0
ostype: other
scsihw: virtio-scsi-pci
smbios1: uuid=63a484c7-3558-46f3-8e11-118f0e215fe3
sockets: 1
vga: qxl
virtio1: local-lvm:vm-104-disk-0,size=64G
If check usb status by qm> info usb / usbhost no devices are shown in my system, nor for other VMs. Even if a want to add a usb device in the hardware section of VMs.
This tutorial is specifically written for Proxmox 6.
VGA qxl is not a configuration I’ve ever validated, don’t use it.
Don’t use virtio as the bus for your disk because I’ve heard that the installer doesn’t support it. You can rename that to sata1.
Proxmox 5 uses an older QEMU with an older q35 machine model and an older OVMF package, none of which I have ever tested with OpenCore. You may at least need to add “vmware-cpuid-freq=on” to your -cpu line if keyboard typematic repeat seems to be running a million miles per hour.
Hi, thank yout for the superb tutorial!
I have the problem on installation of catalina.
When the vm restarts the first time and i select MacOs Installer,
the black loading screen with the apple appears. It starts loading but keep stucked after couple of minutes. After that nothing happens.
Can you give me a hint what to do?
Double check the summary page of the VM on Proxmox, it may show that network or disk activity is happening and installation is actually proceeding.
You mentioned ‘ Use “sudo dd if= of=” to copy the “EFI” partition from the OpenCore CD and overwrite the EFI partition on the hard disk. The OpenCore CD is the small disk (~150MB) that only has an EFI partition on it, and the main hard disk is the one with the large Apple_APFS “Container” partition on it. In my case these EFI partitions ended up being called disk1s1 and disk2s1 respectively, so I ran “sudo dd if=/dev/disk1s1 of=/dev/disk2s1” (note that if you get these names wrong, you will overwrite the wrong disk and you’ll have to start the installation over again!).’
I followed this to the word as my test vm is identical. However, can you show me the file size of your EFI? It should overwrite after the CM line runs but Im getting the same file size as before?
The partition will remain the same size (200-something megabytes) so diskutil list output won’t change. However the filesystem size will be the 150MB of my OpenCore build.
Ah ok. Well I copied over correctly, then removed opencore boot and the MacOS image ISOs from Hardware as you state. But I have installed OS to a seperate NVME drive (SCSI 2) after following the proxmox rules of adding a drive (in this case /dev/nvme0n1). In terminal the NVME EFI partition was originally disk2s1, so I ran ‘sudo dd if=/dev/disk1s1 of=/dev/disk2s1’. After reboot, from hardware ,removal of boot/install ISOs & changed boot order to SCSI 2 (the new nvme assigned boot) in Options, I couldn’t get back in – with Proxmox saying I couldnt boot from the nvme device. So had to put the OpenCore.Iso back on hardware and made it boot in options again.
Does NMVE drive need passing througfh first to make it boot? Any tips?
BTW Thanks for the Ace guide. 🙂
When you specify a drive like that (I’m assuming you have scsi2: file=/dev/nvme0n1) Proxmox/QEMU just sees it as a generic block device, and the guest just sees it as an emulated SCSI disk, so actually neither party is troubled by it being an NVMe disk.
What’s the error message you’re getting and when does it appear, during guest boot?
Under Hard Disk in ‘Hardware’ its ‘Hard Disk (scsi2) with params /dev/disk/by-id/nvme-Force_MP600 blah blah blah serial no’.
In setup I did run this correctly: https://pve.proxmox.com/wiki/Physical_disk_to_kvm
So after removing IDE2 opencore.ISO boot from hardware and changing boot order in ‘Options’ to Disk ‘scsi2’ (the nvme) I get at PROXMOX Start Boot screen :-
BdsDxe: failed to load Boot0001 “UEFI QEMU QEMU HARDISK” from pciroot 0x0) /Pci (0x1E,0,0)/Pci (0x1,0x0)/Pci (0x5,0x0)/Scsi (0x0,0x2) : Not Found
?
Hit F2 at guest startup and try picking a different partition from the boot option editor. Sometimes the UEFI boot entry goes missing and needs to be re-added.
Also you can try to add the OpenCore ISO back and boot macOS using it, then mount the EFI partition from your Mac drive and just double check that it contains OpenCore as expected.
Another thing you can try is to edit the config file and just replace scsi with sata, maybe it doesn’t like booting from SCSI.
I reset the ASRock BIOS boot order to boot from nvme but it didnt boot from nvme, eventually root console came up. Logged back in from guest computer, changed the boot order from the SCSI2 to sata0… booted back in from guest web console and it boots…! oddly…
my conf.
args: -device isa-applesmc,osk=”ourhardwork….blahblahblah$”
balloon: 0
bios: ovmf
boot: cdn
bootdisk: sata0
cores: 32
cpu: host
efidisk0: VM101:vm-101-disk-1,size=4M
machine: q35
memory: 64000
name: Catalina
net0: vmxnet3=7E:AB:0A:DC:F6:F0,bridge=vmbr0,firewall=1
numa: 0
ostype: other
sata0: VM101:vm-101-disk-0,cache=unsafe,size=1720G,ssd=1
scsi2: /dev/disk/by-id/nvme-Force_MP600_201482300001285630A0,size=1953514584K
scsihw: virtio-scsi-pci
smbios1: uuid=32blah blah blah
sockets: 1
usb0: host=1532:0109
usb1: host=05ac:0304
vga: vmware
vmgenid: ed97xxxx-xxxx-xxxx-xxxx-blah blah blah
Ah there was a misunderstanding here, I meant editing the boot order inside the guest’s UEFI settings, not in the host’s UEFI!
Ok I’ll reset.
Thank you. 🙂
F2 rearrange the boot order seemed to work in guest UEFI settings. So it looks like its booting in okay. Disk Utility reports Main 1.85TB and Main – Data (also 1.8TB) is that right?
Yep that size is okay, they’re two virtual APFS volumes that share the space of the same physical partition.
Nick, you are a top guy. Thank you so much for replying and confirming everything looks ok. You must be inundated with questions but you always help. Just brilliant mate.
As Im fairly new to VMs (as you can guess) and despite having done a load of hackintoshes in the past, without invaluable resources like yours and Fabiosuns at MacOS86.it I would never have got where I am so far.
I think myself and quite a few other noobs have this one big question which never really gets answered anywhere else.>
Can I run Proxmox and VMs on the same computer without having to log in from an external workstation once its all setup? Like booting straight into the VM when you turn computer on?
Especially if I have two GFX cards – one for passthru (I do understand one GFX card (or both if used) will disappear from host once passthrough’ed. Only doing MacOS so don’t need Windows necessarily.
Oh another…! Can we get 4K and above editing in Davince Resolve Premiere etc if we have good enough cards in Proxmox?
Or would you recommend using two computers (not only for Proxmox host param editing) but keeping the old workstation MAcOS (I have HS on older Hack) and utilising the 2nd compuiter to run Proxmox and VMS as guest ‘inside’ the screens of the older hack?
I hope you understand what I ask!
You can set the onboot option on your VM to 1 and it’ll be booted automatically at host boot time. That’s what I do with mine.
Yes, Davinci Resolve will work fine when a compatible card is installed.
/dev/disk0 (external, physical):
#: TYPE NAME SIZE IDENTIFIER
0: GUID_partition_scheme *1.8 TB disk0
1: EFI EFI 209.7 MB disk0s1
2: Apple_APFS Container disk1 1.8 TB disk0s2
/dev/disk1 (synthesized):
#: TYPE NAME SIZE IDENTIFIER
0: APFS Container Scheme – +1.8 TB disk1
Physical Store disk0s2
1: APFS Volume Main – Data 4.0 GB disk1s1
2: APFS Volume Preboot 83.7 MB disk1s2
3: APFS Volume Recovery 528.2 MB disk1s3
4: APFS Volume VM 1.1 MB disk1s4
5: APFS Volume Main 11.0 GB disk1s5
Thank you for the excellent guide. I have everything up and running perfectly.
My only question is about screen resolutions. I’d like to add other resolutions, ideally lower than the current 1080p. Do I need to edit the plist file for this? Can you give more information on how to do it?
Thanks again
Yep, you’ll need to edit the plist file. You can check which resolutions are supported by hitting F2 at the beginning of guest boot and checking out the platform configuration settings. Then in the config.plist you just need to enter that here:
<key>Resolution</key>
<string>1920×1080@32</string>
The @32 is the colour bitdepth, so leave that at 32.
So, I add:
XXXX×YYYY@AA
for every supported resolution into the file. Does it need a separate key entry also?
Sorry to reply again also as I am unsure when to hit F2. Is it on initial boot? If so, I get the BIOS and if it is later (like when booting OSX) then it doesn’t seem to do anything.
Yes right on initial boot and yes, you’re hoping to enter the BIOS. Check the platform settings menu in there.
You can only set a single resolution.
Thank you for your help. That all worked!
Hey, I got this to work exactly as explained here except I had no mapped through GPU. Today the ordered GPU arrived, I successfully mapped it through and I have connected it to my TV so I can see its working BUT the keyboard and mouse do not seem to be working.
More exactly I am connected to the VM via my laptop, using the Proxmox console and I can’t get past the boot screen where I need to select the HD to boot from.
I need top boot once, then I can connect my bluetooth keyboard and mouse so I can use the VM straight from the sofa and use the TV as the screen.
No idea why the keyboard stopped working after inserting the GPU, it was all fine except very slow when it came to graphics so I ordered a GPU.
Any ideas?
I even connected a USB keyboard, mapped it through but still it does not accept my input 🙁
any idea how to activate the “Automatic boot” without being able to enter my OS X installation?
Grab the second release of my OpenCore build, the one that says that it enabled Timeout. If you boot with that it’ll automatically choose the first boot option after 5 seconds.
Did you turn off the emulated video with “vga: none”? I’d recommend doing that.
You can always just edit your VM config to comment out the passthrough, boot, edit things as needed, and then put it back afterwards.
Thanks, you helped me fix this mess 🙂
I wrote a long replied than lost it by accidentally closing my browser :-/
All working fine now.
Btw. can we manually update and tweak this setup using kextup and/or hackintool?
Can you recommend a good forum related to virtualizing OS X? It doesn’t feel right to fill up your comment section here with all sorts of questions after you made this awesome guide.
You should be able to update the OpenCore install using regular tools, it doesn’t have anything special in it (just keep a copy of config.plist in case you need to revert it).
I like the Reddit community: https://www.reddit.com/r/hackintosh/ , if I have to read another 50 page linear forum topic on other sites, I think I’ll scream. Not much virtualization help there, but by combining forces of /r/hackintosh and /r/vfio you can get the job done.
> you can revert to the vanilla Proxmox package by running “apt-mark unhold pve-edk2-firmware; apt install pve-edk2-firmware”.
I’m trying to revert to the 2.20200229-1 version of pve-edk2-firmware installed by Proxmox. I’m not having much luck. See below:
# apt install pve-edk2-firmware
Reading package lists… Done
Building dependency tree
Reading state information… Done
pve-edk2-firmware is already the newest version (2.202002-1).
0 upgraded, 0 newly installed, 0 to remove and 0 not upgraded.
Specifying the version in apt doesn’t work either:
# apt install pve-edk2-firmware=2.20200229-1
Reading package lists… Done
Building dependency tree
Reading state information… Done
E: Version ‘2.20200229-1’ for ‘pve-edk2-firmware’ was not found
Any suggestions Nick?
Check that you have the Proxmox apt repo properly configured (by default it isn’t set up if you have no Proxmox subscription).
Also post the output of apt-cache show pve-edk2-firmware
This was it, can’t believe I didn’t think to check it. I had previously disabled the subscription repo and forgotten to re-enable the no-sub repo via the lines below:
# PVE pve-no-subscription repository provided by proxmox.com,
# NOT recommended for production use
deb http://download.proxmox.com/debian/pve buster pve-no-subscription
With this re-enabled, I was able to run apt install pve-edk2-firmware to “revert” to pve-edk2-firmware (2.20200229-1). Thanks for the quick help.
Nick. I have two LG Ultrafine 5K monitors and a Radeon Pro VII on my build. Right now, as the monitors are thunderbolt connection only, I run the video feed out of two display ports on the Radeon into two Gigabyte Titan Controller cards which convert Display port signals into Thunderbolt signals, up to 8K. Works fine in Windows and Linux. Will this pass through as well as my Radeon? Thanks!!
I believe that monitor/card combination will work on macOS.
However since the card is Vega based you may run into the Vega Reset Bug, and this may require you to cold reboot the host whenever you reboot the guest. I’ve talked to one person who had their Vega card just work flawlessly by magic without fixing anything, so you may get lucky.
What do I need to do to map through a Radeon VII ?
I don’t have a tutorial for this but there is some info here: https://www.nicksherlock.com/2018/11/my-macos-vm-proxmox-setup/
Brilliant. Got it proxmox conf/vfio/grubbed etc & mapped and passed through in Hardware. My ‘About this Mac’ shows in the system hardware that its 16gb all correctly and I checked ‘All Functions, PCIExpress and ROM bar ticked. Didnt do Primary GPU for now.
It seems a tad slow and Black Magic RAw test doesnt show a GPUI for testing (CPU is flying) so Im worried I might be missing something – do I need to download a ROM for the RAdeon to make it be seen by Black Magic speed test?
macOS is probably being confused by the emulated video card still being present, set vga: none (console will be disabled)
Bit confused in the myriad of gpu settings everywhere. where is the set vga=none found?
Edit your VM config file and set vga: none, or change the display on the hardware tab I think it is.
Hi Nick
Thanks for a great guide! I am stuck at the Opencore iso image. I have downloaded the file opencore.iso.gz but it does not contain a .iso file but actually a .dmg file. I can’t upload it to Proxmox as it’s not a .iso file. I have tried converting it to a iso but without luck. Can you give me a hint?
You can just rename it to .iso, and I’ll fix my build so the unpacked filename is correct, thanks!
I had the same issue, downloaded on Windows and extracted to .dmg – totally confused I downloaded on linux and extracted to .iso – you might have just exchanged it between my two tries, LOL
Oops, I’ve been stupid. I understood my problem yesterday: the whole time I confused the host and client USB. I get access to the macOs VM only with keyboard and mouse connected to the host. At all other VMs I get direct access to the machines with my client side USB keyboard/mouse.
With devices connected via host USB ports I could start the Catalina installation. But after half an hour the next surprise stopped me. When the machine has restarted the first time I get no access to the open core boot picker, even not with host USB devices. I cannot reach the macOS installer entry, not with the keyboard, not with the mouse. I may be just as stupid now as I was the other day but do not find a way.
Hi Nick,
Thanks for your great tutorial which works great for me. Going forward I was using https://github.com/rusty-bits/OC-tool to maintain my other Hacks. Is there anything in your https://github.com/thenickdude/KVM-Opencore which excludes using normal Opencore? I notice for example that your version does not include VirtualSMC or FakeSMC?
Regular releases of OpenCore binaries should work fine with my config now. (I had been building from source to get the new APFS support before the release of 0.5.8)
My config doesn’t include VirtualSMC because it isn’t needed, since QEMU emulates the SMC for us. You could instead remove the SMC from the VM’s args and re-enable VirtualSMC.
My first nic (the intel one) has gone missing and uis no longer useable for Proxmox installs, web access as it wont ping and offered a unusual 198.162.100.2 IP on Proxmox install after some corruption due to error 500 lvm 100% full.
Easrlier, I had re-installed Proxmox on the Asrock Creator but noticed the nic was not seen during the Proxmox install pve.homeas the IP address 198.162.1.13x was not being offered.
So ended up swapping cable & using my 2nd nic (AQUANTIA) just to get in and install Proxmox to the correct home network. Now I can Ping back and forth and acess web interface.
SO how do I get my Intel Lan back? I notice in Proxmox its showing up as enp69s0 Network Device so it looks like its renamed as that used to be vmbr0.
Anyone know of a method of getting this Intel nic back to normal?
>I notice in Proxmox its showing up as enp69s0 Network Device
Edit /etc/network/interfaces and add a new line if it isn’t there already:
iface enp69s0 inet manual
Then you can connect one of your bridges to it by setting enp7s0 as the “bridge-ports” in one of the “auto vmbrX” sections. Reboot to apply the new config, but I hope you have a keyboard and screen attached to Proxmox in case something goes wrong.
>so it looks like its renamed as that used to be vmbr0.
No, vmbr0 is Proxmox’s default bridge device, it might have been the interface that vmbr0 bridged to though.
OKay I think I got it wrong. The Aquina nic is the only one I can use, to get into proxmox. The Intel nic disappeared or was renamed after the last crash when the lVM filled up 100% – subsequent removals of ISOs didnt work can soon after it was full again. Anyway, TCALSS, ip link show in shell, tells me that the following is DOWN;-
3: wlp70s0: mtu 1500 qdisc noop state DOWN mode DEFAULT group default qlen 1000
link/ether 50:eb:71:77:e7:fa brd ff:ff:ff:ff:ff:ff
The other is up and bridged correctly – the Aquina nic.
How can I rename the Intel DOWN nic to defualt so the IP addresses arent screwed and can be seen by my local home network (pinged)?
2/ Getting back into the Catalina desktop I mount the EFI, try and edit config.plist, unlock, but then it wont save because Permission issues. When I Get Infoi it says I have ‘Read & Write’.
Any pointers as all I want to do is change the bootarguments to verbose -v so I can see whats going on with things. ?
Sorry to be trouble! Best regards.
1) wlp70s0 sounds like a WiFi adapter, you can’t easily bridge to these in Proxmox.
2) This sounds really unlikely because the EFI partition is FAT32 and doesn’t support permissions in the first place. Are you mounting the EFI partition from your Catalina disk, or is it stored on a separate drive? If it’s on a separate drive make sure that the Proxmox storage that it is stored in supports read/write.
Its on the Catalina NVME – the one I copied from the OpenCore.iso/EFI/EFI to the EFI partition on the nvme.
Then my other nic has completely disappeared from Proxmox!
What’s the actual error message you’re getting when trying to save? Which app are you using? What’s your diskutil list output?
Apparently VGA=none doesnt work and was deprecated since proxmox v4. Its now,
hostpci0: 00:02.0,x-vga=on
vga: none works fine, it’s written as a separate line though, not part of hostpci0.
So is the X-vga=on one not worth bothering about?
Ive only tried passing through this Radeon VII. Ill trey adding the VGA:none statement to see if it changes anything, but what checkboxes should I check out of the four when the Radeon VII device is added to hardware: theres ‘All Functions, Primary VGA, ROM-Bar & PCI Express?
I tried as few of these variations and get very slow radeon performance in Catalina – what should be checked?
Do you think I need an UEFI rom installing? /Updating?
Put hostpci0: 00:02,x-vga=on in your config (note no .0 on the end), don’t bother messing with the GUI.
x-vga=on turns off the emulated VGA adapter if no “vga:” line is present in the config and enables vendor hiding for Nvidia’s Windows driver’s benefit. Adding it is harmless.
>Do you think I need an UEFI rom installing?
No, this only applies to ancient pre-UEFI video cards.
Go About this Mac -> System Report and check out the graphics section.
Cant seem to see asnything on any of the screens… proxmox syslog reports:-
May 11 15:32:00 pve systemd[1]: Started Proxmox VE replication runner.
May 11 15:32:03 pve kernel: vfio-pci 0000:03:00.0: vfio_ecap_init: hiding ecap 0x19@0x270
May 11 15:32:03 pve kernel: vfio-pci 0000:03:00.0: vfio_ecap_init: hiding ecap 0x1b@0x2d0
May 11 15:32:03 pve kernel: vfio-pci 0000:03:00.0: BAR 0: can’t reserve [mem 0xd0000000-0xdfffffff 64bit pref]
May 11 15:32:05 pve pvedaemon[68087]: end task UPID:pve:0001581D:00377EBC:5EB961DD:qmstart:101:root@pam: OK
May 11 15:32:05 pve kernel: vfio-pci 0000:03:00.0: No more image in the PCI ROM
May 11 15:32:05 pve kernel: vfio-pci 0000:03:00.0: No more image in the PCI ROM
May 11 15:32:14 pve pveproxy[1768]: worker 83754 finished
May 11 15:32:14 pve pveproxy[1768]: starting 1 worker(s)
May 11 15:32:14 pve pveproxy[1768]: worker 88284 started
May 11 15:32:15 pve pveproxy[88283]: got inotify poll request in wrong process – disabling inotify
May 11 15:33:00 pve systemd[1]: Starting Proxmox VE replication runner…
May 11 15:33:00 pve systemd[1]: pvesr.service: Succeeded.
May 11 15:33:00 pve systemd[1]: Started Proxmox VE replication runner.
What’s the output of “lspci -nn -k | grep 03:00 -A4 ” on the host?
Is this the only GPU in the system? You don’t want the host to initialise the GPU during boot.
Its the only GPU on system at present. I do have a 2nd Radeon VII to install. If needed.
root@pve:~# lspci -nn -k | grep 03:00 -A403:00.0 VGA compatible controller [0300]: Advanced Micro Devices, Inc. [AMD/ATI] Vega 20 [Radeon VII] [1002:66af] (rev c1)
Subsystem: Advanced Micro Devices, Inc. [AMD/ATI] Vega 20 [Radeon VII] [1002:081e]
Kernel driver in use: vfio-pci
Kernel modules: amdgpu
03:00.1 Audio device [0403]: Advanced Micro Devices, Inc. [AMD/ATI] Vega 20 HDMI Audio [Radeon VII] [1002:ab20]
Subsystem: Advanced Micro Devices, Inc. [AMD/ATI] Vega 20 HDMI Audio [Radeon VII] [1002:ab20]
Kernel driver in use: vfio-pci
Kernel modules: snd_hda_intel
04:00.0 Non-Essential Instrumentation [1300]: Advanced Micro Devices, Inc. [AMD] Starship/Matisse PCIe Dummy Function [1022:148a]
root@pve:~#
I think you’ll have to solve that BAR 0: can’t reserve warning, plenty of hits on Google for it. Most likely by preventing Proxmox from trying to use the card.
video=vesafb:off video=efifb:off would that help in GRUB somewhere?
They’re kernel arguments, so stick them next to your iommu parameters you probably already have in GRUB_CMDLINE_LINUX_DEFAULT
so:-
GRUB_CMDLINE_LINUX_DEFAULT=”quiet amd_iommu=on video=vesafb:off video=efifb:off”
Okay just update grub and reboot and will try…!
Just getting following lines repeated:
rootpve:~# qm start 101
kvm: warning: host doesn’t support requested feature: CPUID.01H:ECX.pcid [bit 17]
kvm: warning: host doesn’t support requested feature: CPUID.80000001H:ECX.fma4 [bit 16]
….
rootpve:~#
Those specific warnings are fine. Seems like passthrough is fully operational as far as logged errors know.
Does the guest monitor just not turn on at all? Any spare output connectors you can check?
I have display port connected from back of GPU card’s top port to a 4K monitor, and at the bottom, the HDMI is connected to another monitor.
Whilst this is still running, the HDMI is blank, the Displayport on screen just says;-
Loading Linux…
Loading initial RAMdisk
I hit the return button on the keyboard attached to the root to see if I can blindly get in…nothing… wonder if its boot order… should I try set boot to NVME?
This is the behaviour you want, you need Proxmox to not use the video card. So this is all working as designed. It doesn’t touch the video card so nothing is updated on the display.
But what happens when you start the guest?
I think I might have changed some BIOS settings when I first set it up to someone who was using settings for the Creator Taichi x570 or summit… I could always reset boards BIOS, I assumed everything around IMMU had to be Enabled rather than Auto?
Iommu is already enabled fine or none of this would even try to start working.
You can also check dmesg output for clues.
Does the guest monitor just not turn on at all? Any spare output connectors you can check?
I am in the process of trying this on a Proxmox 6.1 (that hasn’t been updated in probably a month or so, says 6.1-7), its running on an Epyc 7002 series.
I’m using your version 3 OpenCore. On first boot for the install I just had a blank screen with a mouse cursor in the top left (wouldn’t move with mouse movements or clicking), I let it sit there for a long time and nothing happened. Rebooted a few times and saw the same thing. Then finally I decided to hit enter and it magically started booting.
So it seems like the boot menu isn’t rendering. Not sure if this is a problem with my packages being slightly older, or something up with the newer version 3. Still installing as I type this so not sure if I’ll hit anything else.
… and on first installer reboot, it tried to render a menu, but it was kind of overlapped so not really readable. I had to hit the right arrow then enter.
“I just had a blank screen with a mouse cursor in the top left (wouldn’t move with mouse movements or clicking), I let it sit there for a long time and nothing happened. Rebooted a few times and saw the same thing. Then finally I decided to hit enter and it magically started booting.”
<== thanks!
Nick, thank you so much for keeping your guide up to date and continuously improving it. I had a little trick that may not be relevant to you but really improved performance for me. I do GPU passthrough only on my main Ubuntu OS and connect to my other VMs via RDP/VNC. I felt like the built in VNC server on macOS is kinda crap and gave up on using it for anything serious, until I realized I could add a flag to the config file and make the virtio monitor accessible to my Ubuntu machine via VNC without using the web client! Performance is insanely better and you get the perk of controlling OpenCore as well.
All you have to do is modify the .conf file and append “-vnc x.x.x.x:y” to the args. This exposes the VNC server on port 5900+y. It works with 0.0.0.0 but I prefer limiting it to a single interface. Here’s the official documentation: https://pve.proxmox.com/wiki/VNC_Client_Access
BTW There is no onboard video with this mobo.
So the scenario is the Host boots proxmox on a 4TB sata drive, the nvme has macOS installed (catalina) on a NVME drive. EFIO has been copied from OpenCore.iso to the EFO onto the nvme.
With the above settings we have disaabled console access.
When I hit START on run it from ssh, nothing happens on the host’s Radeon VII monitor screen. The host/RAdeon VII has a HDMI output port connected to one monitor and a single monitor connect by the Radeon’s Display port. The Display port is showing the host pve boot stuff and not switching to Catalina when we hit START or run from SSH.
It should be switching to the catalina boot ‘Main’ (nvme) drive, yes?
Should I set Boot on ASRock BIOS to boot first from NVME? Can’t be right but I want to discount the variable!!!!?
If you boot the host from NVMe you won’t even be using Proxmox, you’ll just have a regular Hackintosh, lol
Ooh… a light flickers back on… BIOS change CSM Disabled Above 4G decoding Enabled (ehich I thought Id done earlier but I’d forgotten about my previous crash and BIOS reset.
Also, I think it only works with plus pci Express option ticked on the GPUs ‘PCI Device’ in ‘Hardware’ and it seemed to fix it. Can now single GPU Radeon VII ‘boot into Catalina’ ok, but now another problem.
Only the HDMI monitor shows the desktop and not the displayport adapter/monitor (tried all 3) so now switching between a few things to see if I can change this.
Had to log in blind as the HDMI monitor is secondary, then realised switch off displayport and everything including login screen goes to HDMI monitor.
So I need to get Displayport working only I guess. Testing continues…
>with plus pci Express option ticked
Whoops, sorry, not sure how I missed that one!
Nick
Thanks for your superb support Ive now got the Radeon working – without any ROMs – on both DP and HDMI. Dint need Pavos H17 stuff as wanted to follow your recommendation and keep it vanilla as possible.
Without your support I’d never have got here. Did a heck of a lot of reading and learning 🙂
Now Ive got to get everything else passed through.
Absoolutely screaming speed and cant wait to get the second Radeon VII working alongside it. 🙂
You’re a top top guy. Thanks.
Nick,
Thank you for your tutorial. I’m using CloverOS with Mojave and it’s working perfectly. However, when I use OpenCore, after I start the install using MacOS base system, the apple loader showes and the system reboots almost instantly.
I used the option you provided:
echo “options kvm ignore_msrs=Y” >> /etc/modprobe.d/kvm.conf && update-initramfs -k all -u
But it’s not working. Do you have any idea whats going on?
What’s the model name of your host CPU, does it support SSE4.2?
Are you getting errors in host dmesg output?
I am using a 2 x AMD Opteron(tm) X3216 APU (1 Socket). On the host the dmesg shows:
kvm [2639]: vcpu0, guest rIP: 0xffffff8011159d75 ignored rdmsr: 0x60d
I’m not sure if its related
That warning looks fine. Did you use the “-cpu penryn …” argument? You’ll need that one rather than “-cpu host”
Yes, this is my VM config:
args: -device isa-applesmc,osk=”” -smbios type=2 -cpu Penryn,kvm=on,vendor=GenuineIntel,+kvm_pv_unhalt,+kvm_pv_eoi,+hypervisor,+invtsc,+pcid,+ssse3,+sse4.2,+popcnt,+avx,+avx2,+aes,+fma,+fma4,+bmi1,+bmi2,+xsave,+xsaveopt,check
balloon: 0
bios: ovmf
boot: cdn
bootdisk: ide0
cores: 2
cpu: Penryn
efidisk0: local:109/vm-109-disk-0.qcow2,size=128K
ide0: proxmox:iso/OpenCore.iso,cache=unsafe,size=150M
ide2: proxmox:iso/Catalina-installer.iso,cache=unsafe,size=2096496K
machine: q35
memory: 4096
name: MacOS
net0: vmxnet3=,bridge=vmbr0,firewall=1
numa: 0
ostype: other
sata0: Disk1:vm-109-disk-0,cache=unsafe,discard=on,size=64G,ssd=1
scsihw: virtio-scsi-pci
smbios1: uuid=98d13551-5103-441f-b6a0-043d0af72ee8
sockets: 1
vmgenid: 6365f0b2-964b-4f1f-92bf-bf15dbbe47a2
Thank you for the well written instructions. I successfully upgraded an existing Proxmox VM from Clover to Opencore, no issues at all.
I just repeated my installation of a catalina vm with a proxmox 6.2 host. But I do not get acsess to the opencore boot picker. I only can recurr the first install part. When I have to select the macos-installer for the second part that is impossible. The mouse pointer is frozen in the top left edge of the console. Keyboard is unfunctional except the RETURN key to start the first part again. Please, do you have any hint what I can check or do to find out what happens in my system?
Something struck me: When I ran
echo “options kvm ignore_msrs=Y” >> /etc/modprobe.d/kvm.conf && update-initramfs -k all -u
the system answered
update-initramfs: Generating /boot/initrd.img-5.4.34-1-pve
Running hook script ‘zz-pve-efiboot’..
Re-executing ‘/etc/kernel/postinst.d/zz-pve-efiboot’ in new private mount namespace..
No /etc/kernel/pve-efiboot-uuids found, skipping ESP sync.
Is the last message relevant?
Some thing I did before I wrote to you. I ran the boot loop commands a second time to identify the last message of the system. Then just for fun I checked the function of my keyboard and it works now. I could select the macos-installer with the arrow keys and now the second part is running. Oh hell, one week of wandering around without any light at the end of the tunnel has come to an end now.
Odds are that it was a temporary problem caused by the browser VNC interface, and switching tabs fixed it. That warning message is harmless.
And I understood right: there is no way to bridge the client keyboard to the catalina vm (as it happens automatically with linux and windows)?
Not sure what you mean exactly, keyboard works the same in these OSes as far as I’m aware.
The keyboard I use at the moment for catalina is a second keyboard connected directly to the proxmox host. The other vm’s I use do not need this. I get access to these vm’s with the keyboard connected to the windows client on which is running the browser giving me access to the proxmox web interface.
That’s very untypical, keyboard access through the console works perfectly for me. You would get this symptom if you were missing the definition of the USB keyboard in the VM “args” though.
So, now it works. I did some more reseach on the net and found in the proxmox community forum an older posting about installing a macos mojave in v3.3. I replaced your entry
-device usb-kbd,bus=ehci.0,port=2
by
-device usb-mouse,id=mouse,bus=ehci.0,port=2 -device usb-kbd,id=keyboard,bus=ehci.0,port=3
and now I have access to the catalina vm with the client keyboard and mouse. Does this makes sense to you?
No, that doesn’t make sense to me. Try it again with the original code and also check that Use Tablet for Pointer is enabled in VM options.
Do you have any USB passthrough devices defined? If so try commenting those out at the same time, perhaps they’re getting assigned to the same port.
Strange but without an additional usb-mouse arg I get no mouse access to the catalina vm.
Hi Nick,
when i set vga none my vm crashed at boot.
If i leave my graphic in i see my graphic card is succesfully passthrouhed but as a second monitor.
Any Suggestions for me ?
Thanks for your step by step guide and I was able to run it successfully but only thing that is missing, my virtual mac doesn’t have sound. Is there anyway to add audio device to it?
Hello Nick,
First of all, thank you for your very nice tutorial !
I have just a small question about the boot on OpenCore image. I’ve downloaded the iso from your repository and when I want to boot on it, I got the following error: “OCS: No schema for Disabled at 2 index!”
Do you have eventually an idea of the problem ?
Thank you!
Is that an error or just a warning and it keeps booting? I think it’s a warning right?
It’s caused by a mistake in my config.plist:
https://github.com/thenickdude/KVM-Opencore/commit/d35185375c2aec31941cac4564c20d53f28a9218
But it boots for me even with this error in place.
When I start the VM, this message is displayed and the VM freeze on it
Hi,
Yes I think the message is not related to the problem, but it seems that OpenCore remains stuck at startup.
I have the same behavior when I specify a CPU different from Penryn. (see my post below.)