
macOS 11 Big Sur has now been released! If you’d like that version instead then please use my new Big Sur installation guide!
This tutorial for installing macOS Catalina using OpenCore has been adapted for Proxmox from Kholia’s OSX-KVM project and Leoyzen’s OpenCore configuration for KVM. You can get the full sourcecode on my GitHub here.
If you’d like to use Clover instead, use my older tutorial, but OpenCore works better!
Requirements
I’ll assume you already have Proxmox 6.1 or 6.2 installed. You also need a real Mac available in order to fetch the OSK key.
Your Proxmox host computer’s CPU must support SSE 4.2, so for Intel your CPU must be at least as new as Nehalem, which was the first CPU generation to bear the “Core” i5/i7 branding. Older CPUs will cause the finder to repeatedly crash after installation completes (with an Illegal Instruction exception in the graphics code).
Modern AMD CPUs also support SSE 4.2 and will work with this guide.
First step: Create an installation ISO
The easiest installer to build is a recovery image, which will download Catalina during installation. Download and run fetch-macOS.py in a terminal to download the Catalina recovery image from the Apple software distribution server (this can be run on Linux, Proxmox, or on a Mac):
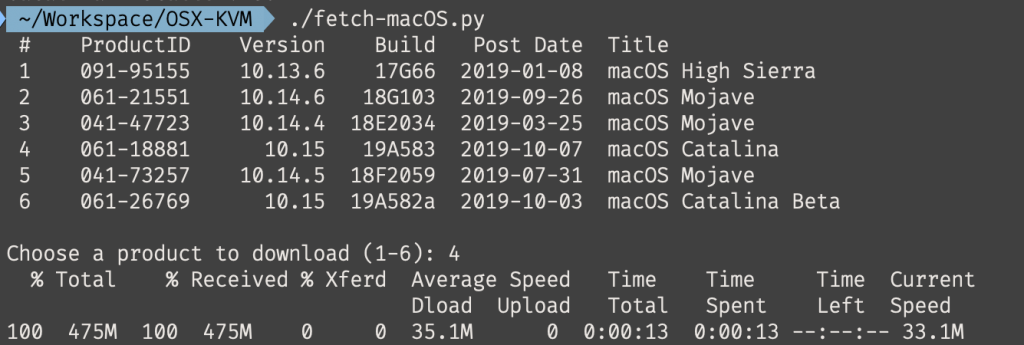
This results in a ~500MB “BaseSystem.dmg” file in the current directory. Convert that dmg into an “iso” like so if you’re building this on macOS:
hdiutil convert BaseSystem.dmg -format UDRW -o Catalina-installer.iso
mv Catalina-installer.iso.img Catalina-installer.iso
Or like so if you’re building this on Linux:
# Install the dmg2img package and...
dmg2img BaseSystem.dmg Catalina-installer.iso

# Or use qemu-img from the qemu-utils package to do it instead:
qemu-img convert BaseSystem.dmg -O raw Catalina-installer.iso
The result is actually a raw disk image, not a true ISO, but Proxmox has better tools for picking and re-using ISO images than disk images. Upload the “ISO” to your Proxmox server’s ISO store (typically /var/lib/vz/template/iso).
If you won’t have an Internet connection available to Catalina during installation, or your network can’t provide an IP address by DHCP you’ll need to build an offline installer instead. Building the offline installer requires you to have a Mac, here are the instructions.
Prepare an OpenCore image
We’ll be using OpenCore as a bootloader for Catalina. This has several improvements over my old Clover-based tutorial, like fixes to screen resolution problems, better CPU feature support, and better FileVault compatibility, and is recommended for all future builds.
Download the latest OpenCore.iso.gz release from my repository, unpack it, and upload it to Proxmox’s ISO store at /var/lib/vz/template/iso. Although it has a .iso file extension, this is actually a hard disk image.
Fetch the OSK authentication key
macOS checks that it is running on real Mac hardware, and refuses to boot on third-party hardware. You can get around this by reading an authentication key out of your real Mac hardware (the OSK key). Save the first block of C code from this page as smc_read.c. In a command prompt, change into the same directory as that file and run:
xcode-select --install # If you don't already have gcc
gcc -o smc_read smc_read.c -framework IOKit
./smc_read
It’ll print out the 64 character OSK for you. Make a note of it.
Every Mac uses the same OSK, so don’t be surprised that it doesn’t look like a random string!
Create the VM
From the Proxmox web UI, create a new virtual machine as shown below.
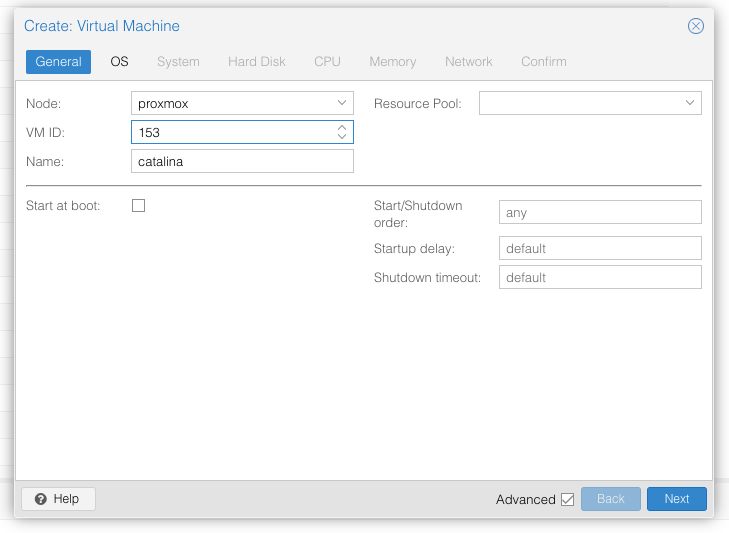
Keep a note of your VM’s ID 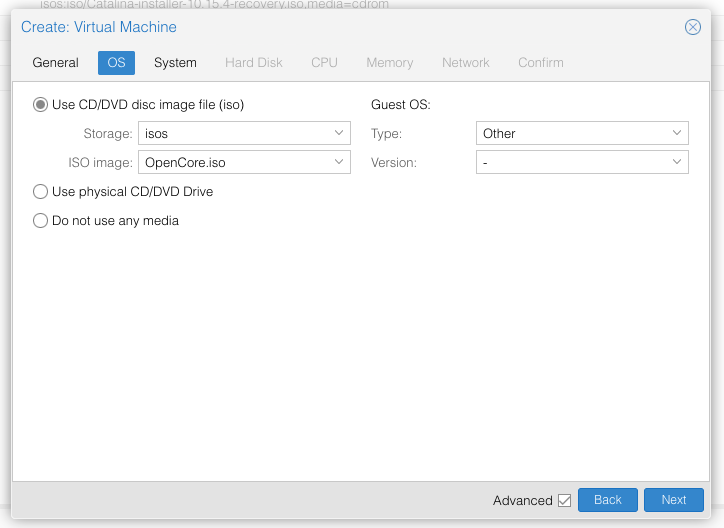
Select the OpenCore ISO you uploaded and set OS type to “Other” 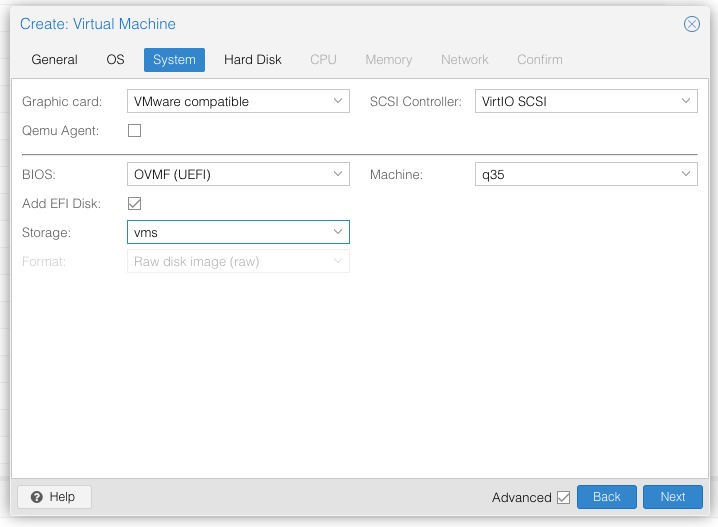
Set graphics to “VMWare Compatible”, set BIOS to OVMF (UEFI), set Machine to Q35, Tick Add EFI Disk and pick storage for it. On Proxmox 7 you must untick “pre-enroll keys” 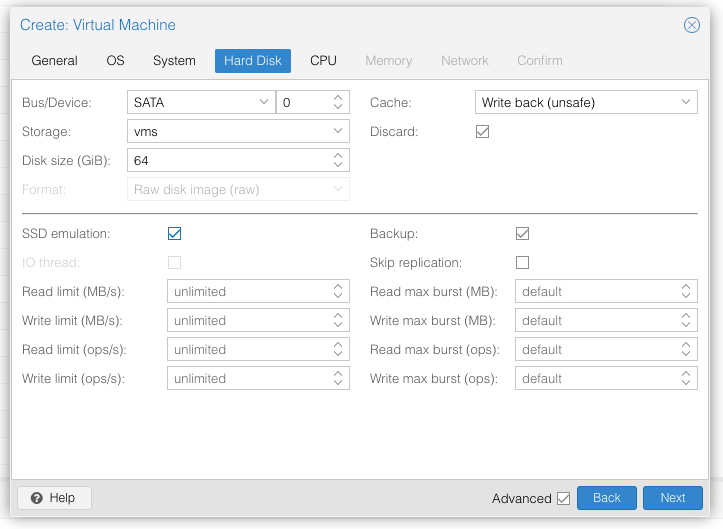
Set the size of the hard disk (I chose 64GB). Attach it to SATA0. Enable discard and SSD emulation to support TRIM. 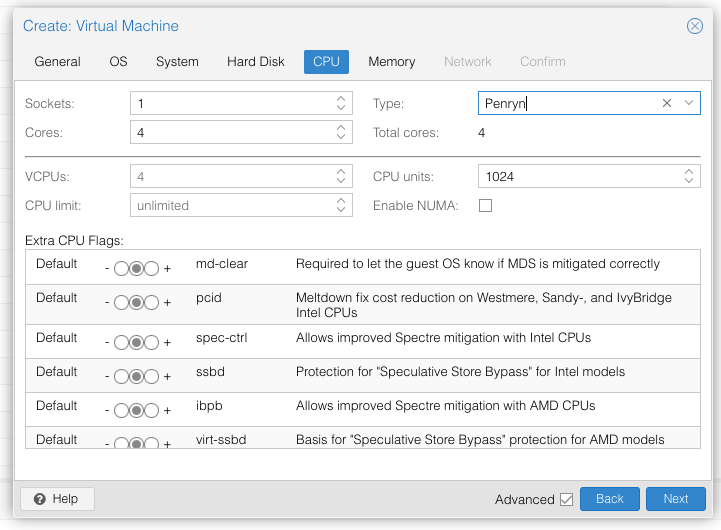
Set the number of cores for the VM, use a power of two (e.g. 1, 2, 4, 8, see note later). Set the CPU to Penryn. 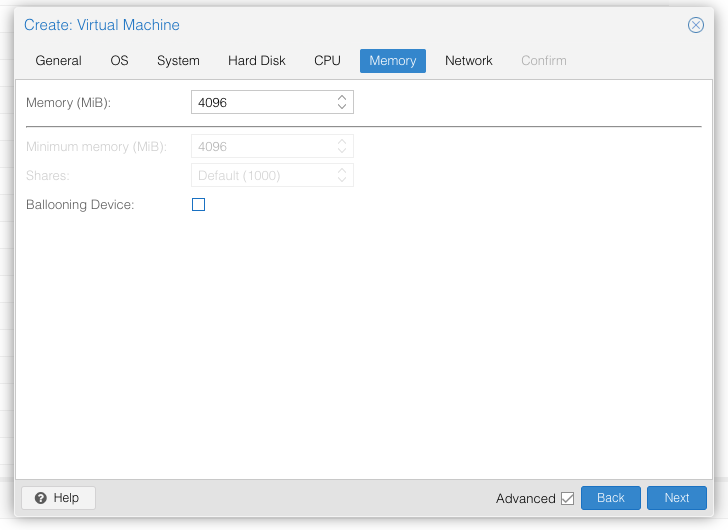
I chose a memory size of 4096MB. Disable ballooning because there is no balloon driver available for macOS. 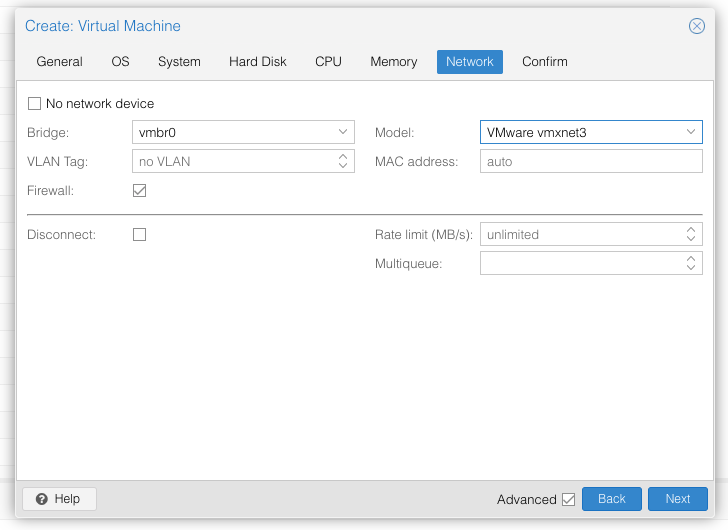
Choose VMWare vmxnet3 for the network model
In the Options page for the VM, ensure that “use tablet for pointer” is set to “Yes”.
In the Hardware page for the VM, add a second DVD drive at IDE0, set it to use your Catalina-installer.iso.
Don’t try to start the VM just yet. First, SSH into your Proxmox server so we can make some edits to the configuration files.
Edit /etc/pve/qemu-server/YOUR-VM-ID-HERE.conf (with nano or vim). Add this line, being sure to substitute the OSK you extracted earlier into the right place:
args: -device isa-applesmc,osk="THE-OSK-YOU-EXTRACTED-GOES-HERE" -smbios type=2 -device usb-kbd,bus=ehci.0,port=2
(A USB keyboard is added here because macOS doesn’t support QEMU’s default PS/2 keyboard.) Ensure the args are all on a single line!
We also need to add a -cpu argument. If your host CPU is Intel, add this to the end of the “args” line:
-cpu host,kvm=on,vendor=GenuineIntel,+kvm_pv_unhalt,+kvm_pv_eoi,+hypervisor,+invtsc
This will pass through all of the features that your CPU supports. OpenCore’s config will pretend to macOS that the CPU’s model name is Penryn for compatibility.
If your host CPU is AMD, or the above argument doesn’t work for you, use this more-compatible alternative:
-cpu Penryn,kvm=on,vendor=GenuineIntel,+kvm_pv_unhalt,+kvm_pv_eoi,+hypervisor,+invtsc,+pcid,+ssse3,+sse4.2,+popcnt,+avx,+avx2,+aes,+fma,+fma4,+bmi1,+bmi2,+xsave,+xsaveopt,check
This pretends that your CPU is Penryn, which will keep macOS happy even if your host CPU is AMD, and adds a bunch of newer required and optional CPU features on top. Features that your host CPU doesn’t support will be ignored (a warning will be printed to the console during launch with qm start 1xx), but note that macOS won’t work without SSE4.2 support.
Now find the lines that define the two “ISOs” (ide0 and ide2), and remove the “,media=cdrom” part from them. Add “,cache=unsafe” in its place. This will treat these as hard disks rather than DVD drives.
Save your changes, return to the Options tab, and change the boot order to put IDE2 (the OpenCore image) first. Your final VM configuration file should resemble this:
args: -device isa-applesmc,osk="..." -smbios type=2 -device usb-kbd,bus=ehci.0,port=2 -cpu host,kvm=on,vendor=GenuineIntel,+kvm_pv_unhalt,+kvm_pv_eoi,+hypervisor,+invtsc
balloon: 0
bios: ovmf
bootdisk: ide2
cores: 4
cpu: Penryn
efidisk0: vms:vm-100-disk-1,size=1M
ide0: isos:iso/Catalina-installer.iso,cache=unsafe,size=2094688K
ide2: isos:iso/OpenCore.iso,cache=unsafe,size=150M
machine: q35
memory: 4096
name: catalina
net0: vmxnet3=...,bridge=vmbr0,firewall=1
numa: 0
ostype: other
sata0: vms:vm-100-disk-0,cache=unsafe,discard=on,size=64G,ssd=1
scsihw: virtio-scsi-pci
smbios1: uuid=...
sockets: 1
vga: vmware
Configure Proxmox
On Proxmox, run “echo 1 > /sys/module/kvm/parameters/ignore_msrs” to avoid a bootloop during macOS boot. To make this change persist across Proxmox reboots, run:
echo "options kvm ignore_msrs=Y" >> /etc/modprobe.d/kvm.conf && update-initramfs -k all -u
Unlike Clover, OpenCore doesn’t require Proxmox’s OVMF package to be patched, so if you had previously installed my pve-edk2-firmware package, and you don’t have any Clover VMs left, you can revert to the vanilla Proxmox package by running “apt-mark unhold pve-edk2-firmware; apt install pve-edk2-firmware”. If you still have Clover VMs that need it, you can continue to use my patched package, it’ll work too.
Install Catalina
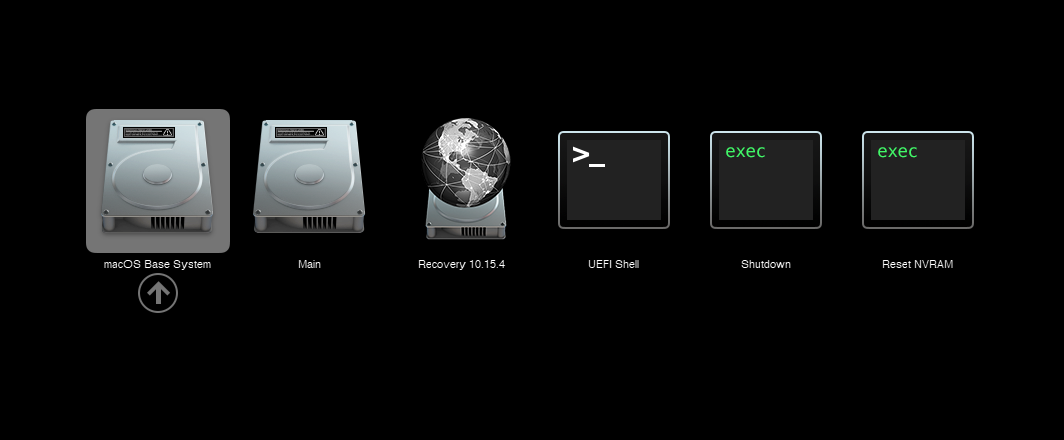
Now start up your VM, it should boot to the OpenCore boot picker:
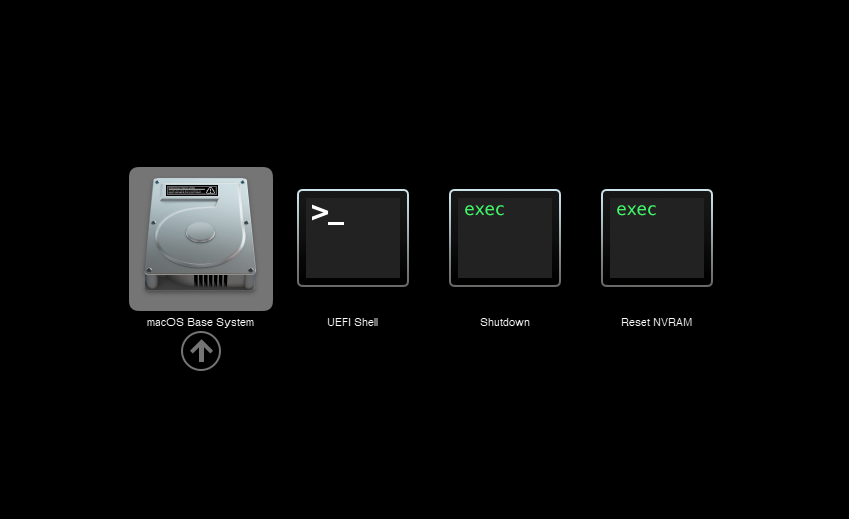
Press enter to boot the “macOS Base System” entry and the installer should appear.
Our virtual hard drive needs to be erased/formatted before we can install to it, so select the Disk Utility option. Follow the steps below to format the disk:
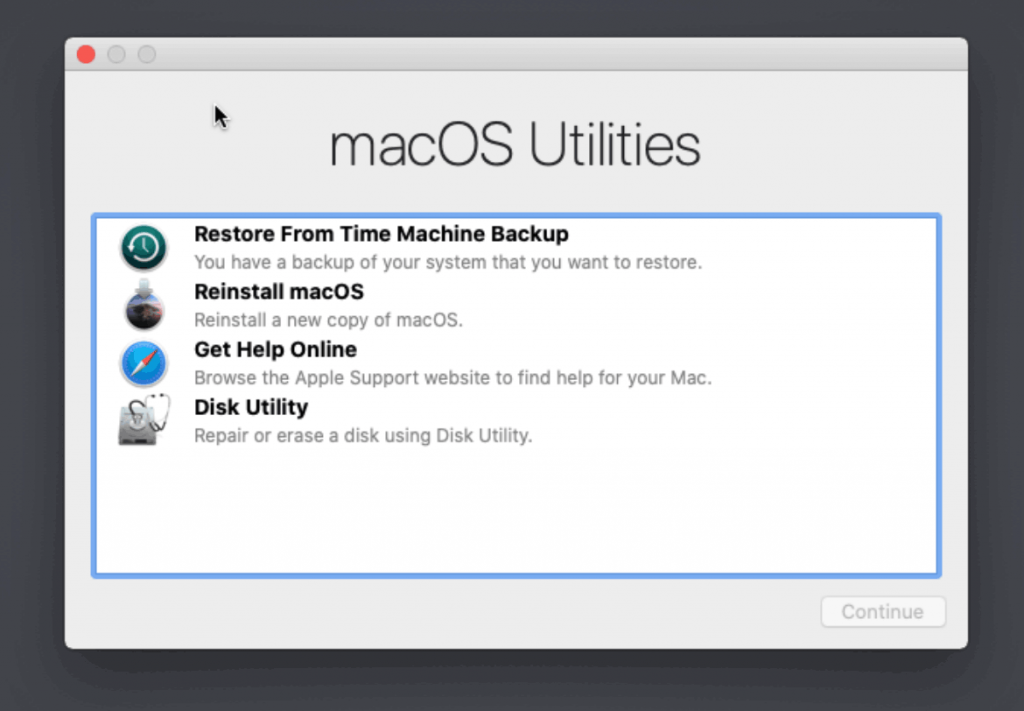
Select Disk Utility 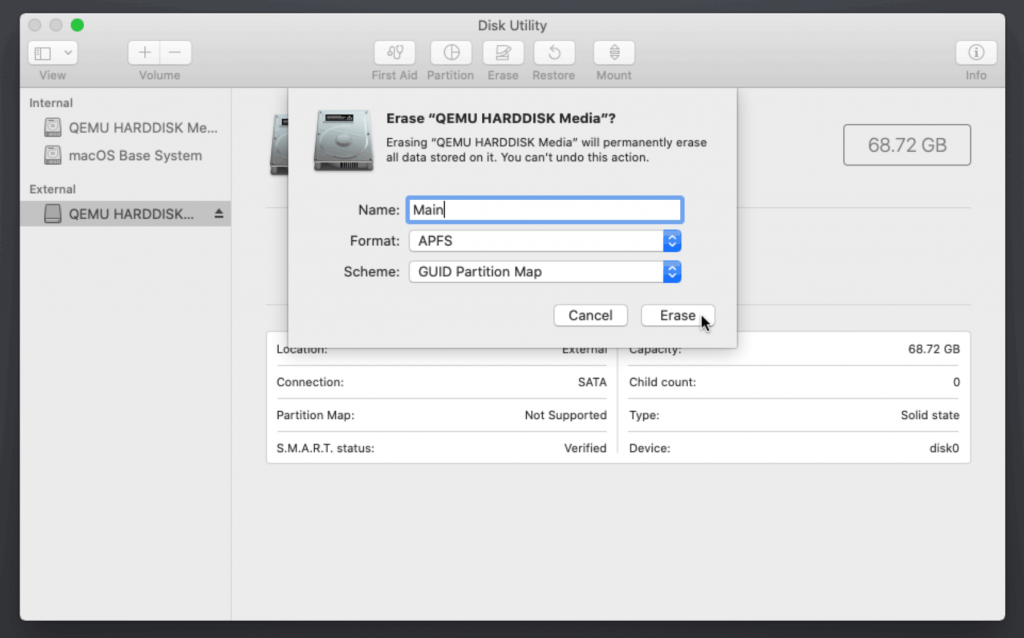
Erase the main disk (it’ll appear as an external drive). Choose APFS. I called mine “Main”. Avoid “Encrypted” at this stage
Now we’re ready to begin installation!
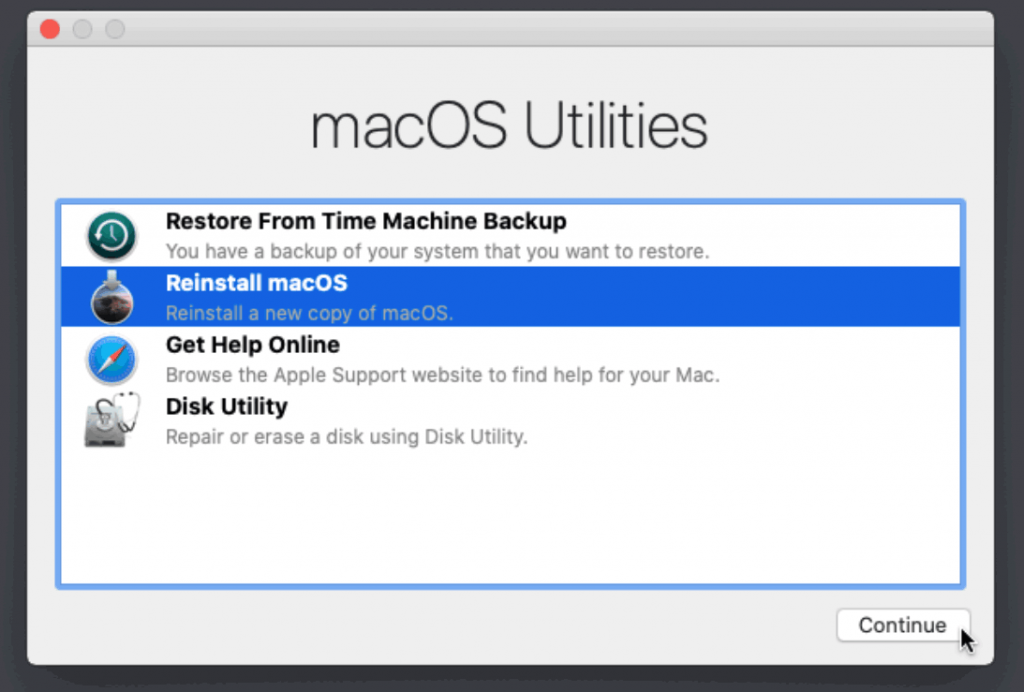
Reinstall macOS 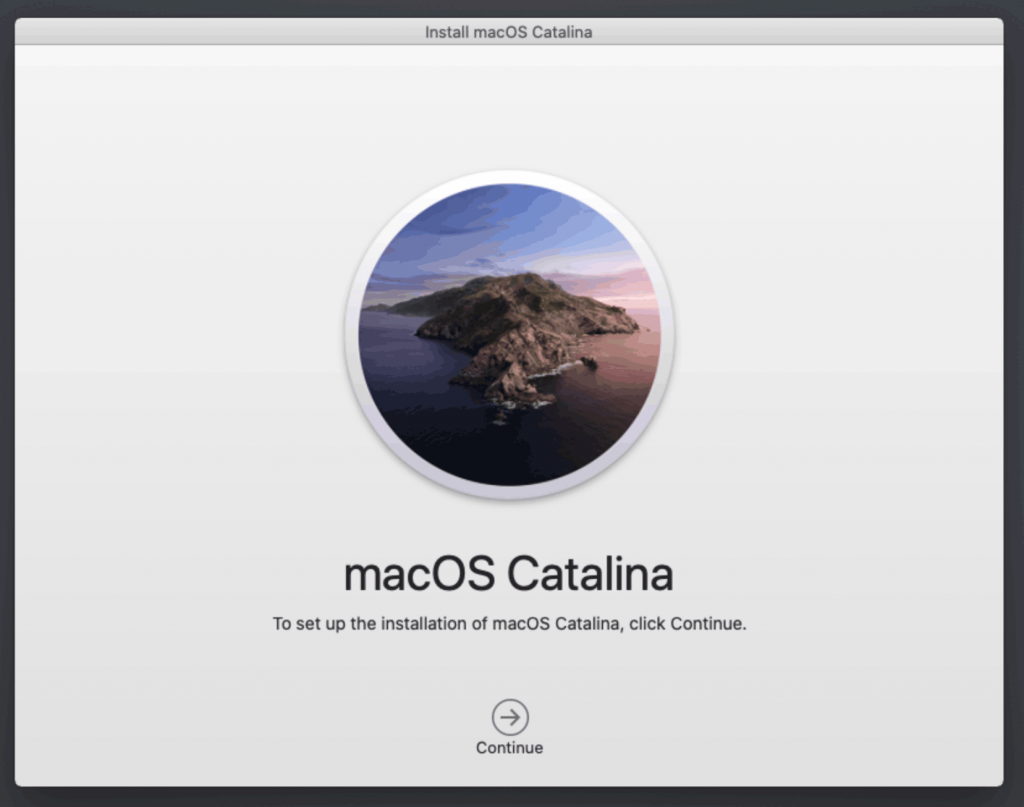
Continue… 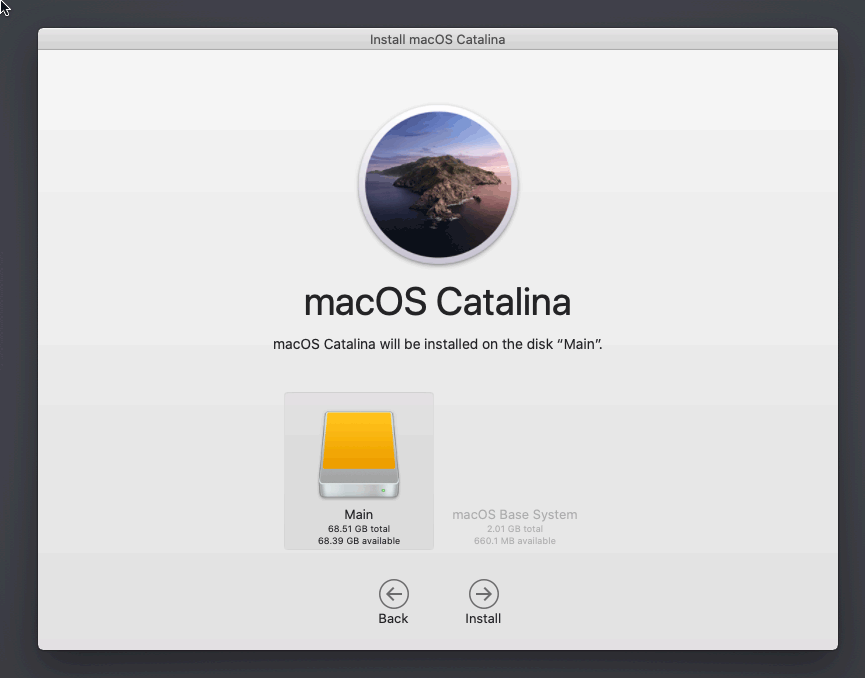
Choose the disk you erased 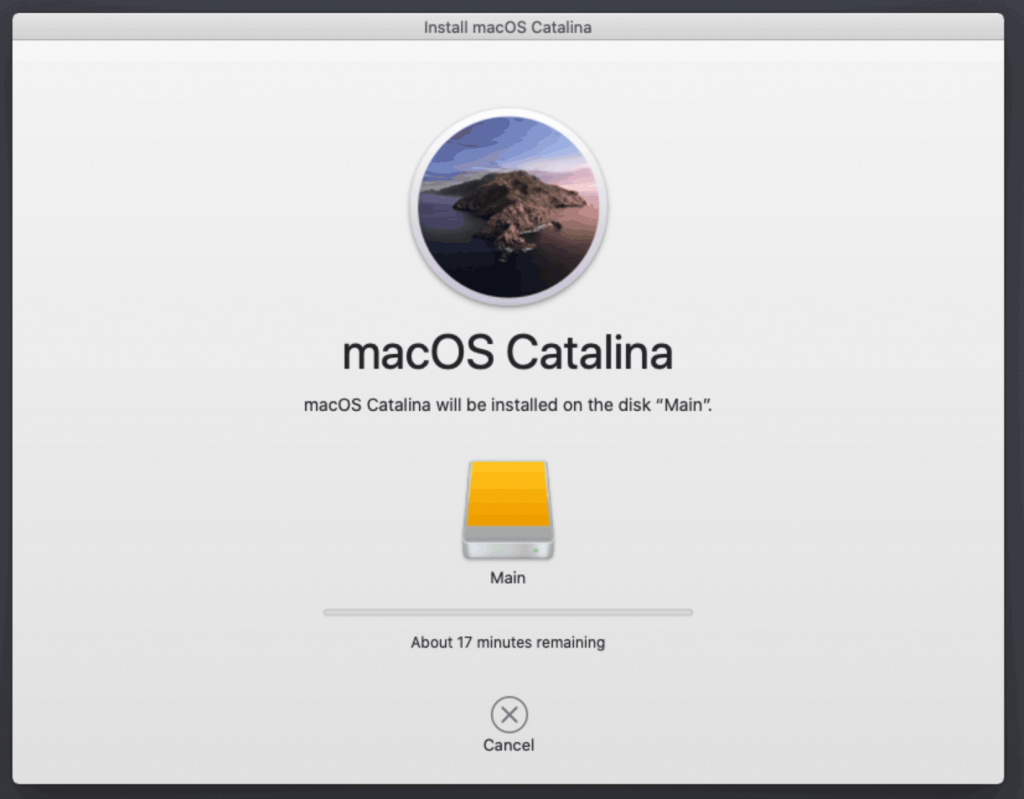
It’s installing!
After the first stage of installation, the VM will reboot. Pick the “macOS Installer” entry to continue installation:

The VM will finish installation and reboot itself a second time. Now the installation is complete, so choose the name of your main disk to boot (mine’s called Main):
Answer the initial install questions, and you’ll be logged on! (Note that you’ll want to hold off on logging into your iCloud account until you’ve configured your SMBIOS to your liking)
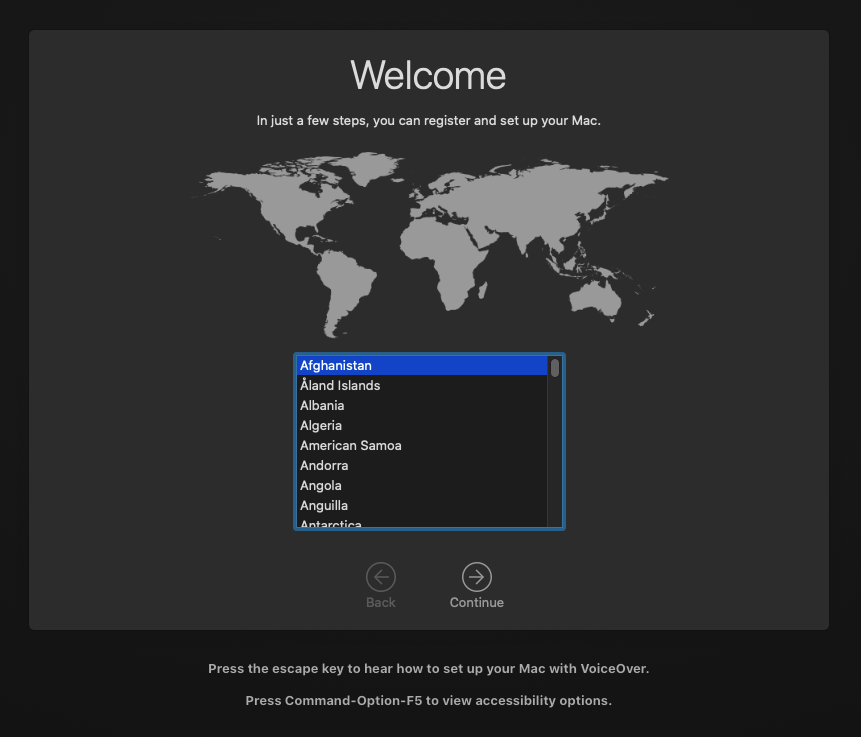
Answer the install questions 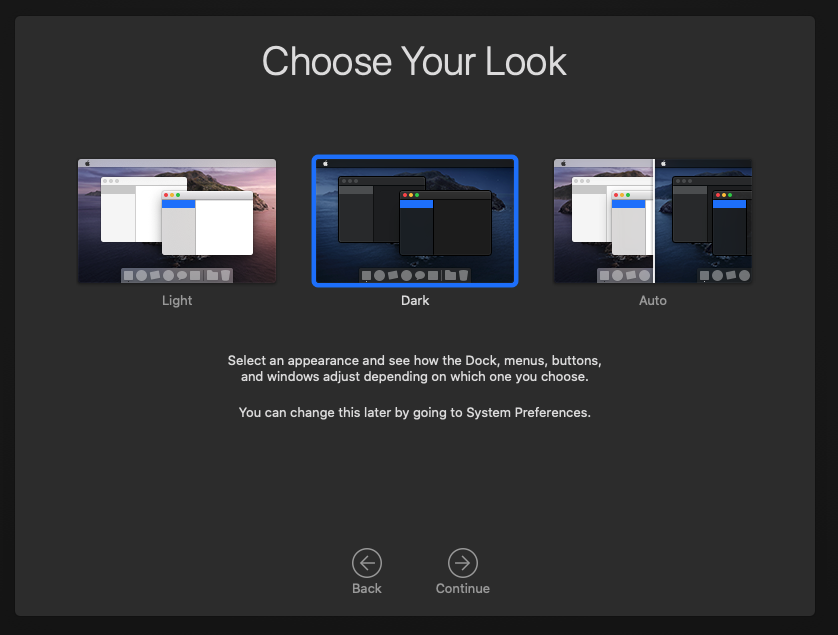
New automatic theme switching! 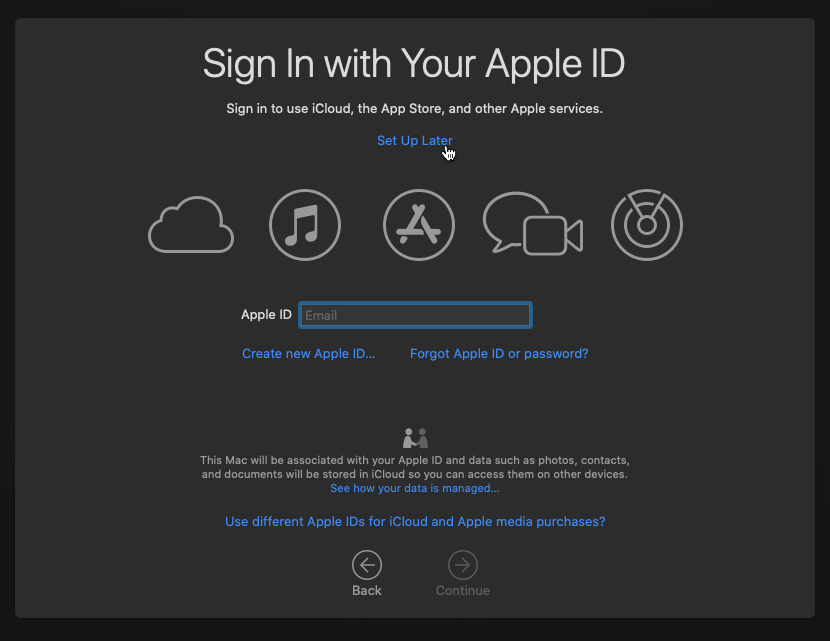
Avoid logging into iCloud just yet
Make the OpenCore install permanent
We’re currently booting using OpenCore from the attached OpenCore ISO. Let’s install that to the hard drive instead. Pop open Terminal and run “diskutil list” to see what drives we have available.
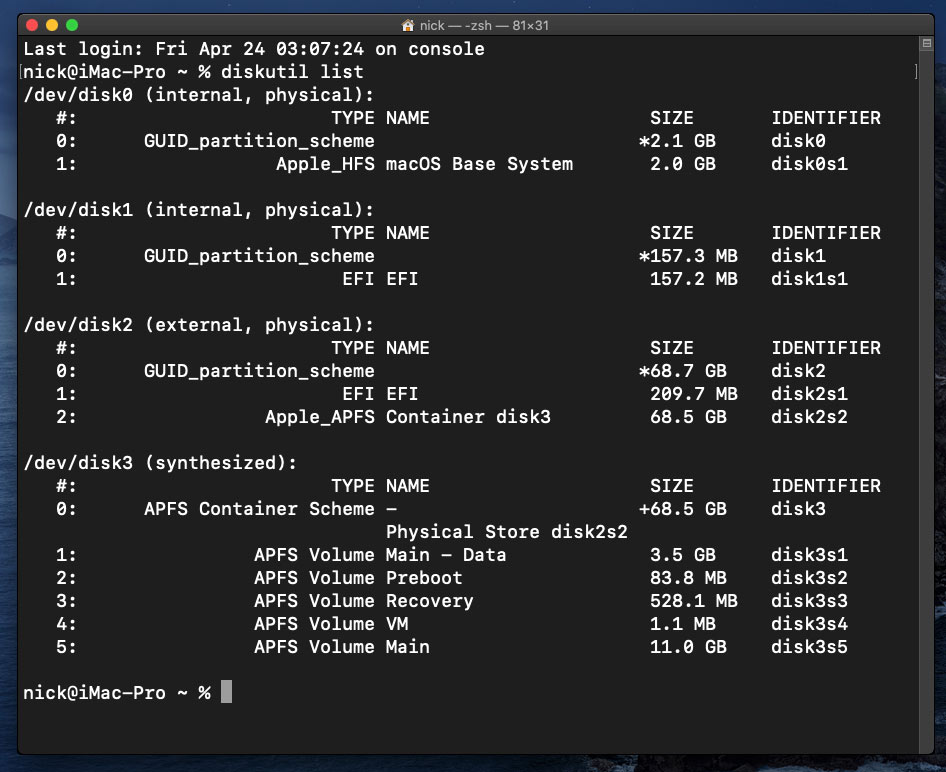
Use “sudo dd if=<source> of=<dest>” to copy the “EFI” partition from the OpenCore CD and overwrite the EFI partition on the hard disk. The OpenCore CD is the small disk (~150MB) that only has an EFI partition on it, and the main hard disk is the one with the large Apple_APFS “Container” partition on it.
In my case these EFI partitions ended up being called disk1s1 and disk2s1 respectively, so I ran “sudo dd if=/dev/disk1s1 of=/dev/disk2s1” (note that if you get these names wrong, you will overwrite the wrong disk and you’ll have to start the installation over again!).
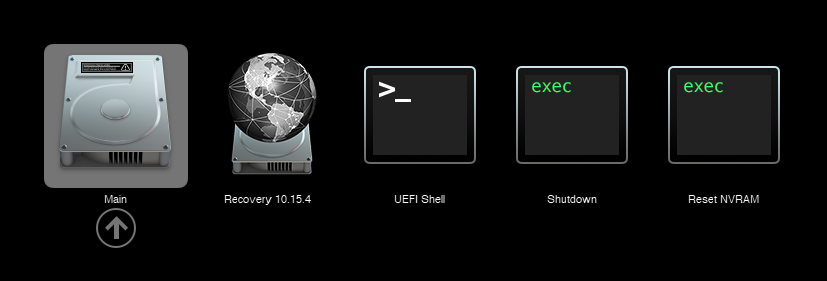
Now shut down the VM, and remove both the OpenCore and the Catalina installer drives from the Hardware tab. On the Options tab, edit the boot order to place your SATA disk as the first disk. Boot up. If everything went well, you should see the OpenCore boot menu, and you can select your “Main” disk to boot Catalina:
Sleep management
I found that I was unable to wake Catalina from sleep using my mouse or keyboard. If you encounter the same problem, you can either disable system sleep in Catalina’s Energy Saver settings to avoid the issue, or you can manually wake the VM up from sleep from Proxmox by running:
qm monitor YOUR-VM-ID-HERE
system_wakeup
quit
Editing your OpenCore/EFI settings
The Configuration.pdf that explains the OpenCore config.plist file can be found along with the OpenCore release on my GitHub.
To mount your EFI partition in macOS so you can edit config.plist, first check the “identifier” of your EFI partition in the terminal:
~$ diskutil list
/dev/disk0 (external, physical):
   #:                   TYPE NAME              SIZE       IDENTIFIER
   0:  GUID_partition_scheme                  *512.1 GB   disk0
   1:                    EFI EFI               209.7 MB   disk0s1
   2:             Apple_APFS Container disk1   511.9 GB   disk0s2
Then you can mount it like so:
sudo mkdir /Volumes/EFI
sudo mount -t msdos /dev/disk0s1 /Volumes/EFI
Now you can edit /Volumes/EFI/OC/config.plist with your favourite text editor to make your changes. (TextEdit is not a great choice because it likes to insert curly quotes into the file and otherwise break things, there are some dedicated plist editors available such as XCode).
If you’re unable to boot macOS, you can edit the config.plist using the “UEFI Shell” option in the OpenCore boot menu instead.
Enter “FS0:” and press enter to open up the first available filesystem, then run “edit EFI\OC\config.plist” (if the file isn’t found, try switching to another filesystem like fs1:). When you’re done editing, press control+Q to exit, “Y” to save, then run “exit” to return to the OpenCore menu. You need to reboot for your changes to take effect.
Automatic boot
In config.plist, set Misc/Boot/Timeout to a non-zero value to allow the default boot option be chosen automatically after that delay in seconds. I’ve disabled this by default because it causes the installer ISO to re-enter its main menu instead of continuing the second stage of installation.
Verbose boot
To boot macOS in Verbose mode to diagnose boot problems, edit config.plist to change the “bootargs” in the NVRam section from “keepsyms=1” to “keepsyms=1 -v”.
Changing screen resolution
To change macOS’ screen resolution, you need to edit the UEFI/Output/Resolution setting in config.plist, the default is 1920×1080@32.
You should be able to change this to any of the modes that the system OVMF menu offers (hit F2 at the start of guest boot and choose “Device Manager/OVMF Platform Configuration” to see which resolutions are available).
Video performance
Because there is no guest video acceleration available for macOS, video performance is poor.
In Google Chrome in the guest you will need to toggle off the setting to “use hardware acceleration when available” to improve issues with elements not being drawn or flickering (especially video). Safari may be a better choice.
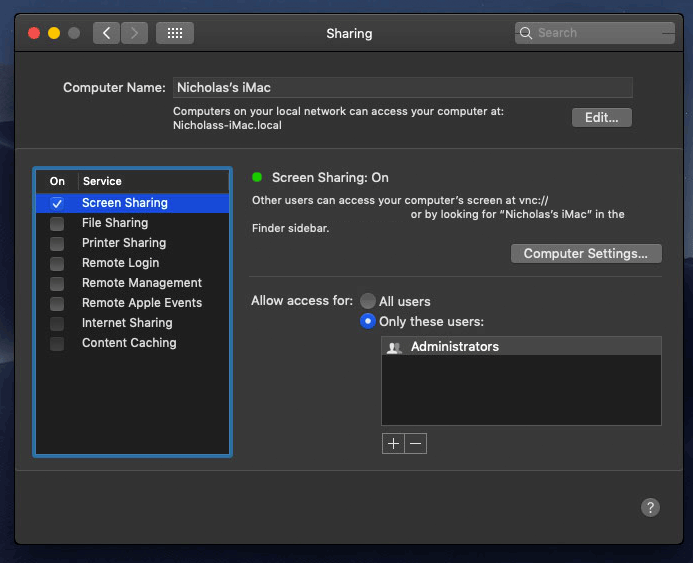
macOS’s built in “Screen Sharing” feature offers dramatically better framerates and latency than Proxmox’s browser-based VNC console, so if you have a real Mac to act as a viewing console, you can enable that in the VM’s “Sharing” settings and connect to the VM using the Screen Sharing app from your Mac instead:
Apparently Screen Sharing is also compatible with VNC clients like RealVNC, so you should be able to connect to it from Linux or Windows consoles using RealVNC.
The real magic bullet for video performance is to pass through a compatible video card using PCIe passthrough (though note that Catalina does not support most NVidia cards). This offers near-native performance. You can read more about how I’m using PCIe passthrough on my own installation here.
USB passthrough
Since I want to use this as my primary computer, I want to use a USB keyboard and mouse plugged directly into Proxmox, rather than sending my input through the web VNC console.
Proxmox has good documentation for USB passthrough. Basically, run “qm monitor YOUR-VM-ID-HERE”, then “info usbhost” to get a list of the USB devices connected to Proxmox:
qm> info usbhost
 Bus 3, Addr 12, Port 6, Speed 480 Mb/s
 Class 00: USB device 8564:1000, Mass Storage Device
 Bus 3, Addr 11, Port 5.4, Speed 12 Mb/s
 Class 00: USB device 04d9:0141, USB Keyboard
 Bus 3, Addr 10, Port 5.1.2, Speed 12 Mb/s
 Class 00: USB device 046d:c52b, USB Receiver
 Bus 3, Addr 9, Port 14.4, Speed 12 Mb/s
 Class 00: USB device 046d:c227, G15 GamePanel LCD
 Bus 3, Addr 8, Port 14.1, Speed 1.5 Mb/s
 Class 00: USB device 046d:c226, G15 Gaming Keyboard
In this case I can add my keyboard and mouse to USB passthrough by quitting qm, then running:
qm set YOUR-VM-ID-HERE -usb1 host=04d9:0141
qm set YOUR-VM-ID-HERE -usb2 host=046d:c52b
This saves the devices to the VM configuration for you. You need to reboot to have the new settings apply. Note that the emulated USB3 device doesn’t work with macOS, so don’t set “usb3=1”.
You can also pass through USB devices by passing through an entire USB controller using Proxmox’s PCIe passthrough feature, which gives much better compatibility.
FileVault
FileVault now works with OpenCore, so you can encrypt your boot disk by using the option in macOS’ system security preferences. But be certain to keep a copy of your recovery key and keep your backups up to date.
Using an odd number of CPU cores
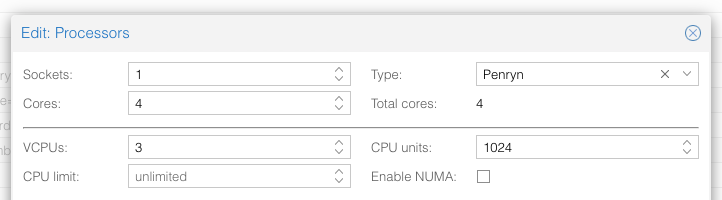
macOS doesn’t like it if your CPU has a weird number of cores, like 3 or 6. You can fix this on the Hardware tab. Edit the Processors settings, and tick the Advanced box. Round up the number of cores you want (e.g. 3) to a nice power of two (4, 8, 16, etc) and use that for the “Cores” setting, but set the “VCPUs” setting to the number of cores you actually want to be used (3), like so:
This will cause macOS to see that system supports a maximum of 4 cores, but that one core is absent since it hasn’t been hotplugged yet, so macOS will only use 3 cores.
Another approach is to use an odd number of sockets in order to make the core count a power of two. e.g. to pass 6 cores, set Sockets to 3, and Cores to 2 (or 4 to pass both threads per core).
Proxmox doesn’t let us set the number of threads per core in the VM config, so if you want to pass every thread of a hyperthreaded 6-core CPU, and have them reported to the guest as hyperthreads, add -smp 12,sockets=3,cores=2,threads=2 to your “args”, or for a 56-core hyperthreaded CPU, -smp 112,sockets=7,cores=8,threads=2.
Nested emulation
If your host CPU is Intel, and you used “-cpu host” in your VM config file (explained above), you can use Nested Virtualisation in macOS. This allows you to run VirtualBox VMs, the Android emulator, or Docker inside your macOS guest. You just need to tweak your Proxmox system config to enable this as explained in the Wiki:
https://pve.proxmox.com/wiki/Nested_Virtualization
macOS’s Hypervisor framework doesn’t support nested virtualisation on AMD host CPUs, but apparently VirtualBox uses their own virtual machine driver which does work (I haven’t tried this myself). I imagine this will stop working in the next version of macOS, since they’re planning to add a bunch of restrictions on third-party kexts and might force VirtualBox to use Hypervisor.framework.
Getting iMessage and FaceTime to work
Unlike the App Store and iCloud, these Apple services actually pay attention to your Mac’s serial number.
Following this guide should get these working for you:
https://dortania.github.io/OpenCore-Post-Install/universal/iservices.html#generate-a-new-serial
I had already generated a serial number for my Mac (when I check the Support Status for it, it says “We’re sorry, but this serial number isn’t valid. Please check your information and try again”) and added it to my OpenCore config, so all I had to do on top of that was use Hackintool to help me mark my Ethernet adapter en0 as built-in. FaceTime then worked immediately. I didn’t need to follow the rest of the guide.
Fixing “guest boots to UEFI shell”
If your guest ends up booting to the UEFI shell instead of showing the OpenCore boot menu, especially if you’ve just updated OpenCore to a new version, you’ll need to edit the guest’s UEFI boot entries to fix this.
At the very start of guest boot, hit F2 to enter guest UEFI settings.
First we’ll remove the old entries. Choose the Boot Maintenance option, then Boot Options -> Delete Boot Option. Use the spacebar to tick any old Clover or OpenCore entries (avoid ticking the EFI Internal Shell option, you want to keep that!). Select “Commit Changes and Exit”.
Now we’ll add the correct entry for OpenCore back in. Select Add Boot Option. Navigate through the device tree to EFI/BOOT/BOOTx64.efi and select it, name this new option “OpenCore” or similar. Again Commit Changes and Exit.
Go to the Change Boot Order and move OpenCore to the top. Commit Changes and Exit.
Now back out to the main menu and choose Reset, and you should successfully boot into OpenCore this time.
Hi,
Thanks Nick for this guide !
I’m trying to configure the cpu to host passthrough, but when I change the line from “-cpu Penryn,…” to “-cpu host,…”, OpenCore won’t boot anymore. I tried to upgrade OpenCore to latest version whith no more success.
When I enable log to Opencore, it seems to be stuck after CPU detection :
——
OC: OpenCore DBG-058-2020-05-04 is loading in Optional mode (0/0)…
OC: Boot timestamp – 2020.05.19 16:37:05
OCCPU: MP services threads 8 (enabled 8) – Success
OCCPU: MP services Pkg 1 Cores 8 Threads 1 – Success
OCCPU: Found Intel(R) Core(TM) i7-6700 CPU @ 3.40GHz
OCCPU: Signature 506E3 Stepping 3 Model 5E Family 6 Type 0 ExtModel 5 ExtFamily 0 uCode 1
OCCPU: Hypervisor detected
OCCPU: VMWare TSC: 3408014000Hz, 3408MHz; FSB: 1000000000Hz, 1000MHz; BusRatio: 3
OCCPU: Detected Apple Processor Type: 07 -> 0705
——
With Penryn cpu (same other options) :
——
OC: OpenCore DBG-058-2020-05-04 is loading in Optional mode (0/0)…
OC: Boot timestamp – 2020.05.19 16:38:10
OCCPU: MP services threads 8 (enabled 8) – Success
OCCPU: MP services Pkg 1 Cores 1 Threads 8 – Success
OCCPU: Found Intel Core 2 Duo P9xxx (Penryn Class Core 2)
OCCPU: Signature 10673 Stepping 3 Model 17 Family 6 Type 0 ExtModel 1 ExtFamily 0 uCode 1
OCCPU: Hypervisor detected
OCCPU: VMWare TSC: 3408014000Hz, 3408MHz; FSB: 1000000000Hz, 1000MHz; BusRatio: 3
OCCPU: Detected Apple Processor Type: 02 -> 0301
OCCPU: CPUFrequencyFromTSC 0Hz 0MHz
OCCPU: CPUFrequency 3408014000Hz 3408MHz
OCCPU: FSBFrequency 1000000000Hz 1000MHz
OCCPU: Pkg 1 Cores 8 Threads 8
OC: OcLoadNvramSupport…
…
——
I noticed that the CPU topology has changed on the line OCCPU: MP services, but I think it’s normal ?
Cpu model is a Slylake i7-6700.
Does anyone have an idea or would face the same problem?
Thanks,
What core/socket count are you specifying exactly? It almost looks like it thinks it is 1 core with 8 threads.
Yes it’s right, in Opencore logs, I can see :
– “MP services Pkg 1 Cores 1 Threads 8” when cpu is set to “Penryn”
but some lines after : “Pkg 1 Cores 8 Threads 8”
–> I do not know why. but it works well in this case
– “MP services Pkg 1 Cores 8 Threads 1” when cpu is set to “host”
–> Opencore keep stuck during boot
In pve config, it’s in both cases:
cores: 8
sockets: 1
(I have not set extra args (-smp) for overwriting proxmox values in pve config.)
With a ps, the command line for qemu always contains : “-smp 8,sockets=1,cores=8,maxcpus=8”
I found the reason, it’s related to CPU detection with Qemu 5 : https://github.com/acidanthera/bugtracker/issues/914
It will be fixed in next release.
It works by compiling Opencore with the latest commits.
Thanks for discovering that, I’ll release a new build with that commit added
I’ve now published v4 of my OpenCore ISO which includes this fix, and now supports QEMU 5 / Proxmox 6.2:
https://github.com/thenickdude/KVM-Opencore/releases
thanks for the guide!, i was able to passthrough GPU, and graphics works but no audio from the displayport-to-hdmi adapter. is there some kext/drivers which needs to be setup? or we’re out of luck with GPU’s audio. and we can only use USB audio?
My Displayport and HDMI audio both work perfectly thanks to Whatevergreen (R9 280X). Maybe the adapter is the source of the problem, or it could just be the video card model.
thanks for the pointers on Whatevergreen, will look into it soon
do we have to still use clover to add Whatevergreen? or is there another path for this proxmox/opencore way.
and I will start to look for USB audio also for a backup solution. would Whatevergreen still be needed with USB audio devices that is known to work without the need for manufacture drivers?
My OpenCore image already has Whatevergreen installed into it so it should be good to go.
As far as I know, most USB audio dongles are plug and play on macOS, and it isn’t any more difficult on Hackintoshes (nothing to configure). If you’re shopping on Amazon you can check reviews to see if they mention macOS.
Thanks for the brilliant guide.
I was able to install test version of Mac OS on Proxmox without any issues a couple of days ago without any issues using Version 3.
However when I tried to follow the guide again today for my actual Mac OS install which I intend to use, the installation keeps crashing just after I select MacOS Base System at the OpenCore Installer screen. It starts loading halfway then crashes and goes back to the OpenCore Installer.
Not sure if this would help but I found this the Proxmox log file:
May 26 00:54:25 balau kernel: kvm [1884]: vcpu0, guest rIP: 0x7e48ef9f ignored rdmsr: 0xe2
I have also tried using the OpenCore ISO from V1-V3 and have the same issue. Were there any changes made to the OpenCore file in the latest V4 version issued yesterday (25th May) that might be causing this?
My test install is working perfectly and I am still able to load into it as usual.
Any help much appreciated.
Since you have the same problem with V3 the issue is definitely not triggered by V4. Double check that your OSK is properly specified in your new VM.
Thanks for your quick reply Nick.
Have double checked the OSK for the new VM and can confirm its correctly defined and is the same with the test VM that works fine.
Is there anything else I can try to troubleshoot this?
Have output my conf settings below.
args: -device isa-applesmc,osk=“…” -smbios type=2 -device usb-kbd,bus=ehci.0,port=2 -cpu host,kvm=on,vendor=GenuineIntel,+kvm_pv_unhalt,+kvm_pv_eoi,+hypervisor,+invtsc
bios: ovmf
boot: cdn
bootdisk: ide2
cores: 2
cpu: Penryn
efidisk0: local-lvm:vm-125-disk-1,size=4M
ide0: local:iso/Catalina-installer.iso,cache=unsafe,size=2094688K
ide2: local:iso/OpenCore.iso,cache=unsafe,size=150M
machine: q35
memory: 4096
name: 125mac
net0: vmxnet3=AE:96:30:E8:97:3F,bridge=vmbr0,firewall=1
numa: 0
ostype: other
sata0: local-lvm:vm-125-disk-0,discard=on,size=64G,ssd=1
scsihw: virtio-scsi-pci
smbios1: uuid=285b87ad-afd6-4702-8a43-f1947f538550
sockets: 1
vga: vmware
vmgenid: 7d175073-cf43-4e98-aab8-38427113cec1
Nick,
Apologies managed to solved this and thanks for pointing me to check on the OSK. The text editor I was using (Bear) was changing my “” to a different format. It is working now.
Thanks again for a brilliant guide and for making this so easy to setup on Proxmox (when you don’t make stupid mistakes like me 🙂
Ah, this is hard to spot in WordPress comments because it converts to curly quotes here too! Another trap is an automatic conversion from (c) to a copyright symbol.
Hi Nick, Thanks for your tutorial.
Opencore is smoother than clover imo.
No sound options available inside System preferences on the OpenCore Catalina VM- any idea?
Have the same issue with my Mojave clover VM – as a work around I get audio from Monitors headphone socket. Speaker icon is greyed out, have tried the APPLE ALC / LILU fix with injecting different layouts etc – no luck!
I have a Mojave (Clover) VM using a AMD RX580 GPU as a PCI passthrough. It is possible to passthrough a second VM through the same RX580?
Thanks
As far as I know, none of the QEMU emulated audio devices are compatible with macOS. You’d need to passthrough a USB or PCIe audio solution, or use the audio output of your passthrough video card, instead.
You can add your GPU passthrough to the config of as many VMs as you like, but only one can be running at a time of course.
Thanks for posting this! I’ve been using your previous method for the last 6+ months.
I have everything configured as described, but I’m getting a black screen on boot with a mouse pointer in the top left corner. I can’t move it or interact with it and it seems to reboot every couple of minutes. Any idea what the issue could be?
Try pressing enter at that prompt, someone reported that that magically fixed it for them.
haha wow – that totally did it. thanks!
I’m going to add an RX580 and passthrough to my OSX VM. Other than assigning the device to the VM, is there any setup within OSX required or will it autodetect and just work?
It ought to just work!
It seems to be working but if I look at “About this Mac” it shows only 7mb display not RX580. Is this correct?
Also, there is no sound. Any ideas?
And a huge thank you for your help.
You need to disable the emulated video by setting vga: none in your VM config.
I don’t think any of the QEMU emulated sound devices are supported by macOS.
Changing to “vga: none” and I can’t connect to the OSX VM either by Chrome Remote Desktop or VNC. It won’t respond to pings either. Looks like it is hanging?
Graphics certainly feel accelerated as scrolling in Chrome is very fast and YT videos are playing (without audio).
As for audio, shouldn’t it recognize the RX580 audio passed through?
Can you clarify if you have your monitor plugged directly up to the RX 580? It’s not going to be happy with no monitor attached.
Hi Nick,
Thanks for this. I have tested on my labs and it works flawlessly.
I have one question, have you ever tried to use the GPU passthrough?
I am in the middle of the installation process and will try the GPU passthrough.
Do I need to change the settings in the opencore if I want to use GPU passthrough?
Thanks
No changes needed to OpenCore. Check out this post of mine where I explain my passthrough setup:
https://www.nicksherlock.com/2018/11/my-macos-vm-proxmox-setup/
I didn’t have a monitor connected as the server is headless. Attaching a dummy HDMI dongle did the trick. It’s working perfectly.
So, there is no possibility of sound at all?
And finally, is it safe to apply the latest OSX update?
Sound would be delivered over HDMI to your monitor for it to decode, if it thought the monitor supported it. Maybe the dummy plug isn’t enough to make it think that’s available? Make sure you’re passing all functions of the GPU in a single hostpci line and you haven’t split it into two hostpci devices.
I’m unable to upgrade to 10.15.4 because macOS hangs with a black screen just as the video card should be initialised, it looks my R9 280X GPU (which was never officially supported) has had support dropped, or needs some more configuration.
If your storage supports snapshots it’s easy to try out the upgrade and just roll-back if it fails! I’m passing through an NVMe drive directly so I had to make an image of the disk as a backup and then copy it back to roll it back after it failed.
I’m passing the full device in a single line as you say. I can see the audio output device listed as HDMI but the volume is not controllable. It’s not muted and is set to maximum. However, there is no audio via Chrome Remote Desktop.
I also tried to connect via VNC and after connecting, it seemed to crash OSX. I guess there is something going with with conflicting remote sessions (via VNC and Chrome Remote Desktop). In Windows and Ubuntu, this works fine.
Re: 10.15.5 upgrade. Once I get everything stable, I’ll take a snapshot, upgrade and let you know how it goes.
The uncontrollable volume is standard for digital audio on macOS, because decreasing the volume digitally would be reducing the precision by throwing away bits. (It’s intended that you use an analogue volume control on your monitor instead).
I’m not sure why Chrome isn’t picking it up.
Just to let you know, I successfully upgraded to 10.15.5 without issues.
From a lot of additional research, remote audio on a Mac is not easy. Splashtop apparently supports it by adding an additional audio device but there are few other options. There are some open source options such as soundflower but I haven’t tried them as of yet.
Anyhow, thanks for the great guide and the help getting it all up and working.
Thanks, I have a RX 580 11265-05-20G on order now so I’m looking forward to having a well-supported GPU going forwards!
Since HDMI audio is known to work on Hackintosh/QEMU (since I get both DP and HDMI audio working on my R9 280X) I would expect that any remote access systems that promise to capture audio at all would work in this configuration, so that problem is really unusual.
I tried this exact GPU card. I works fine with in my OSX VM, but at least on my system it shows the famous AMD reset bug, which means I often cannot reboot/shutdown the OSX VM without also rebooting the host system, before restarting a guest VM using the card.
Could you try your card already? Do you have the same problem?
Yes I’ve just installed it today and I’m having similar issues ;_; At the 75% mark on the loading bar, when macOS goes to initialise the video, it sometimes hangs forever and this is printed to dmesg:
pcieport 0000:00:02.0: AER: Uncorrected (Non-Fatal) error received: 0000:00:02.0
pcieport 0000:00:02.0: AER: PCIe Bus Error: severity=Uncorrected (Non-Fatal), type=Transaction Layer, (Requester ID)
pcieport 0000:00:02.0: AER: device [8086:3c04] error status/mask=00004000/00000000
pcieport 0000:00:02.0: AER: [14] CmpltTO (First)
pcieport 0000:00:02.0: AER: Device recovery successful
It doesn’t do it every time, some guest cold boots and reboots are fine.
At least once I was able to “qm stop 100; qm start 100” and it worked again on the second try.
I’ve heard you can sleep and rewake the host instead of doing a full reboot: https://forum.level1techs.com/t/navi-reset-kernel-patch/147547/116
I found this explanation for remote audio issues:
“Apple has discontinued the support of user-space audio plugins (HAL). Without this functionality, we can not capture audio from user session. The method proposed by Apple (Audio Server) captures audio from a single user session on console only. Therefore all old tool does not support audio redirection.”
Generally speaking, Windows especially and even Linux are blessed with remote options. For Mac, it seems there is only VNC and the commercial options, most of which don’t do the extra legwork to grab the audio stream.
Good luck with the RX580. I have an MSI Armor RX580 8G OC. Had a little trouble getting it working as I have a GPU already passed through for Windows. However, now it’s working, I have no issues so far and seem unaffected by the reset bug also.
In the absolute worst-case, you can USB-passthrough a USB audio dongle ($5-10, I got this one: https://www.amazon.com/gp/product/B001MSS6CS whose main failing is being ear-destroyingly loud, but proves that any cheap piece of shit will do, or the Dragonfly Black https://www.amazon.com/AudioQuest-DragonFly-Black-Preamp-Headphone/dp/B01DP5JHHI, which is nice but doesn’t exactly justify its price) and connect that to the line-in of an audio device on the host.
I usually am not physically close enough to the computer running the VM when I use OSX to take advantage of another USB device. It’s also headless so that’s why I’m trying to get remote audio to work. I’m quite sure if I connect the HDMI out to a monitor that the audio would work.
I’ve tried a few different things and it seems like it’s a general OSX issue rather than being related to the setup. I tried No Machine today and it installs an audio device which is meant to capture the local audio for passing through to the remote machine but so far no luck. Again, according to a quick google, I’m far from alone in this.
I’ll let you know if I ever find a solution.
BTW for future OS updates – the general process is that a new OpenCore is released for every major MacOS release which is then modified in your GitHub project for Proxmox environments? After upgrading to the next version of this, upgrades to OSX should be possible?
I meant to connect the output of the USB audio to the line in port of a soundcard on the host. Then you can stream the audio from the host instead (but with an annoying delay I’d imagine).
Yes, that’s likely to be the upgrade procedure. These days all the Hackintosh modifications are bundled up in OpenCore and the rest is very simple and unlikely to need tweaked much (maybe if macOS requires more CPU features than before).
Ah, yes I understand now re: sound.
OK on the upgrade procedure. Thank you.
I use NoMachine with my setup, and sound from my RX570 is available remotely.
I used to use VirtIO BLK with Clover, but OpenCore doesn’t seem to read VirtIO drives. Do you know if there is a way to make it read them or it’s just not implemented?
I haven’t heard anything about support one way or the other, but try setting ScanPolicy to 0 and see if the drive appears then. (This lets it boot from any supported device instead of the subset it considers by default)
I have a USB switch where I connect my keyboard and mouse to switch between my PC and my VM. VM completely freezes when I press ‘switch’ (keyboard and mouse are disconnected). It worked fine with Clover. Any idea?
OpenCore 0.5.9 seems to have added support for virtio devices. From their changelog: Added PCI device scanning policy support (e.g. VIRTIO)
Nice!
EDIT: I’ve published a new version of my OpenCore ISO to include that virtio support now: https://github.com/thenickdude/KVM-Opencore/releases
On the step where you select the hard drive to boot “Main” my loading bar gets stuck near 99%. Is there a way to see what is happening? I tried looking for bootargs in config.plist using UEFI Shell but nothing came up.
These are the last few lines I am seeing:
https://imgur.com/aSCqesf
What’s the model name of your host’s CPU?
I am using a NUC6i3SYK. This is Core i3-6100U Skylake processor.
That should be okay, can you share your VM config file too?
args: -device isa-applesmc,osk=”….(c)….” -smbios type=2 -device usb-kbd,bus=ehci.0,port=2 -cpu host,kvm=on,vendor=GenuineIntel,+kvm_pv_unhalt,+kvm_pv_eoi,+hypervisor,+invtsc
balloon: 0
bios: ovmf
boot: cdn
bootdisk: ide2
cores: 4
cpu: Penryn
efidisk0: local-lvm:vm-101-disk-1,size=4M
ide0: local:iso/Catalina-installer.iso,cache=unsafe,size=2096496K
ide2: local:iso/OpenCore.iso,cache=unsafe
machine: q35
memory: 3840
name: macos
net0: vmxnet3=62:3E:99:04:20:72,bridge=vmbr0,firewall=1
numa: 0
ostype: other
sata0: local-lvm:vm-101-disk-0,cache=writeback,discard=on,size=32G,ssd=1
scsihw: virtio-scsi-pci
smbios1: uuid=80aa48f0-32c3-49ac-a28d-662a6c45cc11
sockets: 1
vga: vmware
That all looks good, although double check that the osk is not surrounded by curly-quote marks (they need to be regular quotes).
You can try out the “-cpu penryn” variant I mention in the article instead of -cpu host, but I wouldn’t expect it to fix it.
I think one thing that might be interesting is that the NUC comes with a Intel HD 520 video chipset. There are some reports of it working under Clover so I am thinking it might just be a missing kext?
https://www.tonymacx86.com/threads/intel-hd-graphics-520-and-620.274878/
I guess mounting the EFI partition directly inside Proxmox isn’t possible due to it being APFS right? So I need to use your Opencore source. I tried doing a make on it but ran into issues:
% make
cd src/Lilu && xcodebuild -configuration Debug
xcode-select: error: tool ‘xcodebuild’ requires Xcode, but active developer directory ‘/Library/Developer/CommandLineTools’ is a command line tools instance
make: *** [src/Lilu/build/Release/Lilu.kext] Error 1
I do have xcode installed so not sure what is going on here.
The EFI partition is formatted FAT32, so you can indeed mount it inside Proxmox, like so:
losetup --partscan /dev/loop0 /var/lib/vz/template/iso/OpenCore.isomount /dev/loop0p1 /mnt
Then edit /mnt/EFI/OC/ to your heart’s content. Finally, unmount the image:
umount /mntlosetup --detach /dev/loop0
As for your XCode problem, run
sudo xcode-select --switch /Applications/Xcode.app/Contents/DeveloperThank you for this. I managed to download the Whatevergreen.kext and just copy it in when I mounted it. That seemed to fix it. https://github.com/acidanthera/whatevergreen/releases
That’s weird, my OpenCore image already includes Whatevergreen…
I downloaded the newest version (released 5 days ago)
how do we create our own opencore.iso so i can upgrade some kexts before installing mac os?
ive tried everything to create one on mac and windows but my iso never mounts in proxmox likes yours
Hi, thanks for the tutorial. I’ve followed these instructions on an older server (4 x Xeon E7340), and with HighSierra. I am getting the following boot loop:
https://imgur.com/axB392g
I am fine with it not working on this older CPU, but maybe it still can. I’ve chosen HighSierra specifically due to no sse 4.2 and avx.
Here is my config:
args: -device isa-applesmc,osk=”…” -smbios type=2 -device usb-kbd,bus=ehci.0,port=2 -cpu host,kvm=on,vendor=GenuineIntel,+kvm_pv_unhalt,+kvm_pv_eoi,+hypervisor,+invtsc,-avx
balloon: 0
bios: ovmf
bootdisk: ide2
cores: 4
cpu: Penryn
efidisk0: hdd-storage:vm-102-disk-1,size=1M
ide0: local:iso/HighSierra-installer.iso,cache=unsafe,size=2096996K
ide2: local:iso/OpenCore.iso,cache=unsafe
machine: q35
memory: 4096
name: highSierra2
net0: vmxnet3=A6:C9:22:5E:C4:5A,bridge=vmbr0,firewall=1
numa: 0
ostype: other
sata0: hdd-storage:vm-102-disk-0,cache=unsafe,discard=on,size=64G,ssd=1
scsihw: virtio-scsi-pci
smbios1: uuid=c870843a-ad21-4a53-aefb-2d57278cc1f0
sockets: 1
vga: vmware
vmgenid: a3aeda11-6a59-4b86-af1d-813852f98988
Oops, please edit out the osk, I dont’ see an edit button. Also, it seems to be the same error as I got by following the older tutorial https://www.nicksherlock.com/2017/10/installing-macos-high-sierra-on-proxmox-5/comment-page-2/#comment-35334
High Sierra requires SSE 4.1, which your CPU doesn’t have.
Thanks for putting together another great tutorial! I am trying to replace Clover (from the old tutorial) with OpenCore, so I mounted the ISO of OpenCore, booted into macOS and perfromed a “sudo dd if=/dev/diskimage of=/dev/efi”, and was hoping that was all I need to do for a replacement (also I modified the boot script to match the new one).
However, upon reboot, I see two lengthy error messages indicating potential partition mismatch:
BdsDxe: failed to load Boot0001 “UEFI QEMU HARDDISK QM00013 ” from PciRoot(0x0) / Pci(0x1E, 0x0)/Pci(0x1, 0x0)/Pci(0x7, 0x0)/Sata(0x0,0xFFFF,0x0) : Not Found
BdsDxe: failed to load Boot0004 “UEFI QEMU DVD-ROM QM00003 ” from PciRoot(0x0)/Pci(0x1F,0x2)/Sata(0x1,0xFFFF,0x0) : Not Found
Can someone give me a hint on what I should try next? Or this is just not possible?
Ah yep, you just need to hit F2 at the start of guest boot and use the boot maintenance menu to remove all the old Clover entries and readd the EFI/BOOT/BOOTx64.efi file in is place.
Thanks for the quick response, Nick! I didn’t realize the last section of your guide also covers the situation for migrating.
So now my problem becomes after I hit F2 and navigate to Boot Maintenance Manager -> Boot Options -> Add Boot Option, the File Explorer is empty. Is this an indication that my “sudo dd if=/dev/diskimage of=/dev/efi” in macOS is not successful? After all, when I boot into macOS with the CD/ISO inserted, macOS complained that it could not recognize the media and wants me to reject it (diskutil list shows the CD correctly).
Maybe I should try overriding the EFI partition in the Proxmox command line?
In that case you can add the OpenCore ISO as a CD drive, then remove media=cdrom and add cache=unsafe in its place, then you can choose to boot from it from the VM options tab.
That worked, thanks Nick!
For those of you who want to do the same thing, let me summarize the steps that I took to convert from Clover to OpenCore.
0. Backup / Take snapshot!!!
1. First, download the OpenCore.iso patched by Nick and upload it to Proxmox
2. Add the ISO as CD/DVD to your macOS vm as IDE 2.
3. Edit /etc/pve/qemu-server/YOUR-VM-ID-HERE.conf so it resembles the one in the tutorial. Be thorough here, especially the line “ide2: local:iso/OpenCore.iso,cache=unsafe,size=150M”. You need to remove “media=cdrom” and replace it with “cache=unsafe”
4. Now back to Proxmox GUI, click on “Options” tab and adjust the boot order to boot from “ide2” (Might not be neccessary, I just remember I did that at the time)
5. Click on “Start” in GUI to start the VM, navigate to “Console” tab and press “F2”, then navigate to Boot Maintenance Manager menu. If you did this too slow, Clover will boot up instead, just use keypad to navigate to the “Reboot” option in Clover and hit enter, Proxmox splashscreen will show up again and you can hit “F2” again.
6. You are now in Boot Maintenance Manager menu, follow the final part of this guide (Fixing “guest boots to UEFI shell”) to delete Clover related stuff. In my case there are two entries related to Clover. I left the EFI and macOS one alone.
7. Add OpenCore related entry following the final part of the tutorial. In my case there are two options I can pick the entry from(don’t know why), I selected the second one and add the EFI/BOOT/BOOTx64.efi file.
8. You can open the “Delete Boot Option” menu again to check you config. It should have your newly added Boot Option. Now navigate to “Change Boot Order” and move your newly created “OpenCore” to the top. Don’t forget to Commit Changes and Exit as usual; then you can go all the way back to the main menu and select “Reset”
9. Now it is booting into OpenCore, select your macOS installation and boot into it.
10. Note that your EFI partition is still Clover, so once you are in macOS, make sure follow “make the OpenCore install permaent” section to override Clover with OpenCore in your mounted ISO.
11. Once done, you can shutdown macOS and go to Proxmox GUI to change boot order back to “sata0”, and you should be able to remove the ide2/CDROM of OpenCore. macOS will now boot up using OpenCore.
Thanks for this, I’ve added the missing bits about fixing the boot order to the guide too now.
Hello,
please excuse my bad english. I have a failure on the first boot. I have a Xeon W3690.
My Config:
args: -device isa-applesmc,osk=”…” -smbios type=2 -device usb-kbd,bus=ehci.0,port=2 -cpu host,kvm=on,vendor=GenuineIntel,+kvm_pv_unhalt,+kvm_pv_eo$
balloon: 0
bios: ovmf
boot: cdn
bootdisk: ide2
cores: 4
cpu: Penryn
efidisk0: local-lvm:vm-103-disk-1,size=4M
ide0: local:iso/Catalina.iso,cache=unsafe,size=2096496K
ide2: local:iso/OpenCore.iso,cache=unsafe
machine: q35
memory: 4096
name: catalina
net0: vmxnet3=F2:CD:34:D0:B5:DF,bridge=vmbr0,firewall=1
numa: 0
ostype: other
sata0: local-lvm:vm-103-disk-0,cache=writeback,discard=on,size=64G,ssd=1
scsihw: virtio-scsi-pci
smbios1: uuid=288fac10-2c03-43c7-acc0-eb3cfd3ec386
sockets: 1
vga: vmware
vmgenid: cbbf05af-3bea-4edc-b66a-62f23821bb83
What is my fault? This is a video from the boot.
https://imgur.com/a/jMpbjzT
Thanks for youre work and the great tut.
This is likely to be a problem with your OSK, make sure the quote marks around the osk are straight quotes: " and not curly quotes: “”
If that doesn’t fix it, follow the instructions to enable Verbose Mode so you get a detailed log printed during startup.
Thanks for the fast answer, i have the normal quotes. I don’t know if OSK is right, because i don’t have a mac. I found some in the web. How can i edit the OpenCore.iso in Windows?
You can edit it from the VM’s EFI shell (explained in this article)
Also check that the (c) didn’t turn into a copyright sign. Actually just retype the whole OSK so you can verify there are no hidden wordbreak characters breaking it.
So now i have a nev gif from the verbose start.
https://imgur.com/t2Bhjzy
Something weird is going on there. Show your complete args line including OSK.
Did you follow the instructions properly when you built the Catalina ISO?
Here is the config.
https://imgur.com/UtB6oiX
I followed the instrutions with the qemu-img way.
Your OSK is utterly wrong, the correct one has a “(c)” in it
Okay, now i dont know how to get one. I didnt have a “real” mac.
Every mac shares the exact same OSK so it isn’t difficult to find on Google.
Sorry, know i have the right one. It Works!
Thanks you a lot!!!!!
Hello!
After first reboot I get all icons on noVNC but cannot choose macOS Installer, the arrow is on mac base system and cannot be moved. Like the noVNC doesnt react or arrow or click.
Can it be something with proxmox or OpenCore?
Also when I use vmwarecompatibile no picture at all on noVNC console.
Thank you!
Vmware video itself not working is weird as hell, I’ve never once seen that reported. Could it be the fault of the browser you’re using?
Thank you for so fast reply!
The browser was indeed the problem. I used chrome and in edge and mozilla vmware graph. works!
But my main problem is that I cannot move from macos basesystem to macos installer(after first reboot), nor with mouse, arrows or tab. When I press right arrow that part of picture becomes black and after pressing escape picture redraws again, but cant continue with installation.
Is there some special key combination to move or it is again noVNC/browser error?
Sorry to bother you.
Thank you for support!
Hello,
thank you for this manual. It works fine for me but on every start (and if the mac vm is running) i have some log entries on my proxmox vm host.
With dmesg it shows e.g:
kvm [4687]: vcpu0, guest rIP: 0xffffff802561c225 ignored rdmsr: 0x60d
If i change the qm cpu to “host” it is the same.
Any ideas?
Regards yummiweb
That’s fine and expected, you can ignore those warnings. (The guest is probing for features that the CPU/QEMU doesn’t support, which QEMU warns about)
Dear all,
Thanks to the great guide my machine is still running smoothly. There is only one thing that I could’t solve yet – suspend.
Has anyone the same trouble with resuming a machine after a suspend? If I leave my proxmox unattend, the machine is suspended, and I am unable to resume from that state, neither directly on the machine nor remotely.
I have the same problem with my windows machine, so it might be my Proxmox setup.
Hello,
Does the passthrough work for Sapphire Nitro+ RX 580 8GB?
I own this GPU, the installation worked well but when I booted to the OS, it was stuck at “IOConsoleUsers: gIOScreenLockState 3, hs 0, bs 0, now 0, sm 0x0” step as this screenshot: https://i.imgur.com/vezdvLw.png
Do I have to switch to another GPU like Sapphire Pulse RX580?
Thank you.
Check dmesg output on the host at the lockup time, is it complaining about AER errors for the card?
This card suffers from AMD’s reset bug, so you need to ensure that it is not initialised by any other process between host power-on and guest boot. This can be accomplished by some combination of setting the host’s UEFI settings to prefer a different video card, physically swapping the order of two installed PCIe video cards, or at the very least ensuring all the amd drivers are blacklisted on the host, and adding `video=vesafb:off,efifb:off` to the kernel commandline (see https://passthroughpo.st/explaining-csm-efifboff-setting-boot-gpu-manually/ ).
After host boot double check the output of `lspci -nn` and look for your GPU. If it says Kernel driver in use: amdgpu (or anything except vfio-pci) your card has already been used by the host and can’t be re-used by the guest, so you have some blacklisting to fix.
If the GPU has already been used since host powerup (e.g. by a previous boot of the macOS VM, or by the host’s console) it will hang macOS at the 75% mark on the progress bar (just as the graphics is initialised).
I don’t have any reason to believe that the Sapphire card variant will solve that for you. I have the Sapphire and although it works nicely in my macOS VM, it suffers from the reset bug mentioned above so I must powercycle my host between guest boots to properly reset the card.
Hello,
After following your suggestion, the guest is still stuck at the same step.
The dmesg shows these messages when starting the guest: https://i.imgur.com/nhkUdom.png
My GPU has been using kernel driver vfio-pci: https://i.imgur.com/darw6ZC.png
Thank you.
Those “ignored rdmsr” errors are expected and harmless, you can ignore those at least.
Are you currently using “vga: none”? It’s best to use that so that the emulated video isn’t interfering with the passthrough.
Does macOS boot successfully if you remove the passthrough and use vga: vmware? It wasn’t clear from your original comment. (You must get macOS booting using the emulated VGA before it is worthwhile trying out passthrough on top of that)
Yes, it works with vmware VGA.
I do not have an external monitor so I didn’t set vga to none.
I will find a monitor and try again.
Thank you.
You need a monitor or HDMI dummy plug connected for the video card driver to start successfully.
I have a laptop with a HDMI In port.
My VM running Windows 10 with this passthrough GPU can show the screen through this laptop. However, it only receives the signal after booting to the OS.
Does proxmox also export the screen in POST through passhtrough GPU?
I tried to start macOS VM and use a passthrough keyboard to enter macOS in blind but still got no signal.
Yes, the post screens and OpenCore all show on the passthrough GPU. You probably have some other weirdness there created by the laptop hardware.
Hi Nick, I want to passthrough an nvme ssd to my macOS guest,but the guest cannot boot from the nvme ssd, have you encountered this situation?
If it doesn’t even get to the OpenCore menu then hit F2 at the start of guest boot and use the boot maintenance menu to add an entry for EFI/BOOT/BOOTx64.efi.
If it does get to OpenCore but the entry for macOS doesn’t appear, edit OpenCore’s config.plist to set “ScanPolicy” to “0”.
Thanks for this new HOWTO, that make things simplier than ever.
No need for patched OVMF, install is straight forward.
This allows me to convert my mackintosh build (i7-4790K, 32Go) into a multipurpose proxmox server with a Catalina inside to use in remote share screen manner.
Hi to all, tiny message: after having installed catalina on a intel based pve I migrated to a ryzen based now. The change of the args as Nick wrote above was sufficient. All works fine.
Do you have Adobe Creative Suite? I’ve heard conflicting info about whether Photoshop and Lightroom work unmodified under a virtual AMD CPU.
Nicholas, great job. Please help me download basesystem.dmg of BigSur Beta. I have apple developer program Subscription.
Thank you.
Max
This guide was extremely helpful and I was successfully able to install and run the VM. However, we are using it to run CI builds and the VM will randomly crash and restart with this error:
The CPU is a AMD Threadripper btw with latest Proxmox.
Panic(CPU 9, time 41806869254823): NMIPI for spinlock acquisition timeout, spinlock: 0xffffff8034ac68b0, spinlock owner: 0xffffff8033277a40, current_thread: 0xffffff8033277a40, spinlock_owner_cpu: 0x9
RAX: 0x0000000000000361, RBX: 0x0000000000000016, RCX: 0x000000000000000d, RDX: 0x00008c9600000000
RSP: 0xffffff81ed154de0, RBP: 0xffffff81ed154e20, RSI: 0x0000000000000016, RDI: 0xffffff80102a1780
R8: 0x0000000000000001, R9: 0x0000000000989680, R10: 0x0000000000000000, R11: 0x0000000000000000
R12: 0x00008c96679c90b8, R13: 0xffffff8033277a40, R14: 0xffffff80102a1780, R15: 0xffffff80102a1780
RFL: 0x0000000000000083, RIP: 0xffffff800f933a60, CS: 0x0000000000000008, SS: 0x0000000000000010
Backtrace (CPU 9), Frame : Return Address
0xffffff81ed154c90 : 0xffffff800fa49e8b mach_kernel : _interrupt + 0x12b
0xffffff81ed154ce0 : 0xffffff800f8c5d47 mach_kernel : _return_to_iret + 0x157
0xffffff81ed154e20 : 0xffffff800f94420b mach_kernel : _csw_check + 0x1ab
0xffffff81ed154e50 : 0xffffff800f938fee mach_kernel : _thread_quantum_expire + 0x2be
0xffffff81ed154e90 : 0xffffff800f969f5e mach_kernel : _quantum_timer_expire + 0xde
0xffffff81ed154f20 : 0xffffff800fa383c3 mach_kernel : _timer_intr + 0x163
0xffffff81ed154f60 : 0xffffff800fa526f3 mach_kernel : _lapic_interrupt + 0x43
0xffffff81ed154f80 : 0xffffff800fa49e8b mach_kernel : _interrupt + 0x12b
0xffffff81ed154fd0 : 0xffffff800f8c5bed mach_kernel : _hndl_allintrs + 0x11d
0xffffff81ed30be00 : 0xffffff800fe22e3d mach_kernel : _audit_worker_init + 0xb6d
0xffffff81ed30be40 : 0xffffff7f91574725 com.apple.kec.pthread : _ksyn_signal + 0x75
0xffffff81ed30be70 : 0xffffff7f91574615 com.apple.kec.pthread : _ksyn_mtxsignal + 0x87
0xffffff81ed30beb0 : 0xffffff7f91574322 com.apple.kec.pthread : __psynch_mutexdrop + 0xca
0xffffff81ed30bf20 : 0xffffff800fe23312 mach_kernel : _psynch_mutexdrop + 0x32
0xffffff81ed30bf40 : 0xffffff800ff87097 mach_kernel : _unix_syscall64 + 0x287
0xffffff81ed30bfa0 : 0xffffff800f8c6206 mach_kernel : _hndl_unix_scall64 + 0x16
Kernel Extensions in backtrace:
com.apple.kec.pthread(1.0)[1B86B2AD-BFD2-3889-97E3-8C097BAAD040]@0xffffff7f91571000->0xffffff7f9157afff
BSD process name corresponding to current thread: fseventsd
Boot args: keepsyms=1
Mac OS version:
19F101
Kernel version:
Darwin Kernel Version 19.5.0: Tue May 26 20:41:44 PDT 2020; root:xnu-6153.121.2~2/RELEASE_X86_64
Kernel UUID: 54F1A78D-6F41-32BD-BFED-4381F9F6E2EF
Kernel slide: 0x000000000f600000
Kernel text base: 0xffffff800f800000
__HIB text base: 0xffffff800f700000
System model name: iMacPro1,1 (Mac-7BA5B2D9E42DDD94)
System shutdown begun: NO
Panic diags file available: NO (0xe00002bc)
System uptime in nanoseconds: 41806869874996
last loaded kext at 9612567048: @fileutil 20.036.15 (addr 0xffffff7f90d7a000, size 114688)
last unloaded kext at 247962605287: >usb.!UHostPacketFilter 1.0 (addr 0xffffff7f90f5c000, size 24576)
loaded kexts:
as.vit9696.!AALC 1.4.9
as.vit9696.WhateverGreen 1.3.9
as.vit9696.Lilu 1.4.3
@fileutil 20.036.15
>AGPM 111.4.4
>!APlatformEnabler 2.7.0d0
>X86PlatformShim 1.0.0
@filesystems.autofs 3.0
@AGDCPluginDisplayMetrics 5.2.4
>!AHV 1
|IOUserEthernet 1.0.1
>!AUpstreamUserClient 3.6.8
>!AMCCSControl 1.14
|IO!BSerialManager 7.0.5f6
@Dont_Steal_Mac_OS_X 7.0.0
>!ALPC 3.1
>!A!ISlowAdaptiveClocking 4.0.0
@filesystems.apfs 1412.120.2
>!AVmxnet3Ethernet 1.0.10
>!AAHCIPort 341.0.2
>!AVirtIO 1.0
@filesystems.hfs.kext 522.100.5
@!AFSCompression.!AFSCompressionTypeDataless 1.0.0d1
@BootCache 40
@!AFSCompression.!AFSCompressionTypeZlib 1.0.0
@private.KextAudit 1.0
>!AHPET 1.8
>!AACPIButtons 6.1
>!ARTC 2.0
>!ASMBIOS 2.1
>!AAPIC 1.7
$!AImage4 1
@nke.applicationfirewall 303
$TMSafetyNet 8
@!ASystemPolicy 2.0.0
|EndpointSecurity 1
@kext.triggers 1.0
|IOAVB!F 850.1
>!ASSE 1.0
>!ASMBus!C 1.0.18d1
|IOSMBus!F 1.1
|IO!B!F 7.0.5f6
|IO!BPacketLogger 7.0.5f6
|IONDRVSupport 576.1
@!AGPUWrangler 5.2.4
@!AGraphicsDeviceControl 5.2.4
>X86PlatformPlugin 1.0.0
>IOPlatformPlugin!F 6.0.0d8
|IOSlowAdaptiveClocking!F 1.0.0
@plugin.IOgPTPPlugin 840.3
|IOEthernetAVB!C 1.1.0
|IOSkywalk!F 1
>!AHDA!C 283.15
|IOGraphics!F 576.1
|IOHDA!F 283.15
>usb.networking 5.0.0
>usb.!UHostCompositeDevice 1.2
|IOAHCIBlock!S 316.100.5
|IOAHCI!F 290.0.1
>usb.!UEHCIPCI 1.2
>usb.!UUHCIPCI 1.2
>usb.!UUHCI 1.2
>usb.!UEHCI 1.2
|IOAudio!F 300.2
@vecLib.kext 1.2.0
|IOSerial!F 11
|IOSurface 269.11
@filesystems.hfs.encodings.kext 1
|IOUSB!F 900.4.2
>!AEFINVRAM 2.1
|IOHID!F 2.0.0
>!AEFIRuntime 2.1
$quarantine 4
$sandbox 300.0
@kext.!AMatch 1.0.0d1
>DiskImages 493.0.0
>!AFDEKeyStore 28.30
>!AEffaceable!S 1.0
>!AKeyStore 2
>!UTDM 489.120.1
|IOSCSIBlockCommandsDevice 422.120.3
>!ACredentialManager 1.0
>KernelRelayHost 1
>!ASEPManager 1.0.1
>IOSlaveProcessor 1
|IOUSBMass!SDriver 157.121.1
|IOSCSIArchitectureModel!F 422.120.3
|IO!S!F 2.1
|IOUSBHost!F 1.2
>!UHostMergeProperties 1.2
>usb.!UCommon 1.0
>!ABusPower!C 1.0
|CoreAnalytics!F 1
>!AMobileFileIntegrity 1.0.5
@kext.CoreTrust 1
|IOTimeSync!F 840.3
|IONetworking!F 3.4
|IOReport!F 47
>!AACPIPlatform 6.1
>!ASMC 3.1.9
>watchdog 1
|IOPCI!F 2.9
|IOACPI!F 1.4
@kec.pthread 1
@kec.corecrypto 1.0
@kec.Libm 1
mp_kdp_enter() timed-out on cpu 28, NMI-ing
Panic(CPU 19, time 41838882848835): NMIPI for spinlock acquisition timeout, spinlock: 0xffffff8034ac68b0, spinlock owner: 0xffffff8033277a40, current_thread: 0xffffff80345e3520, spinlock_owner_cpu: 0x9
RAX: 0x000000000000001c, RBX: 0x0000000000000003, RCX: 0x0000000000000013, RDX: 0x0000000000000000
RSP: 0xffffff81ed17cb00, RBP: 0xffffff81ed17cb40, RSI: 0x0000000000000003, RDI: 0x0000000000000006
R8: 0xffffff80345e3520, R9: 0x0000000000000000, R10: 0x0000000000000000, R11: 0x0000000000000000
R12: 0x0000000000000003, R13: 0x0000000000000006, R14: 0x0000000000000000, R15: 0x0000000000000001
RFL: 0x0000000000000082, RIP: 0xffffff800f91f17d, CS: 0x0000000000000008, SS: 0x0000000000000010
Backtrace (CPU 19), Frame : Return Address
0xffffff81ed17c9b0 : 0xffffff800fa49e8b mach_kernel : _interrupt + 0x12b
0xffffff81ed17ca00 : 0xffffff800f8c5d47 mach_kernel : _return_to_iret + 0x157
0xffffff81ed17cb40 : 0xffffff800fa58b05 mach_kernel : _kdp_i386_trap + 0x155
0xffffff81ed17cb80 : 0xffffff800fa4a68e mach_kernel : _kernel_trap + 0x4ee
0xffffff81ed17cbd0 : 0xffffff800f8c5a40 mach_kernel : _return_from_trap + 0xe0
0xffffff81ed17cbf0 : 0xffffff800f91ec97 mach_kernel : _DebuggerTrapWithState + 0x17
0xffffff81ed17ccf0 : 0xffffff800f91f087 mach_kernel : _panic_trap_to_debugger + 0x227
0xffffff81ed17cd40 : 0xffffff80100c27cc mach_kernel : _panic + 0x54
0xffffff81ed17cdb0 : 0xffffff800f933b08 mach_kernel : _lck_ticket_lock + 0x128
0xffffff81ed17ce20 : 0xffffff800f94420b mach_kernel : _csw_check + 0x1ab
0xffffff81ed17ce50 : 0xffffff800f938fee mach_kernel : _thread_quantum_expire + 0x2be
0xffffff81ed17ce90 : 0xffffff800f969f5e mach_kernel : _quantum_timer_expire + 0xde
0xffffff81ed17cf20 : 0xffffff800fa383c3 mach_kernel : _timer_intr + 0x163
0xffffff81ed17cf60 : 0xffffff800fa526f3 mach_kernel : _lapic_interrupt + 0x43
0xffffff81ed17cf80 : 0xffffff800fa49e8b mach_kernel : _interrupt + 0x12b
0xffffff81ed17cfd0 : 0xffffff800f8c5bed mach_kernel : _hndl_allintrs + 0x11d
0xffffff81fcf9bd60 : 0xffffff800f8c5a0c mach_kernel : _return_from_trap + 0xac
BSD process name corresponding to current thread: sandboxd
Panic(CPU 23, time 41838883488545): NMIPI for spinlock acquisition timeout, spinlock: 0xffffff8034ac68b0, spinlock owner: 0xffffff8033277a40, current_thread: 0xffffff80381c7000, spinlock_owner_cpu: 0x9
RAX: 0x000000000000001c, RBX: 0x0000000000000003, RCX: 0x0000000000000017, RDX: 0x0000000000000000
RSP: 0xffffff81ed18cb00, RBP: 0xffffff81ed18cb40, RSI: 0x0000000000000003, RDI: 0x0000000000000006
R8: 0xffffff80381c7000, R9: 0x0000000000000000, R10: 0x0000000000000000, R11: 0x0000000000000000
R12: 0x0000000000000003, R13: 0x0000000000000006, R14: 0x0000000000000000, R15: 0x0000000000000001
RFL: 0x0000000000000082, RIP: 0xffffff800f91f17d, CS: 0x0000000000000008, SS: 0x0000000000000010
Backtrace (CPU 23), Frame : Return Address
0xffffff81ed18c9b0 : 0xffffff800fa49e8b mach_kernel : _interrupt + 0x12b
0xffffff81ed18ca00 : 0xffffff800f8c5d47 mach_kernel : _return_to_iret + 0x157
0xffffff81ed18cb40 : 0xffffff800fa58b05 mach_kernel : _kdp_i386_trap + 0x155
0xffffff81ed18cb80 : 0xffffff800fa4a68e mach_kernel : _kernel_trap + 0x4ee
0xffffff81ed18cbd0 : 0xffffff800f8c5a40 mach_kernel : _return_from_trap + 0xe0
0xffffff81ed18cbf0 : 0xffffff800f91ec97 mach_kernel : _DebuggerTrapWithState + 0x17
0xffffff81ed18ccf0 : 0xffffff800f91f087 mach_kernel : _panic_trap_to_debugger + 0x227
0xffffff81ed18cd40 : 0xffffff80100c27cc mach_kernel : _panic + 0x54
0xffffff81ed18cdb0 : 0xffffff800f933b08 mach_kernel : _lck_ticket_lock + 0x128
0xffffff81ed18ce20 : 0xffffff800f94420b mac
I see that you are using a USB keyboard and mouse for your setup.
I was able to successfully install and setup Catalina yesterday…thank you!!!!!!!!!!!!!!!
But I am curious if I would be able to use the wireless apple keyboard and trackpad via passthrough. Worth noting that my server is one story beneath me at most times so I have to deal with bluetooth range if it does work.
It doesn’t seem likely but I figured I would post here and get your educated opinion.
Thanks!
Yes, you can USB passthrough a Bluetooth dongle and attach them that way.
I wish I could edit my previous comment but I also have one other question.
Your guide says to use vmware for the display settings. I also tested others and virtio-gpu works as well. However, my goal is to get dual monitor support…but spice/spice dual lose their mouse cursor functionality.
Any suggestions to make dual monitor work as well as the mouse cursor (without passthrough)?
You can use Mac’s built in Screen Sharing feature to control it instead of Proxmox’s WebVNC, it’s also much higher performance. I believe it is compatible with standard VNC clients, although I haven’t tried it myself.
VNC clients (windows version) work fine with Screen sharing.
I m trying install BigSur beta OS on promox, no success…
No success here either, the installer hangs super early in the boot process. Sounds like both OpenCore and Clover are unable to boot it right now. Subscribe here for an eventual solution:
https://github.com/foxlet/macOS-Simple-KVM/issues/250
You’ll need to set AvoidRuntimeDefrag to false in the OpenCore config, that should get you past the first error. I then had to also switch to a 4 socket/1 core topology, as the old kernel patch isn’t working (I disabled all kernel patches too for simplicity). I also disabled all kext injection (not sure if this is required, but I don’t believe it works, so best not to have it even try). After that, there were still a few times when the system seemed to hang during install (or possibly just not reset the VM correctly), so verbose mode is helpful, and then doing a manual reset and picking the Installer partition the first time, and then the main install drive the second time seemed to do it for me.
The AppleVirtIO kext has expanded support now, with support for memory ballon, a RNG device, as well as QEMU agent support (works out of the box!). VirtIO block devices are supported from the get-go with the installer too. Also, “Standard VGA”/Default are the best bet for video, as there is actually a kext that “supports” it (and not one for the vmware display adapter). The only thing I had issue with (as in the past) is the VirtIO network device, so the VMware one is probably best. There’s also support in there for an audio device, but the default Proxmox one didn’t seem to work. There’s also a separate kext for a “para virtual GPU” of some sort
This was all purely virtual, no hardware passed through.
Thanks! I’ve published a preliminary OpenCore image with those settings now:
https://github.com/thenickdude/KVM-Opencore/releases
I was able to upgrade my Catalina VM to Big Sur using that. I didn’t have any hangs during install, but there was certainly a 30 minute pause with a ton of disk activity where it was computing an APFS seal for my FileVaulted disk.
My passthrough USB controllers and RX 580 Sapphire Pulse are working, except that only HDMI is working on the RX 580 (no DP), possibly from WhateverGreen not loading.
Ah, I did a clean install (no FileVault) using a full image made with createinstallmedia, so that may have been the difference. I also kept -cpu host, but set 4 sockets with 1 core each.
Hi,
Thank you for the great resource – I was able to install MacOS 10.15.5 on my Proxmox 6.2 with latest updates following these steps. The host is a TRX40 and IOMMU groups seem decent.
Having some problems with my GPU – a reference design AMD 5700XT from Asus. Got this card based on info that ver. >= 10.15.2 of MacOS support it, and would appreciate tips as I’m new to this.
I managed to pass it through and I know it works – when I boot my VM I see the OpenCore boot picker on the monitor hooked to the passed-thru GPU. But then when I try to launch the OS, the screen would go black after a few seconds on the Apple logo – around the time it tries to load the driver I imagine.
Going back to vmware display driver and removing the PCI GPU from the VM works, but no acceleration of course.
Another problem is I can’t seem to be able to re-install a lower version of Catalina on the same VM (in an attempt to verify that 10.15.5 is the problem). I tried to re-install 10.15.4 instead by changing the iso, but the installer somehow ends up again with 10.15.5. I use the fetch-macOS.py script and recreate the IDE2 disk with the 10.15.4 image, erase and recreate my volume and reinstall – but that doesn’t seem to matter – it still boots as 10.15.5 – how is that possible – does Apple auto-update during installation?. How can I do a clean install of 10.15.4 only? I haven’t tried recreating the VM from scratch – that would be my next step.
Yes, macOS auto updates during install. In order to get an old version I think the only way is to build an offline installer from an existing macOS installer.app using createinstallmedia, but I don’t know how to fetch an older version of this if you don’t already have a copy stashed. EDIT: you may be able to download a Full Installer using https://github.com/corpnewt/gibMacOS
I was helping someone out recently on a TRX40 / Radeon VII and they had the same issue, but it was solved by unplugging and replugging the monitor when the hang occurred, which kicked things into life.
Critically in their case, on the host there weren’t any fatal errors being printed to dmesg at the time of the hang (so the card still seemed happy). What are you getting printed at that time?
Note that since your card suffers from the AMD reset bug, you will need to powercycle the host between guest boot attempts. And if your card is not properly prevented from being initialised by the host during host boot (it must be assigned to vfio-pci instead of amdgpu, check lspci -k output), it will be trashed and the guest will never be able to use it.
If this is the only GPU on the host then you must also add video=vesafb:off,efifb:off to the kernel cmdline to totally kill Proxmox’s graphics, which avoids initialising the card:
https://passthroughpo.st/explaining-csm-efifboff-setting-boot-gpu-manually/
(Make sure you’re ready to administrate Proxmox over SSH first!)
The Radeon VII issue sounds very similar – nothing alarming gets printed on the host the 1st time after a host reboot and VM start. I see the boot picker (resolution is not adjusted – icons are huge), use the usb passed keyboard to select the Mac OS entry, hint enter, the white Apple logo and progress bar show for a few seconds, and screen goes blank just as the progress bar gets past a certain point.
Once I do get stuck in a black screen and try to stop and restart the VM I do see the FLR “function level reset” retries (although occasionally reset seems to work – maybe there is patch in latest Proxmox to that effect?) It’s easy to distinguish, since when it kicks in I don’t see the OpenCore boot picker at all.
I will try later tonight the plug/unplug. Using DisplayPort, will try HDMI too. If that doesn’t work I may dig in the MacOS logs (with GPU pass disabled) to check if the drivers output anything. I hope the syslog would contain debug messages. Let me know if there is anything specific I need to grep for – I don’t have experience tweaking and debugging the OpenCore drivers.
Thank you again – will follow up with more if I manage to resolve it or get debug info.
AMD reset for vfio hasn’t improved at all recently, nothing has been merged. (Some updates have been made to amdgpu, but that isn’t being used here). I believe the GPU being reusable sometimes is due to it being left in a good state the previous time by chance.
You can check macOS’ boot log from a previous boot today from macOS like so:
log show --predicate "processID == 0" --start $(date "+%Y-%m-%d") --debugBut the messages are likely to amount to a non-informative “GPU driver failed to start” like they did for my old R9 280X.
Some guides suggest adding agdpmod=pikera to macOS’s boot args in config.plist for fixing issues with Navi cards like yours. (Next to the debugsyms=1)
Forgot to mention that I use the ver. 5.5 of the OpenCore iso from your git repo.
No luck with the cable plug/unplug. I’ve never rebuild a disk image from a config.plist so I’d have to go through some homework to figure how to do that. I imagine this is embedded in the OpenCore.iso image? Any way to unpack, edit and repack it on Linux or MacOS?
Since this is a plain disk image you can mount it using the loopback driver on Proxmox:
losetup --partscan /dev/loop0 /var/lib/vz/template/iso/OpenCore.isomount /dev/loop0p1 /mnt
Then edit /mnt/EFI/OC/ to your heart’s content. Finally, unmount the image:
umount /mntlosetup --detach /dev/loop0
Thank you. Adding the agdpmod=pikera argument got me past the blackout. I wasn’t sure exactly where it would go – you see a lot of references to it online but few if any explaining where to put it – it’s in the NVRAM section as explained here
https://www.youtube.com/watch?v=WCW9B5LeBw8
Was able to access the MacOS VM kernel log and used your command above and pipe-grepped for AMD. Seems the driver loaded but then went offline. Not sure if this is the right driver – X6000 ?.
kernel: (AMDRadeonX6000) [1:0:0] [Accel] — Before TTL:initialize() – BootLoader POST Code=0x00000000, Ready=0x80000000
2020-06-25 22:26:16.024049-0700 0x60b Default 0x0 0 0 kernel: (AMDRadeonX6000) [1:0:0] [Accel] >>> Calling TTL::initialize()
2020-06-25 22:26:16.024051-0700 0x60b Default 0x0 0 0 kernel: (AMDRadeonX6000) nonlocalMemSizeLimitBytes = 0x0000000040000000
2020-06-25 22:26:16.024066-0700 0x60b Default 0x0 0 0 kernel: (AMDRadeonX6000HWLibs) initialize normal
2020-06-25 22:26:16.155234-0700 0x60b Default 0x0 0 0 kernel: (AMDRadeonX6000) [1:0:0] [Accel] <<< TTL::initialize() Completed successfully.
2020-06-25 22:26:16.157309-0700 0x60b Default 0x0 0 0 kernel: (AMDRadeonX6000) ==== TTL =====
2020-06-25 22:26:16.157310-0700 0x60b Default 0x0 0 0 kernel: (AMDRadeonX6000) SE=2, SA/SE=2
2020-06-25 22:26:16.157311-0700 0x60b Default 0x0 0 0 kernel: (AMDRadeonX6000) numActiveRB=16, max=16
2020-06-25 22:26:16.157311-0700 0x60b Default 0x0 0 0 kernel: (AMDRadeonX6000) numActiveCU=10, max=10, total=40
2020-06-25 22:26:16.162373-0700 0x60b Default 0x0 0 0 kernel: (AMDRadeonX6000Framebuffer) Accelerator successfully registered with controller.
2020-06-25 22:26:17.933811-0700 0x4c5 Default 0x0 0 0 kernel: (AMDRadeonX6000Framebuffer) [1:0:0][GPUCAP] refresh() — Family: 143, Device: 0x731f, revNo: 2, pciRevNo: c1, emuRevNo: 3.
2020-06-25 22:26:17.933812-0700 0x4c5 Default 0x0 0 0 kernel: (AMDRadeonX6000Framebuffer) [1:0:0][GPUCAP] refresh() — Mem Size: FB: 8176 MB, Aper: 256 MB, Reg Aper: 512 KB.
2020-06-25 22:26:17.933814-0700 0x4c5 Default 0x0 0 0 kernel: (AMDRadeonX6000Framebuffer) [1:0:0][GPUCAP] refresh() — Mem Config: Width: 256, Type: GDDR6.
2020-06-25 22:26:17.933815-0700 0x4c5 Default 0x0 0 0 kernel: (AMDRadeonX6000Framebuffer) [1:0:0][GPUCAP] refresh() — FB Base: 0x8000000000, Top: 0x81ffffffff, Offset: 0.
2020-06-25 22:26:17.933817-0700 0x4c5 Default 0x0 0 0 kernel: (AMDRadeonX6000Framebuffer) [1:0:0][GPUCAP] refresh() — Branding – family: "Radeon RX"; device: "5700 XT"; model: "Radeon RX 5700 XT".
2020-06-25 22:26:17.948402-0700 0x4c5 Default 0x0 0 0 kernel: (AMDRadeonX6000HWLibs) call SW_SMUM_ReadSmuVersion return instance.dwSMC_uCode_Version = 0x2a3400
2020-06-25 22:26:18.014780-0700 0x4c5 Default 0x0 0 0 kernel: (AMDRadeonX6000) === PM4 engine start(): SUCCESS
2020-06-25 22:26:18.148321-0700 0x645 Default 0x0 0 0 kernel: (AMDRadeonX6000Framebuffer) [1:0:0] [AGDC] AMDRadeonX6000_AmdAgdcServices::vendor_doDeviceAttribute() ??? Controller is NOT enabled so SKIP. cmd:[ 3].
2020-06-25 22:26:18.717454-0700 0x4c5 Default 0x0 0 0 kernel: (AMDRadeonX6000Framebuffer) [1:0:0] [AGDC] AMDRadeonX6000_AmdAgdcServices::waitForAGDCReady() ??? AGDC failed to register with controller!
2020-06-25 22:26:19.279103-0700 0x4c5 Default 0x0 0 0 kernel: (AMDRadeonX6000Framebuffer) [1:0:0] [AGDC] AMDRadeonX6000_AmdAgdcServices::waitForAGDCReady() ??? AGDC failed to register with controller!
2020-06-25 22:26:19.849554-0700 0x4c5 Default 0x0 0 0 kernel: (AMDRadeonX6000Framebuffer) [1:0:0] [AGDC] AMDRadeonX6000_AmdAgdcServices::waitForAGDCReady() ??? AGDC failed to register with controller!
2020-06-25 22:26:20.418562-0700 0x4c5 Default 0x0 0 0 kernel: (AMDRadeonX6000Framebuffer) [1:0:0] [AGDC] AMDRadeonX6000_AmdAgdcServices::waitForAGDCReady() ??? AGDC failed to register with controller!
2020-06-25 22:26:20.418823-0700 0x4c5 Default 0x0 0 0 kernel: (AMDRadeonX6000Framebuffer) [1:0:0] [FB:0] AmdRadeonFramebuffer::setCursorImage() !!! Driver is offline.
2020-06-25 22:26:20.418829-0700 0x4c5 Default 0x0 0 0 kernel: (AMDRadeonX6000Framebuffer) [1:0:0] [FB:1] AmdRadeonFramebuffer::setCursorImage() !!! Driver is offline.
2020-06-25 22:26:20.418833-0700 0x4c5 Default 0x0 0 0 kernel: (AMDRadeonX6000Framebuffer) [1:0:0] [FB:2] AmdRadeonFramebuffer::setCursorImage() !!! Driver is offline.
2020-06-25 22:26:20.418836-0700 0x4c5 Default 0x0 0 0 kernel: (AMDRadeonX6000Framebuffer) [1:0:0] [FB:3] AmdRadeonFramebuffer::setCursorImage() !!! Driver is offline.
I should have pasted just the relevant part, sorry for the spam – the 5700XT was recognized, driver loaded but then it claimed the “controller was not enabled”.
kernel: (AMDRadeonX6000Framebuffer) [1:0:0][GPUCAP] refresh() — Branding – family: “Radeon RX”; device: “5700 XT”; model: “Radeon RX 5700 XT”.
2020-06-25 22:26:17.948402-0700 0x4c5 Default 0x0 0 0 kernel: (AMDRadeonX6000HWLibs) call SW_SMUM_ReadSmuVersion return instance.dwSMC_uCode_Version = 0x2a3400
2020-06-25 22:26:18.014780-0700 0x4c5 Default 0x0 0 0 kernel: (AMDRadeonX6000) === PM4 engine start(): SUCCESS
2020-06-25 22:26:18.148321-0700 0x645 Default 0x0 0 0 kernel: (AMDRadeonX6000Framebuffer) [1:0:0] [AGDC] AMDRadeonX6000_AmdAgdcServices::vendor_doDeviceAttribute() ??? Controller is NOT enabled so SKIP. cmd:[ 3].
2020-06-25 22:26:18.717454-0700 0x4c5 Default 0x0 0 0 kernel: (AMDRadeonX6000Framebuffer) [1:0:0] [AGDC] AMDRadeonX6000_AmdAgdcServices::waitForAGDCReady() ??? AGDC failed to register with controller!
In your text “Fetch the OSK authentication key” you write: Save the first block of C code from this page as smc_read.c. Unfortunately, the page no longer exists. Do you have an alternative information here?
That’s annoying, here’s an archived copy of that page from archive.org: https://web.archive.org/web/20200603015401/http://www.osxbook.com/book/bonus/chapter7/tpmdrmmyth/
Thanks for the quick reply, it worked. Now there is an error when using fetch-macOS.py via the Mac Terminal:
File “fetch-macOS.py”, line 325
[print(“- {}”.format(product_info[pid][‘version’])) for _, pid in enumerate(product_info)]
If you’re running that with “python2 fetch-macOS.py” try “python3 fetch-macOS.py” or vice-versa
EDIT: I’ve now fixed the script to be compatible with Python 2
I followed all of your instructions carefully, but now I only have a black screen with a white logo. Nothing happens anymore. Do you have any idea?
Odds are that your OSK is wrong, paste your whole “args” line here.
args: -device isa-applesmc,osk=”…” -smbios type=2 -device usb-kbd,bus=ehci.0,port=2 -cpu host,kvm=on,vendor=GenuineIntel,+kvm_pv_unhalt,+kvm_pv_eoi,+hypervisor,+invtsc
No problem with that line, what’s your host CPU model? (you can find it within `cat /proc/cpuinfo`)
You didn’t download my OpenCore image for Big Sur did you?
the reply button for the last question is missing. I answer here:
Your question :
No problem with that line, what’s your host CPU model? (you can find it within `cat / proc / cpuinfo`)
You didn’t download my OpenCore image for Big Sur did you?
My answer:
CPU: Intel (R) Xeon (R) E-2246G CPU @ 3.60GHz
I downloaded the OpenCore image:
https://github.com/thenickdude/KVM-Opencore/releases/
– OpenCore.iso.gz
Your CPU is compatible.
Yeah, you must have downloaded the Big Sur release, you need to download the one marked as being for Catalina:
https://github.com/thenickdude/KVM-Opencore/releases/download/v5/OpenCore.iso.gz
You can overwrite the existing OpenCore.iso on Proxmox.
Thank you very much, it worked
What am I doing wrong? The installation works. The first time you reboot, macos utilities appears again. I only come to macos utilities again and again.
can you please help me again
After the first reboot you need to select the option described in the post, labelled macos installer I believe, rather than the option for the installer DVD. The correct entry is not selected automatically.
Thanks for a great guide Nick.
I have proxmox 6.2 successfully running Mojave and Windows 10 with Clover and a Radeon VII pass through.
All good.
I decided to create a Catalina VM today and found your guide… which is amazing. Thank you!
BUT, I’m having an issue with Opencore not seeing the IDE drive with the Catalina installer. I just get three options when Opencore starts up, UEFI console, shutdown, reset NVRAM.
I tried passing through an image that I know works for Mojave installation with
ide0: pool1-iso:iso/Mojave.iso,cache=unsafe,size=7G
ide2: pool1-iso:iso/OpenCore.iso,cache=unsafe
in the vm.conf file but that doesn’t show up either.
I’ve tried using a different SCSI controller, and looking at the UEFI console, which seems to show that there is a drive there. But I can’t at present seem to get opencore to see any drive images.
Any ideas what I could look at next?
Thanks in advance, Jason
I created
OpenCore only shows the installer image if the installer is formatted GPT (GUID), you may need to rebuild it according to my instructions.
Thank you for this excellent guide!
I followed it and my Catalina VM was up and running in no time.
Now I am trying to use a dedicated GPU. I bought an AMD Firepro W7000 which is supported in Catalina as per Dortania’s buyer guide and is said to only require lilu and whatevergreen (which already is included in your opencore configuration).
So I have isolated it and have passed it through successfully to the VM (telling proxmox it is to be the primary GPU in the VM). MacOS does recognizes (it is shown in the system report) but it does not use it. There is only one display used – which outputs to the browser console. My monitors attached to the card remain black.
Is there another step that I am missing?
You’ll need to disable the browser console by setting vga: none as a first step
I have tried that now, but the result is the same.
The VM boots up but the monitor stays dark. (Obviously, now console also doesn’t show anything.)
I tried remoting into the VM from my real mac via screen sharing, but I can’t establish a connection (I made sure that works while using the console). So apparently, the VM does not boot completely.
Is there anything else I could try?
Many thanks in advance!
Are you getting errors printed to the host’s dmesg output when the black screen occurs?
No errors. The last thing printed out via dmesg is:
[ 3185.371009] vfio-pci 0000:04:00.0: enabling device (0100 -> 0103)
[ 3185.371203] vfio-pci 0000:04:00.0: vfio_ecap_init: hiding ecap 0x19@0x270
[ 3185.371209] vfio-pci 0000:04:00.0: vfio_ecap_init: hiding ecap 0x1b@0x2d0
04:00 is the address of my Firepro GPU.
It might be noteworthy that the black screen does not “occur”, it doesn’t show something and then goes black, it never shows anything at all. I don’t even get to see Coreboot.
Well, if you don’t get to see the Proxmox boot logo then at least you can rule out an incompatibility with macOS as the cause of the problem, lol
Have you checked multiple monitor outputs on the card? Sometimes the video can end up being sent to an odd port.
Does your card have UEFI support?
Good question about the UEFI!
I had assumed my card does, as it was listed as Catalina compatible (and, afaIk, Catalina does not support booting via bios), but it seems that it does not support it out of the box but needs a bios update to support UEFI. I have now requested the update (apparently you can’t just download it from AMD’s site).
But is that really the cause of my problem? I have another proxmox VM with Windows 10 running inside to which I can pass (another) GPU successfully. The first thing that I get to see when booting is the Windows logo (so also no Coreboot etc.). And yet it works. Of course, Windows is not the same as MacOS and I don’t know anything about the boot process of operation system – so, just asking the question…
I had only checked two of the four graphics ports on the card. But I had tried remoting into the system which does not work. Mmy DHCP server also does not show the client as active. So I am relatively sure that the system does not boot up fully.
For me macOS stops booting if the GPU fails to initialise, and this is easily triggered by the condition of having no monitor connected [to the right port]. This is why people add “HDMI dummy plugs” to their video cards to convince them that a monitor is attached, even when the machine will purely be used remotely.
Not seeing Coreboot probably means that EDK2/UEFI can’t manage to use the GPU, and so it’s only starting to show output on your Windows VM after it’s initialised by AMD’s Windows drivers, which is not an ideal situation and might indeed be fatal (I haven’t experimented).
Did you configure OpenCore to boot automatically? The config.plist I ship has Timeout set to 0, which causes it to pause forever waiting for Enter to be pressed to boot.
(For some reason I can’t reply to your latest response in this thread, but I can respond here…)
Yes, I have changed the timeout in Opencore to boot after 5 seconds. So I am positive the system gets beyong this point.
Not sure if this helps diagnose my issue but since there seems to be nothing else to try at the moment, I installed ESXi on my machine (on another disk) and created a Catalina VM there. I can passthrough my FirePro card to that VM without any issues but – same as on Proxmox – it does not get used by MacOS (but listed in the System Report). Now, the (perhaps) interesting thing is that I haven’t installed Opencore but boot the system directly (I have applied ESXi Unlocker, though). So without Opencore there is no Lilu und no Whatevergreen either. Since the outcome is the same – do you think there might be an issue with loading lilu and whatevergreen in my Catalina VM under Proxmox? Is there a way to check, if they were loaded correctly?
Update:
Maybe there is something wrong with my FirePro GPU: I tested it under Windows (no hypervisor) and it also does not work as it should.
So I tried to passthrough my other GPU (Nvidia Quadro) and this worked at the first attempt (FYI: I did not remove the virtual VMWare graphics card, I did not check the “Primary GPU” box and the GPU apparently also does not support UEFI because the first thing I see is the Catalina background – but it works beautifully).
While I am not finished yet (I want to use a better card than the Quadro), I now know that it works in principle.
So thanks again for this great guide and for your support!!!
(I will come back with some other questions, if I may.)
Hey Nick,
This is great! I plan on using the Catalina VM as a local repository for Apple Photos to keep data off my work laptop. My main machine is a Windows PC for some unrelated reasons.
Currently my Proxmox tower has no GPU as I’m primarily running multiple Ubuntu LXCs and VMs. Any recommendations on a cheap, compatible GPU to passthrough for the MacOS VM?
Thanks again.
There are no great options for GPUs thanks to AMD’s reset bugs on their newer cards, and macOS’ poor support of older cards.
I’m using the RX 580 described by Passthrough Post:
https://passthroughpo.st/finding-a-safe-mac-os-gpu-for-vms/
It works great in macOS but I usually need to power cycle the host the second time I want to boot a guest that uses it.
I read that you could try a script to briefly standby and wake up the host to reset the GPU. Some Proxmox TRX40 users on macos86.it who inspired me to try this setup say it works well, but I have yet to try it. 1st need to get around my USB passthrough issues. The 5700XT works well minus the reset bug, with a minor modification to Nick’s OC file. I use an Asus reference card I got for around 350 refurbished from MicroCenter. I’d be curious to see if the Radeon Pro VII has addressed it, but even if it did, it’s rather pricey.
Yeah, like
rtcwake -m mem --seconds 10? Unfortunately it doesn’t work on my machine (the machine just dies instead of going to sleep) so I haven’t been able to test it.I am having a different issue now. I try to passthrough my keyboard and wireless mouse. The keyboard works in the OpenCore bootpicker, but once booting, MacOS doesn’t pick it up. The mouse is not picked up in either. How do I troubleshoot that?
By USB passthrough? You didn’t tick the “usb3” box on the passthrough device did you? (usb3=1). The emulated usb3 controller isn’t supported by Catalina.
I tried to pass USB following all directions including yours. But it didn’t work. It required me to apply a kernel patch as the official Proxmox 6.2 kernel does not support TRX40 USB. Now I managed to pass the entire USB Starship/Matisse controller as a PCIE device and keyboard and mouse work!
Used the pre-built patch from this gentleman – I wish I had found his github earlier as he has pretty good instructions and has pre-built setup, but going thru the pains made me get better at managing this.
https://github.com/Pavo-IM/Proxintosh/blob/master/README.md
Next left would be sound, bluetooth (via dongle) and hopefully the Titan Ridge Thunderbolt3 that comes with my TRX40 Designare, but the latter will be complicated as I heard it may require a tricky ROM flash. As the motherboard sound is USB, I have some hope it may work, but I already got further than I thought I would, and can fallback on something like the Dragonfly.
Ah and the pesky reset bug – not suitable for production environments, but a sleep/resume of the host sounds like a clever trick for desktop.
Excellent guide. Clover user since High Sierra. This was my first OpenCore install. Thank you!
I am pretty sure I’ve got everything right. I’ve tried installing twice. I get through the installer, but the first boot from the installed drive “SSD” fails. It gets through verbose mode and then goes back to the progress bar and right towards the end of the progress bar, the VM shuts off. Since the installer works, I should have the correct OSK.
CPU supports SSE2.4. E5-2650
PROXMOX 6.2-6
args: -device isa-applesmc,osk=”(c)” -smbios type=2 -device usb-kbd,bus=ehci.0,port=2 -cpu host,kvm=on,vendor=GenuineIntel,+kvm_pv_unhalt,+kvm_pv_eoi,+hypervisor,+invtsc
balloon: 0
bios: ovmf
boot: cdn
bootdisk: ide2
cores: 8
cpu: Penryn
efidisk0: SPEED:113/vm-113-disk-1.raw,size=128K
ide0: FS-ISO-PVE2:iso/Catalina-installer.iso,cache=unsafe,size=2095868K
ide2: FS-ISO-PVE2:iso/OpenCore.iso,cache=unsafe
machine: q35
memory: 8192
name: Catalina
net0: vmxnet3=F6:9A:7B:1D:B7:6C,bridge=vmbr0,firewall=1
numa: 0
ostype: other
sata0: SPEED:113/vm-113-disk-0.raw,cache=unsafe,discard=on,size=128G,ssd=1
scsihw: virtio-scsi-pci
smbios1: uuid=12d5e70f-2c17-4e07-9e31-db4ed9e79905
sockets: 1
vga: vmware
vmgenid: af07aa34-0ea8-4bf0-a06b-7406a37f7d4a
I am guessing mine is failing due to the CPU having no onboard graphics. Worth a shot anyway.
Your host CPU’s graphics are irrelevant here as the guest only sees the emulated CPU and emulated VGA. My CPU is an E5-2670 with no GPU.
Double check that your OSK is correct and doesn’t have curly quotes around it or invisible spaces inside it.
Thank you for your previous replies.
I am now pretty stuck on getting imessages to work after following this guide:
https://dortania.github.io/OpenCore-Desktop-Guide/post-install/iservices.html#customer-code-error
I don’t see place to comment there so I am hopeful that you might be able to assist. I documented my problem on a reddit post (which didn’t yield me much help) if you don’t mind taking a look and either responding there or here…
https://www.reddit.com/r/hackintosh/comments/hgexvs/vm_opencore_catalinaneed_clarification_on/
Thank you!!!!!
Sorry, I’ve never attempted to get iMessage working myself. There’s a tutorial here though:
https://dortania.github.io/OpenCore-Desktop-Guide/post-install/iservices.html
Thanks for this guide! Everything works flawlessly, until I connect an iOS device over USB. Flash drives are detected and work fine, but if I plug in an iPhone / iPad, the VM freezes and I need to reset. It also hangs if plugged in+attached on boot.
I’ve tried attaching via device ID as well as USB port passthrough. I’ve made sure USB3 is unchecked.
Any idea why this might be? I was hoping to have a VM for wireless iTunes syncing.
Most likely the device re-enumerates itself upon negotiation with iTunes, and then reappears with a new device ID. This will cause it to disappear from the bus, and the new device ID can’t be connected dynamically (or at least I’ve never got that to work myself).
I think you’ll have to use PCIe passthrough to pass through an entire USB controller instead.
I noticed in your OpenCore config.plist you delete boot-args. Is this on purpose?
https://github.com/thenickdude/KVM-Opencore/blob/master/EFI/OC/config.plist#L596
If a value already exists in NVRAM then Add does nothing, it won’t overwrite existing values, so a corresponding Delete needs to be added too
Me again 🙂
As I was saying – I want to use a better GPU for passthrough than what I have now.
So I was wondering: Is there any modern card that is supported under Catalina (that probably rules out all modern NVIDIA cards) and that does not suffer from the reset bug (that rules out a few but hopefully not all AMD cards)?
Alternatively, would your guide and the Coreboot configuration also work for installing High Sierra? (It is my understanding that I can get a Geforce GTX 10X0 running under High Sierra with NVIDIA’s web drivers.)
As far as I know there is no such GPU, because AMD has been consistently terrible at supporting FLR on their cards.
https://passthroughpo.st/finding-a-safe-mac-os-gpu-for-vms/
This tutorial could theoretically work for High Sierra but I’ve never tested it and don’t intend to. I have an older tutorial here for High Sierra and you might need to pick up some differences from that.
Nvidia stopped updating their Web drivers completely, so Nvidia cards are now fully dead on macOS.
So, I successfully installed High Sierra following your tutorial and it worked just as it is. No changes necessary.
And I am already using my GTX 1070 with the NVIDIA web drivers inside the VM.
I have also passed through a dedicated disk to the VM (cloned the original install to it) and now can boot from it. I still need to check if the “EFI Disk” is necessary in the VM config on Proxmox (or if the EFI partition on the disk is enough)..
Next I want to experiment and see whether the web drivers also work under Mojave (I know they won’t ootb, but there seems to be a program to patch them just enough to work…).
Do you have any experience with passing through an entire USB controller to the VM? I have a separate usb card which shows up in the System Report but no device connected to it is recognized. Does your Opencore configuration include any USB controller related kexts? If not, I will need to learn more about configuring Opencore…
On a side note: I love my new VM. It runs circles around my real MBP. So thanks again for this great tutorial!
That’s good news about High Sierra working!
Yes, you need the EFI disk, that’s what stores your UEFI settings.
It doesn’t include any USB kexts. I pass three USB controllers to my VM and I didn’t have to change anything with OpenCore, they just worked. Did you include pcie=1 in the hostpci config for it? What controller chip does your USB adapter have and is it known to be compatible?
I saw a discussion on the proxmox forum about the need for the EFI disk (can’t find it right now). Proxmox say it is needed because, as you say, it stores the EFIVARS. But if you remove it, the settings are passed to the VM anyway. So…
So far I have only tried to pass through a USB 3 PCIe-card. It has a Renesas/NEC chipset which, I read, is the best option for macOS. But I might try the built-in controllers of my machine.
Hi, Nick
I am passing my motherboard’s USB controller as a PCIe device:
hostpci1: 00:14.0,pcie=1,rombar=0
All USB 2.0 devices work, however USB 3.0 devices do not work. What can I do?
Cheers!
Better check if macOS is known to support your controller, you might need to add a kext.
Hi,
Great Guide!
Im currently at the point, where i need to Format the disk in preperation for the MacOS installation. if i try to format(erase) it, im getting the following Message: “Error 5: input/output error”
Any Idea, how i could fix this?
Thanks in Advance
I think the Proxmox storage that holds your VM’s disk is full, or you selected the wrong disk to erase. Make sure the one you’re selecting is the big 32GB+ disk you added to the VM and not one of the smaller disks that belong to the installer.
Hi Nick,
I really appreciate your guide! I have one issue maybe you can give me some things to try. When I try to boot for the first time off the OpenCore.iso and open the console, I see “Guest has not initialized the display (yet)”. I have given it a few hours just to be sure.
I have tried all the display modes (starting with VMware complatible) but I haven’t had any luck. I suspected I screwed up the OpenCore.iso somehow, so I tried OpenCore.iso (v4 and 5) with wget straight to the iso folder and gunzip. But that did the same thing.
My hardware is a Ryzen 5 3600X with a R7 240.
Config file:
root@Proxmox:~# cat /etc/pve/qemu-server/109.conf
args: -device isa-applesmc,osk=”…” -smbios type=2 -device usb-kbd,bus=ehci.0,port=2 -cpu Penryn,kvm=on,vendor=GenuineIntel,+kvm_pv_unhalt,+kvm_pv_eoi,+hypervisor,+invtsc,+pcid,+ssse3,+sse4.2,+popcnt,+avx,+avx2,+aes,+fma,+fma4,+bmi1,+bmi2,+xsave,+xsaveopt,check
balloon: 0
bios: ovmf
boot: cdn
bootdisk: ide2
cores: 2
cpu: Penryn
efidisk0: WD-1TB:vm-109-disk-1,size=128K
ide0: local:iso/Catalina-installer.iso,cache=unsafe,size=2095868K
ide2: local:iso/OpenCore.iso,cache=unsafe
machine: q35
memory: 4096
name: MacOS
net0: vmxnet3=BE:BF:47:8E:EB:E9,bridge=vmbr0,firewall=1
numa: 0
ostype: other
sata0: WD-1TB:vm-109-disk-0,discard=on,size=64G,ssd=1
scsihw: virtio-scsi-pci
smbios1: uuid=87847b56-43c8-4a50-b199-566ac28e46f1
sockets: 1
vga: vmware
vmgenid: 9d4a9086-2755-4eb3-94cc-dd9b7200d4c1
Again, thanks for your work setting this up!
Actually before OpenCore even appears you should be seeing the Proxmox boot logo and be able to enter the guest’s UEFI setup by pressing F2, so the fault is occurring even before OpenCore, and so you can skip trying to fix OC. I would comment out the lines for OpenCore and Catalina just so you can rule them out completely, and see if the lack of video persists.
I can’t spot any problems in your VM config.
If you launch your VM from the commandline with “qm start 109” do you get any warnings printed?
Which version of Proxmox is this? Had you previously installed my old patched pve-edk2-firmware package for supporting Clover guests? If so this may now be a version that is too old to work on newer QEMU, you can “apt-mark unhold pve-edk2-firmware; apt update; apt install pve-edk2-firmware” to switch back to the vanilla Proxmox version of this package.
You could try deleting the EFI disk from the VM and re-adding it (on the Hardware tab) just in case the EFI variables have somehow been broken and this is preventing OVMF from starting up.
Thank you so much for your suggestion Nicholas! I guess I missed the part of your guide that says to start the guest via terminal. That had the errors I needed to see. Also to answer your questions, this was a fresh install without the patched pve-edk2-firmware package. And Proxmox version is 6.1-2 (running kernel: 5.3.10-1-pve).
The errors I saw were about my processor’s lack of support for fma4 and pcid. I just removed those two args and it worked like a charm.
I did have the black screen issue, mentioned previously: https://www.nicksherlock.com/2020/04/installing-macos-catalina-on-proxmox-with-opencore/comment-page-2/#comment-35185
So in my case (Ryzen 3600X), I ended up with the following args:
args: -device isa-applesmc,osk=”…” -smbios type=2 -device usb-kbd,bus=ehci.0,port=2 -cpu Penryn,kvm=on,vendor=GenuineIntel,+kvm_pv_unhalt,+kvm_pv_eoi,+hypervisor,+invtsc,,+ssse3,+sse4.2,+popcnt,+avx,+avx2,+aes,+fma,+bmi1,+bmi2,+xsave,+xsaveopt,check
Thanks again for your help!
Those missing CPU features messages are harmless warnings, not errors (due to the “check” at the end of the -cpu argument). My CPU doesn’t support fma4 either and gets the same warning, so I’d be shocked if removing those features was the reason it started working. I notice you have two commas in a row in your new args.
You are right… Maybe it was an issue with my EFI disk? ¯\_(ツ)_/¯
Are you on Patreon?
Yep, some weird fault with the EFI disk is just about the only thing that could cause a boot failure at that early stage (pre-OpenCore).
I’m not on Patreon, but if you’d like to make a donation you can send it to my PayPal address at n.sherlock@gmail.com instead!
EDIT: Thanks for the donation!
Hi Nick,
what are your thoughts on using an app store account within a VM? Other guides talk about how your account could get locked out by Apple, if some characteristics of your VM don’t match a real system.
Do you consider this a risk? If so, is it mitigated by your Opencore configuration or would I need to take action myself? And what would I need to do?
Thanks!
I’ve never had an issue with the app store, I don’t think it’s a concern. You can get your account locked in some fashion by having too many generated serial numbers coming and going (I think there’s some limit to how many distinct devices Apple expects you to sign into with your Apple account), but I’ve heard that people just call up Apple support and get them to fix it. I’ve notarised macOS software with my developer account, all on my Hackintosh.
The service that requires some fiddling, since it actually relies on serial numbers, is iMessage and friends, rather than the app store or iCloud.
Hello, and thank you so much for your incredible work.
I followed step by step this tutorial but I still face the same issue, I get this message after the bios screen display:
BdsDxe: failed to load Boot0004 “UEFI QEMU HARDDISK QM00013 ” from PciRoot(0x0) / Pci(0x1E, 0x0)/Pci(0x1, 0x0)/Pci(0x7, 0x0)/Sata(0x0,0xFFFF,0x0) : Not Found
Hackintosh is not installed yet.
I pressed F2 during the boot, got to boot manager > boot from file, but it is empty, I stuck here.
Here is my config file:
args: -device isa-applesmc,osk=”” -smbios type=2 -device usb-kbd,bus=ehci.0,port=2 -cpu host,kvm=on,vendor=GenuineIntel,+kvm_pv_unhalt,+kvm_pv_eoi,+hypervisor,+invtsc
bios: ovmf
bootdisk: ide2
cores: 4
cpu: Penryn
efidisk0: local-lvm:vm-100-disk-1,size=4M
ide0: local:iso/Catalina-installer.iso,size=2095868K,cache=unsafe
ide2: local:iso/OpenCore.iso,cache=unsafe
machine: q35
memory: 4096
name: catalina
net0: vmxnet3=,bridge=vmbr0,firewall=1
numa: 0
ostype: other
sata0: local-lvm:vm-100-disk-0,cache=writeback,discard=on,size=200G,ssd=1
scsihw: virtio-scsi-pci
smbios1: uuid=302beb61-bc34-4ef6-8c2b-4bbc5825e4e0
sockets: 1
vga: vmware
vmgenid: fb6f0416-4556-4782-8ea5-18c1d765b6cc
Could you help me please?
Did you unpack the OpenCore ISO before uploading it?
Thanks for this, works great – even with Mojave. Much better than the older method. I was able to get better performance for the install steps by attaching the “ISOs” via SATA instead of IDE.
Thank you for your concise and thorough tutorial – outstanding in its ability in guiding a noob through the process to a working result.
Do you have any pro/con comments on using Apple Remote Desktop versus QEMU – noVNC from a Mac?
Thanks again.
I haven’t tried vanilla VNC, I assumed the Apple screen sharing client would do a smoother job of transmitting hotkeys and negotiating a compatible codec.
The Proxmox browser-based VNC client has really poor performance compared to any dedicated app.