
macOS 11 Big Sur has now been released! If you’d like that version instead then please use my new Big Sur installation guide!
This tutorial for installing macOS Catalina using OpenCore has been adapted for Proxmox from Kholia’s OSX-KVM project and Leoyzen’s OpenCore configuration for KVM. You can get the full sourcecode on my GitHub here.
If you’d like to use Clover instead, use my older tutorial, but OpenCore works better!
Requirements
I’ll assume you already have Proxmox 6.1 or 6.2 installed. You also need a real Mac available in order to fetch the OSK key.
Your Proxmox host computer’s CPU must support SSE 4.2, so for Intel your CPU must be at least as new as Nehalem, which was the first CPU generation to bear the “Core” i5/i7 branding. Older CPUs will cause the finder to repeatedly crash after installation completes (with an Illegal Instruction exception in the graphics code).
Modern AMD CPUs also support SSE 4.2 and will work with this guide.
First step: Create an installation ISO
The easiest installer to build is a recovery image, which will download Catalina during installation. Download and run fetch-macOS.py in a terminal to download the Catalina recovery image from the Apple software distribution server (this can be run on Linux, Proxmox, or on a Mac):
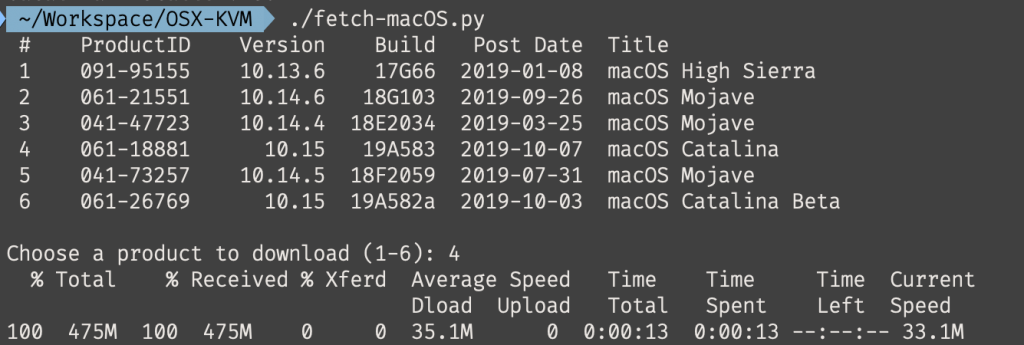
This results in a ~500MB “BaseSystem.dmg” file in the current directory. Convert that dmg into an “iso” like so if you’re building this on macOS:
hdiutil convert BaseSystem.dmg -format UDRW -o Catalina-installer.iso
mv Catalina-installer.iso.img Catalina-installer.iso
Or like so if you’re building this on Linux:
# Install the dmg2img package and...
dmg2img BaseSystem.dmg Catalina-installer.iso

# Or use qemu-img from the qemu-utils package to do it instead:
qemu-img convert BaseSystem.dmg -O raw Catalina-installer.iso
The result is actually a raw disk image, not a true ISO, but Proxmox has better tools for picking and re-using ISO images than disk images. Upload the “ISO” to your Proxmox server’s ISO store (typically /var/lib/vz/template/iso).
If you won’t have an Internet connection available to Catalina during installation, or your network can’t provide an IP address by DHCP you’ll need to build an offline installer instead. Building the offline installer requires you to have a Mac, here are the instructions.
Prepare an OpenCore image
We’ll be using OpenCore as a bootloader for Catalina. This has several improvements over my old Clover-based tutorial, like fixes to screen resolution problems, better CPU feature support, and better FileVault compatibility, and is recommended for all future builds.
Download the latest OpenCore.iso.gz release from my repository, unpack it, and upload it to Proxmox’s ISO store at /var/lib/vz/template/iso. Although it has a .iso file extension, this is actually a hard disk image.
Fetch the OSK authentication key
macOS checks that it is running on real Mac hardware, and refuses to boot on third-party hardware. You can get around this by reading an authentication key out of your real Mac hardware (the OSK key). Save the first block of C code from this page as smc_read.c. In a command prompt, change into the same directory as that file and run:
xcode-select --install # If you don't already have gcc
gcc -o smc_read smc_read.c -framework IOKit
./smc_read
It’ll print out the 64 character OSK for you. Make a note of it.
Every Mac uses the same OSK, so don’t be surprised that it doesn’t look like a random string!
Create the VM
From the Proxmox web UI, create a new virtual machine as shown below.
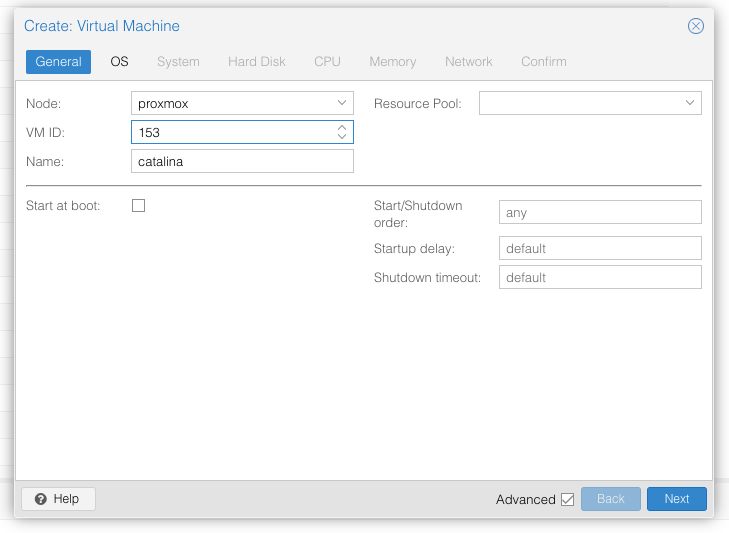
Keep a note of your VM’s ID 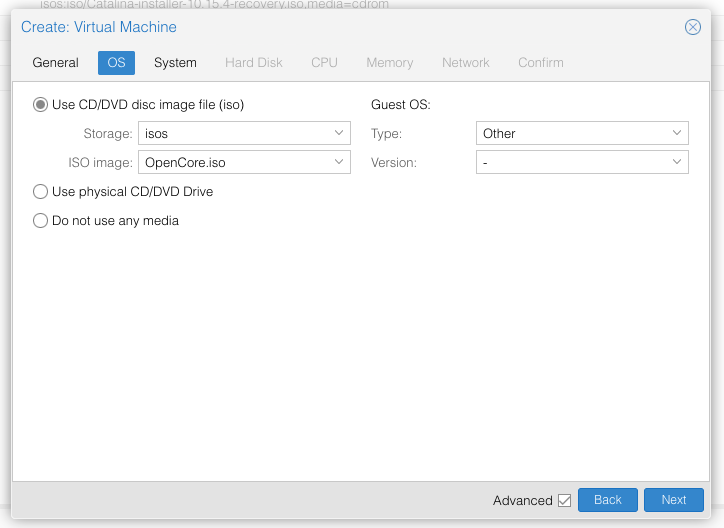
Select the OpenCore ISO you uploaded and set OS type to “Other” 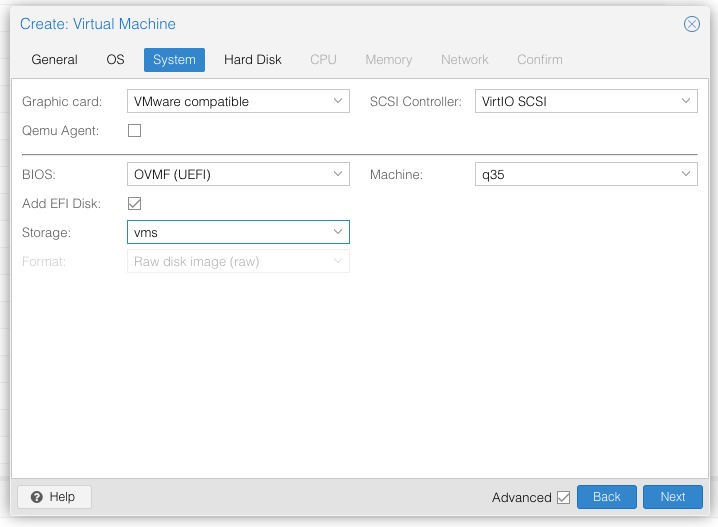
Set graphics to “VMWare Compatible”, set BIOS to OVMF (UEFI), set Machine to Q35, Tick Add EFI Disk and pick storage for it. On Proxmox 7 you must untick “pre-enroll keys” 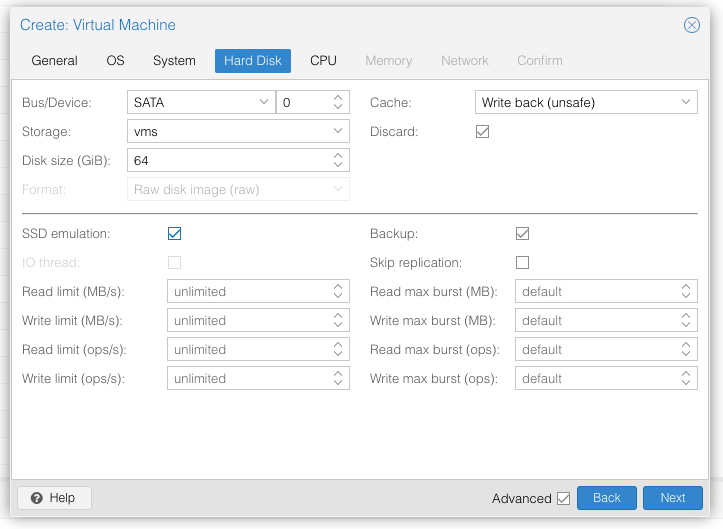
Set the size of the hard disk (I chose 64GB). Attach it to SATA0. Enable discard and SSD emulation to support TRIM. 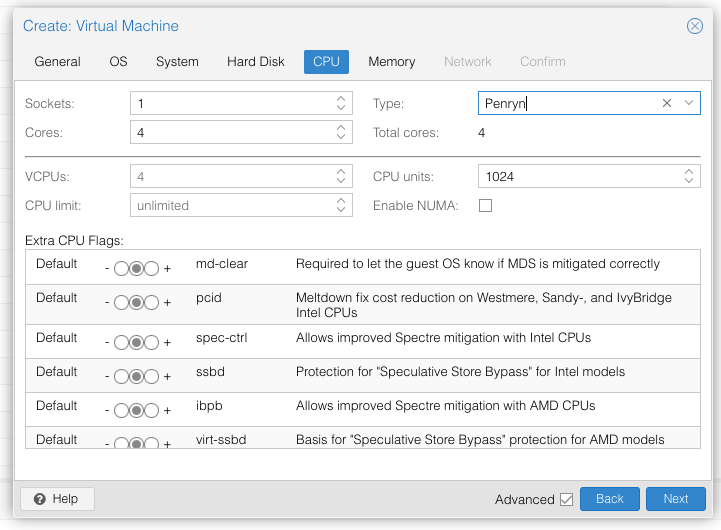
Set the number of cores for the VM, use a power of two (e.g. 1, 2, 4, 8, see note later). Set the CPU to Penryn. 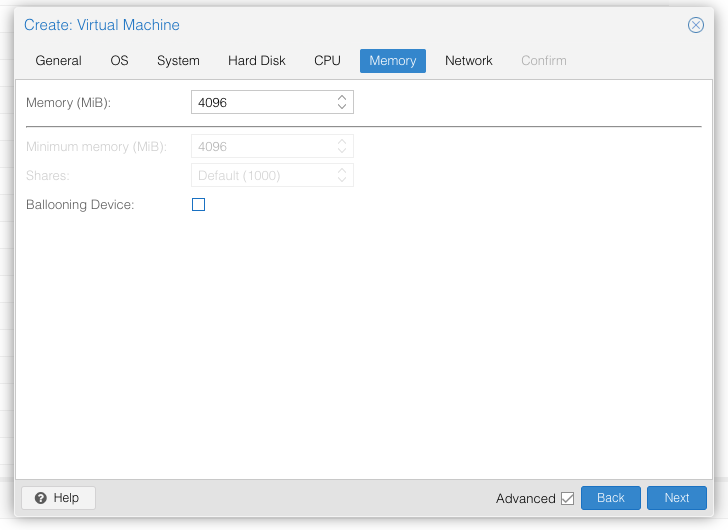
I chose a memory size of 4096MB. Disable ballooning because there is no balloon driver available for macOS. 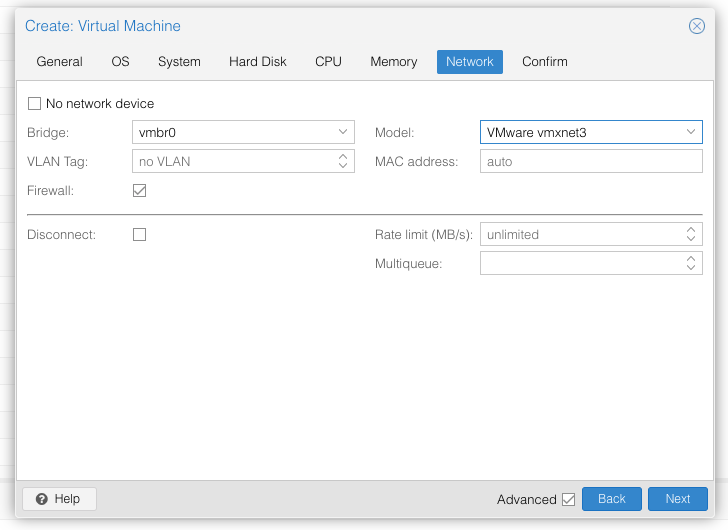
Choose VMWare vmxnet3 for the network model
In the Options page for the VM, ensure that “use tablet for pointer” is set to “Yes”.
In the Hardware page for the VM, add a second DVD drive at IDE0, set it to use your Catalina-installer.iso.
Don’t try to start the VM just yet. First, SSH into your Proxmox server so we can make some edits to the configuration files.
Edit /etc/pve/qemu-server/YOUR-VM-ID-HERE.conf (with nano or vim). Add this line, being sure to substitute the OSK you extracted earlier into the right place:
args: -device isa-applesmc,osk="THE-OSK-YOU-EXTRACTED-GOES-HERE" -smbios type=2 -device usb-kbd,bus=ehci.0,port=2
(A USB keyboard is added here because macOS doesn’t support QEMU’s default PS/2 keyboard.) Ensure the args are all on a single line!
We also need to add a -cpu argument. If your host CPU is Intel, add this to the end of the “args” line:
-cpu host,kvm=on,vendor=GenuineIntel,+kvm_pv_unhalt,+kvm_pv_eoi,+hypervisor,+invtsc
This will pass through all of the features that your CPU supports. OpenCore’s config will pretend to macOS that the CPU’s model name is Penryn for compatibility.
If your host CPU is AMD, or the above argument doesn’t work for you, use this more-compatible alternative:
-cpu Penryn,kvm=on,vendor=GenuineIntel,+kvm_pv_unhalt,+kvm_pv_eoi,+hypervisor,+invtsc,+pcid,+ssse3,+sse4.2,+popcnt,+avx,+avx2,+aes,+fma,+fma4,+bmi1,+bmi2,+xsave,+xsaveopt,check
This pretends that your CPU is Penryn, which will keep macOS happy even if your host CPU is AMD, and adds a bunch of newer required and optional CPU features on top. Features that your host CPU doesn’t support will be ignored (a warning will be printed to the console during launch with qm start 1xx), but note that macOS won’t work without SSE4.2 support.
Now find the lines that define the two “ISOs” (ide0 and ide2), and remove the “,media=cdrom” part from them. Add “,cache=unsafe” in its place. This will treat these as hard disks rather than DVD drives.
Save your changes, return to the Options tab, and change the boot order to put IDE2 (the OpenCore image) first. Your final VM configuration file should resemble this:
args: -device isa-applesmc,osk="..." -smbios type=2 -device usb-kbd,bus=ehci.0,port=2 -cpu host,kvm=on,vendor=GenuineIntel,+kvm_pv_unhalt,+kvm_pv_eoi,+hypervisor,+invtsc
balloon: 0
bios: ovmf
bootdisk: ide2
cores: 4
cpu: Penryn
efidisk0: vms:vm-100-disk-1,size=1M
ide0: isos:iso/Catalina-installer.iso,cache=unsafe,size=2094688K
ide2: isos:iso/OpenCore.iso,cache=unsafe,size=150M
machine: q35
memory: 4096
name: catalina
net0: vmxnet3=...,bridge=vmbr0,firewall=1
numa: 0
ostype: other
sata0: vms:vm-100-disk-0,cache=unsafe,discard=on,size=64G,ssd=1
scsihw: virtio-scsi-pci
smbios1: uuid=...
sockets: 1
vga: vmware
Configure Proxmox
On Proxmox, run “echo 1 > /sys/module/kvm/parameters/ignore_msrs” to avoid a bootloop during macOS boot. To make this change persist across Proxmox reboots, run:
echo "options kvm ignore_msrs=Y" >> /etc/modprobe.d/kvm.conf && update-initramfs -k all -u
Unlike Clover, OpenCore doesn’t require Proxmox’s OVMF package to be patched, so if you had previously installed my pve-edk2-firmware package, and you don’t have any Clover VMs left, you can revert to the vanilla Proxmox package by running “apt-mark unhold pve-edk2-firmware; apt install pve-edk2-firmware”. If you still have Clover VMs that need it, you can continue to use my patched package, it’ll work too.
Install Catalina
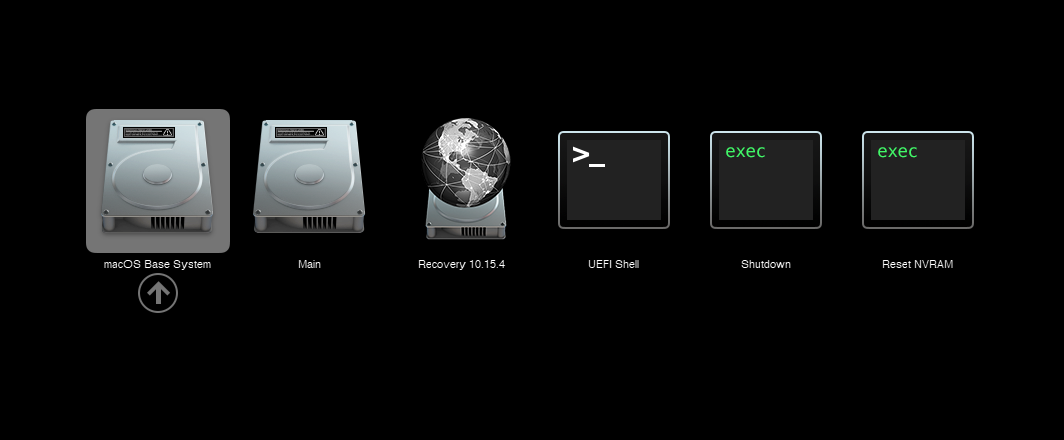
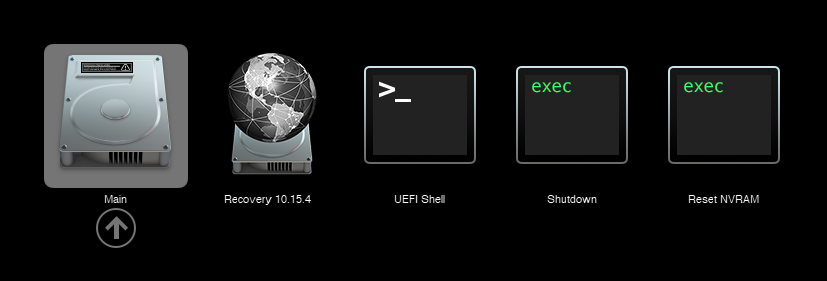
Now start up your VM, it should boot to the OpenCore boot picker:
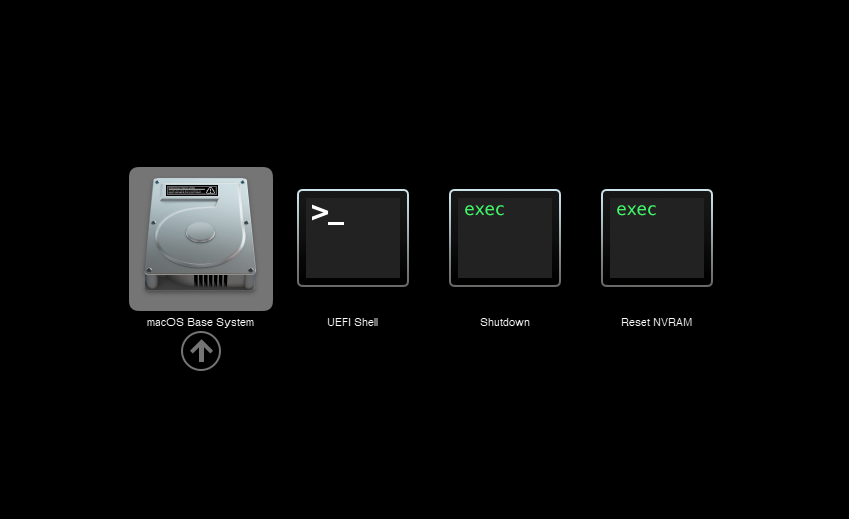
Press enter to boot the “macOS Base System” entry and the installer should appear.
Our virtual hard drive needs to be erased/formatted before we can install to it, so select the Disk Utility option. Follow the steps below to format the disk:
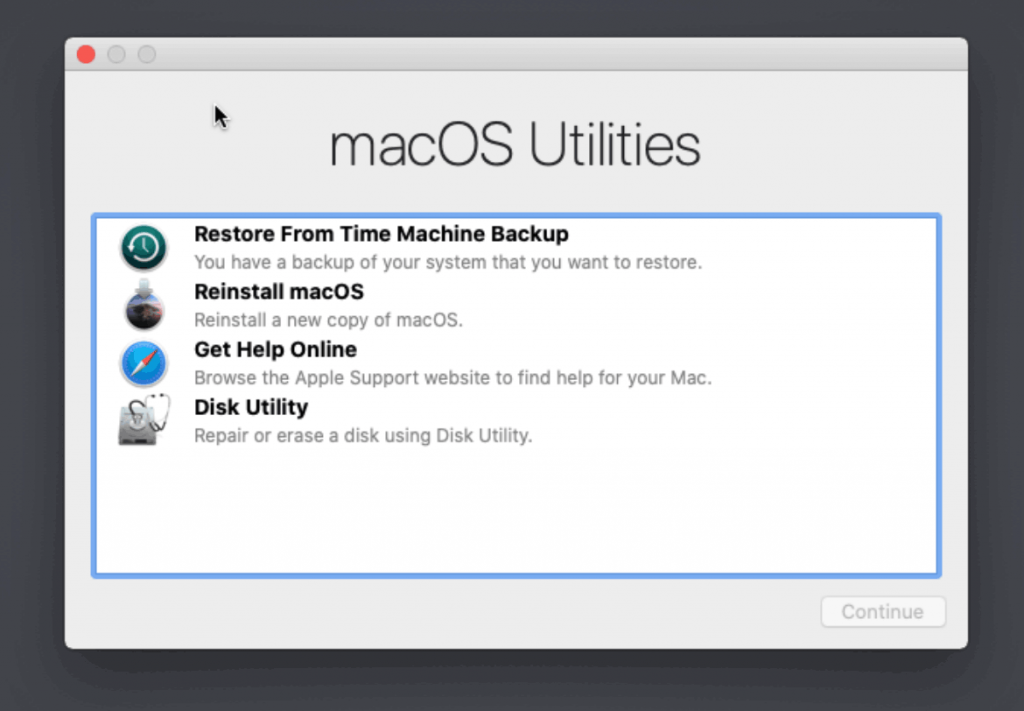
Select Disk Utility 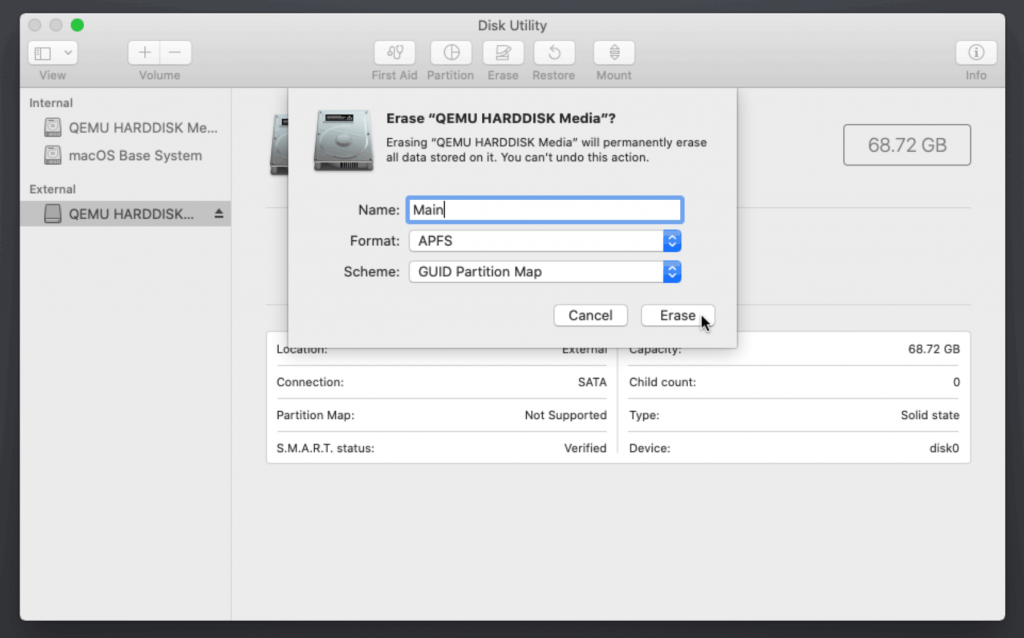
Erase the main disk (it’ll appear as an external drive). Choose APFS. I called mine “Main”. Avoid “Encrypted” at this stage
Now we’re ready to begin installation!
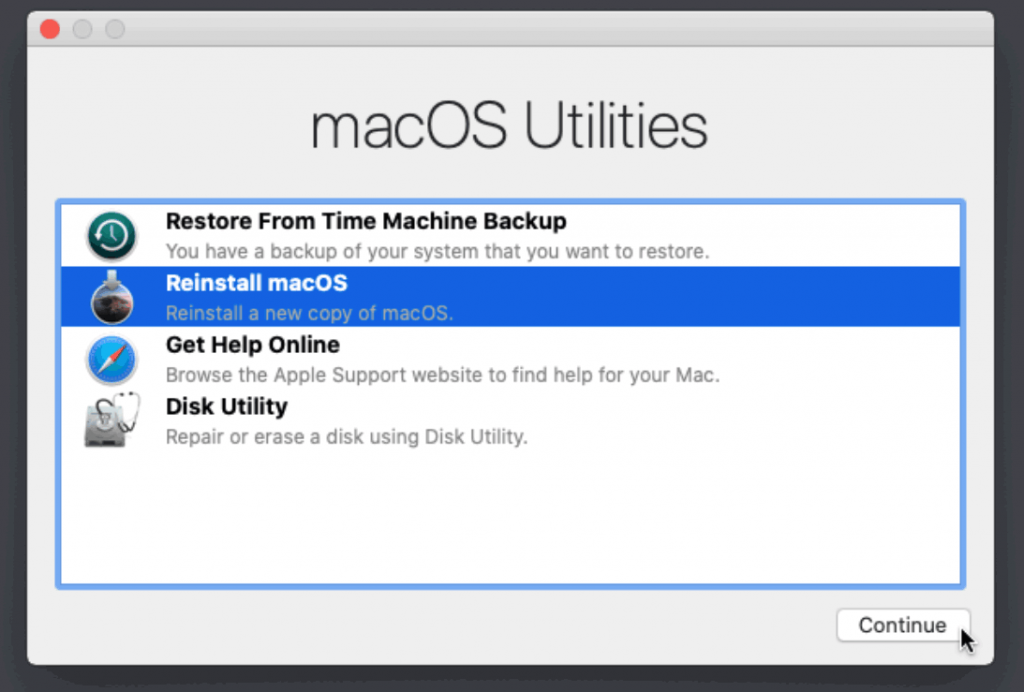
Reinstall macOS 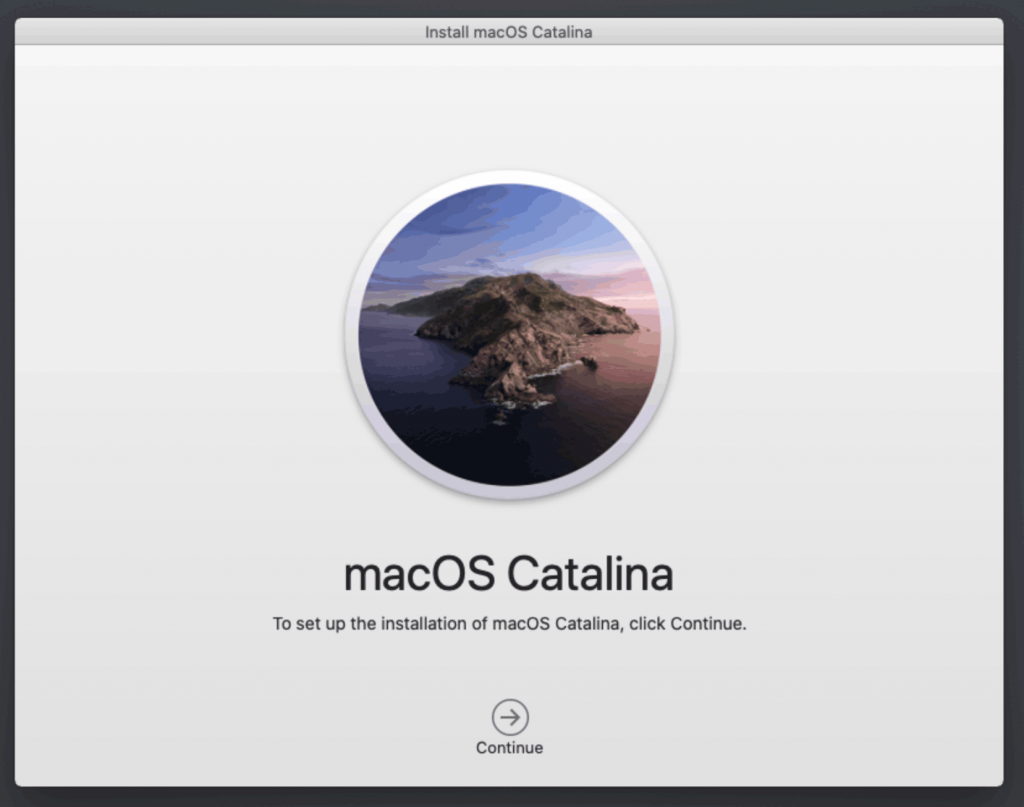
Continue… 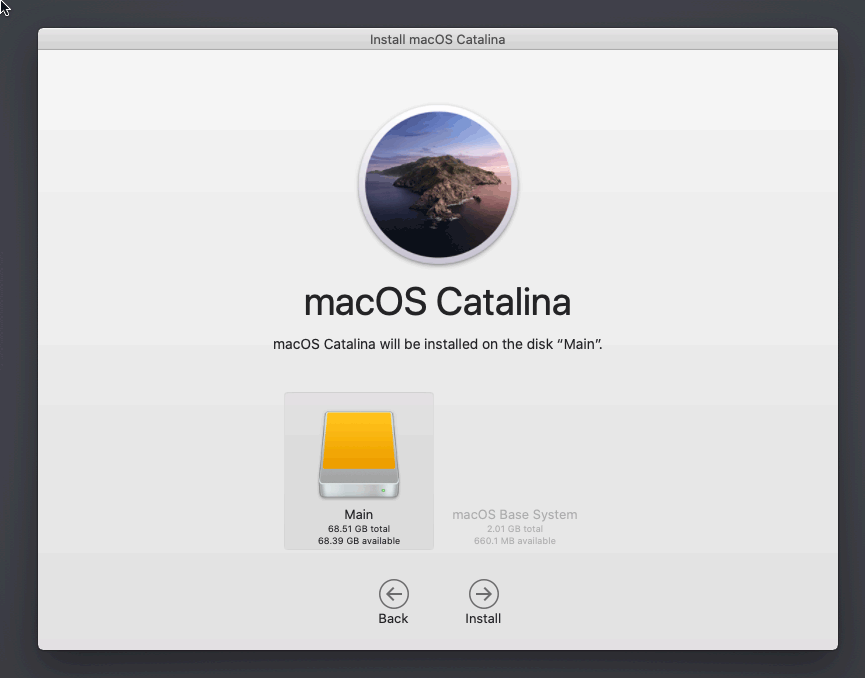
Choose the disk you erased 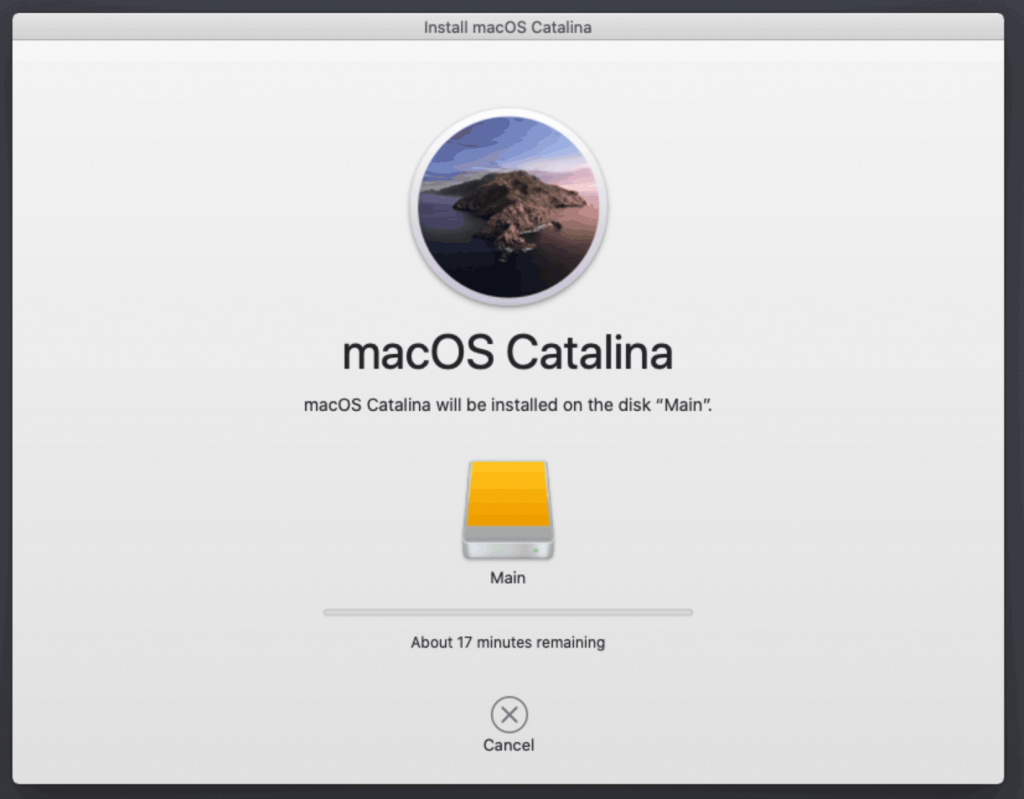
It’s installing!
After the first stage of installation, the VM will reboot. Pick the “macOS Installer” entry to continue installation:

The VM will finish installation and reboot itself a second time. Now the installation is complete, so choose the name of your main disk to boot (mine’s called Main):
Answer the initial install questions, and you’ll be logged on! (Note that you’ll want to hold off on logging into your iCloud account until you’ve configured your SMBIOS to your liking)
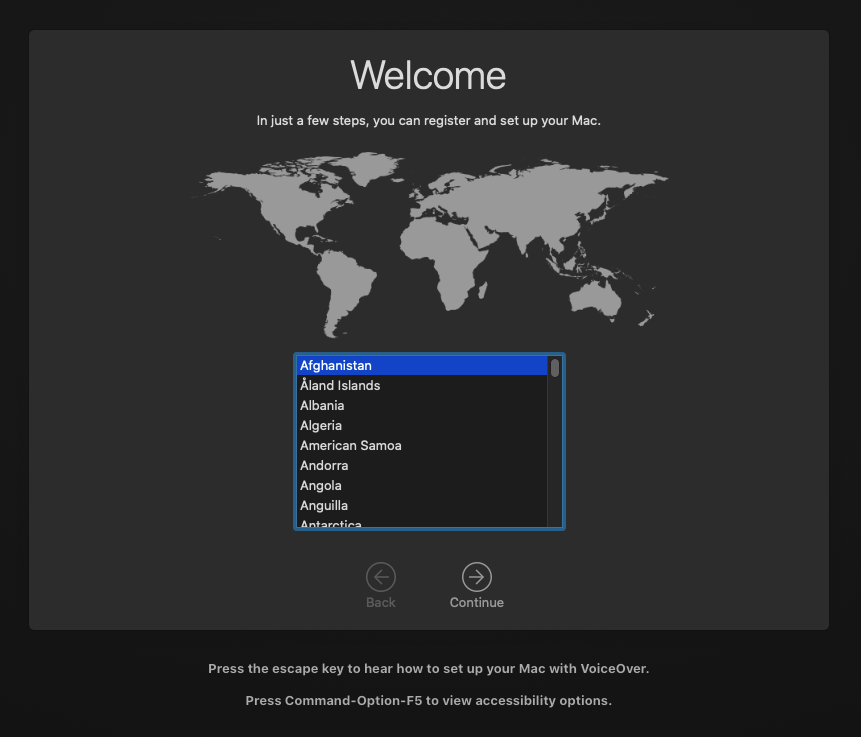
Answer the install questions 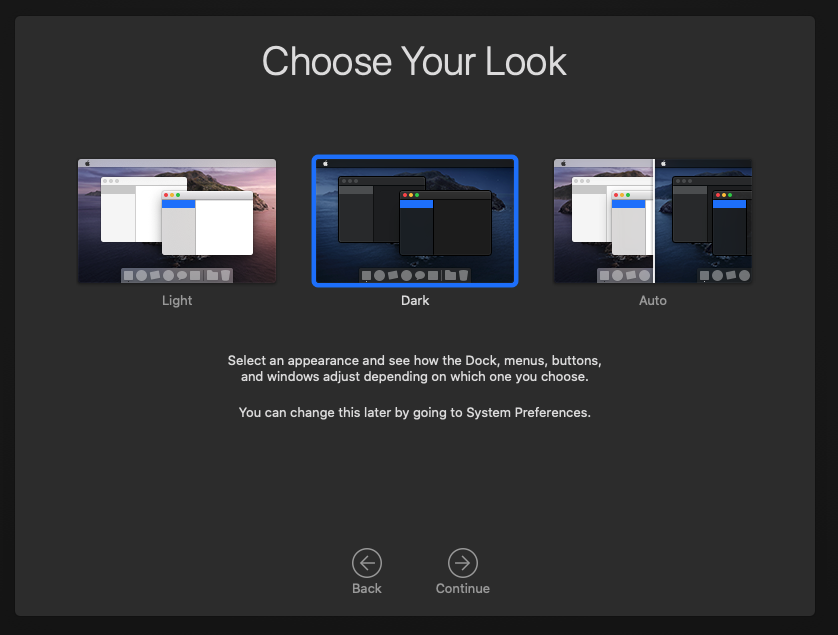
New automatic theme switching! 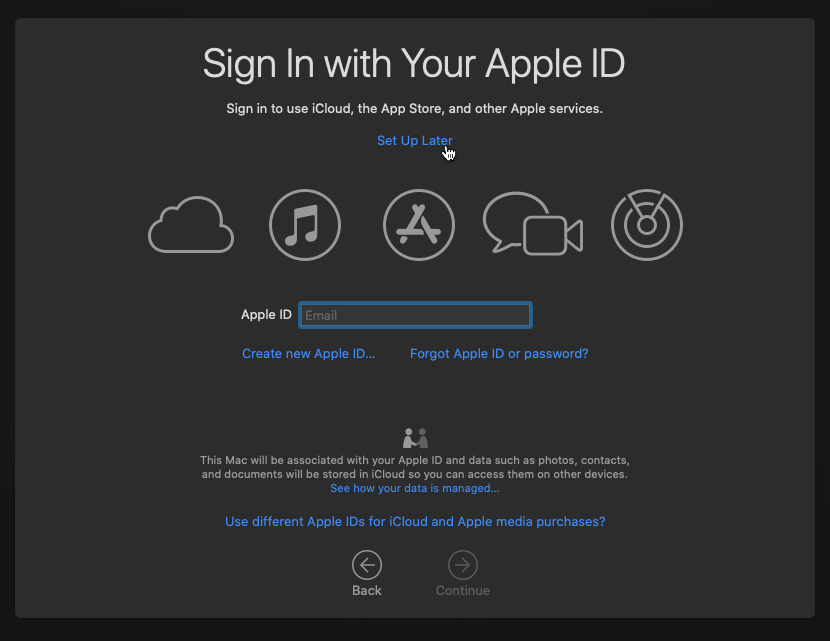
Avoid logging into iCloud just yet
Make the OpenCore install permanent
We’re currently booting using OpenCore from the attached OpenCore ISO. Let’s install that to the hard drive instead. Pop open Terminal and run “diskutil list” to see what drives we have available.
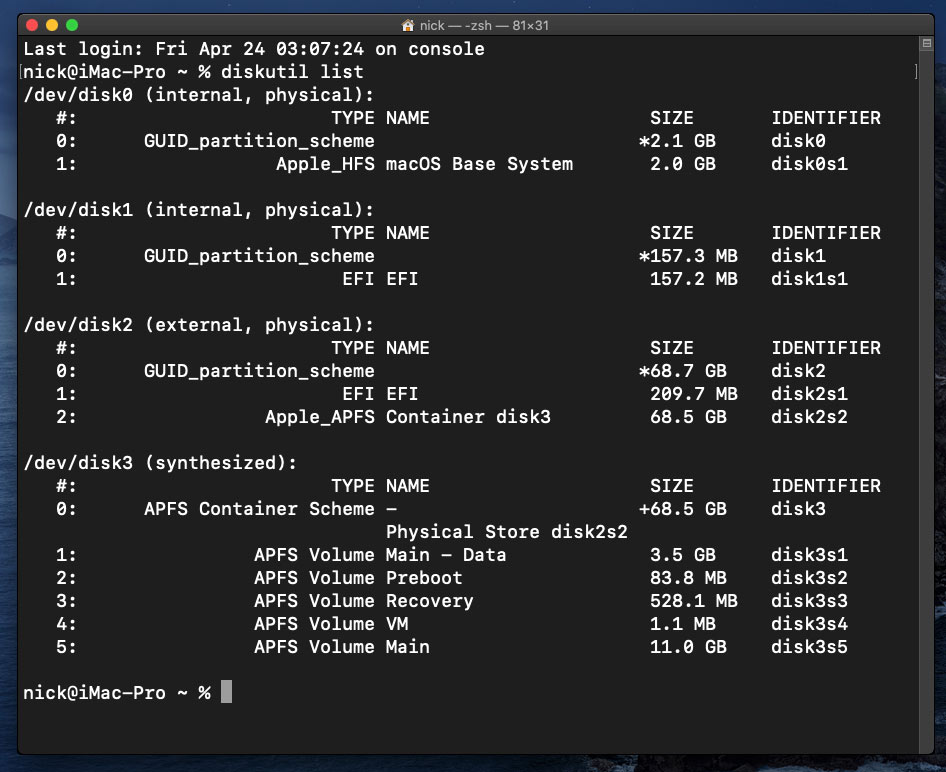
Use “sudo dd if=<source> of=<dest>” to copy the “EFI” partition from the OpenCore CD and overwrite the EFI partition on the hard disk. The OpenCore CD is the small disk (~150MB) that only has an EFI partition on it, and the main hard disk is the one with the large Apple_APFS “Container” partition on it.
In my case these EFI partitions ended up being called disk1s1 and disk2s1 respectively, so I ran “sudo dd if=/dev/disk1s1 of=/dev/disk2s1” (note that if you get these names wrong, you will overwrite the wrong disk and you’ll have to start the installation over again!).
Now shut down the VM, and remove both the OpenCore and the Catalina installer drives from the Hardware tab. On the Options tab, edit the boot order to place your SATA disk as the first disk. Boot up. If everything went well, you should see the OpenCore boot menu, and you can select your “Main” disk to boot Catalina:
Sleep management
I found that I was unable to wake Catalina from sleep using my mouse or keyboard. If you encounter the same problem, you can either disable system sleep in Catalina’s Energy Saver settings to avoid the issue, or you can manually wake the VM up from sleep from Proxmox by running:
qm monitor YOUR-VM-ID-HERE
system_wakeup
quit
Editing your OpenCore/EFI settings
The Configuration.pdf that explains the OpenCore config.plist file can be found along with the OpenCore release on my GitHub.
To mount your EFI partition in macOS so you can edit config.plist, first check the “identifier” of your EFI partition in the terminal:
~$ diskutil list
/dev/disk0 (external, physical):
   #:                   TYPE NAME              SIZE       IDENTIFIER
   0:  GUID_partition_scheme                  *512.1 GB   disk0
   1:                    EFI EFI               209.7 MB   disk0s1
   2:             Apple_APFS Container disk1   511.9 GB   disk0s2
Then you can mount it like so:
sudo mkdir /Volumes/EFI
sudo mount -t msdos /dev/disk0s1 /Volumes/EFI
Now you can edit /Volumes/EFI/OC/config.plist with your favourite text editor to make your changes. (TextEdit is not a great choice because it likes to insert curly quotes into the file and otherwise break things, there are some dedicated plist editors available such as XCode).
If you’re unable to boot macOS, you can edit the config.plist using the “UEFI Shell” option in the OpenCore boot menu instead.
Enter “FS0:” and press enter to open up the first available filesystem, then run “edit EFI\OC\config.plist” (if the file isn’t found, try switching to another filesystem like fs1:). When you’re done editing, press control+Q to exit, “Y” to save, then run “exit” to return to the OpenCore menu. You need to reboot for your changes to take effect.
Automatic boot
In config.plist, set Misc/Boot/Timeout to a non-zero value to allow the default boot option be chosen automatically after that delay in seconds. I’ve disabled this by default because it causes the installer ISO to re-enter its main menu instead of continuing the second stage of installation.
Verbose boot
To boot macOS in Verbose mode to diagnose boot problems, edit config.plist to change the “bootargs” in the NVRam section from “keepsyms=1” to “keepsyms=1 -v”.
Changing screen resolution
To change macOS’ screen resolution, you need to edit the UEFI/Output/Resolution setting in config.plist, the default is 1920×1080@32.
You should be able to change this to any of the modes that the system OVMF menu offers (hit F2 at the start of guest boot and choose “Device Manager/OVMF Platform Configuration” to see which resolutions are available).
Video performance
Because there is no guest video acceleration available for macOS, video performance is poor.
In Google Chrome in the guest you will need to toggle off the setting to “use hardware acceleration when available” to improve issues with elements not being drawn or flickering (especially video). Safari may be a better choice.
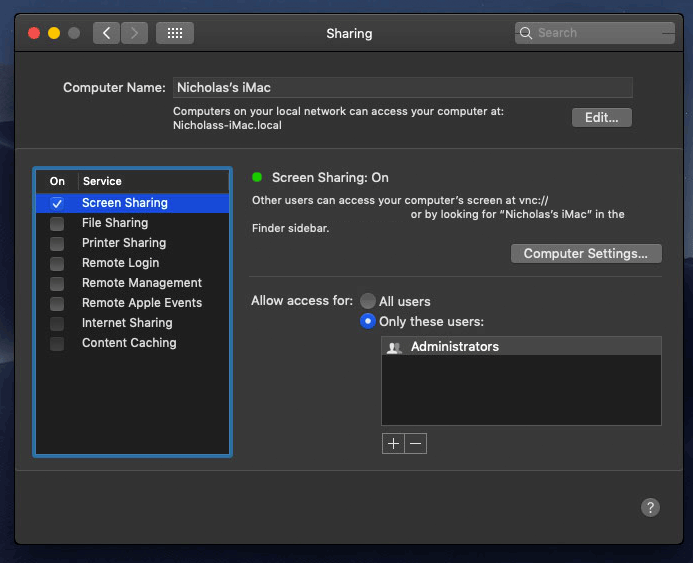
macOS’s built in “Screen Sharing” feature offers dramatically better framerates and latency than Proxmox’s browser-based VNC console, so if you have a real Mac to act as a viewing console, you can enable that in the VM’s “Sharing” settings and connect to the VM using the Screen Sharing app from your Mac instead:
Apparently Screen Sharing is also compatible with VNC clients like RealVNC, so you should be able to connect to it from Linux or Windows consoles using RealVNC.
The real magic bullet for video performance is to pass through a compatible video card using PCIe passthrough (though note that Catalina does not support most NVidia cards). This offers near-native performance. You can read more about how I’m using PCIe passthrough on my own installation here.
USB passthrough
Since I want to use this as my primary computer, I want to use a USB keyboard and mouse plugged directly into Proxmox, rather than sending my input through the web VNC console.
Proxmox has good documentation for USB passthrough. Basically, run “qm monitor YOUR-VM-ID-HERE”, then “info usbhost” to get a list of the USB devices connected to Proxmox:
qm> info usbhost
 Bus 3, Addr 12, Port 6, Speed 480 Mb/s
 Class 00: USB device 8564:1000, Mass Storage Device
 Bus 3, Addr 11, Port 5.4, Speed 12 Mb/s
 Class 00: USB device 04d9:0141, USB Keyboard
 Bus 3, Addr 10, Port 5.1.2, Speed 12 Mb/s
 Class 00: USB device 046d:c52b, USB Receiver
 Bus 3, Addr 9, Port 14.4, Speed 12 Mb/s
 Class 00: USB device 046d:c227, G15 GamePanel LCD
 Bus 3, Addr 8, Port 14.1, Speed 1.5 Mb/s
 Class 00: USB device 046d:c226, G15 Gaming Keyboard
In this case I can add my keyboard and mouse to USB passthrough by quitting qm, then running:
qm set YOUR-VM-ID-HERE -usb1 host=04d9:0141
qm set YOUR-VM-ID-HERE -usb2 host=046d:c52b
This saves the devices to the VM configuration for you. You need to reboot to have the new settings apply. Note that the emulated USB3 device doesn’t work with macOS, so don’t set “usb3=1”.
You can also pass through USB devices by passing through an entire USB controller using Proxmox’s PCIe passthrough feature, which gives much better compatibility.
FileVault

FileVault now works with OpenCore, so you can encrypt your boot disk by using the option in macOS’ system security preferences. But be certain to keep a copy of your recovery key and keep your backups up to date.
Using an odd number of CPU cores
macOS doesn’t like it if your CPU has a weird number of cores, like 3 or 6. You can fix this on the Hardware tab. Edit the Processors settings, and tick the Advanced box. Round up the number of cores you want (e.g. 3) to a nice power of two (4, 8, 16, etc) and use that for the “Cores” setting, but set the “VCPUs” setting to the number of cores you actually want to be used (3), like so:
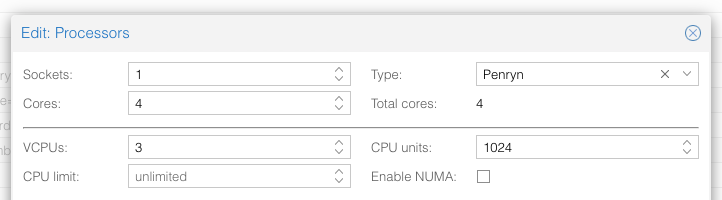
This will cause macOS to see that system supports a maximum of 4 cores, but that one core is absent since it hasn’t been hotplugged yet, so macOS will only use 3 cores.
Another approach is to use an odd number of sockets in order to make the core count a power of two. e.g. to pass 6 cores, set Sockets to 3, and Cores to 2 (or 4 to pass both threads per core).
Proxmox doesn’t let us set the number of threads per core in the VM config, so if you want to pass every thread of a hyperthreaded 6-core CPU, and have them reported to the guest as hyperthreads, add -smp 12,sockets=3,cores=2,threads=2 to your “args”, or for a 56-core hyperthreaded CPU, -smp 112,sockets=7,cores=8,threads=2.
Nested emulation
If your host CPU is Intel, and you used “-cpu host” in your VM config file (explained above), you can use Nested Virtualisation in macOS. This allows you to run VirtualBox VMs, the Android emulator, or Docker inside your macOS guest. You just need to tweak your Proxmox system config to enable this as explained in the Wiki:
https://pve.proxmox.com/wiki/Nested_Virtualization
macOS’s Hypervisor framework doesn’t support nested virtualisation on AMD host CPUs, but apparently VirtualBox uses their own virtual machine driver which does work (I haven’t tried this myself). I imagine this will stop working in the next version of macOS, since they’re planning to add a bunch of restrictions on third-party kexts and might force VirtualBox to use Hypervisor.framework.
Getting iMessage and FaceTime to work
Unlike the App Store and iCloud, these Apple services actually pay attention to your Mac’s serial number.
Following this guide should get these working for you:
https://dortania.github.io/OpenCore-Post-Install/universal/iservices.html#generate-a-new-serial
I had already generated a serial number for my Mac (when I check the Support Status for it, it says “We’re sorry, but this serial number isn’t valid. Please check your information and try again”) and added it to my OpenCore config, so all I had to do on top of that was use Hackintool to help me mark my Ethernet adapter en0 as built-in. FaceTime then worked immediately. I didn’t need to follow the rest of the guide.
Fixing “guest boots to UEFI shell”
If your guest ends up booting to the UEFI shell instead of showing the OpenCore boot menu, especially if you’ve just updated OpenCore to a new version, you’ll need to edit the guest’s UEFI boot entries to fix this.
At the very start of guest boot, hit F2 to enter guest UEFI settings.
First we’ll remove the old entries. Choose the Boot Maintenance option, then Boot Options -> Delete Boot Option. Use the spacebar to tick any old Clover or OpenCore entries (avoid ticking the EFI Internal Shell option, you want to keep that!). Select “Commit Changes and Exit”.
Now we’ll add the correct entry for OpenCore back in. Select Add Boot Option. Navigate through the device tree to EFI/BOOT/BOOTx64.efi and select it, name this new option “OpenCore” or similar. Again Commit Changes and Exit.
Go to the Change Boot Order and move OpenCore to the top. Commit Changes and Exit.
Now back out to the main menu and choose Reset, and you should successfully boot into OpenCore this time.
Followed your excellent tutorial and got up to opening up disk utilities to erase and format however when trying to change the disk name the keyboard is unresponsive. Any suggestions? Thanks in advance.
If the USB keyboard argument is definitely not missing from the end of your args, try switching away from the Console tab and switching back, sometimes the VNC’s input dies.
Hello, thank you very much for your excellent work. With your guide I got a proxmox-Server running on a Ryzen Threadripper. I just started with Proxmox VE and I think that I still have to learn a lot. These are my most urgent Problems:
1. Passthrough of a Pcie 4-port usb-card crashes always the server.
2. Same Problem with rme-audio interface card.
3. I don’t know if the passthrough of the built-in Network adapter (I211) us possible.
I would like to have at same time Catalina running full screen as gpu passtrough (Works fine) and Win 10 running in a browser window, one server on same PC, but I don’t now how to do it and if its even possible.
You’re going to have to double check your IOMMU groups and make sure other critical host hardware isn’t being grouped with the things you’re passing. e.g. if your USB controller is grouped with the host’s SATA controller then the host will be unable to read its disk any more when the VM starts and it’ll freeze.
This could have nothing to do with the Operating System at all, but I did want to point this out. There is not a single Mac out there with PCIE 4.0. The reason is because Intel doesn’t support it. Make sure you are not trying to passthrough any PCIE 4.0 slots, that could be your problem.
The guest only sees the emulated PCIe slot, so the technology available on the host shouldn’t be visible.
Apple Remote Desktop comes with excess baggage and with only marginally better performance for basic use.
Your recommendation for a straightforward (noob remember) VNC client okay for macOS?
And I cannot thank you enough for your well done how-tos.
The main performance advantage comes from the server side, MacOS’s screen sharing feature can know which region of the screen has been updated from the OS’s own redraw queues. QEMU’s VNC server has no idea what has changed and has to diff the whole screen on each frame to find out. On the client side a dedicated VNC client can do much better too, since the browser based client is stuck running everything through the JavaScript virtual machine.
The net result is that switching both sides of the link away from Proxmox’s stock setup more than doubles the framerate on fast links, and does even better on slow links since it seems to be able to switch to more lossy compression for fast updating scenes.
The last time I used a different VNC client was about 10 years ago, so I don’t have one to recommend.
I’m having hell passing through the USB controller (NEC uPD720201). It shows up in PCI devices via hackintool but it’s not working. I’ve tried every combination of kexts I can find and hacked through various things but I can’t seem to get it. I feel I’m missing something fundamental on how this works.
On the plus side, my ubuntu VM sees and uses the card no problem.
You got any pointers? I’ve tried to install the mXHCD.kext both into clover EFI partition and into the Library/Extensions.
From this post it sounds like macOS doesn’t have built-in support for this card:
https://www.tonymacx86.com/threads/making-nec-usb-3-0-card-fully-comportable-with-original-mac-drivers-caldigit-lacie-oyen.77864/
Their strategy is to change the vendor/product ID on the card to match one of the ones where third-party vendors provide macOS drivers, and then use the third-party drivers. However, the drivers linked there are too old to be usable on Catalina, from what I can see. Even the GenericUSBXHCI driver mentioned seems to only be supported up to 10.10:
https://bitbucket.org/RehabMan/os-x-generic-usb3/src/master/README.md
Which Clover EFI directory did you put mXHCD.kext into?
I found this installer for mXHCD too, but haven’t tried it:
https://github.com/chris1111/USB-3.0-NEC
Well I spoke to soon. I have injectall and the genericusbxhci. I’m getting some USB functions to work. Keyboard and mouse work. Hotplugging a thumb drive is sketch at best. The USB bluetooth is not recognized.
I’m trying to go through the process of mapping the ports so I can remove the injectall – hackintool is not reporting any of them in green/active even as the mouse is working in one of those USB ports.
https://pasteboard.co/JkJJ25E.png
Note – I’m using OpenCore per your HowTo so I’ve got my kexts in EFI/OC/Kexts
Yeah that mXHCD breaks all the things. The unsupported works for KB and mouse but apparently only with injectall.
I’m missing something..
If you look at the very last post https://www.insanelymac.com/forum/topic/286860-genericusbxhci-usb-30-driver-for-os-x-with-source/?page=37
You can see someone reporting a similar chipset working with that kext. I have a feeling if I could figure out the mapping I might make some progress on stability/usability.
Bluetooth dongle is visible but it won’t turn on (it’s macos native driver) and hackintool shows FW Loaded as unchecked. Weird stuff happening.
This user reported they had to manually kextload the GenericUSBXHCI kext:
https://sourceforge.net/p/genericusbxhci/tickets/40/
If your kext doesn’t appear in the kextstat output, you might need to do that too.
Yeah it’s loading. The ports are working now, but I’m struggling with the IORegistryExplorer and creating my USBMap.kext.
The dortania instructions have a tool that does the mapping – which doesn’t work with the GenericUSBXHCI’s naming (???). I think hackintool has similar issues which is why it’s not working. I’m going to have to figure out what vales from the IORegistryExplorer tool go into the plist. I need to spend some time with the instructions on how to build the map manually. I joined the r/Hackintosh discord but they might not be kvm friendly.
I just bought a PCIe USB3 card with native MacOS support. $20 and solved the problem.
I noticed from your walkthroughs that you didn’t the host setup to swap to the onboard video after boot, right? The machine with POST with the PCIe graphics card output and then it will go to a blinking cursor. The onboard video never fires up. I assume this is the BIOS telling the onboard to shut off when it detects the PCI. And then linux gets told to isolate the card and can’t/doesn’t know to switch video back to the on board. Is there a solution for this?
I’d like to be able to plug into console on the proxmox host “just in case”. Like today when I couldn’t figure out why it didn’t show up on the network!
Excellent tutorial, Nick, thanks a lot!
I only have a “cosmetic” question:
The boot volume has an “external drive” icon and also is identified as an external drive in “About This Mac > Storage”. Could you point me to a resource which describes how to change that into something that macOS identifies as an internal drive?
Again, many thanks!
basebird
Hi Nick,
Thanks for your work maintaining these guides!
FYI – I noticed OpenCore 0.6.0 got released a few days ago =):
https://github.com/acidanthera/OpenCorePkg/releases/tag/0.6.0
Is it worth re-syncing your Catalina and BigSur images against that?
Regards,
Victor
I will be updating mostly to see if I can make a single image that can boot both. None of the new features really caught my eye though.
Hi Nick,
Did you have any luck getting a single OpenCore image for both Catalina (and below), and Big Sur?
Also – I noticed in the Changelog – they seem to have added some things for earlier macOS versions as well? (10.6, 10.9).
Regards,
Victor
I haven’t managed to get any newer OpenCore version than commit 62e6ab1ec56628e1ea26c12042ca6c6f2fa7662d to boot Big Sur successfully (this commit onwards breaks for me: https://github.com/acidanthera/OpenCorePkg/commit/ebdc3fa056f2a5c9f6dacd54b4410106b9b01cab). I’m hoping to resolve this before the retail release of Big Sur at least.
Hi Nick,
I saw you just updated to a newer OpenCore release =).
Nice one!
I also saw https://github.com/thenickdude/KVM-Opencore/issues/2
Does this mean that v7 won’t boot Catalina and older – but only Big Sur for now? Or are the results variable?
Thanks,
Victor
The results are variable as it is booting Catalina fine for me and Kholia, but I’ve had lots of reports from others that it doesn’t work.
I used this to create a MacOS VM running Catalina on my proxmox 6.2 cluster. It works great, but one thing I noticed is that shutting the VM down via proxmox doesn’t work. My guess is that ACPI shutdown isn’t working properly for the VM. I noticed in this guy’s (albeit older) instructions using clover, he has a step for the q35 ACPI DS/DT blobs. Presumably to fix ACPI issues. That was specific to setting up Clover though. Do you happen to know if there’s anything similar for OpenCore? Or, have you noticed this issue yourself?
This has always been the case for me across both Clover and OpenCore, it’s a little bit annoying. If you figure out a solution please let me know! I’m sure there just needs to be a small addition in some DSDT table or other.
My patch to enable natively included with OSX Qemu Guest Agent got included in Proxmox VE. Just enable it in VM setting. It will make shutdown and IPs section to work, additionally it will allow make the `qm guest VMID ` to work fine.
Nice one!
Could you be a little more specific about how to enable the patch for this noob? I’m on Proxmox VE 6.2-4.
Could you be a little more specific about how to enable the patch for this noob? I’m on Proxmox VE 6.2-4.
Options -> QEMU Guest Agent -> Enabled
Yeah, ACPI shutdowns are not even supported by macOS at all. Even holding down the power button indefinetley on a real MacBook will still require a password to shutdown if the computer is locked. On my Razer Blade 15 I have to hold it down to do what is equivalent to a “stop” in proxmox, or go into the Apple menu and click shutdown. The only safe way to shut it down is through the Apple menu.
Thank you for the awesome work!
My installation hangs right after the second step. I boot the VM, format the drive, run the first part of the installer fine but on reboot after selecting macOS Installer the machine freezes. It hangs on the Apple logo and progress bar. The VM becomes unresponsive.
Thank you!
Double check your OSK is correct and that you didn’t accidentally download my OpenCore image for Big Sur (it can’t boot Catalina)
Help! I’ve used both the Mojave and the Catalina installs on ProxMox. I can get both to install and boot correctly and used every other feature. But on both versions the News app (especially News+) is super slow… and I mean, unusably slow. I can’t figure it out. What am I missing?
You have no video acceleration with the emulated video, so anything based around a Web browser will be super slow. You need a compatible passthrough GPU to get proper performance.
Thank you!
Hi, I have been hackintoshing for a couple months now, and just decided to try a VM on my server. I was doing pretty well, got OpenCore to boot, got it to recognize the MacOS installer, then I get to the apple logo, then after a while a kernel panic. I went into a live installer of Linux to mount the EFI folder and go into the OpenCore config.plist and enable verboose. This here is my output:
https://onedrive.live.com/download?cid=4A1C8D3CB29FFEDB&resid=4A1C8D3CB29FFEDB%2150504&authkey=AEZQQwxeZH79tvc
P.S. I did triple check that I followed all steps properly and had my friend triple check my work as well.
There’s basically only two possible causes of a kernel panic at this point. Wrong OSK (double check your text editor didn’t mangle it by adding curly quotes or a copyright symbol) or your host CPU doesn’t support the required instruction sets.
Those DMA errors you’re getting during boot are unusual, is your Catalina installer image stored on a read-only Proxmox storage maybe? If macOS is trying to write to it this might manifest as a DMA error to that device.
I’m having the same issue.
I have had a second friend provide the key, which confirms that my original key is in deed correct. Should it be enclosed in double-quote marks?
My PC is running a Xeon E5-2680v2 (IvyBridge) on a supermicro server board (X9SRA). All necessary features enabled
Yes, it should be in double quote marks. Make sure you’re not using an editor like TextEdit that uses curly quotes.
Are you booting Catalina or are you actually booting Big Sur?
im unable to passthrought my RX560 to macos.
dont know why.. if I set virtual display to NONE. my monitor just simply goes black. noting happens.(connect using DP cable)
but if I enable virtual display . that monitor will display the wallpaper of macOS. but just that . just wallpaper.
after enabling verbose mode. the last line before it froze is “IOConsoleUsers: gIOScreenLockState 3”
Mac model is macmini8,1
When the virtual display is enabled the dedicated GPU will be a secondary monitor. You can drag windows left and right between the two monitors.
You can designate a new primary monitor from the system Displays settings by dragging the menu bar in the monitor diagram to the other monitor.
Try unplugging the monitor and plugging it back in, this sometimes cures the black screen.
Another thing to try is to add agdpmod=pikera to your kernel args in your OpenCore config.plist
after adding agdpmod=pikera to boot-args is still not working.
BUT strangely. by follow the clover guide. i can install Mojave then passthrough my rx560 with 0 issue. it boot in to system flawlessly.
Amazing as usual !
Just to confirm
Nvidia G710 , G730 Work native
Radeon rx 580 Work native
Wake up from sleep doesn’t work for me , so i disable sleep 😀
Misleading GT730 , GT710
How is the UI speed with GT710 versus the GT730? I’d like to have XCode move along faster than compared to running inside VMWare Workstation. But this is just a casual hobby and RX580 is out of my price range. Thanks!
Hi Xilex , I’m using Xcode little bit .. but as I notice its working smoothly , Emulator working as expected ..
GT710 & GT730 was identified as same device in my setup . So i don’t feel any different between them .. I bought my RX580 from taobao , same prices you will find it on aliexpress .. its not much high price .. believe me 😀
Sleep is for the weak!
Bless you. Thanks for all the hard work.
For anyone new to the Hackintosh/ virtualizing Mac scene, the OSK is nothing special. I have heard tell of folks without access to an actual Mac simply Googling around to find the OSK, which is the same for all Macs. However, this might be illegal, so I would certainly never do such a thing…
Hello sir, It’s me again (now posting on the correct thread).
So I received my NVMes, a USB PCIe card, and an Airport with PCIe adapter. Last install was working ok, but I was runnin it on a test storage. This time I assembled everything and when trying to configure it, I get the “Your computer restarted because of a problem”, and I get a boot loop. Yes, I ran the echo commands, but still no success. 🙁
And I don’t even know how to start debugging it.
BTW: Still not passing through anything (only the NVMe, but even without it, I get bootloops).
Here’s the conf file:
args: -device isa-applesmc,osk=”our…Inc” -smbios type=2 -device usb-kbd,bus=ehci.0,port=2 -cpu Penryn,kvm=on,vendor=GenuineIntel,+kvm_pv_unhalt,+kvm_pv_eoi,+hypervisor,+invtsc,+pcid,+ssse3,+sse4.2,+popcnt,+avx,+avx2,+aes,+fma,+fma4,+bmi1,+bmi2,+xsave,+xsaveopt,check
balloon: 0
bios: ovmf
bootdisk: ide2
cores: 8
cpu: Penryn
efidisk0: local-lvm:vm-101-disk-1,size=4M
ide0: Huginn:iso/Catalina.iso,cache=unsafe,size=12G
ide2: local:iso/OpenCore.iso,cache=unsafe,size=150M
machine: q35
memory: 32000
name: Alfheimr
net0: vmxnet3=52:C8:18:A5:A2:28,bridge=vmbr0,firewall=1
numa: 0
ostype: other
sata0: Huginn:101/vm-101-disk-0.qcow2,cache=unsafe,discard=on,size=32G,ssd=1
scsihw: virtio-scsi-pci
smbios1: uuid=0fb4455a-9519-45f7-8083-d9f1a02ce52e
sockets: 1
vga: vmware
vmgenid: dd434038-61cb-4ec9-a86b-e8eb2c12fa9c
It’s hard to guess what went wrong here because I’m not sure what you changed since it last worked. Your config looks fine, but make sure those are not curly quotes around your OSK.
By the echo commands I’m assuming you mean you enabled Verbose mode? What’s the last output from it?
OSK was wrong indeed. It turns out I was using “©” instead of “(c)”.
It’s a very good protection system.
Ok, so I managed to install the system correctly, but this time I’m installing it into an NVMe drive (same thing for the Windows VM, which I can’t get to boot without having to enter the EFI menu to choose the proper boot device).
Anyway, OpenCore doesn’t seem to see my NVMe. It doesn’t show it as a boot option, and neither does “Select Boot Disk” in the setup. Disk Utility sees it fine, I even managed to install Catalina onto it. Now I’m in a deeper, badly charted territory and can’t seem to find much info online… 🙁
I only have:
“macOS Base System”
“macOS Installer”
“Recovery”
The drive was called just “macOS”. Any ideas? Bad formatting/partitioning?
(BTW, I have two partitions on the same drive in order to use as a fallback for future upgrades gone wrong – the other being “macOS Backup”).
To boot from NVMe you’ll need to edit your OpenCore config.plist to set ScanPolicy to 0 I believe (that’s what I have to do on my system).
Huummm… Any suggestion on how to do that? I can’t access the contents of the OpenCore ISO you posted, even renaming it to IMG.
I also downloaded “OpenCoreEFIFolder.zip” and “KVM-OpenCore-5.zip”. I suppose the contents of the first one are the same as your disk image, but then how would I go about making my own image based on these files now?
You can edit it from inside your VM by using the UEFI shell, follow the directions in the “Editing your OpenCore/EFI settings” section under “If you’re unable to boot macOS”.
Hello again. Sorry for the long time to post I had a few issues. Anyway, the idea of using the EFI shell was brilliant, although I had never used such before. It worked out great – but when I passed the wrong controller to the Windows machine, which was set to auto-start, things got a bit harry and I managed to fix it, but I broke something else along the way and ended up having to reconfigure both VMs.
There are some minor quirks, but in general I’m not bothered at all. Pretty happy, actually! Can’t complain at all. Got myself something equivalent to an iMac Pro base model, for 1/3 of the price, and with about 200% capacity (cores, memory, NVMe and VGA) remaining for another VM. NEAT!
Thank you so very much for the tutorial, and the good will to help people. You, sir, deserve a long life.
Oh, forgot to ask: I have no interest in using iMessages and FaceTime, only iCloud and the App Store. Is it really safe to just login the way it is?
I’ve signed in maybe 20 times to use the app store across 10 VMs and never had a problem. You can remove VMs from your Apple account if you discard them so you don’t build up an unrealistically large graveyard of dead VMs.
Thanks again, man! You rock!
Hello again. Minor annoyances here: PRAM doesn’t seem to be surviving shutdowns. Not quite sure if VM’s or host’s shutdown, but nonetheless.
Also, I can’t for the life of me hide the EFI partition from OpenCore.
So I always have to be present upon VM start to select the propper partition to boot from, otherwise I have to force stop the machine, and reboot the whole host (because of the Vega reset bug).
Any suggestions?
I think PRAM is represented by EFI variables…? In that case make sure you didn’t forget to add an EFI disk to your VM’s hardware tab, it’s used to store those settings. With no EFI disk, it doesn’t complain, but everything is reset to their defaults upon boot.
Makes total sense, I removed the EFI disk thinking it could remove the EFI partition from the boot options. Thank you!
But how would I remove the EFI partition from OpenCore’s boot options? That’s very annoying, specially because my bluetooth peripherals don’t work in OpenCore. :/
If you edit config.plist to set “AllowSetDefault” to true, you can select Catalina in the OpenCore boot menu and press Control+Enter, and it’ll set it as the default boot option going forwards (note: Control, not Command).
While you’re editing config.plist you can also set the Boot/Timeout to some non-zero value, and when that timeout (in seconds) expires it’ll boot the default option without you having to press enter.
I have done that, but any system update is a hassle due to that. Wish I could just hide the EFI partition. That would be great!
Just out of curiosity, is this EFI image compatible with the Big Sur beta? Or should I expect to modify it when upgrading macOS?
My GPU has the AMD reset bug too, so for macOS system updates I made a copy of my VM config file with a new ID number, but with my passthrough GPU removed and vga:std added instead. Then I can use this no-passthrough VM to go through the multi-reboot upgrade process without worrying about my GPU hard-locking the host. (I access the web console from my laptop). Be careful not to launch both VMs at the same time, because they will both be writing to the same disks and stomp all over each other’s writes, causing massive filesystem corruption – and there is no locking to prevent this situation.
Currently my OpenCore v5 release is not compatible with Big Sur. My v7 release works nicely with Big Sur, and is theoretically compatible with Catalina too (it Works For Me™), but everybody else reports that it won’t boot Catalina for them. I’m going to revisit this closer to the Big Sur retail release and see if I can get it harmonised.
That’s one solution… Last time I went through an update, I thought about temporarily removing the VGA passthrough and adding an emulated VGA, but never got to do it.
Great idea on harmonising the EFI partition for cross compatibility between Catalina and Big Sur. That’s the beauty of OpenCore after all! Thank you again for your efforts to make VM hackintoshing easier for us!
Is it possible to have sound in the virtual machine? I tried passthrough without success with snd_intel_hda integrated sound card.
Only if you pick a card that macOS supports, or is compatible with the AppleALC kext which I’ve included.
I use my passthrough RX580 graphics card to send sound over DP or HDMI to my monitor, which decodes it and provides it on a headphone jack. Another alternative is a $5 USB sound dongle from Amazon.
Would something like Sabrent USB External Stereo Sound Adapter https://www.amazon.com/Sabrent-External-Adapter-Windows-AU-MMSA/dp/B00IRVQ0F8 work, you think?
In general the USB soundcards seem to be supported on a generic basis without requiring any special drivers. I have used this one in the past:
https://www.amazon.com/gp/product/B001MSS6CS/ref=ppx_yo_dt_b_asin_title_o05_s00?ie=UTF8&psc=1
The downside with my specific model is that the output volume with high-efficiency earbuds is soul-destroyingly loud. I had to add an attenuator to make sure my hearing wasn’t nuked in a Therac-25-style incident. It probably pairs up really well with big, low-ohm headphones though!
any chance that you can make a openCore image that works with Nvidia 1070 or similar in HighSierra?
It should already work with that thanks to WhateverGreen being included, you will probably need to edit config.plist to enable the Web driver if you want to use that:
https://dortania.github.io/GPU-Buyers-Guide/misc/bootflag.html#nvidia-boot-arguments
updated config.plist like this, still showing 8MB Display memory.
NVRAM
Add
4D1EDE05-38C7-4A6A-9CC6-4BCCA8B38C14
DefaultBackgroundColor
AAAAAA==
UIScale
AQ==
4D1FDA02-38C7-4A6A-9CC6-4BCCA8B30102
rtc-blacklist
7C436110-AB2A-4BBB-A880-FE41995C9F82
SystemAudioVolume
Rg==
boot-args
keepsyms=1 -v nvda_drv_vrl=1 shikigva=4
run-efi-updater
No
csr-active-config
5wMAAA==
nvda_drv
31
prev-lang:kbd
ZW4tVVM6MA==
Did you install the Nvidia Web Driver yet?
I installed, and Nvidia driver manager shows web driver is being used instead of macos built in. but my card is not recognized.
my box is Lenovo y900, i7-7700K + Nvidia 1070, lasted promox. I passthrough GPU and keyboard, mouse. it works, but video is lagging with only 8MB of video memory and no audio.
it works with windows 10 though. although it took me quite sometime to get the 1070 card work in windows 10 too.
OK, gave up on the 1070 card. bought a 710 2GB card, work out of the box. video/audio all work fine. I guess i just won’t play wot in catalina.
quick question: do I still need to install nvidia web driver? the built-in seems work fine.
There is no web driver for Catalina
owe you a big THANKS. I would not even try installing macos on my vm host if I did not see your tutorial.
Hello, everyone,
first of all: This is a very good tutorial!
But unfortunately I have a problem right at the beginning. I have followed the tutorial so far and at the first start the selection of OpenCore comes up. But when I start the BaseSystem, the screen turns black, the apple appears and then nothing more happens…
There is no loading bar.
I used Proxmox 6.2 on a Threadripper 3 (3960x).
Does anyone have a tip for me?
See you later.
Sven
Translated with http://www.DeepL.com/Translator (free version)
Did you use the “-cpu Penryn,…” argument?
Many thanks for the super fast answer!
Yes, I have done so, here is my configuration:
args: -device isa-applesmc,osk=”XXX” -smbios type=2 -device usb-kbd,bus=ehci.0,port=2 -cpu Penryn,kvm=on,vendor=GenuineIntel,+kvm_pv_unhalt,+kvm_pv_eoi,+hypervisor,+invtsc,+pcid,+ssse3,+sse4.2,+popcnt,+avx,+avx2,+aes,+fma,+fma4,+bmi1,+bmi2,+xsave,+xsaveopt,check
balloon: 0
bios: ovmf
bootdisk: ide2
cores: 4
cpu: Penryn
efidisk0: local-zfs:vm-113-disk-1,size=1M
ide0: local:iso/Catalina-installer.iso,cache=unsafe,size=2084424K
ide2: local:iso/OpenCore.iso,cache=unsafe
machine: q35
memory: 8192
name: macOS
net0: vmxnet3=26:01:E6:3D:B5:64,bridge=vmbr0,firewall=1
numa: 0
ostype: other
sata0: local-zfs:vm-113-disk-0,cache=writeback,discard=on,size=64G,ssd=1
scsihw: virtio-scsi-pci
smbios1: uuid=681cd878-aaad-4c2c-a002-6c19c27382db
sockets: 1
vga: vmware
vmgenid: 9b2953ef-63e1-44ed-8424-f2b94cb6772e
Similar experience here. Seems like setting the CPU core count to 1 does help to make it start. Unfortunately even after install I cannot make it boot when I increase the core count.
Me too, with a CPU core the system will boot, but if you increase the number it will not boot.
Hi Nick!
First of all thanks for really detailed guide on how to setup macOS on the latest Proxmox release. I have managed to successfully install the system on my VM and now I’m looking forward to pass through my GPU. At that moment this is just “try if it will work” concept and if will not work, I will rethink if it’s worth buying compatible hardware or just use another OS instead. My spare GPU is good old GT430 which tends to be supported with Legacy Video patch, but it does not support UEFI, so OVMF therefore gets out of the game. I am trying to prepare legacy install OpenCore and I used EFI files from your forked KVM OpenCore repository. I created bootdisk and started VM – everything worked fine until the menu for disk selection showed up, but then the keyboard didn’t work to enter into the install. I believe I should add kext for input devices, but it’s my first time building custom bootloader for macOS.
As you have much much more experience with those things, would you please comment on that – what do you think I should modify in order to make OpenCore legacy install successful?
Thank you!
Jan
Sorry, I’ve never touched legacy boot and don’t intend to.
For me OpenCore-V6 didn’t work I got a stop sign on the screen after the apple icon.
OpenCore-V5 worked well for the installer.
Thanks for the test report! Could you try OpenCore-V7 for me instead? It looks like my V6 missed a needed fix from OpenCore 0.6.1:
https://github.com/thenickdude/KVM-Opencore/releases
First thanks for you great work!
0.6.1 boots my previously installed Catalina fine.
Great, thanks for the test!
Cool stuff here! Sadly, no joy with V7 here, instantly No-parking-sign, after selecting macOS Base System in the picker. Added -v to boot-args, see screenshot https://prnt.sc/udozbq did i missed something? Thanks in advance 🙂
update: installer booting fine with V5, no other changes, just OpenCore V5 iso.
There is no DHCP on my net, so i’ve set static ip “ifconfig en0 inet ip.of.the.vm netmask 255.255.255.248” and can ping the other vms in the same subnet. The gateway is “far”, not in same subnet, so “route add default ip.of.far.gw” fails with “Network is unreachable”. Linux VMs do work this way. Any ideas very appreciated. Thank You!
Networking issue solved on a proxmox node w/o dhcp server on network, installed isc-dhcp-server and bound to vmbr1 (or your bridge, that is used for the catalina vm, default is vmbr0)
how-to following asap i get all running and documented 🙂
Thanks for your great tutorial. Still using your opencore v5 iso (migrated to sata1, also migrated catalina-installer to sata2, target harddisk sata0. all disks are raw on zfs). very cool playground :)))
Tutorial / How to install w/o DHCP server, when only static ip settings possible….
#on the proxmox node:
apt install isc-dhcp-server
vi /etc/default/isc-dhcp-server
————–
INTERFACESv4=”vmbr0″ #set here your bridge, whre your VM-NIC is bound to. vmbr0 is default, you might have another bridge number
INTERFACESv6=”” #same here, but only, if your proxmox server is setup for ipv6 at all (depending on provider or personal preferences)
————–
vi /etc/dhcp/dhcpd.conf
————–
option domain-name “yoursearchdomain.tld”; #selfexplanatory
default-lease-time 600;
max-lease-time 7200;
ddns-update-style none;
subnet 0.0.0.0 netmask 0.0.0.0 { #you can setup your real net like 192.168.1.0 255.255.255.0, but it does not mater, since later we bind a specific ip-address to specific mac-address anyway
authoritative;
default-lease-time 86400; #24h in seconds, change i you like
max-lease-time 604800; #one week in second, change is you like, but more or eqal to default-lease-time
}
host catalina {
hardware ethernet 00:00:00:00:00:00; #mac-address of the virtual NIC of your vm, the vxnet one, to bind this dhcp lease to it. copy from proxmox gui
option routers 192.168.1.1; #gateway/router
option subnet-mask 255.255.255.0; #subnet, default in local nets is 255.255.255.0
fixed-address 192.168.1.2; #ip, that you want to lease to your macos vm, in my case its the failover ip of my provider (ovh/hetzner/etc)
option domain-name-servers 8.8.8.8,8.8.4.4; #huh, whats that?
}
————–
systemctl enable isc-dhcp-server #enable the dhcp server, so it starts automatically after proxmox reboot
systemctl restart isc-dhcp-server #start/restart the dhcp server now
systemctl status isc-dhcp-server #check status, if its “running”, ignore the two red lines about multiple interfaces match
————–
● isc-dhcp-server.service – LSB: DHCP server
Loaded: loaded (/etc/init.d/isc-dhcp-server; generated)
Active: active (running) since Wed 2020-09-09 02:10:48 CEST; 18s ago
Docs: man:systemd-sysv-generator(8)
Process: 19252 ExecStart=/etc/init.d/isc-dhcp-server start (code=exited, status=0/SUCCESS)
Tasks: 1 (limit: 4915)
Memory: 5.0M
CGroup: /system.slice/isc-dhcp-server.service
└─19271 /usr/sbin/dhcpd -4 -q -cf /etc/dhcp/dhcpd.conf vmbr0
Sep 09 02:10:46 h02 dhcpd[19271]: Wrote 0 leases to leases file.
Sep 09 02:10:46 h02 dhcpd[19271]: Multiple interfaces match the same subnet: enp0s1 vmbr0
Sep 09 02:10:46 h02 dhcpd[19271]: Multiple interfaces match the same shared network: enp0s1 vmbr0
Sep 09 02:10:46 h02 dhcpd[19271]: Server starting service.
Sep 09 02:10:48 h02 isc-dhcp-server[19252]: Starting ISC DHCPv4 server: dhcpd.
Sep 09 02:10:48 h02 systemd[1]: Started LSB: DHCP server.
Sep 09 02:10:50 h02 dhcpd[19271]: DHCPDISCOVER from 00:00:00:00:00:00 via vmbr0
Sep 09 02:10:50 h02 dhcpd[19271]: DHCPOFFER on 192.168.1.2 to 00:00:00:00:00:00 via vmbr0
Sep 09 02:10:51 h02 dhcpd[19271]: DHCPREQUEST for 192.168.1.2 (192.168.1.1) from 00:00:00:00:00:00 via vmbr0
Sep 09 02:10:51 h02 dhcpd[19271]: DHCPACK on 192.168.1.2 to 00:00:00:00:00:00 via vmbr0
————–
#reboot your macos vm, now it should have internet
Ooh that’s a handy tutorial, do you mind if I turn this into a post here? With credit of course.
I’m trying to track down the incompatibility here: Which CPU do you have, and did you use -cpu penryn or -cpu host? How much RAM did you assign to the VM? How many cores?
the physical server has xeon e3-1275, used the “intel” args, cpu: penryn. everything as in your tutorial…
Hello,
I ran into an issue installing Mojave with your previous guide. When booting into macOS via Clover, I’m presented with the following error:
Error loading kernel cache (0xe)
I didn’t see anyway to disable kernel cache in that version of Clover so I tried booting Mojave with OpenCore and consistently get the “Prohibited” sign.
Do you have any ideas on either disabling kernel cache in Clover or running OpenCore in verbose/debug?
Thanks in advance!
Try using my older OpenCore v5 release, v7 seems to be giving issues:
https://github.com/thenickdude/KVM-Opencore/releases/tag/v5
I install use your latest opencore(v7) to install catalina, and it’s not working(startimage failed, abort), however I switched to v4, and it worked. just let you know.
Thanks for the datapoint, I’m still trying to figure out why that release works for me and not some others.
@Nicholas, v5 of opencore worked first try.
Good stuff!
Man, I’ve gone a lot deeper into this than I first imaged. As of right now everything is working, except my NIC isn’t checked as “builtin”. I edited my config.plist as follows with the MAC of my NIC:
https://i.imgur.com/os9PHpp.png
When booting I’m seeing the following error and I’m not sure if my formatting is correct:
https://i.imgur.com/Prcvrjs.png
Would anyone be willing to share a working config.plist?
That’s not how to mark it as builtin, follow this guide:
https://dortania.github.io/OpenCore-Post-Install/universal/iservices.html#fixing-en0
Hi,
Thanks a lot for all the hard work!
Considering this on a Intel Core i7-10710u laptop (Intel UHD Graphics 620), with iGPU passthrough, if at all possible… This means Proxmox will have no host UI.
I’m then considering 2 usescases:
– how do I power-off: can Proxmox automatically shutdown as VM is powered-off ? (I guess VM restart is fine).
– typical wifi roaming with laptop (public space, transportation, hotels): how can I adjust wifi settings on Proxmox side while VM is running, and get advantage of then-refreshed network bridge on VM side? Requires VM restart? Requires Proxmox restart?
Can this be done from running VM, without secondary device intervention?
Thanks for any tip
For host shutdown on a desktop, you can just hit the power button, and the host will do an orderly shutdown. If your laptop has a dedicated power button you may be able to do the same.
Passing through WiFi to the guest through a virtual network adapter is something that I never managed to get, it seems really difficult. You could go the Hackintosh route and install an Apple-supported wireless card into your laptop, then pass it through with PCIe passthrough?
Thanks for prompt reply.
Target laptop has no replaceable wifi HW (built-in Intel Wi-Fi 6 AX201), so I’m looking at VM solution because Hackintosh would not work for Wifi.
Curious as to why host bridge on wifi would not work same as for ethernet, as long as Linux side is doing all the native config?
Does your target laptop have an M.2 slot? If it supports PCIe-keyed cards you can add one in there.
AX201 is supported (kind of) by OpenIntelWireless: https://github.com/OpenIntelWireless/itlwm
I forget the reason why WiFi was so hard to work with. Something about the WiFi adapter wanting to present its own IP address and not letting the Proxmox bridge decide it, or something like that. You can probably figure something out. I found lots of pages about it at the time from the Proxmox forum with other users struggling with it.
You can access Proxmox from your guest using SSH to reconfigure the host WiFi as needed (you can add two network adapters to the guest if you need one that is for host-only networking and one that is for WiFi).
No available M.2 slot: nice but not much expandable laptop: https://starlabs.systems/pages/labtop-mk-iv
Thanks for OpenIntelWireless reference! Will definitely track that, while investigating the wifi-bridging to VM approach further.
Cheers.
There is one point I don’t understand concerning the OSK authentication key: I have been using bare metal Hackintoshs for a while with Clover and now OpenCore now, but I never had to deal with that key at all.
So what is the difference between the Proxmox VM and a normal Hackintosh? A normal Mainboard doesn’t expose the OSK either, where does it come from in that scenario?
The OSK can be provided by VirtualSMC, but instead we emulate it on the host using the SMC support built into QEMU so that we can run the guest closer to unmodified stock.
I guess it *must* be provided in OC’s config.plist, given it’s that important, however, I wasn’t able to find this string in there. I will defer that question for a moment though as it is not so critical.
I’m actually more curious if it is possible to find an OC configuration that is suitable for both scenarios, i.e. usage in the VM in proxmox as well as a direct boot into a native Hackintosh (Ryzentosh): When I had added my native SSD (incl. EFI) to the Proxmox VM, it would crash right at the first few OC boot lines.
I assume there is nothing fundamentally different to prevent it from working, so I will play around a bit.
i spent 3 hours on this before seeing the comment that OpenCore 6 might not work and to use another build instead, which i did and then everything worked 😂 i usually leave comments blocked.
Hi Nick!
Your tutorial is very in-depth, however when attempting to load off OpenCore (v5) I’m getting a the apple icon with a loading bar, however at approximately 50% through it restarts and reports a fail.
With the downloading of the Base Image, there are significant different builds as time has passed since you made this tutorial, however I’ve tried about 3 of them and all have the same result. OpenCore v7 displays the Stop sign so that’s a no go.
My specifications are ProxMox 6.2-4 with dual xeon e5-2620 processors.
Double check your OSK, particularly that it isn’t surrounded by curly quotes, the (c) hasn’t been turned into a copyright symbol, and there are no invisible zero-width spaces which are used for word-wrapping (often seen when copying text from blogs that haven’t put it in a code block)
Yeah, it all looks correct from what i can see. Below is the conf file. I tried both the -cpu host and -cpu Penryn arguments with no change.
Let me know if there is anything else I can try.
args: -device isa-applesmc,osk=”our…steal(c)apple…inc” -smbios type=2 -device usb-kbd,bus=ehci.0,port=2 -cpu Penryn,kvm=on,vendor=GenuineIntel,+kvm_pv_unhalt,+kvm_pv$
balloon: 0
bios: ovmf
boot: cdn
bootdisk: ide2
cores: 1
cpu: Penryn
efidisk0: Data-1:vm-100-disk-1,size=4M
ide0: local:iso/Catalina-Installer.iso,cache=unsafe,size=2084424K
ide2: local:iso/OpenCore.iso,cache=unsafe
machine: q35
memory: 4096
name: catalina
net0: vmxnet3=7E:19:80:CF:C8:FB,bridge=vmbr0,firewall=1
numa: 0
ostype: other
sata0: Data-1:vm-100-disk-0,cache=unsafe,discard=on,size=64G,ssd=1
scsihw: virtio-scsi-pci
smbios1: uuid=f3d7c3db-7bf7-4dec-b056-f6b1cafc9551
sockets: 1
vga: vmware
vmgenid: b147a951-9ee0-48d2-a9f6-e7a5959f2d54
Sorry – missed the first line
args: -device isa-applesmc,osk=”our…steal(c)apple…inc” -smbios type=2 -device usb-kbd,bus=ehci.0,port=2 -cpu Penryn,kvm=on,vendor=GenuineIntel,+kvm_pv_unhalt,+kvm_pv_eoi,+hypervisor,+invtsc,+pcid,+ssse3,+sse4.2,+popcnt,+avx,+avx2,+aes,+fma,+fma4,+bmi1,+bmi2,+xsave,+xsaveopt,check
Your OSK is wrong, it’s case- sensitive. Unless you just censored it incorrectly?
I think I need to re-evaluate my life choices to this point.
Didn’t realise it was case sensitive. I feel so stupid right now. Absolute life-saver.
A quick question about upgrades: will they be possible or am I stuck with OSX Catalina?
When Big Sure will be officially released would you mind updating your article with a few words about upgrade options?
In the past upgrades have been smooth. Normally you just need to update OpenCore, and then you can upgrade from the app store like on a real Mac.
I’ll add those details once Big Sur Retail comes out.
Hey. Got Catalina running on Proxmox 6.2 and looks to be good for the most part. Is an Intel i5-2400 w/ 8GB of RAM. VM is given 2 cores and 6GB. Is using OpenCore v5 as v6 wasn’t working. Was able to get USB passthrough working, but the main thing is once I get an iPad plugged in the whole VM freezes up and then I have to end up stopping and starting again. Keyboard and storage devices show fine and cause no trouble. Was wondering if you had any ideas.
Thanks
I haven’t tested a USB iDevice myself, but I suspect the problem is that when your device is connected to macOS, it attempts to re-enumerate as a different device ID, and this causes it to be disconnected from the emulated USB port. You can avoid this kind of issue if you can PCIe-passthrough an entire USB controller instead.
Sounds good. Will it need to be a USB 2.0 card since you mentioned 3.0 won’t work with Mac?
QEMU’s emulated USB 3 controller doesn’t work with macOS, but there are several choices of compatible USB 3 chipsets for PCIe-passthrough USB cards instead. On some motherboards you can even pass through your on-board USB controller. You can see what I’m using on my post here: https://www.nicksherlock.com/2018/11/my-macos-vm-proxmox-setup/
Awesome! Got the USB card installed and assigned it to the VM. iPad is plugged and and Mac is still running and device showing up. Great job finding a solution
Thanks
Updated successfully to 10.15.7; OpenCore 0.6.1 and standard Proxmox install.
I have 10.15.6 on Proxmox, now with the latest OpenCore v8, but I can’t get the update to 10.15.7.
I am asked to restart for the update, the restart goes without problems.
After logging in, the update window shows the message that my Catalina 10.15.6 system is up to date. A moment later the message changes again to show that an update to Catalina 10.15.7 is available for my system.
When you restart you must manually choose the MacOS Installer option from the boot menu to complete the installation.
Hello, Mr. Sherlock,
I’m an owner of a (died) iMac 27″ Late 2009 and I’m interested whether it is possible to pass the physical harddrive (SSD with APFS) to the opencore bootloader and whether it can be used as a bootdisk (I hope yes).
Thanks for Your advice
Markus
Yes, that should work perfectly! You can pass a physical disk to macOS by adding it to your VM config like so, you just need to find the file that represents your disk (named after the disk’s serial number normally):
sata1: file=/dev/disk/by-id/ata-ST3000NC002-00000_00000000
Note that you must ensure that the disk that you pass through is never mounted on any other VM or on the host at the same time that your Hackintosh guest is running. This is because two operating systems writing to the same disk concurrently will cause massive filesystem corruption, and Proxmox will not do anything to prevent you from doing this.
It would be best to keep OpenCore installed on a separate disk (i.e. don’t follow the blogpost instructions to ‘dd’ it onto the main disk), because this way your disk will retain its Apple EFI partition and so should remain bootable on a real Mac, if you ever decide to yank the drive out and put it back into a Mac.
Hey Nick, are you still using that tahiti gpu? Passing through a 7850 here and having a hard time getting fairplay drm working in safari. Without any boot flags, I get audio but solid red video. Tried shikigva=208 and got no display after boot. This was fixed with -raddvi, but drm still no go. Video is just blank and no audio either.
Tried 128 and results were the same as undefined: solid red video.
Thanks
Sorry, I’m not using it any more because it stopped booting in one of the Catalina point releases, and I couldn’t figure out the correct combination of WhateverGreen flags to get it working again, I upgraded to an RX 580 instead. It sounds like you had better success than I did!
Still a work in progress, but I got fairplay 1.0 working with shikigva=80. No dice for netflix in safari.
Makes sense based on the drm chart: https://github.com/acidanthera/WhateverGreen/blob/master/Manual/FAQ.Chart.md
if fairplay 1.0 is sw and netflix (fairplay 3.0 from the chart) is hw.
Although it’s strange then that not having shikigva declared wouldn’t work.
Either way, good enough for now. Thanks
Forgot to mention, this was previously working back in the mojave/clover days. From what I’m reading, it looks to be a new issue with catalina.
Hi, Nicholas, great guide!
I’ve got most of it working except for video passthrough. I get the IOConsoleUsers: gIOScreenLockState 3, hs 0, bs 0, now 0, sm 0x0 error.
My build is a 6700k with an ATI HD 7970 ghz edition. I know out of the box the 7970 didn’t support UEFI, so I flashed a new BIOS to it to add UEFI support. From there I followed everything in this guide + the other video card passthrough guide you have and I seem to still get the error. I’m not sure what else I should be trying at this point, but I’m a bit stuck.
Thanks,
Kevin
Is this card actually supported by macOS?
Did you add the Lilu and Whatevergreen kexts? They’re required to prevent the video card from turning itself off halfway through boot on some SMBIOSes, and fix other problems too.
It used to be compatible with my previous hackintoshes so I figured it would be compatible here. But I actually got it working earlier this morning and just ended up needing to change my BIOS to only use the 6700K’s iGPU and then it finally booted (seemed to suffer the same bug of being initialized by the host before the guest).
So now I get passthrough on the card and I get to the login screen after the Apple logo. Weirdly though my keyboard only works on the OpenCore bootloader screen, but when I get to the login screen after the Apple logo it stops working completely. Not sure where to go from here with it. I’ve passed through the keyboard and mouse as USB devices in the VM’s settings.
Thanks,
Kevin
Sorry, I got it figured out! For some reason just passing through the USB devices (even without USB3=1) didn’t work, and I just needed to do the PCIe passthrough.
Interesting, thanks for the update!
Yo, I’m getting this python error with fetch-macOS.py:
Invalid XML in content/downloads/37/41/001-04366/a6boefh8b6bee4k2x6v5lwyfjr7od2ica3/001-04366.English.dist
# ProductID Version Build Post Date Title
Traceback (most recent call last):
File “./fetch-macOS.py”, line 442, in
main()
File “./fetch-macOS.py”, line 434, in main
product_id = determine_version(args.version, product_info)
File “./fetch-macOS.py”, line 338, in determine_version
product_info[product_id][‘BUILD’],
KeyError: ‘BUILD’
Same here
I should note- I get the error on Mac, ubuntu, and armbian
Here’s a potential workaround since the script isn’t working.
Follow this guide to obtain the installer image (it’s a guide to installing Mac OS on unsupported Mac hardware):
http://dosdude1.com/catalina/
Then follow this guide to create the offline image:
https://www.nicksherlock.com/building-an-offline-installer-iso-for-catalina/
Really impressive work here. I have everything running with the exception of I cannot log into iMessage. I have logged into iCloud with no issues. I have logged into the App Store, but it looks like it may not download or install apps.
Any thoughts on what direction I should look?
I got that working by following these instructions to mark my Ethernet as builtin:
https://dortania.github.io/OpenCore-Post-Install/universal/iservices.html#fixing-en0
I had already set up a serial number previously so that might have helped too.
I’ve followed the guide (using the offline disk method) and when I boot the machine I get the option to install from the ‘macOS Base System.’ I select it, and when the install starts the black screen flashes a white apple logo, and then immediately goes to a crossed out circle. I’ve checked all the settings, recreated a new machine to be sure, etc., but get the same result. I’m using 10.15.7. Any suggestions? TIA!
Roll back to my OpenCore v5 release if you were using the newer one
That was is, thank you! Sorry if I missed it in the earlier comments.
Hello. I got most things to work using this guide. However, I’m at a loss on how to get audio to work. I have a X570 Gigabyte motherboard with Ryzen 3900X. Can you teach me on how to add audio? My idea was to get an IOGEAR Bluetooth 4.0 USB Micro Adapter (GBU521) and connect a bluetooth speaker but there is no bluetooth item in the systems preference.
Hey Nick,
Thanks a lot for this amazing guide. As a complete noob, I was up and running in less than an hour. Everything worked perfectly fine over VNC and macOS’ screen sharing until I tried passingthrough my RX 570 GPU (followed your personal setup). Here’s my VM conf:
args: -device isa-applesmc,osk=”…” -smbios type=2 -device usb-kbd,bus=ehci.0,port=2 -cpu$
balloon: 0
bios: ovmf
boot: cdn
bootdisk: sata0
cores: 4
cpu: Penryn,hidden=1,flags=+pcid
efidisk0: local-lvm:vm-101-disk-1,size=4M
hostpci0: 06:00,pcie=1,x-vga=1
machine: q35
memory: 4096
name: catalina
net0: vmxnet3=xxx,bridge=vmbr0,firewall=1
numa: 0
ostype: other
sata0: local-lvm:vm-101-disk-0,cache=unsafe,discard=on,size=35G,ssd=1
scsihw: virtio-scsi-pci
sockets: 1
usb0: host=30fa:2251
usb1: host=18f8:0f99
vga: vmware
Right after starting the VM, I see Apple Boot logo along with the progress bar in noVNC Console and the display connected to my RX 570 (thru DisplayPort) remains blank. After a few seconds, I’m seeing my macOS Desktop background on the external display and the progress bar in noVNC is stuck at ~50%.
update-grub works out fine, but update-initramfs -k all -u throws:
update-initramfs: Generating /boot/initrd.img-5.4.34-1-pve
W: Possible missing firmware /lib/firmware/amdgpu/navi12_vcn.bin for module amdgpu
W: Possible missing firmware /lib/firmware/amdgpu/arcturus_vcn.bin for module amdgpu
W: Possible missing firmware /lib/firmware/amdgpu/navi12_smc.bin for module amdgpu
W: Possible missing firmware /lib/firmware/amdgpu/arcturus_smc.bin for module amdgpu
Running hook script ‘zz-pve-efiboot’..
Re-executing ‘/etc/kernel/postinst.d/zz-pve-efiboot’ in new private mount namespace..
No /etc/kernel/pve-efiboot-uuids found, skipping ESP sync.
I’d greatly appreciate any help, if you see where I’m going wrong.
Thanks!!
Those initramfs warnings are fine, you can ignore those.
It looks like macOS is setting your emulated video card (the NoVNC stream) as your primary display and the RX570 as the secondary, you can probably move your mouse cursor to the right and it’ll appear over there on the RX (you can use the macOS Displays settings and drag the menu bar from one screen to the other to elect a new primary display).
Set “vga: none” to disable the emulated video altogether and your RX 570 will become the primary.
It worked!! Thanks…
Did you tried to start docker?
For me everything seems to work except for docker.
I tries to spin up but never finishes. Maybe you have an idea?
(Intel i9).
I haven’t been able to get Docker working either, not sure why as I do have nested virtualisation enabled. It seems to generate a ton of log files using the diagnostic mode, so maybe someone with more experience will be able to figure it out from those.
In the Docker docs they say you can check if virtualization should work with “sysctl kern.hv_support” and that “… your CPU supports VT-x, VT-d, and VT-x with EPT (all three virtualization features must be supported)”.
Since docker runs in a vm (other than linux) an virtualization works (tested with virtual box and Parallels) I’m not quite sure where to look now.
If I try to read trough the debug logs of docker. Think those are the cause of the problem
“msg=”com.docker.driver.amd64-linux -addr fd:3 -debug (pid: 2099): stderr: 2020/10/23 10:47:15 WARN : hyperkit: failed to read stdout: EOF\n”
msg=”dial unix docker.raw.sock: connect: no such file or directory”
I`ve also tried a plain macOS installation but same results. Hope anyone can help.
I have just installed Docker Desktop for Mac and it worked. No problems at all.
cat /sys/module/kvm_intel/parameters/nested
Y
vm_id.conf: args: -cpu host
(but Docker worked when it was Penryn as well 🙂 ).
(OpenCore v9)
For my first installation I used the V8 release but it failed. So I then used the V5 release and it was OK. Then, after successful installation, I replaced V5’s files (BOOTx64.efi, OpenCore.efi, OpenRuntime.efi and config.plist) with the V8 release files and the system started and is working fine.
Thank you Nickolas for your excellent tutorial!
I want to add that finally I upgraded OC from V5 to V8 (copied all files from V8) and it works.
So I did this before when 10.15.5 and OpenCore 5 a few months back all worked file.
Now I am trying to make a New Catalina as new Xcode and OS what more space. Everything works to the point of Install the OS. After I click the Continue button. I get this error after a minute or so.
The recovery server could not be contacted.
I am behind a proxy is that my problem?
I tried to do the Step “need to build an offline installer instead”
But it never see the Image when it try’s to boot.
Any help would be great thanks. Just wish I could resize my Volumes but Apple doesn’t allow this.
Yep you need unrestricted access to the Internet to use the default ‘recovery’ based installer.
If your offline installer never appears as a boot option then it’s likely not formatted GUID (OpenCore doesn’t support MBR volumes), but this shouldn’t happen if you built it using my script. Did you remember to edit media=cdrom into cache=unsafe for it?
Thanks for the fast reply
by the way your link to the file is bad for the offline. But I did find it in your git repo on GitHub.com
I will try that right now
Yep I noticed that yesterday and fixed it, make sure you got the one that builds a dmg and not the other one that builds an ISO, that might have been the cause of your issue.
I got your script and then ran it dmg was created
hdiutil convert /Users/build/Desktop/Catalina.dmg -format RdWr -o Catalina-installer.iso
hdiutil: convert failed – image/device is too large
doing a UDTO instead of RdWr didn’t get me a error but it did not work.
The workaround I did was boot my old image and add a larger second drive and then clone the volume with carbon carbon cloner and dd the OpenCore partition and it is working now.
Thanks for the help you are the greatest.
You never need to convert the dmg to an iso using hdiutil when you use this script:
https://raw.githubusercontent.com/thenickdude/OSX-KVM/master/scripts/create_dmg_catalina.sh
You just rename it from .dmg to .iso
Glad to hear it’s working now.
First of all, thanks so much for this guide. I had no issues whatsoever getting Catalina installed and it runs quite well!
Quick question for you though. I wanted to try installing an older MacOS – 10.11 El Capitan and figured I could just follow this guide but use the El Capitan ISO instead. For some reason OpenCore starts up but doesn’t show anything to install. Just the UEFI Shell, Shutdown, and Reset NVRAM options. Do you have any advice for getting El Capitan installed using this guide with OpenCore?
The main limitation of OpenCore is that it doesn’t support disks formatted MBR, they need to be GPT/GUID instead. You might adjust your El Capitan build script to look at more like the Catalina one I have, assuming that you’re building an “offline installer”.
the OSX key blog link is not working any more, I can’t find the smc_read.c , and I googled this file, there are a lot different version and after go through their code, the command line give me this result:
-removed-
any suggestion on how to resolve this case?
Thanks
That’s it, that’s the OSK, you got it.
Good afternoon.
I have proxmox 6.2 and host on AMD Ryzen 7 3700
The installation is successful, but there is no boot from the main disk, or rather the machine stops. I see errors in the console
[Thu Nov 5 18:23:06 2020] kvm_get_msr_common: 62 callbacks suppressed
[Thu Nov 5 18:23:06 2020] kvm [13943]: vcpu2, guest rIP: 0xffffff80136bfd75 ignored rdmsr: 0x60d
[Thu Nov 5 18:23:06 2020] kvm [13943]: vcpu2, guest rIP: 0xffffff80136bfd75 ignored rdmsr: 0x3f8
[Thu Nov 5 18:23:06 2020] kvm [13943]: vcpu2, guest rIP: 0xffffff80136bfd75 ignored rdmsr: 0x3f9
[Thu Nov 5 18:23:06 2020] kvm [13943]: vcpu2, guest rIP: 0xffffff80136bfd75 ignored rdmsr: 0x3fa
[Thu Nov 5 18:23:06 2020] kvm [13943]: vcpu2, guest rIP: 0xffffff80136bfd92 ignored rdmsr: 0x630
[Thu Nov 5 18:23:06 2020] kvm [13943]: vcpu2, guest rIP: 0xffffff80136bfd92 ignored rdmsr: 0x631
[Thu Nov 5 18:23:06 2020] kvm [13943]: vcpu2, guest rIP: 0xffffff80136bfd92 ignored rdmsr: 0x632
[Thu Nov 5 18:23:06 2020] kvm [13943]: vcpu2, guest rIP: 0xffffff80136bfd92 ignored rdmsr: 0x619
[Thu Nov 5 18:23:06 2020] kvm [13943]: vcpu2, guest rIP: 0xffffff80136bfd92 ignored rdmsr: 0x61d
[Thu Nov 5 18:23:06 2020] kvm [13943]: vcpu2, guest rIP: 0xffffff80136bfd92 ignored rdmsr: 0x621
[Thu Nov 5 18:23:12 2020] kvm_get_msr_common: 98 callbacks suppressed
[Thu Nov 5 18:23:12 2020] kvm [13943]: vcpu0, guest rIP: 0xffffff80136bfd75 ignored rdmsr: 0x60d
[Thu Nov 5 18:23:12 2020] kvm [13943]: vcpu0, guest rIP: 0xffffff80136bfd75 ignored rdmsr: 0x3f8
[Thu Nov 5 18:23:12 2020] kvm [13943]: vcpu0, guest rIP: 0xffffff80136bfd75 ignored rdmsr: 0x3f9
[Thu Nov 5 18:23:12 2020] kvm [13943]: vcpu0, guest rIP: 0xffffff80136bfd75 ignored rdmsr: 0x3fa
[Thu Nov 5 18:23:12 2020] kvm [13943]: vcpu0, guest rIP: 0xffffff80136bfd92 ignored rdmsr: 0x630
[Thu Nov 5 18:23:12 2020] kvm [13943]: vcpu0, guest rIP: 0xffffff80136bfd92 ignored rdmsr: 0x631
[Thu Nov 5 18:23:12 2020] kvm [13943]: vcpu0, guest rIP: 0xffffff80136bfd92 ignored rdmsr: 0x632
[Thu Nov 5 18:23:12 2020] kvm [13943]: vcpu0, guest rIP: 0xffffff80136bfd92 ignored rdmsr: 0x619
[Thu Nov 5 18:23:12 2020] kvm [13943]: vcpu0, guest rIP: 0xffffff80136bfd92 ignored rdmsr: 0x61d
[Thu Nov 5 18:23:12 2020] kvm [13943]: vcpu0, guest rIP: 0xffffff80136bfd92 ignored rdmsr: 0x621
[Thu Nov 5 18:23:37 2020] kvm[13943]: segfault at 4 ip 0000562ff332d277 sp 00007ff7b6d52e98 error 6 in qemu-system-x86_64[562ff3100000+4af000]
[Thu Nov 5 18:23:37 2020] Code: 44 00 00 49 8b 84 05 70 09 00 00 eb b0 66 0f 1f 44 00 00 c3 66 66 2e 0f 1f 84 00 00 00 00 00 0f 1f 40 00 48 8b 87 a8 09 00 00 70 04 c3 0f 1f 44 00 00 f6 05 5a f0 76 00 04 75 07 c3 66 0f 1f
any ideas?