
macOS 12 Monterey is now available! If you want to install that instead, check out my newer guide!
This tutorial for installing macOS Big Sur using OpenCore has been adapted for Proxmox from Kholia’s OSX-KVM project and Leoyzen’s OpenCore configuration for KVM. You can get the full sourcecode on my GitHub here.
Requirements
I’ll assume you already have Proxmox 6 installed. You also need a real Mac available in order to fetch the OSK key.
Your Proxmox host computer’s CPU must support SSE 4.2, so for Intel your CPU must be at least as new as Nehalem, which was the first CPU generation to bear the “Core” i5/i7 branding. Older CPUs will cause the finder to repeatedly crash after installation completes (with an Illegal Instruction exception in the graphics code).
Modern AMD CPUs also support SSE 4.2 and will work with this guide.
First step: Create an installation ISO
Download my copy of the OSX-KVM repository using the download button, and unzip it:
https://github.com/thenickdude/OSX-KVM
First we need to install some build requirements. If you will be building the installer ISO on macOS, open up the Terminal and run this command to install the commandline tools:
xcode-select --installIf you’re building the ISO on Linux, you instead need to run this command (these are the package names for Ubuntu or similar distributions, they may need adjustment on other distributions):
sudo apt install qemu-utils make
Now in the Terminal, from the root of OSX-KVM, run:
cd scripts/bigsur
make BigSur-recovery.img
This will download the Big Sur installer from Apple’s software distribution servers and build a BigSur-recovery.img file for you. Upload this file to your Proxmox’s ISO store directory (typically /var/lib/vz/template/iso). Although we’re putting it in the ISO directory so that we can use it with Proxmox’s ISO picker later, this a raw disk image rather than a true ISO.
If you’re building the installer on macOS, you can build a full installer instead of just a recovery, which will mean that macOS won’t have to download Big Sur files during installation, and so won’t require an Internet connection. Simply ask it to build BigSur-full.img instead:
cd scripts/bigsur
make BigSur-full.img
This option is not available when building the installer on Linux.
Prepare an OpenCore image
Download the OpenCore.iso.gz file from the newest release in my repository (that says it’s Big Sur compatible), double click it to unpack it, and upload it to Proxmox’s ISO store at /var/lib/vz/template/iso. Although it has a .iso file extension, this is actually a hard disk image. (You need v12 or newer for Big Sur 11.3 or newer)
Fetch the OSK authentication key
macOS checks that it is running on real Mac hardware, and refuses to boot on third-party hardware. You can get around this by reading an authentication key out of your real Mac hardware (the OSK key). Save the first block of C code from this page as smc_read.c. In a command prompt, change into the same directory as that file and run:
xcode-select --install # If you don't already have gcc
gcc -o smc_read smc_read.c -framework IOKit
./smc_read
It’ll print out the 64 character OSK for you. Make a note of it.
Every Mac uses the same OSK, so don’t be surprised that it doesn’t look like a random string!
Create the VM
From the Proxmox web UI, create a new virtual machine as shown below.
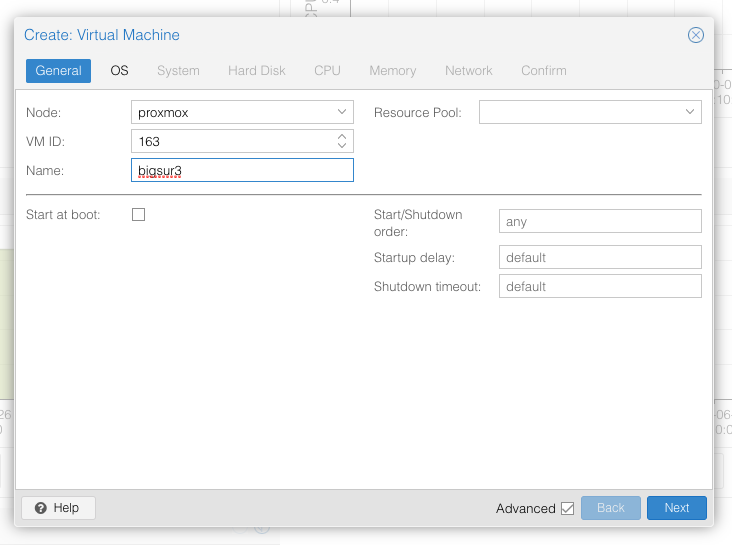
Keep a note of your VM’s ID 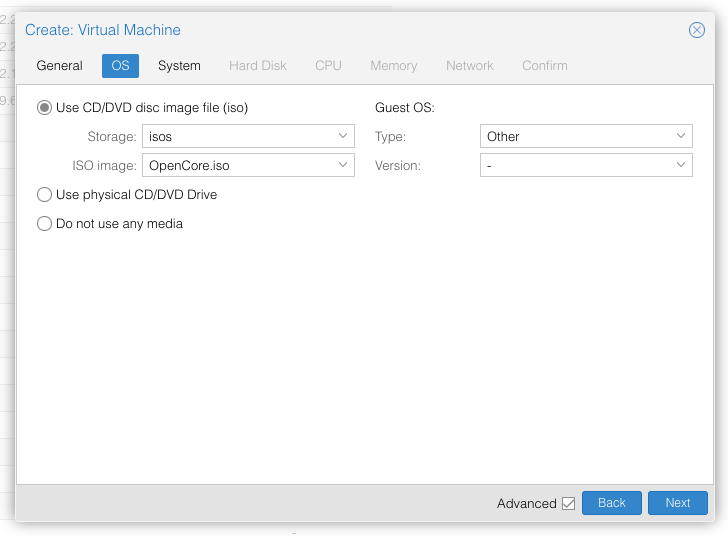
Select the OpenCore ISO you uploaded and set OS type to “Other” 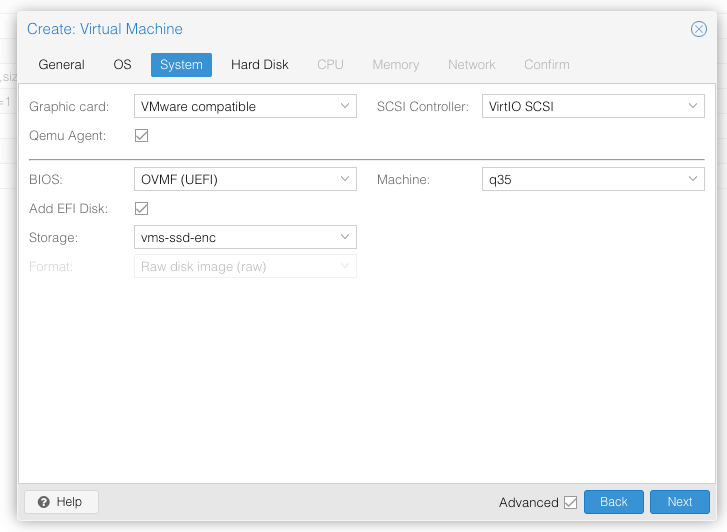
Set graphics to “VMWare Compatible”, set BIOS to OVMF (UEFI), set Machine to Q35, tick QEMU Agent, tick Add EFI Disk and pick storage for it. On Proxmox 7 you must untick “pre-enroll keys” 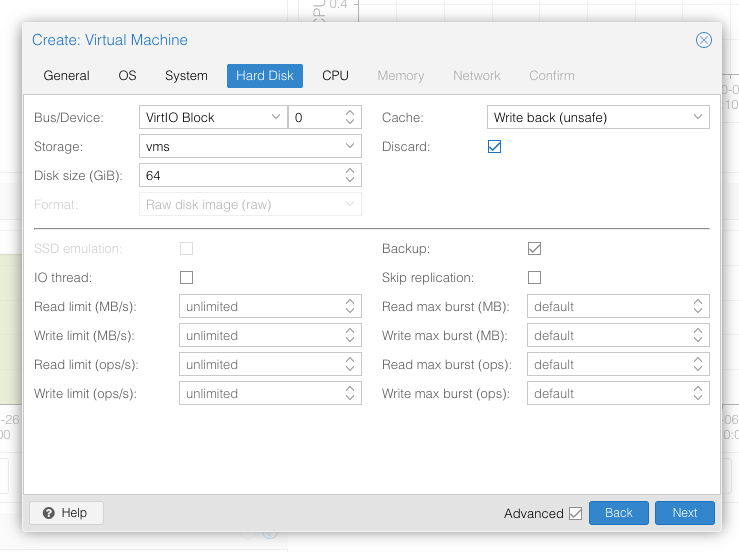
Set the size of the hard disk (64GB or greater, 32GB is too small). Attach it to virtio0. Enable discard to support TRIM. 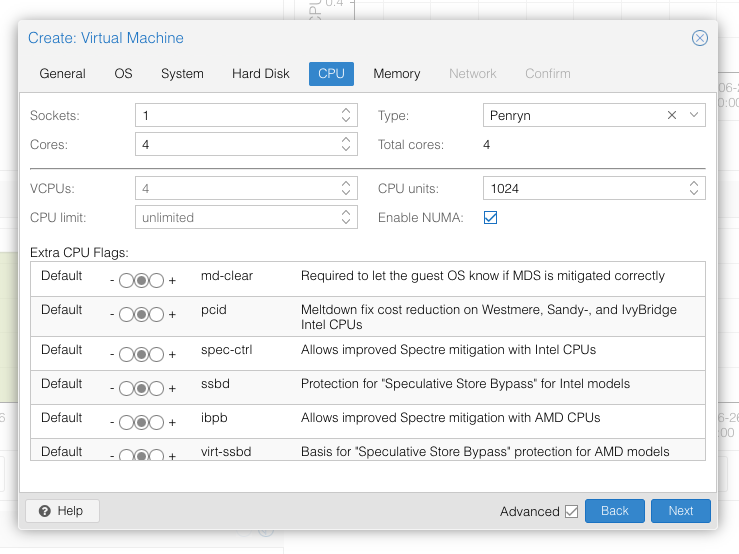
Set the number of cores for the VM, use a power of two (e.g. 1, 2, 4, 8). Set the CPU to Penryn. 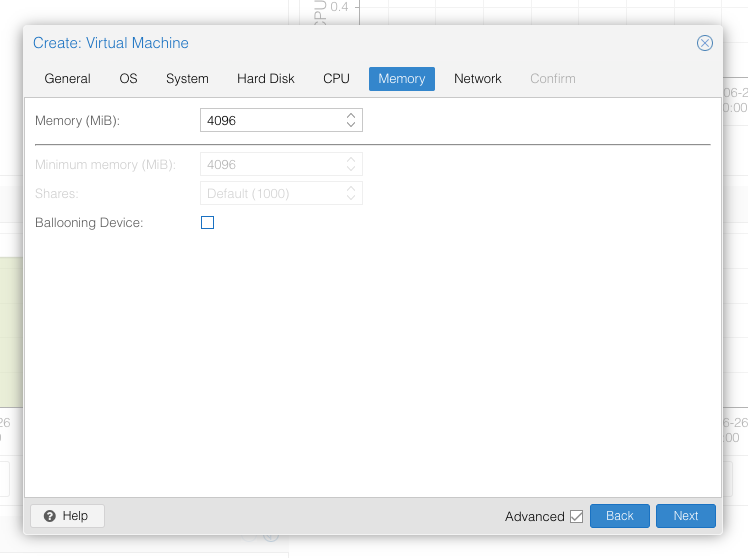
I chose a memory size of 4096MB 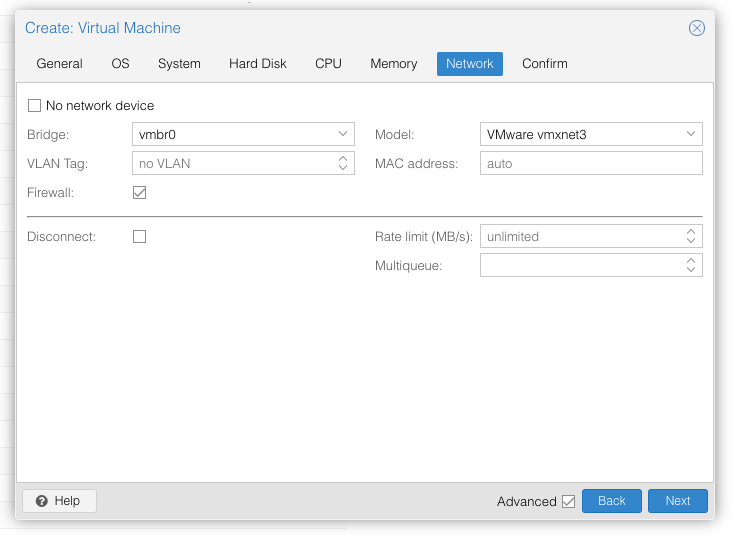
Choose VMWare vmxnet3 for the network model
In the Options page for the VM, ensure that “use tablet for pointer” is set to “Yes”.
In the Hardware page for the VM, add a second DVD drive at IDE0, set it to use your BigSur-full.img or BigSur-recovery.img.
Don’t try to start the VM just yet. First, SSH into your Proxmox server so we can make some edits to the configuration files.
Edit /etc/pve/qemu-server/YOUR-VM-ID-HERE.conf (with nano or vim). Add this line, being sure to substitute the OSK you extracted earlier into the right place:
args: -device isa-applesmc,osk="THE-OSK-YOU-EXTRACTED-GOES-HERE" -smbios type=2 -device usb-kbd,bus=ehci.0,port=2
A USB keyboard is added here because macOS doesn’t support QEMU’s default PS/2 keyboard. Ensure the args are all on a single line!
For Proxmox 7 with QEMU 6.1 or newer, also add “-global ICH9-LPC.acpi-pci-hotplug-with-bridge-support=off”.
We also need to add a -cpu argument. If your host CPU is Intel, add this to the end of the “args” line:
-cpu host,kvm=on,vendor=GenuineIntel,+kvm_pv_unhalt,+kvm_pv_eoi,+hypervisor,+invtsc
This will pass through all of the features that your CPU supports. OpenCore’s config will pretend to macOS that the CPU’s model name is Penryn for compatibility.
If your host CPU is AMD, or the above argument doesn’t work for you, use this more-compatible alternative:
-cpu Penryn,kvm=on,vendor=GenuineIntel,+kvm_pv_unhalt,+kvm_pv_eoi,+hypervisor,+invtsc,+pcid,+ssse3,+sse4.2,+popcnt,+avx,+avx2,+aes,+fma,+fma4,+bmi1,+bmi2,+xsave,+xsaveopt,check
This pretends that your CPU is Penryn, which will keep macOS happy even if your host CPU is AMD, and adds a bunch of newer required and optional CPU features on top. Features that your host CPU doesn’t support will be ignored (a warning will be printed to the console during launch with qm start 1xx), but note that macOS won’t work without SSE4.2 support.
Now find the lines that define the two “ISOs” (ide0 and ide2), and remove the “,media=cdrom” part from them. Add “,cache=unsafe” in its place. This will treat these as hard disks rather than DVD drives.
Save your changes, return to the Options tab, and change the boot order to put IDE2 (the OpenCore image) first. Your final VM configuration file should resemble this:
args: -device isa-applesmc,osk="..." -smbios type=2 -device usb-kbd,bus=ehci.0,port=2 -cpu host,kvm=on,vendor=GenuineIntel,+kvm_pv_unhalt,+kvm_pv_eoi,+hypervisor,+invtsc
balloon: 0
bios: ovmf
bootdisk: ide2
cores: 4
cpu: Penryn
efidisk0: vms:vm-100-disk-1,size=1M
ide0: isos:iso/BigSur-full.img,cache=unsafe,size=2094688K
ide2: isos:iso/OpenCore-v10.img,cache=unsafe,size=150M
machine: q35
memory: 4096
name: bigsur
net0: vmxnet3=...,bridge=vmbr0,firewall=1
numa: 1
ostype: other
virtio0: vms:vm-100-disk-0,cache=unsafe,discard=on,size=64G
scsihw: virtio-scsi-pci
smbios1: uuid=...
sockets: 1
vga: vmware
Configure Proxmox
On Proxmox, run “echo 1 > /sys/module/kvm/parameters/ignore_msrs” to avoid a bootloop during macOS boot. To make this change persist across Proxmox reboots, run:
echo "options kvm ignore_msrs=Y" >> /etc/modprobe.d/kvm.conf && update-initramfs -k all -u
Install Big Sur
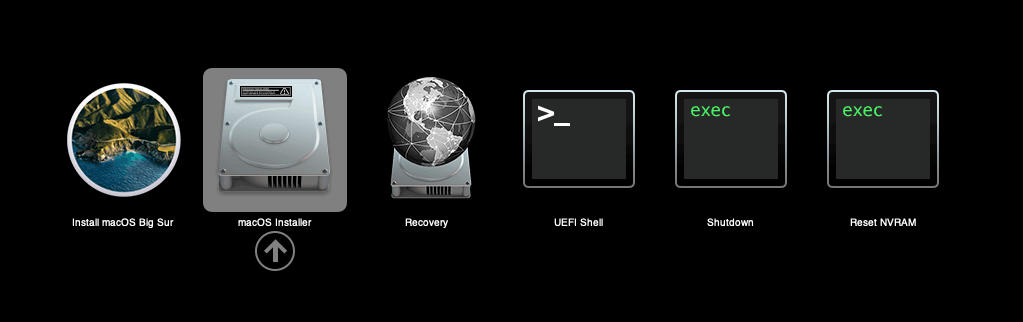
Now start up your VM, it should boot to the OpenCore boot picker:
Press enter to boot the “Install macOS Beta” entry and the installer should appear.
If you built a recovery installer, the icon will instead be an image of a hard disk and be labelled “MacOS Base System”.
Our virtual hard drive needs to be erased/formatted before we can install to it, so select the Disk Utility option. Follow the steps below to format the disk:
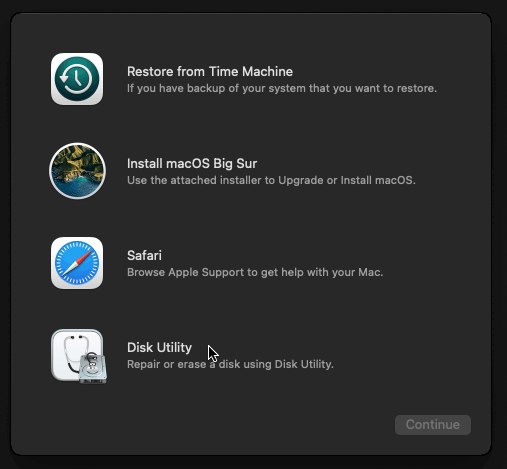
Select Disk Utility 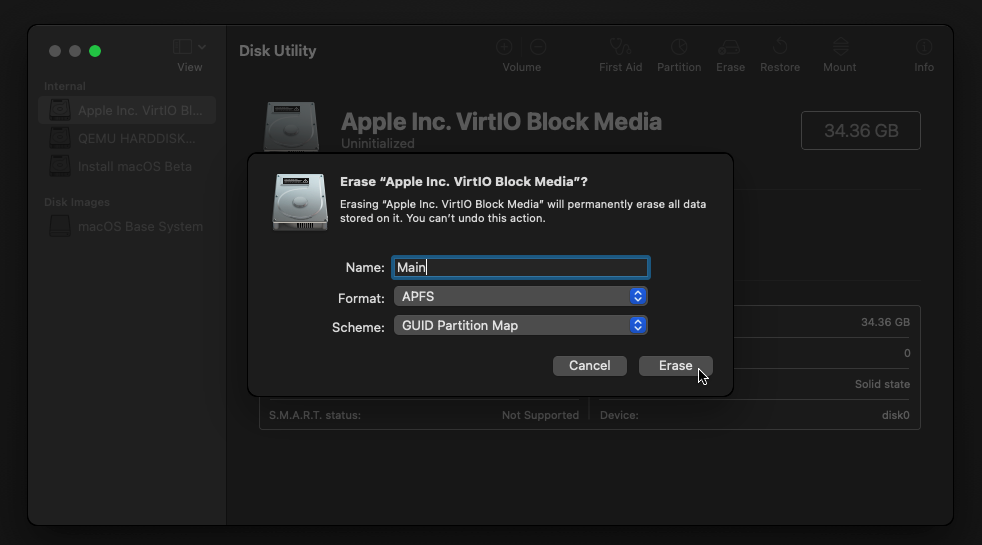
Erase the main disk (it’ll appear as VirtIO Block Media). Choose APFS. I called mine “Main”. Avoid “Encrypted” at this stage because I have not tested that scenario
Now we’re ready to begin installation!

Install macOS 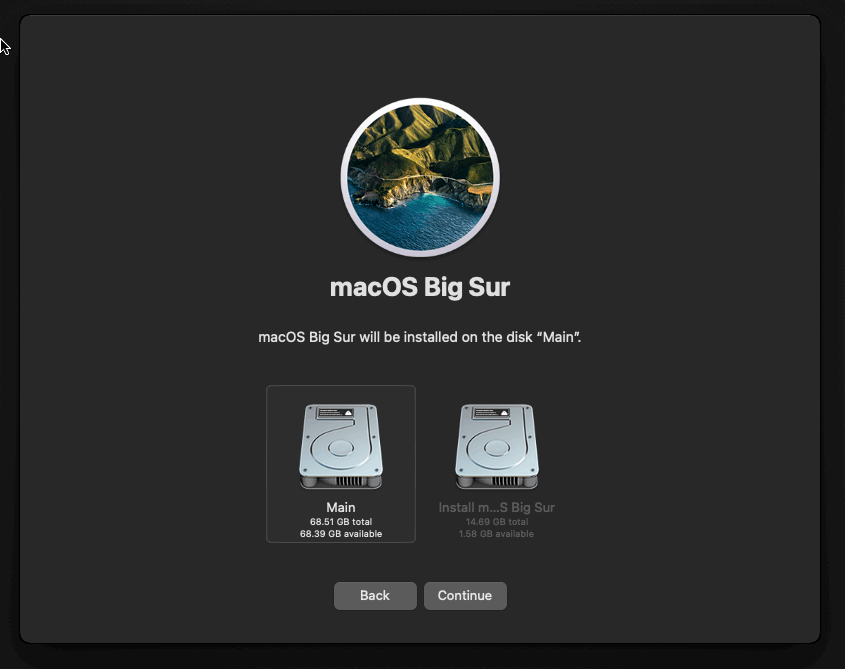
Choose the disk you erased 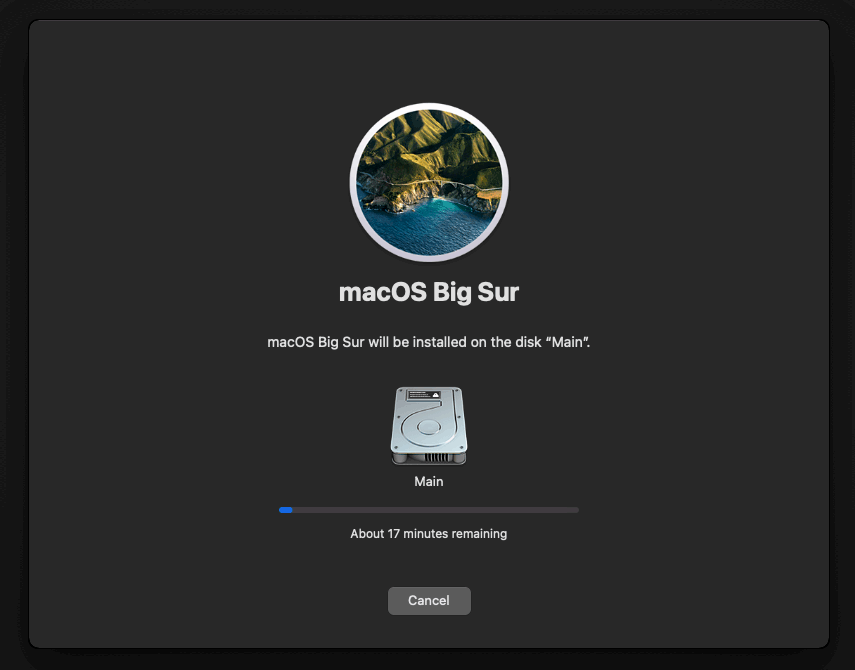
It’s installing!
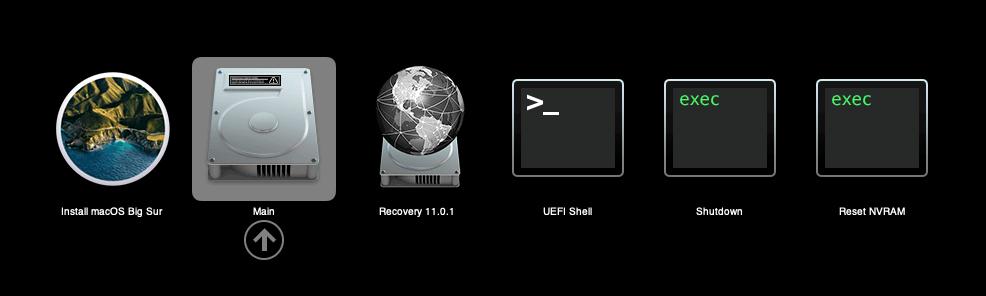
After the first stage of installation, the VM will reboot 3 or 4 times in quick succession, and each time you must pick the “macOS Installer” entry (the second one here, with the hard disk icon) to continue installation. It will not be selected for you automatically:
If your keyboard isn’t responding on this screen, exit the Console tab in Proxmox and re-enter it. If you get a “prohibited” sign like this appearing, hit the Reset button on the VM to try again:

Now the installation is complete and the macOS Installer entry disappears, so pick the name of your main disk to boot (mine’s called Main).
Answer the initial install questions, and you’ll be logged on! Note that you might want to hold off on logging into your Apple ID until you’ve configured your Mac’s serial number in OpenCore.

Note that it will be really sluggish for a few minutes after the first boot while the system performs housekeeping tasks.
Make the OpenCore install permanent
We’re currently booting using OpenCore from the attached OpenCore ISO. Let’s install that to the hard drive instead. Pop open Terminal and run “diskutil list” to see what drives we have available.
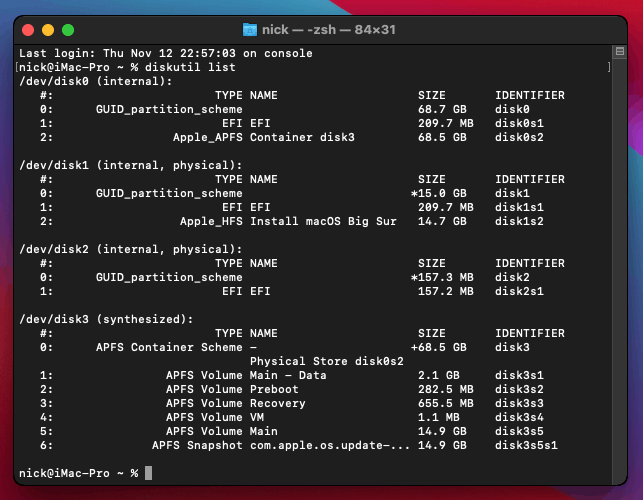
Use “sudo dd if=<source> of=<dest>” to copy the “EFI” partition from the OpenCore CD and overwrite the EFI partition on the hard disk. The OpenCore CD is the small disk (~150MB) that only has an EFI partition on it, and the main hard disk is the one with the large (>30GB) Apple_APFS “Container” partition on it.
In my case these EFI partitions ended up being called disk2s1 and disk0s1 respectively, so I ran “sudo dd if=/dev/disk2s1 of=/dev/disk0s1” (note that if you get these names wrong, you will overwrite the wrong disk and you’ll have to start the installation over again!).
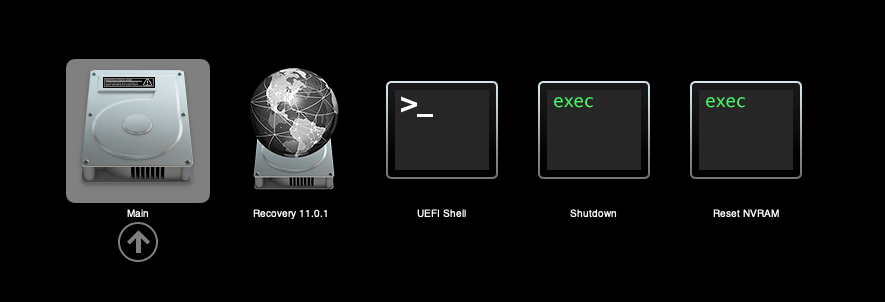
Now shut down the VM, and remove both the OpenCore and the Big Sur installer drives from the Hardware tab. On the Options tab, edit the boot order to place your virtio0 disk as the first disk. Boot up. If everything went well, you should see the OpenCore boot menu, and you can select your “Main” disk to boot Big Sur:
Sleep management
I found that I was unable to wake Big Sur from sleep using my mouse or keyboard. If you encounter the same problem, you can either disable system sleep in Big Sur’s Energy Saver settings to avoid the issue, or you can manually wake the VM up from sleep from Proxmox by running:
qm monitor YOUR-VM-ID-HERE
system_wakeup
quit
Editing your OpenCore/EFI settings
The Configuration.pdf that explains the OpenCore config.plist file can be found along with the OpenCore release on my GitHub.
To mount your EFI partition in macOS so you can edit your config.plist, first check the “identifier” of your EFI partition in the terminal:
~$ diskutil list
/dev/disk0 (external, physical):
   #:                   TYPE NAME              SIZE       IDENTIFIER
   0:  GUID_partition_scheme                  *512.1 GB   disk0
   1:                    EFI EFI               209.7 MB   disk0s1
   2:             Apple_APFS Container disk1   511.9 GB   disk0s2
Then you can mount it like so:
sudo mkdir /Volumes/EFI
sudo mount -t msdos /dev/disk0s1 /Volumes/EFI
Now you can edit /Volumes/EFI/OC/config.plist with your favourite text editor to make your changes. (TextEdit is not a great choice because it likes to insert curly quotes into the file and otherwise break things, there are some dedicated plist editors available such as XCode).
If you’re unable to boot macOS, you can edit the config.plist using the “UEFI Shell” option in the OpenCore boot menu instead.
Enter “FS0:” and press enter to open up the first available filesystem, then run “edit EFI\OC\config.plist” (if the file isn’t found, try switching to another filesystem like fs1:). When you’re done editing, press control+Q to exit, “Y” to save, then run “exit” to return to the OpenCore menu. You need to reboot for your changes to take effect.
If you prefer, you can edit config.plist from the comfort of your Proxmox host instead. If you’re booting from an attached OpenCore.img file, you can mount that file as a disk on the host. If you’re booting from the VM’s disk instead, it must be in raw format in order to be mounted (e.g. typical LVM or ZFS usage) rather than qcow2.
# Mount an OpenCore image:
losetup --partscan /dev/loop0 /var/lib/vz/template/iso/OpenCore-v11.img
# or a VM boot disk:
losetup --partscan /dev/loop0 /dev/zvol/tank/vms/vm-100-disk-1

mount /dev/loop0p1 /mnt
Now the contents of that first partition are available in /mnt, so you can edit /mnt/EFI/OC/config.plist in your favourite editor. When you’re done, do this to unmount the disk:
umount /mnt
losetup --detach /dev/loop0
Automatic boot
In config.plist, you can set Misc/Boot/Timeout to a non-zero value to allow the default boot option be chosen automatically after that delay in seconds. I’ve disabled this by default because it causes the installer ISO to re-enter its main menu instead of continuing the second stage of installation.
You can set the default boot option by pressing control+enter on it.
Verbose boot
To boot macOS in Verbose mode to diagnose boot problems, at the OpenCore boot menu press Cmd+V before pressing enter to boot macOS (you don’t need to hold it down).
If there is a kernel panic during boot and it reboots too quickly to be read, edit config.plist to add “debug=0x100” to the kernel arguments.
Changing screen resolution
To change macOS’ screen resolution, you need to edit the UEFI/Output/Resolution setting in config.plist, the default is 1920×1080@32.
You should be able to change this to any of the modes that the system OVMF menu offers (hit F2 at the start of guest boot and choose “Device Manager/OVMF Platform Configuration” to see which resolutions are available).
Video performance
Because there is no guest video acceleration available for macOS, video performance is poor.
In Google Chrome in the guest you will need to toggle off the setting to “use hardware acceleration when available” to improve issues with elements not being drawn or flickering (especially video). Safari may be a better choice.
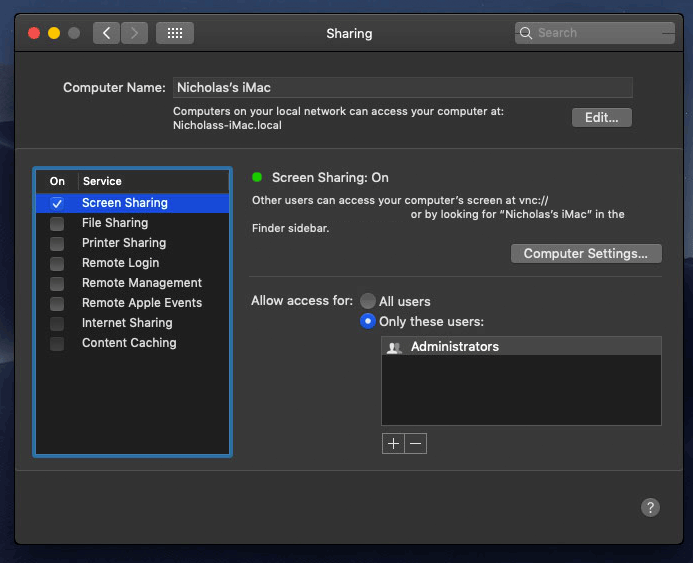
macOS’s built in “Screen Sharing” feature offers dramatically better framerates and latency than Proxmox’s browser-based VNC console, so if you have a real Mac to act as a viewing console, you can enable that in the VM’s “Sharing” settings and connect to the VM using the Screen Sharing app from your Mac instead:
Apparently Screen Sharing is also compatible with VNC clients like RealVNC, so you should be able to connect to it from Linux or Windows consoles using RealVNC.
The real magic bullet for video performance is to pass through a compatible video card using PCIe passthrough (though note that Big Sur, like Catalina, does not support most NVidia cards). This offers near-native performance. You can read more about how I’m using PCIe passthrough on my own installation here.
USB passthrough
Since I want to use this as my primary computer, I want to use a USB keyboard and mouse plugged directly into Proxmox, rather than sending my input through the web VNC console.
Proxmox has good documentation for USB passthrough. Basically, run “qm monitor YOUR-VM-ID-HERE”, then “info usbhost” to get a list of the USB devices connected to Proxmox:
qm> info usbhost
 Bus 3, Addr 12, Port 6, Speed 480 Mb/s
 Class 00: USB device 8564:1000, Mass Storage Device
 Bus 3, Addr 11, Port 5.4, Speed 12 Mb/s
 Class 00: USB device 04d9:0141, USB Keyboard
 Bus 3, Addr 10, Port 5.1.2, Speed 12 Mb/s
 Class 00: USB device 046d:c52b, USB Receiver
 Bus 3, Addr 9, Port 14.4, Speed 12 Mb/s
 Class 00: USB device 046d:c227, G15 GamePanel LCD
 Bus 3, Addr 8, Port 14.1, Speed 1.5 Mb/s
 Class 00: USB device 046d:c226, G15 Gaming Keyboard
In this case I can add my keyboard and mouse to USB passthrough by quitting qm, then running:
qm set YOUR-VM-ID-HERE -usb1 host=04d9:0141
qm set YOUR-VM-ID-HERE -usb2 host=046d:c52b
This saves the devices to the VM configuration for you. You need to reboot to have the new settings apply. Note that the emulated USB3 device doesn’t work with macOS, so don’t set “usb3=1”.
You can also pass through USB devices by passing through an entire USB controller using Proxmox’s PCIe passthrough feature, which gives much better compatibility.
FileVault
FileVault now works with OpenCore, so you can encrypt your boot disk by using the option in macOS’ system security preferences. But be certain to keep a copy of your recovery key and keep your backups up to date.
Fixing “guest boots to UEFI shell”
If your guest ends up booting to the UEFI shell instead of showing the OpenCore boot menu, especially if you’ve just updated OpenCore to a new version, you’ll need to edit the guest’s UEFI boot entries to fix this.
At the very start of guest boot, hit F2 to enter guest UEFI settings.
First we’ll remove the old entries. Choose the Boot Maintenance option, then Boot Options -> Delete Boot Option. Use the spacebar to tick any old Clover or OpenCore entries (avoid ticking the EFI Internal Shell option, you want to keep that!). Select “Commit Changes and Exit”.
Now we’ll add the correct entry for OpenCore back in. Select Add Boot Option. Navigate through the device tree to EFI/OC/OpenCore.efi (use EFI/BOOT/BOOTx64.efi instead on my “OpenCore v10” and older) and select it, name this new option “OpenCore” or similar. Again Commit Changes and Exit.
Go to the Change Boot Order and move OpenCore to the top. Commit Changes and Exit.
Now back out to the main menu and choose Reset, and you should successfully boot into OpenCore this time.
Fixing iMessage
iCloud and the App Store should already be working for you, but for iMessage support you must follow these steps to mark your network adapter as built-in:
https://dortania.github.io/OpenCore-Post-Install/universal/iservices.html#fixing-en0
Disabling SIP (System Integrity Protection)
You can disable SIP by selecting the Recovery option from the OpenCore boot menu, then use the top menu to open the Terminal and run “csrutil disable”. Then reboot.
This may be needed to run unsigned kexts or perform other hacks.
Upgrading OpenCore
Sometimes you need to update OpenCore to a new release in order to support a new macOS update. I’ll assume you don’t have any customisations to config.plist you want to save.
First take a snapshot! It’s great to be able to roll back if something goes wrong.
If you’re still able to boot macOS, you can update it from within the guest. Follow the instructions in the “Editing your OpenCore/EFI settings” section to mount your EFI partition. Then you can delete the EFI folder in there and replace it with the one from the OpenCoreEFIFolder.zip file from my OpenCore release (you’ll probably need to empty the trash to make room for the new folder). You’re done!
If you aren’t able to boot macOS, unpack and upload the new OpenCore ISO to Proxmox’s ISO store instead. Add a new CD drive to the VM that uses that ISO. Then in Proxmox’s terminal edit the VM’s config (in /etc/pve/qemu-server) to replace “media=cdrom” with “cache=unsafe” for the OpenCore drive. Now on the “Options” tab, change the boot order to put the new OpenCore drive first.
Start the VM and boot into macOS using the new OpenCore drive. From within macOS you can now follow the instructions from the “Make the OpenCore install permanent” section to install the new OpenCore image to your main macOS disk, after which the OpenCore drive can be detached from the VM.
Upgrading from macOS Catalina
First make a backup or snapshot of your system! Being able to roll back when the upgrade goes wrong is a real lifesaver.
You’ll need to update OpenCore to my v10 release before the upgrade. You can follow the instructions in the “Editing your OpenCore settings” section above to mount your EFI disk. Then you can replace the OpenCore files in the mounted “EFI” disk with the ones from the OpenCoreEFIFolder.zip file in my newest OpenCore release.
Reboot to make sure that you can still boot Catalina.
If you’re using any PCIe passthrough devices (particularly video cards) you’ll want to disable those and set “vga: vmware” instead, so you can install using Proxmox’s web console from a different machine during the upgrade. This avoids installer problems triggered by flaky video card passthrough, especially host lockups caused by the AMD Reset Bug.
Now you can upgrade to Big Sur using the App Store like you would on a real Mac.
I tried doing this on Linux. Was able to login to the VM and the Mac OS boot disk appears. Here, the option is to install from recovery image which requires internet access on the VM Opencore bootloader. I tried setting up the IP and gateway using ifconfig/route commands respectively via “Terminal” provided by the Utilities in the Recovery window. But, it didn’t work. Any suggestions on how I can setup the internet? Meanwhile, now I am back to the old method of making the full dmg instead of recovery dmg.
I’ve not heard a method for configuring the networking except by providing a DHCP server it can use.
Building a full installer requires a Mac
I use static IP instead of DHCP. Got the Mac up and running. The internet is working fine on the Mac VM. But, the apple ID isn’t working. It says “Couldn’t communicate with the server”. Any ideas?
I am having this same issue. Any replies yet with a fix?
I had a lot of trouble with this as well installing it on a Proxmox on a remote server in a datacenter.
I was able to set the IP and the gateway (ifconfig en0 IP netmask and route – add default GW) but I was unable to set the nameserver(s) (using scutil).
What I did was added another small server as a Proxmox guest running a DHCP server (www.dhcpserver.de/CMS) … et voila …
Thank you for all your hard work on this. Everything works great, except setting “+invtsc” by itself will block live migration. If your proxmox cluster has all homogenous processors, you can add “ tsc-frequency={cpu frequency in hz}” to the cpu arguments. This will retain guest macOS performance but allows live migration between cluster nodes with the same processors.
Hi Nick,
Thanks for putting together this lovely guide. I made it to the “Install Big Sur” step. However, in Disk Utility, I do not see a VirtIO Block Media, only the following:
Internal
– QEMU HARDDISK Media (157.3 MB)
– Install macOS Big Sur (14.69 GB)
Disk Images
– macOS Base System (1.79 GB)
I am using the BigSur-full.img installation and OpenCore-v10.iso. Here is the output of my VM’s config:
agent: 1
args: -device isa-applesmc,osk=”…” -smbios type=2 -device usb-kbd,bus=ehci.0,port=2 -cpu Penryn,kvm=on,vendor=GenuineIntel,+kvm_pv_unhalt,+kvm_pv_eoi,+hypervisor,+invtsc,+pcid,+ssse3,+sse4.2,+popcnt,+avx,+avx2,+aes,+fma,+fma4,+bmi1,+bmi2,+xsave,+xsaveopt,check
balloon: 0
bios: ovmf
bootdisk: ide2
cores: 8
cpu: Penryn
description: boot%3A order=ide2;scsi0;net0
efidisk0: local-lvm:vm-101-disk-1,size=4M
ide0: local:iso/BigSur-full.img,cache=unsafe
ide2: local:iso/OpenCore-v10.iso,cache=unsafe
machine: q35
memory: 32768
name: bigsur
net0: vmxnet3=0E:B9:B3:E4:58:12,bridge=vmbr0,firewall=1
numa: 1
ostype: other
scsi0: local-lvm:vm-101-disk-0,cache=unsafe,discard=on,size=256G
scsihw: virtio-scsi-pci
smbios1: uuid=…
sockets: 1
vga: vmware
vmgenid: …
Do you by any chance know how to resolve this?
Many thanks!
Nic
In your config you need to rename scsi0 to virtio0 (you’re aiming for the disk to be virtio-blk, not virtio-scsi)
Hi Nicholas,
That worked perfectly, many thanks for your help!
Nic
Hi Nicolas, thanks for this amazing guide! I’m new to proxmox and with it was able to install Big Sur.
However I’m facing this strange issue, I’m passing through an usb keyboard but after I hit enter in OpenCore boot picker to select my Main disk I got a black screen, if I hit enter in my host keyboard in Proxmox’s Console, it works, I don’t see any error with dmesg just the black screen. I need this because I want to passthrough my gpu also and without a keyboad I’m stuck in OpenCore, any suggestion?
PS:Sorry for my bad english.
Hello,
There is a problem that when I install MacOs and ask for my Apple Id then after I enter it it sends out the code for two factor authentication and after entering it I get the message “Could not communicate with the server”. And it’s also interesting that I can log in to the App Store.
Can someone please help me with this?
Click skip instead of logging in at this step
I’m also having this problem. Everything in the guide was great, but now I’m not able to sign into my Apple ID now that it is all running. Error is “Could not communicate with the server”.
I found a thread on the unraid forums that said to change to the e1000 nic. That didn’t work for me, but I tested all and the VirtIO (paravirtualized) did; don’t ask me why…
Hi Nick,
Really love the great work you’re doing here.
The AMD patches have seen some recent updates here:
https://github.com/AMD-OSX/AMD_Vanilla
This would be awesome for those of us trying this on AMD systems (e.g. EPYC, Threadripper etc.), and it allows near native support. (Possibly can use host CPU instead of Penryn).
Is there any chance of you adding this to your builds, or maybe making a second branch for AMD?
Also – I believe you’re current based on OpenCore 0.6.3, right? I checked, and I think 0.6.4 is out, with some AMD fixes as well. Any chance you’re doing a refreshed build sometime? =)
Thanks,
Victor
I don’t update my OpenCore build unless there is some clear advantage to the new version, because it’s tedious retesting everything.
It’s not clear that the host-CPU approach is needed for AMD, since you can just pass a bunch of features instead, and then you don’t have to constantly maintain a suite of patches as the OS is updated. I don’t know if they’re properly detected though since I don’t have an AMD.
What are you running with your Mac VM?
I was running the “make BigSur-recovery.img” and ran into an error.
hdiutil convert BaseSystem.dmg -format RdWr -o BigSur-recovery.img
Usage: hdiutil convert -format -o [options]
hdiutil convert -help
make: *** [BigSur-recovery.img] Error 1
I changed hdiutil command as follows and it worked.
– hdiutil convert $< -format RdWr -o $@
+ hdiutil convert -format UDRW -o $@ $<
Thanks for this great blog post.
Which OS were you running this command on?
Hey Nick,
Thanks for the great guide. Everything is working great for me except GPU passthrough. I am able to attach my RX 580 to the VM and get through the boot loader, but then it gets stuck on the Apple logo. When turning on verbose boot, I can see the kernel is stuck on “PCI configuration begin,” I’ve tried various solutions and can’t get anything to work. Any ideas?
CPU: AMD Ryzen 9 5900x
MB: Gigabyte x570 Taichi
GPU: Gigabyte RX 580
vm.conf
agent: 1
args: -device isa-applesmc,osk=”” -smbios type=2 -device usb-kbd,bus=ehci.0,port=2 -cpu Penryn,kvm=on,vendor=GenuineIntel,+kvm_pv_unhalt,+kvm_pv_eoi,+hypervisor,+invtsc,+pcid,+ssse3,+sse4.2,+popcnt,+avx,+avx2,+aes,+fma,+fma4,+bmi1,+bmi2,+xsave,+xsaveopt,check
bios: ovmf
boot: order=virtio0
cores: 16
cpu: Penryn
efidisk0: fast0:vm-103-disk-1,size=1M
hostpci0: 0f:00,pcie=1,x-vga=1
machine: q35
memory: 16384
name: macos
numa: 0
ostype: other
scsihw: virtio-scsi-pci
smbios1: uuid=a60f0594-c296-4799-92c5-a95abb8bfd28
sockets: 1
vga: none
virtio0: fast0:vm-103-disk-0,cache=unsafe,discard=on,size=128G
vmgenid: 5b0a982f-95c0-4743-8227-7f63764b301c
Does it freeze at the 50% mark on the progress bar? This is the point where the GPU driver is started.
The RX580 suffers from the AMD Reset Bug, so you must ensure that it has never been used since the last host power-cycle. It may be fatal if your host BIOS settings has it set as the primary display.
The bar actually seems to freeze at the 0% mark, never progressing at all.
I was able to apply the vendor-reset patch correctly (at least it seems to be when testing in other VMs), but I’m having the same problem even on fresh power cycles.
I’ve never seen GPU problems being triggered that early on the bar, are you sure the VM actually boots when the passthrough is removed?
Also try launching the VM on the command line like “qm start 1xx” so you can see any warning messages being printed (check dmesg output too)
Yep, VM works fine without GPU using the VMware compatible display, and the GPU works fine in other VMs. dmesg output is just related to the reset patch and the KVM start log just seems to reference a CPU feature (but it does this without GPU as well). I can’t really seem to find anything that points to a specific problem unfortunately.
KVM Start Log:
kvm: warning: host doesn’t support requested feature: CPUID.01H:ECX.pcid [bit 17]
kvm: warning: host doesn’t support requested feature: CPUID.80000001H:ECX.fma4 [bit 16]
Relevant dmesg:
[ 57.062314] vfio-pci 0000:0f:00.0: enabling device (0400 -> 0403)
[ 57.062458] vfio-pci 0000:0f:00.0: AMD_POLARIS10: version 1.1
[ 57.062460] vfio-pci 0000:0f:00.0: AMD_POLARIS10: performing pre-reset
[ 57.062536] vfio-pci 0000:0f:00.0: AMD_POLARIS10: performing reset
[ 57.062540] vfio-pci 0000:0f:00.0: AMD_POLARIS10: CLOCK_CNTL: 0x0, PC: 0x2b50
[ 57.062542] vfio-pci 0000:0f:00.0: AMD_POLARIS10: performing post-reset
[ 57.082271] vfio-pci 0000:0f:00.0: AMD_POLARIS10: reset result = 0
[ 57.082390] vfio-pci 0000:0f:00.0: vfio_ecap_init: hiding ecap 0x19@0x270
[ 57.082398] vfio-pci 0000:0f:00.0: vfio_ecap_init: hiding ecap 0x1b@0x2d0
[ 57.082404] vfio-pci 0000:0f:00.0: vfio_ecap_init: hiding ecap 0x1e@0x370
[ 57.102241] vfio-pci 0000:0f:00.1: enabling device (0000 -> 0002)
[ 57.103553] vfio-pci 0000:04:00.0: enabling device (0000 -> 0003)
[ 57.145072] vfio-pci 0000:0c:00.0: vfio_ecap_init: hiding ecap 0x19@0x270
[ 57.145076] vfio-pci 0000:0c:00.0: vfio_ecap_init: hiding ecap 0x25@0x400
[ 57.145078] vfio-pci 0000:0c:00.0: vfio_ecap_init: hiding ecap 0x26@0x410
[ 57.145080] vfio-pci 0000:0c:00.0: vfio_ecap_init: hiding ecap 0x27@0x440
[ 57.202135] vfio-pci 0000:0c:00.3: enabling device (0000 -> 0002)
[ 57.244565] vfio-pci 0000:11:00.3: enabling device (0000 -> 0002)
[ 58.679766] vfio-pci 0000:0f:00.0: AMD_POLARIS10: version 1.1
[ 58.679769] vfio-pci 0000:0f:00.0: AMD_POLARIS10: performing pre-reset
[ 58.679841] vfio-pci 0000:0f:00.0: AMD_POLARIS10: performing reset
[ 58.679846] vfio-pci 0000:0f:00.0: AMD_POLARIS10: CLOCK_CNTL: 0x0, PC: 0x2a44
[ 58.679847] vfio-pci 0000:0f:00.0: AMD_POLARIS10: performing post-reset
[ 58.699664] vfio-pci 0000:0f:00.0: AMD_POLARIS10: reset result = 0
Are you using my OpenCore image or has it been replaced or customised?
I am using your OpenCore image. Only thing that has been modified is the serial numbers and such for iMessage.
config.plist: https://pastebin.com/pD8GFCWd
Just tried to see if I could get into the Mac OS installer with GPU passthrough and that doesn’t work either. When turning on verbose boot, I am yet again greeted with “PCI configuration begin. I found the page below about the issue which seems to talk about it being a SSDT issue, however I am not sure how to fix this since OpenCore will not be running on bare metal.
https://dortania.github.io/OpenCore-Install-Guide/troubleshooting/extended/kernel-issues.html#stuck-on-rtc-pci-configuration-begins-previous-shutdown-hpet-hid-legacy
I’ve really never seen anything like this, because both the installer and the early boot progress bar don’t use the full GPU driver and instead just limp along with OVMF’s graphics interface.
Actually that’s a good point, you don’t have my old pve-edk2-firmware package pinned from my old Clover tutorials do you?
No, I do not. This is the first time I am attempting to set up MacOS on Proxmox. Its a relatively new Proxmox install too (~3 months).
I seem to have found the problem. My motherboard shipped with an option enable called “Above 4G Decoding”, once disabled I am able to get into the installer just fine. You might want to note this in one of your guides somewhere, because others might experience the same issue. I’m still reinstalling but if you don’t hear from me again it seems the problem is solved. Thanks so much for your help!
Thank you, Aiden! This was exactly my problem. I have successfully used Nick’s excellent method on a couple of VM hosts for “lab” VMs and am now in the process of converting my desktop machine to follow Nick’s example of passthrough GPU etc. This was a roadblock for me!
Also – many thanks Nick! Your guide is great!
Nick, have you tried to upgrade to 11.1? My install does not see the upgrade and if I try to upgrade it manually (downloading full 11.1) it starts to install, reboots and goes back to 11.01.
Mine didn’t see the upgrade either so I downloaded the full installer instead and ran that and had no issues.
When it reboots you need to pick the Installer option from the OpenCore boot menu manually, it rarely if ever selects it for you.
Hi, Nick.
I wonder if something like this would work for the Mac to share the radeon graphics card?
https://blog.ktz.me/passthrough-intel-igpu-with-gvt-g-to-a-vm-and-use-it-with-plex/
Might be limited to intel gpu
It only applies to Intel GPUs and GVT-g doesn’t offer direct display output.
Got it – thanks. Good for using hardware transcoding in, say, Plex in one VM and Jellyfin in another VM.
Not sure if you have seen this. I was able to go through the installation, but when it reboots and try to boot the osx drive from open core after the installer is done I get the loading screen with the bar full but it never goes any further than that.
Double check your OSK
Looks correct to me and all lower cases and the (c) part is not special characters.
Oh NVM. I goofed on the capitalization when I typed it in. Hurdle passed. Thank you soo much and sorry to be a bother.
Thank you!! This was my issue as well, messed up the capitalization. I appreciate the amount of questions you’ve answered as well!
Hello,
thank you for your nice tutorial. I did everything successfully according to your instructions, but the virtual machine hangs on the Appe logo after choosing Install MacOS.
CPU: Intel(R) Core(TM) i7-7700K
MB: ASUS STRIX Z270E GAMING
GPU: Vmware compatible
agent: 1
args: -device isa-applesmc,osk=”” -smbios type=2 -device usb-kbd,bus=ehci.0,port=2 -cpu host,kvm=on,vendor=GenuineIntel,+kvm_pv_unhalt,+kvm_pv_eoi,+hypervisor,+invtsc
balloon: 0
bios: ovmf
boot: order=virtio0;ide2;net0
cores: 6
cpu: Penryn
efidisk0: data1:vm-101-disk-1,size=1M
ide0: local:iso/BigSur-full.img,cache=unsafe,size=14G
ide2: local:iso/OpenCore-v10.iso,cache=unsafe
machine: q35
memory: 8192
name: MacOS
net0: vmxnet3=E2:8C:F6:AA:0F:F9,bridge=vmbr0,firewall=1
numa: 1
ostype: other
scsihw: virtio-scsi-pci
smbios1: uuid=64e49b6d-d743-48b5-bcba-44ae41a0f6d9
sockets: 1
virtio0: data1:vm-101-disk-0,cache=unsafe,discard=on,size=64G
vmgenid: a8d5c7a8-59bf-4f36-b878-ceb11b6a676a
Any Idea? Thank you!
Set cores:4 and try again
Hi Nicholas:
Thank you for your help. Your suggestion works with 4 cores.
In that case you can probably get 6 cores total with sockets:3 and cores:2
First, thank you for the brilliant tutorial. Now I have a MAC in my VM. 🙂 You wrote: “Note that you might want to hold off on logging into your Apple ID until you’ve configured your Mac’s serial number in OpenCore.”
How do I configure the Mac’s serial number? Do I set the serial number of my physical Mac there?
I didn’t find that in your instructions.
Thanks a lot
Steven
You can set whatever serial you like, or set no serial at all and OpenCore will compute one for you. Check out the guide here:
https://dortania.github.io/OpenCore-Post-Install/universal/iservices.html#generate-a-new-serial
hello, first like everyone I thank you for your awesome tutorial !!
Thanks to Kholia and you everything works like a charm.
But I have one concern about SMBIOS and / or serial number.
First : can I change only the serial number in the config.plist and let everything else as it is (SmUUID, MLB, UUID) or should I change all SMBIOS variables ?
Because I tried to change everything thanks to GenSMBIOS and I ended up booting on EFI shell…
Thanks for your help if you can, and thank you again for your work !!!!
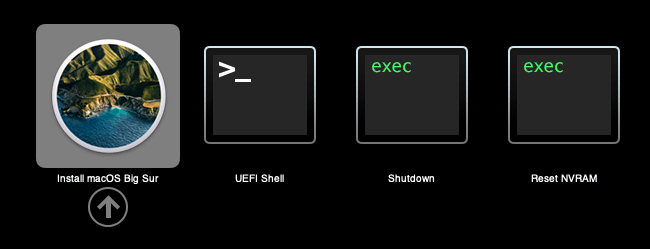
Same, how do I fix this? I can only see UEFI shell, shutdown, and clear NVMRAM or whatever that last one is. I tried re-adding OpenCore to the boot order and raising it to the top.
Again, amazing tutorial. This server allowed me to automate xcode into CI/CD for app compiling on a HP-DL380!
Quick stop?
Thanks to this blog I’ve become a tinkerer – setting up a Mac with RX 580 graphics and an Ubuntu server that takes the Intel GPU.
All good when things are working.
I’ve got a Realtek 2.5 Gb Ethernet port that requires me to update the drivers when I update the kernel (it’s supported in 5.9 but Proxmox is currently on 5.4.
I forgot to update shit down, and now don’t have a network connection. And my VMs are set to auto start, which means I fairly quickly lose access to the console when I plug in a monitor (the VMs take all my graphics and the screen goes black.
I have about 10 seconds from logging in until losing my screen.
Is there a quick command that will stop the auto start of all my containers (or at least the Mac (104) and the Ubuntu (101)) or turn it off for next boot? Then I can get in to reinstall my network drivers and get back on my merry way?
Unrelated, but this is what started it: trying to pass through a USB hard drive: I can pass through the USB address (find it using qm info usbhost) but the drive never shows in the Mac. Same with a thumb drive – any way to get hot pluggable usb storage on the Mac?
Thanks in advance for anyone’s assistance (particularly on quick stop issue)!
proofreading…sheesh!
>Is there a quick command that will stop the auto start of all my containers
I wish there was, I’ve seen this suggested several times on the Proxmox forums, to solve this very situation, but Proxmox seem resistant to the suggestion.
Hit the E key at the Proxmox boot menu to edit the kernel commandline, and remove the vfio arguments. Now your VM starts will fail so you’ll get to keep your hardware.
With your USB passthrough, make sure you aren’t ticking the usb3 option, because this controller isn’t supported by macOS.
To get hot-pluggable USB, PCIe passthrough an entire USB controller instead of using USB passthrough.
Thanks – I’ll try both when I’m back at the machine tomorrow. I really appreciate it.
>Hit the E key at the Proxmox boot menu to edit the kernel commandline, and remove the vfio arguments. Now your VM starts will fail so you’ll get to keep your hardware.
Worked great – thank you! Turns out the latest kernel (5.4.78-2-pve hated my network card (Realtek 2.5Gbps) and the script wouldn’t install, so I needed to downgrade to 5.4.65-1-pve.
>To get hot-pluggable USB, PCIe passthrough an entire USB controller instead of using USB passthrough.
I could access my keyboard, but for some reason storage won’t mount on my system. A USB Blu-Ray drive will work fine (passthrough and when passing the controller).
It’s possible that USB storage is actually working, but macOS is busy silently scanning the volume for errors before it surfaces it in the UI. It takes about 30 minutes to scan my 64GB CompactFlash card when I insert that, if macOS decides that it was inappropriately ejected last time. I think it MIGHT appear in Disk Utility before the scan finally finishes, or else Disk Utility will also hang when you open it until the scan finishes. This is likely to be the case if the LED on your USB drive is madly blinking.
Patience. Ok. I’ll give it another go and see where it ends up (I packed it away headless again…). Thanks so much!
Thanks for this complete guide. I could do all other than auto boot timeout. Everything works and RX570 makes it butter smooth. EFI editing is not giving me auto boot, this is the only annoyance, I need to go to Proxmox console and push Enter to boot.
Can anyone recommend a Bluetooth usb dongle that’s compatible w Mac? All I’ve found online expressly state they don’t work w Mac. And the one Nick linked to in his setup post is no longer for sale.
Thanks!
Search in/ask in Reddit’s “Hackintosh” subreddit:
https://www.reddit.com/r/hackintosh/
Mine was super cheap and super generic, so I imagine there must be a ton of choices, although Handoff support is something I’ve never tried.
Good resource, thanks.
For anyone looking at this: it appears that both the TP-Link UB400 and ASUS BT400 will work for basic functions like keyboard, mice, and maybe some audio. No USB adapters appear to offer advanced (handoff, AppleWatch, etc.) functionality.
I went with the UB400 and will report back once it arrives. I’m looking to use my existing apple keyboard and trackpad, so fingers crossed.
TP-Link UB400 plugged in: apple wireless keyboard, apple trackpad, and bluetooth speaker all working great. None of the “advanced” features seem to be working (this was expected).
I followed your upgrade steps but everytime i run the install. Proxmox crashes and the vm freezes. i have catalina running from your steps before so i dont understand what could be wrong. I have replace the EFI and the opencore iso.. but still freezes. no core no nothing just hangs and then i lose access to all my vms.
Double check that you aren’t running out of host RAM or disk space.
I’m assuming you’re not using any hostpci passthrough yet?
No its not diskspace.. i have 167GB and 12GB of Ram assigned to it.. Plus i can turn off my other vm and the host still does the same thing. Im wondering if i just do a new install. So i may be running out of space overall. So i just ordered 1TB hard drives for the server and will update with a fresh install and let you know if issues. Thank you for the help.
It doesn’t matter how much you have assigned to the VM if the host is actually running out of RAM or disk space. How much free space does your Proxmox Storage have?
Hi Nick, I’ve seen a picture that bigsur can support virtIO network, I think that’s a good news.
Hey, thanks for the writeup! I’ve got this almost fully configured, thanks to you. I’m left with two issues:
1. Does not boot with `vga: none`. I have to keep the `vmware` display, and basically disable it within macOS. No big deal, but a fix for this is appreciated! (I will try changing the SMBIOS as you suggested in a comment on the Catalina article.)
2. I have no onboard video, just an AMD Radeon HD 7750 (later rebranded R7 250E). “All functions” PCIe passthrough does not work — it fails at ~99%. So, I have to pass _just_ the video through with `hostpci0: 0a:00.0,pcie=1,x-vga=1`. The audio bus `0a:00.1` does not work, even if it is passed separately at `hostpci1`. Any idea why? The full device works fine in Windows 10.
Any input is appreciated. Thanks!
Dortania says you need to add radpg=15 to your macOS kernel args for this card:
https://dortania.github.io/GPU-Buyers-Guide/modern-gpus/amd-gpu.html#r7-r9
That might account for both issues if you’re lucky!
It solved problem #1! Still no audio, but that’s not a show stopper. Thanks for all the help.
@Nick @shea
I think i have same issue , but with rx 750 . if i pass vga:none its will not boot . but if i pass vmware or virtio gpu its boot . I’m using pve-manager/6.4-4/337d6701 (running kernel: 5.4.106-1-pve)
GPU work smoothly on windows VM . But not with MacOSX .
Any thought ?
Sorry type RX570 , I’m using latest opencore image on your repo
Strange thing , I tried to pass rx580 , it’s booted without any issue .
Maybe because rx570 is the primary gpu ?
But why it’s booted on windows without any issue ?
If it is your primary GPU you must provide a clean vBIOS using the romfile option, since the vBIOS gets trashed during host boot for the primary GPU.
I think Windows does better because it’s better at crashing and restarting the GPU driver when something goes wrong.
Edit: Also make sure your card’s BIOS supports UEFI, since the Mac VM boots EFI (your Windows VM might be using SeaBIOS). Updated/patched BIOSes are usually available.
Hmmm , Windows installed with UEFI Bios . also i tried to pass romfile to Mac , its same issue .
I think i will pass it . rx570 for windows , rx580 for mac .
Thanks Nick !
Nick ! Your tips lets me try the whole thing again ..
Its Solved !
Causes :
* As you told me , because its the primary gpu , vbios screwed ! UEFI Not found in loaded vbios “not supported ” checked by rom-parser
* I tried to get vbios from techpower but its failed . “not same ID’S ” Mac not booted , Windows too . I dont know how windows booted in uefi with loaded gpu since its not supported ?!
Finaly i got an idea from : https://github.com/aaronanderson/LinuxVMWindowsSteamVR
to get vbios via GPU-Z i think there is linux tool for that ? to export vbios from the gpu itself . like nvflash for nvidia ?
VBIOS EXPORTED ! MAC BOOT !
Thanks for your tips !
My rx570 GPU ID’S : 1002:67df 1002:aaf0
Hello,
Thanks for this tutorial. I have macOS running perfectly on my Proxmox PC as my main desktop with a RX570 passed through and my USB controller 🙂
My only issue with the machine is that any shutdown requests triggered within macOS fail to properly shut the system down and I have to use the stop function within Proxmox.
Is this something that you found would happen? If so, did you find a work around?
It’s usable, but minorly inconvenient as I have to switch to a different device if I want to change OS for my desktop.
Thanks!
I’ve never had that issue, try removing your passthrough GPU and see if the problem goes away.
The Proxmox “shutdown” feature requires QEMU guest agent to be turned on on the VM Options tab.
The problem doesn’t go away with the GPU removed, however, if I remove the GPU and my USB pci passthrough then it shuts itself down successfully.
I know with my past experience on bare metal hackintosh it will be a pain to map USB ports and I assume the same would be needed here. However I never ran into this isuse on bare metal which intrigues me. Perhaps I need to pass through some other chipset?
– For reference, Windows & Linux VM’s do not face this issue. It’s purely isolated to macOS.
The PCI passthrough for my USB controller is on the VFIO stub and of course my GPU is as well with vendor-reset working flawless.
I’m not using any KEXT’s external as of this moment but I planned to install the Mac Pro memory notification disabler as I use the MacPro7,1 smbios. This is because I have a pre-existing serials which are linked to my account.
I’d be curious if anyone could develop a QEMU guest agent as that would be the final stepping stone to a great KVM experience but it doesn’t seem like there’s anything online except some old non-updated attempt at it.
Please let me know of anything you would suggest to help pinpoint this issue further. I’m not really aware of to debug macOS outside of OpenCore logging which I assume isn’t related to ACPI shutdowns.
Many thanks.
Hi Nick,
In the Catalina tutorial, it mentions using “SATA” for the disk device.
In this BigSur tutorial, your guide mentions using “virtio-blk”.
Do you know what the current recommendations are for the various macOS version – does virtio-blk work with all of these?
1. High Sierra
2. Catalina
3. Mojave
4. BigSur
My understanding is that virtio-scsi performs better than virtio-blk – but I don’t know if anybody has gotten virtio-scsi to work with macOS?
Is virtio-blk superior to sata?
Thanks,
Victor
virtio-blk is superior to SATA. As for the rest of your questions, I don’t know, but it’s easy enough for you to test it.
So I have tried a few of your mac tutorials, but every time, it ends up that in the boot menu, there is no mac option. It just lets me go into a shell console or restart the computer. It doesn’t seem to recognize there is a Mac disk in it. I am at a loss for what to do. Please help if possible
This implies you didn’t build the installer properly, e.g it is wrongly formatted MBR. Did you follow the instructions? Also post your VM config line for the installer drive.
Hi Nick,
first from my side: Thanks for your gorgeous guide!
At the moment I have the problem that the USB passthrough works, BUT:
Let’s take a USB keyboard controller as an example for all other USB devices. This is recognized properly after the start and works without problems. If I pull this USB device and plug it into the same port again, the OSX no longer recognizes the stick. The only thing that changes in the host system is only the device ID of the bus. This is increased. Since I passed the device through with the vendor ID and device ID, this should work.
Before unplugging the stick:
Host:
Bus 001 Device 026: ID 046d:c52b Logitech, Inc. Unifying Receiver
Guest:
USB Receiver:
Product ID: 0xc52b
Vendor ID: 0x046d (Logitech Inc.)
Location ID: 0x1a100000 /1
After unplugging and reconnecting
(at the same Port on the hub):
Host:
Bus 001 Device 027: ID 046d:c52b Logitech, Inc. Unifying Receiver
Guest:
No Device found and shown
Why is this so important? Well, the idea is to use a KVM switch and thus to switch between the main computer and the Proxmox server. The monitors were connected to the graphics card via extra long DVI cables. 😉
Maybe you have any idea where I can start to look for a solution.
Here the system and my config:
Ryzen 3900X
Gigabyte B550 Aorus Pro V2
MSI RX580
agent: 1
args: -device ” -smbios type=2 -device usb-kbd,bu$
balloon: 0
bios: ovmf
boot: order=virtio0;net0
cores: 16
cpu: Penryn
efidisk0: pve-p2r:vm-106-disk-0,size=1M
hostpci0: 06:00,pcie=1,romfile=MSI.RX580.8192.170321_1.rom,x-vga=1
machine: q35
memory: 16384
name: OSXI-BigSur
net0: vmxnet3=42:2A:28:B9:0D:B9,bridge=vmbr0,firewall=1
numa: 1
ostype: other
scsihw: virtio-scsi-pci
smbios1: uuid=xxxxxxxx-xxxx-xxxx-xxxx-xxxxxxxxxxx
sockets: 1
usb0: host=046d:c52b
vcpus: 16
vga: none
virtio0: pve-p2r:vm-106-disk-1,cache=unsafe,discard=on,size=128G
vmgenid: xxxxxxxx-xxxx-xxxx-xxxx-xxxxxxxxxxx
I have never seen USB hotplugging work on Proxmox, and I’m unsure if it’s actually supposed to work. You can avoid this issue by doing PCIe passthrough of an entire USB controller instead, which is what I do on my system.
make BigSur-full.img gives me a error:
make: *** [InstallAssistant.pkg] Error 1
then goes back to command line…
same with the recovery.img on Ubuntu…
Did you download the whole repository as instructed?
I’ve got the same but with an error on previous lines of:
Could not find version 11.2. Versions available are:
– 10.14.5
– 10.14.6
– 10.13.6
– 10.14.4
– 10.13.5
– 10.15.3
– 10.15.4
– 10.15.5
– 10.15.6
– 10.15.6
– 10.15.7
– 10.15.7
– 10.15.7
– 11.2.1
make: *** [InstallAssistant.pkg] Error 1
Fix: I edited my Makefile to 11.2.1 and it seems to have fixed it
Thanks, I’ve applied this now.
Thank you it is working now 🙂
just bad luck with another macOS update ….
same problem here, in the folder in no more present that script
smc read does not work on my Mac….
clang: error: no such file or directory: ‘smc_read.c’
?
This means you’re not in the same directory as the smc_read.c file, you need to be in that directory.
Somebody knows what I am doing wrong?
I created the sac_read script and got an error from Xcode
smc_read.c:1:1: error: expected identifier or ‘(‘
{\rtf1\ansi\ansicpg1252\cocoartf2578
^
1 error generated.
I still tried to load the script so made is executable (chmod command) then started and got this
./smc_read.c: line 1: {rtf1ansiansicpg1252cocoartf2578: command not found
./smc_read.c: line 2: syntax error near unexpected token `}’
./smc_read.c: line 2: `\cocoatextscaling0\cocoaplatform0{\fonttbl\f0\fnil\fcharset0 AndaleMono;}’
I did this on a MacBook Pro 13″ 2017, Big Sur 11.2.1
Hope anybody is smart to find out what went wrong, I am not good with Xcode…
Looks like you ended up saving the file as rich text (rtf). It needs to be saved as plain text.
i am so stupid sorry!
was doing this too quick…
but never mind found the oak in an other script online.
I now am going to try this set again.
Sorry it is sometimes difficult to understand, I build a lot of hackintoshes but never in Proxmox, I am still learning sorry.
But thanks for all the quick replies
To let you all know, it all working fine now.
After installation I changed the graphics to VirtIO and 512Mb ram (makes it a little bit faster), however macOS sees only 7mb.
Also after install changed the network card to VirtIO to hold on on fast speed with TrueNAS VM and able to log to my AppleID, which did not work with the vm thing.
So happy now everything is back on track, I wanted to use Proxmox instead of ESXi and have everything the same and same VM’s now I can format my ESXi disk 😉
Now I have LACP and that was not possible with ESXi without VSphere.
Hi Nick,
I can’t download fonts. It always says download error.
Do you have the same issue? Any idea to fix that?
Thanks
Fonts? Inside the guest? Where from and using what tool to download them?
Just one more question, i use mainly maca in my house, thats why i wanted a mac vm on my proxmox server.
Only one thing i have to find out… does anybody know if it is possible to let bigsur dafe shutdown forced?
Becuase my server is only switched on in the weekends and monday morning switched off automated. This worked on esxi but i could install guest support files and when i shutdown the vm in esxi it shutdown like it should be, but on proxmox i get the question if i want to shut down, restart or log out…. is there a trick? I try to google it but could not find a solution.
I found the solution for having a guest agent!
by the lack of a Qemu Guest agent i wanted to try out if VMWare Guest Tools would do the trick… and you know what?
It did…. i downloaded the latest version of the VMWare site for macOS and installed it on my macOS Big Sur VM and yes…. enabled Qemu Guest Agent and then restarted the VM, op IPs in summary is now shown the IP adress of the Agent and… i tried to hit the shutdown button of Proxmox.
It shutdown safely without prompting so this is perfect for this server wich will only run in the weekend and willl be shutdown every monday morging and boots every friday evening.
do you have a link to the VMWare Guest Tools you used please?
Here you go…
https://my.vmware.com/web/vmware/downloads/details?downloadGroup=VMTOOLS1125&productId=742
You need to create an account at vmware to download this.
Thanks for the guide, I’ve tried it a number of times now, both Big Sur & Catalina but I can never get the mac install disk to show up in the OpenCore menu.
I’ve tried using full .ISO image made on mac, as well as the recovery built in linux but nothing seems to work.
I’m sure I have the -arg & conf file correct as well.
any ideas? thanks
I ran the updated OSX-KVM script ( 1st March 2021) to download the recovery ISO and it all worked perfectly this time.
Thanks for the test report! I get the impression some of the Big Sur packaging has been changing in each point release, which probably broke the earlier version of the script.
Your Catalina guide worked beautifully, and now the update to Big Sur worked fine as well.
One suggestion I have is to add a more specific call-out at the end of your guide where you describe the update process for Catalina users, to manually update the config.plist if one is using one based on your Catalina template.
I used BBEdit’s “difference” feature to compare the config.plist configured for Catalina plist with the updated one for BigSur, once I did that the install worked beautifully.
Didn’t have to touch anything, each reboot had the correct “Install MacOS” selected on the boot screen, so I went from clicking “Install Big Sur” to a finished install in a matter of about 30 minutes.
I am trying to upgrade from Catalina to Big Sur and tried following your instructions but when trying to copy the content to the mounted EFI partition I get errors – any idea what cold be wrong?
mv: /Volumes/EFI/EFI/OC/OC/Resources/Font: No space left on device
mv: /Users/ovi/Downloads/EFI/OC/Resources/Font: unable to copy extended attributes to /Volumes/EFI/EFI/OC/OC/Resources/Font: No space left on device
You need to delete the existing files and then empty your trashcan to make room before you start copying the new files in.
Hi Nicolas! I am not sure if this problem is more about HW or something but I try to install on my machine using VMWare and now proxmox (First time i listen about it) and in both cases I am getting an error about checksum in SharedSupport.dmg using full iso. Recovery is also showing it but not remember if it is over same dmg. Do you think this could be a HW issue, I mean on windows I have strange behavior about CRC problem, but on mac ssh256 calculation is working as expected.I change Hard drives willing was a HDD problem but also not lucky. My machine have i7 4770k cpu do you think it could be HW related or what I can do to know what problem is?
Maybe run a memcheck on the system to rule out a faulty RAM stick
yes, I just found same info, and one of my modules is damaged. I am trying to install it once again. and looks like pass that step. Thanks.
For anybody wanting to get iMessages to work:
You’ll have to generate your own iMacPro1,1 Serial by following https://dortania.github.io/OpenCore-Post-Install/universal/iservices.html
Specific to Nick’s build I had to add ssdt-rmne.aml and the NullEthernet kext and add the NIC’s “built in” flag to 1
Now Messages works like a charm.
Great guide, but I’m having trouble in stage 2 of the install. It tends to get stuck at less than a minute remaining, and restarting it causes macros update assistant to appear and throw errors. It also asks me to select a drive to boot from, but it’s blank
Hi Nick, I’m following your guide and everything has worked up to this point.
But after the 1st reboot, I selected the Installer as per your instructions and the installation continues, and then fails when it tries to apply Mac updates which fail and then a window comes up asking me to choose my startup disk but nothing is there to select. There is a wheel going round looking like it is searching but no disks appear.
If I revert the VM, it restarts the install at the reboot point and then fails again on the updates.
I am running ProxMox VE 6.3.3 and have configured 1 CPU socket and 4 cores, 4GB ram, 128GB drive, I went with the BigSur recovery disk (as I don’t have a Mac) and used the latest OpenCore ISO from your Github.
Any idea what I am doing wrong?
I had a working Catalina install, booting off of a passthrough NVME. I tested using your new EFI for Big Sur. It worked fine for Catalina. No additional kexts or config required.
After the upgrade to Big Sur, the boot process slows to a glacial crawl. Updating with a new line every 15-30 minutes. I let it go for a few hours with no progress. I tried the latest Opencore and it moves forward in verbose mode, but then shows to progress bar and appears frozen.
Any idea to fix?
Sorry, I haven’t experienced anything like that before and I’m not sure what to suggest.
First boot on Big Sur does take a long time as it computes a hash over the disk contents for a signature, but this has obvious high disk usage percentage while it does it.
Are you using the verbose logging for OpenCore? I had a similar issue, it’s entirely down to that (for the slow logging anyway).
Note to anyone using an RX 470/480/570/580: You need something plugged into the HDMI port. If it’s plugged into DVI or DP, I get this error on boot:
IOConsoleUsers: gIOScreenLockState 3
This is not true for me. My system boots including boot loader screen with a RX570, without issue. No WhateverGreen also! Interesting that this is required for you. Have you used vendor-reset?
How do we update to later versions of OpenCore? I’m running into issues when attempting to get on 0.6.7. I merge the changes, replace the critical boot files as described in Dortania, save everything to the internal (main) EFI disk. However, on reboot and opening of OCConfigurator I keep getting a warning that I am on an outdated version of OC 0.6.4.
I think there was a little reshuffle in which .efi file is used to boot in this version, so the directory structure needs to be updated a little.
It’s possible you still have an old efi file from the previous version, and it’s booting that one in preference to the new .efi. You can use the boot manager editor in the guest UEFI settings to pick another efi file to boot instead.
I’ll have to play with it more. I also didn’t try resetting NVRAM but didn’t think it was required.
One thing I am surely confused by, though, is the CPU choice. Proxmox only plays nice with Penryn for macOS installs, right? No Haswell, Coffee Lake, whatever else?
I ask because it thoroughly confuses me when it comes to evaluating the config.plist and SMBIOS options (and SSDTs, etc.) when cross referencing with Dortania. Am I suppose to only look at Penryn section on Dortania? Maybe a mixture of sections? If it helps, I’m running E3 Xeon 1246 V3 Haswell.
Maybe if I understood why you chose the config.plist options you did, the SMBIOS, then I might understand why it should deviate from the Dortania guide for bare metal installs…
On a side note, I want to report that my passthrough Kepler based GPU works without blacklisting any drivers nvidia,nvidiafb,nouveou. Hope that helps someone.
Hi Nick!
I have several thoughts and questions. I’ll start with USB passthrough questions, though. Here it goes…
I’m passing through the USB XHCI controller (00:14 pcie=1) and using USB 3.0 without issue (USBInjectAll.kext / USBMap.kext).
However, when shutting down the Guest it seems the 00:14 PCIe device cannot be used by the Host as it is not listed anymore and USB devices pulled/plugged doesn’t change anything. No devices show under “info usbhost”. I must reboot the Host to access those USB devices again on the Host.
The Guest is able to reuse the USB passthrough device without restarting the Host so I can start/stop the Guest any number of times. But I really want to use those freed up ports on my Host without having to restart the Host.
Do you have any suggestions on what I can try?
Most likely you need to manually rebind the device to the host xhci drivers. Check out the hookscript I describe here:
https://www.nicksherlock.com/2018/11/my-macos-vm-proxmox-setup/
Replace “pre-start” with “post-stop”, and for the command do something like:
echo 0000:81:00.0 > /sys/bus/pci/devices/0000:81:00.0/driver/unbind
echo 0000:81:00.0 > /sys/bus/pci/drivers/xhci_hcd/bind
Replace with the PCI address of your USB controller
This is working for me! Thank you
Hi, was wondering what you’d think about this project, which as far as i can see, would sit somewhere in the middle between a simple VM and bare bones one such as proxmox, using docker :
https://www.linuxuprising.com/2021/03/install-macos-big-sur-or-catalina-in.html
Would it be speedier than a VM and yet more flexible than a bare bones installation?
That’s literally just a QEMU VM which happens to be set up using Docker. There is no performance advantage.
Also I think running someone’s binary blob release of pirated software is a stupid idea. It could be backdoored a hundred times over and you have no way of verifying it.
Thank you much for this write up, very useful !
Great write up, I followed your catalina write up, and it works great, no issues. On this one, I think iv followed everything correctly, but when trying to erase the disk in Disk utility, I get an error.
Erasing “Apple Inc. VirtIO Block Media” (disk0) and creating “MacOS”
Unmounting disk
Creating the partition map
POSIX reports: The operation couldn’t be completed. Input/output error. :(5)
Operation failed…
Hmm, is your host disk filled up maybe?
Thanks for the reply, no host disk is ~40% full
here is my config file
args: -device isa-applesmc,osk=”…” -smbios type=2 -device usb-kbd,bus=ehci.0,port=2 -cpu host,kvm=on,vendo$
agent: 1
balloon: 0
bios: ovmf
boot: order=;ide2;virtio0;net0
cores: 8
cpu: Penryn
efidisk0: nvme:vm-111-disk-1,size=4M
ide0: local:iso/BigSur-installer.img,cache=unsafe,size=2096060K
ide2: local:iso/OpenCore-v11.iso,cache=unsafe
machine: q35
memory: 16384
name: MacOSBigSur
net0: vmxnet3=6A:F9:EB:CB:00:B4,bridge=vmbr0,firewall=1
numa: 1
ostype: other
scsihw: virtio-scsi-pci
smbios1: uuid=3e2c5a4b-7b01-4378-85e6-bff8f3642211
sockets: 1
vga: vmware
virtio0: nvme:vm-111-disk-0,cache=unsafe,discard=on,size=64G
vmgenid: 44161114-08c5-4c78-869d-90e90166b5e3
Update: deleted the disc that I was trying to erase, and made a new one using sata, like in your catalina write up. Got it up and running. Is this possibly a driver issue with mac?
Maybe, it’s not one that I’ve encountered before though. You can edit the VM config to switch it to virtio after you get it installed (just make sure it doesn’t have an ssd=1 argument, since virtio doesn’t support that)
just to clarify, I would switch
sata1: nvme:vm-111-disk-0,cache=unsafe,discard=on,size=64G
to
virtio0: nvme:vm-111-disk-0,cache=unsafe,discard=on,size=64G
Yes, that’s correct
Hi,
your post works/worked like a charm! <3
Anyone experienced problems after updating to 11.3?
I don't get past the Apple logo on a black screen anymore …
Did return to a 11.2 Snapshot but after retying same thing.
Peter
Yes, I’m currently struggling with the update to 11.3 myself. It panics during boot, and I haven’t yet tracked down the cause.
I was able to resolve my panic stacktrace. For me it’s crashing in __platform_memset$VARIANT$Haswell, because it’s trying to use an AVX2 instruction to set memory (VBROADCASTSS), and my CPU is the previous generation Sandy Bridge-EP, which only supports AVX1. Now I just need to figure out why it is choosing an AVX2 routine.
I’ve now fixed this problem in OpenCore v12:
https://github.com/thenickdude/KVM-Opencore/releases/tag/v12
That’s cool, it really works, thank you!
I can’t understand only one thing: my host CPU is Xeon E5-2682v4, Broadwell-EP, it supports AVX2. Big Sur (guest OS) shows my CPU as “Xeon E5”, $sysctl -a returns “hw.optional.avx2_0: 1”. But why this problem affects me?
Maybe I have something wrong in virlual machine config? What more should I check?
The old OpenCore v11 no longer applied its patch to make the CPU look like Penryn, and this can cause the kernel to pick instructions your CPU doesn’t support. Some of the kernel only checks the detected model instead of actually checking what features the CPU supports.
I’m not sure exactly what combination you would have been running into.
How do you update?
I’ve added a new section to the post titled “Upgrading OpenCore” to answer this now!
Thanks, will try this tomorrow. Your work and immediate support is really appreciated!
This is a great write up thanks. Most of the setup went smoothly up to this point but I’ve run into an issue on the series of reboots.
I’ve selected “macOS Installer” after reboot dozens of times and it never disappears. When selecting the installer I get the Apple loading screen to about 30% before the VM restarts.
I’ve tried both the Intel and AMD variants of the args. Any ideas?
Proxmox 6.3-6
VM Config:
agent: 1
args: -device isa-applesmc,osk=”…” -smbios type=2 -device usb-kbd,bus=ehci.0,port=2 -cpu host,kvm=on,vendor=GenuineIntel,+kvm_pv_unhalt,+kvm_pv_eoi,+hypervisor,+invtsc
balloon: 0
bios: ovmf
boot: order=ide2;virtio0;net0
cores: 4
cpu: Penryn
efidisk0: local-lvm:vm-160-disk-1,size=4M
ide0: local:iso/BigSur-recovery.img,size=3145632K,cache=unsafe
ide2: local:iso/OpenCore-v11.iso,cache=unsafe
machine: q35
memory: 8192
name: someName
net0: vmxnet3=…,bridge=vmbr0,firewall=1
numa: 1
ostype: other
scsihw: virtio-scsi-pci
smbios1: uuid=…
sockets: 1
vga: vmware
virtio0: local-lvm:vm-160-disk-0,cache=unsafe,discard=on,size=64G
vmgenid: …
Please try my new OpenCore v12 release, it fixes a boot panic on 11.3:
https://github.com/thenickdude/KVM-Opencore/releases/tag/v12
Works great, thank you!
Worked great. Thanks!
Wow, I use your opencore img and have a try on ESXi instead of Proxmox, gpu passthrough with nvidia kepler cards, it works like a charm!
That’s curious lol, wasn’t expecting that to be compatible!
I’m having trouble getting network speeds above 2Gb between a BigSur VM and other computers on my network. I’d like to have a Mac SMB share as a storage point in a Dell r720XD box with Proxmox as host.
the 720 has SPF+ ports and everything in ethtool and in my switch is reporting 10Gb connection.
Using VMXNet3 on Linux Bridge I’m capped at 1Gb. I tried Virtio (which still shows up as VMXNet3 in System Info on the BigSur VM) and it increased my speed to 2Gb (about 240MB/s).
One thing is under Network preferences I can’t set Jumbo Frames. It says “Autoselect” for speed and only allows MTU up to 1500. Is this a VMXNet3 limitation? also any changes I make don’t stick here anyway.
I could passthrough a 10GB Nic PCIe and use it directly but I’d prefer to keep my system simpler if possible.
Any help appreciated. thanks!
It’s really unlikely you’ll be able to do any better without doing PCIe passthrough of a network adapter, because all of the emulated networking has large software overhead.
You can try playing with the “queues” option described for net[n]:
https://pve.proxmox.com/wiki/Manual:_qm.conf#:~:text=the%20bridge%20MTU-,queues%3D%3Cinteger%3E,-(0%20-%2016)
@Jeremy: I use a 11.3 VM on proxmox on a R720. Virtio gives approx 9 Gigabit/s via iperf3 to a NAS also connected to a SFP+ switch.
Has anyone seen any issues on 11.4, or is all going well?
I have updated my Big Sur to 11.4 yesterday without any problems.
Hi Nicholas,
Thanks for the tutorials for Catalina and Big Sur, with a bit of patience, I got all this working on Proxmox 6.4-2.
Hi Nick, Thanks heaps of the tutorial.
I am having a bit of an issue with GPU Passthrough. It get stuck at 0% with the Apple logo. I’ve gone through the comments and “Above 4G Decoding” was already disabled.
GPU: PowerColor RX 480 4GB
The VM works fine without the GPU
GPU works fine on Windows 10 with OVFM
Grub configs:
GRUB_CMDLINE_LINUX_DEFAULT=”quiet intel_iommu=on iommu=pt pcie_acs_override=downstream,multifunction nofb nomodeset video=vesafb:off efifb:off”
VM Config:
args: -device isa-applesmc,osk=”…” -smbios type=2 -device usb-kbd,bus=ehci.0,port=2
-cpu Penryn,kvm=on,vendor=GenuineIntel,+kvm_pv_unhalt,+kvm_pv_eoi,+hypervisor,+invtsc
balloon: 0
bios: ovmf
boot: order=virtio0
cores: 4
cpu: Penryn
efidisk0: vms:vm-102-disk-1,size=1M
hostpci0: 01:00,pcie=1,x-vga=on,romfile=vbios.bin
machine: q35
memory: 8192
name: mac-BigSur
net0: vmxnet3=2E:DE:05:40:CB:11,bridge=vmbr0,firewall=1
numa: 1
ostype: other
scsihw: virtio-scsi-pci
smbios1: uuid=43c16e91-0c1a-4a93-ba6f-ae0aef020e0b
sockets: 1
usb0: host=1-5,usb3=1
usb1: host=1-6,usb3=1
vga: none
virtio0: vms:vm-102-disk-0,cache=unsafe,discard=on,size=64G
vmgenid: e9b6c9cc-0b45-4821-a4f2-178039bfc3e6
I have also tried romfile option with the card rom and also generating it from the command line. But no luck
Any ideas would be great.
0% is actually unusual, it normally gets stuck at 50%+ where the GPU driver initialises.
Press cmd+V (Windows key + V) at the OpenCore boot screen to enable Verbose mode before pressing enter to boot, and see if that output reveals anything.
Thanks Nick for the reply. I ended up installing Catalina from scratch then update to Bigsur with Opencore v11 instead.
All seems to be working now. It will only boot up with HDMI but won’t from DisplayPort. At leat it’s working. Thanks for your help.
Just a note I have 2 displays connected to the GPU one with HDMI and the other with DisplayPort
The new kernel quirk “ ProvideCurrentCpuInfo” added in OpenCore 0.7.0 seems to have eliminated the need for invtsc on Intel processors.
Neat, this should be helpful for cluster migration!
Hi Nick,
I noticed on Github, you mentioned re-basing to the latest upstream OpenCore 0.7.0
Will you be cutting a new downloadable release soon? Or are there other goodies in store?
Thanks,
Victor
That release is pending support for macOS 12 Monterey 🙂
Oh nice!
Any ideas how far off that support is? =)
It appears the python script required for a BigSur-full.img has been relocated to the backups subfolder in the repo. You may want to call this out as currently trying to run the make for a full image throws a 127 error unless the script is moved to its original location.
Thanks, I’ve updated the Makefile for this now