
macOS 12 Monterey is now available! If you want to install that instead, check out my newer guide!
This tutorial for installing macOS Big Sur using OpenCore has been adapted for Proxmox from Kholia’s OSX-KVM project and Leoyzen’s OpenCore configuration for KVM. You can get the full sourcecode on my GitHub here.
Requirements
I’ll assume you already have Proxmox 6 installed. You also need a real Mac available in order to fetch the OSK key.
Your Proxmox host computer’s CPU must support SSE 4.2, so for Intel your CPU must be at least as new as Nehalem, which was the first CPU generation to bear the “Core” i5/i7 branding. Older CPUs will cause the finder to repeatedly crash after installation completes (with an Illegal Instruction exception in the graphics code).
Modern AMD CPUs also support SSE 4.2 and will work with this guide.
First step: Create an installation ISO
Download my copy of the OSX-KVM repository using the download button, and unzip it:
https://github.com/thenickdude/OSX-KVM
First we need to install some build requirements. If you will be building the installer ISO on macOS, open up the Terminal and run this command to install the commandline tools:
xcode-select --installIf you’re building the ISO on Linux, you instead need to run this command (these are the package names for Ubuntu or similar distributions, they may need adjustment on other distributions):
sudo apt install qemu-utils make
Now in the Terminal, from the root of OSX-KVM, run:
cd scripts/bigsur
make BigSur-recovery.img
This will download the Big Sur installer from Apple’s software distribution servers and build a BigSur-recovery.img file for you. Upload this file to your Proxmox’s ISO store directory (typically /var/lib/vz/template/iso). Although we’re putting it in the ISO directory so that we can use it with Proxmox’s ISO picker later, this a raw disk image rather than a true ISO.
If you’re building the installer on macOS, you can build a full installer instead of just a recovery, which will mean that macOS won’t have to download Big Sur files during installation, and so won’t require an Internet connection. Simply ask it to build BigSur-full.img instead:
cd scripts/bigsur
make BigSur-full.img
This option is not available when building the installer on Linux.
Prepare an OpenCore image
Download the OpenCore.iso.gz file from the newest release in my repository (that says it’s Big Sur compatible), double click it to unpack it, and upload it to Proxmox’s ISO store at /var/lib/vz/template/iso. Although it has a .iso file extension, this is actually a hard disk image. (You need v12 or newer for Big Sur 11.3 or newer)
Fetch the OSK authentication key
macOS checks that it is running on real Mac hardware, and refuses to boot on third-party hardware. You can get around this by reading an authentication key out of your real Mac hardware (the OSK key). Save the first block of C code from this page as smc_read.c. In a command prompt, change into the same directory as that file and run:
xcode-select --install # If you don't already have gcc
gcc -o smc_read smc_read.c -framework IOKit
./smc_read
It’ll print out the 64 character OSK for you. Make a note of it.
Every Mac uses the same OSK, so don’t be surprised that it doesn’t look like a random string!
Create the VM
From the Proxmox web UI, create a new virtual machine as shown below.
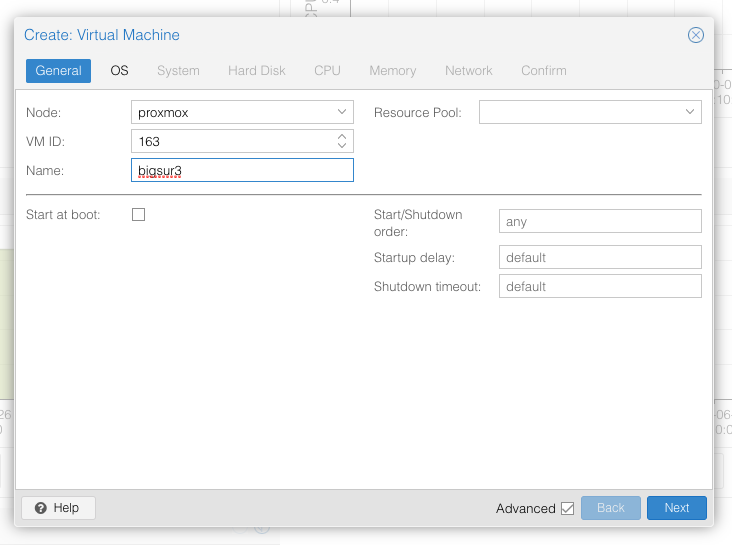
Keep a note of your VM’s ID 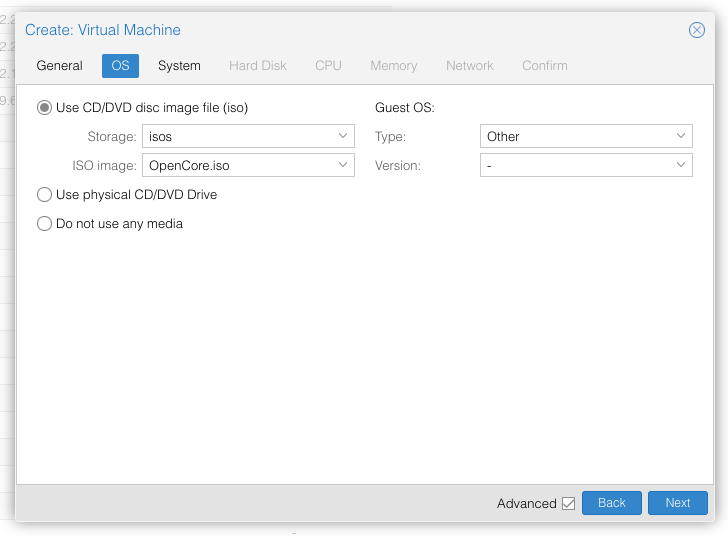
Select the OpenCore ISO you uploaded and set OS type to “Other” 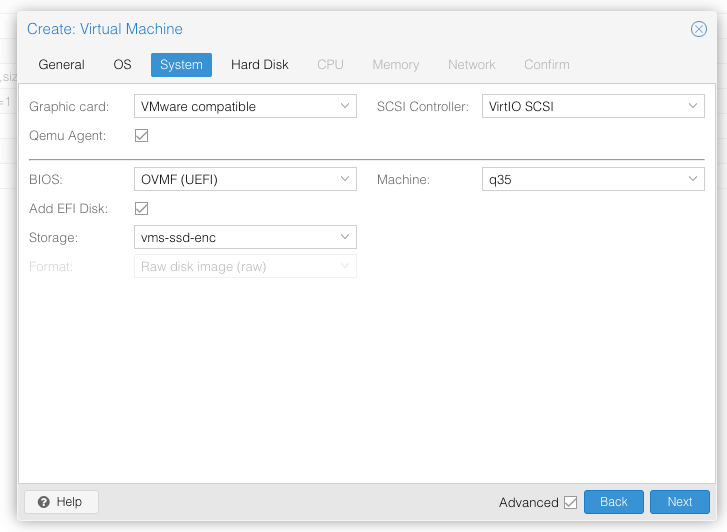
Set graphics to “VMWare Compatible”, set BIOS to OVMF (UEFI), set Machine to Q35, tick QEMU Agent, tick Add EFI Disk and pick storage for it. On Proxmox 7 you must untick “pre-enroll keys” 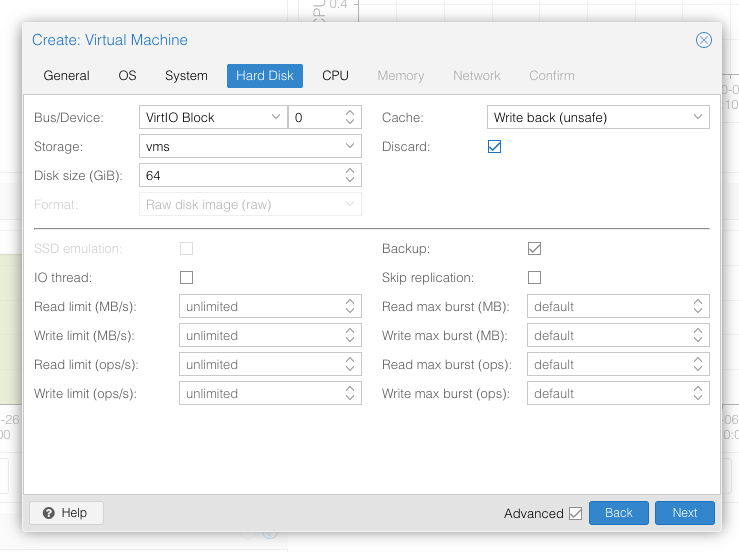
Set the size of the hard disk (64GB or greater, 32GB is too small). Attach it to virtio0. Enable discard to support TRIM. 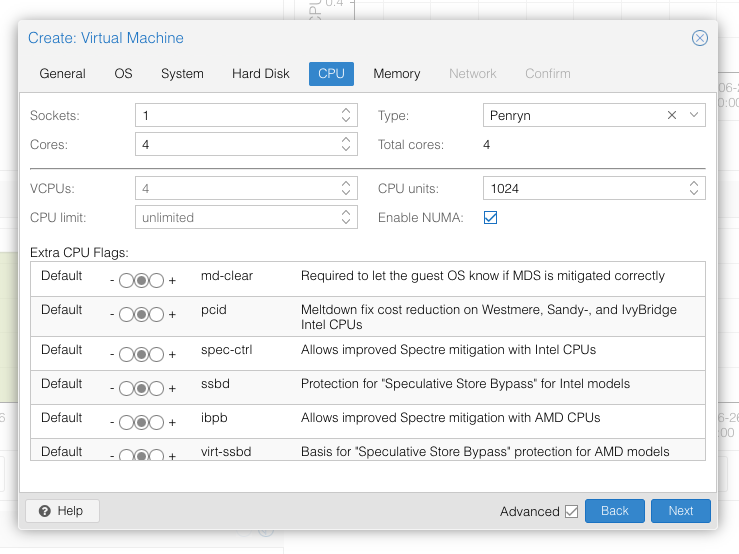
Set the number of cores for the VM, use a power of two (e.g. 1, 2, 4, 8). Set the CPU to Penryn. 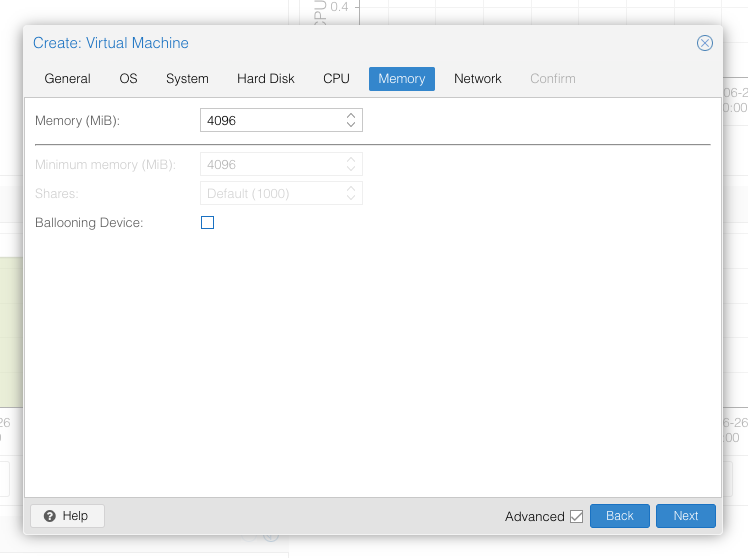
I chose a memory size of 4096MB 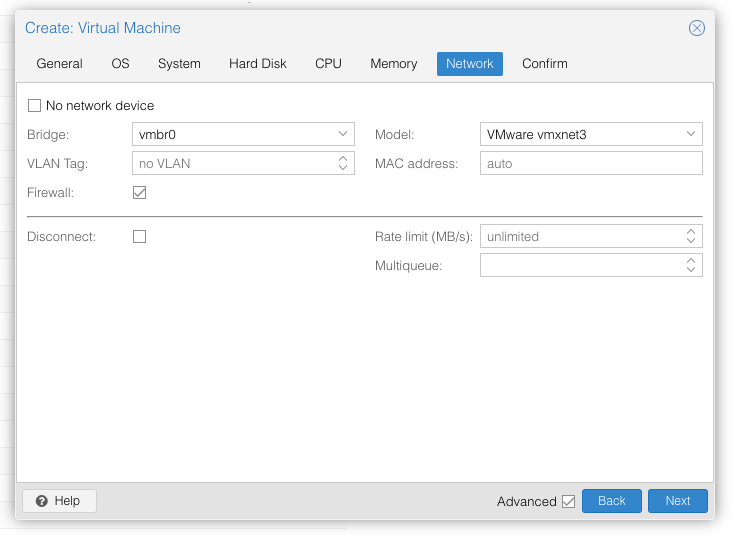
Choose VMWare vmxnet3 for the network model
In the Options page for the VM, ensure that “use tablet for pointer” is set to “Yes”.
In the Hardware page for the VM, add a second DVD drive at IDE0, set it to use your BigSur-full.img or BigSur-recovery.img.
Don’t try to start the VM just yet. First, SSH into your Proxmox server so we can make some edits to the configuration files.
Edit /etc/pve/qemu-server/YOUR-VM-ID-HERE.conf (with nano or vim). Add this line, being sure to substitute the OSK you extracted earlier into the right place:
args: -device isa-applesmc,osk="THE-OSK-YOU-EXTRACTED-GOES-HERE" -smbios type=2 -device usb-kbd,bus=ehci.0,port=2
A USB keyboard is added here because macOS doesn’t support QEMU’s default PS/2 keyboard. Ensure the args are all on a single line!
For Proxmox 7 with QEMU 6.1 or newer, also add “-global ICH9-LPC.acpi-pci-hotplug-with-bridge-support=off”.
We also need to add a -cpu argument. If your host CPU is Intel, add this to the end of the “args” line:
-cpu host,kvm=on,vendor=GenuineIntel,+kvm_pv_unhalt,+kvm_pv_eoi,+hypervisor,+invtsc
This will pass through all of the features that your CPU supports. OpenCore’s config will pretend to macOS that the CPU’s model name is Penryn for compatibility.
If your host CPU is AMD, or the above argument doesn’t work for you, use this more-compatible alternative:
-cpu Penryn,kvm=on,vendor=GenuineIntel,+kvm_pv_unhalt,+kvm_pv_eoi,+hypervisor,+invtsc,+pcid,+ssse3,+sse4.2,+popcnt,+avx,+avx2,+aes,+fma,+fma4,+bmi1,+bmi2,+xsave,+xsaveopt,check
This pretends that your CPU is Penryn, which will keep macOS happy even if your host CPU is AMD, and adds a bunch of newer required and optional CPU features on top. Features that your host CPU doesn’t support will be ignored (a warning will be printed to the console during launch with qm start 1xx), but note that macOS won’t work without SSE4.2 support.
Now find the lines that define the two “ISOs” (ide0 and ide2), and remove the “,media=cdrom” part from them. Add “,cache=unsafe” in its place. This will treat these as hard disks rather than DVD drives.
Save your changes, return to the Options tab, and change the boot order to put IDE2 (the OpenCore image) first. Your final VM configuration file should resemble this:
args: -device isa-applesmc,osk="..." -smbios type=2 -device usb-kbd,bus=ehci.0,port=2 -cpu host,kvm=on,vendor=GenuineIntel,+kvm_pv_unhalt,+kvm_pv_eoi,+hypervisor,+invtsc
balloon: 0
bios: ovmf
bootdisk: ide2
cores: 4
cpu: Penryn
efidisk0: vms:vm-100-disk-1,size=1M
ide0: isos:iso/BigSur-full.img,cache=unsafe,size=2094688K
ide2: isos:iso/OpenCore-v10.img,cache=unsafe,size=150M
machine: q35
memory: 4096
name: bigsur
net0: vmxnet3=...,bridge=vmbr0,firewall=1
numa: 1
ostype: other
virtio0: vms:vm-100-disk-0,cache=unsafe,discard=on,size=64G
scsihw: virtio-scsi-pci
smbios1: uuid=...
sockets: 1
vga: vmware
Configure Proxmox
On Proxmox, run “echo 1 > /sys/module/kvm/parameters/ignore_msrs” to avoid a bootloop during macOS boot. To make this change persist across Proxmox reboots, run:
echo "options kvm ignore_msrs=Y" >> /etc/modprobe.d/kvm.conf && update-initramfs -k all -u
Install Big Sur
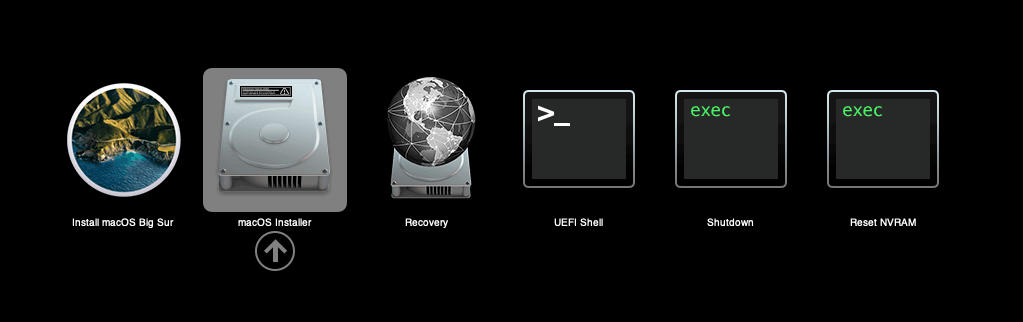
Now start up your VM, it should boot to the OpenCore boot picker:
Press enter to boot the “Install macOS Beta” entry and the installer should appear.
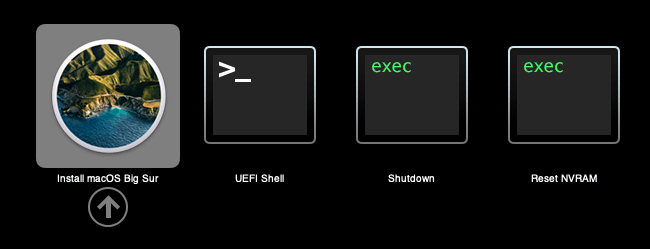
If you built a recovery installer, the icon will instead be an image of a hard disk and be labelled “MacOS Base System”.
Our virtual hard drive needs to be erased/formatted before we can install to it, so select the Disk Utility option. Follow the steps below to format the disk:
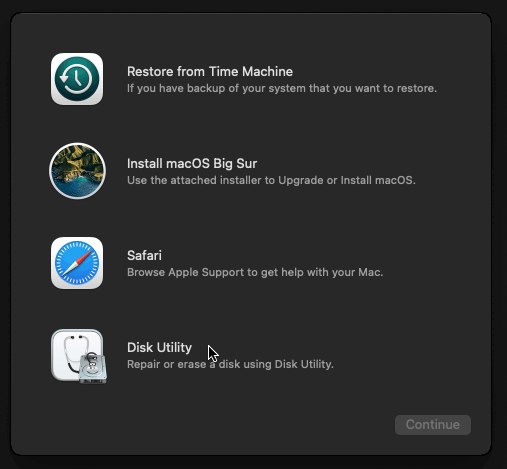
Select Disk Utility 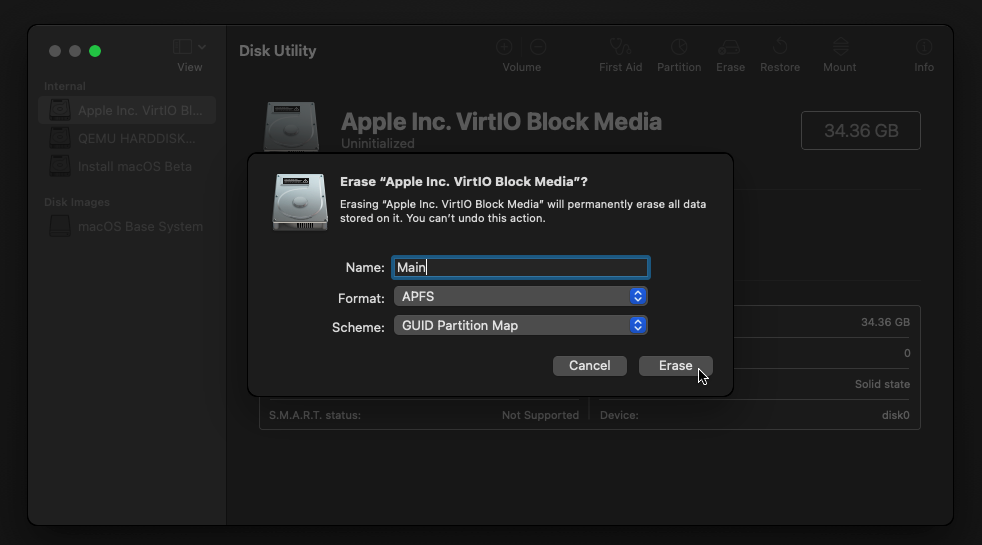
Erase the main disk (it’ll appear as VirtIO Block Media). Choose APFS. I called mine “Main”. Avoid “Encrypted” at this stage because I have not tested that scenario
Now we’re ready to begin installation!

Install macOS 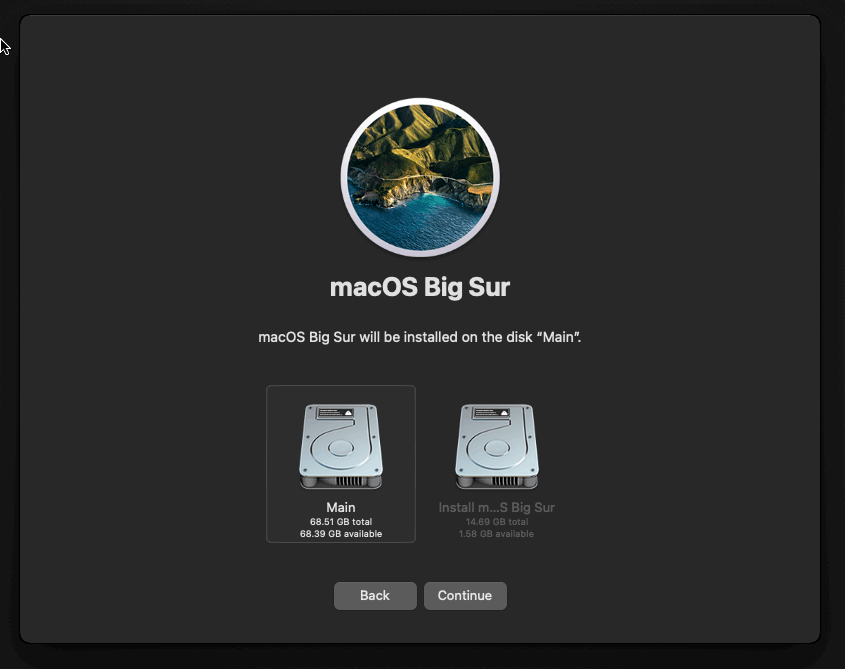
Choose the disk you erased 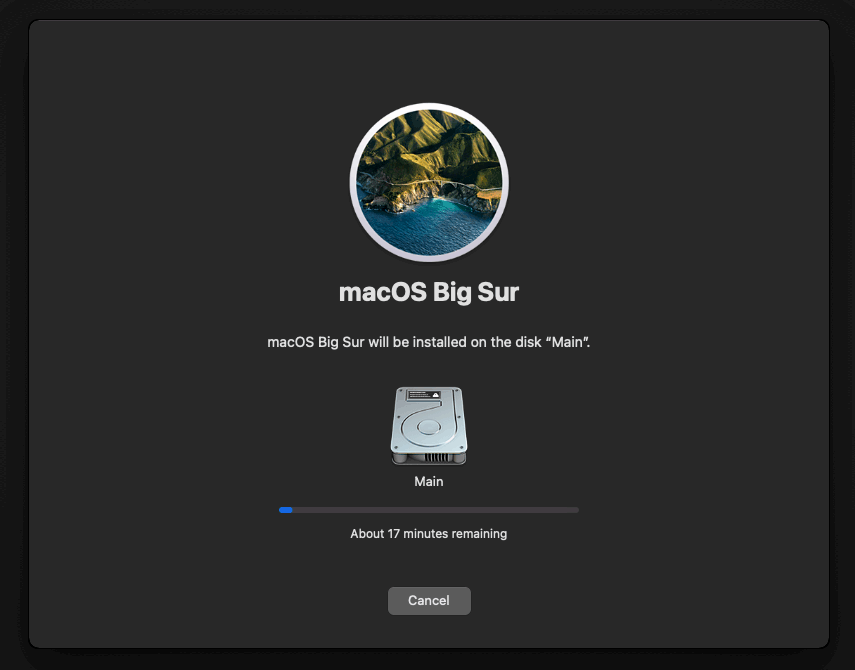
It’s installing!
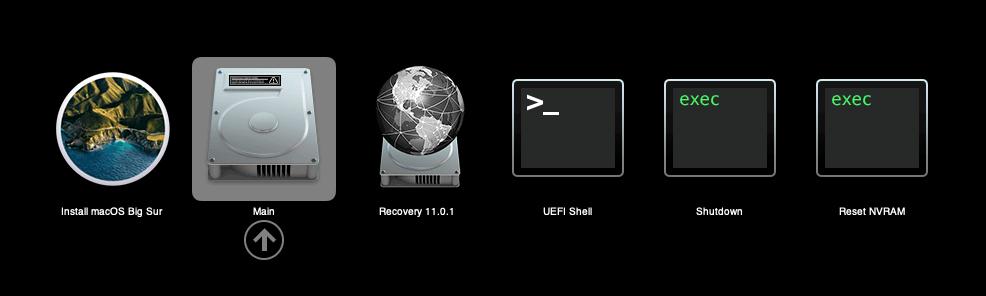
After the first stage of installation, the VM will reboot 3 or 4 times in quick succession, and each time you must pick the “macOS Installer” entry (the second one here, with the hard disk icon) to continue installation. It will not be selected for you automatically:
If your keyboard isn’t responding on this screen, exit the Console tab in Proxmox and re-enter it. If you get a “prohibited” sign like this appearing, hit the Reset button on the VM to try again:

Now the installation is complete and the macOS Installer entry disappears, so pick the name of your main disk to boot (mine’s called Main).
Answer the initial install questions, and you’ll be logged on! Note that you might want to hold off on logging into your Apple ID until you’ve configured your Mac’s serial number in OpenCore.

Note that it will be really sluggish for a few minutes after the first boot while the system performs housekeeping tasks.
Make the OpenCore install permanent
We’re currently booting using OpenCore from the attached OpenCore ISO. Let’s install that to the hard drive instead. Pop open Terminal and run “diskutil list” to see what drives we have available.
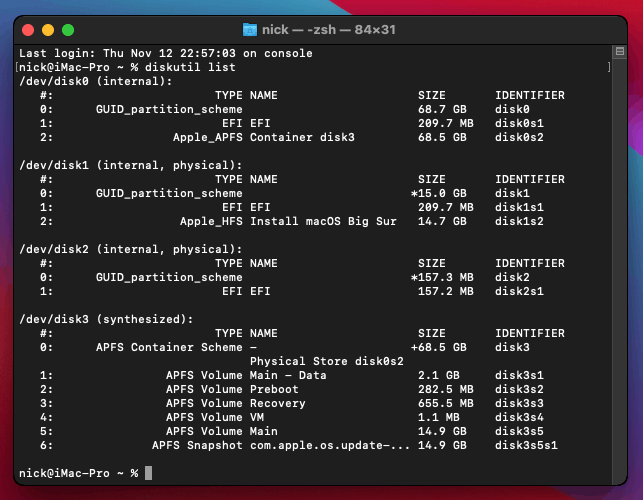
Use “sudo dd if=<source> of=<dest>” to copy the “EFI” partition from the OpenCore CD and overwrite the EFI partition on the hard disk. The OpenCore CD is the small disk (~150MB) that only has an EFI partition on it, and the main hard disk is the one with the large (>30GB) Apple_APFS “Container” partition on it.
In my case these EFI partitions ended up being called disk2s1 and disk0s1 respectively, so I ran “sudo dd if=/dev/disk2s1 of=/dev/disk0s1” (note that if you get these names wrong, you will overwrite the wrong disk and you’ll have to start the installation over again!).
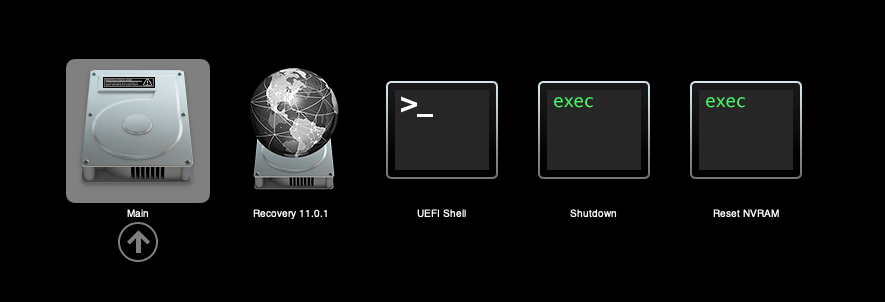
Now shut down the VM, and remove both the OpenCore and the Big Sur installer drives from the Hardware tab. On the Options tab, edit the boot order to place your virtio0 disk as the first disk. Boot up. If everything went well, you should see the OpenCore boot menu, and you can select your “Main” disk to boot Big Sur:
Sleep management
I found that I was unable to wake Big Sur from sleep using my mouse or keyboard. If you encounter the same problem, you can either disable system sleep in Big Sur’s Energy Saver settings to avoid the issue, or you can manually wake the VM up from sleep from Proxmox by running:
qm monitor YOUR-VM-ID-HERE
system_wakeup
quit
Editing your OpenCore/EFI settings
The Configuration.pdf that explains the OpenCore config.plist file can be found along with the OpenCore release on my GitHub.
To mount your EFI partition in macOS so you can edit your config.plist, first check the “identifier” of your EFI partition in the terminal:
~$ diskutil list
/dev/disk0 (external, physical):
   #:                   TYPE NAME              SIZE       IDENTIFIER
   0:  GUID_partition_scheme                  *512.1 GB   disk0
   1:                    EFI EFI               209.7 MB   disk0s1
   2:             Apple_APFS Container disk1   511.9 GB   disk0s2
Then you can mount it like so:
sudo mkdir /Volumes/EFI
sudo mount -t msdos /dev/disk0s1 /Volumes/EFI
Now you can edit /Volumes/EFI/OC/config.plist with your favourite text editor to make your changes. (TextEdit is not a great choice because it likes to insert curly quotes into the file and otherwise break things, there are some dedicated plist editors available such as XCode).
If you’re unable to boot macOS, you can edit the config.plist using the “UEFI Shell” option in the OpenCore boot menu instead.
Enter “FS0:” and press enter to open up the first available filesystem, then run “edit EFI\OC\config.plist” (if the file isn’t found, try switching to another filesystem like fs1:). When you’re done editing, press control+Q to exit, “Y” to save, then run “exit” to return to the OpenCore menu. You need to reboot for your changes to take effect.
If you prefer, you can edit config.plist from the comfort of your Proxmox host instead. If you’re booting from an attached OpenCore.img file, you can mount that file as a disk on the host. If you’re booting from the VM’s disk instead, it must be in raw format in order to be mounted (e.g. typical LVM or ZFS usage) rather than qcow2.
# Mount an OpenCore image:
losetup --partscan /dev/loop0 /var/lib/vz/template/iso/OpenCore-v11.img
# or a VM boot disk:
losetup --partscan /dev/loop0 /dev/zvol/tank/vms/vm-100-disk-1

mount /dev/loop0p1 /mnt
Now the contents of that first partition are available in /mnt, so you can edit /mnt/EFI/OC/config.plist in your favourite editor. When you’re done, do this to unmount the disk:
umount /mnt
losetup --detach /dev/loop0
Automatic boot
In config.plist, you can set Misc/Boot/Timeout to a non-zero value to allow the default boot option be chosen automatically after that delay in seconds. I’ve disabled this by default because it causes the installer ISO to re-enter its main menu instead of continuing the second stage of installation.
You can set the default boot option by pressing control+enter on it.
Verbose boot
To boot macOS in Verbose mode to diagnose boot problems, at the OpenCore boot menu press Cmd+V before pressing enter to boot macOS (you don’t need to hold it down).
If there is a kernel panic during boot and it reboots too quickly to be read, edit config.plist to add “debug=0x100” to the kernel arguments.
Changing screen resolution
To change macOS’ screen resolution, you need to edit the UEFI/Output/Resolution setting in config.plist, the default is 1920×1080@32.
You should be able to change this to any of the modes that the system OVMF menu offers (hit F2 at the start of guest boot and choose “Device Manager/OVMF Platform Configuration” to see which resolutions are available).
Video performance
Because there is no guest video acceleration available for macOS, video performance is poor.
In Google Chrome in the guest you will need to toggle off the setting to “use hardware acceleration when available” to improve issues with elements not being drawn or flickering (especially video). Safari may be a better choice.
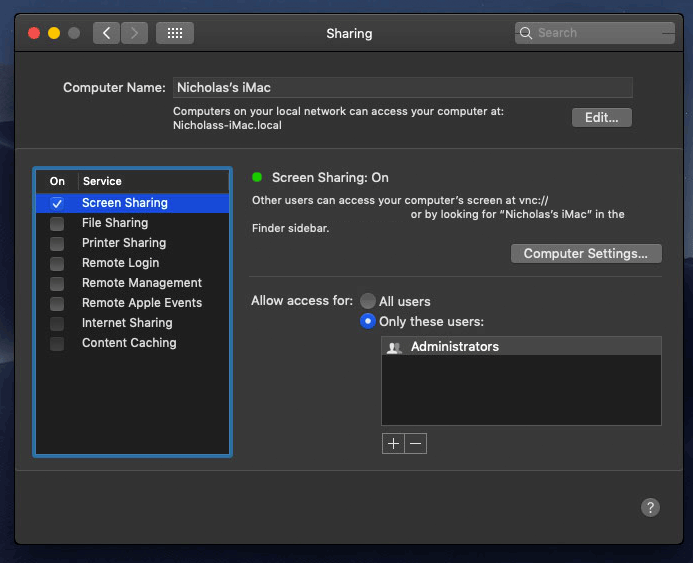
macOS’s built in “Screen Sharing” feature offers dramatically better framerates and latency than Proxmox’s browser-based VNC console, so if you have a real Mac to act as a viewing console, you can enable that in the VM’s “Sharing” settings and connect to the VM using the Screen Sharing app from your Mac instead:
Apparently Screen Sharing is also compatible with VNC clients like RealVNC, so you should be able to connect to it from Linux or Windows consoles using RealVNC.
The real magic bullet for video performance is to pass through a compatible video card using PCIe passthrough (though note that Big Sur, like Catalina, does not support most NVidia cards). This offers near-native performance. You can read more about how I’m using PCIe passthrough on my own installation here.
USB passthrough
Since I want to use this as my primary computer, I want to use a USB keyboard and mouse plugged directly into Proxmox, rather than sending my input through the web VNC console.
Proxmox has good documentation for USB passthrough. Basically, run “qm monitor YOUR-VM-ID-HERE”, then “info usbhost” to get a list of the USB devices connected to Proxmox:
qm> info usbhost
 Bus 3, Addr 12, Port 6, Speed 480 Mb/s
 Class 00: USB device 8564:1000, Mass Storage Device
 Bus 3, Addr 11, Port 5.4, Speed 12 Mb/s
 Class 00: USB device 04d9:0141, USB Keyboard
 Bus 3, Addr 10, Port 5.1.2, Speed 12 Mb/s
 Class 00: USB device 046d:c52b, USB Receiver
 Bus 3, Addr 9, Port 14.4, Speed 12 Mb/s
 Class 00: USB device 046d:c227, G15 GamePanel LCD
 Bus 3, Addr 8, Port 14.1, Speed 1.5 Mb/s
 Class 00: USB device 046d:c226, G15 Gaming Keyboard
In this case I can add my keyboard and mouse to USB passthrough by quitting qm, then running:
qm set YOUR-VM-ID-HERE -usb1 host=04d9:0141
qm set YOUR-VM-ID-HERE -usb2 host=046d:c52b
This saves the devices to the VM configuration for you. You need to reboot to have the new settings apply. Note that the emulated USB3 device doesn’t work with macOS, so don’t set “usb3=1”.
You can also pass through USB devices by passing through an entire USB controller using Proxmox’s PCIe passthrough feature, which gives much better compatibility.
FileVault
FileVault now works with OpenCore, so you can encrypt your boot disk by using the option in macOS’ system security preferences. But be certain to keep a copy of your recovery key and keep your backups up to date.
Fixing “guest boots to UEFI shell”
If your guest ends up booting to the UEFI shell instead of showing the OpenCore boot menu, especially if you’ve just updated OpenCore to a new version, you’ll need to edit the guest’s UEFI boot entries to fix this.
At the very start of guest boot, hit F2 to enter guest UEFI settings.
First we’ll remove the old entries. Choose the Boot Maintenance option, then Boot Options -> Delete Boot Option. Use the spacebar to tick any old Clover or OpenCore entries (avoid ticking the EFI Internal Shell option, you want to keep that!). Select “Commit Changes and Exit”.
Now we’ll add the correct entry for OpenCore back in. Select Add Boot Option. Navigate through the device tree to EFI/OC/OpenCore.efi (use EFI/BOOT/BOOTx64.efi instead on my “OpenCore v10” and older) and select it, name this new option “OpenCore” or similar. Again Commit Changes and Exit.
Go to the Change Boot Order and move OpenCore to the top. Commit Changes and Exit.
Now back out to the main menu and choose Reset, and you should successfully boot into OpenCore this time.
Fixing iMessage
iCloud and the App Store should already be working for you, but for iMessage support you must follow these steps to mark your network adapter as built-in:
https://dortania.github.io/OpenCore-Post-Install/universal/iservices.html#fixing-en0
Disabling SIP (System Integrity Protection)
You can disable SIP by selecting the Recovery option from the OpenCore boot menu, then use the top menu to open the Terminal and run “csrutil disable”. Then reboot.
This may be needed to run unsigned kexts or perform other hacks.
Upgrading OpenCore
Sometimes you need to update OpenCore to a new release in order to support a new macOS update. I’ll assume you don’t have any customisations to config.plist you want to save.
First take a snapshot! It’s great to be able to roll back if something goes wrong.
If you’re still able to boot macOS, you can update it from within the guest. Follow the instructions in the “Editing your OpenCore/EFI settings” section to mount your EFI partition. Then you can delete the EFI folder in there and replace it with the one from the OpenCoreEFIFolder.zip file from my OpenCore release (you’ll probably need to empty the trash to make room for the new folder). You’re done!
If you aren’t able to boot macOS, unpack and upload the new OpenCore ISO to Proxmox’s ISO store instead. Add a new CD drive to the VM that uses that ISO. Then in Proxmox’s terminal edit the VM’s config (in /etc/pve/qemu-server) to replace “media=cdrom” with “cache=unsafe” for the OpenCore drive. Now on the “Options” tab, change the boot order to put the new OpenCore drive first.
Start the VM and boot into macOS using the new OpenCore drive. From within macOS you can now follow the instructions from the “Make the OpenCore install permanent” section to install the new OpenCore image to your main macOS disk, after which the OpenCore drive can be detached from the VM.
Upgrading from macOS Catalina
First make a backup or snapshot of your system! Being able to roll back when the upgrade goes wrong is a real lifesaver.
You’ll need to update OpenCore to my v10 release before the upgrade. You can follow the instructions in the “Editing your OpenCore settings” section above to mount your EFI disk. Then you can replace the OpenCore files in the mounted “EFI” disk with the ones from the OpenCoreEFIFolder.zip file in my newest OpenCore release.
Reboot to make sure that you can still boot Catalina.
If you’re using any PCIe passthrough devices (particularly video cards) you’ll want to disable those and set “vga: vmware” instead, so you can install using Proxmox’s web console from a different machine during the upgrade. This avoids installer problems triggered by flaky video card passthrough, especially host lockups caused by the AMD Reset Bug.
Now you can upgrade to Big Sur using the App Store like you would on a real Mac.
Great article. Thank you so much for posting this.
I will try it today and I hope it works on my Proxmox as well.
Greetings from Indonesia.
Excellent article. Thanks. I cloned a Catalina VM and changed Clover to Opencore Boot, I used create_dmg_bigsur.sh and I have successful installed.
Hi, Nick
I am passing through my Radeon VII; when booting up, I can see the Apple logo and the progress bar for a while, then I get a little screen corruption and no signal afterwards. The system boots up fine, as I can remote into it through VNC, albeit the resolution is different than the regular VNC screen I get without the Radeon VII.
This did not happen in previous Catalina installs.
Should I try setting the resolution in OpenCore?
Thanks!
It might be outputting the image on a different port, try switching plugs on the back of the card. A visual glitch at this point in the boot is common, as the video card is initialised, but it shouldn’t turn off the screen afterwards…
I’m assuming you’ve already set vga: none? The emulated video can mess things up if it is left enabled.
I’m having what I think is the same error;
VGA:none, Proxmox UEFI and OpenCore both show up on the monitor, bar loads at least half way then the screens go black.
If I switch back to VMWare vGPU and remove my passthrough it works again.
Tried with a GTX 780 and my 5700XT, both work in my Catalina VM
The OpenCore image you’re using doesn’t support kext injection and so WhateverGreen is not available, which’ll be why your card isn’t working properly.
I’m not even sure if that whole kext chain has been updated for Big Sur support yet.
I don’t see how you got Big Sur booting with the OpenCore config.plist you have provided. The require NVRAM settings are not in the config at all.
Which required settings would those be?
Are you maybe reading the config.plist from my Catalina OpenCore release? The Big Sur branch’s version is here:
https://github.com/thenickdude/KVM-Opencore/blob/bigsur/EFI/OC/config.plist
The booter-fileset-kernel setting in NVRAM > Add section. This NVRAM setting is required in order boot Big Sur with prelinkedkernel support. Without this variable being set, Big Sur boots with KernelCollections.kc which is unable to be booted by OpenCore yet. I tried your Big Sur script and your OpenCore.iso with the exact same settings of your VM.conf settings and only got the same result of the SIGABRT loop with the installer.
There must be something wrong with that info, because otherwise it could never have installed and been happily running for me (twice, as one VM I upgraded from Catalina and the other VM was a clean install). I’ve never had the setting you mention in any of my configs.
I redownloaded my OpenCore image just now and used it to create a fresh new Big Sur VM, and it installed and ran fine. https://i.imgur.com/cJxROAr.jpg
Post your VM config, and what’s your host CPU model?
Host CPU is a AMD 3970x Threadripper, I have BigSur booting fine but it I had to use a real MacBook Pro with a NVMe to USB adapter and installed it to an external drive and then moved it to my Proxmox system. But I can boot the installer in any fashion.
Here is my VM config
“`
args: -device isa-applesmc,osk=”…” -cpu Penryn,kvm=on,vendor=GenuineIntel,+kvm_pv_unhalt,+kvm_pv_eoi,+invtsc,vmware-cpuid-freq=on,+pcid,+ssse3,+sse4.2,+popcnt,+avx,+aes,+xsave,+xsaveopt
balloon: 0
bios: ovmf
bootdisk: ide0
cores: 32
cpu: Penryn
efidisk0: local-lvm:vm-100-disk-1,size=4M
hostpci0: 23:00,pcie=1,x-vga=1
hostpci1: 01:00.0,pcie=1
hostpci10: 48:00.3,pcie=1
hostpci2: 02:00.0,pcie=1
hostpci3: 43:00.0,pcie=1
hostpci4: 44:00.0,pcie=1
hostpci5: 46:00.0,pcie=1
hostpci6: 47:00.0,pcie=1
hostpci7: 48:00.1,pcie=1
hostpci8: 4b:00.0,pcie=1
hostpci9: 04:00.3,pcie=1
localtime: 1
machine: q35
memory: 98304
name: BigSur
numa: 1
ostype: other
scsihw: virtio-scsi-pci
smbios1: uuid=6623598a-7a98-4b99-8229-e44ed0d3568c
sockets: 1
tablet: 0
vcpus: 32
vga: none
vmgenid: d3eb685a-544e-4936-b26a-89f3e0fec696
“`
I meant I can not boot the installer in any fashion.
There’s no point in trying to diagnose a VM with so many passthrough devices enabled because an incompatibility with any one of them could trigger a fault.
Also I’d try reducing cores to 8 or 16 since it could be unhappy about the topology.
Nevermind I just got the installer to boot, I recreated a new VM with the settings and it is working now, thanks for the settings.
Hi Nick, I don’t have dev account, so I went for the BigSur ISO from the internet. But, I cannot see the BigSur logo/icon in the boot picker. I only see UEFI shell, Shutdown and Reset NVRAM.
Do you think this is because of the ISO that I have? It is 10 GB size and it was used by someone to install it on VMware, and they said successful.
Thank you again. I got my Catalina running. Now want to try this Big Sur
OpenCore only supports disks formatted GUID/GPT, not MBR. There are a lot of images floating around that are formatted MBR and will be invisible in the OpenCore boot menu.
If your image is a true ISO (rather than a harddisk image) then make sure you have retained media=cdrom in the config line for that drive. This isn’t going to be the case if the extension of your image is .dmg.
From inside a Catalina VM you could run the Big Sur installer app from the image you have currently, which bypasses any boot problems since you never need to boot from the installer.
Hi Nick, Finally I can get the BigSur from my Hackintosh. So I created the DMG and convert to ISO as your instruction.
But upon boot, I still unable to see the BigSur in the boot picker.
Which settings I should play with? I use your OpenCore for Big Sur.
Thanks again
Did you remove media=cdrom from the Big Sur ISO and add cache=unsafe in its place? It’s required.
If you didn’t follow my instructions to create the DMG then it’s probably partitioned MBR instead of the GPT/GUID that OpenCore requires for the boot icon to become visible.
Hi Hello,
I got errors when building the dmg. I think this is why my ISO is not visible on picker.
In the .sh command: I saw this line: in_path=/Applications/Install\ macOS\ Beta.app
And my actual .app name is: Install macOS Big Sur Beta, not Install macOS Beta.
Is this mismatch command that causes the error during dmg creation using the create_dmg_bigsur.sh?
Thank you
Sorry to bother again, just want to inform you about my error:
sudo: /Applications/Install macOS Beta.app/Contents/Resources/createinstallmedia: command not found
And then I try to manually execute that command with the correct path, I got this:
dhani@iMac-Pro-2 Desktop % sudo /Applications/Install\ macOS\ Big\ Sur\ Beta.app/Contents/Resources/createinstallmedia –volume /Volumes/install_build –nointeraction
Password:
dyld: Library not loaded: @executable_path/../Frameworks/IAESD.framework/Versions/A/IAESD
Referenced from: /Applications/Install macOS Big Sur Beta.app/Contents/Resources/createinstallmedia
Reason: no suitable image found. Did find:
/Applications/Install macOS Big Sur Beta.app/Contents/Resources/../Frameworks/IAESD.framework/Versions/A/IAESD: stat() failed with errno=20
/Applications/Install macOS Big Sur Beta.app/Contents/Resources/../Frameworks/IAESD.framework/Versions/A/IAESD: stat() failed with errno=20
zsh: abort sudo –volume /Volumes/install_build –nointeraction
Any idea about this error?
Thank you
I would delete the app and redownload it.
Which system are you running this on, a Catalina VM or like a really old Mac?
It looks to be the spaces in the file name. I renamed the app to `Beta.app` and changed the in_path in the script accordingly and it works.
I met another problem and the solution is to increase the disk size from 12g to 14g in the script. The new beta app must have increased in size, 13g might be ok but I just give it more than needed.
Thanks, I’ve now updated my script to include the changes needed for Big Sur Beta 3.
I downloaded it from my Catalina VM on Proxmox
Thanks
Amazing! Spent a lot of time to make it work bare metal with Catalina+opencore with no success, but with your approach it worked flawlesly the first time! Thanks a lot!!!
Thanks for great article clearly showing how would the new Big sur like. Always good to know before a light user step in.
It’s a bit sad to know SSE2 is a must for Big sur, my macbook pro 2009 with core 2 due could not be working with Big Sur.
hey nick, great work. i have a 3960x 24/48c i can get it to boot with 8/16 core how czn i change the topology to utilize all 24/48c ive been busting my head with this one if you can help out.
thanks
Try this in your args line: -smp 48,sockets=3,cores=8,threads=2
Hi Nick, finally I can install BigSur with your new script.
I am using 2K monitor. Before, I use 1080 monitor and I can enable the mirroring display in macOS. I can use the 2K monitor as 2nd display but that is not convenient. The mirroring is my only preferred way I guess.
But now since I have 2K monitor, and I enable the mirroring, I cannot get a good resolution for my Monitor. It uses the default Display max resolution (1080).
Is there any way to fix this?
I’m using an app called RDM to set custom monitor resolutions with my RX 580:
https://github.com/avibrazil/RDM
This allows you to pick HiDPI options even if macOS doesn’t offer them for some reason.
I think if you mirror, then both monitors will have to be the same resolution though.
Hi Nick, thanks again. I will give it a try
Hi Nick, first thank you for all the work you do. It helped me get into Proxmox in a big way.
I am now rocking 2 servers with several VMs each, Windows 10, 8, Linux and couple MacOS, HS, Catalina and Big Sur Beta 3.
I wanted to let you know that now that Beta 4 is out I managed to do a clean install no problem following your guide after you made the update to the script.
I though maybe it was good to have confirmation that the guide still works even after the new Beta.
Thanks again.
Thanks, these confirmations save me a bunch of time testing myself!
This is a great tutorial! I was able to create an ISO using the Public Beta and everything seemed to run smoothly through the installation.
However, when I use Screen Sharing from my MacBook Pro, the image shown on the screen is blank. Using the Proxmox console, I can see that, while the screen is blank through Screen Sharing, it is indeed moving the mouse.
So, for some reason no video is getting passed when using Screen Sharing. Any ideas?
Seems like there may be some VNC/Screen Sharing bugs in Big Sur. If anyone else is having this challenge, I found success installing a different VNC server: https://github.com/stweil/OSXvnc
I tested it out and works in Big Sur Beta, thanks for the tip.
I’m very happy about this guide! The only issue I’m facing is the BiErrorDomain Error 12 I got while selecting the installation Disk…someone suggest Disk Type, SATA + SSD Emulation rather than Virtio …I’m stuck here. Any help will be appreciated!!! THANKS
I’ve never seen that error before, could you share your VM config?
Yes, probably is because my server have the SSD M2 ? Any suggestions for different disk approach ? thanks!
No, the guest can’t tell what kind of storage backs the host’s virtual disks, M2 is fine. Can you share the contents of your VM config file?
sure!
https://pastebin.com/ANmaEbrQ
You’re using a third-party built macOS install image… it’s really hard to guess what they might have messed up with this one so it isn’t really worth debugging it.
I didn’t spot any other problems in your VM config.
I just followed “your way”, but when I try the boot now I got the EFI/startup.nsh message…stuck here 🙁
thank you
root@mithril:/var/lib/vz/template/iso# file Big_Sur_Beta.iso
Big_Sur_Beta.iso: DOS/MBR boot sector; partition 1 : ID=0xee, start-CHS (0x3ff,254,63), end-CHS (0x3ff,254,63), startsector 1, 29360127 sectors, extended partition table (last)
What error message is that exactly? When does it appear?
Are you using my correct OpenCore image for Big Sur, and not my earlier Catalina one?
this is it:
https://i.imgur.com/R07NUlP.png
Make sure your boot order is actually set to the OpenCore image and the OpenCore image file isn’t missing from the filesystem.
If it’s all configured correctly then delete the EFI disk from the hardware tab and re-add it to reset your boot order properly.
well, I probably did some mistake while editing the .cfg file.
I’ve done a new machine from scratch, re-uploading everything and now it’s installing! 🙂
I also noticed the Disk I selected in my previous install was the QEMU HARDDISK rather than the VirtIo Block Media!!
So, finger crossed and thank you again for this PERFECT guide…I recently moved from ESXi to Proxmox only for that ehehe
keep you posted. ciao
Oh that’s what happened, you accidentally installed on top of the OpenCore image or the installer ISO and it never worked again, lol
I finally got my Big Sur installation working but the disk is still called “preboot”…any idea on how to fix it? Thanks
may I ask a bit of help for my GPU passthrough? I’m able to see the GPU like this:
https://i.imgur.com/z2m8j0V.png
thanks!
GPU passthrough is not going to work on Big Sur right now because my OpenCore image doesn’t support loading WhateverGreen.
Which GPU is that BTW?
I’m using SuperMicro server:
https://www.supermicro.com/en/products/system/Mini-ITX/SYS-E200-9A.cfm
You’re passing through the onboard Aspeed GPU then? That’s not going to work in a useful way because macOS doesn’t have a driver for it.
Hey Nick,
Thanks for this article, and the whole series really. I used the Catalina article to spin up both High Sierra and Catalina VMs.
Question – I’m primarily just using my Mac VM as a local repo for my iCloud Photo Library but I want to passthrough a GPU. Any Catalina recommendations that aren’t as expensive – or should I just run an older GPU into the High Sierra VM? I was looking at the linked website but wasn’t clear which models were best still.
Thanks for any insight.
Sorry, I can only confirm that R9 280X no longer seems to work on Catalina and the RX 580 mentioned by Passthrough Post works nicely but shows the reset bug for me, so I have to power cycle the host between guest boots. I don’t have experience with any of the other cards and I’m really hesitant to recommend one since the success rate is so variable.
If you can go back to High Sierra you’ll have a lot more choice.
Hello! I tried this today, and am stuck in a boot loop during the install, after the first restart and to boot into the second macOS Installer it gets 1/10th done, and a spinner happens underneath the loading bar, then it restarts into the loop.
Running Proxmox 6.1-8 (32 x Intel(R) Xeon(R) CPU E5-2667 v2 @ 3.30GHz)
here is the config:
args: -device isa-applesmc,osk=”…” -smbios type=2 -device usb-kbd,bus=ehci.0,port=2 -cpu Penryn,kvm=on,vendor=GenuineIntel,+kvm_pv_unhalt,+kvm_pv_eoi,+hypervisor,+invtsc,+pcid,+ssse3,+sse4.2,+popcnt,+avx,+avx2,+aes,+fma,+fma4,+bmi1,+bmi2,+xsave,+xsaveopt,check
balloon: 0
bios: ovmf
boot: cdn
bootdisk: ide2
cores: 4
cpu: Penryn
efidisk0: TwoTB:vm-111-disk-1,size=4M
ide0: local:iso/BigSurBeta.iso,cache=unsafe,size=14G
ide2: local:iso/OpenCore.iso,cache=unsafe
machine: q35
memory: 8192
name: BigSur
net0: vmxnet3=82:CA:B1:02:2E:ED,bridge=vmbr0,firewall=1
numa: 1
ostype: other
scsihw: virtio-scsi-pci
smbios1: uuid=06b55e5a-6b03-40b8-8b7d-e6b23de0354d
sockets: 1
vga: vmware
virtio0: TwoTB:vm-111-disk-0,cache=unsafe,discard=on,size=64G
vmgenid: 2fb46f8b-134d-4dbb-9484-438fa45f6055
any help would be wonderful!
Typically this would be due to a bad OSK, double check that your text editor didn’t mangle it by inserting a copyright symbol or curly quotes. If you copied it from a blog you also need to look out for invisible Unicode linebreaking characters.
Make sure you’re using my OpenCore image for Big Sur and not the one for Catalina, too.
Didnt expect you to respond so quickly! i will double check that, and yes i am using opencore that is for big sur (aka your link you had in the instructions).
Still stuck in loop, this is what it looks like before rebooting.
https://nextcloud.askdavis.com/s/WLTe5xMmp2CBwcc
this link works better
https://nextcloud.askdavis.com/s/dC3NKHpRNJ5XAzo
I’ve now updated my OpenCore release, and the new image supports booting both Catalina and Big Sur, and both support “-cpu host”.
Just checking – does -cpu host work for both AMD and Intel CPUs?
Also – this change is in v7 of your release?
But v7 still has issues for some people, right? (https://github.com/thenickdude/KVM-Opencore/issues/2). Do you have any hunches on what the root cause there might be?
Is it possible for you to provide the Big Sur ISO by any chance?
No, sorry.
not convert to dmg worked just rename the file to iso
You have the best tech support of anyone.
The Full installer is installing now
Thanks so much
Hi Nick, thanks so much for the great guides!
I have an off topic question, apologies for adding it here but I really didn’t know how else to reach you.
I have an unusual project, I’m trying to get an ancient Snow Leopard Server install migrated over to VM. Yes, believe it or not it’s an install that’s still in use. I managed to get a functional Fusion VM running with it first. Converted to OVA, imported the VMDK file into Proxmox as qcow2 format. Otherwise I’m following your guide. OpenCore sees the disk I imported, and it loads up with an Apple Logo but goes to the prohibited symbol right after. I feel like I’m very close here, so I was really hoping for some advice – if you have the time. Thank you
For Snow Leopard I would try to use a much more contemporary bootloader, Clover for sure instead of OpenCore. Few developers are testing new bootloaders with these older releases now. Note that Clover required a patched version of pve-edk2-firmware last time I tried it, which my Clover-based macOS tutorials provide.
You can edit your config.plist to add “-v” (for verbose mode) next to keepsyms=1 here:
https://github.com/thenickdude/KVM-Opencore/blob/master/EFI/OC/config.plist#L644
To edit config.plist from your Proxmox host, follow these directions:
https://www.nicksherlock.com/2020/04/installing-macos-catalina-on-proxmox-with-opencore/comment-page-2/#comment-35599
If you want to continue trying OpenCore, be sure to use -cpu penryn, because I don’t think the kernel patches in config.plist that fake a Penryn CPU will be functional on these old macOS versions.
I had a hunch you would refer me to Clover. 🙂 I was hoping to avoid it and stick with OpenCore, mostly because I feel like future updates may overwrite your patched pve-edk2-firmware and break things. Correct me if I’m wrong? I completely understand that I’m working with an older abandoned OS here that nobody really uses anymore, so it is what it is. In any case, thanks for the advice – I really appreciate it! I’ll do some more tinkering here and see if I can get anywhere with this.
You can pin my pve-edk2-firmware package to prevent Proxmox from upgrading it automatically, but it will eventually need to be updated in order to be compatible with Proxmox changes (probably needs to be updated once every couple of years).
Makes sense.
By the way, thanks for the info on setting up verbose mode. This is where it’s getting stuck (while still using OpenCore):
Loading System\Library\Caches\com.apple.kext.caches\Startup\Extensions.mkext….
Error allocating 0xdb3 pages at 0x00000000773000 alloc type 2………………………………
Could not allocate driver module memory
I’ll try Clover next as well.
Not expecting you to diagnose this, but if something stands out let me know. Otherwise I’ll stop filling this thread for Big Sur on this unrelated issue as I don’t want to cause any confusion for others.
Thanks
Hi Nick,
Thanks a lot for this very helpful instruction! I’ve successfully installed Big Sur and most of the time running smoothly.
But I get one issue that when I reboot Proxmox and start the vm, the Mac system is unstable and stuck after several minutes. But if start the vm and then restart Mac immediately, I can then get the system running perfectly.
Any suggestion on how to solve the issue so that I don’t need to restart after every boot? Thanks a lot!
Hi Nick, Thanks for the great and comprehensive guides! I’ve been using the same setup as you with Win/Mac/Linux VM (rotating between 2 GPUs). I love having the flexibility I changing CPU/RAM/GPU configs easily through Proxmox. Great Idea!
Any idea on compatibility of Big Sur release today and whether WhateverGreen will now work with passthrough GPUs?
Thanks again for the work on the guide!
I’ve updated this guide now for Big Sur, there’s a new OpenCore release required!
Initially both of my monitors would turn off halfway through boot, then I added vga: vmware back in, and now only the DisplayPort monitor turned off, and the HDMI monitor stayed on. I think this is the behaviour I had way back before I used WhateverGreen for the first time.
I entered the Recovery Mode, popped up the Terminal from the top menu and ran “csrutil disable”, then rebooted and my monitors now work perfectly. So without looking into it, I suspect that SIP has to be disabled (or at least set to allow unsigned kexts) in order for the WhateverGreen kext to load, but it works successfully once you’ve done that.
Awesome, Thanks! I’m doing a snapshot right now to get ready to upgrade from Catalina. Quick question if you get this: Can I use my previous config.plist file with the OpenCorev10? Just trying to retain my iMessage and other compatibility. I think I was on the v5 previously.
nevermind…just saw the next post..haha
Was able to upgrade today but had a couple of issues. I ended up using the new config.plist but replacing SN and a couple of others that I had generated previously, but unfortunately it still broke my iMessages….must have missed something, so I’ll probably have to go back and repeat the iCloud guide….no biggie. I do have an issue with graphics though. I have a RX560 and a 5700XT that I swap amongst my Mac/Windows/Linux VMs. I am able to passthrough the RX560 to the BigSur VM, but the 5700XT wont display. It shows up under devices and accelerates with Metal and everything, but neither the DP or HDMI will output. Any ideas?
PS: This actually happened with my previous Catalina install, but I think I did something to fix it…..just can’t remember what :-/
Also, if anyone knows a fix for the Reset Bug with proxmox, I’d appreciate a reference….debugging this set up is a complete pain when I have to fully reset the bare metal to test out different VM settings trying to get the 5700XT working
For the iMessages, you probably missed the section in config.plist that flagged your network adapter as built-in.
>PS: This actually happened with my previous Catalina install, but I think I did something to fix it…..just can’t remember what :-/
It would have been adding agdpmod=pikera to the boot args in config.plist I bet! Dortania notes that this is required for all Navi GPUs, like your 5700XT:
https://dortania.github.io/GPU-Buyers-Guide/misc/bootflag.html
Thanks Nick! I remember doing that now! I’ll give it a try.
Appreciate the help!
You were 2-for-2 on those suggestions 👍🏻!
Thanks again, Nick!
Regarding the upgrade from Catalina, I assume we’re to replace all files in the mounted EFI disk with those from ‘OpenCoreEFIFolder-v10.zip’.
However, can I omit replacing the ‘config.plist’ file from EFI/OC folder, as I’ve made a number of modifications there (s/n, autoboot, ethernet drivers, etc.)?
Or do I need to use the new ‘config.plist’ file and make the same edits as I did for Catalina?
You can keep your config.plist, but you’ll want to update it with one change at least, there’s a ForceSecureBootScheme setting which needs to be enabled:
https://github.com/thenickdude/KVM-Opencore/compare/v9…v10#diff-18ce8f2001c3c18075dbf54219a44cbfbc93fc79f0f2ab519305ed1bcd16112e
Thanks!
For anyone following this one, note that you’ll need to cut and paste the entire https line, including the …v10, to get to the correct page showing the changes to the config.plist.
For some reason the website stops the link just before the “…”
That’s so weird, it appears to be a quirk of WordPress, I can’t even edit the link to be complete. Thanks for the tip!
Great work as always Nick, thank you.
I’ve been using Catalina+Clover+RX580 (PCI passthrough) quite happily for a while now.
I’ve just followed your tutorial above and made the switch to opencore and a fresh install of BigSur. The problem I have is that my screen is blank when I boot with vga=none, but it works if I have the VMWare enabled at the same time. Any ideas?
Thanks for any pointers you can give.
Same happened to me! Try the instructions in the last section to disable SIP, that did the trick.
sorry, I should have mentioned, I have already tried that and no dice.
Double check that you tried the combination SIP disabled and vga: none, I think I had to set vga: none too for this to work.
it’s setting vga to none that’s the problem (it works with vmware), and I’ve tried disabling SIP (twice). (also when vga is set to vmware I’m not getting the right screen res on the connected monitor).
Do you know if the serial number or machine type settings are important in the config file of Opencore? I’ve tried changing these but it doesn’t help.
I’m using the unmodified OpenCore v10 image, I didn’t change the serial number or Mac model. My screens are connected by Mini DisplayPort and HDMI, maybe that’s the difference? Try swapping around display connectors if you can.
-solved-
It seems I never properly set up my Proxmox system in the first place. I’ve been running Windows10, Ubuntu & MacOS for a year quite happily oblivious to the syslog errors about failure to allocate memory and not realizing that it’s not normal to have a blank screen right up until the host OS is booting. I’ve spent the weekend going back and forth with no luck, even toggling the hardware switch on my RX580 out of shear desperation. The first glimmer of hope occurred when I switched my MOBO setting from CSM to UEFI (there’s already a place to set UEFI on the mobo which I had done, but there’s another under the a section called ‘windows10’). This gave me the Proxmox logo on the screen!! albeit corrupted. Then more digging led me to some additional settings in my grub file. This cleared the corruption. I tested Ubuntu, good, Catalina (Clover) good, and finally BigSur(OpenCore) and yes all good. Thanks for the tips and of course the invaluable guide.
Hi!
Did you set “All functions”, “Primary GPU”, “ROM-Bar” and “PCI-Express” as enabled and “Display” as ‘none’?
I know that is a silly question but sometimes it is worth double-check :-).
Yes, I did all that. Thanks for the thought though.
So, I have booted my working Catalina, swapping Clover for Nicks OCv10 boot image and I get the same problem. So it’s nothing to do with the Catalina->BigSur upgrade; it’s something to do with swapping Clover for OC.
I have a bit of a noob question now; (with regard to GPU passed-through and vga:none) should I expect some output to my display during the OC pre-boot phase? Are there display drivers built in to OC (or Clover) to make this happen? To date I have never seen anything on my display until the Apple logo and progbar are already half way through and the Apple drivers kick in. The only way to debug the bootloader is to enable the display(VMWare). Is this completely normal or have I missed something fundamental?
That preboot support comes from OVMF (the guest’s UEFI implementation). I think a blank screen is only expected for video cards that don’t have UEFI support. Some cards can be flashed to add this support (or you can just supply the vBIOS as a romfile in the VM config).
If your card does support UEFI then most likely the card is outputting to a connector you don’t have a monitor attached to, for some reason. Or else it is some manner of AMD Reset Bug, but it isn’t one I have encountered on my system.
EDIT: maybe you already are supplying a romfile for your card but it’s a vBIOS designed for a card that has a different port layout than the actual card you’re using?
ok, so I’ve downloaded and tried a ROM file for my RX580 from ‘techpowerup’ and it caused my host machine to reboot! It’s the only GPU in my system so I don’t think I can make my own ROM file. I haven’t yet tried plugging anything in to the any of the other outputs yet as they’re a little hard to access right now.
Just to add; when the host machine does reboot/boot I can see the proxmox boot menu on my HMDI display which makes me think I should be seeing something when a guest boots.
Hi Nick,
Thank you for your guide. I just installed Big Sur today and assigned RX 470 to it. After the login screen, the fan on RX 470 stops. It works well with Catalina before (using clover).
Test on Windows 10 and the fan works well. I added the rom file but the fan still stops. Do you have any suggestions?
Test with Catalina using Open core, it stops too.
Interesting point from Apple Software License Agreement for macOS Big Sur:
“D. Virtualization. For each copy of the Apple Software subject to a lease under this Section 3, either a Lessor or a Lessee (but not both) may install, use and run additional copies or instances of the Apple Software within virtual operating system environments in accordance with Section 2B(iii), provided that a Lessor may only virtualize a single instance or copy of the Apple Software as a provisioning tool for the purpose of providing a Lessee with access to and use of the Apple Software pursuant to this Section 3.”
I know that still it is about Apple hardware where you can run virtual instances but do you think that this decision comes with additional technical benefits for others :-).
I updated my VM to Big Sur and USB hotplug stopped working. MacOS won’t detect my USB device if I plug it after booting the VM. Is it only me?
That’s working for me (at least by adding devices using the qemu monitor). I don’t think it ever worked for me on Catalina using the Proxmox Web interface.
Hotplug support can be toggled on and off in VM settings so make sure that’s on
I mean, I pass through the USB port, so if I plug something i.e a usb key on that port, it shows up in MacOS. If I plug it after MacOS booted, it doesn’t detect it. It used to work.
Fantastic guide! I followed the guide for Catalina and wanted to upgrade to Big Sur. I made a hard drive of 64 GB but during the upgrade process got a message that it needed 7 GB more to install Big Sur. I thus increased the size in Proxmox but the changes do not seem to flow through to MacOS. How do I expand the volume?
You have to use Disk Utility app to extend the partition.
Just found the solution: in terminal I typed “diskutil repairdisk disk0”. Then followed by “diskutil apfs resizecontainer disk0s2 0”
That solved my problem!
Hi Nick,
So I believe I’ve followed the instructions correctly, I tried twice and both times had the same result. The installation goes smoothly, but when I attempt to the boot the installation for the first time, I get the white apple on the black screen and the progress bar gets to 100% and then its hangs. It doesn’t crash, or display any kind of error just sits eternally at 100%. Wondering if you have any ideas that I might try.
I appreciate all you do, and look forward to hearing from you!
As an update… I started over, created a new virtual machine, and followed the instructions again. This time it worked. Worth noting, I had to temporarily disable the “discard” option under the hard disk settings during installation, otherwise I could not perform an erase on the disk to start the installation.
Also I wonder if anyone has been successful in using airplay / mirroring from a virtual hackintosh WITHOUT passing through a GPU and what might be involved in getting that working .
Thanks again for all your hard work!
Sorry forgot to attach my config file as well…
agent: 1
args: -device isa-applesmc,osk=”…” -smbios type=2 -device usb-kbd,bus=ehci.0,port=2 -cpu host,kvm=on,vendor=GenuineIntel,+kvm_pv_unhalt,+kvm_pv_eoi,+hypervisor,+invtsc
balloon: 0
bios: ovmf
boot: c
bootdisk: ide0
cores: 4
cpu: Penryn
efidisk0: pve-ss-store:vm-105-disk-1,size=4M
ide0: OS-Images:iso/OpenCore-v10.iso,cache=unsafe,size=150M
ide2: OS-Images:iso/BigSur.iso,cache=un
machine: q35
memory: 4096
name: BigSur
net0: vmxnet3=D2:B2:73:F8:70:77,bridge=vmbr0
numa: 0
ostype: other
scsihw: virtio-scsi-pci
smbios1: uuid=0c7b6b07-3ab3-4323-a79c-03b8937b7b68
sockets: 1
vga: vmware
virtio0: pve-ss-store:vm-105-di
Correct: ide2: OS-Images:iso/BigSur.iso,cache=unsafe
Not correct: ide2: OS-Images:iso/BigSur.iso,cache=un
yes, that was an artifact of copying and pasting out of vi, I didn’t get the entire line. Good catch though
So, I answered my own question about the AMD reset bug and thought I would share. I had previously looked for solutions but didn’t want to go down the route of patching the kernel. But it just so happens that there was an update to the effort just this week that doesn’t require the patch anymore. I installed the module and I’m happy to say that I can now reset VM’s and shutdown and switch my 5700XT across multiple VM’s without rebooting the bare metal!!
Here is the link: https://github.com/gnif/vendor-reset
for proxmox I did the following steps:
#———-installed git ———–
apt install git
#———-cloned project locally—-
git clone https://github.com/gnif/vendor-reset.git
#———installed dkms——-
apt install dkms
#——installed pve-headers (required for dkms build)–
apt install pve-headers-$(uname -r)
#——installed vendor-reset module——
cd vendor-reset/
dkms install .
——add module to boot—
nano /etc/modules
# add vendor-reset to top of list
update-initramfs -k all -u
reboot now
Been using it for a day now and I haven’t seen any issues. I’m no expert on the details though, so I’d refer back to project team. Looks like it will work for a good range of cards (RX580 inculded)!
You can see the activity in dmesg on startup/reset:
[ 41.669318] vfio-pci 0000:04:00.0: enabling device (0400 -> 0403)
[ 41.669459] vfio-pci 0000:04:00.0: AMD_POLARIS11: version 1.0
[ 41.669460] vfio-pci 0000:04:00.0: AMD_POLARIS11: performing pre-reset
[ 41.669549] vfio-pci 0000:04:00.0: AMD_POLARIS11: performing reset
[ 41.669552] vfio-pci 0000:04:00.0: AMD_POLARIS11: GPU pci config reset
[ 41.669658] vfio-pci 0000:04:00.0: AMD_POLARIS11: performing post-reset
[ 41.689346] vfio-pci 0000:04:00.0: AMD_POLARIS11: reset result = 0
[ 41.693885] vfio-pci 0000:04:00.0: vfio_ecap_init: hiding ecap 0x19@0x270
[ 41.694207] vfio-pci 0000:04:00.0: vfio_ecap_init: hiding ecap 0x1b@0x2d0
[ 41.694460] vfio-pci 0000:04:00.0: vfio_ecap_init: hiding ecap 0x1e@0x370
[ 41.841411] vfio-pci 0000:04:00.0: AMD_POLARIS11: version 1.0
[ 41.841414] vfio-pci 0000:04:00.0: AMD_POLARIS11: performing pre-reset
[ 41.841507] vfio-pci 0000:04:00.0: AMD_POLARIS11: performing reset
[ 41.841510] vfio-pci 0000:04:00.0: AMD_POLARIS11: GPU pci config reset
[ 41.841615] vfio-pci 0000:04:00.0: AMD_POLARIS11: performing post-reset
[ 41.865316] vfio-pci 0000:04:00.0: AMD_POLARIS11: reset result = 0
Double check which commit you installed (the first commit in ‘git log’ output), because bugs were fixed within the last day that were writing to the wrong locations in memory.
My host was dying with corrupt kernel heaps after about 5 minutes of runtime until I removed the module.
It didn’t fix my RX 580 but this may have been due to the same bug.
Hmmm…Looks like I’m still on the Nov 15 commits. I haven’t noticed any host issues though and everything else has been smooth. I’ll update it just in case, thanks!
Oh, and my previous dmesg was incorrect (that was for my RX560, which had no issues)
Here is the output for the 5700XT doing a Big Sur VM reboot with no issues 🙂
[ 1684.746122] usb 4-1.4.3: reset full-speed USB device number 8 using ehci-pci
[ 1685.159691] DMAR: DRHD: handling fault status reg 20
[ 1685.207469] vfio-pci 0000:07:00.0: AMD_NAVI10: version 1.1
[ 1685.207471] vfio-pci 0000:07:00.0: AMD_NAVI10: performing pre-reset
[ 1685.207531] vfio-pci 0000:07:00.0: AMD_NAVI10: performing reset
[ 1685.208280] vfio-pci 0000:07:00.0: Invalid PCI ROM data signature: expecting 0x52494350, got 0xe808aa55
[ 1685.208296] vendor-reset-drm: atomfirmware: bios_scratch_reg_offset initialized to 4c
[ 1685.208306] vfio-pci 0000:07:00.0: AMD_NAVI10: bus reset disabled? yes
[ 1685.208310] vfio-pci 0000:07:00.0: AMD_NAVI10: SMU response reg: 1, sol reg: 568498e0, mp1 intr enabled? yes, bl ready? yes
[ 1685.208310] vfio-pci 0000:07:00.0: AMD_NAVI10: Clearing scratch regs 6 and 7
[ 1685.208375] vfio-pci 0000:07:00.0: AMD_NAVI10: begin psp mode 1 reset
[ 1685.726153] vfio-pci 0000:07:00.0: AMD_NAVI10: mode1 reset succeeded
[ 1687.670134] vfio-pci 0000:07:00.0: AMD_NAVI10: PSP mode1 reset successful
[ 1687.670138] vfio-pci 0000:07:00.0: AMD_NAVI10: performing post-reset
[ 1687.690151] vfio-pci 0000:07:00.0: AMD_NAVI10: reset result = 0
[ 1687.826872] usb 2-4: reset full-speed USB device number 2 using xhci_hcd
[ 1688.066140] usb 4-1.2.2: reset full-speed USB device number 10 using ehci-pci
[ 1688.354085] usb 4-1.4.4: reset high-speed USB device number 11 using ehci-pci
[ 1688.654112] usb 4-1.2.3: reset full-speed USB device number 12 using ehci-pci
[ 1701.302134] usb 4-1.2.3: reset full-speed USB device number 12 using ehci-pci
[ 1701.622127] usb 4-1.4.3: reset full-speed USB device number 8 using ehci-pci
[ 1701.994564] usb 2-4: reset full-speed USB device number 2 using xhci_hcd
[ 1702.234141] usb 4-1.2.2: reset full-speed USB device number 10 using ehci-pci
[ 1702.534110] usb 4-1.4.4: reset high-speed USB device number 11 using ehci-pci
A bit of trouble in paradise…..it appears that my RX560 now suffers a reset bug, but only after I’ve used it in my Big Sur VM. Something must be going on shutting down MacOS that spoils it. I can it pass it around all my VMs Linux/Win but it becomes spoiled after MacOS or OpenCore touches it. When I try to reboot or swap to another VM after I get:
nc kernel: DMAR: DRHD: handling fault status reg 40
Ironically, it didn’t have a reset bug before. Any clues where I can find OpenCore/Mac shutdown logs? nothing looks out of the ordinary in host dmesg. I even removed vendor-reset, then removed the card from the vendor-reset devices-db list so if wasn’t being touched by the module, rebuilt and reinstalled, but it still persists.
Good news is that the 5700XT has no issues
I saw some comments in the original announcements for the patch that the quirk doesn’t seem to reset the GPU well enough for macOS guests. I get the same errors as you with my RX 580.
hi nick, I have a question.
I followed your guide/tutorial word to word.
everything went well and everything is fine
*thanks by the way.
everything but gpu passthrough.
I’ve passed nvme, usb everything, but gpu passthrough doesn’t work.
It displays the screen little after the picker menu, and the black screen. it worked fine with console view.
as soon as i pass it to the gpu, it doesn’t work.
do you have any idea where to look first?
thanks in advance.
Which GPU model?
im using radeon VII
Radeon VII is Vega 20 and suffers from the AMD Reset Bug, did you take care of that by making sure the host never initialises it itself between host power-on and guest launch?
Alternatively, install this module into Proxmox to mitigate the reset bug: Working around the AMD GPU Reset bug on Proxmox using vendor-reset
Thank you for this guide. I followed every step and successfully installed MacOS Big Sur. There is one issue: It won’t boot correctly. I also named my drive “Main” and selected this in the boot menu. The apple logo appears and the progress bar starts filling. When it’s completely full, the system stops working. I ca still move the mouse but nothing is happening.
I rebooted a few times, but got the same problem every time. I then booted into verbose mode by holding cmd+v while booting. It stops around the point where these messages start appearing:
– “IOConsoleUsers: gIOScreenLockState 3 …….”
– “Failed to send SMC number of eGPU P state ………”
From what I understand this would be an issue with my graphics card? I’m running proxmox on a HP DL360 G7 Proliant. There is an Intel(R) Xeon(R) E5630 CPU installed (2.54 GHz) I have no other graphics cards installed and I don’t really know if there is an integrated graphics card present in this CPU. I am running some other VM’s like windows 7 and some ubuntu desktops.
What can I do to fix this? I haven’t been able to find any useful information on the internet.
Your system GPUs don’t matter because the guest can’t see any of them anyway, it only sees the emulated vga adapter.
It’s odd that you say you can still move the mouse because I didn’t think there was any mouse cursor visible on the progress bar screen? Do you mean the progress bar disappears and you advance to an empty desktop wallpaper?
Maybe post your VM config file here.
My mistake, there was no cursor in the loading screen. Only in the boot menu (disk select) although I’m not sure if it was usable here (keyboard works fine).
I did find a typing error in the OSK key (used steel instead of steal). I now copied everything so this is no longer an issue. My system now booted to the install steps (select country etc) So I guess this was the mistake I made? The cursor is responding very slow, is this something I can fix or should I take that for granted?
Anyways: thank you so much for this guide and your quick response to my earlier question. I have been wanting to create a vm of macos for years, but never succeeded.
Yep, wrong OSK will kill the boot.
Everything should be evenly slow due to lack of hardware acceleration for video. It’s much smoother if you enable screen sharing inside macOS and connect to that instead (I believe it’s VNC compatible).
Thank you again for this guide. It has been really helpful. Do you by any chance know how to “trick” MacOS in thinking its not ran as a VM? I’m trying to get the caching option working and don’t want to leave my MacBook on all the time. That was the reason for me to use a MacOS VM.
I have looked on the internet, but can’t really find anything useful. For the record, when running this command:
sudo /usr/bin/AssetCacheManagerUtil activate
I’m getting this error:
Failed to activate content caching: Error Domain=ACSMErrorDomain Code=5 “virtual machine” ……..
For that one the kernel needs to be patched, kholia has a patch for Catalina:
https://github.com/kholia/OSX-KVM/blob/master/reversing-notes.md
I’ve solved it the same Issue with “Failed to send SMC number of eGPU P state”.
put “pcie_aspm=off” to grub boot args. Magic!
Thank you very Nicholas, today, using your guide I successfully managed to create an Opencore BigSur Hackintosh on Proxmox. I had previously a Clover based Hackintosh on Mojave and had been reading about Opencore being better for a while. I also managed to use migration assistant to copy everything over after having created the new machine.
Your guide was excellent, easy to follow and had the right information at the right place, just excellent.
Thanks again,
Anthony
Hello Nick,
I’m an old fan of your work, I have recently wanted to upgrade/re-install my setup and I have a lot of trouble to do it my clover won’t boot correctly after the upgrade and your OpenCore.iso won’t boot either and there a lot of graphical glitches.
I finally remember in Mojave (with clover) at this time, we have to use your modified version of pve-edk2-firmware (https://www.nicksherlock.com/2018/04/patch-ovmf-to-support-macos-in-proxmox-5-1/).
So I ran “apt-mark unhold pve-edk2-firmware” and “apt update && apt upgrade” to solve the issue.
Your OpenCore.iso boot without graphical glitches and the istall process is accesible.
Maybe add a warning or a new section for old setup to prevent this 😉
Thanks for your work have a nice day 😉
Hi Nick. Thanks for the guide. Really resourceful and helped in building the hackintosh vm.
The vm is working great but slow. Its almost as if it stutters sometimes. Example would be if i was opening a folder, the animation would start, freeze half way and then continue. During the freeze, the image becomes a bit grainy. Is this something to do with ssdt or kext files missing?
Also how did you get Facetime and iMessage working? My ethernet shows en0 but I can’t get built-in to enable. Is this because ethernet is vmxnet ethernet controller? Any help would be appreciated in making this my daily driver.
Many thanks!
I was able to get the built in by modifying the plist as the instructions here state:
https://dortania.github.io/OpenCore-Post-Install/universal/iservices.html#fixing-en0
Starting with the section that says “ export your PCI DeviceProperties”
Greetings Nick:
Facing the following issue when attempting to build the image …
[ 96%] Building CXX object CMakeFiles/darling-dmg.dir/src/main-fuse.cpp.o
[100%] Linking CXX executable darling-dmg
make[3]: Leaving directory ‘/root/OSX-KVM/scripts/bigsur/darling-dmg’
[100%] Built target darling-dmg
make[2]: Leaving directory ‘/root/OSX-KVM/scripts/bigsur/darling-dmg’
make[1]: Leaving directory ‘/root/OSX-KVM/scripts/bigsur/darling-dmg’
umount .bigsur-package-tmp || true
umount: .bigsur-package-tmp: no mount point specified.
rm -rf .bigsur-package-tmp
mkdir .bigsur-package-tmp
darling-dmg/darling-dmg SharedSupport.dmg .bigsur-package-tmp
Skipping partition of type Primary GPT Header
Skipping partition of type Primary GPT Table
Skipping partition of type Apple_Free
Skipping partition of type C12A7328-F81F-11D2-BA4B-00A0C93EC93B
Using partition #4 of type Apple_HFS
Everything looks OK, disk mounted
fuse: device not found, try ‘modprobe fuse’ first
make: *** [Makefile:83: BaseSystem.dmg] Error 1
So this is what I had done … this is a new ubuntu container in proxmox I am using for the build process.
root@iso:~/OSX-KVM/scripts/bigsur# history
1 apt update && apt upgrade -y
2 nano /etc/ssh/sshd_config
3 service sshd restart
4 apt install g++ git qemu-utils libxml2-dev libssl-dev zlib1g-dev cmake libbz2-dev libfuse-dev fuse autoconf unzip
5 ls -la
6 git clone https://github.com/thenickdude/OSX-KVM.git
7 ls -la
8 cd OSX-KVM/
9 ls -la
10 cd scripts/bigsur/
11 ls -la
12 history
13 ls
14 make BigSur-recovery.img
15 ls
16 du -h
17 du -h | grep G
18 ls -la
19 cd darling-dmg/
20 ls
21 ls -la
22 cd ..
23 locate BigSur-recovery.img
24 apt install mlocate
25 locate BigSur-recovery.img
This is what I have in the directory …
root@iso:~/OSX-KVM/scripts/bigsur# ls -la
total 23781588
drwxr-xr-x 6 root root 4096 Dec 4 16:58 .
drwxr-xr-x 3 root root 4096 Dec 4 15:47 ..
-rw-r–r– 1 root root 70 Nov 17 09:42 ._SharedSupport.dmg
drwxr-xr-x 2 root root 4096 Dec 4 16:58 .bigsur-package-tmp
-rw-r–r– 1 root root 12183951241 Nov 17 19:38 InstallAssistant.pkg
-rw-r–r– 1 root root 3296 Dec 4 15:47 Makefile
-rw-r–r– 1 root root 12168347736 Dec 4 16:58 SharedSupport.dmg
drwxr-xr-x 4 root root 4096 Dec 4 16:38 content
drwxr-xr-x 7 root root 4096 Dec 4 16:58 darling-dmg
drwxr-xr-x 10 root root 4096 Dec 4 16:56 xar
… and nothing found. I’m on …
Distributor ID: Ubuntu
Description: Ubuntu 20.04.1 LTS
Release: 20.04
Codename: focal
Thoughts?
Thanks so much,
Andy
>fuse: device not found, try ‘modprobe fuse’ first
This build requires access to FUSE. In a container getting access to FUSE is a pain in the ass, since it’s a kernel feature and containers are somewhat gimped here.
The simplest option is to build it on the host or in a VM instead.
I think there may be an option in Proxmox’s container settings to allow FUSE (fuse package must be installed on the host first), but you’d have to experiment.
Bingo. Spot on.
Per https://medium.com/myatus/quick-note-fuse-inside-proxmox-lxc-container-481706005a09 … in the container config
lxc.autodev: 1
lxc.hook.autodev: sh -c “mknod -m 0666 ${LXC_ROOTFS_MOUNT}/dev/fuse c 10 229”
… reboots container and … fab!
root@iso:~/OSX-KVM/scripts/bigsur# ls
InstallAssistant.pkg Makefile SharedSupport.dmg content darling-dmg xar
root@iso:~/OSX-KVM/scripts/bigsur# make BigSur-recovery.img
umount .bigsur-package-tmp || true
umount: .bigsur-package-tmp: not mounted.
rm -rf .bigsur-package-tmp
mkdir .bigsur-package-tmp
darling-dmg/darling-dmg SharedSupport.dmg .bigsur-package-tmp
Skipping partition of type Primary GPT Header
Skipping partition of type Primary GPT Table
Skipping partition of type Apple_Free
Skipping partition of type C12A7328-F81F-11D2-BA4B-00A0C93EC93B
Using partition #4 of type Apple_HFS
Everything looks OK, disk mounted
unzip -p “.bigsur-package-tmp/com_apple_MobileAsset_MacSoftwareUpdate/*.zip” AssetData/Restore/BaseSystem.dmg > BaseSystem.dmg
umount .bigsur-package-tmp
rm -rf .bigsur-package-tmp
qemu-img convert BaseSystem.dmg -O raw BigSur-recovery.img
root@iso:~/OSX-KVM/scripts/bigsur# ls -la
total 25977384
drwxr-xr-x 5 root root 4096 Dec 4 17:35 .
drwxr-xr-x 3 root root 4096 Dec 4 15:47 ..
-rw-r–r– 1 root root 70 Nov 17 09:42 ._SharedSupport.dmg
-rw-r–r– 1 root root 652212989 Dec 4 17:35 BaseSystem.dmg
-rw-r–r– 1 root root 1757586944 Dec 4 17:35 BigSur-recovery.img
-rw-r–r– 1 root root 12183951241 Nov 17 19:38 InstallAssistant.pkg
-rw-r–r– 1 root root 3296 Dec 4 15:47 Makefile
-rw-r–r– 1 root root 12168347736 Dec 4 16:58 SharedSupport.dmg
drwxr-xr-x 4 root root 4096 Dec 4 16:38 content
drwxr-xr-x 7 root root 4096 Dec 4 16:58 darling-dmg
drwxr-xr-x 10 root root 4096 Dec 4 16:56 xar
You rock. Really appreciate the expedient assistance!
Andy
Greetings Nick:
Made it through all the installation and booted and am stuck at the Apple boot screen (post selecting the ‘Main’) at approx 95% on the progress bar and nothing.
Thoughts?
Andy
Check the Summary tab for the VM and check if it’s busy reading from the disk, there can be a very long process which computes a signature of the system partition.
Otherwise verify you have the correct OSK entered and there are no curly quotes or other unusual Unicode characters slipping in
OSK mistake … goodness, the simple things in life. Thanks again!
Hi, I tried setting up a VM and it worked perfectly.
However, when I try GPU passthrough I always get stuck after selecting my drive in the boot menu.
Enabling verbose boot shows that I always get stuck at [EB|LOG:EXITBS:START]
Any suggestions on how I can fix it?
Which GPU?
Sapphire Pulse RX580
hi, can’t succeed in having the opencore icon to appear on boot…
this is the type of iso i’m using (tried even the beta, same results):
file macOS-Big-Sur-11.0.1-20B29.iso
macOS-Big-Sur-11.0.1-20B29.iso: Apple Driver Map, blocksize 512, blockcount 33554432, devtype 0, devid 0, driver count 0, contains[@0x200]: Apple Partition Map, map block count 3, start block 1, block count 63, name Apple, type Apple_partition_map, valid, allocated, contains[@0x400]: Apple Partition Map, map block count 3, start block 64, block count 262144, type Apple_Free, contains[@0x600]: Apple Partition Map, map block count 3, start block 262208, block count 33292224, name disk image, type Apple_HFS, valid, allocated, readable, writable, mount at startup
and this is my vm conf file:
cat /etc/pve/qemu-server/100.conf
agent: 1
args: -device isa-applesmc,osk=”” -smbios type=2 -device usb-kbd,bus=ehci.0,port=2 -cpu Penryn,kvm=on,vendor=GenuineIntel,+kvm_pv_unhalt,+kvm_pv_eoi,+hypervisor,+invtsc,+pcid,+ssse3,+sse4.2,+popcnt,+avx,+avx2,+aes,+fma,+fma4,+bmi1,+bmi2,+xsave,+xsaveopt,check
balloon: 0
bios: ovmf
boot: order=ide2
cores: 4
cpu: Penryn
efidisk0: local:100/vm-100-disk-1.raw,size=128K
ide0: local:iso/macOS-Big-Sur-11.0.1-20B29.iso,cache=unsafe,size=16G
ide2: local:iso/OpenCore-v10.iso,cache=unsafe
machine: q35
memory: 8192
name: BigSur
net0: vmxnet3=16:2C:94:19:17:32,bridge=vmbr0,firewall=1
numa: 1
ostype: other
scsihw: virtio-scsi-pci
smbios1: uuid=c9a0de5a-e549-4228-8274-a657c204a72e
sockets: 1
vga: vmware
virtio0: local:100/vm-100-disk-0.raw,cache=unsafe,discard=on,size=80G
vmgenid: a913138a-766b-48a3-b522-72497bcdfaac
any hint appreciated, thanks…
Installer must be partitioned GUID/GPT
HELLO! It’s a very nice article< thx. But I can't login to apple id < how I' may fix it? Please help me
Do you mean in iCloud / App Store settings, or do you mean somewhere else?
I’ve never seen iCloud or App Store fail before on any of my VMs, except when the first Ethernet interface wasn’t called “en0”. Run “ifconfig” in your macOS VM and check that your network interface is called “en0”.
I mean login to apple id (icloud/mail,iMessage) picture url ————————————->https://ibb.co/XLBQkky
pav@iMac-Pro ~ % ifconfig -a
lo0: flags=8049 mtu 16384
options=1203
inet 127.0.0.1 netmask 0xff000000
inet6 ::1 prefixlen 128
inet6 fe80::1%lo0 prefixlen 64 scopeid 0x1
nd6 options=201
gif0: flags=8010 mtu 1280
stf0: flags=0 mtu 1280
en0: flags=8863 mtu 1500
options=424
ether 00:24:58:00:00:7f
inet6 fe80::185b:9a68:40cc:9ab%en0 prefixlen 64 secured scopeid 0x4
inet6 2a03:e2c0:100d:5555:1c5f:1c85:83b9:5390 prefixlen 64 autoconf secured
inet6 2a03:e2c0:100d:5555:b872:9b35:a383:d24c prefixlen 64 autoconf temporary
inet6 fd48:c431:f56c:0:48d:ff3:af7c:71fa prefixlen 64 autoconf secured
inet6 fd48:c431:f56c:0:409b:c0c2:7d75:a82d prefixlen 64 autoconf temporary
inet6 fd48:c431:f56c::b4a prefixlen 64 dynamic
inet 192.168.0.153 netmask 0xffffff00 broadcast 192.168.0.255
nd6 options=201
media: autoselect (1000baseT )
status: active
utun0: flags=8051 mtu 1380
inet6 fe80::b6f7:a592:5410:e645%utun0 prefixlen 64 scopeid 0x5
nd6 options=201
utun1: flags=8051 mtu 2000
inet6 fe80::c84a:3a75:4ed4:c4aa%utun1 prefixlen 64 scopeid 0x6
nd6 options=201
iCloud should already be working, but for iMessage you need to follow these steps to mark your network adapter as built-in:
https://dortania.github.io/OpenCore-Post-Install/universal/iservices.html#fixing-en0
Thanks a lot. Fixing-en0 resolves my problem after step mark as built-in.