
macOS 12 Monterey is now available! If you want to install that instead, check out my newer guide!
This tutorial for installing macOS Big Sur using OpenCore has been adapted for Proxmox from Kholia’s OSX-KVM project and Leoyzen’s OpenCore configuration for KVM. You can get the full sourcecode on my GitHub here.
Requirements
I’ll assume you already have Proxmox 6 installed. You also need a real Mac available in order to fetch the OSK key.
Your Proxmox host computer’s CPU must support SSE 4.2, so for Intel your CPU must be at least as new as Nehalem, which was the first CPU generation to bear the “Core” i5/i7 branding. Older CPUs will cause the finder to repeatedly crash after installation completes (with an Illegal Instruction exception in the graphics code).
Modern AMD CPUs also support SSE 4.2 and will work with this guide.
First step: Create an installation ISO
Download my copy of the OSX-KVM repository using the download button, and unzip it:
https://github.com/thenickdude/OSX-KVM
First we need to install some build requirements. If you will be building the installer ISO on macOS, open up the Terminal and run this command to install the commandline tools:
xcode-select --installIf you’re building the ISO on Linux, you instead need to run this command (these are the package names for Ubuntu or similar distributions, they may need adjustment on other distributions):
sudo apt install qemu-utils make
Now in the Terminal, from the root of OSX-KVM, run:
cd scripts/bigsur
make BigSur-recovery.img
This will download the Big Sur installer from Apple’s software distribution servers and build a BigSur-recovery.img file for you. Upload this file to your Proxmox’s ISO store directory (typically /var/lib/vz/template/iso). Although we’re putting it in the ISO directory so that we can use it with Proxmox’s ISO picker later, this a raw disk image rather than a true ISO.
If you’re building the installer on macOS, you can build a full installer instead of just a recovery, which will mean that macOS won’t have to download Big Sur files during installation, and so won’t require an Internet connection. Simply ask it to build BigSur-full.img instead:
cd scripts/bigsur
make BigSur-full.img
This option is not available when building the installer on Linux.
Prepare an OpenCore image
Download the OpenCore.iso.gz file from the newest release in my repository (that says it’s Big Sur compatible), double click it to unpack it, and upload it to Proxmox’s ISO store at /var/lib/vz/template/iso. Although it has a .iso file extension, this is actually a hard disk image. (You need v12 or newer for Big Sur 11.3 or newer)
Fetch the OSK authentication key
macOS checks that it is running on real Mac hardware, and refuses to boot on third-party hardware. You can get around this by reading an authentication key out of your real Mac hardware (the OSK key). Save the first block of C code from this page as smc_read.c. In a command prompt, change into the same directory as that file and run:
xcode-select --install # If you don't already have gcc
gcc -o smc_read smc_read.c -framework IOKit
./smc_read
It’ll print out the 64 character OSK for you. Make a note of it.
Every Mac uses the same OSK, so don’t be surprised that it doesn’t look like a random string!
Create the VM
From the Proxmox web UI, create a new virtual machine as shown below.
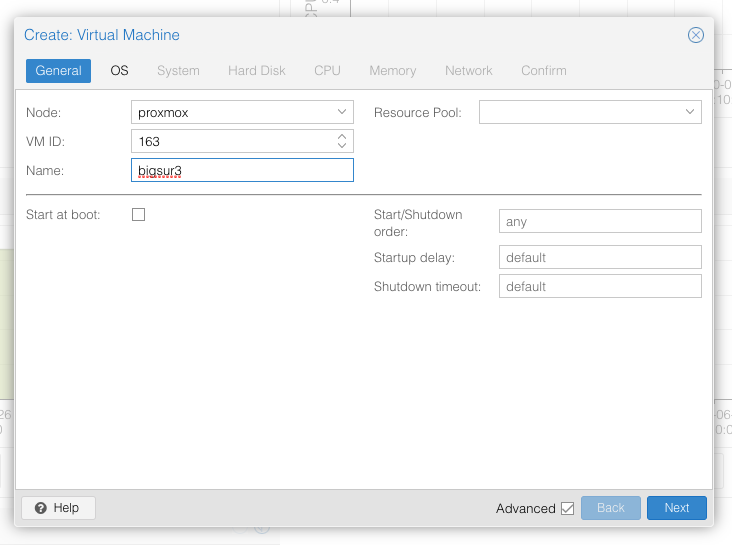
Keep a note of your VM’s ID 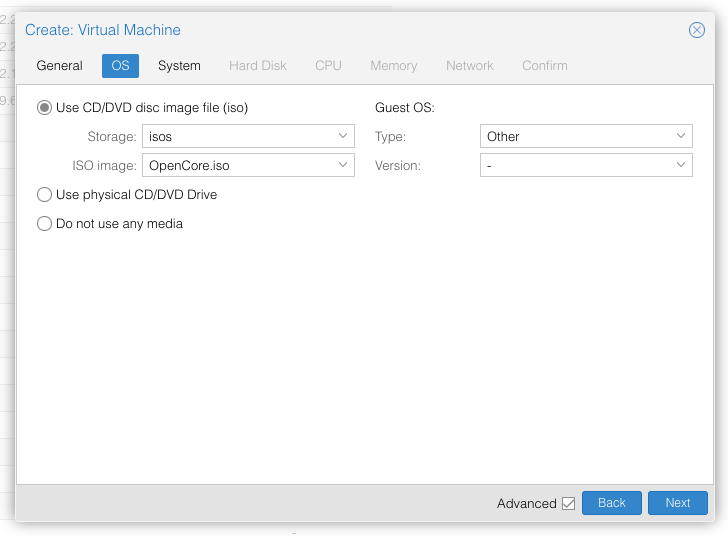
Select the OpenCore ISO you uploaded and set OS type to “Other” 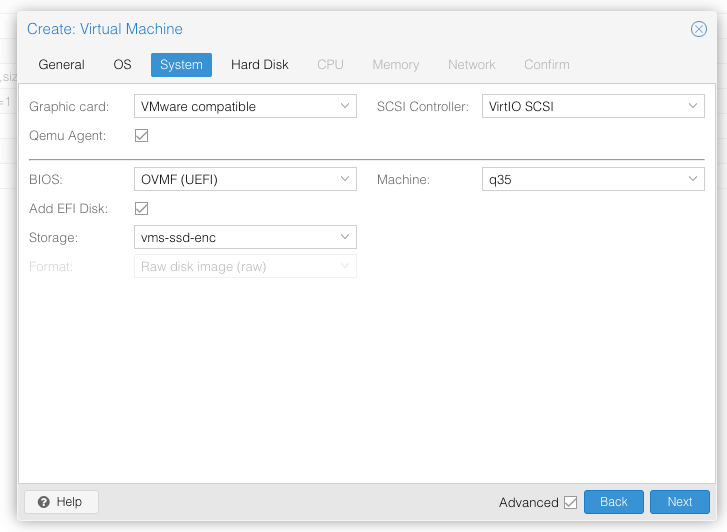
Set graphics to “VMWare Compatible”, set BIOS to OVMF (UEFI), set Machine to Q35, tick QEMU Agent, tick Add EFI Disk and pick storage for it. On Proxmox 7 you must untick “pre-enroll keys” 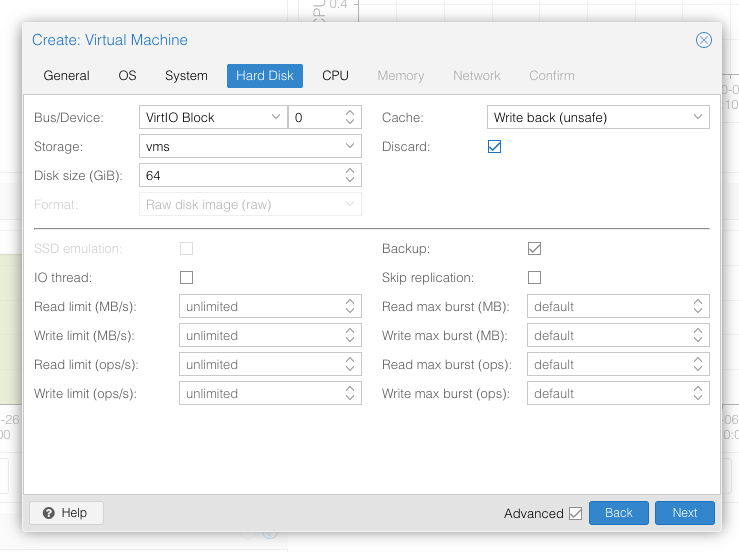
Set the size of the hard disk (64GB or greater, 32GB is too small). Attach it to virtio0. Enable discard to support TRIM. 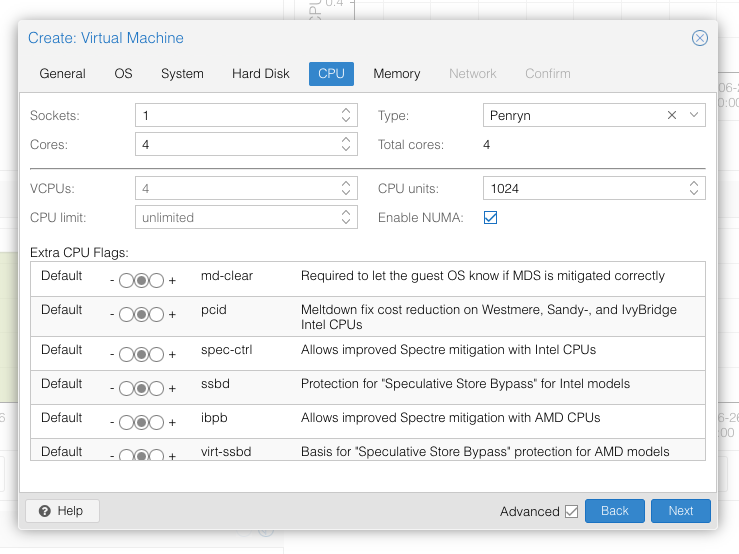
Set the number of cores for the VM, use a power of two (e.g. 1, 2, 4, 8). Set the CPU to Penryn. 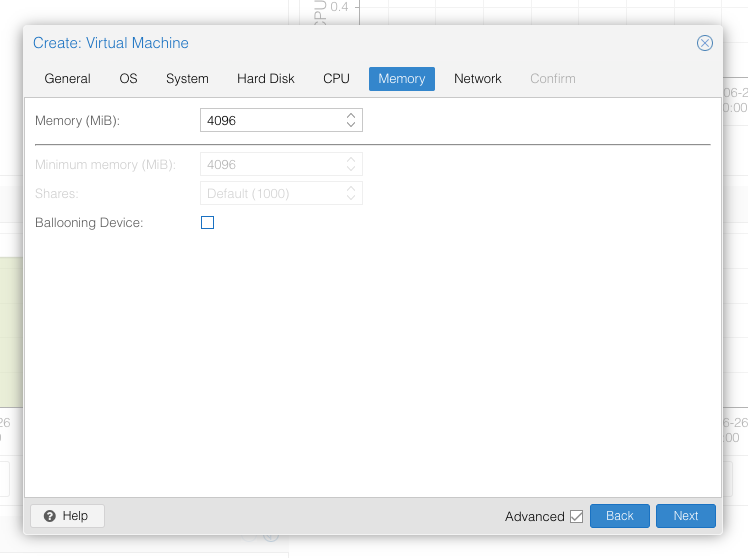
I chose a memory size of 4096MB 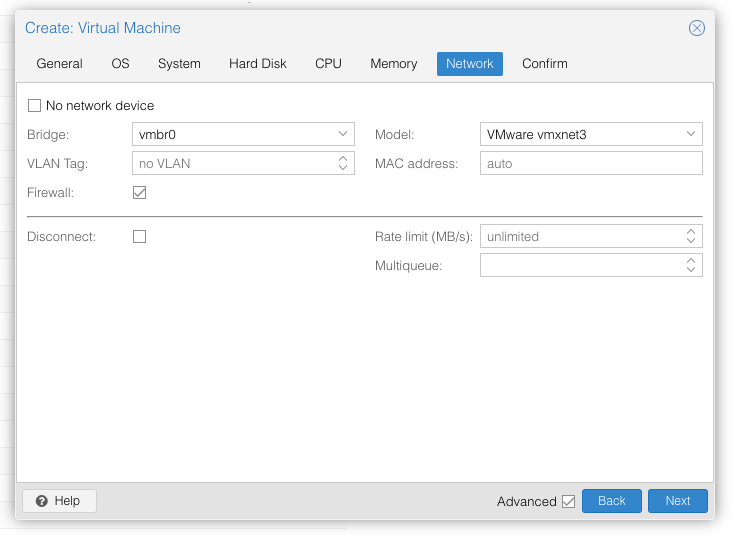
Choose VMWare vmxnet3 for the network model
In the Options page for the VM, ensure that “use tablet for pointer” is set to “Yes”.
In the Hardware page for the VM, add a second DVD drive at IDE0, set it to use your BigSur-full.img or BigSur-recovery.img.
Don’t try to start the VM just yet. First, SSH into your Proxmox server so we can make some edits to the configuration files.
Edit /etc/pve/qemu-server/YOUR-VM-ID-HERE.conf (with nano or vim). Add this line, being sure to substitute the OSK you extracted earlier into the right place:
args: -device isa-applesmc,osk="THE-OSK-YOU-EXTRACTED-GOES-HERE" -smbios type=2 -device usb-kbd,bus=ehci.0,port=2
A USB keyboard is added here because macOS doesn’t support QEMU’s default PS/2 keyboard. Ensure the args are all on a single line!
For Proxmox 7 with QEMU 6.1 or newer, also add “-global ICH9-LPC.acpi-pci-hotplug-with-bridge-support=off”.
We also need to add a -cpu argument. If your host CPU is Intel, add this to the end of the “args” line:
-cpu host,kvm=on,vendor=GenuineIntel,+kvm_pv_unhalt,+kvm_pv_eoi,+hypervisor,+invtsc
This will pass through all of the features that your CPU supports. OpenCore’s config will pretend to macOS that the CPU’s model name is Penryn for compatibility.
If your host CPU is AMD, or the above argument doesn’t work for you, use this more-compatible alternative:
-cpu Penryn,kvm=on,vendor=GenuineIntel,+kvm_pv_unhalt,+kvm_pv_eoi,+hypervisor,+invtsc,+pcid,+ssse3,+sse4.2,+popcnt,+avx,+avx2,+aes,+fma,+fma4,+bmi1,+bmi2,+xsave,+xsaveopt,check
This pretends that your CPU is Penryn, which will keep macOS happy even if your host CPU is AMD, and adds a bunch of newer required and optional CPU features on top. Features that your host CPU doesn’t support will be ignored (a warning will be printed to the console during launch with qm start 1xx), but note that macOS won’t work without SSE4.2 support.
Now find the lines that define the two “ISOs” (ide0 and ide2), and remove the “,media=cdrom” part from them. Add “,cache=unsafe” in its place. This will treat these as hard disks rather than DVD drives.
Save your changes, return to the Options tab, and change the boot order to put IDE2 (the OpenCore image) first. Your final VM configuration file should resemble this:
args: -device isa-applesmc,osk="..." -smbios type=2 -device usb-kbd,bus=ehci.0,port=2 -cpu host,kvm=on,vendor=GenuineIntel,+kvm_pv_unhalt,+kvm_pv_eoi,+hypervisor,+invtsc
balloon: 0
bios: ovmf
bootdisk: ide2
cores: 4
cpu: Penryn
efidisk0: vms:vm-100-disk-1,size=1M
ide0: isos:iso/BigSur-full.img,cache=unsafe,size=2094688K
ide2: isos:iso/OpenCore-v10.img,cache=unsafe,size=150M
machine: q35
memory: 4096
name: bigsur
net0: vmxnet3=...,bridge=vmbr0,firewall=1
numa: 1
ostype: other
virtio0: vms:vm-100-disk-0,cache=unsafe,discard=on,size=64G
scsihw: virtio-scsi-pci
smbios1: uuid=...
sockets: 1
vga: vmware
Configure Proxmox
On Proxmox, run “echo 1 > /sys/module/kvm/parameters/ignore_msrs” to avoid a bootloop during macOS boot. To make this change persist across Proxmox reboots, run:
echo "options kvm ignore_msrs=Y" >> /etc/modprobe.d/kvm.conf && update-initramfs -k all -u
Install Big Sur
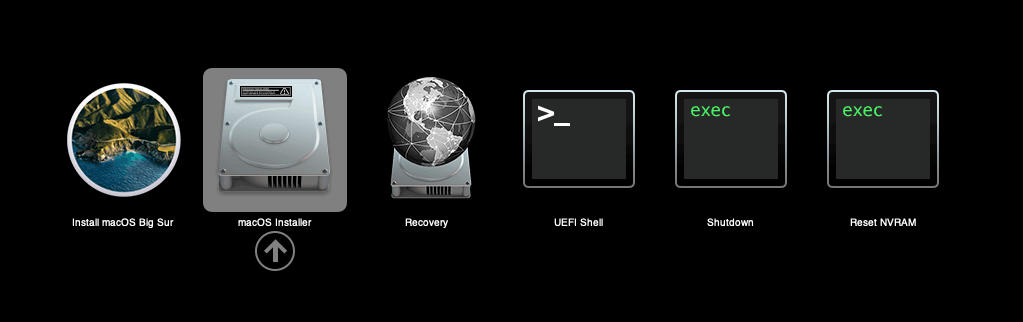
Now start up your VM, it should boot to the OpenCore boot picker:
Press enter to boot the “Install macOS Beta” entry and the installer should appear.
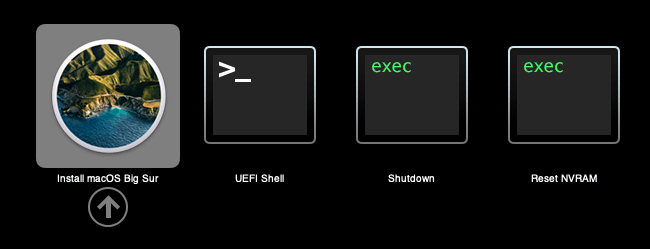
If you built a recovery installer, the icon will instead be an image of a hard disk and be labelled “MacOS Base System”.
Our virtual hard drive needs to be erased/formatted before we can install to it, so select the Disk Utility option. Follow the steps below to format the disk:
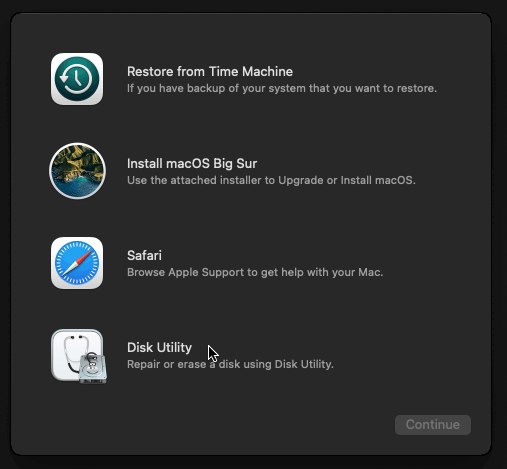
Select Disk Utility 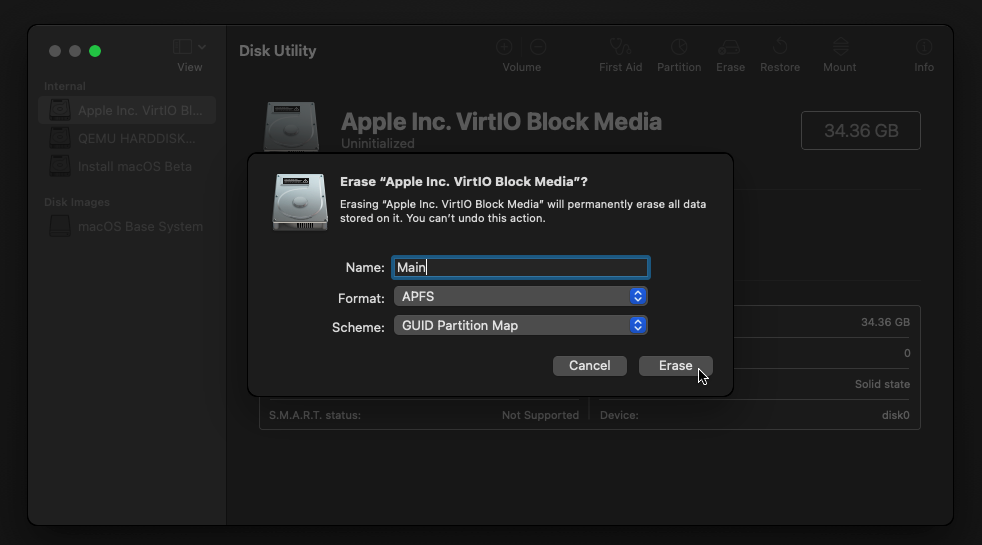
Erase the main disk (it’ll appear as VirtIO Block Media). Choose APFS. I called mine “Main”. Avoid “Encrypted” at this stage because I have not tested that scenario
Now we’re ready to begin installation!

Install macOS 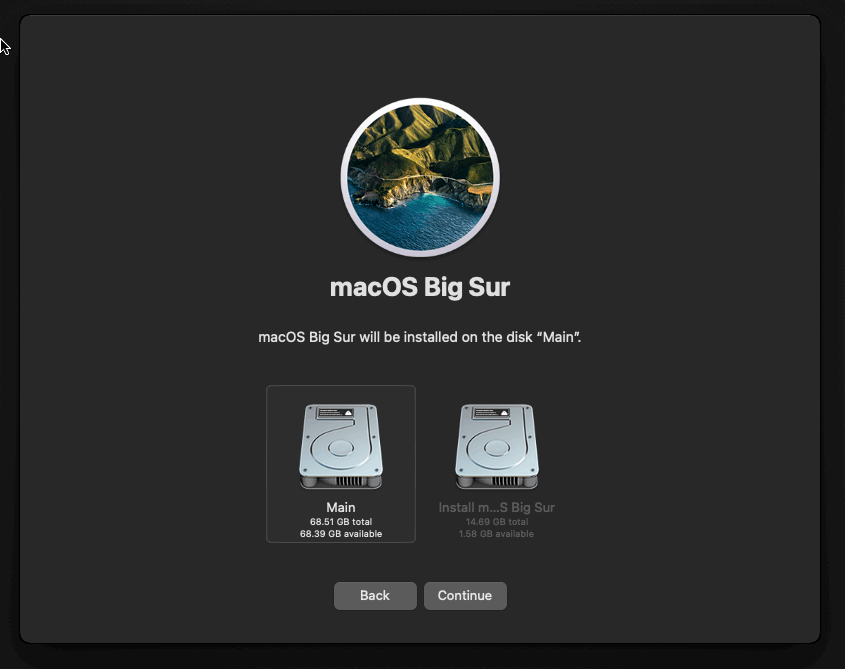
Choose the disk you erased 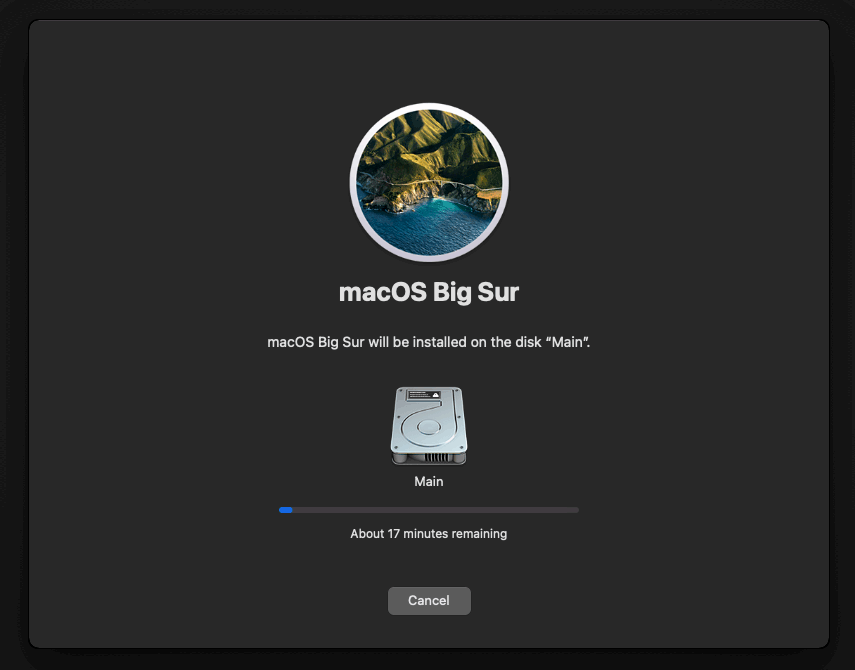
It’s installing!
After the first stage of installation, the VM will reboot 3 or 4 times in quick succession, and each time you must pick the “macOS Installer” entry (the second one here, with the hard disk icon) to continue installation. It will not be selected for you automatically:
If your keyboard isn’t responding on this screen, exit the Console tab in Proxmox and re-enter it. If you get a “prohibited” sign like this appearing, hit the Reset button on the VM to try again:

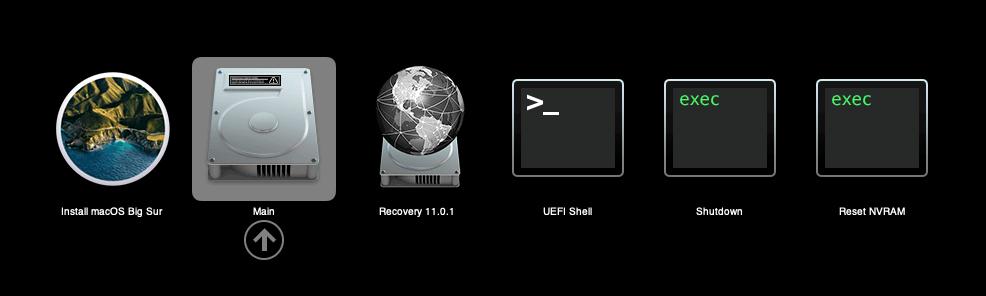
Now the installation is complete and the macOS Installer entry disappears, so pick the name of your main disk to boot (mine’s called Main).
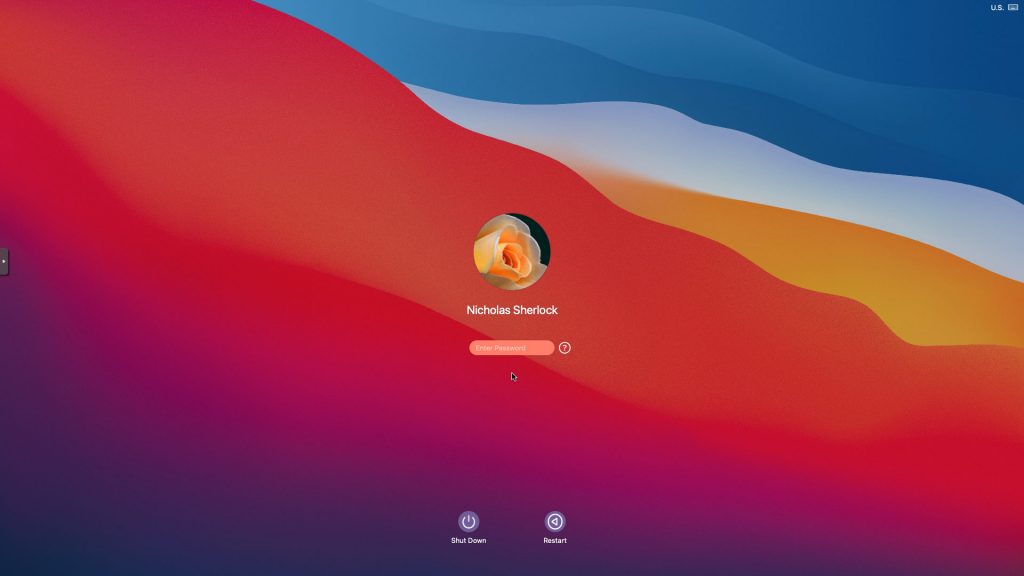
Answer the initial install questions, and you’ll be logged on! Note that you might want to hold off on logging into your Apple ID until you’ve configured your Mac’s serial number in OpenCore.

Note that it will be really sluggish for a few minutes after the first boot while the system performs housekeeping tasks.
Make the OpenCore install permanent
We’re currently booting using OpenCore from the attached OpenCore ISO. Let’s install that to the hard drive instead. Pop open Terminal and run “diskutil list” to see what drives we have available.
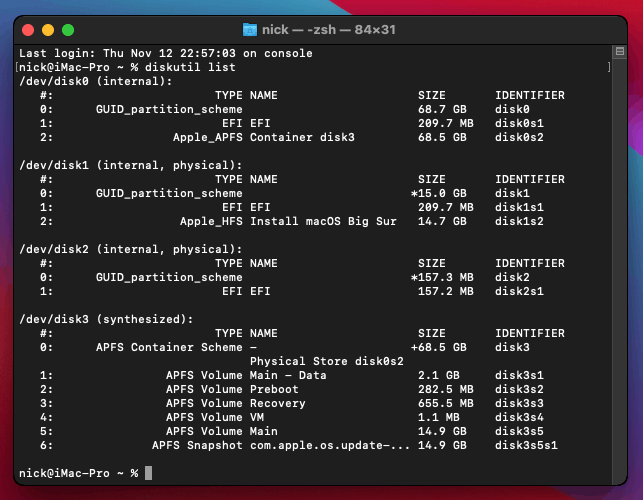
Use “sudo dd if=<source> of=<dest>” to copy the “EFI” partition from the OpenCore CD and overwrite the EFI partition on the hard disk. The OpenCore CD is the small disk (~150MB) that only has an EFI partition on it, and the main hard disk is the one with the large (>30GB) Apple_APFS “Container” partition on it.
In my case these EFI partitions ended up being called disk2s1 and disk0s1 respectively, so I ran “sudo dd if=/dev/disk2s1 of=/dev/disk0s1” (note that if you get these names wrong, you will overwrite the wrong disk and you’ll have to start the installation over again!).
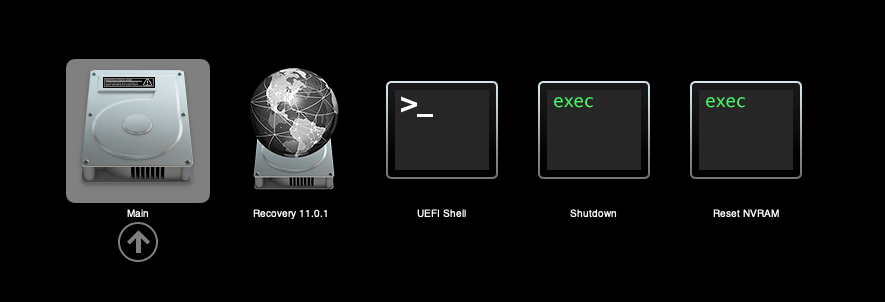
Now shut down the VM, and remove both the OpenCore and the Big Sur installer drives from the Hardware tab. On the Options tab, edit the boot order to place your virtio0 disk as the first disk. Boot up. If everything went well, you should see the OpenCore boot menu, and you can select your “Main” disk to boot Big Sur:
Sleep management
I found that I was unable to wake Big Sur from sleep using my mouse or keyboard. If you encounter the same problem, you can either disable system sleep in Big Sur’s Energy Saver settings to avoid the issue, or you can manually wake the VM up from sleep from Proxmox by running:
qm monitor YOUR-VM-ID-HERE
system_wakeup
quit
Editing your OpenCore/EFI settings
The Configuration.pdf that explains the OpenCore config.plist file can be found along with the OpenCore release on my GitHub.
To mount your EFI partition in macOS so you can edit your config.plist, first check the “identifier” of your EFI partition in the terminal:
~$ diskutil list
/dev/disk0 (external, physical):
   #:                   TYPE NAME              SIZE       IDENTIFIER
   0:  GUID_partition_scheme                  *512.1 GB   disk0
   1:                    EFI EFI               209.7 MB   disk0s1
   2:             Apple_APFS Container disk1   511.9 GB   disk0s2
Then you can mount it like so:
sudo mkdir /Volumes/EFI
sudo mount -t msdos /dev/disk0s1 /Volumes/EFI
Now you can edit /Volumes/EFI/OC/config.plist with your favourite text editor to make your changes. (TextEdit is not a great choice because it likes to insert curly quotes into the file and otherwise break things, there are some dedicated plist editors available such as XCode).
If you’re unable to boot macOS, you can edit the config.plist using the “UEFI Shell” option in the OpenCore boot menu instead.
Enter “FS0:” and press enter to open up the first available filesystem, then run “edit EFI\OC\config.plist” (if the file isn’t found, try switching to another filesystem like fs1:). When you’re done editing, press control+Q to exit, “Y” to save, then run “exit” to return to the OpenCore menu. You need to reboot for your changes to take effect.
If you prefer, you can edit config.plist from the comfort of your Proxmox host instead. If you’re booting from an attached OpenCore.img file, you can mount that file as a disk on the host. If you’re booting from the VM’s disk instead, it must be in raw format in order to be mounted (e.g. typical LVM or ZFS usage) rather than qcow2.
# Mount an OpenCore image:
losetup --partscan /dev/loop0 /var/lib/vz/template/iso/OpenCore-v11.img
# or a VM boot disk:
losetup --partscan /dev/loop0 /dev/zvol/tank/vms/vm-100-disk-1

mount /dev/loop0p1 /mnt
Now the contents of that first partition are available in /mnt, so you can edit /mnt/EFI/OC/config.plist in your favourite editor. When you’re done, do this to unmount the disk:
umount /mnt
losetup --detach /dev/loop0
Automatic boot
In config.plist, you can set Misc/Boot/Timeout to a non-zero value to allow the default boot option be chosen automatically after that delay in seconds. I’ve disabled this by default because it causes the installer ISO to re-enter its main menu instead of continuing the second stage of installation.
You can set the default boot option by pressing control+enter on it.
Verbose boot
To boot macOS in Verbose mode to diagnose boot problems, at the OpenCore boot menu press Cmd+V before pressing enter to boot macOS (you don’t need to hold it down).
If there is a kernel panic during boot and it reboots too quickly to be read, edit config.plist to add “debug=0x100” to the kernel arguments.
Changing screen resolution
To change macOS’ screen resolution, you need to edit the UEFI/Output/Resolution setting in config.plist, the default is 1920×1080@32.
You should be able to change this to any of the modes that the system OVMF menu offers (hit F2 at the start of guest boot and choose “Device Manager/OVMF Platform Configuration” to see which resolutions are available).
Video performance
Because there is no guest video acceleration available for macOS, video performance is poor.
In Google Chrome in the guest you will need to toggle off the setting to “use hardware acceleration when available” to improve issues with elements not being drawn or flickering (especially video). Safari may be a better choice.
macOS’s built in “Screen Sharing” feature offers dramatically better framerates and latency than Proxmox’s browser-based VNC console, so if you have a real Mac to act as a viewing console, you can enable that in the VM’s “Sharing” settings and connect to the VM using the Screen Sharing app from your Mac instead:
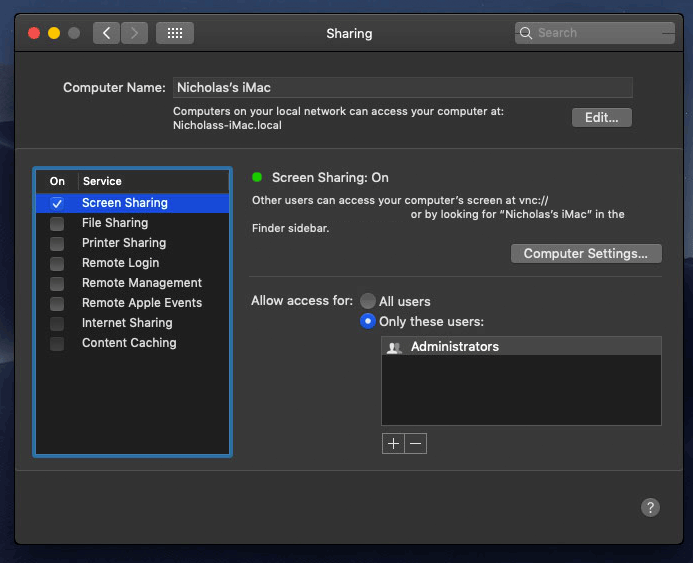
Apparently Screen Sharing is also compatible with VNC clients like RealVNC, so you should be able to connect to it from Linux or Windows consoles using RealVNC.
The real magic bullet for video performance is to pass through a compatible video card using PCIe passthrough (though note that Big Sur, like Catalina, does not support most NVidia cards). This offers near-native performance. You can read more about how I’m using PCIe passthrough on my own installation here.
USB passthrough
Since I want to use this as my primary computer, I want to use a USB keyboard and mouse plugged directly into Proxmox, rather than sending my input through the web VNC console.
Proxmox has good documentation for USB passthrough. Basically, run “qm monitor YOUR-VM-ID-HERE”, then “info usbhost” to get a list of the USB devices connected to Proxmox:
qm> info usbhost
 Bus 3, Addr 12, Port 6, Speed 480 Mb/s
 Class 00: USB device 8564:1000, Mass Storage Device
 Bus 3, Addr 11, Port 5.4, Speed 12 Mb/s
 Class 00: USB device 04d9:0141, USB Keyboard
 Bus 3, Addr 10, Port 5.1.2, Speed 12 Mb/s
 Class 00: USB device 046d:c52b, USB Receiver
 Bus 3, Addr 9, Port 14.4, Speed 12 Mb/s
 Class 00: USB device 046d:c227, G15 GamePanel LCD
 Bus 3, Addr 8, Port 14.1, Speed 1.5 Mb/s
 Class 00: USB device 046d:c226, G15 Gaming Keyboard
In this case I can add my keyboard and mouse to USB passthrough by quitting qm, then running:
qm set YOUR-VM-ID-HERE -usb1 host=04d9:0141
qm set YOUR-VM-ID-HERE -usb2 host=046d:c52b
This saves the devices to the VM configuration for you. You need to reboot to have the new settings apply. Note that the emulated USB3 device doesn’t work with macOS, so don’t set “usb3=1”.
You can also pass through USB devices by passing through an entire USB controller using Proxmox’s PCIe passthrough feature, which gives much better compatibility.
FileVault
FileVault now works with OpenCore, so you can encrypt your boot disk by using the option in macOS’ system security preferences. But be certain to keep a copy of your recovery key and keep your backups up to date.
Fixing “guest boots to UEFI shell”
If your guest ends up booting to the UEFI shell instead of showing the OpenCore boot menu, especially if you’ve just updated OpenCore to a new version, you’ll need to edit the guest’s UEFI boot entries to fix this.
At the very start of guest boot, hit F2 to enter guest UEFI settings.
First we’ll remove the old entries. Choose the Boot Maintenance option, then Boot Options -> Delete Boot Option. Use the spacebar to tick any old Clover or OpenCore entries (avoid ticking the EFI Internal Shell option, you want to keep that!). Select “Commit Changes and Exit”.
Now we’ll add the correct entry for OpenCore back in. Select Add Boot Option. Navigate through the device tree to EFI/OC/OpenCore.efi (use EFI/BOOT/BOOTx64.efi instead on my “OpenCore v10” and older) and select it, name this new option “OpenCore” or similar. Again Commit Changes and Exit.
Go to the Change Boot Order and move OpenCore to the top. Commit Changes and Exit.
Now back out to the main menu and choose Reset, and you should successfully boot into OpenCore this time.
Fixing iMessage
iCloud and the App Store should already be working for you, but for iMessage support you must follow these steps to mark your network adapter as built-in:
https://dortania.github.io/OpenCore-Post-Install/universal/iservices.html#fixing-en0
Disabling SIP (System Integrity Protection)
You can disable SIP by selecting the Recovery option from the OpenCore boot menu, then use the top menu to open the Terminal and run “csrutil disable”. Then reboot.
This may be needed to run unsigned kexts or perform other hacks.
Upgrading OpenCore
Sometimes you need to update OpenCore to a new release in order to support a new macOS update. I’ll assume you don’t have any customisations to config.plist you want to save.
First take a snapshot! It’s great to be able to roll back if something goes wrong.
If you’re still able to boot macOS, you can update it from within the guest. Follow the instructions in the “Editing your OpenCore/EFI settings” section to mount your EFI partition. Then you can delete the EFI folder in there and replace it with the one from the OpenCoreEFIFolder.zip file from my OpenCore release (you’ll probably need to empty the trash to make room for the new folder). You’re done!
If you aren’t able to boot macOS, unpack and upload the new OpenCore ISO to Proxmox’s ISO store instead. Add a new CD drive to the VM that uses that ISO. Then in Proxmox’s terminal edit the VM’s config (in /etc/pve/qemu-server) to replace “media=cdrom” with “cache=unsafe” for the OpenCore drive. Now on the “Options” tab, change the boot order to put the new OpenCore drive first.
Start the VM and boot into macOS using the new OpenCore drive. From within macOS you can now follow the instructions from the “Make the OpenCore install permanent” section to install the new OpenCore image to your main macOS disk, after which the OpenCore drive can be detached from the VM.
Upgrading from macOS Catalina
First make a backup or snapshot of your system! Being able to roll back when the upgrade goes wrong is a real lifesaver.
You’ll need to update OpenCore to my v10 release before the upgrade. You can follow the instructions in the “Editing your OpenCore settings” section above to mount your EFI disk. Then you can replace the OpenCore files in the mounted “EFI” disk with the ones from the OpenCoreEFIFolder.zip file in my newest OpenCore release.
Reboot to make sure that you can still boot Catalina.
If you’re using any PCIe passthrough devices (particularly video cards) you’ll want to disable those and set “vga: vmware” instead, so you can install using Proxmox’s web console from a different machine during the upgrade. This avoids installer problems triggered by flaky video card passthrough, especially host lockups caused by the AMD Reset Bug.
Now you can upgrade to Big Sur using the App Store like you would on a real Mac.
Hi, I’m getting “Cannot connect to server” when trying to sign in to iCloud. Whats the fix? Thanks.
Did you figure this out? I have similar problem
I had this same issue. I tried editing the plist file with the instructions in the link below and I thought it was going to work but ultimately got the same result. Then on a whim, I tried logging into the App Store but downloading Xcode and once that worked, the AppleID in the system settings showed up.
https://github.com/deomkds/OpenCore-Post-Install/blob/main/universal/iservices.md
Hey, you be able to make videos and post on YouTube so it be easier for us to follow?
No, videos are too hard to keep up to date as the software changes.
Hi Nicholas,
Thanks again for your guides. I’ve used them several times before and have been on my Mojave build for a while, and finally got going with Big Sur. Things are working great as long as I don’t attach my GPU (Radeon Pro WX 4100). The GPU works fine with my Mojave VM, but not Big Sur. If I keep the vmware vga set and passthrough the GPU, the vnc instance shows it loading to about 30% and hanging, but my monitor will light up with my background so I know that’s working. In verbose, I’m not seeing anything that really tells me what the problem could be. I’ve also installed the reset bug fix, but that didn’t help.
Here’s my qemu config:
agent: 1
args: -device isa-applesmc,osk=”” -smbios type=2 -device usb-kbd,bus=ehci.0,port=2 -cpu host,kvm=on,vendor=GenuineIntel,+kvm_pv_unhalt,+kvm_pv_eoi,+hypervisor,+invtsc
balloon: 0
bios: ovmf
boot: order=virtio0
cores: 8
cpu: Penryn
efidisk0: local-qemu:1016/vm-1016-disk-1.raw,size=128K
hostpci0: 0000:01:00,pcie=1,x-vga=1
hostpci1: 0000:00:14,pcie=1
machine: q35
memory: 24576
name: derek-osx-bigsur
net0: vmxnet3=BA:4E:F8:92:BA:E4,bridge=vmbr0
numa: 1
ostype: other
scsihw: virtio-scsi-pci
smbios1: uuid=4d9220ae-a60d-422e-bade-1bbab0d9428b
sockets: 1
vga: vmware
virtio0: local-qemu:1016/vm-1016-disk-0.raw,cache=unsafe,size=150G
vmgenid: 52258d4c-9920-4b58-a72d-6bb7671cb570
Here is dmesg from my PVE host:
[ 1367.939388] vfio-pci 0000:01:00.0: AMD_POLARIS11: version 1.1
[ 1367.939389] vfio-pci 0000:01:00.0: AMD_POLARIS11: performing pre-reset
[ 1367.959376] vfio-pci 0000:01:00.0: AMD_POLARIS11: performing reset
[ 1367.959381] vfio-pci 0000:01:00.0: AMD_POLARIS11: CLOCK_CNTL: 0x0, PC: 0x2994
[ 1367.959382] vfio-pci 0000:01:00.0: AMD_POLARIS11: performing post-reset
[ 1367.999306] vfio-pci 0000:01:00.0: AMD_POLARIS11: reset result = 0
[ 1368.383247] device tap1016i0 entered promiscuous mode
[ 1368.389247] vmbr0: port 2(tap1016i0) entered blocking state
[ 1368.389248] vmbr0: port 2(tap1016i0) entered disabled state
[ 1368.389323] vmbr0: port 2(tap1016i0) entered blocking state
[ 1368.389323] vmbr0: port 2(tap1016i0) entered forwarding state
[ 1370.743261] vfio-pci 0000:01:00.0: enabling device (0400 -> 0403)
[ 1370.743411] vfio-pci 0000:01:00.0: AMD_POLARIS11: version 1.1
[ 1370.743412] vfio-pci 0000:01:00.0: AMD_POLARIS11: performing pre-reset
[ 1370.763285] vfio-pci 0000:01:00.0: AMD_POLARIS11: performing reset
[ 1370.763290] vfio-pci 0000:01:00.0: AMD_POLARIS11: CLOCK_CNTL: 0x0, PC: 0x2880
[ 1370.763291] vfio-pci 0000:01:00.0: AMD_POLARIS11: performing post-reset
[ 1370.803237] vfio-pci 0000:01:00.0: AMD_POLARIS11: reset result = 0
[ 1370.803359] vfio-pci 0000:01:00.0: vfio_ecap_init: hiding ecap 0x19@0x270
[ 1370.803366] vfio-pci 0000:01:00.0: vfio_ecap_init: hiding ecap 0x1b@0x2d0
[ 1370.803372] vfio-pci 0000:01:00.0: vfio_ecap_init: hiding ecap 0x1e@0x370
[ 1371.007316] vfio-pci 0000:01:00.0: AMD_POLARIS11: version 1.1
[ 1371.007317] vfio-pci 0000:01:00.0: AMD_POLARIS11: performing pre-reset
[ 1371.007427] vfio-pci 0000:01:00.0: AMD_POLARIS11: performing reset
[ 1371.007431] vfio-pci 0000:01:00.0: AMD_POLARIS11: CLOCK_CNTL: 0x0, PC: 0x2880
[ 1371.007432] vfio-pci 0000:01:00.0: AMD_POLARIS11: performing post-reset
[ 1371.047232] vfio-pci 0000:01:00.0: AMD_POLARIS11: reset result = 0
[ 1371.363026] vfio-pci 0000:01:00.0: No more image in the PCI ROM
[ 1371.363050] vfio-pci 0000:01:00.0: No more image in the PCI ROM
[ 1390.183894] kvm_get_msr_common: 46 callbacks suppressed
[ 1390.183895] kvm [5335]: vcpu0, guest rIP: 0xffffff800d031d75 ignored rdmsr: 0x60d
[ 1390.183902] kvm [5335]: vcpu0, guest rIP: 0xffffff800d031d75 ignored rdmsr: 0x3f8
[ 1390.183906] kvm [5335]: vcpu0, guest rIP: 0xffffff800d031d75 ignored rdmsr: 0x3f9
[ 1390.183909] kvm [5335]: vcpu0, guest rIP: 0xffffff800d031d75 ignored rdmsr: 0x3fa
[ 1390.183912] kvm [5335]: vcpu0, guest rIP: 0xffffff800d031d92 ignored rdmsr: 0x630
[ 1390.183915] kvm [5335]: vcpu0, guest rIP: 0xffffff800d031d92 ignored rdmsr: 0x631
[ 1390.183918] kvm [5335]: vcpu0, guest rIP: 0xffffff800d031d92 ignored rdmsr: 0x632
[ 1390.183921] kvm [5335]: vcpu0, guest rIP: 0xffffff800d031d92 ignored rdmsr: 0x619
[ 1390.183924] kvm [5335]: vcpu0, guest rIP: 0xffffff800d031d92 ignored rdmsr: 0x61d
[ 1390.183927] kvm [5335]: vcpu0, guest rIP: 0xffffff800d031d92 ignored rdmsr: 0x621
[ 1397.273420] kvm_get_msr_common: 146 callbacks suppressed
[ 1397.273422] kvm [5335]: vcpu7, guest rIP: 0xffffff800d031d75 ignored rdmsr: 0x60d
[ 1397.273428] kvm [5335]: vcpu7, guest rIP: 0xffffff800d031d75 ignored rdmsr: 0x3f8
[ 1397.273431] kvm [5335]: vcpu7, guest rIP: 0xffffff800d031d75 ignored rdmsr: 0x3f9
[ 1397.273434] kvm [5335]: vcpu7, guest rIP: 0xffffff800d031d75 ignored rdmsr: 0x3fa
[ 1397.273437] kvm [5335]: vcpu7, guest rIP: 0xffffff800d031d92 ignored rdmsr: 0x630
[ 1397.273439] kvm [5335]: vcpu7, guest rIP: 0xffffff800d031d92 ignored rdmsr: 0x631
[ 1397.273441] kvm [5335]: vcpu7, guest rIP: 0xffffff800d031d92 ignored rdmsr: 0x632
[ 1397.273444] kvm [5335]: vcpu7, guest rIP: 0xffffff800d031d92 ignored rdmsr: 0x619
[ 1397.273446] kvm [5335]: vcpu7, guest rIP: 0xffffff800d031d92 ignored rdmsr: 0x61d
[ 1397.273449] kvm [5335]: vcpu7, guest rIP: 0xffffff800d031d92 ignored rdmsr: 0x621
And lastly, here a screenshot of verbose OpenCore output during boot. The boot process is halted from here, but I can see my Big Sur background image showing on the monitor attached to the GPU (WX 4100).
https://imgur.com/a/wtKT6wD
Only change I’ve made to my config.plist is setting an autoboot of 3 seconds, otherwise it’s untouched. I’m running PVE 6.4-8, fully updated. If I remove “hostpci0: 0000:01:00,pcie=1,x-vga=1” from my qemu config, Big Sur will boot up just fine in the PVE console session.
Any ideas?? Thanks!!!!
Do you know if your Mojave config.plist has any extra kernel args added? I’m wondering if you had added a Whatevergreen flag that is missing in your new Big Sur config
Thanks for your quick response. It’s been so long since I setup this Mojave build (it’s really been rock solid) that I don’t recall. But I fired up Clover and took a look, and not really seeing anything special. Took screenshots, threw in an imgur album:
https://imgur.com/a/2Dp3fvX
Here’s the config.plist from my Mojave build EFI volume:
https://justpaste.it/530yf
I don’t see any kexts, at all, on my EFI volume but I feel like I had to load a few kexts using kextbeast. Looking in /Library/Extensions, all I’m really seeing that stands out is Lilu, which is on my Big Sur EFI volume already (along with Whatevergreen), but Whatevergreen is NOT on my Mojave build (best I can tell).
Thoughts?
I have tried so many things (re-registering kexts, updated boot args, etc) and am unable to get any change in my experience. I’m on the verge of giving up and sticking with Mojave until my hardware dies…
🙁
You could keep the vmware vga attached as a workaround. The GPU display currently only shows your background because it’s your secondary display, you should be able to drag windows over to it from the virtual display.
In macOS system display settings, on the Arrangement tab you can drag the white dock over to the GPU monitor to designate it as your primary display instead.
Unfortunately, when I connect the GPU via pass through and use the vga console, it won’t boot fully. I have a screenshot linked in my original comment that shows verbose boot output. Where it’s hanging at is where I can see the gpu showing the background, but the primary screen (virtual vga) doesn’t make it to the login screen. 🙁
Thank you very much for such a detailed guide, it clarified many things for me and I got a VM working.
However, I had to switch the hdd from virtio0 to SATA otherwise it would not show up in Disk Utility. I am using HighSierra, if that makes any differences.
Yes, virtio disk support is relatively new in macOS (I have older guides for the older versions)
Nice guide except I’m having a problem following it you say to use penryn for the cpu however that’s not an option for me.
You can actually pick any option here for the CPU setting, because it’ll be overwritten later by the “args” option.
Hi Nick,
Been trying to get this to work for the past few hours. I have a ryzen 5950x and an nvme drive running proxmox 6.4 (latest). I was trying to virtualize big sur 11.4, i created the iso file on my mac. I can get opencore to boot but I never see the OSX install icon when the VM boots. The only thing i could not do while following your tutorial is for hard disk, I could not put “vms”, I had to use local-lvm (only option given).
Any idea where I went wrong?
args: -device isa-applesmc,osk=”o…c” -smbios type=2 -device usb-kbd,bus=ehci.0,port=2 -cpu Penryn,kvm=on,vendor=GenuineIntel,+kvm_pv_unhalt,$
balloon: 0
bios: ovmf
boot: order=ide2;ide0;virtio0;net0
cores: 8
cpu: Penryn
efidisk0: local-lvm:vm-103-disk-1,size=4M
ide0: local:iso/BigSur.iso,cache=unsafe,size=15000M
ide2: local:iso/OpenCore-v13.iso,cache=unsafe,size=150M
machine: q35
memory: 8192
name: bs004
net0: vmxnet3=02:AC:FA:C1:91:70,bridge=vmbr0,firewall=1
numa: 1
ostype: other
scsihw: virtio-scsi-pci
smbios1: uuid=d…
sockets: 1
vga: vmware
virtio0: local-lvm:vm-103-disk-0,cache=unsafe,size=64G
vmgenid: d…
> I could not put “vms”,
That’s just the name I gave to my Proxmox storage, it’s fine for it not to match.
Did you use my script to create your install image? If not, it probably isn’t formatted correctly, and that’s why it doesn’t appear in the OpenCore menu. The image needs to be formatted GPT to work.
Hi,
Thanks for your guide and github repo.
I tried to use the VirtIO network card… and it’s working ! On Proxmox, I setup the multiqueue parameter to 8 for the VM’s network card. On other VM this increase greatly the performance, I didn’t test to much on MacOS for now.
The last stuff missing are the audio and the QXL driver. For the audio, maybe the hackingtosh people could have a driver for one of the 3 audio card emulated by Qemu.
I also activated the balooning option on the RAM and I didn’t got any problem or alert, but i’m not sure the thing is used/working.
Regards
The last
Audio does work when using default ICH9 drived in Catalina, but breaks after upgrade to Big Sur. Maybe this piece of info would be of any use.
The Spice audio works with MacOS13 on Proxmox 7.2 (no mater which intel audio device you pass from Proxmox) , but you need to install the latest VoodooHDA (3.0.2 in my case). Here is setup reference: https://github.com/yahgoo/installVoodooHDA4BSnMont
I’m missing only QXL driver with multiple resolutions (right now I can change them only via the OpenCore’s settings) and some kind of clipboard sync.
Hi nick!
I followed all your steps and everything seemed okay until the step:
– “In the Hardware page for the VM, add a second DVD drive at IDE0, set it to use your BigSur-full.img or BigSur-recovery.img.”
I can see the BigSur-recovery.img in /var/lib/vz/template/iso/, but I’m not seeing it on proxmox UI when I’m trying create a DVD drive and to set it to use for that .img. I can see all other isos I have, but not BigSur-recovery.img
Can you please help me?
Thanks in advance!
Check that your uploaded file didn’t end up with weird rights like not being world-readable.
You can “chmod 0644 /var/lib/vz/template/iso/BigSur-recovery.img” to clean that up for example.
Also, reload the page, your browser caches the list of ISOs when the dropdown box is first rendered.
How do I change the serial number for my device? It’s still showing the one from your Opencore.
Follow the Dortania guide here:
https://dortania.github.io/OpenCore-Post-Install/universal/iservices.html
wow Nicholas,
Many thanks for this 100% working, and also great looking manual:
a 100% percent working manual to virtualize the latest version of MacOS on a AMD host is a rarity, but you succeeded!
I set my BigSur up in about 2 hours, and added video and USB pass through (a OSX natively supported Radeon 570 ). Also working !
(cheap, but exellent) proxmox hardware:
MoBo: AsRock X470 master sli
Cpu: AMD Ryzen 7 2700 (8c,16thd)
Mem: 2x16GB, Corsair Vengeance LPX , DDR4, 3200MHz
Vid: Radeon RX570
Thanks again!!
Wow, talk about a speedrun!
Hiya, I got this up and running on a proxmox cloud install no problem. I was wondering: I want to install proxmox 6.4 on my MacBook Pro (15-inch, 2018), and set this exact same thing up but on the mac.
Sounds stupid, but bear with me:
I have this machine as a backup, not my main rig. So I want to run windows 10 pro on it (good specs, i7 6 core, 16gb ddr4 RAM), and run osx on it as well. Even on a vanilla brand new install, Big Sur runs a lot slower with an external monitor than my Macbook Air 2017, ironically!
Main questions are:
a. Can I PCI Passthrough the USB-C/Thunderbolt/DisplayPort to plug in my 4K monitor, you think? as well as my USB trackpad and USB Magic Keyboard
b. can I GPU Passthrough the AMD Radeon 555x built in?
c. (a stretch), use the built in retina display for a VM?
>a. Can I PCI Passthrough the USB-C/Thunderbolt/DisplayPort to plug in my 4K monitor, you think?
I haven’t tried the DisplayPort part of this functionality so I’m not sure on that one. For the PCIe attachment functionality of Thunderbolt, you can’t actually pass through the port itself, you instead PCIe passthrough the device that is connected to the port. Use “boltctl” on the host to allow the device to appear in lspci, and then you can PCIe passthrough the attached device as if it was a normal PCIe device.
It’s possible that your GPU has its own USB controller in its IOMMU group which corresponds to the USB-C functionality of this port. If that’s the case, the USB-C and DisplayPort functionality would work fine since the passed-through GPU will handle all the features of the port.
>as well as my USB trackpad and USB Magic Keyboard
Do you mean external devices or the ones integrated into the MacBook? Both are possible. You’ll be able to PCIe passthrough the USB controller that these are attached to if you are lucky with IOMMU groups, or you activate the ACS Override Patch. Otherwise you can use regular USB device passthrough (but note that for USB device passthrough, I’ve never seen it support hot-attach and hot-detach, i.e. devices must be present at VM start time, which is a huge pain in the ass).
>can I GPU Passthrough the AMD Radeon 555x / use the built in retina display for a VM?
For Nvidia Optimus setups this is difficult, because the discrete GPU has to cooperate with the integrated GPU in order to get its output onto the integrated display (and there are further complications with loading the firmware for the dGPU even if you don’t want to use the integrated display), this architecture is known as “muxless”. I haven’t heard anything at all about the equivalent technology for AMD and I’m not sure if it is possible or not.
Most likely you’ll have to install a windowing environment on Proxmox so you have a display on your iGPU (https://pve.proxmox.com/wiki/Developer_Workstations_with_Proxmox_VE_and_X11), then add an HDMI dummy plug to convince the dGPU that there is a monitor attached (GPUs tend to disable acceleration otherwise), and then view the output of the dGPU on your iGPU using network streaming software like Steam Remote Play or Parsec. For Windows guests you can use Looking Glass instead.
Thanks again for your efforts with these valuable installation tutorials and files.
I carefully followed your steps and this dummie got a functioning Big Sur install in Proxmox running.
Except… Is there anything in the settings or setup that would prevent NoMachine from installing? The 7.6.2 installer ends with a “failed to install” dialog. The same DMG installer does work on a real Mac 10.14.6.
Open the “Console” app while you run the install and see if any complaints get logged to the system log.
Thanks for the quick response.
I think this has something to do with sandboxing. These are a few lines extracted from the install.log…
2021-08-02 12:59:13-04 VMMacOS Installer[85909]: Package Authoring Error: has an unsupported MIME type: image/data
2021-08-02 12:59:27-04 VMMacOS installd[703]: PackageKit: Set reponsibility for install to 85909
2021-08-02 12:59:28-04 VMMacOS installd[703]: PackageKit: Extracting file:///Volumes/NoMachine/NoMachine.pkg#nxclient.pkg (destination=/Library/InstallerSandboxes/.PKInstallSandboxManager/F057B5EE-FA45-460D-8B6B-56FECD08844B.activeSandbox/Root, uid=0)
2021-08-02 12:59:30-04 VMMacOS installd[703]: PackageKit: Cleared responsibility for install from 85909.
2021-08-02 12:59:30-04 VMMacOS installd[703]: PackageKit: Cleared permissions on Installer.app
2021-08-02 12:59:30-04 VMMacOS installd[703]: PackageKit: Install Failed: Error Domain=NSPOSIXErrorDomain Code=2 “No such file or directory” UserInfo={NSFilePath=/private/tmp/PKInstallSandbox.XXXXXX} {
NSFilePath = “/private/tmp/PKInstallSandbox.XXXXXX”;
The entire log is at https://docs.google.com/document/d/1yVL0J0xM1MPi30jQPo546Aii7r5rRnqZJ7lWTbvSySE/edit?usp=sharing. (I didn’t want to take up a lot of space in the post.)
That is curious, can you check the output of “ls -l /private”? For me the tmp directory within /private has these rights set:
drwxrwxrwt 28 root wheel 896 Aug 3 15:49 tmpYou could try booting into recovery mode, then open the Terminal from the top menu, then in there run “csrutil disable”, and then reboot and try the installer again. Actually, before running “disable”, run “csrutil status” and check what it is currently set to.
Hurray! I think the problem is solved. It basically had affected any application install routine.
Looking back early in the install log there was a “No such file or directory” failure related to /private/tmp. This was a clue even this dummie recognized. A little online research then identified an odd recursive symlink bug problem with Catalina that sure seemed similar.
https://whitehatmac.com/odd-recursive-symlink-bug-in-catalina/
https://forums.macrumors.com/threads/package-installation-fails.2234247/page-2
I disabled SIP per your instructions. Then made the following changes in Recovery with Terminal using those Catalina postings for guidance.
cd /Volumes/’Main – Data”/private (my hard disk is named “Main” like yours)
ls -laO (to see the original tmp link)
rm -rf tmp
mkdir -m 777 tmp
ls -laO (to see the changed tmp directory)
I assume I could go back if this was a catastrophe by simply reversing those commands.
But all installers now worked like a charm! Problem solved so far.
Why the tmp link appeared in /private instead of a tmp directory like yours remains a mystery.
Let me repeat: Thanks for your efforts with these valuable tutorials, files, and feedback to comments.
Hi Nick,
You mentioned on the Proxmox subreddit a couple of years ago that a proxmox guest is not good for audio production due to latency issues…
One problem is that (by default) the guest doesn’t have exclusive access to the core it’s running on. Unbeknownst to the guest OS, a host thread can pre-empt it. This means that unless you carefully isolate the guest using the host scheduler, any attempt of the guest to make real-time guarantees (for instance, to deliver an audio buffer on time) is guaranteed to fail.
Can you give any advice about isolating the guest using the host scheduler please? Thanks so much
There are a lot of guides for doing this on non-Proxmox hosts, but I haven’t seen any for Proxmox specifically yet. Probably something that uses raw QEMU commandline options (instead of libvirt) can be adapted using the “args” VM option in Proxmox.
Sorry, I haven’t attempted this myself and don’t have any advice to add here.
OK Nick sounds like a step too far for me. I’ll stick with my Hackintosh. 🙂
Thanks for the quick reply!
Hi Nick
I installed macos big sur but once the installer is gone and when I try to boot into macos drive, it gets stuck, I checked verbose log. See this screenshot https://imgur.com/a/DTrsFRl
I am running Proxmox 7
Please help
Your OSK is wrong
I can’t get usb 3 working on my passed through internal usb controller. I tried USB mapping through dortania guide, but no usb 3 devices showed up. Not sure what to do next.
Passed through using PCIe passthrough?
Yeah passed through using PCIe passthrough. Those same ports work as USB 2 as does the GPU and Wifi Bluetooth card I passed in, but USB 3 doesn’t work. No usb 3 devices show up in system report.
So you already used USBMap?
https://github.com/corpnewt/USBMap
Maybe macOS doesn’t support your USB chipset? What’s the product name and PCI device ID?
Yes I tried USBMap and populated ports wouldn’t pop up.
Here is a snippet from lspci -vvnn of the controller I’m trying to pass.
https://pastebin.com/SwzknCRG
I was able to get them working at full speed as a bare metal hackintosh but I’m not sure how that translates over to vfio.
Hello.
Did you figured out what happened?
I am facing the same issue, usb2 are working fine but no usb3 are recognized when I try to map usb ports inside the VM.
Hi and thanks for great guide! I’ve Ryzen 3900 and if I set cores to 4 or less it works well, but if I increase to 6 or 8 Mac OS get stuck at the beginning of loading. Also I want to install Catalina or Mojave but Open core didn’t see my images of it . I formatted it myself from dmg to img trought diskutil, maybe u can make that easy creation of img as BigSur have, please?
>if I increase to 6 or 8 Mac OS get stuck at the beginning of loading
Hmm, try setting cores to 8 in Proxmox, then add this to your args: -smp 8,sockets=1,cores=4,threads=2
Your installer images must be formatted GPT in order for OpenCore to see them (not MBR), use my older Catalina or Mojave guides which include instructions for this if you get stuck.
thx for fast reply! 😀 when I set cores to 8, then add args I get that error:
kvm: -smp 8,sockets=1,cores=4,threads=2,kvm=on,vendor=GenuineIntel,+kvm_pv_unhalt,+kvm_pv_eoi,+hypervisor,+invtsc,+pcid,+ssse3,+sse4.2,+popcnt,+avx,+avx2,+aes,+fma,+fma4,+bmi1,+bmi2,+xsave,+xsaveopt,check: Invalid parameter ‘kvm’
TASK ERROR: start failed: QEMU exited with code 1
and about Catalina or Mojave I did like in ur past guides:
hdiutil convert BaseSystem.dmg -format UDRW -o Catalina-installer.iso
mv Catalina-installer.iso.img Catalina-installer.iso
then upload to prox, but it didn’t work anyway. sorry for lame questions
It looks like you melded the new smp argument with the existing cpu one, these need to be kept separate, sort of like what I have in my config here:
https://www.nicksherlock.com/2018/11/my-macos-vm-proxmox-setup/
Thats works! Thanks u a lot:P u’r great person! 😀
Hi Nick!
Thank you for putting up the image and updating the tutorial for Big Sur.
I have a Catalina installation working with USB-controller, Vega 64, WiFi and PCIe NVMe passthrough – using the Catalina version of your OC setup. It never picked up the USB/Bluetooth at OpenCore screen – I have to plug the keyboard through USB in order to choose the partition to boot. That’s a bit tourblesome when updating MacOS, but not a big deal. Once it’s booted up into Catalina, the bluetooth devices work normally.
But with this Big Sur OC image, the bluetooth won’t work even when booted to the OS. It shows the bluetooth icon, but it never manages to connect. I’m still booting into my Catalina install though, mind you.
Do you have any idea how I can get that fixed?
Do any devices work in that Bluetooth’s USB port after boot? Most likely you need to perform USB port mapping:
https://dortania.github.io/OpenCore-Post-Install/usb/intel-mapping/intel.html
Yes, the keyboard and trackpad work fine. It’s the bluetooth that only shows the icon, but doesn’t connect to anything.
Under Catalina, it says my chipset is a 20703A1.
If I’m not mistaken, it’s a BCM943602CDP, which is supposed to work with Big Sur… 🤔
Is it common for firmwares on these things to be updated “secretly” in real Macs?
Actually, when I said:
If I’m not mistaken, it’s a BCM943602CDP, which is supposed to work with Big Sur… 🤔
I meant:
If I’m not mistaken, it’s a BCM943602CDP, and it is working under Catalina with the previous OC config you posted… 🤔
So do you have any ideas on which kexts I should look for in order to get the bluetooth devices to work properly…?
Hello Nick!
I tried to suspend and resume my macOS which has a NVIDIA GT710 PCI-E graphics card passed through.
After resume the monitor is still black.
Is it generally impossible to use suspend and resume commands from proxmox for macOS VMs?
I tried to passthrough a USB3 card too but after resume it is “disabled” too.
I don’t think that suspend is expected to work with VMs that have passthrough PCIe devices attached
I tested with Windows 10 without any problems.
I use suspend (by configuring guest to sleep) and use the passed-through USB card (connected to the keyboard and mouse) to wake it up again. It works normally.
Hi there,
i just followed your explanations and it worked just fine… until the first start of macOS Big Sur…
After I installed macOS and wanted to start it for the first time (macOS installer disappeared) the VM is not booting and stops on the loading screen…. Any suggestions why?
I am using Proxmox 6.4 and configured the VM like you did
Double check your OSK
Thanks for this write-up; it worked perfectly for me on PVE 7. The only issue was signing into iCloud; I was getting an error message of “could not communicate with the server.” The issue was that the built-in (virtual) NIC wasn’t marked as “built-in” in config.plist; correcting that as described in https://dortania.github.io/OpenCore-Post-Install/universal/iservices.html#fixing-en0 resolved the issue.
Using your default Opencore config.plist, I can boot Big Sur and use it via PVE console just fine. But if I try to passthrough my Radeon Pro WX 4100, the VM no longer boots. Is it expected that I need to make changes to the config.plist? It looks like WhateverGreen kext is in there, which I think is all I need for my Polaris-based GPU.
Any thoughts?
It shouldn’t need any edits. Make sure you’re either avoiding the host using the card on startup (e.g. by setting a different card as primary in host UEFI and binding it to vfio-pci) or you supply a clean vBIOS for the GPU using the romfile argument.
This is a model affected by the AMD Reset Bug, so you might only be able to use the card once per host power cycle. Some cards can be fixed by;
https://github.com/gnif/vendor-reset
Thanks!
I had to do the vendor-reset fix, change a BIOS setting so that my PVE host wouldn’t use my GPU on boot, and had to do the PCI passthrough setup direct in my qemu conf file instead of in the PVE gui. Not sure why, but after those 3 things I am able to boot and use Big Sur with my WX 4100 on PVE 7.x!
I’m trying to use the same GPU (WX 4100) and hit the same issue. After passing the card through with the Proxmox GUI the macOS VM won’t start anymore. Can you post a copy of your hostpci line in your vm.conf. Mine looks like this:
`hostpci0: 0000:03:00,pcie=1,x-vga=1`
I can pass the card through a Windows10 VM just fine. So it must be connected to macOS. Would appreciate your help.
That line is correct. You can see my whole config here:
https://www.nicksherlock.com/2018/11/my-macos-vm-proxmox-setup/
At what point in the boot does it get stuck? Any errors in host dmesg?
Hello Nick,
I followed your guide, I believe 100%. However, my newly purchased (but still used) AMD Radeon 7770 seems to make my VM hang during boot up.
I am quite familiar with general Linux as well as MacOS, although my old 2010 iMac doesn’t go past High Sierra, so Big Sur is new to me. Running on ProxMox VE 7.
I have seen folks mention “whatevergreen”, but I don’t know what that is or how to use it.
You’re already using Whatevergreen, it’s a kext included as part of my OpenCore image.
This GPU requires you to add “radpg=15” to the boot flags in your OpenCore’s config.plist
Ok. I think I already added that flag by following someone else’s suggestion.
Still not booting.
Here is the MacOS boot log:
afs kevbag init:2037: failed to initialize volume keybag,
KextLog: kernelmanagerd is not active
apfs _keybag_init :2037: failed to initialize volume keybag,
apfs _keybag_init: 2037: failed to initialize volume keybag, err
AppleKeyStore: 10727:244: operation failed (sel: 17 ret:
e00002f0,
205,
100005)
apfs _keybag_init: 2037: failed to initialize volume keybag,
nash Tree: Tound Kext unro (try HLF, hasn Tree:
found kext_info
(otr) apfs kevbag i
:2037: failed to
lume keybag,
= 7
KextLog: Loading FileSet KC(s)
KextLog: Loading Pageable k trom file /System/Llbrary/kernellollections/systemkernelExtensions.kc
apfs keybag_init :2037 : failed to initialize volume keybag,
apfs _keybag_init: 2037: failed to initialize volume keybag,
apfs_keybag_init:2037: failed to initialize volume keybag,
telemetry:
ustackshot every
12000000000 cycles
apfs_keybag_init:2037:
rauled to unuttallze volume kevbag.
virtual bool CoreAnalyticsUserblient::nitwithlask(task.
void
UInt32, OSDictionary *): :165: success
lUReturn CorehnalyticsHub: :settlientlated(CorehnalyticsUserClient *)::26/:adding userClient
IUketurn CorehnalvticsHub
newlserClienttatedttask+.
UInt32,
OSDictionary*,
IOUserClient **): :257: Successfully opened
virtual I0Return CoreRnalyticsUserClient::clientMemoryForType(UInt32,
1UUptLonbuts *,
IOMemoryDescriptor **): : 269: got memory descriptor with 16432
apfs _keybag_init: 2037: failed to
initialize volume keybag, err
apfs_keybag_init:2037: failed to initialize volume keybag,
apts_keybag_init:
updaterules msg ‹ptry,
id koxi
(ntr) KextLog:
KextLog: Loading Aux KC from file /Librarv/KernelCollectio
KextLog: Lollection UUID matches with Loaded kLS
ed kis
erred rematchina count
old data swfs _pid_entry (ptr>,
updaterules _msg (ptr>,
updaterules _state (ptr›ALF.
poleHlu
alc: © talled to obtain device into tor analog controller (1)
Trace synchronization point 0
No Generation from SMC
X86PlatformPlugin: :getCPUCStates
– COO ACST and
(sT evaluations failpr
X86PlatformPlugin: :getCPUCStates-
CST did not return
a package
ko6PLatformPlugin: a:getCPUPstates – CO00 APSS and PSS evaluations
failed!
X86PlatformPlugin: :getCPUPStates – acpiPSArray0bj is not an valid OSArray
X86PlatformPlugin: :publishACPIStates
– Failed to get (rU P States!
ACPIStates
ratled to get max non-turbo state. Set max non-turbo rotate
to default value 1
obLtrormLudin::getrulstates
C001 ACST and
CST evaluations failed!
X86PlatformPlugin: :getCPUCStates
CST
did not return a package
X86PlatformPlugin: :getCPUPStates
– C001 APSS and
PS evaluations failed!
found kext_info (ptr› I0G flags 0x3 (0x51)
X86PlatformPlugin: :publishACPIStates – Failed to get CPU P States!
finlatform/StartunPnuprEvents•
Ox0
DsmUs has arrived
Grace synchronuzatlo
ola entry ‹our/,
updaterules msg sotry,
les state (ptr›ALF. hash frop•
found kext info (ptr› GTrace
vIrace syncnronization polnt
Grace synchronization
bount b
X86PlatformPlugin: :configResourceCal(back – DeepSleep is not supported!
X86PlatformPlugin: :cgRegisterPLimitCallbackHandler
• There are 0 entries in the linked list before target Oxffffff9351132000 callback Oxffffff7fa61ab926 name AGPM, LINK at Oxffffff9351afd668 contains Oxffffff93511894a0
HEN _Key Does Not Exist, use kSMCPStatesEGPU for External GPU
Palled to send sMl number of etru r states (16) due to Ux8z.
X86PlatformPlugin: :cgRegisterPLimitCallbackHandler
– Inere are
X86PlatformPlugin: :cqRegisterPLimitCallbackHandler
– SKIP setPLimitRange.
l.entries in, the, linked list, before farget Oxfffff*33510e5806 callback Oxffffff7fablab$26 name AGPH, LINK at Oxfffff-33511834h0 contains Oxffffff9351183460
AppleKeyStore:7289:260:
unexpected session: 100000 uid:
-1 requested by:
260
ApplekeyStore:10727:260: operation failed (sel: 17 ret: e00002c2,
100000)
+- AppleHDADriver: : layoutLoadCallback ( (ptr>,
0,
(ptr>.
15073 )
DK: AppleUserUSBHostHIDDevice-0x100000312 : :start (I0USBHost Interface-0x10000023f) ok
DK: AppleUserUSBHostHIDDevice-0x100000308 : :start (I0USBHost Interface-Ox100000249) ok
HID: Legacy shim
MIl: Legacy shim 2
AppleUserHIDEventDriver-Ox100000385: :start(IOHIDInterface-0x100000384) ok
AppleUserHIDEventDriver-Ox100000380: :start (IOHIDInterface-0x10000037f) ok
IConsoleUsers:
time(0) 0->0,
unb.
LLK
luconsoleusers: GlUscreenLockstate 3.
hs A. hs A. nou A.
sm Ayf
Make sure your host never initialises the card during its own boot (e.g. set a different card as primary in host UEFI settings). Otherwise the card’s vBIOS gets trashed in the process
Did that already. Set internal GPU as primary, and also blacklisted the modules.
Do you still have the emulated video adapter attached? Set Display to None in Proxmox just in case the video is going there instead
Tried that. Display stays black. Seems to be no signal. Would it matter that I am using an HDMI to DVI adapter? My monitor doesn’t support HDMI.
The DVI adapter should be fine, although sometimes there are troubles where only one of the outputs on the card gets enabled (and it might not be the one the monitor is actually connected to).
If you’re not seeing the Proxmox boot logo on the guest display then the GPU has failed even before OpenCore loads. Make sure it has a vBIOS that supports UEFI (you can load a patched one that does with the romfile option in Proxmox, rather than physically reflashing the card)
Every time I start my Big Sur VM, I see:
vfio-pci 0000:01:00.0: vfio_ecap_init: hiding ecap 0x19@0x270
In dmesg (on the ProxMox host). Is that anything important?
Just now, I also see:
i2c i2c-1: sendbytes: NAK bailout.
However, I suspect that the last message could be related to me switching off my Apple Magic Keyboard and Touchpad, which are currently hard-wired using usb-passthrough. I have never seen that last one before now.
Those ones don’t seem to be a problem (I get a similar message with mine).
Make sure you have “all functions” ticked for your hostpci0 entry, so that you’re not leaving behind any orphaned functions from the GPU like an HDMI audio device or an I2C bus controller.
All functions is ticked, as is PCIe, rombar, primary gpu.
My VM config file is below:
root@pve1:~# cat /etc/pve/qemu-server/108.conf
agent: 1,fstrim_cloned_disks=1,type=virtio
args: -device isa-applesmc,osk=”…” -smbios type=2 -device usb-kbd,bus=ehci.0,port=2 -cpu host,kvm=on,vendor=GenuineIntel,+kvm_pv_unhalt,+kvm_pv_eoi,+hypervisor,+invtsc
bios: ovmf
boot: order=virtio0
cores: 2
cpu: host
efidisk0: local-lvm:vm-108-disk-0,size=4M
hostpci0: 0000:01:00,pcie=1,x-vga=1
localtime: 0
machine: q35
memory: 8192
name: macOS
net0: vmxnet3=1A:4F:6B:0A:BB:14,bridge=vmbr0,firewall=1
numa: 0
ostype: other
scsihw: virtio-scsi-pci
smbios1: uuid=031d423c-3682-4a1c-bf56-bcd7f6c973b3
sockets: 1
usb0: host=05ac:026c
usb1: host=05ac:0265
vga: none
virtio0: Cluster:vm-108-disk-0,backup=0,cache=unsafe,discard=on,size=1T
vmgenid: 0bdf4546-aa77-4ed5-a7a7-c7d139a45ada
vbios??
That’s new to me!
What is that, and how do I do what you mentioned. There is no Proxmox logo on the display at boot time.
You can check for a compatible vBIOS with UEFI support on Techpowerup:
https://www.techpowerup.com/vgabios/?model=HD+7770
I included the ROM file, but still no dice. It took me a hot minute to realize that when I specify /root/xyz.bin that it actually is looking in /usr/share/pve/root/xyz.bin (or something similar). Any chance this model has the AMD reinit bug?
Essentially, if I attach the card with PCI passthrough, macOS hangs at startup. Without the card, it boots fine.
I think I may just make a Catalina VM for troubleshooting.
Ok, so I’m wondering if I’m not blacklisting all necessary modules? I have “radeon” and “amdgpu” blacklisted. Any others I need? Like HDMI Audio, etc?
Check for error messages in dmesg at VM boot time, if there are any issues with vfio-pci binding to devices they will appear there.
You can use lspci -k after Proxmox boot to check that all the GPU’s devices are bound to vfio-pci
Hi,
after some work with the machine the current MacOs update won’t run because of missing disk space. To increase the the space by “diskutil apfs resizeContainer disk0s2 128G failed: The size (128G) must not be greater than the partition map allocatable size” How can I increase this? A the moment the used space is 68G and the total size of the virtual HD is 128G.
Thx and Greetz
Tom
Did you increase the size of the VM disk in Proxmox already?
Otherwise poke around in Disk Utility in macOS recovery, it has several distinct sets of tools for partitioning and APFS operations.
Thank for your answer. And, yes, the size of the Proxmox VM disk is 128G. (I checked to increase the main volume only to 80G but that did not work too.) The try the way to boot the recovery mode.
Accidently, I created a new volume trying to increase the size of “main”. But now if I try to delete this volume in the terminal or with the disk utiity program the volume is automaticllay re-added again. I do not understand what happens.
If the disk is 128GB, you cannot make APFS 128GB, because there are a bunch of other stuff on the disk including several hundred megs needed for the EFI partition. 127GB should work fine.
To avoid this answer I wrote that I have checked to increase only to 80G, but unfortunately this was refused too with the allocatable size message I wrote in my first posting.
Hi,
for all who will face the same problem with the partition map allocatable size, here the solution I found for all apfs based volumes after having tried a lot instructions not working:
diskutil apfs resizeContainer /dev/apfs_container_id_goes_here 0
All detailed explanation you will find here: https://derflounder.wordpress.com/2017/10/18/resizing-a-macos-vms-apfs-boot-drive-to-use-all-available-disk-space/
Thanks and greetz
Tom
Hi, Nick, i did it as in ur guide and everything work well, but then i want to run another one VM, i bought 1 more gt730, but i cant passtrought it . It have the same vendor id’s as my 1st card,
23:00.0 0300: 10de:1287 (rev a1)
23:00.1 0403: 10de:0e0f (rev a1)
2d:00.0 0300: 10de:1287 (rev a1)
2d:00.1 0403: 10de:0e0f (rev a1)
and even if i double the id’s in /etc/modprobe.d/vfio.conf i didnt work.
i changed pcie slots did anything, and i cant make them work together.
1 by 1 works good, but if i put them both in motherboard only 2d card works, even if 2d vm is offline and i try to run 23, it didnt work. Can u help me, please?
Hi, sorry for my english. I want to say that it’s crucial to set a power of 2 (2, 4, 8) in cpu. I put 6 and lost 1 day stucking in logo. I didn’t read that in the guide.
Thanks for all, Nick.
Thanks!
I was stuck at Apple Logo after booting, this fixed it! (used 6 cpu cores, changed it to 4)
You can use 6 threads if you set sockets: 3 and cores: 2.
Thanks, good hint!
Maybe you should add this information to your initial howTo, so others wont have this issue 🙂
hi nick ,
having problem getting the macos to detect a ipad through usb.
set the pass through using the commands “qm set 112 -usb1 host=05ac:12ab” and rebooted vm but do not see the device in the os.
have you seen this before , any help would be appreciated ?
thanks
does detect a mouse and keyboard fine though.
with the ipad i do not see it detected at all using the command “system_profiler SPUSBDataType”
Hi, Nick
I followed your tutorial to set up a big sur VM, I compared the vm configuration of my other host intel cpu and it was basically correct. But the new ryzen 3500x host I have set up now will not boot successfully and keeps looping through the opencore picker menu. I can see the white apple logo, but it will soon reboot and continue to the picker menu.
Did I miss something?
Here is my pve kvm configuration:
root@pve:~# cat /etc/pve/qemu-server/100.conf
agent: 1
args: -device isa-applesmc,osk=”…” -smbios type=2 -device usb-kbd,bus=ehci.0,port=2 -cpu Penryn,kvm=on,vendor=GenuineIntel,+kvm_pv_unhalt,+kvm_pv_eoi,+hypervisor,+invtsc,+pcid,+ssse3,+sse4.2,+popcnt,+avx,+avx2,+aes,+fma,+fma4,+bmi1,+bmi2,+xsave,+xsaveopt,check
balloon: 0
bios: ovmf
boot: order=ide2;ide0;virtio0;net0
cores: 4
cpu: Penryn
efidisk0: local-lvm:vm-100-disk-1,size=4M
ide0: local:iso/Catalina-installer.iso,size=2097012K,cache=unsafe
ide2: local:iso/OpenCore-v14.iso,size=150M,cache=unsafe
machine: q35
memory: 4096
name: macOS
net0: vmxnet3=06:E8:5C:EE:9E:D5,bridge=vmbr0,firewall=1
numa: 1
ostype: other
scsihw: virtio-scsi-pci
smbios1: uuid=3c1b176f-4c2d-4bcc-8492-1de1c8d4d611
sockets: 1
vga: vmware
virtio0: local-lvm:vm-100-disk-0,cache=unsafe,discard=on,size=64G
vmgenid: ae6504d2-2066-4c97-9481-7462a3fd4cd4
Regards
Thanks
Double check that your OSK didn’t get mangled by your text editor (e.g. inserting curly quotes or converting (c) to ©)
I directly copied the osk of another normal running hackintosh which is an intel cpu host, the args arguments are the same except for `-cpu`.
And I tried copying the normal running args arguments and doing a search on the new server and both results are the same. I uploaded an image you can check to see what I mean.
https://imgur.com/oKW3UUG
Regards
Thanks
hi all,
anyone been able to get a device working other than a mouse and keyboard ?
Hello! thanks for your tutorial, i’m stuck at apple logo just after open core selector, in the progress bar stuck at 1% of the bar and the vm turn off automatically
If the VM actually completely turns off then you probably added a USB 3 passthrough device, remove that.
On Proxmox 7 it looks like the EFI disk needs to not have “pre-enroll keys” checked, or else you can’t boot into OpenCore.
You can remove the EFI disk and re-add it to change this setting
Hello Nicholas
i’m on Mojave 10.14.6
When i try this “VM108:bigsur ox$ make BigSur-full.img”
i receive a message :
”
../../backups/fetch-macOS.py –version latest –title “macOS Big Sur”
env: python3: No such file or directory
make: *** [InstallAssistant.pkg] Error 127
”
Any idea ?
Thanks
I also get this in Mojave.
Hello Nick and Fellow Virtual Mac users.
I wanted to pass along a quick tip I just noticed.
This applies to **newly created vm** only.
This applies to **Proxmox 7.0 fully updated** only.
This applies to **omvf bios** only.
When you first start the VM, go into (virtual) uefi bios setup, select device manager->secureboot->clear the checkbox.
If you don’t, non-windows OS’ won’t boot correctly.
First and foremost, thanks again for your amazing guidance on this blog, its been my most trusted resource for running macos on proxmox 🙂
I had everything running beautifully with iMessage and everything functional but just recently in last few days, iMessage has just randomly stopped, it asks me to login and it spins for a while before saying “An unknown error occured”
My guess is that somehow my generated serial and stuff is getting blocked by apple, do you think that sounds right? Im assuming best next steps is to try and regenerate and try the process over again?
Sorry, I don’t have experience with that. Most likely generic Hackintosh guides should have advice for this situation
Hi Nicholas, thank you for the great guide. I was able to get BigSur up and running without a hitch. I went on to install a GPU as a pass through and ran into a roadblock.
I have 2 extra GPU cards in my Proxmox 7 server that I have working with win10 and win11. I added the pci device and it does not show up inside of BigSur. I have also checked in the system information -> pci and system information -> displays and there is no sign of it. I have tried with each GPU with the same results.
The cards are AMD r5-340 and NVIDIA gt730. I have tried passing as “all functions” and also separate pass throughs for the video and audio.
Both work great in windows pass through and I have the windows vms disabled while trying to pass to macos so the cards are available. Any thoughts?
For Proxmox 7 with QEMU 6.1 you have to add this argument to the end of your VM’s args for passthrough devices to work:
-global ICH9-LPC.acpi-pci-hotplug-with-bridge-support=off
One last tidbit, I am trying to run macos headless (vm running on proxmox servers) connecting with vnc with no monitors attached to the gpu cards.
I hope you have HDMI dummy plugs attached at least, because cards don’t function properly without something attached.
Hello, tried to follow your tutorial, not sure what exactly went wrong but when I get to the recovery part to install BigSur I am not able to move the mouse or use the keyboard through the console. I also tried passing through a usb keyboard/mouse and this does not work either. The keyboard either through console or usb passthrough does work in the opencore image though.
Did you try leaving the Console tab and re-entering it in Proxmox?
Make sure you have Tablet enabled on the Options page.
Yes I have tried leaving the console tab, even closing the whole tab altogether. Tablet option is selected but I have tried that both ways as I think I read somewhere someone had success with it unchecked and using vnc from their pc, which did not work for me anyway. I was able to get connected with vnc but again no mouse or keyboard once the installer came up.
Please share your VM config file
…
The config you posted had too much line truncation to be readable. Read it using cat instead of copying from an editor instance.
agent: 1
args: -device isa-applesmc,osk=”…” -smbios type=2 -device usb-kbd,bus=ehci.0,port=2 -global ICH9-LPC.acpi-pci-hotplug-with-bridge-support=off -cpu host,kvm=on,vendor=GenuineIntel,+kvm_pv_unhalt,+kvm_pv_eoi,+hypervisor,+invtsc
balloon: 0
bios: ovmf
boot: order=ide2;virtio0;net0;ide0
cores: 4
cpu: Penryn
efidisk0: Z1:vm-104-disk-1,efitype=4m,size=1M
ide0: ISO:iso/BigSur-recovery.img,cache=unsafe,size=2097012K
ide2: ISO:iso/OpenCore-v15.iso,cache=unsafe
machine: q35
memory: 8192
meta: creation-qemu=6.1.0,ctime=1639311431
name: MacOS
net0: vmxnet3=6A:7D:65:58:D0:3A,bridge=vmbr0,firewall=1
numa: 1
ostype: other
scsihw: virtio-scsi-pci
smbios1: uuid=abd71a07-2dc3-4a0d-9fee-895af747eafd
sockets: 1
tablet: 0
usb0: host=3938:1032
vga: vmware
virtio0: Z1:vm-104-disk-0,cache=unsafe,discard=on,size=64G
vmgenid: c9aa19c8-6c8c-4c45-8fc7-c3c0fe4eeb7ba
I think it may be the comment box doing that? the terminal cut the args line at +hypervisor.
Which web browser are you using? If it’s not Chrome, try Chrome.
It is Chrome Version 96.0.4664.93 (Official Build) (64-bit), Tried Edge and Tried Firefox on Ubuntu same thing…
Sorry wouldn’t let me reply to your last post
Hello Nick,
After installing your efi and config list, i was able to use Catalina and BigSur on my Proxmox 6.4-13, i want to thank you so much for the great job you do !!
Only one problem remaining…
i Have 2 identicals 4K screens connected to Radeon Vega Frontier edition.
When i boot, Proxmox screen appear on the screen at the right side (DP connector) , when i choose the boot disk, boot continue to the same screen but at the end of the boot, there is a switch to the left side screen (HDMI) where i can see my login and desktop.
The strange thing is when i’m on my desktop, Catalina recognize 3 screens… i can go with my mouse on the (ghost) left and on the right but they stay black.
Can you help me to resolve this problem please ?
I can contribute to pay your time.
Best regards
The invisible screen would be the emulated video adapter, be sure to set vga: none in your config to remove this (console tab will cease functioning).
If you want to switch which display is considered the primary one inside macOS, go into the System Preferences screen settings and in the monitor layout diagram you can drag the little titlebar rectangle from one monitor to the other.
Thank you for your reply,
This is my config :
root@info:~# cat /etc/pve/qemu-server/151.conf
args: -device isa-applesmc,osk=”…” -smbios type=2 -device usb-kbd,bus=ehci.0,port=2 -cpu Penryn,kvm=on,vendor=GenuineIntel,+kvm_pv_unhalt,+kvm_pv_eoi,+hypervisor,+invtsc,+pcid,+ssse3,+sse4.2,+popcnt,+avx,+avx2,+aes,+fma,+fma4,+bmi1,+bmi2,+xsave,+xsaveopt,check
balloon: 0
bios: ovmf
boot: order=sata0;net0
cores: 8
cpu: Penryn
efidisk0: local-zfs:vm-150-disk-1,size=1M
hostpci0: 03:00.3,pcie=1
hostpci1: 43:00.0,pcie=1
hostpci2: 25:00.3,pcie=1
hostpci3: 23:00,pcie=1,x-vga=1
hostpci4: 44:00.0,pcie=1
machine: q35
memory: 32768
name: Catalina-500-GPU
net0: vmxnet3=xxxxxx,bridge=vmbr0,firewall=1
numa: 0
ostype: other
sata0: local-zfs:vm-150-disk-0,cache=unsafe,discard=on,size=500G,ssd=1
sata1: local-zfs:vm-108-disk-2,size=500G
scsihw: virtio-scsi-pci
smbios1: uuid=xxxxxxx
sockets: 1
usb0: host=5-2.1
usb1: host=5-1
usb2: host=8-1.1
vga: none
virtio1: /dev/disk/by-id/nvme-Force_MP600_20368295000130352032,backup=0,size=1953514584K
virtio2: /dev/disk/by-id/nvme-Force_MP600_2036829500013035201C,backup=0,size=1953514584K
virtio3: /dev/disk/by-label/NVMe2000_BAK,backup=0
vmgenid: xxxxx
The problem is that only one screen work and my second screen stay black
On my mojave clover config, the 2 screens works correctly
My mojave working on 2 screens use this clover config part :
ACPI
DSDT
Patches
Comment
change GFX0 to IGPU
Disabled
Find
R0ZYMA==
Replace
SUdQVQ==
Comment
change PEGP to GFX0
Disabled
Find
UEVHUA==
Replace
R0ZYMA==
i think i need to have the translation of this to opencore language so opencore recognize more than one screen.
Can you tell if it’s possible ?
Thank you Nick
Found the solution :
Just Add in NVRAM :
7C436110-AB2A-4BBB-A880-FE41995C9F82
ForceDisplayRotationInEFI
0
SystemAudioVolume
Rg==
boot-args
keepsyms=1 agdpmod=pikera
csr-active-config
Jg8=
prev-lang:kbd
ZW4tVVM6MA==
run-efi-updater
No
Now working good with more than one screen !
Best regards Nick
I guess agdpmod=pikera was the important part of that
SURE !
Thank you to be there for us
Best regards and happy christmas and a good new year to you and your family
Olivier
I was getting IO errors on my VM (Big Sur) on an AMD host with nVME using a virtio (block) disk image.
The IO errors seemed to happen with large writes and perhaps related to high CPU load.
After many attempts, I switched the disk to SATA (remove, then reattach) and my IO errors are gone.
I also tried switching to virtio-scsi, but the VM wouldn’t boot into macOS.
I wish I could find a better way to fix this issue, but I don’t know how to debug the complex interactions between the VM and the host and virtualized hardware.
Hey Nick, after I setup the GPU passthrough I just can’t figure out how to boot without getting the message “Your computer restarted because of a problem” which ends up in a loop.
When I remove the PCI from the hardware tab I can boot again without gpu and I get a crash report which says (excerpt, which is hopefully relevant):
panic(cpu 2 caller 0xffffff7fb9412deb): “virtual bool IOAccelLegacyDisplayMachine::display_mode_did_change(uint32_t): Uninitialized NVIDIA GPU driver returns false”@/System/Volumes/Data/SWE/macOS/BuildRoots/a0c6c82cc8/Library/Caches/com.apple.xbs/Sources/IOAcceleratorFamily_kexts/IOAcceleratorFamily-442.9/Kext2/IOAccelLegacyDisplayMachine.cpp:267
What GPU model is this?
MSI GT 730
Hi,
anyone got their BigSur VM updated to 11.6.6?
It does not finish installation, ends with a black screen and a mouse pointer and when I reboot I have two Harddisks (and two Recovery Disks) in my Boot menu. The first (Default) runs in a boot loop and the second returns to 11.6.4.
I’m running on ProxMox 7.2-4 with OC16.
I always have to return to a snapshot (lucky me there is one 🙂 ), as I can’t get rid of the extra Boot Menu entries anymore.
Any idea?
Thanks
Peter
The last Big Sur version I tried was 12.3.1.
The first option will be the installer to finish the upgrade. It’s normal for that to restart a couple of times, so it may be operating as-designed and you just need to re-enter it a couple more times.
Sometimes the upgrades through the app store don’t work, and you need to build a full installer image instead. The full installer can reinstall macOS for you without losing any user data.
Do you know of this guide will work with other less expensive providers than proxmox like Amazon ec2 instances / linode or whatever?
Hello, I might sound super noob, and even funny with my question here, but there I go: Is it actually needed a second computer running Proxmox 24/7 ?
I actually need BigSur running because I need to run the last Adobe Premiere & Photoshop, and throughout the web it seemed to me that running it in a VM would make it be almost bare metal.
All insights are wellcome 🙂
You need to PCIe-passthrough a compatible GPU to macOS to achieve that. In that case you only need one machine since macOS outputs to the GPU directly.
Thanks a lot Nicholas!
At the very beginning you assume Proxmox installed, and after checking several different tutorials, I must accept I am totally lost here…
I wonder if you could recommend a proper tutorial for it. My work case is: I have desktop running Manjaro in a 1Tb SSD where I would like to be able to run a Linux distro (ideally Manjaro) and BigSur. Though I’ve seen it is possible to run both simultaneously, that’s not my need at all.
I have an AMD 5900x cpu and a AMD 6800xt gpu.
Again, thanks 🙂
Sorry, I don’t know any good tutorials. The Proxmox wiki has some details but it’ll be somewhat incomplete and setup is difficult:
https://pve.proxmox.com/wiki/Pci_passthrough
Note that Proxmox will erase whatever disk you install it onto so migrating from a current install is tricky.
Hi Nick, thanks for the guide, it was extremely helpful
I was wondering if you could help me over (what appears to be) the last hurdle though. I have gotten the VM to work as expected through the VMWare compatible display, but when I try to use it on a monitor attached to the Sapphire Pulse Rx 580 8GB I have passed through it just hangs at 0% at the progress bar. Any idea what this could be? I’m already flashing a clean ROM to it on guest boot and I’ve applied vendor reset just in case, but to no avail. Thanks in advance
In the “args” line of your VM, add this:
-global ICH9-LPC.acpi-pci-hotplug-with-bridge-support=offThis has been needed for passthrough devices to work on macOS since QEMU 6.1 (this guide predates that, so it’s missing that instruction!)
Replying from my working VM now. Thank you so, so much!!!
My bigsur works in vmware but when i pass through to vga radeon rx 580, i got this error
https://unparacid-my.sharepoint.com/:i:/g/personal/hendrasa_unpar_ac_id/EazltOZauR9Ng0V_ZkJtWocBH0QpsLBoYZMC4KRL8z1Ygw?e=PKI2q8
any suggestion? thanks before
I am following this:
In the “args” line of your VM, add this:
-global ICH9-LPC.acpi-pci-hotplug-with-bridge-support=off
and it is working.. thanks a lot.