
I’ve now created a new tutorial that uses OpenCore instead of Clover, and it fixes a lot of problems. I recommend using the new tutorial for all new builds
This tutorial for installing macOS Catalina has been adapted for Proxmox 6 from Kholia’s GitHub project for installing into vanilla KVM. There is more documentation there which will help out with enabling extra features and diagnosing problems!
If you run into trouble, also check out the comment section of my previous tutorial on Mojave – these two versions are very similar so the problems and solutions are likely to be the same.
Requirements
I’ll assume you already have Proxmox 6 installed. You also need a real Mac available in order to fetch the OSK key.
Your Proxmox host computer’s CPU must support SSE 4.2, so for Intel your CPU must be at least as new as Nehalem, which was the first CPU generation to bear the “Core” i5/i7 branding. Older CPUs will cause the finder to repeatedly crash after installation completes (with an Illegal Instruction exception in the graphics code).
Apparently modern AMD CPUs also support SSE 4.2 and can be used with this guide without any modification (maybe Bulldozer and certainly Ryzen), but I haven’t tested this myself.
First step: Create an installation ISO
Download and run fetch-macOS.py in a terminal to download the Catalina recovery image from the Apple software distribution server (this can be run on Linux, Proxmox, or on a Mac):
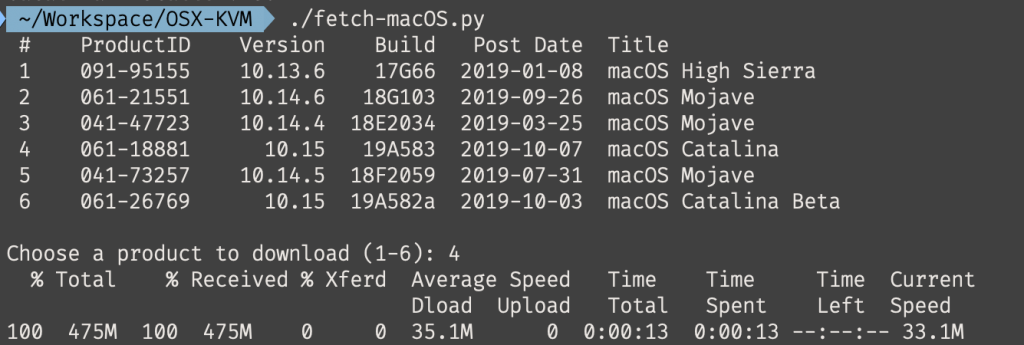
This results in a ~500MB “BaseSystem.dmg” file in the current directory. Convert that dmg into an “iso” like so if you’re building this on macOS:
hdiutil convert BaseSystem.dmg -format UDRW -o Catalina-installer.iso
mv Catalina-installer.iso.img Catalina-installer.iso
Or like so if you’re building this on Linux:
# Install the dmg2img package and...
dmg2img BaseSystem.dmg Catalina-installer.iso

# Or use qemu-img from the qemu-utils package to do it instead:
qemu-img convert BaseSystem.dmg -O raw Catalina-installer.iso
The result is actually a raw disk image, not a true ISO, but Proxmox has better tools for picking and re-using ISO images than disk images. Upload the “ISO” to your Proxmox server’s ISO store (typically /var/lib/vz/template/iso).
If you don’t have an Internet connection available to Catalina during installation you’ll need to build an offline installer instead. Building the offline installer requires you to have a Mac, here are the instructions.
Prepare a Clover image
We’ll be using Clover as a bootloader for Catalina.
Download this Clover disk image (that I built using kholia’s build script from Clover r5107 on Fedora 27), unpack it, and upload it to Proxmox’s ISO store at /var/lib/vz/template/iso. Although it has a .iso file extension, this is actually a hard disk image.
Fetch the OSK authentication key
macOS checks that it is running on real Mac hardware, and refuses to boot on third-party hardware. You can get around this by reading an authentication key out of your real Mac hardware (the OSK key). Save the first block of C code from this page as smc_read.c. In a command prompt, change into the same directory as that file and run:
xcode-select --install # If you don't already have gcc
gcc -o smc_read smc_read.c -framework IOKit
./smc_read
It’ll print out the 64 character OSK for you. Make a note of it.
Every Mac uses the same OSK, so don’t be surprised that it doesn’t look like a random string!
Create the VM
From the Proxmox web UI, create a new virtual machine as shown below.

Keep a note of your VM’s ID 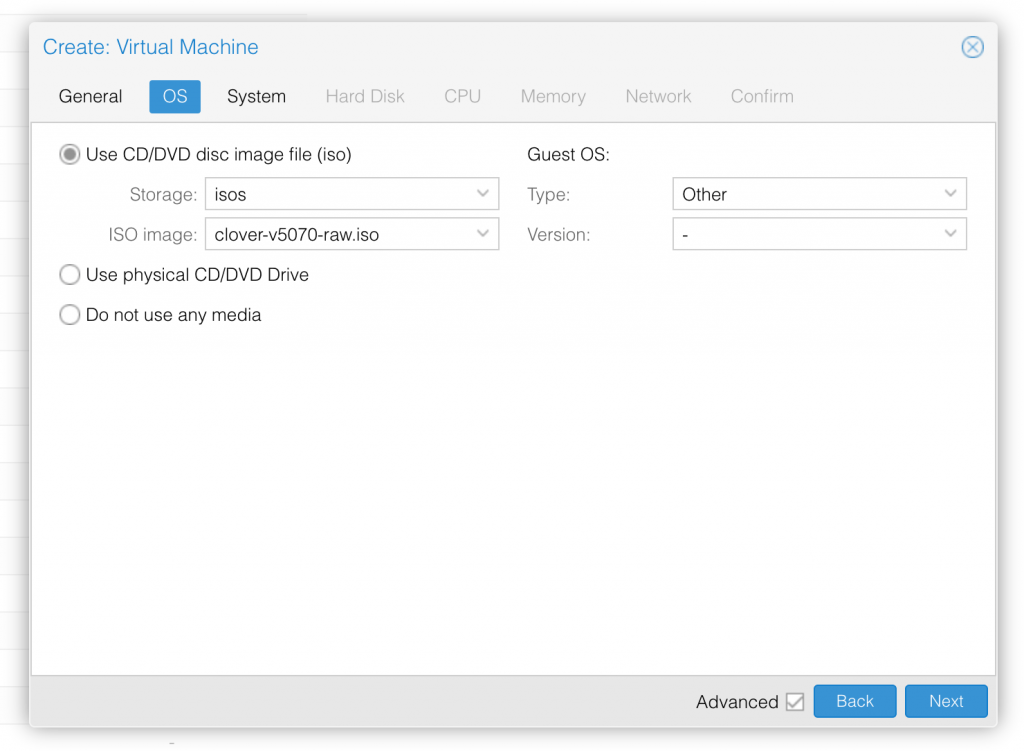
Select the Clover ISO you uploaded and set OS type to “Other” 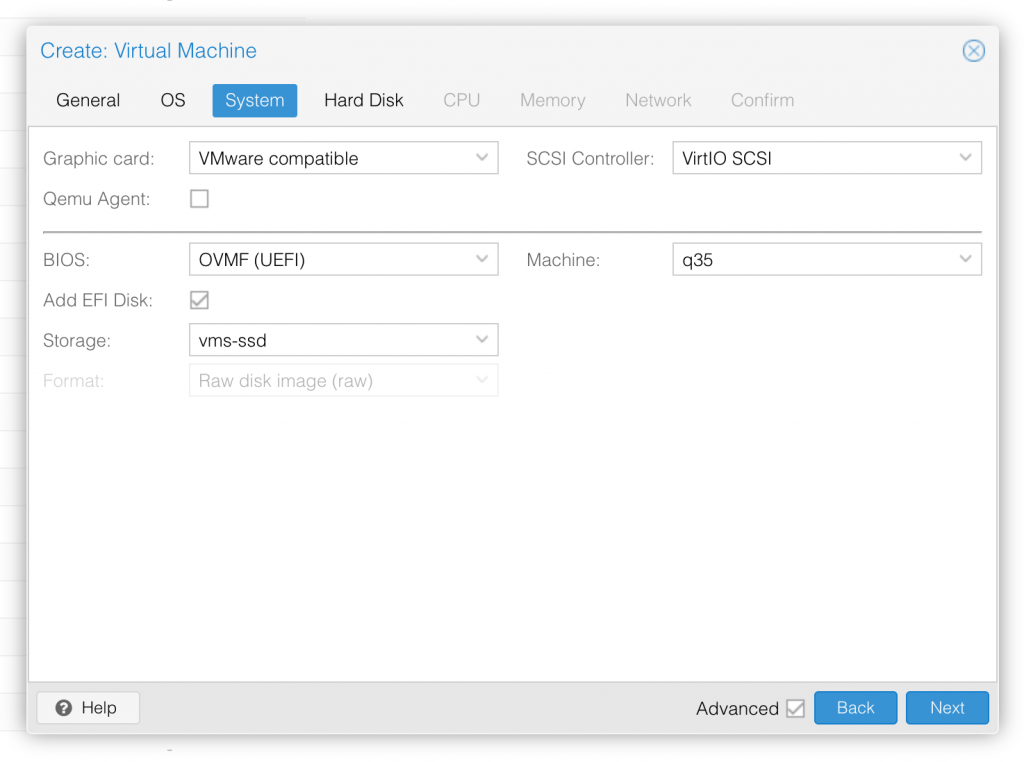
Set graphics to “VMWare Compatible”, set BIOS to OVMF (UEFI), set Machine to Q35, Tick Add EFI Disk and pick storage for it 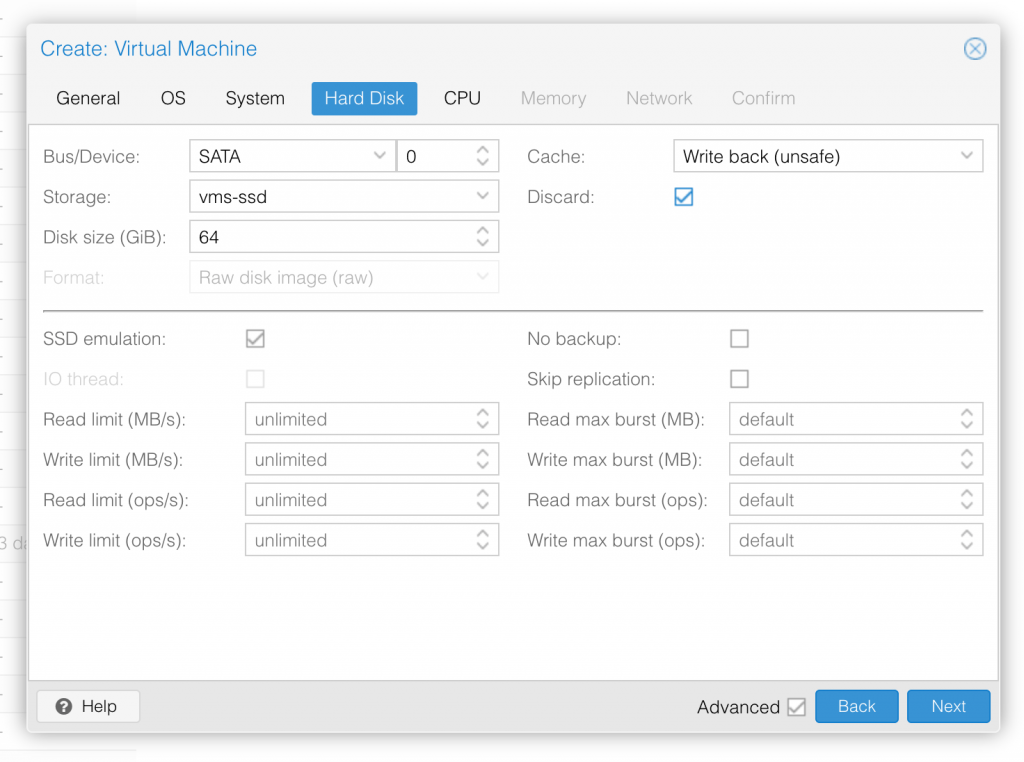
Set the size of the hard disk (I chose 64GB). Attach it to SATA0. Enable discard and SSD emulation to support TRIM. 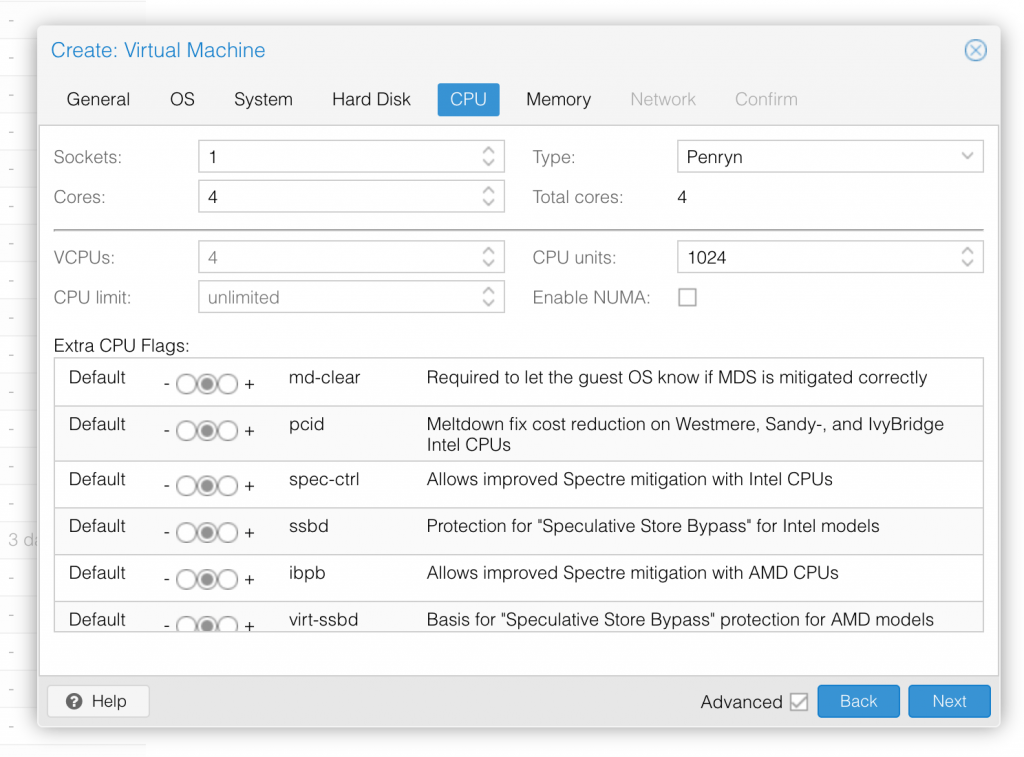
Set the number of cores for the VM, I chose 4 (note that some core counts are troublesome, try 4 first). Set the CPU to Penryn. 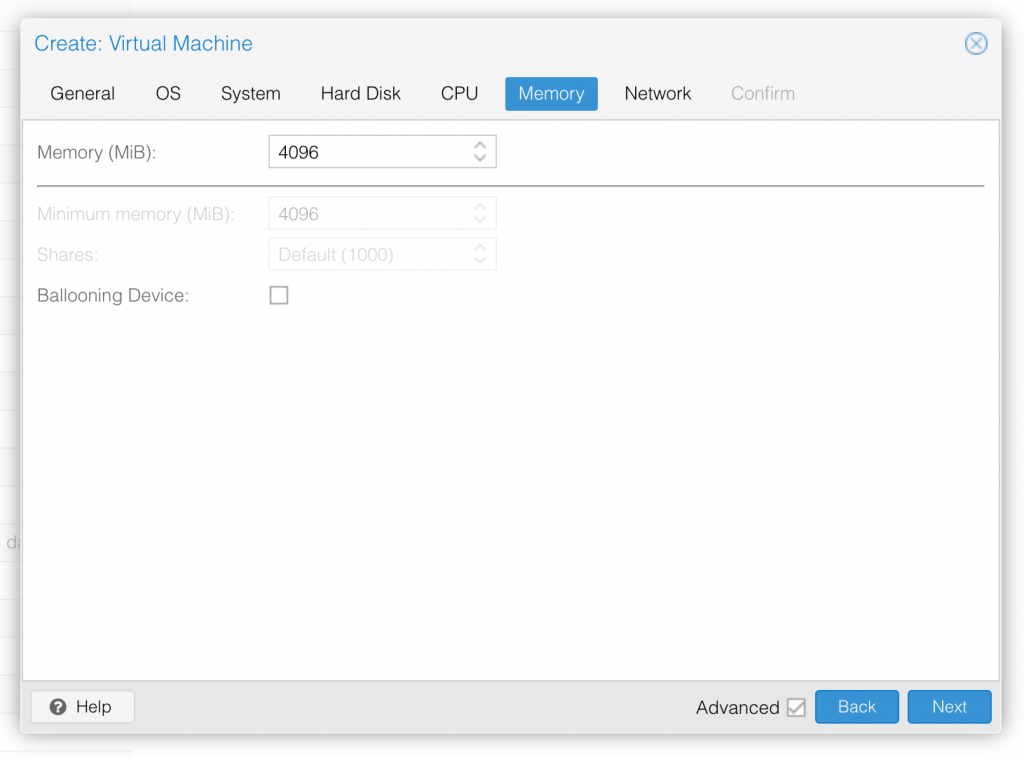
I chose a fixed memory of 4096MB. Disable ballooning because there is no balloon driver available for macOS. 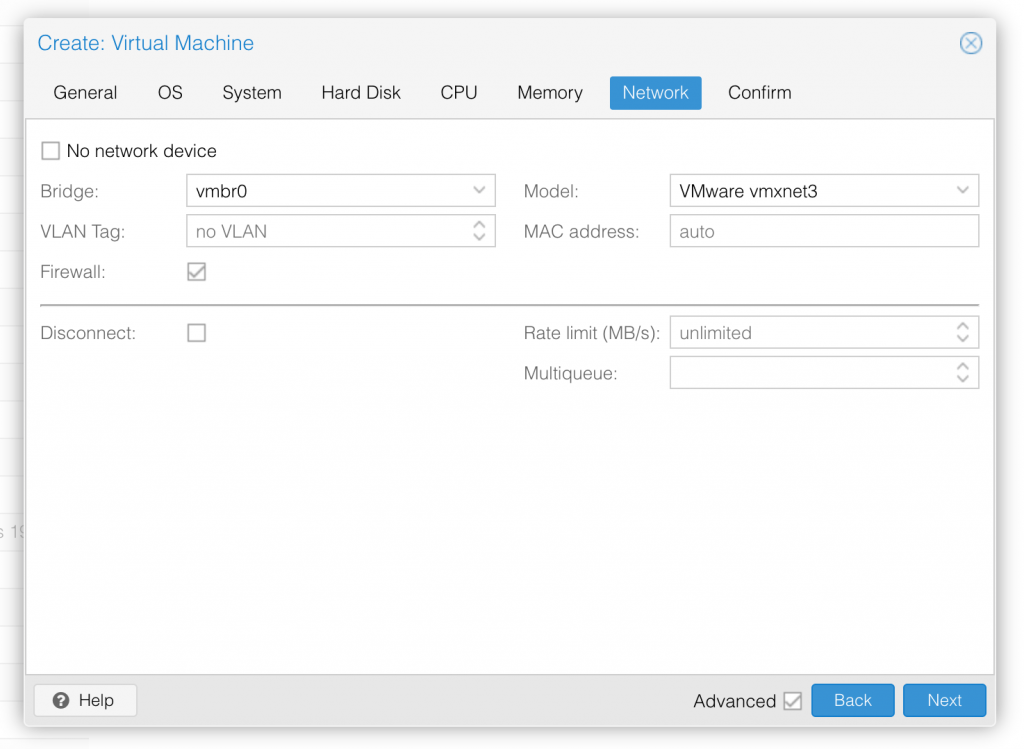
Choose VMWare vmxnet3 for the network model 
In the Options page for the VM, ensure that “use tablet for pointer” is set to “Yes”.
In the Hardware page for the VM, add a second DVD drive at IDE0, set it to use your Catalina-installer.iso.
Don’t try to start the VM just yet. First, SSH into your Proxmox server so we can make some edits to the configuration files.
Edit /etc/pve/qemu-server/YOUR-VM-ID-HERE.conf (with nano or vim). Add this line, being sure to substitute the OSK you extracted earlier into the right place:
args: -device isa-applesmc,osk="THE-OSK-YOU-EXTRACTED-GOES-HERE" -smbios type=2 -cpu Penryn,kvm=on,vendor=GenuineIntel,+kvm_pv_unhalt,+kvm_pv_eoi,+invtsc,vmware-cpuid-freq=on,+pcid,+ssse3,+sse4.2,+popcnt,+avx,+aes,+xsave,+xsaveopt,check -device usb-kbd,bus=ehci.0,port=2
We’re telling macOS that the CPU is Penryn (it doesn’t seem to like booting otherwise), but we’re enabling all the new CPU features found in Nehalem which macOS will require, plus some optional features found in later generations (AVX/AES). A USB keyboard is added here because macOS doesn’t support QEMU’s default PS/2 keyboard.
Find the line that define the two “ISOs” (ide0 and ide2), and remove the “,media=cdrom” part from them. Add “,cache=unsafe” in its place. This will treat these as hard disks rather than DVD drives.
Save your changes, return to the Options tab, and change the boot order to put IDE2 (the Clover image) first. Your final VM configuration file should resemble this:
args: -device isa-applesmc,osk="..." -smbios type=2 -cpu Penryn,kvm=on,vendor=GenuineIntel,+kvm_pv_unhalt,+kvm_pv_eoi,+invtsc,vmware-cpuid-freq=on,+pcid,+ssse3,+sse4.2,+popcnt,+avx,+aes,+xsave,+xsaveopt,check -device usb-kbd,bus=ehci.0,port=2
balloon: 0
bios: ovmf
boot: cdn
bootdisk: ide2
cores: 4
cpu: Penryn
efidisk0: vms:vm-144-disk-1,size=128K
ide0: isos:iso/Catalina-installer.iso,cache=unsafe
ide2: isos:iso/clover-r5107.iso,cache=unsafe
machine: q35
memory: 4096
name: catalina
net0: vmxnet3=xx:xx:xx:xx:xx:xx,bridge=vmbr0,firewall=1
numa: 0
ostype: other
sata0: vms:vm-144-disk-0,cache=unsafe,size=64G
smbios1: uuid=xxxxxx-xxxx-xxxx-xxxx-xxxxxxxxxxx
sockets: 1
vga: vmware
Configure Proxmox
On Proxmox, run “echo 1 > /sys/module/kvm/parameters/ignore_msrs” to avoid a bootloop during macOS boot. To make this change persist across Proxmox reboots, run:
echo "options kvm ignore_msrs=Y" >> /etc/modprobe.d/kvm.conf && update-initramfs -k all -u
You must now install a patched version of Proxmox’s OVMF library in order to be able to boot Catalina.
Install Catalina
Now start up your VM.
Go to the Console tab, quickly hit Escape or F2 at the Proxmox logo to enter the OVMF configuration. If your keyboard doesn’t work, leave the Console tab, stop the VM, start the VM, then re-enter the console tab.
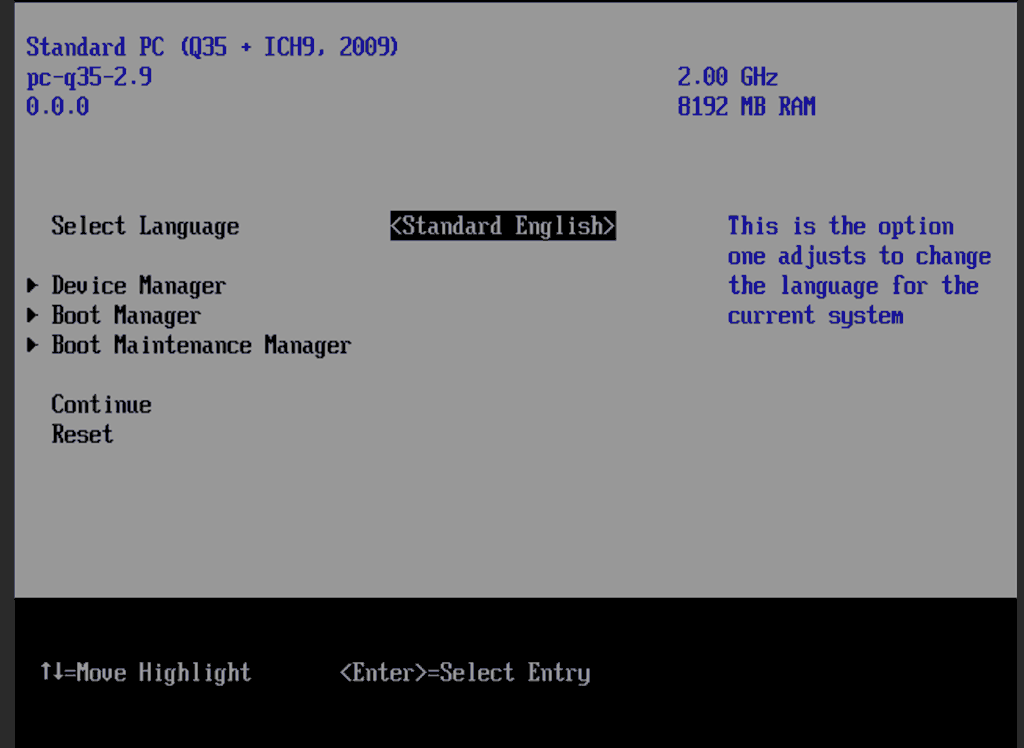
Select Device Manager 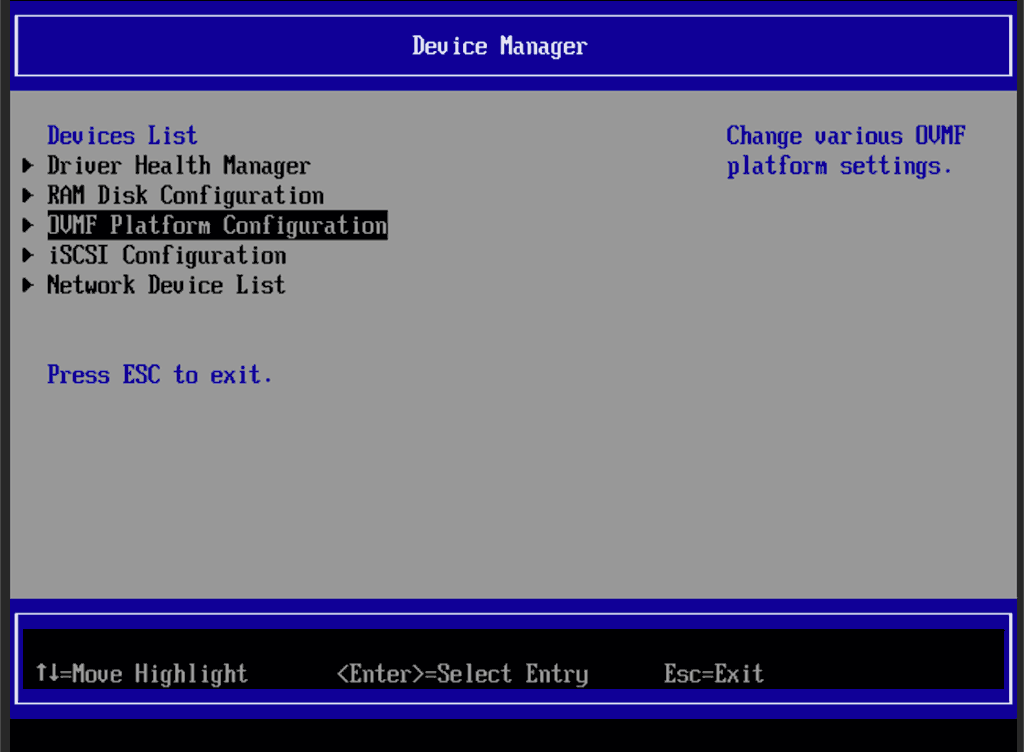
Select OVMF platform configuration 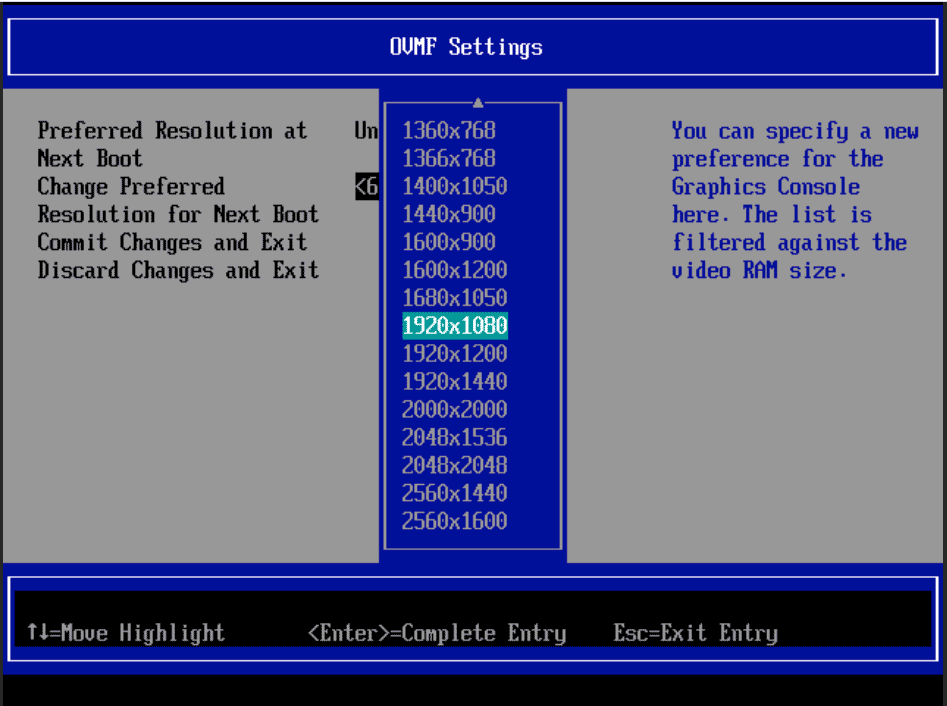
Set the preferred resolution to 1920×1080 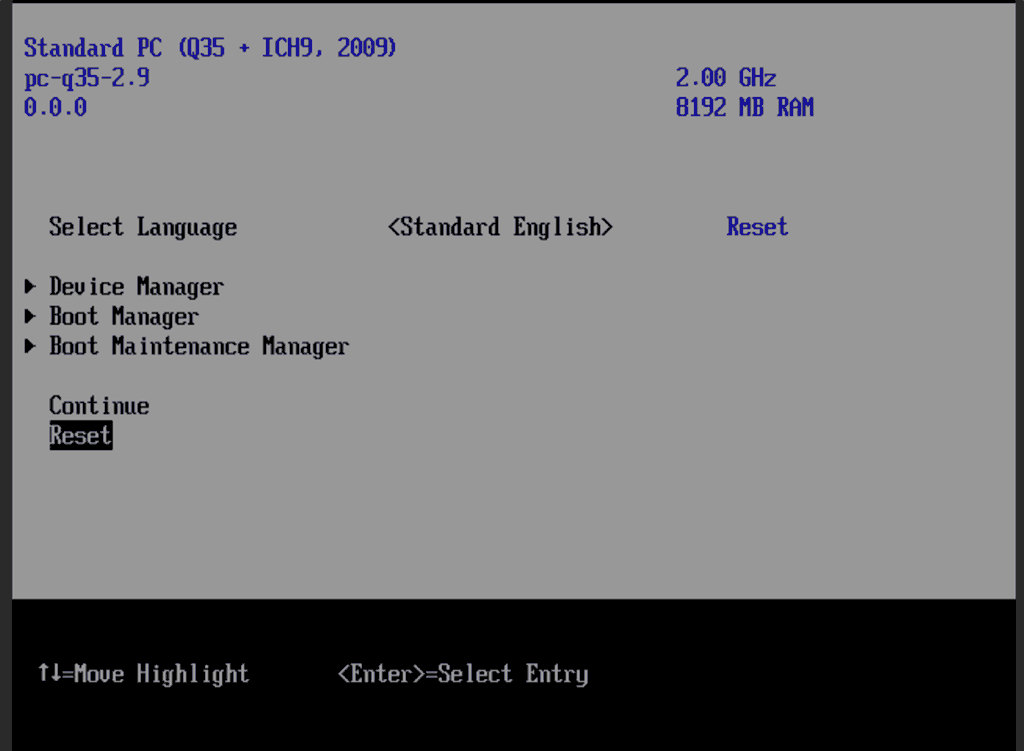
Save changes, then Reset
Follow the steps above to set the screen resolution to 1920×1080, press F10 to save your changes, and “reset” to apply the new settings (not “continue”). This step is required to avoid scrambled graphics on boot and a hang (Clover resolution must match OVMF resolution, or else the Apple logo will be off-centre and the progress bar will be smeared across the screen, resulting in a lockup).
Note that in future you’ll find that when initially started, your VM doesn’t properly apply the the 1920×1080 screen resolution until you hit “Restart Computer” in Clover when the Clover menu appears (or “Reset” on the VM). You’ll notice this happening when the “Proxmox” logo fills a large area of the screen on boot due to the low resolution.
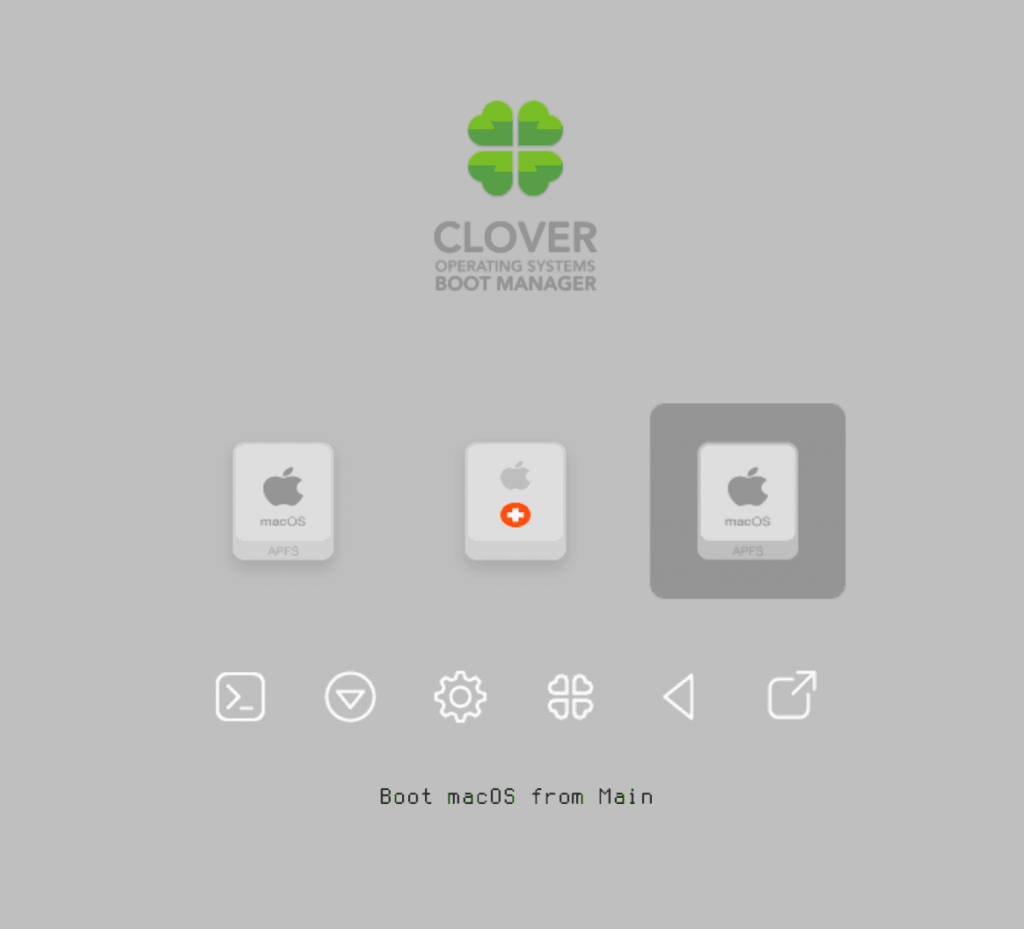
It should now boot into Clover.
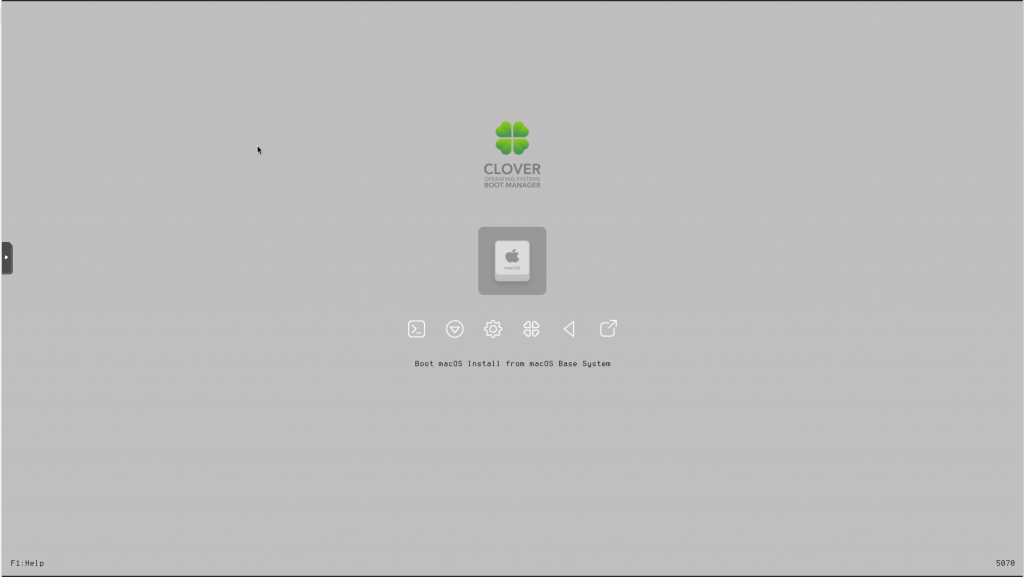
Press enter to boot the “Boot macOS Install from macOS Base System” entry and the installer should appear. Choose your language.
Our virtual hard drive needs to be erased/formatted before we can install to it, so select the Disk Utility option. Follow the steps below to format the disk:
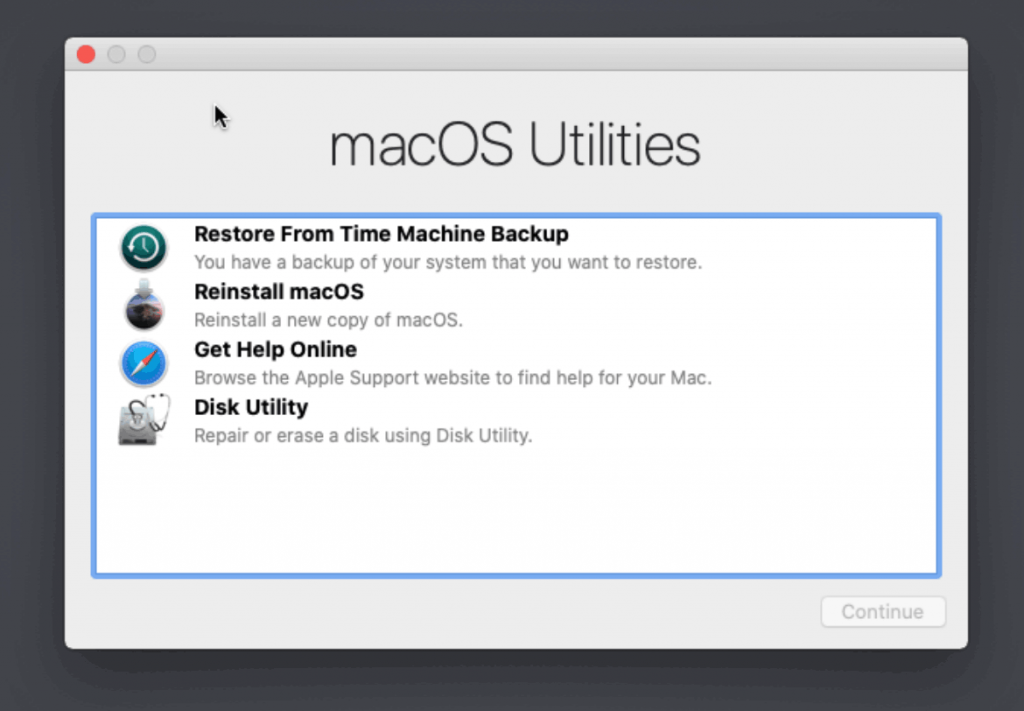
Select Disk Utility 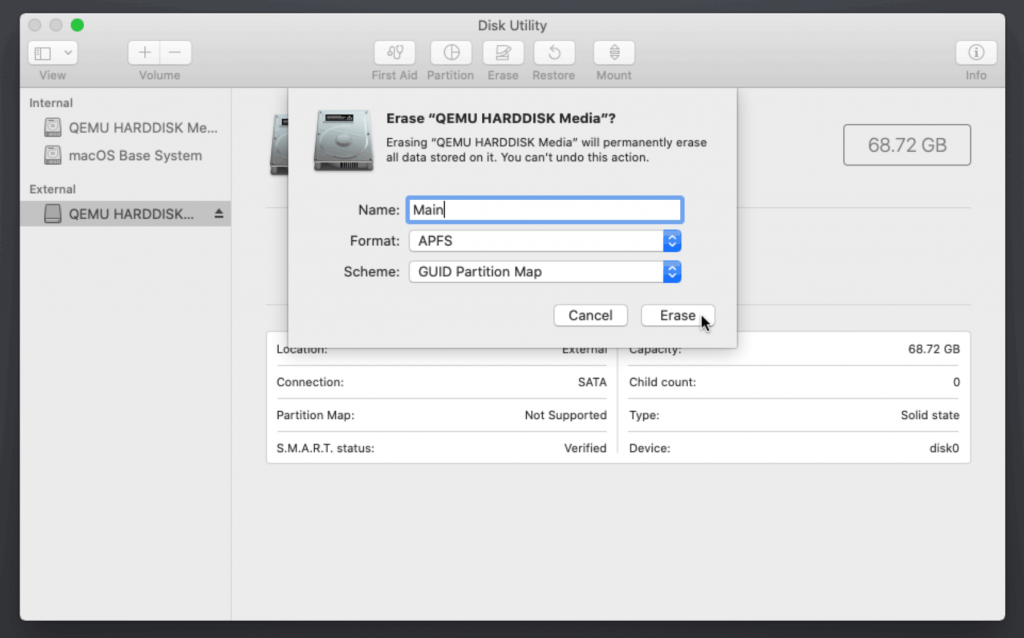
Erase the main disk (it’ll appear as an external drive). Choose APFS. I called mine “Main”. Avoid “Encrypted” at this stage
Now we’re ready to begin installation!
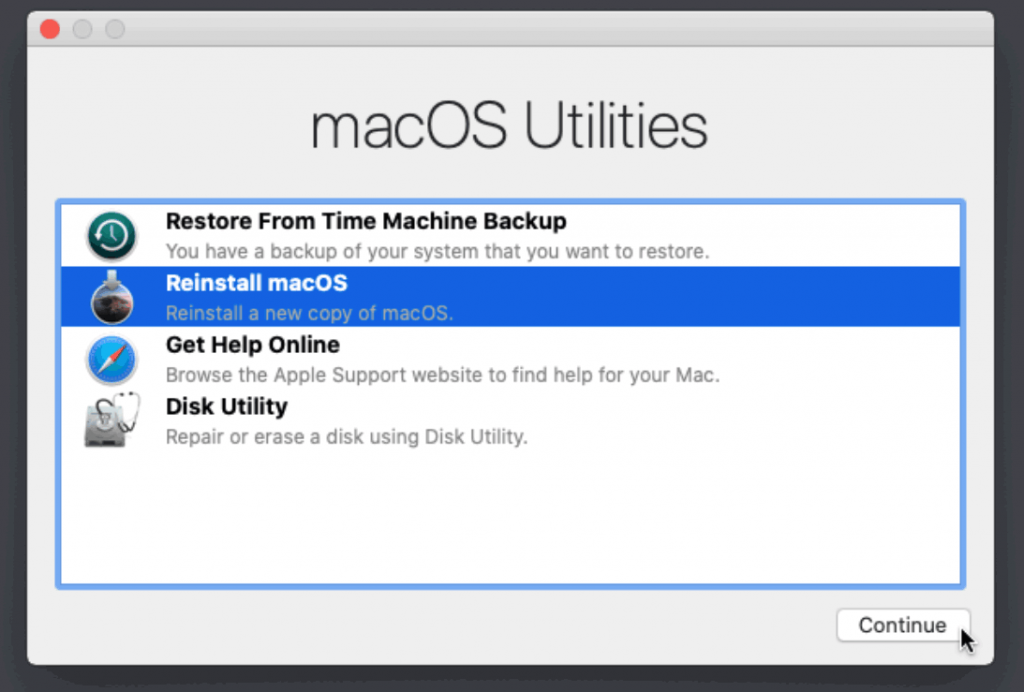
Reinstall macOS 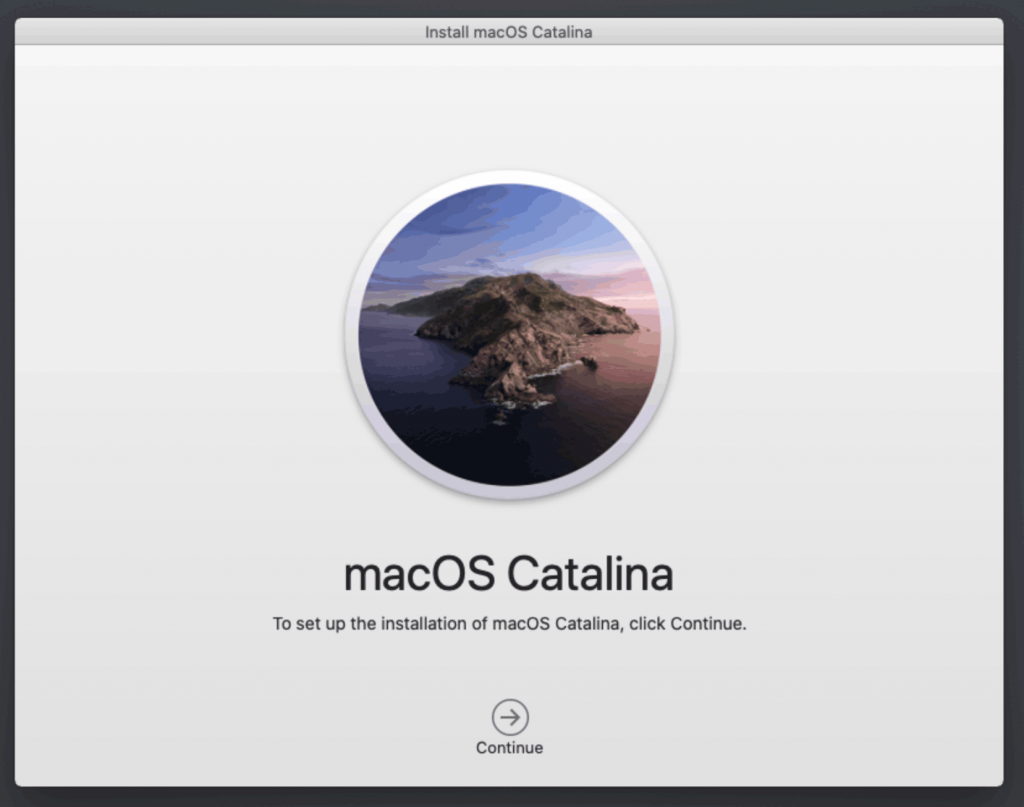
Continue… 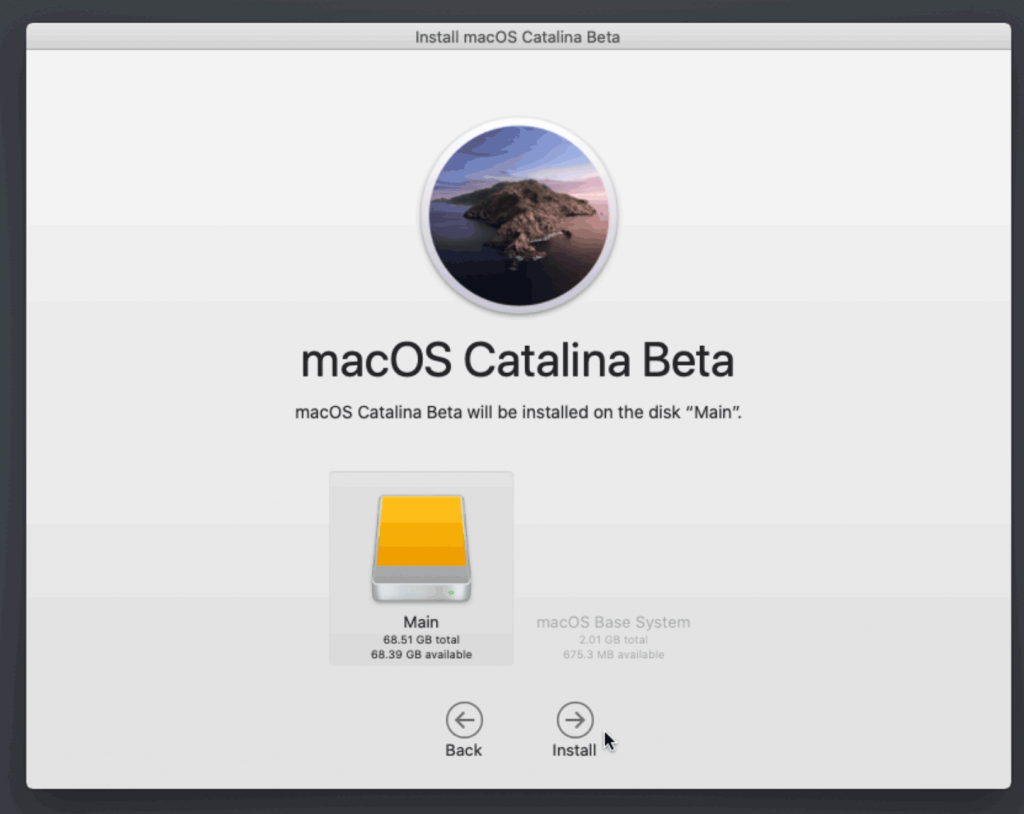
Choose the drive you erased 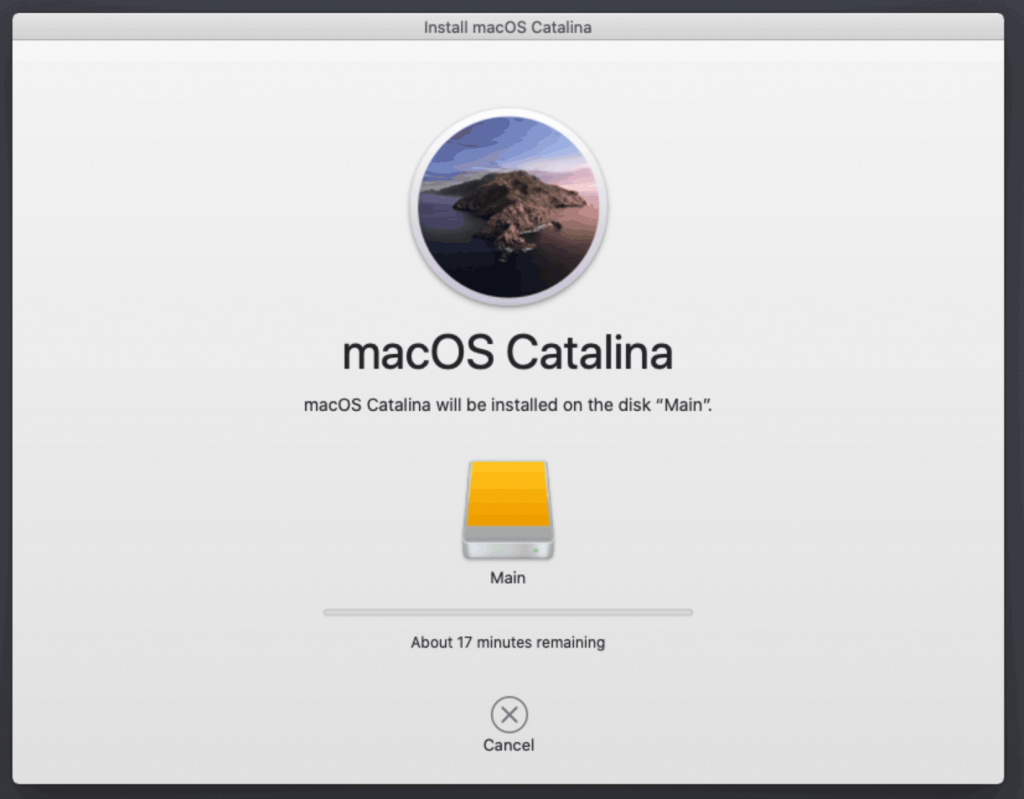
It’s installing!
After the first stage of installation, the VM should reboot itself and automatically continue installation by booting from the hard drive, then reboot itself a second time and automatically boot from “filevault prebooter”. Note that an Internet connection is required during installation, as the installer needs to download Catalina.
Answer the initial install questions, and you’ll be logged on! (Note that you’ll probably want to hold off on logging into your iCloud account until you’ve configured your SMBIOS to your liking in Clover Configurator)
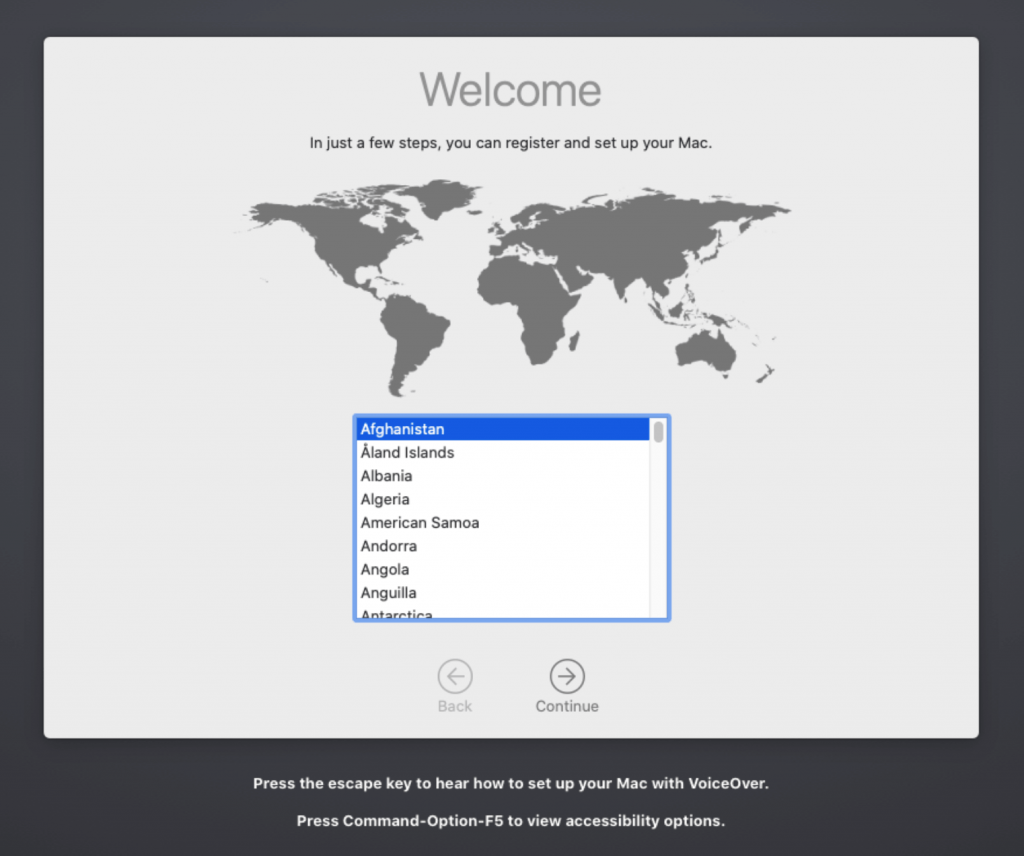
Answer the install questions 
New features! 
New automatic theme switching!
Make the Clover install permanent
We’re currently booting using Clover from the attached Clover ISO. Let’s install that to the hard drive instead. Pop open Terminal and run “diskutil list” to see what drives we have available.
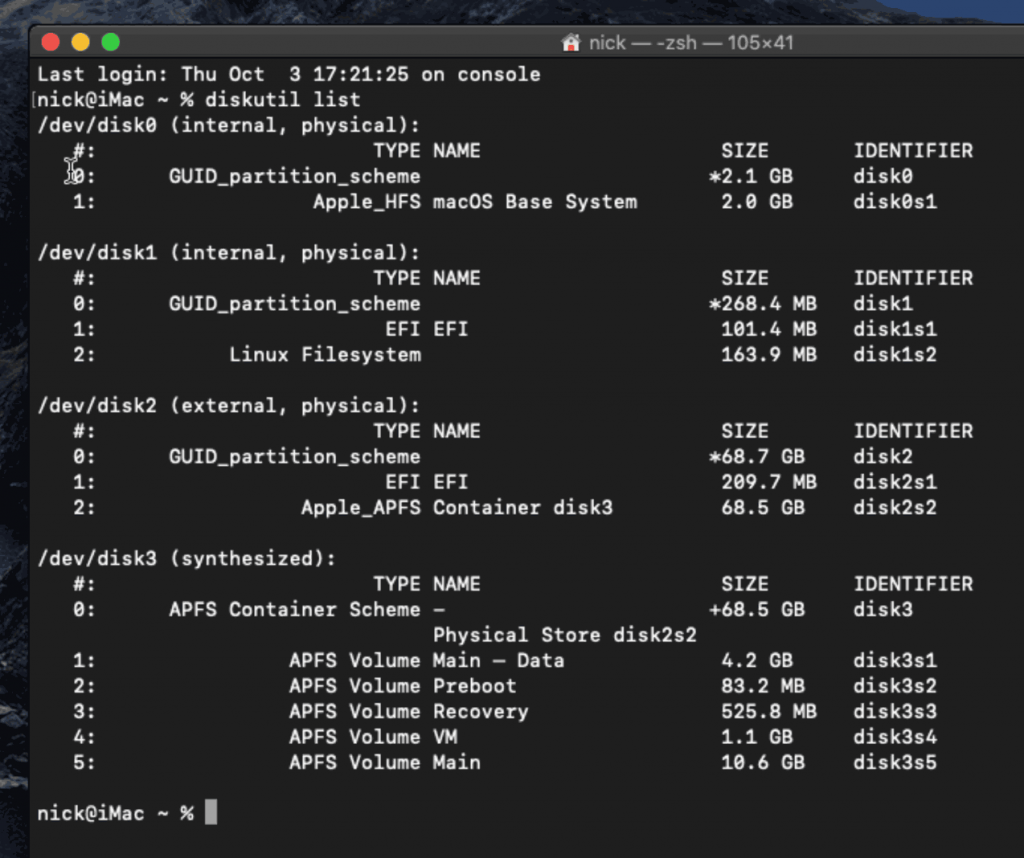
Use “sudo dd if=<source> of=<dest>” to copy the “EFI” partition from the Clover CD and overwrite the EFI partition on the hard disk. The Clover CD is the small disk with the “linux filesystem” on it, and the main hard disk is the one with the large Apple_APFS “Container” partition on it.
In my case these EFI partitions ended up being called disk1s1 and disk2s1 respectively, so I ran “sudo dd if=/dev/disk1s1 of=/dev/disk2s1” (N.B. if you get these names wrong, you will overwrite the wrong disk and you’ll have to start the installation over again!).
Now shut down the VM, and remove both the Clover and the Catalina installer drives from the Hardware tab. On the Options tab, edit the boot order to place SATA0 as the first disk. Boot up. If everything went well, you should see the Clover boot menu, and you can select “Boot macOS from Main” to boot Catalina.
Sleep management
I found that I was unable to wake Catalina from sleep using my mouse or keyboard. You can either disable system sleep in Catalina’s Energy Saver settings to avoid this, or you can manually wake the VM up from sleep from Proxmox by running:
qm monitor YOUR-VM-ID-HERE
system_wakeup
quit
“Prohibited” sign on boot
On a regular Hackintosh this is typically a sign that the boot drive can’t be read, but that situation is difficult to encounter with this VM setup. Nevertheless, I receive a “prohibited” sign during boot in perhaps 1 out of 20 system boots at random (maybe a timing bug?) If this happens, just hit “reset” for the VM to retry (no need to stop and start).
If you get it persistently, something is going wrong with the boot. You can boot macOS in “verbose” mode by hitting space on the macOS option in Clover and ticking the verbose option. This’ll give you a log during booting that can narrow down when the problem occurs.
Editing your Clover/EFI settings
You can use the Clover Configurator tool (Global Edition) to edit your Clover “config.plist” configuration file, which is stored in the hard drive’s EFI partition. This tool should mount the EFI partition for you. If you want to mount it without using Clover Configurator, first check the device name of the EFI partition in the terminal:
~$ diskutil list
/dev/disk0 (external):
   #:             TYPE   NAME           SIZE       IDENTIFIER
   0: GUID_partition_scheme             512.1 GB   disk0
   1:              EFI   EFI            209.7 MB   disk0s1
   2:        Apple_HFS   Main           511.8 GB   disk0s2
Then you can mount it like so:
sudo mkdir /Volumes/EFI
sudo mount -t msdos /dev/disk0s1 /Volumes/EFI
Note that if you upgrade Clover in the future, you must untick the “AudioDxe” driver during installation, because this causes Clover to hang.
Video performance
Because there is no guest video acceleration available for macOS, video performance is poor.
In Google Chrome in the guest you will need to toggle off the setting to “use hardware acceleration when available” to improve issues with elements not being drawn or flickering (especially video). Safari may be a better choice.
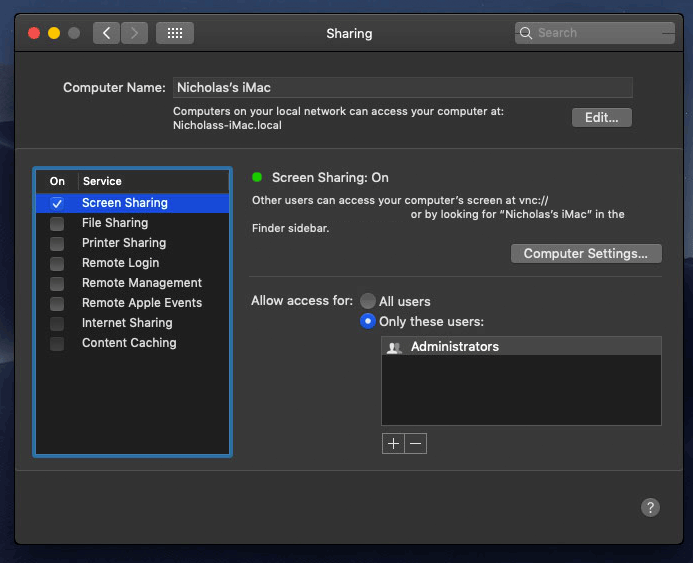
macOS’s built in “Screen Sharing” feature offers dramatically better framerates and latency than Proxmox’s browser-based VNC console, so if you have a real Mac to act as a viewing console, you can enable that in the VM’s “Sharing” settings and connect to the VM using the Screen Sharing app from your Mac instead:
Apparently Screen Sharing is also compatible with VNC clients like RealVNC, so you should be able to connect to it from Linux or Windows consoles using RealVNC.
The real magic bullet for video performance is to pass through a compatible video card using PCIe passthrough (though note that Catalina does not support most NVidia cards). This offers near-native performance. You can read more about how I’m using PCIe passthrough on my own installation here.
USB passthrough
Since I want to use this as my primary computer, I want to use a USB keyboard and mouse plugged directly into Proxmox, rather than sending my input through the web VNC console.
Proxmox has good documentation for USB passthrough. Basically, run “qm monitor YOUR-VM-ID-HERE”, then “info usbhost” to get a list of the USB devices connected to Proxmox:
qm> info usbhost
 Bus 3, Addr 12, Port 6, Speed 480 Mb/s
 Class 00: USB device 8564:1000, Mass Storage Device
 Bus 3, Addr 11, Port 5.4, Speed 12 Mb/s
 Class 00: USB device 04d9:0141, USB Keyboard
 Bus 3, Addr 10, Port 5.1.2, Speed 12 Mb/s
 Class 00: USB device 046d:c52b, USB Receiver
 Bus 3, Addr 9, Port 14.4, Speed 12 Mb/s
 Class 00: USB device 046d:c227, G15 GamePanel LCD
 Bus 3, Addr 8, Port 14.1, Speed 1.5 Mb/s
 Class 00: USB device 046d:c226, G15 Gaming Keyboard
In this case I can add my keyboard and mouse to USB passthrough by quitting qm, then running:
qm set YOUR-VM-ID-HERE -usb1 host=04d9:0141
qm set YOUR-VM-ID-HERE -usb2 host=046d:c52b
This saves the devices to the VM configuration for you. It’s possible to hot-add USB devices, but I just rebooted my VM to have the new settings apply.
You can also pass through USB devices by passing through an entire USB controller using Proxmox’s PCIe passthrough feature.
FileVault 2

FileVault disk encryption is a little janky at the moment. It takes a long time (a couple of minutes) for the password prompt to appear on boot, and then the graphics are scrambled so you have to enter your password blind.
If you really want to use it, be certain to keep a copy of your recovery key and keep your backups up to date!
Upgrading from Mojave
First make a backup or snapshot of your system! Catalina has a new disk layout that separates user data from the system partition, so there’s a higher than normal chance of the installer destroying everything.
Update Clover to r5107 by running the Clover installer. Choose the Customise option. Choose:
- Install for UEFI booting only
- UEFI drivers section:
- Recommended Drivers: Tick all, except untick AudioDxe (it causes Clover to hang)
- Filesystem drivers: Tick ApfsDriverLoader
- Memory fix drivers: Tick OsxAptioFix3Drv
- FileVault 2 drivers: Tick all
- Additional drivers: Tick PartitionDxe
Update any kexts you have installed (Lilu, WhateverGreen, etc). Now reboot to check that Mojave still boots properly using this updated Clover install.
If you’re using any PCIe passthrough devices (particularly video cards) you’ll probably want to disable those and set “vga: vmware” instead, so you can install using Proxmox’s web console. This avoids installer problems triggered by flaky video card passthrough.
Now you can upgrade to Catalina by adding the Catalina-intaller.iso as a DVD drive, editing the VM config to replace “media=cdrom” with “cache=unsafe” and booting from that. You can probably also just install Catalina from the Mac App Store, but I haven’t tested that approach myself.
After upgrading, you may find that on boot you are dropped into the UEFI shell instead of booting Clover. If so, you can manually find and run Clover (e.g. by running “fs0:” “cd EFI\CLOVER “CLOVERX64.efi”), then use Clover’s “Boot Menu Options” menu to remove the Clover UEFI entries and re-add them.
Hi,
My problem concerns this article. I have followed the instructions above.
I have a strange problem : after the boot of clover, I cannot start the installation of Catalina, because the “Apple Logo” is simply missing.
I have renamed initialy the file InstallESDDmg.pkg to InstallESDDmg.dmg and after that used dmg2img.exe to create the ISO. Is that the correct way ? ( I have found an other file named InstallESD.dmg inside the same pkg file, so I’m in doubt of the correct procedure )
What could be reasons of a missing apple logo in the start screen of clover ?
Thanks
Michel
Where are you getting InstallESDDmg.pkg from? The fetch-macOS.py script described here, used to download Catalina, results in a BaseSystem.dmg file, never an InstallESDDmg.pkg file. That BaseSystem.dmg is converted to a raw disk image in the second step.
Hi,
I have found the link to the pkg here :
https://7labs.io/tips-tricks/macos-catalina-direct-download.html
After that, I go to : http://swcdn.apple.com/content/downloads/24/50/061-10700-A_RGVHHKO7O2/ht647isnxisi6xcjx58vib39t7rmgsy3es/InstallESDDmg.pkg
I’ve opened the InstallESDDmg.pkg with 7zip and found in it : InstallESD.dmg
After that I’ve used your article to continue the installation.
Is this way to proceed not in adequation with your method ?
Thanks for the time you take to investigate my problem.
Regards,
Michel
Don’t do any of that, just follow the directions from here.
Hi,
I’ll follow your complete instructions.
A question that I ask myself about the size of the file InstallESD.dmg. Yours is about 500 mb.
Do you know why the update size from Mojave to Catalina ( InstallESDDmg.pkg ) is about 8 GB in comparison ?
Regards,
Michel
This is because the method used here just writes a recovery image to the disk, then Catalina is downloaded by the recovery during installation just like on a real Mac.
Thank you so much for your tutorials! After installing Proxmox out of curiosity on an INTEL NUC with a low end 2 core i3 CPU I was able to install Catalina and Mojave following your steps. After a long time of installing OSX “bare metal” I might switch to this method because of the snapshots and ZFS. I was not able to install El Capitan what I really need because I have a software that runs only on this OSX version. I’d send you a donation if you find ever the time for a tutorial (or help me) to get El Capitan up and running on Proxmox. Continue your great work!
Thanks a ton for this tutorial! It worked flawlessly for me. Btw, do you know why the disk appears as external? Is there any way to correct this? Clover kext maybe? It might be a minor thing but it’s kinda bugging me.
Thank you for your tutorial. It worked well, though I did the install twice due to the strange screen resolution after a reboot before I found the answer in the comments.
I really appreciate the thoroughness and supplementary support.
How exactly can I define a static IP when in macOS utilities prior to Reinstall macOS? Network Utilities appears to be stripped down.
I was really excited following this guide as it’s going as per guide however same like Mark, I ran into a problem performing the Mac OS Install as the vm does not have a network connection because all our VMs are running on static IP addressing(no DHCP).
getting error: An internet connection is required to install macOS
I have followed below guides to do this via Terminal and it looks like it’s able to set the network settings successfully however recovery can’t get past internet, only within local network.
Firewall is fine and no manual intervention required other than just setting up Static IP on the VM.
Guides I followed in Setting Static IP on Mac OS Recovery
– https://www.maninara.com/2015/08/setting-static-ip-address-in-os-x.html
– https://apple.stackexchange.com/questions/324584/how-to-change-nameserver-in-resolv-conf-in-recovery-mode
Anyone has success with doing static IP setup for this?
Unfortunately no luck for me to get internet connection after setting Static IP while in macOS Recovery in this configuration. It’s weird, i was able to ping devices in local network but pinging 8.8.8.8 just fails.
As we had never require to do anything on our firewall for new device setup, i don’t suspect our firewall was the cause of this.
Gave up on forcing static ip on macOS recovery
Fortunately for me, Proxmox is running on Dell Poweredge R720 with multiple network options.
Connected 2nd network port to another VLAN with DHCP within our network and apply the bridge connection with the macOS Catalina guest OS.
Was able to complete the macOS installation successfully now as macOS recovery is able to get internet connection.
I was then able to set the static IP within macOS Catalina, shutdown the guest OS and swap back the network to vmbr0 putting it back to the management VLAN.
Finally had time to circle back on this today.
https://www.danpros.com/2017/09/assign-static-ips-to-kvm-guests-using-dhcp-in-proxmox
The above was my solution. Setup DHCP services on Proxmox node to listen to vmbr0 for the MAC assigned to the VM.
Problem solved! Should have been easier though.
Hello
I tried several times this guide and all works fine until I reach the MAC OS Intaller. The screen becomes unusable, the apple logo appears and the loading bar is shown 10 times duplicated in the screen, and then the installer appears but it is totally distorted and unusable… Any clue about this issue?
Setup
HP Proliant DL380 Gen6
Proxmox 6.1-5
VM created by your instructions…
FNK
You need to follow the instructions for setting the screen resolution in the UEFI settings, then make sure you reboot the VM once upon every VM cold boot in order for that resolution to actually be applied (e.g by using the Restart Computer option in Clover).
hi, love your tutorial. I now have an awesome setup with your help. Just wanted to add that you need to add apfs.efi to the drivers/UEFI in clover to be able to boot with APFS filesysteme.
Best regards.
No, you don’t, otherwise nobody following this tutorial would ever have been able to boot, since Catalina always has an APFS root filesystem.
This Clover build uses ApfsDriverLoader.efi to load apfs.efi from the installed macOS itself, just like on a real Mac, so that the correct apfs version is always used. If you manually put apfs.efi into Clover then you will end up with a version mismatch after macOS upgrades.
my bad thought it was the solution but it isn’t even after adding the apfs.efi i am still not able to see the boot drive where i installed catalina. In the boot sequence there is a line saying the partion was not recognised as a system or data partition. think i am going to use macos journaled instead.
You can’t install on macOS Journaled because Catalina will automatically convert it to APFS during installation.
For the missing disk, try entering the guest UEFI settings and picking a different boot option there. For some reason this fixes things for some users.
Thanks for your reply, How can i do that on pve6?
In the guest, hit F2 at the start of boot to enter UEFI settings, then check out the boot order settings.
Thanks, that worked
Hi, I’m trying to install Catalina, but when I boot the first time the vm, Clover start, but I can’t see the Hard Disk where is located the macOS Installer.
Here’s my *.conf:
args: -device isa-applesmc,osk=”OSK-KEY” -smbios type=2 -cpu Penryn,kvm=on,vendor=GenuineIntel,+kvm_pv_unhalt,+kvm_pv_eoi,+invtsc,vmware-cpuid-freq=on,+pcid,+ssse3,+sse4.2,+popcnt,+avx,+aes,+xsave,+xsaveopt,check -device usb-kbd,bus=ehci.0,port=2
balloon: 0
bios: ovmf
boot: c
bootdisk: ide2
cores: 8
cpu: Penryn
efidisk0: bigdrive:100/vm-100-disk-1.raw,size=128K
hostpci0: 00:1d.0
ide0: local:iso/Catalina.iso,cache=unsafe,size=8500M
ide2: local:iso/clover-r5070.iso,cache=unsafe
machine: q35
memory: 24576
name: catalina
net0: vmxnet3=XX:XX:XX:XX:XX:XX,bridge=vmbr0,firewall=1
numa: 0
ostype: other
sata0: bigdrive:100/vm-100-disk-0.raw,cache=unsafe,discard=on,size=64G
scsihw: virtio-scsi-pci
smbios1: uuid=…
sockets: 2
vga: vmware
vmgenid: d2831b47-cc4c-447f-881c-47e57b7deaa5
Hit F2 at boot and pick a different boot option, this seems to fix Clover for an unknown reason.
Very unorthodox question: Have you tried doing a passthrough of the Intel Integrated Graphics for your macOS VM? I managed to do it for a Linux VM (got Linux running through the IGPU and Win 10 running through the DGPU at the same time), but so far, no luck doing the same with macOS. I get video output, but it’s either all black, or a garbled screen.
Sorry, I haven’t, as my Xeon CPUs don’t have integrated video!
I am stuck at this point:
“Don’t try to start the VM just yet. First, SSH into your Proxmox server so we can make some edits to the configuration files.
Edit /etc/pve/qemu-server/YOUR-VM-ID-HERE.conf (with nano or vim).”
I have another MacOs machine from which I can access my second machine running Proxmox, but I have no idea how to perform the actions I quoted.
From the MacOs machine I launched terminal and I connected to my proxmox machine with ssh, but from there I have no idea how to navigate the content or edit the conf file. Can anybody help me writing me down clearly the commands I have to use?
Googling “Linux Tutorial” would be a really good start here if you’re going to be doing any administration of Proxmox at all going forward.
nano /etc/pve/qemu-server/100.conf
And then ctrl-x to exit when you’re finished and tell it to save changes when asked.
Hi i’m Stuck at the Apple Logo without a Progress bar.
With -v it shows me that boot failed: will sleep for 10 seconds before exiting.
I tried installing the Patch OVMF again nothing happend same issue.
Any ideas?
If you need anything just let me know.
What core count and RAM are you giving to the VM?
You might need to post your whole VM config file here for review.
It has 8 Gb of Ram and i configured 4 for the VM. Is it possible that my Cpu or something like that is not compatible?
Do you mean this config ?
args: -device isa-applesmc,osk=… -smbios type=2 -cpu Penryn,kvm=on,vendor=GenuineIntel,+kvm_pv_unhalt,+kvm_pv_eoi,+invtsc,vmware-cpuid-freq=on,+pcid,+ssse3,+sse4.2,+popcnt,+avx,+aes,+xsave,+xsaveopt,check -device usb-kbd,bus=ehci.0,port=2
balloon: 0
bios: ovmf
boot: cdn
bootdisk: ide2
cores: 2
cpu: Penryn
efidisk0: local-lvm:vm-100-disk-1,size=128K
ide0: local:iso/Catalina-installer.iso,cache=unsafe,size=2093068K
ide2: local:iso/clover-r5070.iso,cache=unsafe
machine: q35
memory: 4096
name: Catalina
net0: vmxnet3=82:EA:67:FD:B0:1E,bridge=vmbr0,firewall=1
numa: 0
ostype: other
sata0: local-lvm:vm-100-disk-0,cache=unsafe,discard=on,size=64G
scsihw: virtio-scsi-pci
smbios1: uuid=bfa5f555-f6f2-4a2f-b631-e2506a36516a
sockets: 1
vga: vmware
vmgenid: a6a5f082-30e8-4f1b-a14b-93c809887807
Your config looks perfect, which CPU model does your host have?
AMD Turion(tm) II Neo K625 Dual-Core Processor
I hope you dont tell me i made evertyhing wrong because its an AMD not an Intel Processor hahahahah
Whoo boy that’s an antique! Unfortunately it doesn’t support SSE 4.2, which is a requirement for Catalina.
I think the newest version you could install would be El Capitan.
HAHA ok hahah good to know , than i have to find something else…
I really have to say thank you ! First of all because of your Tutorial here and second because you reply so fast that is amazing thank you really much for this !
Usb keyboard passthrought is working only partly. I can select the booting partion at clover boot screen but after booted successfully into catalina the mouse and also the keyboard is not working anymore, so I cannot login… What can I do?
The mouse doesn’t work either? Double check that you have the Tablet enabled in VM settings. If you do have it enabled then this is a problem I’ve never seen before.
Is the VM actually locking up rather than disabling the keyboard and mouse? Watch the clock display and see if it continues to update to match real time.
Sorry about my late answer and thanks for your comment! In the meantime I solved my problem by removing the “,usb3=1” option from VM.conf in the usb section. Now the catalina is working great with gpu and usb passthrough. Congratulation for your project it is amazing. I think, it is gonna be the future of hackintoshing.
I installed proxmox into a new new ssd raidz1. So I started over everything. I followed your steps one by one again. However I am facing problem when trying to boot into catalina installer. Catalina installation starts with clover iso, I can select the installer boot hdd, then apple logo is showing up, but then nothing is happening… there is no progressbar showing up and no error message showing up. What do you think can be the problem?
Hit space at the Clover boot menu and tick the Verbose option for booting, this will show you what the boot sequence is getting stuck on.
Most likely causes are setting the core count to an odd number (use 1, 2, or 4 cores), or making a typo in your OSK, especially by using text editors which replace the straight quotes with curly quotes, or the “(c)” text with a Unicode copyright symbol.
I investigated the problem a little more. On the new proxmox setup the kernel hasn`t updated to 5.3.13-3-pve, but it it still showing(uname -r) 5.3.10-1-pve. Is that what it cause my problem? I had ran your deb package on the new proxmox too: pve-edk2-firmware_2.20191002-1_all.deb on the new proxmox. Wasn`t this this update supposed to update the kernel to 5.3.13-3-pve?
That kernel version should be fine. Did you set up your Proxmox apt repository correctly to get updates though? They have details in their wiki.
I will check the updates and I also try to recreate catalina VM again.
I corrected the repository from stretch to buster the kernel updated to 5.3.18.1 but it didn`t change anything. I recreated another catalina vm in my old proxmox install, it works perfectly. On the new proxmox setup it is not. The progress bar is not showing up. The verbose boot shows no error message. I am stuck now…Have you got any idea?
What CPU model does your server have?
corei7 8700. I recreated catalina vms on the both proxmox installs with exactly the same steps. On the same workstation old proxmox setup runs catalina installation perfectly, new proxmox install stuck with apple logo with no progress bar showing up.
Can this script has to do solving this problem: pve-edk2-firmware_2.20191002-1_all.deb?
It seems, I solved it. 🙂 Yes. It had to with this script pve-edk2-firmware_2.20191002-1_all.deb. The problem I installed it in lazy graphical way in debian. Debian showed success at the end, but actually it wasn`t. I tried with intstalling with dpkg -i with root user in terminal and now it is working.
Finally… It works. Thanks anyway! and Please continue with your blog posts about proxmox and macosx. They are super useful!
One more question. Why are you sugesting adding the hardisk as sata type instead of as a virtio device. Usually virtio devices has better performance, aren`t they?
Memory usage in PVE not tallying with macOS Activity Monitor
Anyone else faced this issue?
– I have allocated 16GB of memory on our macOS Catalina Guest VM
– in PVE, it’s showing 90% usage
– in macOS Activity Monitor, it’s only showing 50% usage
Is there something else PVE is picking up that macOS is not detecting?
Will enabling ballooning help?
Proxmox has no insight into how much memory the guest considers “used”, because macOS has no QEMU agent support and no ballooning support. This renders the memory graph pointless.
Proxmox can’t discard any of the guest’s pages because it can not tell when the guest is done using them.
Thanks for the quick response! And if i have not mentioned, thank you for the detailed guide which allows us to install macOS easily on our Proxmox install with only 1 hiccup which is the static IP networking while in macOS install which we managed to get pass by temporarily assigning DHCP during installation.
Does that mean we can safely ignore the memory information on Proxmox and just rely on the information within macOS?
Sorry – just a little paranoid seeing 90% usage in proxmox even though the macOS guest is idling and not running services that would cause a spike in usage.
>Does that mean we can safely ignore the memory information on Proxmox and just rely on the information within macOS?
Yes, that’s correct, because only your guest knows how much memory is used by apps, used by disk cache, or truly free (normally zero unless you’ve only just booted).
Excellent instructions and very thorough. I haven’t had much of any difficulty in implementation. I am experiencing an odd issue. I have a WX7100 that gets detected via PCIe passthrough, showing up in the system profiler – however, it doesn’t load the AMD video driver for Catalina, therefore accelerated graphics, instead of reverting to the default virtual framebuffer. Is this related to the machine type/ smbios in clover or some additional work that I need to do? Obviously there is are other facts probably needed for a clear answer but I’m curious if this behavior has been seen before and what may be possible to adjust.
Try adding the Lilu and WhateverGreen kexts to Clover:
https://github.com/acidanthera/Lilu/releases
https://github.com/acidanthera/WhateverGreen/releases
You can also try setting your SMBIOS to 14,2 using Clover Configurator, that’s the one that I use with success.
Thanks for the speedy reply — I doublechecked everything and lilu and WEG are both activated. I’m now seeing the wx7100 card as its defined name instead of just GPU. However it doesn’t activate the connected headless DP nibs. (I’ve got three attached)
Side note – I got a wx4100 to work –but just with an HDMI at 1080p so same issue – no Display port / framebuffer activated .
Is this one of those issues where I need to flash the Or load it via ROM file? Or maybe use hackintool to generate the correct framebuffer?
Did you set “vga: none” in your VM config? By removing the emulated video like this the passthrough card should become the primary device.
You might find some better help for this device at a generic Hackintosh forum like https://www.reddit.com/r/hackintosh/ , the problem may not be virtualisation-related.
I’ll give the reddit channel a try for sure.
I should probually mention that the card does pcie passthrough on proxmox into a windows 10 VM perfect, with all three headless DP ports detected and able to run at 4k.
Hi Nicholas, my name is Christian, I arrive without problems to the clover screen to start the installation, but after that nothing happens, only the apple icon appears, would you know why?
Show the line of VM config for the Catalina ISO
args: -device isa-applesmc,osk=”…” -smbios type=2 -cpu Penryn,kvm=on,vendor=GenuineIntel,+kvm_pv_unhalt,+kvm_pv_eoi,+invtsc,vmware-cpuid-freq=on,+p$
balloon: 0
bios: ovmf
boot: cdn
bootdisk: ide2
cores: 4
cpu: Penryn
efidisk0: vmachines:126/vm-126-disk-1.raw,size=128K
ide0: vmachines:iso/Catalina-installer.iso,cache=unsafe,size=2093068K
ide2: vmachines:iso/clover-r5070.iso,cache=unsafe,size=256M
machine: q35
memory: 8192
name: Catalina
net0: vmxnet3=FE:16:C8:96:C8:EE,bridge=vmbr0,firewall=1
numa: 0
ostype: other
sata0: vmachines:126/vm-126-disk-0.raw,cache=unsafe,discard=on,size=64G,ssd=1
scsihw: virtio-scsi-pci
smbios1: uuid=c99ca027-3e4d-457a-9e9e-3e40152dfe32
sockets: 1
vga: vmware
vmgenid: ebe35e19-744c-449d-a609-fd55ea8441af
CPU Model: Intel(R) Xeon(R) CPU E5-2640 0 @ 2.50GHz
Double check that you installed the pve-edk-firmware package properly, it causes this symptom if not installed.
The fetch-macOS.py script lets you download High Sierra, Mojave and Catalina.
Do you know how to download older MacOS installers (e.g. Sierra)?
Thanks,
Victor
Download the installers from Apple here and install them onto your Mac, this will add the installer into your /Applications directory for you:
https://support.apple.com/en-us/HT201372
Then you can create a big enough disk image using Disk Utility, and follow the instructions there to call createinstallmedia to make your install image for you.
For Sierra, I installed that as a VM recently myself, but I haven’t managed to get it to boot using Clover. Instead follow my old instructions for booting in SeaBIOS mode and adding Enoch to the args (Enoch is now found in the /backups directory of the OSX-KVM repo): https://www.nicksherlock.com/2016/10/installing-macos-sierra-on-proxmox-4-3-qemu-2-6-1/ .
Please post any followup questions on that recent Fork Bomb post of mine.
Unable to take a backup – it times out… only this vm- strange
Also note that I am using a AMD EPYC 7401P CPU and i get this error
kvm: warning: host doesn’t support requested feature: CPUID.01H:ECX.pcid [bit 17]
any suggestions
You’re getting that warning because pcid is Intel’s Meltdown mitigation CPU feature, you can remove pcid from your “args” line, since AMD isn’t affected and so has no equivalent feature.
So I decided to setup a 2nd proxmox node and setup a 2-node cluster. This 2nd node has exact same hardware spec(Dell Poweredge R720) with an exception that it’s running on a single Xeon CPU and 16GB of RAM compared to the 1st node that runs on dual Xeon CPU with 64GB of RAM.
Now when I tried to install macOS catalina on the 2nd node, i get stuck to the point where it’s booting on to macOS installation recovery.
Progress bar goes to about 80% before the VM reboots again back to clover. It feels like it was going to load the installation recovery but it just decide not to at the very last minute.
I had no issues with the 1st node which had the same exact hardware and firmware in fact other than the number of CPU and RAM installed.
Any advice on how to proceed?
Make sure your OSK didn’t get mangled between systems.
dang this is embarrassing, i checked my vm conf and noticed the osk is empty, i swear i thought i copied the config from my other vm.
macOS installation loads fine now.
Thank you!!
I am running proxmox 6, I have couple questions. 1st mojave or catalina is better on Proxmox 6? And can I use this instruction to install mojave? What would happen to the Mac that I retrieve the OSK Key? Would it interrupt how I update that machine?
Regards,
Mojave and Catalina run identically on Proxmox 6, neither has an advantage. You’d want Mojave if you need compatibility for old 32-bit applications in macOS.
These instructions should work fine for Mojave.
Every mac shares the exact same OSK so using the OSK from a mac doesn’t have any effect on it.
Hi, Nice tut…Did all the above, when I hit the switch, I received this error “Guest has not initialized the display (yet). What do I do now ?
The VM has display: vmware set? Try starting the VM on the command line (qm start 1xx), you can see extra error messages this way.
I did that already, no error messages. here is my syslog
“Mar 5 08:42:17 pve qm[23451]: starting task UPID:pve:00005B9C:000A4B19:5E6101B9:qmstart:115:root@pam:
Mar 5 08:42:17 pve qm[23452]: start VM 115: UPID:pve:00005B9C:000A4B19:5E6101B9:qmstart:115:root@pam:
Mar 5 08:42:17 pve systemd[1]: Started 115.scope.
Mar 5 08:42:17 pve qm[23451]: end task UPID:pve:00005B9C:000A4B19:5E6101B9:qmstart:115:root@pam: OK
Mar 5 08:42:54 pve pvedaemon[23248]: starting task UPID:pve:00005C21:000A5990:5E6101DE:vncproxy:115:root@pam:
Mar 5 08:42:54 pve pvedaemon[23585]: starting vnc proxy UPID:pve:00005C21:000A5990:5E6101DE:vncproxy:115:root@pam:
Mar 5 08:43:00 pve systemd[1]: Starting Proxmox VE replication runner…
Mar 5 08:43:00 pve systemd[1]: pvesr.service: Succeeded.
Mar 5 08:43:00 pve systemd[1]: Started Proxmox VE replication runner.
“
Update: I was able to fix the above issue with the help of the proxmox 5 version. I changed the disk that the efi partition was using. I am now installing, will keep you posted.
Thanks,
Hey there, nice tutorial. I have tried this on two systems now and the progress bar gets about 2/3 of the way across and it halts and reboots. Verbose shows the 2nd to last line is “** AppleSMBusPCI::start failed to get acpi path for provider”. The last line before reboot happens really fast and I can’t capture it. The same error shows on both systems. Both are prox 6.1. One is i5-6600, other is E5-2603v4. conf is:
args: -device isa-applesmc,osk=”stuff_here” -smbios type=2 -cpu Penryn,kvm=on,vendor=GenuineIntel,+kvm_pv_unhalt,+kvm_pv_eoi,+invtsc,vmware-cpuid-freq=on,+pcid,+ssse3,+sse4.2,+popcnt,+avx,+aes,+xsave,+xsaveopt,check -device usb-kbd,bus=ehci.0,port=2
balloon: 0
bios: ovmf
boot: cdn
bootdisk: ide2
cores: 4
cpu: Penryn
efidisk0: local-zfs:vm-114-disk-0,size=128K
ide0: local:iso/Catalina-installer.iso,cache=unsafe,size=2096736K
ide2: local:iso/clover-r5070.iso,cache=unsafe
machine: q35
memory: 4096
name: catalina
net0: vmxnet3=AE:87:1C:6A:9F:4E,bridge=vmbr0,firewall=1
numa: 0
ostype: other
sata0: local:114/vm-114-disk-0.raw,cache=unsafe,discard=on,size=64G,ssd=1
scsihw: virtio-scsi-pci
smbios1: uuid=858241c8-ce30-4cff-89ad-0a3bdfbece77
sockets: 1
vga: vmware
vmgenid: 149ac23a-d7e6-4c7e-81af-59a49d29560c
I installed the EDK firmware as follows:
root@prox-1u:~/pve-edk2-firmware# dpkg -i pve-edk2-firmware_*.deb
(Reading database … 51402 files and directories currently installed.)
Preparing to unpack pve-edk2-firmware_2.20191127-1_all.deb …
Unpacking pve-edk2-firmware (2.20191127-1) over (2.20191002-1) …
Setting up pve-edk2-firmware (2.20191127-1) …
root@prox-1u:
What am I doing wrong here? Many others don’t have any issues.
Thanks!
Try starting your VM from the terminal using “qm start 1xx” and see if you get any warnings printed on startup. I’m betting you’re getting a warning about your OSK – double check that the (c) in the OSK hasn’t been converted into a copyright symbol by your text editor, and the quotes are not curly quotes.
I manually retyped the OSK when I read another comment that said it was possible. Starting via bash results in no errors:
root@prox-1u:~/pve-edk2-firmware# qm start 114
root@prox-1u:~/pve-edk2-firmware#
Try entering that again, using emacs or nano (definitely not macOS TextEdit because it loves to mangle text). This really seems like the fault that a bad OSK generates. Post the OSK you’re using (I’ll edit it out of your comment afterwards)
Well I did manage to capture the next (last?) two lines before the reboot if this helps at all:
timestamp iMac.local com.apple.xpc.launchd[1] (org.ntp.sntp.205) : Service exited with abnormal code: 1
ACPI_SMC_PlatformPlugin::start – waitForService(resourceMatching(AppleIntelCPUPowerManagement) timed out
…and as I was typing that, the progress bar went across the screen to 100%. I had a capital ‘O’ as the first letter instead of lowercase ‘o’.
You were right!
Thanks for your help. Hopefully I’ll be able to get the rest of the install done without issue.
Hi, I saw you say on Reddit that you may not recommend macOS on Proxmox for audio production, because timing/latency is a concern and your audio software may be fighting for cores that it doesn’t know is already being used for something else. But what if it is the only VM running? Then it just comes down to normal macOS CPU utilization, right?
Just need to know before I jump in. Low-latency audio production is my main goal with my rig, but I’ll only be running one VM at a time when I’m doing audio production.
Thanks in advance.
>But what if it is the only VM running? Then it just comes down to normal macOS CPU utilization, right?
The host is still running threads of its own. Even apart from the normal Linux operating system threads, the host will be running threads specifically to service guest disk IO.
If I run heavy enough tasks on the host / other VMs (e.g. CPU intense VMs or large file copy/moves on the host), then macOS sees such large timegaps in execution that it actually triggers timeouts in its hardware drivers (e.g. timeouts for time-since-last-device-reply), and my PCIe-passthrough’d USB controllers crash and need their devices to be replugged to be re-enumerated.
Even with a quiet host, some macOS audio programs (Clementine, iTunes) struggle to deliver audio consistently regardless of selected buffer sizes (e.g. 2000ms), and I get gaps and pops in the audio. That’s to a USB DAC connected to a PCIe-passthrough’d USB controller. Chrome does manage to deliver audio mostly fine, but Chrome will buffer audio out the wazoo.
I think this is caused by the fact that the host schedules the guest’s threads to host cores without knowing anything about the priority level of the guest thread that is currently executing. So even if the guest’s audio player is set to realtime priority, it can still be pre-empted by a guest Chrome tab that ended up being scheduled to the same host core.
You can likely improve latency a lot by using thread pinning and core reservation features (cpuset) that keep host threads away from the guest’s cores completely, and prevent guest threads from migrating between host cores. Proxmox doesn’t offer this out of the box, but you can achieve it by adding a bunch of options to your VM “args” and adding VM start scripts. There is a lot of documentation about this out there for QEMU because people want low, consistent latency for gaming:
https://www.redhat.com/archives/vfio-users/2017-February/msg00010.html
https://null-src.com/posts/qemu-optimization/post.php
I would definitely plan to use a PCIe NVMe disk for the guest, so that you can give the whole disk directly to the guest using PCIe passthrough and the host doesn’t need to get involved for guest disk IO at all (and the same for USB controllers). It’s probably easiest to avoid a NUMA host system (multi-socket Xeon, some of the new AMD lines) so you don’t have to deal with that mess too.
If you enjoy playing around and troubleshooting this stuff then give it a go, you can always buy an old Mac Mini if it doesn’t work out.
Thank you so much for all this detail Nicholas. You rock.
thank you Nick. wonderful work and thank you for sharing. It works. I’ve been wanting to do this for a long time
Got to the part of running Clover, but the macOS installer iso is a no show for me 😥
Show the line from your VM config which defines that drive
I wasn’t sure if you meant the Clover drive or the installer drive, so here’s both:
ide0: local:iso/Catalina-installer.iso,cache=unsafe,size=9328M
ide2: local:iso/clover-r5070.iso,cache=unsafe,size=256M
Thanks
Hi Nicholas,
Thanks for a brilliant how to, worked like a charm. The only problem I have, is that the Catalina does not see my iPhone, I did some USB through pass, but I cannot see the iPhone, see below
root@proxmox:/# qm monitor 100Entering Qemu Monitor for VM 100 - type 'help' for help
qm> info usbhost
Bus 1, Addr 123, Port 1.6.4, Speed 480 Mb/s
Class 00: USB device 05ac:12a8, iPhone
Bus 1, Addr 110, Port 1.6.3, Speed 480 Mb/s
Class 00: USB device 0bda:8153, USB 10/100/1000 LAN
qm> ^C
root@proxmox:/# qm set 100 -usb0 host=05ac:12a8
update VM 100: -usb0 host=05ac:12a8
root@proxmox:/# cat /etc/pve/qemu-server/100.conf
args: -device isa-applesmc,osk="..." -smbios type=2 -cpu Penryn,kvm=on,vendor=GenuineIntel,+kvm_pv_unhalt,+kvm_pv_eoi,+invtsc,vmware-cpuid-freq=on,+pcid,+ssse3,+sse4.2,+popcnt,+avx,+aes,+xsave,+xsaveopt,check -device usb-kbd,bus=ehci.0,port=2
balloon: 0
bios: ovmf
boot: cdn
bootdisk: sata0
cores: 4
cpu: Penryn
efidisk0: local-lvm:vm-100-disk-1,size=128K
machine: q35
memory: 4096
name: catalina
net0: vmxnet3=DA:70:05:44:6B:67,bridge=vmbr0,firewall=1
numa: 0
ostype: other
sata0: local-lvm:vm-100-disk-0,cache=unsafe,discard=on,size=64G,ssd=1
scsihw: virtio-scsi-pci
smbios1: uuid=e8632ea1-8627-4188-9102-14d3cc371913
sockets: 1
vga: vmware
vmgenid: 34b8205d-055d-46df-8d0e-784f20011fd4
[PENDING]
usb0: host=05ac:12a8
After Catalina reboot
root@proxmox:/# cat /etc/pve/qemu-server/100.confargs: -device isa-applesmc,osk="..." -smbios type=2 -cpu Penryn,kvm=on,vendor=GenuineIntel,+kvm_pv_unhalt,+kvm_pv_eoi,+invtsc,vmware-cpuid-freq=on,+pcid,+ssse3,+sse4.2,+popcnt,+avx,+aes,+xsave,+xsaveopt,check -device usb-kbd,bus=ehci.0,port=2
balloon: 0
bios: ovmf
boot: cdn
bootdisk: sata0
cores: 4
cpu: Penryn
efidisk0: local-lvm:vm-100-disk-1,size=128K
machine: q35
memory: 4096
name: catalina
net0: vmxnet3=DA:70:05:44:6B:67,bridge=vmbr0,firewall=1
numa: 0
ostype: other
sata0: local-lvm:vm-100-disk-0,cache=unsafe,discard=on,size=64G,ssd=1
scsihw: virtio-scsi-pci
smbios1: uuid=e8632ea1-8627-4188-9102-14d3cc371913
sockets: 1
usb0: host=05ac:12a8
vga: vmware
vmgenid: 34b8205d-055d-46df-8d0e-784f20011fd4
root@proxmox:/#
And when I log into Catalina and try to see the IPhone
diginetiot@DiginetotsiMac2 ~ % idevice_id -ldiginetiot@DiginetotsiMac2 ~ %
When the VM reboots, I can hear the indication that the phone goes off charge and on charge, so the charging part works but not the through pass. Any ideas please?
Note that with QEMU USB passthrough, the device must already be plugged in before the guest starts, and if you unplug the device you have to shut down the guest to plug it in and have it recognise it again (it’s really, really annoying). It’s also not super compatible with all devices.
Check About this Mac… -> System Report button, and check the USB page, it has more detail about connected devices and your iPhone might appear there.
When I plug in my Android phone it asks me what USB mode I want to use (MTP / mass-storage / charging), and it could be that during this process the device’s USB ID changes as it re-enumerates. If the iPhone does something similar (“would you like to give permission to use this Mac?”), that would cause it to disconnect from your guest. You may be able to work around that by passing your USB port by its port index instead, like so:
usb0: host=1-1.6.4
If your machine has a spare USB host controller, it’s compatible with macOS, and it’s in a reasonable IOMMU group, you could use PCIe passthrough to pass the entire controller through instead. That’s the approach that I use:
https://www.nicksherlock.com/2018/11/my-macos-vm-proxmox-setup/
The bonus is that you can freely plug and unplug devices from the controller without rebooting the guest, and compatibility and performance is much improved.
Thanks Nick for the tips using iPhone with PCIe passthrough. Following your post, simply choose a pci device for USB hub in Proxmox to pass it to my macOS, it works like a charm. Really helpful to be able to backup my iPhone.
Hi nick,
I followed your tutorial, but can’t use the console because kind of blurred view. I posted it on reddit. Could you have a look if you have any idea?
https://www.reddit.com/r/Proxmox/comments/fovuc5/console_blurred_mac_os_catalina/
Regards
Markus
This happens if your Clover configured resolution does not match the resolution set in the OVMF settings. Make sure you understood the note about being required to restart the VM once on every cold start for the resolution change to be applied.
Thanks. It worked – another guy at reddit also mentioned it.
So the next 2 Problems 🙁
1) I successfully passed through a RX 590 BUT: The boot screen of clover (grey) just appears on the virtual console. The monitor just shows the proxmox startup screen and stucks there.
2) On the clover boot screen the mouse pointer doesn‘t work – After the boot everything works as intended (USB mouse passed through)
3) I also activated Filevault and just can use the virtual console keyboard to put the passphrase. The passed through USB keyboard doesn‘t work. I read that I probably need to load another driver – do you have Filevault activated and probably help out here?
1) Disable the virtual graphics by setting “vga: none” in your VM config. While you’re there, make sure you have ,x-vga=1 in your hostpci0 line.
2) Does Clover even support a mouse? Keyboard seems preferable here.
3) I’ve activated Filevault on a VM but only tried it with the virtual console’s USB keyboard, which worked fine. You may need to add some UEFI drivers to your Clover image, but I don’t know which ones you need.
Hi Nicholas,
it seems clover r5107 is not working well
in OVMF bios setting I see Unset for initial resolution.
Any advice for this?
Is it a way to repack a standard clover release in a format compatible with Proxmox iso/img format?
thank you
I mean in OSX/windows system…
I don’t understand what you mean by “unset” for the resolution, what’s the actual problem you’re facing here?
I am using an UHD in config I have 3840×2160 set
when I enter in proxmox bios via F2 to pair OVMF resolution I have Unset for preferred resolution and 3840×2160 where I can choice other resolution
This happen in Catalina.
In high Sierra I see
3840×2160
3840×2160
to explain with a picture
https://ibb.co/pnrkF0g
I doubt this menu is the cause of any problems.
Did you edit the Clover config.plist file to change its resolution to match OVMF? You can do that from within the UEFI Shell option of Clover.
I’m getting the error that somebody else here in replies also got, “Guest has not initialized the display (yet)”.
I tried manually starting it (qm start) and disabled the AVX/AES flags that it was complaining about.
However, it still doesn’t boot. Could you have any idea on what is causing this?
Does it print any other warnings?
Missing AVX/AES is fine, it’ll just ignore that and continue. But SSE4.2 is critical.
Nothing else, after I removed the AVX/AES. I removed the xsave and xsaveopt as well (warnings displayed about them too). Are they essential?
The CPU in question is Xeon W3503, and it supports SSE4.2.
Catalina hangs during boot if I remove xsave/xsaveopt, so I think you’re out of luck with your CPU there. EDIT: Apparently this is only a problem if the AVX feature is present, so remove that if it’s there.
However, it won’t cause the video issue you’re seeing. Can you even enter the guest UEFI settings by hitting F2 at the start of guest boot? If not this doesn’t seem like a Clover or macOS problem, it’d have to be a pve-edk2-firmware problem, or something weird with the VM config. Post your VM config too.
I have changed clover with opencore
Now scrambling OVMF problem is gone..
And system boots faster
That’s great news, do you have any config files to share?
I have built opencore 0.57 release with OC EFI maker (macOS.it)
Add a SSDT usefull for my nvidia to have hdmi/DP audio
Used sample.plist as is.
Only renamed
Later I will upload my config if it can be useful
as requested here is my config:
https://pastebin.com/Wj7g1pwq
if you want here a video :
https://www.macos86.it/topic/2509-guide-trx40-osx-bare-metal-proxmox-setup/?do=findComment&comment=65880
Oh wow – this would be amazing if it works, and we could write a guide for it =).
Fabio – do you any list of instructions you used to set it up?
Did you still have to do any of the steps in this guide?
echo “options kvm ignore_msrs=Y” >> /etc/modprobe.d/kvm.conf && update-initramfs -k all -u
And the patched OVMF packages?
Nicholas – do you have any idea how to do it this way?
Hi Victor
If you have a proxmox ve Osx vm booting it is pretty simple
I have used OC efi maker to build a 057 opencore release with efi driver and basic kext
I have modified sample.plist to add only my language and a ssdt inuse for hdmi/dp audio
Then i have inserted in my ssd efi boot disk
Done
Hi Fabio,
I’m sorry, but I’m still a bit confused =(.
Is there any chance you can provide slightly more detailed instructions or steps?
Do you essentially create a new ISO file and use that instead of clover.iso? Any other changes to the above steps?
Also – do you mean this OC EFI Maker?
https://www.macos86.it/files/file/20-opencore-efi-maker/
If I go to that page, it says:
> Sorry, you aren’t permitted to download this file.
Thanks,
Victor
Hi Victor
to create a new ISO file from scratch you have to adapt to your need kholia script
I did in more simple way. If you have an OSX booting in proxmox you can modify Your EFI simply as you do in a non virtual environment..ISO file you have uploaded previously will be changed consequently
Guide for now is pretty complete
Many great info found in nick’s blog
I have done that guide to have my amd 3970x and Nvidia Titan Xp fully working and with all features i can
I have no linux experience at all 🙂
Proxmox and high sierra guide helped a lot to my basic doubts
Now fighting with a pretty big of OVMF bios problem
Problem I have had with OVMF bios are gone now.
Reverted to a not patched deb file solve different problem for me.
Now correct boot order is maintained also without having no Qemu drive in VM
Hi,
This is a great and very easy guide to use. Everything works well for me right up until the first reboot during the installation process.
Clover boots up and I see three options. The prebooter is automatically selected and it starts booting from there. Once the apple logo shows up, it starts loading but shortly stops afterwards and stays there for hours.
Running it in verbose mode, it gets stuck at “Initialized /dev/rdisk5 as a 5 MB case-insensitive HFS Plus Volume”. (Link w/ video https://www.loom.com/share/29979d4e74854cd2bc33dd399602472d).
Disk is erased/formatted as AFPS. Same problem whether the VM it is installed onto SSD or HDD.
I’ve tried different versions of Catalina as well as Mojave and High Sierra – same exact problem on all of those installations.
And I’ve tried the current Proxmox version (6.1) as well as the older 6.0 version and both have ended in the same problem.
I’ve been trying to figure this out for 5 days now w/o any success.
I’ve found some forums/threads with others having similar issues during installation on hackintoshes, but with varied (and not always successful) solutions (for example switching SATA ports of a SSD or changing installation media from USB 3.0 to 2.0).
My setup is a Dell Precision T7400 workstation running 2x Xeon 5482 processors and a Nvidia Quadro FX 580 graphics card.
My VM configuration file:
args: -device isa-applesmc,osk=”*key_is_entered_correctly*” -smbios type=2 -cpu Penryn,kvm=on,vendor=GenuineIntel,+kvm_pv_unhalt,+kvm_pv_eoi,+intsc,vmware-cpuid-freq=on,+pcid,+ssse3,+sse4.2,+popcnt,+avx,+aes,+xsave,+xsaveopt,check -device usb-kbd,bus=ehci.0,port=2
balloon: 0
bios: ovmf
bootdisk: ide2
cores: 4
cpu: Penryn
efidisk0: macOS:vm-100-disk-1,size=128K
ide0: local:iso/Catalina-installer.iso,cache=unsafe,size=2096996K
ide2: local:iso/clover-r5107.iso,cache=unsafe
machine: q35
memory: 4096
name: catalina
net0: vmxnet3=xx:xx:xx:xx:xx:xx,bridge=vmbr0,firewall=1
numa: 0
ostype: other
sata0: macOS:vm-100-disk-2,cache=unsafe,discard=on,size=64G,ssd=1
scsihw: virtio-scsi-pci
smbios1: uuid=xxxxxx-xxxx-xxxx-xxxx-xxxxxxxxxxx
sockets: 1
vga: vmware
vmgenid: xxxxxx-xxxx-xxxx-xxxx-xxxxxxxxxxx
I’d appreciate any insights and help :). Let me know if there is anything else I need to provide.
Thanks,
Matt
I suspect you’re getting bitten by a lack of xsave/xsaveopt instructions on your CPU – are you getting warned about those if you run “qm start 100”?
If I remove xsave/xsaveopt from my VM it hangs during boot as well.
Yup I’m getting exactly that.
Bummer.
Thanks for the help.
~Matt
x5482 is a penryn chip and lacks sse4.2 required since mojave.
Use this: http://dosdude1.com/catalina/
MacPro3,1 is dual harpertowns
Thanks for the info Jim. I’ll attempt this sometime this upcoming weekend.
Nick,
The OpenCore project just made the front page of HackerNews – and there’s some interesting discussions:
https://news.ycombinator.com/item?id=22916281
One of the posters there also mentioned this guide for KVM and OpenCore:
https://github.com/Leoyzen/KVM-Opencore
I’m still not clear how to download their repo and put it under the EFI disk in Proxmox for your guide – any tips?
Do you think this is a viable alternative to Clover?
Thanks,
Victor